Whatever the pipeline is, it will require repair after some time. It is quite difficult to replace a specific part in complete systems, so most often threaded connections are made using couplings and bends. Let's find out what a pipeline surge is and what couplings are, and also consider the technology of pipeline installation using these parts.
What is a coupling
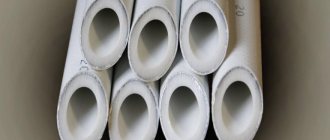
A coupling is a connecting part; its internal diameter and the outer diameter of the pipes are of equal size. The fitting has internal threads on both sides. Compared to the coupling, the thread length on the pipes should be 2 times shorter. Then the pipes on both sides will be screwed into the fitting at the same distance.
To independently connect pipes using a coupling without errors, you should study its specifics. If you carefully examine the threads on the pipe, you will notice that the last turns have the smallest depth in the place where the thread transitions into a flat surface. Such turns are called “escape”. It jams the clutch. It turns out that when screwed onto the run, the part stops. Then you can screw in the pipe from the other side.
If the thread of the pipe is longer than that of the coupling, then the run-out will be outside its limits. As a result, jamming will not occur, and water will flow through the threads. In other words, there will be a leak. For this reason, several turns should remain between the pipes after they are connected. When performing thread cutting yourself, it is worth remembering this rule.
The coupling method of connecting pipes is dismountable, but regardless of this, it is impossible to replace a specific section of the pipeline without disassembling the entire system. To make it easier to solve this problem, downpipes are installed in some areas of the system. We’ll find out what pipe benders are in the next section.
Manufacturing
What should you do if you couldn’t find a suitable size for sale?
Of course, make it yourself. For this you will need:
- Water and gas pipe;
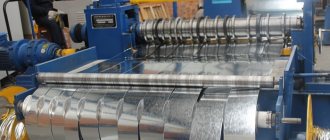
VGP pipes according to GOST 3262-75 are produced in light, ordinary and reinforced types. The difference is in the wall thickness: for nominal bore DN15 it is 2.5, 2.8 and 3.2 mm, respectively. For our purposes, it is better to take a reinforced pipe, otherwise the wall thickness at the thread cavities will be dangerously small.
Wall thickness of different types of VGP pipes.
- Die with holder;
Die in a frame - holder.
- Vise;
- Grinder or hacksaw for cutting pipes;
- File for chamfering;
- Any oil (spindle, diesel fuel, motor oil, sewing machine oil, etc.).
This is what the process of making a squeegee according to your own dimensions looks like:
- The pipe is cut to length;
- External chamfers are removed from both sides with a file;
- The pipe is clamped in a vice;
- Its surface is lubricated . Oil will reduce the force required for cutting and relieve the surface from metal scuffing;
- The die is put on the pipe by a guide frame and pressed against it with maximum force ; at the same time the frame rotates clockwise. You can stop pressing the die only after cutting the first two threads;
- Five threads are cut on the short thread side, and 20 on the long thread side.
After the entry is made, the die can be turned over. This way we compensate for uneven wear.
What are surges
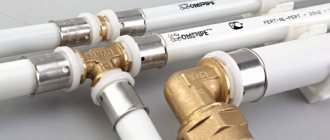
A squeegee is a connecting piece that looks like a short tube with a short thread at one end and a longer thread at the other. The locknut and the entire coupling are put on here.
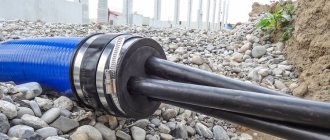
It is recommended to take pipe bends with a sufficiently long thread, otherwise all the parts will not fit in the threaded area, and then you will need to increase the distance between the connected ends of the pipe and the bend, as a result, the strength of the connection will be reduced.
This connecting part is most often used when laying water pipes. Therefore, it must be treated with anti-corrosion agents.
The most common types of metal pipe fittings are:
- Nickel plated . These bends give the pipeline a more beautiful appearance, therefore they are most often used in residential premises. However, they are more expensive compared to conventional steel parts.
- Galvanized . They are used in open areas where the pipeline will be affected by atmospheric phenomena.
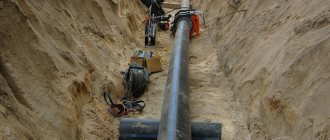
- Steel . Used for pipelines laid in the ground. To prevent the formation of corrosion, they are painted.
Gosstandart defines the following dimensions of pipe fittings:
- 150×50×65×17 mm, where the first value is the length, the second is the internal diameter, the third is the length of one threaded section, the last is the length of another threaded section;
- 130×32×55×13 mm;
- 110×15×40×9 mm.
Products with other intermediate sizes are also manufactured. Fittings should be selected taking into account the diameter of the pipeline being installed.
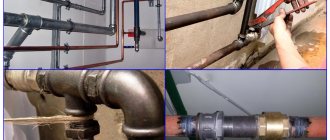
How to make the right seam
To make a high-quality seam, proper preparation of the pipe for welding is necessary. The quality of the pipe edge is decisive for a durable and airtight seam.
For example, for butt welding, the pipe cut must be strictly at a right angle. Before starting work, it is thoroughly cleaned with sandpaper 1 cm from the edge of the pipe, then oil, paint, metal dust are removed and degreased.
The welding technique depends on the cross-sectional shape, thickness and diameter of the pipes being connected. Simple round pipes for heating systems are welded using a simple continuous seam, moving the electrode along the surface of the pipe until the two pieces are completely welded.
For relatively thin pipes (up to 6 mm), a two-layer weld is suitable; for thicknesses from 6 to 12 mm, three-layer welding is used. Massive and thick pipeline fragments are connected with four or more seams.
The seams are performed alternately, one after the other. The next seam can be started only after the previous one has cooled. To achieve a high-quality and beautiful seam, you need to periodically remove the slag formed at the welding site by lightly tapping the pipe with a hammer.
Features of welding rotary and non-rotary joints
To make a high-quality rotary joint (where two pipes are connected at a certain angle), you can use a special rotator, which fixes and provides the most convenient access for the welder.
In the absence of a device, you will have to rotate the pipe manually, using an electrode to treat a section of the pipe cross-section of 60-110 degrees.
When making a rotary joint manually, the diameter of the pipes is first welded 2/4 from the outside in two layers, then unfolded and the joint is welded using all three or four layers.
A fixed joint is much easier to make: combine two pipe fragments and make several welding points (for example, in the form of an imaginary cross, or only on two opposite sides). Cook the pipe, starting from the bottom point, moving the electrode to the top section.
Pipeline assembly technology
To assemble the pipeline, you must perform the following sequence of actions:
- First, screw the coupling onto the pipe.
- Then the side with the short thread is screwed into the coupling (sometimes it is connected directly). The parts should be screwed all the way, then the connection will be reliable.
- A locknut is screwed onto the long side of the drive.
- Next comes the connecting fitting.
- Then the end of the drive is applied to the pipe and the coupling is screwed together so that it goes onto the pipe. The connection will be easier to complete if the axes of the parts coincide as much as possible.
- The fitting must then be secured with a locknut. To do this, it should be screwed to the coupling so that there is a distance of 2-3 cm between the parts. This space must be filled with strands of flax. They should be wound in the direction of rotation of the nut. Then the locknut should be tightened until it stops. This must be done to seal the connection and prevent water leakage through it. You should use a wrench to tighten the locknut because its edges are narrow.
Working with rotary and non-rotary joints
The technique of welding pipes of different diameters with rotating and non-rotating joints requires special mention (read also: “How to weld non-rotating pipe joints - a step-by-step guide”).
Among the rules for performing such work are the following:
- It will be convenient to make rotary joints in a rotator. It is desirable that the speed of work and rotation of the mechanism be the same.
- The point of contact between the metal and the arc (weld pool) should be located 30º below the top point of the pipe installed in the rotator, on the side opposite to the direction of rotation.
- This work can also be done manually. To do this, the pipe is rotated 60-110º each time to make it convenient to work with.
However, the most difficult work will be when turning the pipe 180º.
In this case, it is better to divide welding into 3 stages:
- First of all, 2/4 sections of the pipe are welded in 1-2 layers along the outer radius of the bend.
- Next, the pipe is unrolled and the remaining part of the seam is welded, completing all the layers at once.
- At the end, the pipe is rotated again and the remaining layers of seam are added to the outer part of the bend.
Welding of fixed joints is carried out in two stages.
The working method is as follows:
- The pipe must be visually divided into two sections. The seam in this case will be horizontal, vertical, and ceiling at the same time.
- Welding begins from the bottom point of the circle, smoothly moving the electrode to the top point. Work in the same way on the opposite side.
- In this case, the arc is made short, with a length equal to ½ the thickness of the electrode core.
- The height of the roll seam can reach 2-4 mm, it all depends on the thickness of the pipe wall.
The final stage of welding work is quality control of the joints.
Recommendations for dismantling
To prevent rust from occurring on gas and water pipes, they must be painted. The service life of the pipeline after painting will increase, however, after this, dismantling the threaded connections becomes quite difficult. For this reason, you should not paint the threaded area several times; one coat is enough. To make disassembly easier, these areas should be coated with grease.
If the connections on the section of the pipeline to be disassembled have been painted several times, then it is necessary to first remove the paint layer. To do this, you can use a blowtorch or a knife.
The material from which the fitting is made affects the complexity of dismantling. For example, ductile cast iron parts screwed onto steel pipes will not be difficult to unscrew with a wrench. Such parts practically do not “grow together” with the pipes. But it is impossible to unscrew a steel coupling with a wrench.
The key should not be reinforced with a lever, otherwise it will be damaged and the part will remain unscrewed.
Heating with a gas torch or blowtorch makes disassembling the pipeline easier. The heating process may take 15 – 55 minutes. The time depends on the diameter of the pipeline. The pipe must be turned periodically so that the connection is heated on all sides.
Conclusion
So, we found out that this is a pipeline bend and a coupling. Using these parts, a collapsible pipeline connection is created. The use of a sweep makes it possible to dismantle a certain section of the system without the need to disassemble the entire pipeline in the event of repair work.
Any pipeline is bound to lack repairs. In one-piece systems, replacing any individual parts is associated with a number of difficulties; therefore, in many systems, threaded connections are used using couplings and bends. In this article we will look at what it is, how these parts differ from each other and how the pipeline is installed using them.
Subtleties of electric welding
If round pipes are welded, the seam on them must be continuous. This means that once work has begun, it cannot be interrupted until a continuous weld has been formed. When working with rotating and non-rotating joints, electric welding of heating pipes should be performed in several layers. Their number will depend on the thickness of the pipe walls.
The dependence of the number of layers on the wall parameters is expressed in the following quantities:
- 2 layers of welding seam are performed on pipes with a wall thickness of up to 6 mm;
- if the walls vary between 6-12 mm in thickness, 3 layers will be required;
- all other products, the wall thickness of which is even greater, require the application of 4 layers of seam.
It is worth noting that each subsequent welding layer can be applied only after the previous one has completely cooled. All resulting slag must be removed before application. Read also: “How to properly weld pipes using electric welding – theory and practice from a master.”
In addition, it is worth considering a number of important features:
- What polarity and current should be used (constant or alternating) will depend on the wall thickness of the pipes, their material and the shell of the electrodes. All information must be indicated in the instructions for the electrodes.
- The thickness of the electrode rods affects the current required for welding. You can estimate this indicator by multiplying the thickness of the rod by 30 or 40. This way you can calculate the current strength in amperes and set it on the welding equipment.
- The speed of work execution has no regulated value. You just need to make sure that the arc doesn’t stay at one point for too long, otherwise the edge will burn out and you’ll have to start all over again.
To make your work easier, before starting to weld gas pipes using electric welding, you can assemble the joints.
coupling
Non-specialized information
A coupling is a connecting fitting, the inner diameter of which is equal to the outer diameter of the pipes. At both ends of the part there is an internal thread into which pipes are screwed. The length of the pipe threads is also two times less than the fitting, which allows them to be screwed in to the same depth.
Features of the coupling connection
In order to correctly connect the structure with your own hands using this fitting, you need to familiarize yourself with its specifics. If you closely examine the threads on the pipe, it turns out that the last turns have a shallower depth in the area where the thread turns into a smooth surface. These turns are called runaway, which jams the connecting fitting.
Safety rules when working with a welding machine
An important point when carrying out any electrical work, including welding metal pipes, is compliance with safety regulations. If they are neglected, a variety of injuries can occur, such as thermal skin burns, arc flash burns to the retina, electric shocks, and others.
Therefore, before starting work, you should perform the following steps:
- current-carrying conductors and components of the welding machine must be insulated;
- the body of the welding equipment and additional devices must be grounded;
- overalls and gloves must be absolutely dry;
- wear galoshes or lay a rubber mat in a small room for additional insulation;
- To protect your eyes and face, you should wear a protective shield when working.
Results
Thus, we have partially explained how welding work should be performed on electrical equipment. Of course, for the job to be successful, you must have some practical skills. However, thanks to the information presented in the material, you will know where to start practicing. If you follow our recommendations, you will definitely be able to weld metal pipes at a decent level.
Sgony
Non-specialized information
The squeegee is also a connecting fitting, which is essentially a short tube. On one side, the part has a small thread for connecting to the fitting. At the other end there is a long thread on which the locknut and the entire coupling for connecting the pipes are placed.
It is necessary that the product has a sufficiently long thread, because if the parts do not fit in the area with the thread, it will be necessary to increase the distance between the connected ends of the pipe and the pipe, which will reduce the strength of the connection.
It must be stated that this connecting element is much more often used for water pipes. For this reason, it lacks good anti-corrosion protection. The most common types of surges are:
| Nickel plated | They are much more often used in residential premises in order to give the pipeline a more aesthetic appearance. It goes without saying that the price of such fittings is higher than simple steel ones. |
| Galvanized | Used in areas where the system is exposed to atmospheric phenomena. |
| Steel | Much more often they are used for pipelines that are laid in the ground. They are painted to protect against corrosion. |
In accordance with GOST 6357-73, the dimensions of pipe bends can be as follows:
| Product length, mm | Inner diameter, mm | Length of long threaded section, mm | Length of small threaded section, mm |
| 150 | 50 | 65 | 17 |
| 130 | 32 | 55 | 13 |
| 110 | 15 | 40 | 9 |
In addition, there are some intermediate sizes. Naturally, connecting parts are selected in accordance with the diameter of the pipeline.
Connection Features
The instructions for assembling the pipeline are as follows:
- First of all, a coupling is screwed onto the pipe.
- After this, the product is screwed with the small side into the connecting fitting (in some cases, the squeegee is connected directly). The connection must be strong, so you need to tighten the parts until they stop.
- A lock nut must be screwed onto the long end of the part..
- Then, from the side of the long threaded section, you need to screw the connecting fitting until it stops.
- Then you need to bring the end of the drive to the pipe and unscrew the coupling so that it slowly begins to move onto the pipe . The more correctly the axes of the parts coincide, the easier it is to make the connection.
- Then the fitting is locked with a lock nut; to do this, the lock nut must be tightened to the coupling, leaving a distance of a couple of centimeters . The space that appears between the parts must be filled with strands of flax, which are wound in the direction of rotation of the nut. Then the locknut is tightened until it stops, as a result of which the connection will be sealed and water will not be able to leak through it.
Features of dismantling
Gas and water pipelines are usually painted to protect against corrosion. The paint can prolong the life of the system, but it is then very difficult to dismantle the threaded connections. Based on this, it is possible to paint areas with threads no more than once, and when disassembling they must be coated with grease.
If you need to disassemble a section of a structure with multiple painted connecting elements, you must first burn the paint with a blowtorch or clean it off mechanically, for example, with a knife or awl.
The complexity of dismantling greatly depends on the material of the fittings. For example, parts made of malleable cast iron “grow together” with steel pipes much less. Based on this, it is usually possible to unscrew them using a wrench. But it’s unlikely that you’ll be able to unscrew a steel coupling with a wrench.
Note! The key should not be reinforced with a lever, since it can be broken without unscrewing the part.
In addition, heating helps when disassembling the pipeline. For these purposes, it is possible to use a gas burner or a blowtorch. Depending on the diameter of the pipeline, warming up may take 15 minutes. up to an hour. At the same time, during heating, the pipe must be periodically turned so that the seal is burned on all sides.
Welding safety rules
The electrical welding process poses three potential hazards:
- receiving electrical injury from contact with live wires or electrodes;
- skin burn from molten metal;
- Arc flash burn of the retina.
To avoid undesirable consequences, you should take care of electrical insulation: use special rubber mats and galoshes, ground the welding machine, and insulate the conductors.
It is important to use personal protective equipment - special gloves, as well as a protective helmet or face shield.
Electric welding of water pipes is one of the most reliable ways to achieve the necessary tightness of the circulation circuit. The seams obtained using this technology are resistant to pressure, mechanical loads, and corrosion.
Unfortunately, even if all requirements are met, pipes may leak during operation. This occurs due to external loads for which metal structures are simply not designed, as well as due to natural aging and wear of the material.
In such a situation, you have to act immediately and eliminate leaks in an already used pipeline.