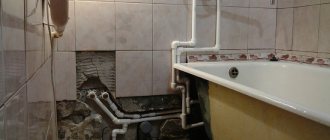
Installation of a faucet in the bathroom is somewhat different from installing a faucet for a kitchen sink, because the pipes in the bathroom can be walled into the wall and only a small part with threads for connecting the faucet protrudes outside. If the pipes are not embedded in the wall, then they run along the walls, and the mixer will be at a distance from the wall.
Let's define the problem more specifically - because two faucets are often installed in the bathroom: one above the bathtub, the second above the sink. So, here we will only talk about the one above the bathtub and above the sink. We will install it together with the sink.
What do you need to know before installing a faucet in the bathroom?
Practically, all mixers have a connecting size of 1/2 inch and a distance between the axes of the tubes of 150 mm plus or minus 15 mm (see diagram below). These dimensions should be taken into account when installing the pipeline, and be sure to measure these distances from the mixer purchased in advance.
If the mixer is rotary, then we choose a place to install the mixer, also taking into account the rotation:
The height of the mixer from the finished floor is 120 cm.
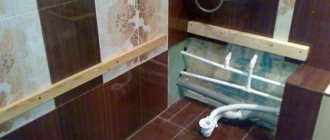
However, you can determine the location for the faucet above the bathtub as follows: temporarily place the bathtub in the place where it should be. Then we draw a line on the wall vertically upwards exactly in the center of the bathtub, select the desired height, usually no more than 30 cm. We drill two holes with a center-to-center distance of 150 mm:
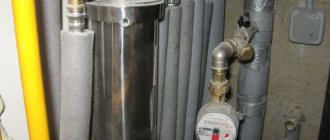
Holes are needed if you need to bring hot and cold water pipes from a room located behind a wall (partition) to the mixer; this is the layout in most apartments where the bathroom and toilet are separated by a wall. Usually the risers are located in the toilet, and the tubes go into the bathroom from there. If you have everything in one room (say, an old apartment with a shared bathroom or a private house where the bathroom is also shared for some reason), then, most likely, you don’t need to drill through the wall. I am hinting that you should proceed from your own situation and not blindly copy. But since this article is only about installing a faucet in the bathroom, I will not tell you here how to install a water supply from different pipes, but will continue on the topic of the article.
The mixer kit includes gaskets, eccentric bushings and decorative cups:
Distance between clamps
The length of the pipe section to the clamps is also taken into account, which also allows minimizing the effect of gravity and linear elongation on the water supply and heating circuit. This applies to both connecting couplings and suspension clamps, which serve as fixed supports. As an average indicator, you can use the data for attaching the support posts or the more accurate tabular ones given below.
Table 3. Lengths between clamps of polypropylene pipes
| Diameter (mm) | At temperature(cm) | |||||
| 20 C | 30 C | 40 C | 50 C | 60 C | 80 C | |
| 16 | 50 | 50 | 50 | 50 | 50 | 50 |
| 20 | 60 | 60 | 60 | 55 | 50 | 50 |
| 25 | 75 | 75 | 70 | 70 | 65 | 55 |
| 32 | 90 | 90 | 80 | 80 | 75 | 65 |
This table can be a starting point when installing any elements of a pipe system that ensure reliability and structural rigidity. By tying to it, you can get the distance between the clips of polypropylene pipes and guarantee that your system will last at least 50 years. When installing connections in the riser, take into account the freedom of movement and the coefficient of linear expansion.
Installation of a bathroom faucet: operating sequence
Let's take a step-by-step look at how to install a faucet in a bathroom. Moreover, we will assume that
We wind tow (flax) onto the small thread of the eccentric bushing along the thread:
After winding, smooth the wound flax with your hand and lightly spread a special sealant:
– and also spread it on the linen with your hand.
Attention! When purchasing plumbing components, you may encounter the following problem: some threads do not have a notch, which is why the tow will slide along the thread when screwing on the second part. So, if there are no notches, we make them ourselves: you can use pliers or a gas wrench to slightly (not too much!) compress the thread until notches appear.
You can use fum tape to seal the threads: take a fum tape, preferably thicker, and wind it tightly along the threads. It is torn off and smoothed by hand. Sealant for the fum tape is NOT needed.
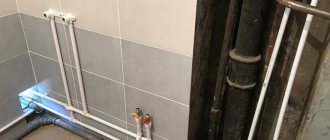
We screw the eccentric into the coupling - into the hole at the pipeline outlet:
Eccentric bushings are needed if the pipeline terminals are not at the same level, or if the center-to-center distance is not 150 mm.
After the required center distance and level are set using eccentrics, all other parts of the mixer are screwed on:
And then we screw on the shower head hose and the shower holder:
That's all for installing a faucet in the bathroom .
Nothing complicated, no expensive tools, just wrenches and your hands. Good luck.
Materials and tools for installation work
Before we begin installing plumbing equipment, let's try to decide what exactly we need for this.
The photo shows the unpacking of the mixer and accessories.
We will need the following materials and tools:
- Mixer - a device in which hot and cold water is supplied separately or mixed and then supplied to the tap or to the “rain”;
- “Rain” - a watering can attached to a hose;
- Decorative trims that will cover the area where the plumbing equipment meets the wall;
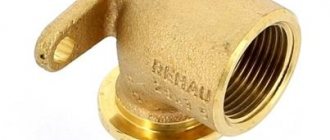
- Eccentrics are adapters adjustable in the vertical plane from water pipes to the mixer;
- Fum tape is a Teflon seal that is wound directly onto the external thread of the fittings;
- Hammer and drills of suitable diameter;
- An adjustable wrench or a set of open-end wrenches;
- Large shaped screwdriver;
- Assembly knife;
- Spirit level and measuring instrument.
Installation technology
As an example, let's look at how to install a faucet in a bathroom where the piping is hidden.
This is the most common case when short pipes with internal threads protrude from the wall and it is on them that the plumbing fixture will be installed. In other cases, a special bracket for the bathroom faucet is used.
The installation instructions are as follows:
- Before assembling the faucet for hot and cold water, we clean the impurities, if any, from the water supply pipes;
- Unpack the eccentrics;
How to wind a seal? Wind clockwise
- We wrap fum tape in several layers on the thread of the eccentrics from the narrow edge;
We wind Teflon tape, tow and other types of seals clockwise when looking at the eccentric from the end. If you wind it differently, the seal will become confused when screwed into the fitting and it will not be possible to achieve optimal tightness of the connection.
- We insert the prepared eccentrics into the fitting and tighten them several turns, that is, so that they are held well, but, nevertheless, not all the way;
- We unpack the mixer itself and insert the included sealing gaskets into the fittings;
- We apply the mixer to the eccentrics and see if the seats coincide in the centers;
- If there is a discrepancy, turn one of the eccentrics in the right direction so that the centers coincide;
- We screw the mixer to the eccentrics and do a test run of water to see whether there is a leak at the junction of the pipe in the wall and the eccentric or not;
- If there is a leak, turn off the water, disassemble the assembly, repack the connections, wrapping more sealant and repeat the previously listed steps;
- If there is no leak, turn off the water and remove the mixer;
Decorative trims installed
- We install decorative trims on top of the eccentrics;
- We finally fix the mixer in place;
We check for leaks, and at the same time dirty water will drain
- We turn on the water again and check the installation for leaks;
- Unpack the hose with a watering can to install the “rain”;
Assembling the hose and watering can
- We insert a gasket into the fitting on one side of the hose, to which we attach the watering can with our own hands;
We twist the fittings carefully so as not to damage the gasket
- On the other hand, we also insert an O-ring into the fitting and screw the union nut to the thread on the mixer;
When connecting the “rain”, do not place the hose directly into the bathtub; it is better to lay it down with cellophane, especially if the bathtub is acrylic. As you tighten the fittings, the hose will move from side to side, and you can scratch the glossy finish of the plumbing.
- We disassemble the bathtub holder;
Most often, it is not the height from the floor that is taken into account, but the height of the watering can relative to the person’s height
- We try it on and mark its location on the wall;
For information on how to drill ceramics correctly, read the installation instructions.
- According to the markings, we drill holes for screws with a seal;
- We drive the seals into the holes made;
We fasten the base of the holder firmly, so that the installed part does not play.
- We fasten the holder with screws;
We set the distance from the floor to the watering can either according to the standard or in accordance with your height
- We finally check the functionality of the entire structure.
The instructions given are not universal. Therefore, if individual installation steps are irrelevant for the mixer you purchased, ask the appropriate questions in the comments to the text. I look at your comments every day and, on occasion, I will be happy to explain how to do it right.
Explanations for installation work
Correct placement of the gasket extends the life of the connection
A rubber or polyurethane sealing gasket is inserted into the fitting, which is screwed onto the eccentric. Please note that one side of the gasket is ribbed and the other is smooth. So, the ribbed side is installed inside the fitting, and the smooth side outside, that is, towards the eccentric.
Types of distribution devices
Water outlets are divided:
- to single, used to connect 1 water line;
- solid double, used to connect 2 pipes;
- double, united by a common bar.
Fittings are made from non-ferrous and ferrous metals, plastics, and alloys. Wall varieties are classified as follows:
- crimping;
- threaded;
- crimping;
- self-anchoring.
Each type has its own positive and negative qualities.
Crimping type
The device is secured using a collet, which is a sleeve that is used to secure cylindrical elements. The part is installed between the outer and inner parts, which ensures tightness. The positive qualities of crimp water sockets include:
- acceptable price;
- increased service life;
- ease of installation;
- wide range of shapes and sizes;
- tightness;
- Possibility of dismantling and reuse.
The crimp type is secured using a collet.
Threaded sockets
The device is connected to the pipe using a thread. This connection is hermetically sealed, does not depend on operating temperatures, and holds in any conditions. High-quality thread is considered an important design element. The strength of the device is also determined by the material.
Threaded fittings are good:
- long service life;
- ease of installation and maintenance without the use of special tools;
- reliable operation, increased tightness;
- resistance to mechanical stress.
Water inlets with crimping
The devices are connected to the water supply system by soldering using a special device. The positive qualities of a crimp fitting include:
- minimum number of elements;
- small sizes;
- resistance to mechanical stress;
- compatibility with any type of plumbing fixtures;
- long service life;
- reliability and tightness;
- comfortable height;
- acceptable price.
Water inlets with crimping are resistant to mechanical stress.
The disadvantages are the impossibility of reuse and the need to use special equipment during installation.
Self-locking devices
The recently introduced self-locking fittings are dismountable, universal, and easy to install. Such water sockets can be dismantled and reused.
Conclusion
So, now you know at what height to install the faucet in the bathroom and how to adjust the center distance using eccentrics , which means you can independently cope with the arrangement of the bathroom in your home. But even if you have questions during installation, ask them in the comments, I will answer them all.
By the way, don’t forget to watch the video in this article, it will probably be useful to you.
Every apartment or house has devices and appliances that you can replace and repair yourself, without turning to a qualified technician for help. Such devices include a bathroom faucet.
As a rule, it becomes unusable due to poor water quality or due to untimely replacement of the cartridge in the main filter.
If any problems occur, you should know how to replace the faucet in the bathroom without damaging the device.
Attaching the shower head holder
How to attach the holder to the wall depends on what material it is made of. If it is concrete, then dowels and screws will be required. Installation steps:
- Mark the location of the fasteners on the wall. A pencil or marker is suitable for this. The holder must be placed at the installation site at the required height and marks must be made through the holes for fasteners. To prevent the drill from sliding on the surface of the tile, you need to slightly damage the smooth coating of the tile using a self-tapping screw or a pobedit drill. It should be placed in the center of the mark and knocked down with a hammer.
- Drill holes and insert dowels into them.
- Secure the watering can holder with self-tapping screws.
Installing a holder in a plasterboard wall lined with tiles is more difficult - you need to know the location of the rack profile or mount it in advance, at the stage of constructing the partition. Only in this case is the secure fixation of the holder guaranteed. The first two stages of installation in drywall are similar to mounting on a concrete wall. You only need to drill the tiles and the adhesive layer. In this case, the holder is attached to metal screws with fine threads.
This completes the self-assembly and installation of the faucet in the bathroom. All that remains is to turn the water supply valve and use the device for its intended purpose. If all the work is done correctly, the tap will not leak for a long time.
Advice! If you need bathroom renovation specialists, there is a very convenient service for selecting specialists from PROFI.RU. Just fill out the order details, the experts will respond and you can choose who to collaborate with. Each specialist in the system has a rating, reviews and examples of work, which will help with the choice. Looks like a mini tender. Placing an application is FREE and does not oblige you to anything. Works in almost all cities of Russia.
If you are a master, follow this link, register in the system and be able to accept orders.
Common bathroom faucet failures
Damage can vary, but the most common are:
- Water leaking when the tap is closed . The reason for this is damage to the mixer cartridge by small particles that are in the water.
- The threaded connection of the device is broken.
- Corrosion that faucets made of brass alloy are subject to over time.
The last two problems are typical for faucets made in China, because low-quality brass alloy is used to manufacture the device. Therefore, their cost is much lower, in contrast to European equipment, which is made from stainless steel.
- Necessary tool
Before changing the faucet in the bathroom, it is worth preparing all the tools that may be required so that you do not need to constantly be distracted from the process to search for this or that equipment. Arsenal should be placed close to the workplace.
To replace the mixer you will need the following tools:
- pliers;
- several adjustable wrenches;
- tow or fum tape;
- sealant;
- sanitary linen;
- paranitic or rubber gaskets, ¾ and ½ inch in size;
- graphite gasket former;
- water container.
Most of the listed materials and tools are available at home, and other accessories can be purchased at a specialty store.
- Preparatory work
- To understand how to replace a bathroom faucet, step-by-step instructions are provided.
- Shut off the hot and cold water supply in the water supply pipes.
- Drain the remaining water from the mixer and reduce the pressure in the pipes by opening the taps.
- Once the air and water are completely out of the plumbing system, loosen the large faucet nuts that secure it to the eccentric adapters connecting the plumbing pipes to the faucet.
- Remove the old faucet.
- Pay attention to the condition of the eccentrics - they may need to be replaced.
Video instructions for replacing a bathroom faucet
As a rule, the distance between standard places for pipes in mixers corresponds to 15 cm. In practice, this may not correspond to the indicated figures. Then the inaccuracy can be leveled to the desired size using eccentrics that are released or tightened. Thus, the displaced part of the pipe will take a central or extreme position, thereby increasing the interaxial distance or reducing it.
When the required distance has been selected between the eccentric nozzles, you can begin installing the new mixer. The installed eccentrics must be securely fixed using plumbing flax and a gasket former. To do this, a small amount of flax is wound on the external thread, after which a graphite gasket former is applied, and a sealant can be used. If these materials are not available, it is recommended to use sealing tape.
The eccentrics must be screwed into the pipes with mirror precision. The synchronization of actions is incredibly important, because at the slightest violation the device will take the wrong position and the installed mixer will be skewed. Installation of the mixer is carried out only after the position of the eccentrics has been correctly fixed and the required center distance has been set, which will be equal to the size of the mixer.
The final stage is tightening the fastening nuts. There are also some tricks in this process, using which the installation will be performed more efficiently. To avoid damaging the coating of the nuts that secure the mixer to the eccentrics, it is recommended to wrap them with electrical tape and then tighten them using pliers or an adjustable wrench. Upon completion of the work, the electrical tape should be removed from the nuts.
Knowing how to correctly change a faucet, you can not only get the job done efficiently, but also save money on calling a technician. Using simple recommendations and step-by-step instructions, the mixer will last a long time.
We provide the same data for other brands
Length to supports PN 16 for horizontal installation:
Length to support posts PN 20 for horizontal installation:
Length to STABI PN 20 support posts for horizontal installation: