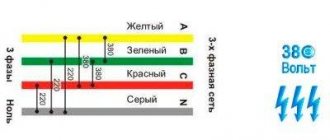
Using plumbing in a bathroom or toilet should not cause discomfort to all family members. It is for this reason that before carrying out installation work, the optimal height of water outlets is determined - equipment designed for connecting plumbing fixtures to water supply and sewerage pipes. How to determine the height of device placement yourself? What parameters need to be taken into account additionally? Are there standards for the location of water outlets? The answers follow.
Equipment for connecting the mixer to the water pipe
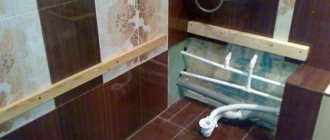
Wiring diagram for the bathroom and toilet
When performing plumbing work in these rooms, 3 methods of laying metal-plastic pipe products can be used.
Serial connection system. This option involves connecting each plumbing fixture to the main pipe using a separate tee. It is relevant for bathtubs that contain a minimum number of objects (faucet, washing machine). It is possible to implement a sequential scheme after finishing the finishing work in the room by means of open laying. The assembly process looks quite simple: the pipe is laid from object to object, and the supply element is simultaneously removed from the tee.
Wiring with pass-through sockets. Here the technique is similar, only sockets are used, not tees. This scheme is most widespread in private homes, since it involves laying long pipes. Here you need to know that to provide the necessary pressure you will need to install an additional pump.
With a sequential wiring scheme, the water supply can be laid openly, without cutting walls for pipes and water sockets
Efficient collector system. This practical and reliable option involves connecting to the central pipe of each object through a supply pair. A manifold for metal-plastic pipes allows you to turn off or regulate the water supply to a separate plumbing fixture. The collector is placed together with the control devices in a special cabinet. This technical solution has the following advantage: if one of the objects (mixer, washing machine) fails, there is no need to completely disconnect the bathtub from the water supply - just turn off the corresponding shut-off valve.
What happens if you connect the hose incorrectly?
If you connect the hose incorrectly, water will be drawn into the machine and immediately drained into the sewer. If the water is drained, the washing is interrupted and the error “LE” or “4E” appears on the display. This usually happens at the beginning of the wash or before rinsing.
The height of the washing machine drain and the distance to the connection area are within the length of the drain pipe. When installing equipment, the first step is to select a location with a hard, level floor near the release point. The height of the washing machine drain hose and the gasket must prevent pinching and twisting of the walls, so that nothing interferes with the free flow of water.
Installation of water sockets
Installation of water sockets can be done:
inside the wall. This method is used when installing equipment before the final finishing of the room (under tiles) or in a plasterboard wall. Hidden installation allows you to hide the water supply pipes and the main part of the fitting and achieve a more pleasant appearance of the room;
Installing water sockets under drywall
onto the wall surface. Surface installation is used for a sink, faucet or other equipment when hidden installation is not possible.
Installing a water socket on the wall surface
Regardless of the installation method, it is recommended to use the following diagram:
- marking. At the first stage, it is necessary to determine the location of the water outlet, which corresponds to the location of the mixer, tap or other connected equipment;
Determining the location
- wall chipping. The work is performed only when choosing a hidden method of installing the fitting. If surface installation is preferred, then this point should be skipped;
Preparing niches for placing pipes and fittings
- fitting fastening. The walk-through water socket can be fixed on the wall in one of the following ways:
using self-tapping screws. This method is the most durable. To fix the water socket with self-tapping screws, you need to drill holes, insert a dowel into each hole and only then fix the water socket;
Fixing the water socket using self-tapping screws
using sand-cement mortar. This method of fastening is only suitable for hidden installation equipment. The fixation is strong;
Fixing the water socket with cement mortar
using polyurethane foam. This method is also only suitable for hidden wiring;
Fixing the fitting with polyurethane foam
- checking the correct installation of equipment;
To connect a mixer or other equipment, it is important that the water outlet outlets are located at the same height from the floor and along the same axis. You can check the correct installation using a construction or laser level
Determining the correct installation of a water socket
- connecting the water outlet to the water supply pipes.
After completing the specified list of works, the niches are sealed, for hidden installation of equipment and the connection of a mixer, tap, and so on.
You can watch the video in more detail about the process of doing the work yourself and the rules for installing equipment.
Installation procedure for water outlets
Marking for sockets
The pipes in the grooves must be laid with a small margin in order to then trim them to the level of the horizontal markings. After welding the pipes and placing them in the niches, it is necessary to make planar markings on the wall in accordance with the project. There should be a distance of 150 mm between the vertical axes passing through the centers of the sockets when installing for a wall-mounted mixer. For a sink faucet with hidden connections or other consumers, this distance may vary. When the vertical marking is made and the pipes are aligned along it, horizontal markings are made according to the level at the height specified in the project. It is also necessary to apply markings to the pipes at a horizontal level with a 15 mm correction for the socket joint, and then make cuts with special scissors for polypropylene pipes.
Preparation of pipelines for soldering with sockets
After all the preparatory work, marking and cutting of pipes, the final fitting of the couplings is carried out. It is necessary to ensure that the threaded holes are level with a permissible deviation of no more than 5 mm.
If one pipe turns out to be much shorter than the other, it needs to be extended. To do this, use a piece of 20 mm polypropylene pipe of the required length with a margin of at least 5 centimeters and a polypropylene coupling. Such a connection, with qualified installation, is not inferior in strength to a solid structure and can be safely installed inside a wall.
To solder polypropylene pipes, a special soldering iron is used, which comes with attachments for different pipe diameters. When the instrument is assembled, it is plugged into a power outlet and the heating temperature is set to about 200-250 degrees. The indication on the soldering iron shows the heating of the device. An extinguished light on the switch indicates that you can start working.
To solder, you need to insert the end of the pipe into the “Female” soldering iron nozzle, and at the same time insert the “Male” nozzle into the coupling. The polypropylene should be held in this position for 3-4 seconds. The main condition when heating is not to overexpose. In case of overheating, backlash is formed during soldering, which can contribute to the formation of voids in the polypropylene joint when cooling. After the heating time has expired, the pipes are separated from the soldering iron and connected to each other. When connecting within 5-7 seconds, the connection can be calibrated. It is necessary to adjust the water socket not only in height, but also in angle relative to the axis of rotation. The installation angle of the water outlet relative to the wall plane should be close to 90 degrees. Having fixed the coupling on the pipe, you need to wait a few seconds, after which the connection can be released. Do not use the water supply until the connection has completely cooled. This may take up to 5 minutes. If the connection has not completely cooled down, the pressure created by the water can partially destroy the joint and form microcracks, which will subsequently leak.
Varieties
The classification of water sockets is based on a number of criteria. Let's look at them in a little more detail.
1. Scope of application. According to this criterion, water sockets are:
- for cold water supply;
- for supplying hot water;
- for heating.
The last two types of water sockets are similar in many ways.
The situation is different with cold water supply systems. They are created using fittings for metal-plastic pipes made from a plastic mass that does not lose its strength properties at a temperature not exceeding +30۫С.
2. Material of manufacture. Water inlets are made from:
- galvanized cast iron;
- brass and bronze;
- of stainless steel.
Water inlets are made from steel, brass, bronze, PVC, polypropylene, and can also be combined
In addition, advances in the field of polymer technology have created the prerequisites for the production of similar elements from PVC or polypropylene. This was mentioned above.
3. Configuration and shape of connectors. According to this criterion, water sockets are of the following types:
- with a short or long strap for fastening;
- with three and two holes for fastening;
- single and double.
Where should I place this element?
One of the key points when installing a water outlet is its location. The ideal solution would be a major renovation of the bathroom with a special space allocated for the fitting. Then you can place a new branch in accordance with the existing rules.
- Sufficient distance to the insert. The inlet hose from the washing machine should freely reach the water socket, without complicating connection and operation. If possible, the wiring should be redone in order to move the machine as close as possible to the pipeline.
- The optimal height for the water outlet. Two nuances are taken into account here. Firstly, the height recommended by plumbers is 77 cm from the finished floor. Secondly, the dimensions of the existing washing machine, especially if you plan to install a branch directly behind its body.
- Free access to the valve. This is a safety requirement - in case of problems with water supply, leakage or accident, the owner must quickly and easily reach the tap and turn off the water supply to the machine . You can use shutoff of the general water supply, but it is better to act locally.
- Reliable fastening. To avoid leaks, it is necessary to carefully approach the method of installing the water outlet. Especially if you plan to place it on the wall. In this case, a special type of fitting is selected, and if there are no possibilities, alternative options are sought.
The main thing when choosing a modern insert is to think about convenience. The outlet should not be difficult to install and use and should not be obstructive or inaccessible in an emergency. The aesthetic side of the issue will also be an important point, so do not forget about a beautiful design that matches the interior of the bathroom.
Installation and installation
As for connecting the fitting to the water supply system, all the main options have been considered, and now it is worth paying attention to the connection of the water outlet to the wall, and, to be more specific, the installation and installation of its structure. The simplest mounting option is visible, but it is not recommended to use it due to its extreme lack of aesthetics and special requirements for the base to which the water socket is attached
Therefore, hidden installation options are more often used, among which three technologies are distinguished:
The simplest mounting option is visible, but it is not recommended to use it due to its extreme lack of aesthetics and special requirements for the base to which the water socket is attached. Therefore, hidden installation options are more often used, among which three technologies are distinguished:
• In the pocket.
• Lined.
• Mixed.
The first option is used when the wall is thick enough and creating a recess in it will not cause much harm. For example, in the case when these are concrete or brick floors. In this case, the recess is made to the full width of the fitting, i.e. no less than 40-50 mm.
If it is impossible to go deeper into the wall, as is the case with plasterboard partitions, the reverse method is used - building up or creating a lining. In this case, a lining is installed in a niche created on the basis of a wooden or metal frame covered with plasterboard. A fitting is mounted on it, and after that the entire structure is hidden under a sheet of plasterboard, which is installed flush with the outlet fastening elements. This mixed option will allow you to achieve aesthetic balance.
If there is no need for hidden installation, you can get by with a simple installation on a wooden lining processed according to the rules, to which the water socket will be attached using mounting holes.
Tip: when installing, be sure to check the alignment of the horizontal and vertical lines using a building level to achieve an optimal result.
As for the holes themselves, depending on the design created by the manufacturer, there can be from two to five. Anchor dowels can be used as fastening, and if they are unavailable, a cement-sand mixture or polyurethane foam can be used.
Are there height standards?
In practice, today it is impossible to identify any strict parameters that need to be taken into account when installing a sink. It is worth understanding that the owner will make calculations based on the lower or central pipeline.
Next, you should consider the type of sink: wall-hung, on a pedestal, etc. Each type requires special attention, since there is a significant difference in fastening.
Note! The hanging type requires prior placement. First, the owner makes all the necessary holes, installs the sink, and then makes markings for drainage.
If we talk about hidden installation, then experts recommend making all the markings and calculations in advance . Any deviation can eventually cause a leak, which will create a number of problems. Therefore, it is better to entrust this work to an experienced specialist. In any case, an adjustable siphon will allow you to gain a few extra centimeters of space in case there is a deviation or error in the calculation.
Types and types of water sockets
Water inlet (VR) is a type of fitting for water pipes, which on one side has a standard connector for connecting to a pipe (depending on the type of pipe), on the other, a threaded connection to which a mixer eccentric or water supply hose is connected. VRs are distinguished by material, connector shape and configuration.
For the manufacture of VR use:
- stainless steel;
- galvanized cast iron;
- brass and bronze;
- PVC and polypropylene.
Stainless steel fittings are quite expensive, the average price of one fitting is 800 rubles. Working pressure – 10-20 atmospheres.
To connect stainless steel VR to copper pipes, use brass adapters. Connection to plastic and metal-plastic (metal-polymer) pipes is made without adapters, using a crimp coupling or tightening nut (depending on the type of connector). Connection to a corrugated stainless pipe is only possible for BP with a connector designed for such installation or through an adapter. Therefore, before purchasing, check the connector type.
VRs made of galvanized cast iron are cheaper than those made of stainless steel, the average price is 200 rubles. Technical parameters and connection are similar to stainless steel VR. If the protective layer is damaged, it rusts.
VR made of brass and bronze are even cheaper, the average price is 100 rubles. This type of VR is used more often than others. In terms of technical characteristics, it is not inferior to BP made of stainless steel. To connect to copper and steel pipes, you do not need an adapter (if the connector matches). The main types of connectors are compression and crimp.
VR made of PVC and polypropylene are the cheapest, the average price is 40 rubles. PVC fittings are used to connect plumbing fixtures to cold water supply (CWS), because the maximum temperature recommended for these CS is 40 degrees. Fittings made of polypropylene are used for cold and hot water supply (DHW). The working pressure is similar to stainless steel BP. Installation is carried out by soldering.
Do not use PVC BP for installation on polypropylene pipes and vice versa. These materials are not compatible for soldering.
Plastic water sockets
VR configuration
Single VR with 2 mounting holes. Used to connect transition hoses. Therefore, depending on the model, they are cut with external or internal threads of various diameters. When faucets are tightly connected, there is a high probability of damage to the fasteners. It is possible to install several VRs on a mounting plate to reduce the number of holes in the wall.
Single VR with 3 holes for fastenings. Used to connect transition hoses and mixers. Depending on the model, the fittings have external or internal threads of various diameters. Additional fastening at the top increases the rigidity and strength of the connection. Installation on a mounting strip is possible; to install the mixer, the strip is secured with 4 or more anchor dowels.
Double BPs on a short bar are used to connect adapter hoses. This reduces installation time. Application for connecting mixers is impossible due to the large difference in the distances between the installation locations and the BP thread.
Double VRs on a long bar are used to connect adapter hoses and install faucets (for this, use a bar with two rows of mounting holes, top and bottom). The use of such BPs facilitates the installation and connection of plumbing fixtures, because the distance between BPs corresponds to standard faucets.
Brass water sockets on mounting plate
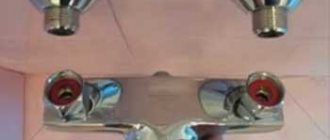
Distance between pipes when connecting a mixer
Before installing the mixer, pipes with cold and hot water are installed, and the outlets are supplied to the place where the mixer is attached. At this stage, you should know the distance between the pipes when connecting the mixer; this parameter should be selected based on SNIP standards and usually it is 15 cm, with a deviation of 1.5 cm in both directions.
Pipes under the sink
The size of the pipe connected to the mixer is half an inch, and based on this parameter, if necessary, you should take care of additional adapters. Installing a faucet in a bathroom, shower or kitchen has its own characteristics and nuances that should be paid attention to even at the initial stages of pipe installation.
Installing a faucet in the kitchen
When installing a faucet in the kitchen, as a rule, the pipes are laid open and are not walled up in the wall, so it is not so important what the distance between the pipes is on the faucet; it can be easily adjusted if necessary. If the pipes are mounted into the wall, in order to avoid the use of additional elements and adapters, it is worth taking care of the distance between the pipes in advance so that the installation of the mixer goes without unnecessary problems. It is worth buying the mixer in advance and installing the pipeline based on the given dimensions.
Installing a faucet in the kitchen
Installing a faucet in the shower
The most suitable for these purposes are faucets designed specifically for showers. Until recently, in this role they used one mixer for both the sink (pictured) and the shower, which did not require large expenses.
Installing a faucet in the shower
A distinctive feature of this type of faucet is the absence of a bath-shower switch, which gives a more modest size of the product. Recently, there has been a tendency to use special mixers that allow you to reveal the functions of the shower at 100%. Installation of such a mixer can be done openly or some parts can be hidden during the installation process for a more aesthetic appearance; it is worth noting that with hidden installation, when repairing the mixer, problems arise with access to failed parts. Shower faucets designed to connect special shower heads or hydromassage elements are becoming increasingly popular.
Pipe distance
The distance between the pipes of the mixer in the shower during hidden installation is selected especially carefully, since the complexity of installing the mixer itself will depend on this. When installing the mixer, you should take into account the height to which the mixer should be raised. Also, you should not ignore the height at which the shower head is located, which affects the quality of the mixer. Before purchasing a mixer, check all the necessary indicators with a sales consultant.
Installing a faucet in the bathroom
Often, when installing a water supply system to connect a faucet in a bathroom, the pipes are walled into the wall, this saves space in the bathroom. With this type of installation, the distance between the pipes for the faucet in the bathroom plays a big role.
A small error when installing the mixer can be eliminated with the help of eccentrics that come with most mixer models. After setting the required distance between the pipes for the mixer using eccentrics, all the necessary elements are connected.
When choosing a faucet, pay attention to the weight of the product; as a rule, faucets made of silumin are cheaper and lighter in weight than brass ones, but they are usually inferior in quality. When installing the mixer, it is necessary to wrap tow or full tape on the threads of the products, this will prevent leaks during operation of the product.
Advice when installing the mixer: tools for work, if possible, should be wrapped with electrical tape or other materials to prevent damage to the surface of the mixer. When dismantling an old mixer, you should be careful not to damage the threads on the fitting connected to the water supply, which can lead to unnecessary costs.
Connection types
The classification of water sockets by connection type is the most extensive
It is directly related to the options of materials used to create the fitting, but these are only details of the range of manufacturing companies, so it is worth paying attention to the types of connection with the main pipe
They can be self-locking, crimp, threaded or even pressed. Each type of connection has many features that make them more attractive from the point of view of operation and installation. They are most obvious in the example of crimp water sockets.
At the heart of their connection is a special bushing, the so-called collet. It has a cylindrical shape and is clamped between the outer and inner parts, due to which it provides the necessary tightness. The undoubted advantages of this connection:
• Modernity of the method.
• Relatively low cost.
• Easy to install.
• Widespread.
• Tightness.
• Recyclable.
An older connection option is threaded. Its main disadvantage is the need to comply with operating conditions, since an alternate increase and decrease in the temperature of the water passing through the water supply can significantly reduce the tightness of the connection.
On the other hand, there are many advantages:
• High impact strength.
• Easy to dismantle and reuse.
• Durability.
As for press water inlets, they have a more serious drawback.
They cannot be installed without special equipment, and in addition, such a connection is non-separable, so it will not be possible to dismantle and re-install such a fitting. They are connected to the supply water supply by soldering, which is the main difficulty in using them
At the same time, they are quite inexpensive, versatile, compact, and most importantly, durable.
Important: polypropylene and PVC elements are incompatible with each other, and when soldering they will not provide a tight connection. The last, but sooner to appear option is self-locking fittings
The last option, but sooner appeared, is self-locking fittings.
This version of water sockets is a complex design with a connection based on internal rings, including toothed ones, which are responsible for connecting the elements.
Their main advantage is the trouble-free repeated installation and dismantling of the product, as well as its reuse.
What is a water socket?
This is a type of fitting, a device for connecting a plumbing fixture to a water supply.
Most often this is a threaded fitting with bosses with holes for attaching the fitting to the surface. There are from two to four mounting holes. A large number of fittings are produced, which differ in design and materials of manufacture. These devices are: 1. Single - designed for use with a single water supply line. 2. Double solid - two in one block for connecting two connected lines. 3. Double on a common bar - two, located at a certain interval on one bracket. They are made from ferrous and non-ferrous metals, alloys, and synthetic materials.
Wall options are:
- threaded;
- crimping;
- on pressure testing;
- self-fixing.
Each type has its own characteristics, advantages or disadvantages.
Threaded water sockets
It is clear from the name that the joining of pipes is carried out using a threaded connection. It must guarantee tightness and not depend on the temperatures used, that is, maintain quality under any conditions. The most important thing in this case is high-quality carving. Of course, the material also plays an important role.
It might be interesting: How best to cover the space under the bathroom with a screen
Threaded types differ:
- long service life;
- simple installation, repair and maintenance without specialized equipment and destruction;
- reliability during operation due to excellent tightness;
- impact resistance.
Crimping types
In this type, the means of fastening is a collet. This is a bushing used to fasten cylindrical parts. The collet is installed between the inner and outer parts, ensuring tightness.
Advantages of crimp options:
- low price;
- long service life;
- ease of installation;
- a large selection of various design parts on the market;
- reliable tightness;
- Possibility of disassembly and reuse.
Water inlets with crimping
Devices of this type are connected to the main line by soldering using a special device. Advantages:
- minimum details;
- versatility;
- small sizes;
- high durability;
- long period of use;
- reliability;
- convenient height of water sockets;
- low price.
The disadvantages of this design include the need to use special tools and the impossibility of reuse.
Self-fixing species
Appeared on the market recently. Main advantages:
- disassembly of the device;
- possibility of reuse;
- reliability;
- versatility;
- ease of installation.
Design Features
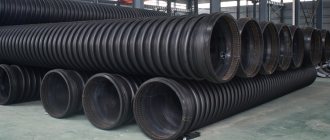
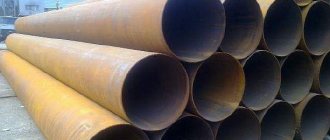
For the installation of modern water supply systems, metal-plastic pipes and fittings are often used. This material is non-corrosive, durable and easy to install and maintain. For such systems, connecting elements appropriate for their intended purpose are selected: tees, press connections, etc. Polypropylene, polyvinyl chloride and other pipes are no less popular; fittings for them are also available in a wide range.
Different types of pipes are used for water supply; fittings for them are plastic or metal
As for the water socket, it acts as a fastening of the outlets of the water supply system to the wall and connecting them to the taps. A special feature of this element is that its design includes a fastening strip and an adapter fitting (socket). The fastening bar is usually made of steel due to its higher strength compared to similar samples made of metal-plastic or plastic. On this part itself there is a connector in the form of a coupling. On one side there is a thread for connecting a water supply hose or mixer, and on the other side it is connected to the water supply system.
Features of sewer liner to the sink
It is worth immediately noting that the sink and washbasin are installed higher than other plumbing units. The height will depend, rather, on the position of the kitchen unit . You need to make markings according to the position of the countertop, including the volume of the sink, especially when it comes to the kitchen.
Moreover, when it comes to new houses and apartment complexes, the toilet, bath and kitchen are often connected by one riser. Therefore, you will have to work hard on the correct slope .
Experts identify an average that varies from 50 to 55 cm . The siphon and the sink itself will be installed above. Additionally, it is customary to use special tees, which allow the space not to be cluttered with pipes and bends. The specifics of kitchen plumbing engineering allow the use of this technique. In this case, all outlets are simply hidden at the bottom of the kitchen module or unit.
Installation of water sockets
The following methods have been developed to carry out this operation:
- hidden (secret) on anchor dowels.
- secret for cement-sand mortar;
- hidden on polyurethane foam;
- surface mounting strip;
- surface anchor dowels.
In the first three cases, the water socket is installed in a groove that was created for the pipe itself. Thus, only the upper part of the part with the threaded connection protrudes from the wall. When implementing this method, special requirements are placed on the sizes of fittings for metal-plastic pipes. This is due to the fact that there is a certain distance between the bottom of the groove and the water outlet. This parameter is adjusted using wedges - homemade wooden stands. Meanwhile, with the secret method, it is possible to use water sockets of any configuration.
Fastening with anchor dowels is carried out in the following sequence:
- the water socket is connected to the pipe;
- Having attached this fitting to the bottom of the groove, mark the fastening points;
- drill holes, the diameter of which must match the value of this parameter of the anchor and a depth of 3 mm greater than the length of this fastener;
- attach the water socket to the wall, align its mounting positions with the holes;
- insert the anchor nails and then hammer them in with a hammer.
The method of attaching water sockets depends on the wall material and the method of laying the plumbing system
The above sequence of actions is performed for both types of installation with anchor dowels - hidden and surface.
Concealed installation of a water socket on polyurethane foam is carried out as follows:
- clean the bottom of the groove;
- Determine the size of the wood spacer. Its thickness should not be more than 1 millimeter;
- connect the water socket to the pipe;
- Moisten the bottom of the groove and apply a layer of polyurethane foam 1 cm thick according to the size of the fitting:
- insert the gasket and press firmly;
- Apply the same layer of polyurethane foam to the gasket, press the water socket to it and fix it in a pressed state. Excess foam is cut off after an hour.
Begin installation on a cement-sand mixture by connecting the water outlet to the pipe. Then adjust the distance between this fitting and the bottom of the groove. Then securely fasten the water socket. This is best done by inserting a wooden or metal rod between this part and, for example, the opposite wall. Having done this, coat the fitting and cracks with the solution. After two days, remove the spacer, rub the surface and sand it. The cement-sand mixture with water is prepared in a 3:1 ratio. It should not spill out of the groove.
A water socket is a mandatory attribute of the water supply system of a house or apartment. Being rigidly fixed, it protects engineering communications from vibrations that occur during the operation of household plumbing devices.
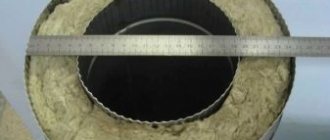
Preparing a place for water outlets
First, let's show the input node, this is what it looks like:
We specially covered it from dust and dirt so that it remains clean after installation:
Normal bidet manufacturers have technical instructions that tell you how to set the water sockets.
There is nothing complicated here, everything is set out clearly according to the instructions.
The instructions allow you to determine the location for the conclusions. Naturally, the location for the pins also depends on the devices themselves.
Here we will have a shower, in the corner there will be a shelf. We have positioned the shower in such a way that it is convenient to use. A built-in shower cabin will be installed, there will be a tray and a curtain.
A heated towel rail, bath faucet, and sewer pipe outlet will be located here:
And these water sockets are made for the sink:
We will dwell on them in more detail. Professional installation of plumbing means that everything is done clearly and correctly, and that then everything works without problems. To ensure that our devices are easily installed and positioned perpendicular to the wall, we use the following extension cords:
These are extensions from “Viega”, 150 mm. Our wall will be tiled, the thickness of which together with the tile adhesive will be 1 cm. In order to accurately align the extensions under the tiles, we will use this “Stanley” square:
The wall is plastered along the beacons and allows you to set the water sockets clearly perpendicular to it. Accordingly, our devices will not be installed crookedly. We do the same with the sewer outlet. We always install water outlets according to the instructions.
The sink has its own instructions on how to draw conclusions. Here we still have marks - horizontal and vertical. Each water socket clearly falls into the crosshairs:
We would like to pay special attention to the compensation conclusion. It practically does not protrude from the wall, protruding no more than 5 mm.
This is achieved thanks to a special siphon outlet. A special rubber band is inserted into it. The advantage of this outlet is that it is not deep.
Types and classification
As for the species classification of water rosettes, it can be conditionally divided into three types:
• According to the materials used in the design.
• By design features.
• According to the type of connection being installed with the main water supply pipe.
As for the materials used in the production of water sockets, there are quite a lot of them. Conventionally, they can be divided into three basic groups:
• Non-ferrous metals.
• Ferrous metals.
• Polymers.
The first includes mainly alloys such as bronze and brass, but pure non-ferrous metals such as copper can also be used. The second group includes cast iron and steel. But the third one is the most extensive. It includes a huge number of polymers, the main of which are PVC - polyvinyl chloride, PET - polyethylene, as well as polybutene and polypropylene.
All of them must be used with the appropriate pipes, so polyethylene water sockets will only be compatible with plastic pipes, but there are some tricks that can be used when installing dissimilar components when creating a water supply system.
Options for organizing drainage into the sewer system
There are several ways to install a washing machine with vertical or horizontal loading:
- Draining water into a sink or bathtub is the easiest way. Even a novice master who connects the washing unit for the first time can organize this drainage.
- Installation of drain to siphon. This option is the most optimal, it is chosen most often.
- The connection point for the washing machine drain is located directly at the sewer outlet. This method is the most difficult; connecting a drain pipe in this way is usually entrusted to a specialist.
In addition to the difficulty of connecting a drain at a height, each method has its own advantages and disadvantages. For example, draining water into a sink or bathtub cannot be called reliable. Attachment to plumbing fixtures may not hold securely. In this case, a flood is guaranteed.
In addition, this can contaminate the bath itself, which will constantly need to be washed until it shines. When draining, the room sometimes smells unpleasant. And if you put the drain pipe into a siphon, then you can protect yourself from these odors.
You need to think carefully before choosing a specific drain connection point and height. It’s better to spend time and effort initially than to have to do it all over again and pay your neighbors for repairs.
The “overboard” drain pipe option is only suitable if the washing machine is installed in a country house where there is no sewer system. Moreover, the hose must be placed on a special tank, from which dirty water will need to be drained after washing.
How to choose a water socket
To choose the right water socket for a mixer, tap, washing machine or other equipment, you need to consider the following factors:
- fitting material;
- device type;
- method of connection to equipment;
- manufacturer.
What materials are water sockets made from?
Water outlets intended for installation both in the bathroom and in any other place can be made:
- made of brass. The most popular material, characterized by strength, inertness to chemical impurities, resistance to temperature and pressure changes, as well as low cost;
- made of stainless steel. A more expensive material with similar properties compared to brass water sockets;
Water inlets made of stainless steel are not recommended for installation on systems with an internal pressure of more than 20 bar.
- made of cast iron. The material has a high safety margin, which allows the use of fittings on pipelines with high levels of pressure and fragility. We install water sockets made of cast iron exclusively in a hidden way, this will prevent any mechanical impact;
Cast iron fitting for plumbing systems
- made of plastic. Plastic sockets are absolutely inert to chemical attack, can withstand high temperatures and pressure, and are characterized by minimal cost. Recommended for use on polypropylene pipes, PVC pipes or metal-plastic pipes;
Plastic fitting for connecting plumbing fixtures
- from copper, bronze and other similar metals. Expensive fittings, characterized by a maximum margin of safety under any circumstances. It is recommended to install on pipes made of similar material.
Types of fittings
After determining the material for making the fitting, you can begin to select a model.
Water outlets can be:
- single (pictures above). Used to connect one source of water intake or heating tap;
- double.
A double water socket can be designed:
for connecting two water intake points to one pipe, for example, for connecting a tap and for a washing machine;
Water socket with one connection and two outlets
for connecting one equipment to two pipes, for example, a faucet in a kitchen or bathroom. Such equipment is supplied on a support bar. The strip for water sockets can be cast or composite.
Double water socket on a composite strip
Connection methods
Water outlets can be equipped with the following systems for attaching to pipes and plumbing equipment:
threaded (pictures above)
Threaded fittings are easy to install, low in cost and reusable, which is especially important for repair work; To achieve a tight connection when using a threaded fitting, it is recommended to use special sealing materials, which include FUM tape, flax thread, etc.
To achieve a tight connection when using a threaded fitting, it is recommended to use special sealing materials, which include FUM tape, flax thread, and so on.
crimping The fittings are distinguished by a high level of tightness, which is achieved due to the presence of an additional element in the device - a crimp collet, fixed with a nut;
Crimp fitting
press. The pipes are fastened to the press water socket using special equipment. Among the advantages are a high level of tightness and resistance to high pressure, which allows the fittings to be used in specialized plumbing or heating systems.
Fitting with press fastening equipment
Manufacturers
An important aspect when choosing a water socket is to identify a manufacturer that produces reliable and durable fittings.
Such manufacturers are:
- Valtec (joint Russian-Italian production). Advantages: low cost, adaptability to Russian systems, high quality.
- UNI-FITT (Italy). Fittings are made from high quality raw materials. Product quality control is carried out at all stages of production, which allows us to obtain reliable components for plumbing and heating systems.
- Rehau (Germany). Rehau is a popular brand on the Russian market, characterized by a high degree of reliability and a long service life.
- Uponor (Finland). The company specializes in the manufacture of high-strength fittings for sinks, bathtubs or other plastic equipment.
At what height to place water sockets in the bathroom - standards, regulations
Sometimes, for convenience, it is necessary to install water sockets in the bathroom. This is necessary to distribute pressure from a common pipe to other equipment. But it is not always clear how to do this correctly and safely so that the device does not fail. Therefore, it is important to know the rules and regulations for installing sockets in the bathroom.
- Why are water sockets needed?
- Standards and regulations for the installation of water outlets
- For bathroom
- For the sink
- For shower
- For washing machine
- Other equipment
Water outlets are usually classified according to several criteria.
According to the scope of application of the pipeline element, they are distinguished:
- water sockets for cold water supply systems,
- hot water supply,
- heating.
The difference between the last two and the first is the use of materials adapted to high-temperature thermal effects.
Also, water sockets are distinguished by the material of manufacture:
- Bronze and brass. Relatively inexpensive and practical products.
- Stainless steel products. They are able to withstand pressure up to 20 atmospheres, but the cost is higher than other types.
- Water inlets made of galvanized cast iron. They are cheaper than stainless steel, but less practical, and if the outer protective layer is damaged in any way, they are subject to corrosion.
- Polypropylene products, which, due to their reliability and low cost, are becoming increasingly in demand among consumers. Perfectly suitable for both cold and hot water supply systems.
- PVC water sockets. Can be used in water supply networks where the temperature of the medium does not exceed 40 degrees.
Note! Despite all the apparent similarity of water sockets made of polypropylene and PVC, their use in the same water supply scheme is prohibited. The fact is that these materials are completely incompatible during the soldering process.
Classification of sockets by design features
The answer to the question of how to choose a water socket for a washing machine has long been found. It is necessary to take into account all their technical characteristics: shape, type, material, but first of all, the method of connection to the highway. Here you need to focus on the configuration of your water supply system, the material of the pipes and the availability of special tools.
Threaded models
As the name suggests, a thread is used to connect these products. This is a time-tested method. Made from high-quality material, this socket is guaranteed to last for many years. A threaded water socket is:
- long service life;
- excellent tightness performance;
- strength and reliability;
- ease of installation.
Installing a threaded water socket does not require any special tools; even a novice craftsman can handle it. An additional plus is that the connection is removable. The socket is easy to disconnect from the pipeline, dismantle, and replace if necessary.
Crimp water sockets
The water supply connection is carried out using the crimping method. The basic part of the product is a collet, a special bushing that ensures the reliability and tightness of the joint. Such models have been used relatively recently, however, they have a number of significant advantages:
- low cost;
- long service life;
- ease of installation;
- wide range of models;
- Possibility of dismantling and reinstallation.
Installing such a water socket is somewhat more complicated than working with its threaded counterpart, but it also does not require special tools.
Self-locking
This type of sockets is characterized by ease of connection. For fixation, various locks are used, which are easy to close, securely hold the pipe, and can be easily separated if necessary. Advantages of such products:
- completely collapsible design;
- possibility of reconnection;
- ease of installation;
- versatility.
After connecting these parts, you must check the reliability of the joint. Carefully inspect for leaks, use a napkin if necessary.
Solder sockets
These water sockets are attached to a plastic pipe using a special soldering iron. The joint is even, smooth and reliable. Advantages of this method:
- minimum of used parts;
- compactness;
- long service life;
- tightness;
- low cost;
- versatility.
This is one of the simplest methods of fastening, but it also has disadvantages. First of all, the connection is permanent; if replacement is necessary, the pipe will have to be cut. In addition, installation will require special equipment.