Here you will learn:
- Advantages and disadvantages of a sandwich chimney
- Structural elements and their features
- Types of chimneys
- The influence of fuel type on the choice of chimney
- Preliminary calculation of the chimney and installation diagram
- Manufacturing process
- Chimney cleaning and maintenance
A three-layer chimney, like any other device, has a number of features that distinguish it from other similar structures. First, let's look at the advantages and disadvantages of the design.
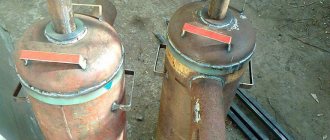
How to make a sandwich pipe with your own hands?
Brick chimneys are gradually being replaced by new designs. New building materials are used in their production. Such chimneys are called sandwich pipes. They have a lot of advantages. However, the high cost does not allow everyone to purchase the presented design.
If you really want to, assembling a sandwich pipe with your own hands will not be difficult. Detailed instructions will help the home craftsman perform all the steps correctly. At the same time, he will be able not only to assemble the pipe, but also to mount it on the roof himself.
general characteristics
The structure, like a sandwich pipe, appeared on the building materials market relatively recently. Production technologies are constantly being improved. New types of materials are being produced that allow you to mount any system and give it the necessary qualities.
Installing a sandwich pipe with your own hands will save money on the family budget. The production of such chimneys is not very difficult. The presented designs can be made from materials that are available in hardware stores.
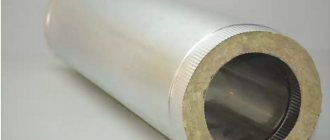
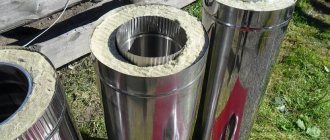
A sandwich pipe is a structure made of metal and insulation. For the latter, non-combustible materials are used, for example, basalt wool. The structure also includes two pipes of different diameters. Insulation is installed into the resulting cavity between them. It is thanks to the simplicity of such a pipe that you can assemble it yourself.
Advantages
Making a sandwich pipe with your own hands is justified for many reasons. The presented design has many advantages. First of all, it is necessary to note the versatility of the sandwich pipe. It is compatible with chimneys made of almost any material.
This is a compact and lightweight product. It is easy to install yourself. Moreover, the work will be completed literally in one day. It looks aesthetically pleasing and can complement the overall appearance of roofs made from different materials.
One of the main advantages of the presented chimneys is its non-flammability. Basalt wool, which is used as insulation, does not burn or smolder at high temperatures. She will simply turn to stone.
The rafter system does not interfere with the installation of a sandwich pipe. Soot will not settle on the walls of the chimney and condensation will appear. Therefore, the system will not need to be cleaned frequently. The materials from which the pipe is made are not exposed to aggressive environments, chemicals, or temperature changes.
How to choose a metal sandwich chimney?
To answer the question: is it possible to install a sandwich pipe directly on the stove, it is important to take into account all the criteria for selecting parts. You can answer unequivocally only when purchasing parts without documents from the manufacturer. In this case, neither the purchase nor the installation of such chimneys is recommended. We carefully study the main characteristics:
- material. The quality and grade of steel - the durability of metal chimneys when exposed to an aggressive environment depends on these characteristics. There should be no scratches or other damage to the protective layer on steel parts on the surfaces;
- minimum heating level. These indicators should be in the range of 5000-7500;
- type and thickness of the thermal insulation layer;
- For units operating on solid fuel, parts with a laser longitudinal seam are selected. For gas-fired boilers, pipes connected by rolling are used. In the first case, the chimneys are made of stainless steel. In the second, brass, polyester or galvanization is used to make the outer layer.
Assessment of the quality of manufacturing materials
In this matter, much depends on the capabilities of buyers. You can buy pipes for 200 rubles. per linear meter or ready-made set for 30,000-50,000 rubles. The best inexpensive option is the inner layer is made of stainless steel, the outer layer is made of galvanized steel.
To assess the quality, you will need to measure the thickness of the metal and the thermal insulation layer, especially when selling products from a well-known brand at ridiculous prices. Such parts can be made of thin steel and with a small layer of insulation.
The sandwich pipe for the stove chimney should not have damage to the protective layer, especially on the inner surface. But it’s better to go to the forums before going to the store and study reviews about products from different manufacturers and only then go shopping.
Type of insulation material
In this category, mineral wool or basalt insulation is used. But basalt insulation does not withstand high gas temperatures, so mineral wool is used for these purposes.
Chimney duct diameter and insulation thickness
Let's determine the thickness of the thermal insulation layer:
- a layer of insulation, 30 mm thick, is installed on the chimneys of gas boilers with medium or low power. Exhaust gas temperature – up to 2500;
- thickness 50 mm - such pipes are installed on all types of boilers and furnaces, provided that the pipe is directly connected to the street near the heating device. Gas temperature – up to 4000;
- pipes with a 100 mm layer of thermal insulation are used in the construction of all types of furnace units and boilers operating on all types of fuel. Gas temperature up to 8500.
The most common chimney sections used by many manufacturers of stoves and boilers are 120 - 200 mm. parts with a cross section of 50-80 mm are produced, but this is more likely for camp stoves of low power.
Sandwich pipe dimensions
Flaws
The list of disadvantages of sandwich pipes is quite modest. The designs on sale are relatively expensive. This drawback does not matter for those owners who want to make such a chimney with their own hands.
It should also be noted that sandwich structures have not been used for more than 15 years. This is also a dubious flaw. The building materials market is constantly improving. If new, high-quality materials are used in the manufacture of pipes, they can last longer.
According to professional builders, the presented systems have a lot of advantages that overshadow the disadvantages. It is for this reason that many owners create sandwich pipes with their own hands. For a wooden bathhouse, the presented option is considered the best. It is also suitable for other types of materials.
Preparation
Do-it-yourself installation of a sandwich pipe is carried out using a certain technology. It includes several stages. First you need to make a drawing. To do this, take appropriate measurements and think through the necessary details.
After creating a plan, you can purchase the required amount of materials. You should also prepare all the tools necessary for the work. Next, the structure is assembled and installed on the roof.
To manufacture such a system, you will need to purchase a sheet for the inner part of the pipe made of stainless steel, thermal insulation and an outer sheet for the pipe, which can be made of galvanized steel, brass or copper. The choice of materials must be given special attention. The functionality and durability of the chimney will depend on this.
Some fire safety tips
Unfortunately, even good thermal insulation will not prevent the outer surface of the sandwich pipe from heating up. Therefore, such chimneys should not be located next to flammable objects.
In accordance with fire safety requirements, there must be at least 25 centimeters from the chimney to the walls, ceilings and roof.
If the pipe does not heat up much, then this distance can be reduced to ten centimeters.
The best heat insulator is air, so it is better not to fill the space next to the pipe with mineral wool or expanded clay. These materials will only improve heat transfer.
When installing a sandwich pipe on a roof, two factors must be taken into account. Firstly, the temperature to which the surface of the pipe is heated, and secondly, the direction of the heated flow of air and sparks.
If the roof is made of flammable materials, then the pipe should be one meter higher than the ridge. We are talking specifically about the ridge, and not the entire surface of the roof, since sparks should not fall on the roof as a whole.
Selection of materials
When studying the question of how to make a sandwich pipe with your own hands, you need to take a responsible approach to the choice of materials. The inner section of the pipe must be made of stainless steel sheet. When heated, this material changes its dimensions minimally and does not deform. Galvanized steel is best used only for the outer part of the pipe. Brass or copper may also be suitable for this purpose.
The insulation between the two metal parts of the chimney can be made of mineral wool. This is basalt fiber, which has minimal thermal conductivity. Its thickness can range from 25 to 60 mm. This material is environmentally friendly and does not ignite. This is an excellent option for creating a chimney.
Expanded clay or polyurethane can also be used as insulation. Do not use flammable materials for fasteners, insulation and other elements of the system. A typical factory boiler can heat the system up to 120ºC. But a homemade sauna stove, for example, produces a temperature of up to 800ºC in the chimney. Therefore, materials must be selected very carefully.
Device
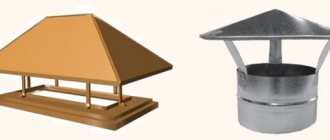
Sandwich chimneys for stoves are made from separate parts:
- Fittings are used for turning, passing through ceilings and exiting outside.
- To lay straight sections, pipes made of thin galvanized or stainless steel are installed.
- For the outer layer, a separate pipe made of steel or other materials is used, the metal thickness is from 0.5 mm.
- The internal part is made of a smaller diameter necessary to create a thermal insulation layer.
- Basalt, mineral wool and other materials are used for thermal insulation.
Description of elements
Carrying out calculations
Installing a chimney from sandwich pipes with your own hands should begin with calculations. In accordance with the house plan, you can find out the distance of the chimney to the roof surface. However, it is important to correctly calculate the parameters of the area that will rise above the roof surface.
If the roof has a flat surface or minimal slope, the chimney pipe should rise above it to a height of 50 cm. If the slopes are covered with flammable material, this figure increases by 2 times. In this case, the pipe must be at least 1 m.
If the chimney is located at a distance of 3 m or more from the roof ridge, you need to correctly determine its installation line. It runs at an angle of 10º from the center of the roof.
You should also pay attention to the cross-section of the pipe. For a boiler with a power of 3.5 kW, a chimney with a cross-section of 14x14 cm is suitable. If this figure reaches 5 kW, the dimensions should be 14x20 cm. If the boiler has a rated power of up to 7 kW, the cross-section should be 14x27 cm.
How to choose the required chimney diameter?
The diameter of the chimney pipe is selected based on the boiler power data.
For low-power heating installations with less than 3.5 kW, pipes with a diameter of 8 cm are used, for boilers with values no more than 5.2 kW, pipes with a diameter of 9.5 cm are used, and over 5.2 kW - 11 cm. Narrowing of the chimney is not allowed, but widening, on the contrary, can be carried out.
Another indicator that affects the diameter of the chimney is the thickness of the insulating layer. It can be 25-100 mm. The larger it is, the better it exhibits its properties, but its cost also increases. The thickness of the metal itself used to produce pipes can be up to one millimeter.
If it is necessary to build on, replace or modernize any section of the chimney, the consumer may find himself in a difficult situation. Elements from different brands are not able to provide a sealed joint.
When purchasing missing parts, it is better to find (order) components of the same brand as the rest of the structure.
Pipe assembly
Making a sandwich pipe for a chimney with your own hands is quite simple. Having prepared all the necessary elements and carried out the calculations, you can begin to work. First, you need to remove the film from all materials. If a factory-made boiler is installed, you can use ordinary glass wool. But for homemade stoves it is extremely important to use basalt fiber. After unpacking, leave it for 5 minutes. This will allow the fibers to straighten out.
A steel pipe (most often solid) will need to be wrapped in a layer of insulation. The outer part of the chimney can be assembled from several fragments. Galvanized steel is assembled using small self-tapping screws. Using them you will need to mount both fragments and the surface of the sheet.
In some cases, steel sheets are joined by welding. It is important to ensure high tightness of the system. In this case, it will be effective and safe. In the place where the pipe will pass through the roof, it is necessary to equip a special box. It is filled with expanded clay or other non-flammable material.
Chimney assembly
It is better to start assembly directly from the heating device.
All elements are designed in such a way that the diameter of the pipe at one end of the element is smaller than at the other. This is necessary so that you can connect elements and insert them into each other.
It is important to pay attention to certain features:
- Condensate. The top element is inserted into the bottom, and not vice versa. This is necessary for normal drainage of condensate;
- Sealing. Heat-resistant sealant is applied to the joints of the contour;
Sealing the joints of the sandwich chimney.
- Docking. It is very difficult to connect both circuits at the same time. Therefore, you need to partially remove the inner pipe (10-15 cm) and connect it. Then you can join the outer contours;
- The joints are secured with special metal clamps;
- Fastening to the wall is carried out using special brackets in increments of 1.5-2 m. Tees - supporting elements;
- The horizontal position of the pipes is acceptable, but it should be noted that it slightly reduces the draft. It is not recommended to install pipes longer than 1 m in a horizontal position;
- The film covering the elements must be removed.
Floors and roofing
Installation of a sandwich chimney through the ceiling.
The ceilings are “overcome” with the help of special elements – passage pipes. A hole of the appropriate size (cut) is made in the ceiling and a chimney is installed. The chimney pipe is inserted into the passage pipe located in the cutting opening. The part of the chimney adjacent to the pipe should not have joints.
The hole is sealed with fire-resistant mineral stone wool.
Roofing during installation of a sandwich chimney.
The roof is passed through using a special roofing passage pipe. The only difference is that the roof pipes are different. Their design is focused on the angle of inclination of the roofing plane.
From the outside, the passage is sealed with special elements, the design of which depends on the roof covering.
External part of the chimney
The height of the outer part of the chimney - the chimney pipe - depends on its distance from the roof ridge:
| Distance to ridge (cm) | Size of the part of the pipe rising above the ridge (cm) |
| 150 | 50 |
| 150-300 | Flush |
| More than 300 | Below the ridge (to a conventional line drawn at a 10-degree slope to the horizon line) |
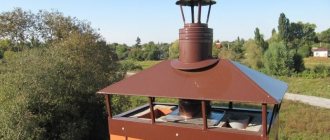
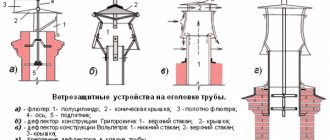
To prevent precipitation from entering the chimney, it is important to place a special umbrella at the chimney outlet. There are umbrellas that increase traction (exhaust deflectors)
Sandwich chimneys are an excellent solution for structures with low fire safety (for example, wooden houses and bathhouses). They are perfectly insulated, airtight, and reliable. Its main disadvantage is its high cost, but everything is relative: such a chimney is assembled very simply, like a designer kit, which saves money, because you don’t need to invite an expensive stove specialist.
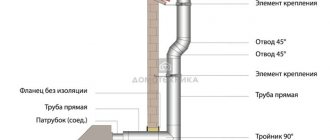
Chimney pipe connection
Knowing how to make a sandwich pipe with your own hands is not enough. It is important to correctly install the presented structure on the roof. To do this, you will need to purchase special adapters. A pipe with a smaller diameter is inserted into the extension of the previous section of the chimney. This connection method avoids the appearance of soot inside the system.
If the chimney will pass through the wall, you need to dismantle the place to carry out this process. This area will need to be strengthened. Next, the outer bracket is assembled. Special structural elements are attached to it, which will allow you to easily move the tee during the process of attaching the chimney pipe.
The wall through which the installation will be carried out can be covered with a sheet of plywood 10 mm thick. An asbestos sheet is installed around its perimeter. A galvanized steel plate will also need to be mounted on this layer. All layers are strengthened with screws in the place where the pipe will pass. The bracket should be painted. Next, the pipe is threaded into the prepared hole.
Chimney installation rules
- In no case should the chimney be laid in the place where communications pass (electrical wiring, sewerage, etc.).
- To minimize heat loss, it is recommended to locate most of the structure indoors.
- The outer part of the chimney must end with a deflector to prevent precipitation from getting inside. Don't forget about the snow guard. They will protect the gas outlet channel from damage.
- Keep the step of fastening the structure to the wall no more than one meter to avoid further curvature of the chimney.
- The place where the pipe passes through the wall must be additionally protected with thermal insulation material. To do this, the diameter of the hole needs to be made slightly larger than the diameter of the pipe.
- The sandwich pipe cannot be installed as the first pipe above the combustion tank. It is preceded by the so-called “sandwich start”.
- The length of horizontal straight sections of the chimney should not exceed 1 m.
- When designing a chimney, make sure that when passing through the wall there is a single pipe without joints. All connections must be visible and directly accessible.
Selecting the type of chimney outlet
A chimney through a wall can be done in two ways. The first option involves raising the pipe closer to the ceiling and then exiting. The second option represents a design that goes directly from the boiler in a straight line.
With the second option, almost the entire chimney ends up outside the house. The advantage of this type of design is that only one elbow will need to be used, which will affect the efficiency of traction. And the likelihood of soot plugs forming is much less.
Chimney outlet options
Before performing installation work, it is necessary to draw an assembly plan, calculating the diameter of the chimney and its height. There are some factors to consider.
Warm air rises, which means the higher the chimney, the greater the draft. It also depends on the diameter, so it is very important to correctly determine what size chimney you need. Its size is also affected by the power of the heating device.
You can get acquainted with the variety of chimneys and choose the appropriate option for your home at Isolux.ru
Calculate the diameter of the structure
The diameter of the double-circuit pipe directly depends on the size of the boiler installation pipe. Therefore, it is difficult to draw an installation diagram without knowing what type of heating device will be used. A simple rule applies here: the inner casing of the sandwich should in no case be smaller than the pipe itself. You can take more.
For example, if the diameter of the outlet pipe is 120 mm, then the internal diameter of the sandwich pipe should be the same size or larger. In no case should you allow “narrowing” at the junction of the pipes and throughout the entire chimney, otherwise this may affect the draft.
Determining the chimney diameter
The diameter of the chimney is also affected by the type of heating device. Therefore, if you are building a smoke exhaust structure before purchasing a stove or boiler, then immediately take into account its power.
If the power of the heating device does not exceed 3.5 kW, then you can limit the diameter of the internal casing to 80 mm. For more powerful boilers (up to 5.2 kW), the pipe size should be increased to 95 mm. The larger the diameter of the inner pipe, the faster it will cool.
Determining the height of the chimney
Calculating the height of the chimney pipe depends on the overall height of the house. If the height of the house is small (up to 5 meters), the height of the chimney in any case should be at least 5 meters. A short chimney can cause “smoke” in the house, and the power of the device is significantly reduced due to poor draft. And an excessively long pipe will increase fuel consumption, as if “forcing” the operation of the heating device, which affects the low efficiency of the heating system.
Calculation of chimney height based on boiler power
The optimal pipe length is considered to be in the range of 5-10 meters.
If the house is higher than 10 meters, then we focus on the ridge of the roof. The chimney should be 0.5 meters higher than the ridge to avoid creating turbulence. Consider also the material from which the roof is made. If the roof is covered with flammable material, then the top of the chimney should be 1 meter from the ridge.
How will we assemble the sandwich: by smoke or condensation?
Before starting construction work, you should decide on the type of assembly of the pipes themselves: “smoke” or “condensate”.
Sandwich pipe assembly options
The “smoke” design is characterized by building sections inward (visible clearly in the figure):
Inner tube: The bottom element is inserted inside the top element of the sandwich.
The outer pipe is built in the same way as the inner one. The lower section is inserted inside the upper contour.
Each subsequent section is built upon the previous element, as if being put on top. This type of chimney connection is best used in stoves with high combustion temperatures.
The “condensate” design is built using the opposite method:
Inner tube: take the upper section of the sandwich and insert it into the lower part.
Outer pipe: Here you have to do the opposite method. Take the lower element of the outer pipe and insert it inside the outer pipe of the upper element.
With this construction, condensate flows freely along the outer casing of the chimney into a special sump.
When is it better to use this assembly scheme?
- at low temperatures of combustion products;
- for external installation of a chimney;
- in stoves with a long burning function;
- in fireboxes with smoldering combustion.
Differences between smoke and condensate connections
Considering our task - to assemble a chimney outside the house, the choice of the type of sandwich connection is obvious. Pipes outside the house, when exposed to low temperatures, will cool faster, which means that the likelihood of condensation forming is high. Under the influence of moisture, soot begins to dissolve, forming acids. These substances pose a serious threat to pipe surfaces.
What tools are needed for installation through a brick or concrete wall?
- screwdriver;
- construction gloves to protect hands;
- ladder;
- knife;
- electric drill (for attaching the bracket);
- building level (to check the verticality of the chimney installation);
- perforator (for a hole in the wall).
What materials are needed for installation?
- metal box (pipe);
- dowels;
- sandwich pipe set;
- silicone sealant (necessarily heat-resistant!);
- tee (necessary to change the direction of the smoke and connect the pipe directly to the firebox of the heating apparatus).
- knee (450 or 900);
- support console, bracket (the entire structure is supported on it);
- clamps for connecting sections;
- foiled mineral wool (for insulating the pipe opening);
- plug (protective umbrella from precipitation and debris).
Roof installation
You can install a sandwich pipe for a chimney with your own hands through the roof. From the inside, a sheet of galvanized steel should be attached to the created hole. It is attached only after the pipe is brought to the roof. If necessary, it can be placed under the edge of the roofing material.
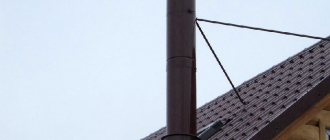
If the pipe is high (more than 1 m), you need to consider a system of spacers. Otherwise, such a system will be unreliable. Crimp clamps are also used. This will prevent the pipe from tilting due to the wind. When installing spacers, you should take into account the wind rose in the area.
If the roof is made of bitumen or roofing felt, the material is additionally protected from fire. To do this, install a deflector above the coating. It has an absorber mesh in its design.
Pipe joints should not go through the ceiling or roofing material. These are the most fire hazardous places in the chimney. The home owner must be able to control the joints.
You need to fix the sandwich pipe correctly with your own hands. All elbows, tees and joints must be tightened with clamps. It is especially important to consider the height of the chimney. Such structures must be properly fixed and strengthened.
Clamps are tightened at the junction of the sandwich pipes. If there are tees or adapters, you will need to use two mounting elements.
Supports can be created from corners of 50, 30 mm. It is also important to use a heat-resistant sealant. This substance prevents air from entering the pipe. If you do not ensure the tightness of the system, the draft in it will be insufficient. Carbon monoxide may enter the room.
Features of joining chimney elements
Pipe connections are made in the manufacture of chimneys in two ways:
- Flange;
- Boynetnym.
The sandwich chimney is assembled using “smoke” or “condensate”.
Installation of a sandwich chimney “along the smoke” is carried out in order to prevent carbon monoxide from penetrating into the house or bathhouse. Making a sandwich chimney “for condensate” ensures free flow of condensate formed due to temperature differences down the pipes.
In the first case, the smoke comes out freely under the influence of draft, without lingering in the pipe. But if the pipe is poorly sealed, condensate can get inside the sandwich, which can cause the insulated pipe to suffer greatly and lose its properties. The second method implies that the chimney pipe of the upper sandwich fits into the socket of the lower one. Moisture cannot get inside, but if there is even the slightest gap, smoke will end up in the house or bathhouse. The choice is difficult: gas is hazardous to health, and condensation spoils the sandwich.
Then it is guaranteed that there will be no penetration of smoke into the room and no condensation into the pipe insulation. We recommend connecting the internal pipes of the chimney “for condensate” to protect the pipe seams from getting into it.
Sandwich chimney elbow
Despite the double walls and thermal insulation, during the manufacture of chimneys it is necessary to additionally insulate the sandwich pipes in places with the greatest fire hazard. This is contact with beams, ceilings and roofing. And remember that the sandwich used to make chimneys is not heat-resistant enough. It is unacceptable to use it as the first pipe connected to the furnace (boiler). Take this into account initially, at the stage of drawing up the chimney diagram.
Final stage
The sandwich pipe must be installed correctly with your own hands. It should be noted that the distance of the entire chimney should be a total of 5-6 m. The distance is measured from the head to the grate. All joints will need to be sealed with sealant. Also, the space between the two pipes from above must be treated with the presented product. The insulated circle should not remain open.
Pipes are treated both indoors and outdoors. You should also seal the joints on the outside of the chimney. Moreover, after starting the system, all connections must be carefully checked. If there are leaks, the joints are once again treated with a sealant that can withstand heating temperatures of up to 1000 ºC.
Having learned how to assemble a sandwich pipe with your own hands, you can create a chimney yourself in accordance with building codes. At the same time, it will be possible to save money on the family budget and install a strong, durable system that will not need to be restored for many years.
System care
Maintenance operations will require monitoring the draft level in the chimney and promptly clearing it of soot or debris. Let's look at several situations and measures to eliminate them:
- New chimney, but insufficient draft. There are 2 explanations for this situation. The first one is simple. During the construction of the stove and installation of the chimney, construction debris remained in the ducts. By cleaning the channels, we easily obtain normal traction. If the flame in the stove remains brown, it means that mistakes were made during the construction of the stove or the installation of the chimney. Such a malfunction will require finding the cause, but for this it is better to involve specialists.
- The furnace was put into operation and after several months of operation the draft became insufficient. This means it's time to clean the chimney ducts from soot. To do this, you can pass a cable through the pipe and tie a brush to the end and drag it through the pipes. Traditional recipes are simpler. It is advised to make a large snowball and lower it down the chimney. The snow will gradually melt and fall, removing carbon deposits from the walls.
Therefore, the main chimney maintenance work is to prevent clogging of the channels and periodically check the tightness of the pipe joints.
Do-it-yourself sandwich pipe: tips for assembling and installing the structure
A sandwich pipe is a structure of two hollow cylinders that have different diameters, which allows you to install one inside the other. The gap between the inner and outer parts is filled with a special fire-resistant insulating material (for example, basalt wool). Such products have long been popular as chimneys for stoves and boilers of various types. If you are wondering how to make a sandwich pipe with your own hands, you should carefully study some rules and aspects.
A chimney pipe of the “sandwich” type is a simple design and can be made with your own hands
Components of a chimney sandwich system
The diameter of the pipeline depends on the power and type of furnaces. The pipelines carry the main load in the interior of the furnace. The internal diameter of the furnace is indicated in the main characteristics of furnaces or boilers. Then, based on these data, the outer diameter of the pipes is selected. 150 mm internal diameter. In this case, the outer section will be 210 mm.
Stainless steel pipes are used to equip the chimneys of gas boilers and stoves operating on solid fuel. The minimum diameter of sandwich parts is 120 mm, the maximum is up to 200 mm. Several types of fittings are used to connect straight sections and turns:
- bends - to ensure turns at a certain angle;
- tees - connecting a separate section of ventilation or other heating device to the chimney;
- a section of pipe with an inspection - cleaning the walls from soot and dirt;
- adapters - for connecting pipelines of different diameters;
- slide valves or valves - regulate the level of draft in the firebox;
- To protect against precipitation and gusts of wind, the installation of protective devices is provided - a “Thermo” weather vane, cones or simple mushrooms.
Pros and cons of the design
The internal part of this design is made of stainless steel, and the external part is made of galvanized steel. The inner pipe sheet is wrapped in thermal insulation material and inserted into the outer part, thus creating a multi-layer construction “sandwich”. This design is quite effective and is highly reliable during operation.
Helpful information! Such products are produced in sections that have a length of up to 1 m.
The installation of a finished sandwich structure is distinguished by its simplicity and speed of work (all installation work of a finished pipe can be completed in 1 day). Like any product, a sandwich pipe has a number of advantages and disadvantages.
- versatility of use (they can be mounted on buildings made of any material, which is very convenient);
- compact design;
- ease of transportation;
- ease of installation - all installation work can be performed without any special construction knowledge.
- aesthetics of the chimney;
- fire resistance ( in this indicator, the “sandwich” is ahead of other types of chimneys );
- speed of installation;
- the roof rafter system will not interfere with the installation of such a pipe;
- multi-layering - it gives the structure protection from soot deposition and condensation formation during operation, which allows preventive cleaning of the system to be carried out much less frequently.
- protection from the effects of aggressive chemical compounds that are formed during the combustion process.
Installation of this type of pipe does not require special knowledge and skills
- The operational life of such a system is about 15 years, which is a fairly short period.
- high price.
There are not many disadvantages to such a modern design, and if you decide to make a sandwich-type chimney with your own hands, it will be cheaper than brickwork. The sandwich structure is rightfully considered reliable and safe and is easy to assemble and install.
Advantages and disadvantages
Device
As mentioned earlier, these chimneys have become very popular and more and more people are choosing to use them, and there are many reasons for this. Surely one of the main advantages is the attractive price. If we take into account chimneys made from other materials, their cost will be more expensive. Still, despite the affordable price, they are an excellent option and get the job done. Let's find out in detail why many homeowners choose sandwich pipes:
- The light weight of the structure, as well as its versatility, makes it possible to use chimneys made from sandwich pipes both outside and inside the building.
- Simplicity of pipe design. The finished chimney consists of several pipe sections that are very easy to assemble and install. Even a simple craftsman who has no experience in installing such pipes will be able to figure out the assembly and installation.
- Thanks to its smoothness and multi-layer structure, the chimney becomes less susceptible to the formation of soot and condensation on the surface.
- Compactness. Unlike large and bulky brick or other chimneys, a sandwich chimney will not take up much precious space inside your premises. This is especially useful for those who install a chimney in a small bathhouse.
- High fire safety and reliability. Both the waterproofing material and the steel itself are not subject to combustion, which will protect the room and you.
- When you place a chimney on the roof, structural elements such as beams, rafters and the roof itself will not interfere with you during installation of the chimney.
- There is no need to build an additional foundation for the chimney, which greatly simplifies your work and the costs associated with it.
Beams and ceilings are not a hindrance
True, among all these advantages it is worth noting one small drawback - the service life of a chimney made from sandwich pipes is at most 10–15 years, which is not so much compared to others. However, this can be compensated by the fact that the price of the material is not so high, and it will not be difficult to install it again yourself. If you are not yet sure whether to use sandwich pipes for your chimney, weigh the pros and cons.
How to make a sandwich pipe for chimneys yourself?
The sandwich pipe is assembled with your own hands using the following materials:
- stainless steel sheet;
- thermal insulation material;
- galvanized steel sheet.
Insulation for such structures must meet certain characteristics. First of all, it is fire resistance. The thickness of the filler that will fill the void between the inner and outer pipes, as a rule, ranges from 3 to 6 cm. In some cases, expanded clay or polyurethane can serve as an insulating material.
To make a pipe you will need insulation; it is most convenient to use a ready-made “shell”
Assembly of this design is simple:
- Sheets of metal need to be rolled up, turning them into pipes. The joints are welded or fixed with special locks.
- Then the required layer of insulation is applied to the inner pipe, made of stainless steel.
- The inner part is placed in the outer galvanized part.
However, such an assembly includes a number of important nuances that are worth paying attention to:
- In order to increase the fire resistance of the structure, it is recommended to install it in a special protective box. This installation will eliminate contact between the chimney sandwich and the roof slab.
- For maximum protection, the box is filled with fire-resistant thermal insulation material. In this case, using expanded clay is perfect.
- On the inside, parts of the pipe are installed with the sockets facing up.
- The outer pipe is mounted by putting a section on the end of the previous one (using sockets).
After the assembly of the structure is completed, it is worth thinking about its installation. To do this, you also need to study the step-by-step instructions, which will prevent mistakes and eliminate accidents in the system.
How to make a chimney in a house if pipes can only be laid through walls
When getting started, keep a few important points in mind. Where the pipe passes through the wall, there should be no contact - the pipe in these places must be covered with a special heat-insulating material. If the wall is wooden, the outlet of the pipe in the wall must be lined with some kind of fire-resistant material - this could be, for example, brick or asbestos. So-called “aprons” are suitable for concrete and brick walls. In each case, the insulating material and its thickness must be selected based on the type of pipes and type of heating device. As a rule, pipes are sold already covered with insulating material.
Preparing for installation of a sandwich chimney
There are two basic rules that you should follow when installing a sandwich structure:
- It is strictly forbidden to install such a structure above the furnace firebox. This is due to the fact that direct location above the firebox leads to rapid wear of the structure. Experts recommend installing a fire-resistant chute coming out of the firebox, which is connected to the chimney pipe with a special conductor.
- If such a structure is laid through fire hazardous areas, then it must be equipped with additional thermal insulation. Using a bare structure in such conditions may result in a fire.
There should be a pipe coming out of the stove that connects the firebox to the sandwich chimney
Preparation for installing a sandwich pipe begins with drawing up a project. To do this, a pre-thought-out plan is applied to paper - it should contain the most successful route for laying the structure. At the same time, do not forget that each specific case has its own characteristics and nuances, so it is best to work hard and draw up a plan specifically for your chimney. You can also hire a specialist who can easily carry out the necessary calculations. After drawing up the plan, it is necessary to carry out the necessary calculations of the material. This activity largely depends on what kind of pipe will be installed (purchased or made by hand).
Note! It is much easier to calculate the amount of material required when installing a finished factory structure, since all purchased elements have standard, accurate parameters. When assembling such a pipe yourself, calculations are made approximately, but always with a margin.
After all the necessary materials have been purchased, marking begins. This event is carried out in order to prevent curvature of the chimney and fix it as reliably as possible. Experts recommend using brackets, and the markings for them are quite simple. It is important to remember that in such a matter it is worth remembering consistency. When laying pipes through ceilings, it is necessary to use special pipes, which must be covered with heat-insulating material.
The hole for the pipe is selected in advance. After the hole is ready, an insulating layer is applied and the pipe is installed. To achieve maximum heat removal from the chimney, it is necessary to maintain a gap between it and the pipe.
Some nuances during installation
It is necessary to ensure high-quality insulation
Before proceeding directly to connecting and installing the chimney, let's look at some rules that need to be taken into account when working:
- To minimize temperature differences, as well as heat loss, it is recommended to locate most of the chimney inside the heated room. Thanks to this, you can also create suitable conditions for high-quality operation of the heating system.
- Most often, a sandwich pipe is installed inside a heated building, leading the pipe outlet to the roof of the building. But there is another method, used less frequently, when the pipe is passed through the wall of the building and placed along the wall.
Chimney damperTo be able to regulate the level of draft, a special pipe with a damper (from German - damper) is installed in the chimney, which allows partially blocking the smoke channel. With a pipe handle that moves the damper, you can adjust the thrust, depending on the weather conditions and the type of fuel you use.
- At the outlet of the chimney from the roof, which is located outside, it is necessary to install a deflector that will protect the gas exhaust system from the penetration of precipitation, debris and other unnecessary objects. It will promote good smoke passage and keep the pipe from trapping smoke inside when strong winds blow. Instead of a deflector, the outlet can be closed with a fungus, thermal fungus or spark arrestor, if permitted.
- The pipe must be brought to the roof with a minimum distance of 50 cm above the ridge.
- In inclined or horizontal sections of the chimney, special tees must be installed to drain condensate that will form on the walls of the pipe. If there are no tees, then the pipes must be connected not as usual - “through smoke”, when the upper pipe with a socket needs to be put on the lower one, but quite the opposite - “through condensate”.
- It doesn’t hurt to make a plan or drawing of the future chimney, taking into account all the true dimensions, then you can easily navigate the work and know what and how to do. This will significantly speed up the process.
- Installation of a chimney made of sandwich pipes begins from the heating device: the first pipe element is connected to the outlet pipe using an adapter. When the appliance is a stove or fireplace, it is important that this first pipe does not have insulation inside, since it is located in close proximity to the heat source. Otherwise, the insulation will burn and end up in the stove.
Assembly
By adhering to these rules, you can easily and efficiently install a chimney made of sandwich pipes in your home or bathhouse. It won't be a big deal, but you will certainly not regret choosing this material (unlike people who choose asbestos pipes), since this design can give you everything that every owner needs from a chimney pipe. So, having found out all the advantages and disadvantages of sandwich pipes, as well as having learned the rules for their installation, let’s look at how to install them correctly in your room.
Necessary calculations to determine the correct pipe location
The height of the chimney to the roof, as a rule, is indicated in the general plan of the house, and to determine the height of the sandwich pipe above the roof, you should familiarize yourself with the following building codes and regulations:
- the height of the chimney above the flat roof should be 50 cm;
- if the roof is made of a material that is not fire resistant, then the height of the structure above it must be at least 1 m;
- if the distance between the sandwich structure and the roof ridge is more than 3 m, then in this case the height should correspond to a conventional line drawn from the center of the ridge at an angle of 10°;
- if the chimney is no further than 1.5 meters from the ridge, then its height should be at least 50 cm.
It is very important to correctly calculate the height of the chimney, the draft in the system depends on this
As mentioned above, the thickness of the thermal insulation layer ranges from 3 to 6 cm. But the cross-sectional dimensions of the sandwich structure depend on the power of the boiler.
The dependence of the pipe cross-section on the boiler power is presented in Table No. 1.
Table 1
Thanks to the modern building materials market, the question of how to make sandwich pipes yourself has a simple answer. Selecting and purchasing the necessary parts is also not difficult.
Chimney design advice from professionals
To properly assemble a sandwich chimney, you should take into account a number of important features. They are:
- Horizontal sections of the structure should not be longer than 1 meter.
- Normal and stable draft is guaranteed at a chimney height of 5 meters or more.
- Above the flat roof of the house, the pipe cut should be more than 50 cm.
- It is imperative to thermally insulate chimney elements that are located outdoors or in unheated rooms.
- Joining pipes in the thickness of the floors of a building and its walls is prohibited.
- When installing a chimney through a roof made of materials prone to fire, a special spark arrester should be installed.
- The gap between the roofing covering and stainless pipes must be at least 13 cm. This condition must be met even when the roof was constructed from non-combustible products.
Installation of stainless steel chimneys allows for three rotations of the structure along its entire length. It is prohibited to turn the pipes more times.
Chimney structures
Vertical sections of smoke exhaust systems are installed “by condensate”. This means that each subsequent section of a pipe product is always mounted into the underlying one. This scheme guarantees that moisture will never seep into the insulation.
But the installation of inclined and horizontal sections must be installed “following the smoke” - the next pipe is pulled onto the one that comes from the heating device. Due to this, combustion products move through the chimney channel without any difficulty.
A stainless steel structure for smoke removal can be located inside the building. In this case, the chimney is covered with brickwork. Pipes for it can only be used that are thermally insulated. A scheme in which the chimney is placed on an external wall is considered safer. The function of the fixing element of the structure is performed by special brackets or a metal supporting profile.
Sandwich pipe installation
Sandwich pipe installation can be done in the following ways:
Through the wall. This method is carried out if it is not possible to remove the sandwich pipe through the roof. In some cases, owners simply do not want to “make holes” in the roof and opt for this option. In addition, the pipe outlet through the wall is safer, since most of the structure is located outside the house.
Important! If the structure is made with a long horizontal section, this increases the chance of a fire. In the horizontal section, the air slows down and thus the pipe walls heat up more than in the vertical sections of the structure. It is especially not recommended to equip horizontal areas if the draft in the system is not very good. In any case, the length of the horizontal segment should not exceed 1 m.
If it is not possible to bring the chimney out through the roof, it is quite possible to make an exit through the wall
Let's consider the main nuances of installing a pipe through a wall:
- The distance from the pipe to the wall of the house must be filled with non-flammable thermal insulation material to eliminate the possibility of fire. This is especially true for wooden houses or bathhouses.
- The horizontal section of the pipe must have its own special tee, the design of which includes a plug.
- Pipe clamps are installed on the outside of the wall every 0.5 meters. Installing brackets for a chimney yourself must comply with building regulations, otherwise they may not support the weight of the pipe and it will simply collapse.
- The finished chimney must be protected from moisture entering it.
Through the roof. Exiting the pipe through the roof is the most common method and is practiced everywhere. However, in some cases, this installation option is carried out due to circumstances, for example, the boiler may be located in the center of the room and laying a pipe through the wall simply becomes impractical.
Installation of the chimney always starts from the stove and proceeds step by step in the vertical direction. In addition, when installing a sandwich pipe, it is worth considering a number of important nuances:
- The structure should not have any protrusions.
- The temperature inside the structure should not exceed 500 °C.
- The pipe outlet angle should be no more than 30°.
- Inclined segments should not have roughness or foreign inclusions that could impede the movement of smoke in the system.
- The diameter of the inclined sections of the structure should not be less than that of the vertical ones.
If the roof consists of materials that have poor fire resistance or do not have it at all, then the installation of additional elements - spark arresters - will be required. Such elements can be made from ordinary metal mesh. The cell dimensions should correspond to 0.5 x 0.5 cm.
A very important factor is the protection of the chimney structure, which goes onto the roof, from precipitation. For these purposes, a special umbrella is installed at the end of the pipe. When installing such a visor, it must be taken into account that it should not create any interference with the normal removal of smoke from the system.
In addition, it is worth remembering that contact of any electrical wiring with the chimney is strictly prohibited. Failure to comply with building codes and regulations (SNiP) may result in a fire, which could subsequently cost you your life.
Types of chimneys
Depending on the location of the stove or boiler, the availability of free space and the design features of the chimney, organizing the removal of smoke outside the building can be done in two ways - external or internal installation of the chimney.
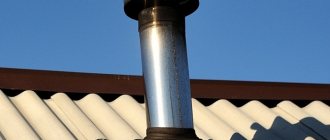
Outer
An external chimney is a flue that connects the outlet pipe of the heating device to a pipe that goes outside through the wall. To ensure good draft, the height of the chimney pipe must be no lower than the level of the ridge or rise above it. The length of the horizontal section of such a structure should not exceed 1 m, the distance from the edge of the roof should be at least 0.5 m. A prerequisite for the normal functioning of the external chimney can also include the installation of external insulation.
The advantages of this option for placing a chimney are saving usable space in the house, reducing fire hazards, maintaining the integrity of the roofing, and independence from interior design decisions.
Interior
The internal smoke exhaust system consists of a vertical part located inside the house and led outside through the roof. The modules must be joined outside the attic and between floors so that there are no obstacles to checking their tightness. The chimney passages are protected from high temperatures using passage pipes and a roof penetration. Sealing of the joint with the roofing is ensured by the roof groove.
The internal arrangement of the chimney pipe with a 100% vertical position provides more stable draft, is easier and more convenient to maintain, does not require insulation, and does not spoil the architectural appearance of the building facade. However, this type of chimney will take up part of the usable space in the room; during its construction, the costs of arranging passages through the ceilings, ceiling and roof will increase, and the tightness of the roof covering will be compromised.
Pros and cons of the design
What is a sandwich pipe and what does it consist of? The product is manufactured according to the principle of a multilayer construction “sandwich”. Two stainless steel pipes of different diameters are inserted into one another, and the space between them is filled with heat-insulating material, for example, basalt wool. Thus, the structure acquires “immunity” and cannot be destroyed by moisture and heat.
The product is sold in fragments up to one meter long. How to properly assemble a sandwich pipe purchased in the form of such parts? It's simple: the kit includes cones, angles, tees, adapters, revisions and even fungi; you simply assemble elements as if you were playing Lego. It won’t take even a day to install a chimney made of such material.
Before you learn how to make a sandwich pipe with your own hands, you should familiarize yourself with the advantages and disadvantages of this design in order to decide whether your work will pay off, is this what you need?
So, first about the advantages:
- versatility of use (can be used for houses made of any material);
- compactness of the product;
- ease of transportation of structures;
- ease of installation - sandwich pipe installation can be done on your own;
- aesthetics of the structure;
- fire safety - the product is a leader in this quality among its “brothers”;
- installation speed (everything can be done in one day);
- the roof rafter system is not an obstacle to installing a sandwich structure for smoke removal;
- multi-layered, thanks to which the chimney is protected from settling of soot and condensation (the structure does not need to be cleaned as often as a brick chimney);
- protection from the aggressive effects of heat, acids and other chemicals;
The disadvantages of the design include:
- relatively modest service life (about 15 years);
- high price.
As you can see, the advantages outweigh the disadvantages. And if you learn how to make a sandwich pipe yourself, you will reduce the cost of a chimney to such an extent that its installation will cost you less than brickwork. This means that you can afford to change it more often, and therefore, you will completely neutralize the influence of the two disadvantages listed above.
If you understand that sandwich pipe is the optimal material for constructing a durable, safe and reliable chimney, then let’s move on to practical lessons.
Manufacturers and prices
According to reviews from buyers and builders, it is recommended to buy products from several domestic and foreign manufacturers:
- produces only high-quality pipes and fittings, thanks to quality control throughout the entire production cycle and almost complete automation. The production of steel, stainless steel and enameled chimney parts has been launched.
- specializes in the production of chimney parts for all types of stoves, fireplaces and boilers. Such designs are additionally equipped with a water heating device, which is installed directly on the chimney.
- Italian has been producing ventilation devices for a century. The product is certified and meets all requirements of SNiP and PPB.
- The Russian company produces parts for powerful installations running on gas and solid fuel.
- produces sandwich chimneys for bathhouses, private and multi-apartment construction.
The price of sandwich pipes for a furnace depends on many factors. To calculate the design of a private house, a chimney length of 5 m is taken as the basis. On average, high-quality parts or a complete set from leading manufacturers will cost 20,000 rubles.
But you can find pipes on the Internet that cost only 280 rubles per linear meter. Therefore, recommendations and choice depend on the amount you are willing to spend on purchasing parts. Moreover, if you need sandwich pipes to match the color of your roof, such a purchase will initially cost 20% more.
Master class on making sandwich pipes
To make a design with your own hands, you have to go through the following steps:
- thinking through details;
- taking measurements;
- sketches/sketches;
- compiling a list of materials and tools;
- purchase;
- sandwich pipe assembly;
- chimney installation.
Important nuances
It would seem that a sandwich pipe is made “one-two”: you wrap the steel pipe with heat-insulating material, and then with galvanized iron, and the structure is ready, but this business has its own peculiarities. It’s important not only to do everything yourself, but also to do it so that you don’t have to redo it later.
And for this it is worth considering the following nuances:
- Sandwich pipes are universal, but in the case of “creative amateur performances” it would not be superfluous to understand this point. Factory boilers differ in operation from their home-made counterparts (for example, stoves for baths, fireplaces, etc.). If for industrial models the outlet temperature remains up to 120 degrees, then for those made by hand it can exceed 800. Therefore, glass wool is suitable as a heat-insulating material for the former, but for the latter you will have to use basalt wool.
- When making a sandwich chimney yourself, forget about materials such as ropes or other synthetic products. They will certainly start to burn and spoil the air in the house.
- The outer shell also needs to be secured - putting the pipe on the pipe is not enough.
- The best material for making sandwich pipes is factory-made stainless steel. It lasts a long time, maintaining a shiny surface and thereby (due to infrared radiation) preventing heat leakage to the street.
Worth paying attention! A brick chimney will have to be cleaned a couple of times a year, repaired and monitored. By installing a sandwich system, you will save yourself from such hassle.
Worth paying attention! Under no circumstances should you lay electrical wiring or other communications through the chimney unless you want trouble.
Necessary calculations
If you can find out the height of the chimney to the roof without taking measurements - from the house plan, then you need to think carefully about the height of the fragment above the roof. And for this it will not hurt to familiarize yourself with the following standards:
- above a flat roof, the chimney should rise 0.5 m;
- if the roof is made of flammable material, the distance from it to the end of the pipe should be 1 m;
- if the distance between the chimney and the ridge is more than 3 m, then the structure is mounted no lower than a line visually drawn at an angle of 10 degrees from the center of the ridge;
- if the distance between the chimney and the ridge does not exceed 1.5 m, then the height of the structure must be at least 0.5 m.
The thickness of the thermal insulation layer varies between 2.5-6 cm.
The cross section may also vary. If you follow the rules of SNiP, the cross-section depends on the power of the boiler according to the following scheme:
- up to 3.5 kW – 0.14 to 0.14;
- 3.5-5.2 – 0.14 to 0.2;
- 5.2-7.0 – 0.14 to 0.27.
This is important to know! There should be no ledges in the constructed pipe.
Pipe assembly
Making a sandwich pipe is easy. If you have purchased pipes of the required cross-section, fasteners and thermal insulation material (basalt or stone wool), found tools and carved out a day for work, you can begin.
First, remove the protective film, if any, on the products.
Wrap the steel pipe with cotton wool and attach a galvanized coating on top. While the inner part of steel can be solid, the outer part often consists of several fragments. Pay special attention to connecting the pieces. Galvanized iron is connected with self-tapping screws or fleas. Moreover, both the surface of the sheet and the fragments should be fastened to each other.
Remember that you can save money by replacing basalt wool with stone wool if you equip an industrial boiler with a chimney.
This is important to know! The temperature near a boiler or other heating device is so high that even the most durable structure can burn out. Take this feature into account and make/construct a chimney so that this piece of pipe can be dismantled and replaced with a new one at any time.
Step-by-step installation
If you do not have much experience in construction, but want to equip your house, cottage or bathhouse, sandwich pipes are just for you. Indeed, thanks to its design, the installation of such a chimney is simple and anyone can do it. All the work consists of putting the pipes on top of each other, connecting them and securing them. Let's take a closer look at how and what to do.
Stage 1: connecting the chimney elements
Arrangement of sandwich chimney elements
So, let's find out how the sandwich pipes will be connected to each other. When purchasing, you can immediately notice that one end of the pipe will have a slightly smaller radius, it is called loaded. It is then inserted into the previous pipe. But you decide for yourself how exactly to connect the elements. It has already been mentioned that this can be done using the “smoke” or “condensate” method. In order to remove condensate, it is better to additionally install tees.
It is important to install the inner and outer pipe correctly
The work begins with the fact that you need to connect the first pipe to the heating device. This is done using a special adapter, the size of which depends on the nozzle of the device and your pipe. The adapter is inserted into the socket, and a plug is installed in it, which will prevent open fire from entering the pipe. Then install the starting tube and secure it with the adapter using a crimp clamp. When the first pipe is ready, you can start connecting the second. There is only one nuance here: the design of the pipes involves an internal and external pipe, so it is important that both of them are joined correctly. Doing this right away is not so easy. But there is an easy way:
- Pull out the inner tube about 10-15cm and connect it with another inner tube first.
- Only then connect the outer pipes in the same way, lowering it down.
Installation of the inner pipe
As usual, the joint needs to be strengthened using a steel clamp, which is tightened with bolts and nuts or wire. All such joints must be reinforced with clamps. When there is a high probability that pressure will increase in the chimney, it is better to seal all joints with sealant. Remember - the tighter your chimney is, the stronger the draft in it. Directly in this part (usually under the ceiling) it is recommended to install a pipe with a gate to regulate the draft level.
Installation of external pipe
Stage 2: passing the pipe through the ceiling
Despite the fact that sandwich pipes have high thermal insulation properties, those places where the pipes will pass through the ceiling must be additionally secured, especially when the pipe passes through a ceiling made of wood. Due to improperly performed work, you can cause damage to both property and yourself, because there is always a danger that this place near the pipe will become very hot and the material will ignite.
Passing the tube through the ceiling
To avoid this, you need to follow a few rules:
- In such places an additional layer of thermal insulation material is additionally laid.
- The hole in the wooden ceiling into which the pipe will enter should not be identical to the diameter of the pipe. It is extremely important that the distance from the inner tube of the sandwich to the wooden floor is at least 38 cm, and this space must be filled with fireproof material.
- The distance from the wall to the chimney pipe should be 25 cm or more.
- The passage of the pipe in the ceiling should be covered with a galvanized sheet. It performs several functions: it prevents the spread of fire in the ceiling, ensures uniform heat dissipation over the surface, and also screens and reflects thermal radiation coming from the pipe. A hole identical to the diameter of the pipe is cut in this screen, the pipe itself is inserted into it, and then it is attached to the ceiling.
- When you install a chimney in an interfloor ceiling, even at the design stage you need to take into account that the pipe passes through the entire ceiling, without joints with other elements.
Scheme of passage through the ceiling
The top of the ceiling is cut. To do this, you need to install a special chimney link in the form of a metal box, inside of which there is a hole, or it can be a passage pipe. This cutting should be 7 cm greater than the thickness of the ceiling. It serves to prevent the ignition of highly flammable ceilings both from below and from above. Next, the pipe is installed in a manner already known to you.
Roof passage
When you need to bring the chimney through the wall, you need to make the necessary hole in it and strengthen the place where the landing bracket will be installed, which will hold the pipe. For this you will need a hammer drill. To secure the brackets to the wall, make holes and install them using anchor bolts. Check the secureness of the fastening by pressing firmly on it. Now you can install the horizontal pipe through the ceiling and install the outer elbow. As usual, the walls need to be covered with asbestos sheets. Attach the knee itself to the bracket with clamps. Additionally, make another fastening (bracket) in the wall above, which will hold the entire structure. Finally, all the parts are assembled together, and a deflector, fungus or spark arrestor is installed at the end. For reliability, the chimney is secured with brackets both at the base and near the roof overhang.
Exit through the wall
Note!
It is important to consider the offset - the space left between the wall and the chimney, which must be maintained along the entire wall.
Diagram of internal and external chimney
All structural elements, such as tees, elbows and adapters, are fastened together with clamps. Only the sandwich pipes are connected to each other with crimp clamps at the joint, but tees and adapters must be connected with such clamps on both sides. By the way, if you don’t want to buy ready-made brackets, you can make them yourself, saving your money. Take two angles of 30 mm and 50 mm, a grinder, a drill and M10 and M8 bolts and build them.
Attached with brackets
Stage 3: chimney outlet to the roof
It is especially difficult for beginners to figure out how to install a pipe on the roof, because this is perhaps the most difficult stage of the work. After all, the structure must not only be removed from the premises, it must be done correctly. A special element called a roof cut will help you with this. This is what should be used to bring out the pipe. Roof cutting is a metal structure that prevents the pipe from coming into contact with the roofing material and the remaining layers of the roofing pie, protecting them from overheating. When purchasing this item, it is important to consider the slope of your roof. Standard products will help bring the pipe to a roof with a slope of 15–35˚ or 35–55˚.
Chimney outlet to the roof
The further procedure is as follows:
- First, you need to mark the location of the chimney in the roof with a construction pencil or marker.
- Based on the markings you made, make a hole on the inside of the roof. Its size should allow the chimney pipe to pass freely.
- Attach a special roof sheet from the inside, and install a roof trim on the outside. Its conical part can be adjusted depending on the desired angle of inclination of the roof.
- All that remains is to place the cutting edges under the sheet of roofing material or under the ridge of the roof.
Note!
To improve the tightness of the joint between the chimney and the groove, use a special adjustable apron. Then rain or snow will not penetrate inside.
Master flush
Finally, when everything is installed, you can mount the next, final structural element. Grow the pipe to the required size, taking into account the characteristics of your roof, and install the necessary element at the end: deflector, fungus, weather vane, spark arrester, etc.
Stage 4: Complete installation
When all the work has already been done, the structure is assembled and firmly strengthened, the protective film, if any, can be removed from all pipes. All gaps and seams must be sealed. To do this, use a heat-resistant sealant, which is used for chimneys and is designed for temperatures of at least 1000˚C. If everything is ready, all that remains is to check the most dangerous areas of the chimney for heating temperature.
Note!
In order to easily and quickly clean the chimney, provide a special inspection in advance. This is a removable part of the structure or a simple hole with doors.
Metal apron
As you can see, anyone can install a chimney from sandwich pipes. This is all thanks to the light weight, which you can easily lift yourself, and also due to the simplicity of the design itself. And if you carefully read this article, watch additional materials and videos, you can easily do it yourself. The main thing is to decide on the project, purchase the material, and then everything will go like clockwork, roll up your sleeves and get to work.
If this article helped you figure out how to install a chimney from sandwich pipes, and you were able to do it, write to us in the comments. Maybe you encountered some problem or didn't understand something? Our experts will be happy to help you solve your problems!