In individual houses, in the absence of a central water supply, water is taken from wells and wells, connecting pipes underground from the foundation of the building to the source. When carrying out work, it is important to know at what depth to bury a water pipe in a private house - this will reduce material costs during excavation work and avoid freezing of the water pipe in winter.
Using modern technologies, insulating pipelines using electrical cables or heat insulators can significantly reduce the depth of the pipeline - this will be convenient for repair work in case of leaks. However, a small depth of laying water pipes is also undesirable - water with a superficial line location will heat up in the summer, which contradicts SanPiN 2.1.4.1074-01. If drinking water is at a high temperature, harmful microorganisms will develop in it.
Rice. 1 How to dig a trench for water supply
At what depth should the water supply be laid?
Construction codes and regulations (SNiP 2.04.02-84) stipulate that the depth of pipelines should be at least 0.5 from the ground surface - this prevents damage to the pipeline from pressure on the soil by vehicles and heavy equipment. The same immersion depth of pipelines of 0.5 meters is established by standards from the freezing point of the soil in a given area, so uninsulated pipes in most cases are buried to a depth of 1.8 to 2 meters.
A soil freezing map has been developed for each area; it is easy to find your location with the freezing depth using it, and by increasing the distance another half a meter in depth, you are guaranteed to avoid freezing of water in the pipes at this depth.
It should be noted that, unlike sewer systems, which can be defrosted with hot water, freezing of the water supply system of an individual house in winter, if it is laid at a shallow depth, will lead to a lack of water and the impossibility of further residence, therefore the deepening of the water supply system should be taken with full responsibility.
Rice. 2 Map of soil freezing in the Moscow region
What does depth depend on?
SNiP lists some factors that influence the determination of depth, which must be taken into account when immersing a water line in the ground, these include:
- The depth of the caisson well above the source of water intake. This factor influences the location of the point of entry of the pipeline into the ground through the walls of the caisson; usually the pressure pipe is mounted as close as possible to the bottom surface.
- The degree of ring rigidity of the pipeline material affects its resistance to soil pressure on the walls, which can lead to damage to the pipeline. The factor must be taken into account when laying plastic water pipelines of large diameters, the maximum depth of which does not exceed 8 meters.
- Soil characteristics (loose, clayey, rocky), presence of vegetation, presence and level of groundwater.
- Installing thermal insulators or electric cables for heating water inside pipes or outside a water supply system can significantly reduce the depth; in this case, complex calculations are required to accurately determine it.
- The location of the point of entry of the external main into the house through its foundation - the lower it is, the greater the depth of the water supply.
- Water temperature at the water intake source.
- The climatic conditions of the region are the lower temperature limit in winter and the highest temperature in summer, the amount of precipitation.
Rice. 3 Map of soil freezing in Russia
Rules, formulas and data
The laying of communications is preliminarily calculated at the design stage of the house - technological openings (inputs) for pipes must be provided in the foundation.
First of all, a site survey is carried out to identify existing utility networks, clarify their location and depth. If there are other networks, in accordance with SNiP 3.05.04-85, the pipeline is laid at the following distance from:
- Sewerage – 50 cm.
- Power cable – 50 cm.
- Gas pipeline – 100 cm.
- Heating networks – 150 cm.
- Another water supply – 150 cm.
Under any road or paved area, the pipe must run perpendicularly. This is necessary to reduce the loads to which the pipe will be subjected. Based on the data obtained, a route plan is developed.
The second stage is determining the shape of the trench . It can be rectangular, trapezoidal or mixed.
A rectangular excavation is dug in soils with high bearing capacity and low groundwater levels. Such trenches are easier to construct and excavation work is cheaper. Additional reinforcement of the walls is required only when the pipe is buried at a large depth.
Trapezoidal trenches are installed in areas with high groundwater levels, on peat, marshy or other soils with low bearing capacity. Due to their shape, they do not need to strengthen the walls, but excavation work is more difficult.
The second stage of preparatory work is the calculation itself. Three parameters are determined: the depth of the trench (H), its length (L) and width (B).
Depth
This parameter depends on the type of soil, the diameter and type of pipes, and the depth of soil freezing. How deep should I dig a trench under water? In accordance with SNiP, the minimum depth for different types of soil is:
- rocky soil – 0.5 m;
- loose, soft sandy soil – 1.6 m;
- clay soil – 1.3 m;
- soils with average looseness - 1.7 m.
But the calculations take into account the depth of soil freezing - pipes must be laid below this mark. If this is technically difficult, the pipeline is additionally insulated.
The depth of soil freezing is indicated in special tables. Here are the data for some regions of the Russian Federation (in meters):
- Moscow - from 1.35 to 2.
- Republic of Adygea - from 0.29 to 0.43.
- Altai Territory – 1.30 – 3.52.
- Arkhangelsk region – 1.57 – 2.89.
- Astrakhan – 0.78 – 1.50.
- Krasnodar – 0.00 – 0.74.
- Leningrad region – 0.99 – 1.96.
- Novosibirsk – 1.84 – 2.98.
- Yekaterinburg – 1.58 – 2.32.
- Republic of Crimea – 0.01 – 0.49.
The height of the trench is also calculated - the distance from its bottom to the black mark. Depth is not equal to height, since the latter indicator includes the depth of the pipe, the thickness of the backfill under it, the thickness of the thermal insulation, and the thickness of the total layer of backfill.
When laying a pipeline that will be used only in the warm season, a minimum trench depth of 50 cm is allowed.
Length
The length of the trench consists of the length of the pipeline sections from the point of insertion into the main line or well to the point of connection to the internal pipeline.
In rare cases, the trench runs in a straight line, more often it has a more or less complex shape, so you need to calculate the total length of the excavation. This is done using a large-scale site plan.
Width
In accordance with SNiP, the width for pipes with a diameter of 50-100 mm should be in the range of 0.5 - 0.8 m.
This indicator is observed when digging by hand. If an excavator is used, calculations are not needed - they are based on the width of the equipment bucket. But the minimum width of the trench, regardless of any factors, is 0.7 m.
If you dig a rectangular trench, its width at the top and bottom is the same. With a trapezoidal shape, the upper width is 1.5 - 2 times greater than the lower one. In this case, the lower width is the main one, and for pipes with a diameter of 50-100 mm it is 0.5 - 0.8 m.
Perimeter and area
After determining the main parameters of the pit, its volume is calculated - this is necessary to determine the total volume of excavation work.
The calculation is carried out using the formula V = a * h * L (for a trench with rectangular walls).
This formula uses the following values:
- V – required volume;
- a is the width of the pit;
- h – its depth;
- L – length.
If the trench has a trapezoidal shape, that is, its walls are beveled, the formula V = (a + b) /2 * h * L is used. Here a is the width of the pit along the bottom, b is the width at the top.
For simple calculations taking into account all parameters, you can use a calculator.
At what depth to bury a water pipe in a private house - how to calculate correctly
The depth of the trench for the water supply depends on the climatic conditions of the area, so the main document for calculating it is the freezing depth map. This information can be obtained from Internet sources using the appendix to the map of Russia, where more accurate ground temperature data are given for various cities, taking into account the soil structure.
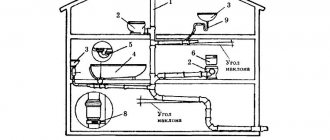
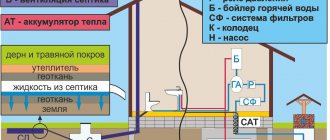
When drawing water from wells, caisson pits are often used to place pumping equipment, in which the water pipe is laid in the direction of the foundation of the building through the walls of the caisson.
If the depth of the water pipe to prevent freezing is significant, the caisson will have to be deepened to an appropriate distance - this will lead to additional financial costs for construction and inconvenience when using the pit. The way out of this situation is to insulate the water supply pipe with insulation, which allows you to reduce the depth of its laying.
To determine at what depth to bury the water supply in this case, it is necessary to carry out calculations using formulas that take into account the temperature of water and soil in winter at a given depth. If there are no problems with water with a conventional thermometer, measuring the temperature parameters of the soil at the required depth is quite problematic. Therefore, the best option is to obtain information about the permissible depth of the water supply in winter with this material and the thickness of the insulation from the manufacturer or seller of the insulating shell.
The second method - independent calculation of insulation using formulas according to the well-known standard methodology (SNiP 2.04.14-88 clause: Calculation of thermal insulation) is difficult. The formulas and methodology presented in it are developed only for determining the parameters of the insulating shell against environmental cooling of pipelines with a working fluid temperature from +20º to +300º C.
Rice. 4 Installation of an external water supply system when drawing water from a well - diagram
Subtleties of underground installation of water supply lines
When it comes to the above-ground part of the water supply system, you need to give preference to products that are strong and reliable enough to successfully withstand changes in temperature and pressure. In this case, the type of pipe described above is perfect, another advantage of which is ease of installation using fitting fasteners.
And to make it easier to decide which pipes for underground water supply are best suited in each specific case, it is worth paying attention to the existing ready-made water supply projects, proven by practice, and also take into account the requirements of technical standards. With this approach, you will get inexpensive and high-quality plumbing, and installed without much effort.
Where to start
To carry out excavation work, first of all, it is necessary to decide on the excavation technology, which includes manual and mechanical methods.
When digging a trench for a water supply, they mainly use special equipment - manual excavation of large volumes of soil is not economically feasible, it takes a lot of effort and time and costs 2 times more if they hire outside workers rather than try to dig a ditch with their own hands.
To lay a pipeline at shallow depths of up to 1 meter, household walk-behind tractors with special belt (chain) attachments, trenchers or soil cutters with small dimensions and weight are used, the width of the ditch is 15 - 20 cm. When using special equipment for digging trenches - bar, those carrying out soil extraction using a belt or chain mechanism with blades, reach an excavation depth of up to 2 meters with a channel width of about 30 cm.
If the water supply is buried at a distance of more than 2 meters, the parameters of the width and depth of the trench increase; mini-excavators used for digging to great depths form a ditch about 50 cm wide.
Rice. 6 Special equipment for digging trenches: walk-behind tractor, trencher, bar attachment, mini-excavator
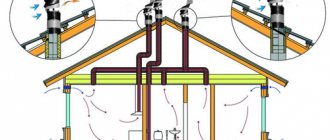
Installation rules and useful video
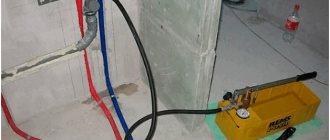
The key rules for carrying out installation work are to follow a number of actions: before operating the water supply network, it is worth checking the system to avoid leaks by filling the pipe with water under pressure. In case of leakage from the coupling or fitting, the components must be tightened and the pressed fitting must be replaced.
Errors cannot be excluded if the connection rules are violated, namely:
- the distance between fasteners is not maintained;
- the heating time is broken or excessive force is applied during welding;
- rigid fasteners were installed, the linear expansion of the raw material base was not taken into account.
HelpfulUseless
How to dig a trench for a water supply
When carrying out excavation work, it is advisable to follow the following basic recommendations:
- The trench must be drawn along the shortest path between the water intake point and the entrance to the house; if there are branches in the main line, they are located at right angles to the main line.
- According to SNiP, the width of the channel should be at least 70 cm; in practice, dimensions of about 50 cm are sufficient.
- If the submersible electric pump is not equipped with a check valve, then you can drain water from the system back into the well or well, and the angle of the upward slope increases with decreasing diameter and is about 50 mm. per 1 linear meter of pipes with a standard one-inch section.
- Building codes prohibit placing water supply and sewer lines in the same trench - they must be at least 1.5 meters apart from each other.
Excavation work for excavation and installation of pipes is carried out in the following order:
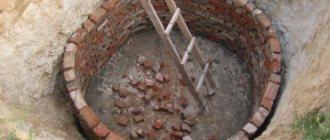
- Near the walls of the well or caisson from which water is drawn, dig the required depression in the ground (pit) 100x100 cm wide.
- A cord is pulled between the well and the entrance to the foundation, marking the direction of the trench so that it is not damaged during work; it is tied to sections of reinforcement every 3 - 5 meters, which are removed from the ground after the technician approaches. Sometimes the line to the house is additionally laid out on the ground with improvised objects, which are removed during digging.
- Using special equipment, dig a trench of the required depth, 20 - 50 cm wide (depending on the type of machines chosen), placing the excavated soil at a distance of at least 2 - 3 m from the excavation site to avoid collapse of the walls.
- After digging the channel, a layer of sand 5-10 cm thick is poured onto its bottom and then the pipeline is laid on a sand cushion, filling the excavated soil back.
Fig. 7 How pipes are laid in ditches for water supply using special equipment
- To increase thermal insulation, you can cover the pipes with roofing felt, remnants of insulation after repair work, or cover them with expanded clay with a layer of 20 - 50 cm.
- In dug pits, the line is connected to a borehole or well pump through a hole drilled in the walls of the well with a hammer drill; in a similar way, a connection is made to the house line through a hole in the foundation.
- The connection of the pipeline, depending on the material of manufacture, is made in different ways - if pipes made of low-density polyethylene (HDPE) are used, the sections are connected with collapsible compression fittings or, if the budget allows, with electric welded fittings, the ends of the steel pipes are usually welded to each other.
- After laying the water supply and filling the channels and excavations with earth, the trench is compacted to prevent further subsidence and covered with previously raised turf.
HDPE pipe installation process
Despite the fact that the installation process of polyethylene pipes is quite simple, to create a durable and reliable functioning system, compliance with technical standards is required. To work, you will need a set of tools, pipes and connecting elements - fittings and accessories (tees, angles, plugs).
Tools
The set of tools for connecting HDPE pipes depends on how you are going to do it. When connecting pipes using compression fittings, you do not need any special tools other than a fine-toothed hacksaw or special cutters to cut the pipes into the required lengths.
When “hot” joining HDPE pipes, you will need a special electrical device - a welding iron. This device heats the ends of the pipe and couplings to the melting temperature, after which they are inserted into each other. You will also need special pipe cutters that allow you to quickly cut pipes at an angle of 90°.
Fitting
Connecting fittings for HDPE pipes come in two types:
- Compression.
- Diffusion.
Compression couplings are equipped with a threaded connection and rubber seals. The two halves of the coupling are put on the ends of the pipes being joined, after which they are connected with threads, forming a sealed joint. Diffusion couplings are used when welding pipes using a heating apparatus. Recently, electric couplings have appeared on the domestic construction market, connecting pipes by heating them with current. Electric couplings have terminal outputs on their surface that are connected to a special welding machine, which heats them.
DIY installation of HDPE pipes for water supply
Installation should begin from the water supply source - a well, a standpipe, or a main water supply. To speed up work and avoid possible errors, you should draw up a pipeline diagram in advance. In accordance with the scheme, the required number of pipes, additional elements and couplings should be purchased.
Country water supply from polyethylene pipes is easiest to install using compression fittings. The process will not take much time and does not require special skills. Compression couplings are first disassembled and screwed onto the pipe ends to be connected, installing the gasket and clamp. The connection is secured using an external clamping nut. When tightening it, do not use adjustable wrenches or other improvised tools. The nut should only be tightened using manual force to avoid damaging the coupling.
It is also possible to install the pipeline yourself using diffusion couplings. Here, for the connection, you will need a special device - an electric heater-iron, equipped with nozzles of the required diameter. The device is connected to the network, the heating relay is set to the desired temperature, after which the ends of the pipe and coupling are inserted into the heated nozzles. After melting the connecting ends, they are inserted into one another and fixed for one or two minutes.
It is also possible to solder HDPE pipes into joints, without using couplings. This happens with the help of a special end heating device equipped with holding devices. This method is usually used for large diameter pipes. When soldering pipes, you should ensure that the ends being connected are cleaned of dirt and moisture, otherwise the connection will not be airtight. When working with electric heaters, it is necessary to observe safety precautions, use special clothing and protective gloves.
Distance between two pipes underground
As noted earlier, building codes do not allow the placement of water supply and sewer lines in the same or different trenches if the distance between them is less than 1.5 meters; this rule applies to industrial and domestic water supply lines.
Also, construction regulations (clause 9.6 of SNiP 41-02-2003) allow the joint installation of water supply and heat communications in one trench. When laying a water supply and cable electric line in parallel with a voltage of up to 35 kV, the permissible distance between them is at least 1 meter (electrical installation rules PUE-7 clause 2.3.88.), if the electric cable crosses a water supply system, the distance at the crossing point is at least 0 .5 meters.
Rice. 9 Electrical cable - installation diagram
- Reading about how deep to bury a water pipe in a private house, you may be interested to learn about the security zone of the water supply and sewerage system
Features of laying pipes for hot water supply
The form of gasket discussed above is channelless. The second option for underground water supply is the channel option.
The hot water supply must remain hot during transport to the point of use. Such a water pipe is additionally insulated not only by wrapping it with a special material. Often the hot water supply pipe is hidden in a concrete box, which is placed at the bottom of the trench.
On the other hand, using a concrete channel is an additional waste of effort and money. The feasibility of using the channel method in the household is very doubtful. Many people prefer to place the hot pipe together with the cold pipe in the same ductless trench.