Hello, dear readers! A ditch at the entrance to the courtyard of a private house or cottage performs an important function. It is into it that rain and melt water flows, which can damage the road surface of the roadway.
The pipe in the ditch must be installed correctly. Otherwise, it will not withstand external pressure and will collapse, or the drainage of precipitation and groundwater will not be fully carried out. They will wash away the entrance embankment and cause an emergency. This article will tell you how to properly lay a pipe in a ditch.
Materials and types
The weight of the earth puts pressure on the pipes laid in the ditch. Even if a concrete bridge is poured on top of them, it only redistributes this load, but cannot completely eliminate it. Therefore, for hidden installation, pipes with a sufficient level of ring rigidity are required.
In addition, they are negatively affected by groundwater, rain or melt water, and the cyclical nature of winter freezing. This means that the material used to make such products must be resistant to corrosion and able to withstand low temperatures.
The following types of pipes are suitable for such work:
- Metal.
- Concrete.
- Reinforced concrete.
- Made of plastic.
Metal
The steel pipe for laying in a ditch can be of different diameters and lengths, but it must be thick-walled and of good quality. Metal products with such characteristics, despite the likelihood of corrosion, will last at least 30-40 years. However, due to the large weight of metal pipes, lifting equipment will be required during their installation.
Concrete
Concrete pipes are placed in ditch more often than others, since they have a large capacity. Concrete perfectly resists the effects of aggressive environments, withstands significant loads and serves for a long time. However, due to the large weight of such structures, their independent installation is unlikely to be feasible.
Reinforced concrete
They are manufactured at reinforced concrete factories by vibrocompression from heavy or fine-grained concrete, reinforced with reinforcing cages made of steel rods of classes A-1 and A-III. Reinforced concrete products ensure free transportation of wastewater and are suitable for any climatic conditions. The length of the segments ranges from 6 to 10 m.
Among reinforced concrete pipes, according to their load-bearing capacity, there are 5 groups with a permissible height of backfilling with soil of no more than 2, 4, 6, 8 and 10 m. For laying in a ditch, you can take a pipe from group 1. It is capable of withstanding the pressure of a soil layer up to 2 m high. For most regions of our country, where soil freezing is no more than 1.5 m, this will be sufficient. Products of group 2 have a higher load-bearing capacity. They can be laid to a depth of up to 4 m. However, such structures are quite fragile, so they must be laid on a sand bed and protected from weight loads with a layer of sand on top.
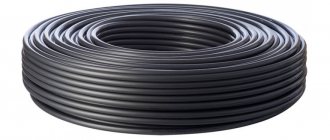
Plastic
For underground installation, corrugated plastic pipes are produced, which are much lighter and cheaper than other analogues. Their throughput and ring rigidity are sufficient for placement in a ditch. They do not rust, are durable and easy to install. They also need to be placed on a sand cushion with a layer of geotextile, and covered with sand and crushed stone on top.
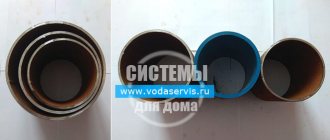
Types of pipes
Ditch pipes are made from various materials. When choosing elements of a drainage pipeline, you need to pay attention to their characteristics, strengths, and weaknesses.
Metal
Made from steel. Advantages:
- high strength and wear resistance;
- service life - 40 years;
- availability of large diameter products.
The main disadvantage of steel tubes is their low resistance to prolonged exposure to moisture. Because of this, over time, rust forms on their walls. Gradually the walls are destroyed, the pipeline becomes unusable.
Steel parts are suitable for installing drainage drains under the entrances to a summer cottage. Thick walls withstand high pressure and therefore do not deform after cars passing on top.
Concrete Advantages of concrete pipes for ditch:
- high strength;
- resistance to environmental influences and corrosion.
The disadvantages of concrete tubes include their heavy weight and installation difficulties (the help of other people is needed). Over time, concrete walls are destroyed and this process is irreversible.
Reinforced concrete
These are structures that consist of a metal frame filled with concrete. Then the product is placed in a centrifuge and vibropressed. This is necessary to compact the concrete structure.
The main disadvantage of reinforced concrete pipes is that they can crack under heavy load. To prevent this, you need to make a special sand cushion before laying the pipes.
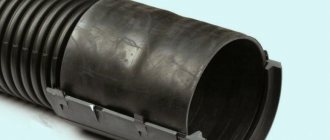
Plastic
They are corrugated elements of drainage pipelines that are gradually replacing metal ones. Advantages:
- resistance to external factors;
- plaque and dirt do not accumulate on smooth walls;
- plastic is not susceptible to rust;
- durability under normal conditions;
- simple installation that can be done independently without the use of specialized equipment;
- are not destroyed under the influence of various chemicals.
The disadvantages of plastic tubes include their low resistance to mechanical stress. They can crack under heavy weight.
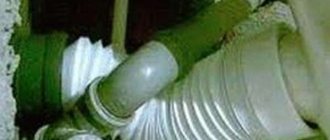
Plastic pipes (Photo: Instagram / sdscenter1)
Tips for choosing a pipe
In addition to choosing the pipe material, it is important to correctly determine its diameter. Correct calculation of the channel cross-section will allow melt and rain water of any intensity to freely pass beyond the site. If there is a danger of large debris getting into the cavity of the structure, then protective steel grilles must be installed on both sides.
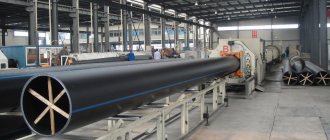
Considering that reinforced concrete structures are labor-intensive to install, and metal structures are susceptible to corrosion in damp conditions and are also expensive, the best option for installing a drainage ditch would be a plastic corrugated pipe. It is easy to cut and installed without the use of special equipment.
For a ditch, you can take a sewer two-layer corrugated pipe made of polypropylene PP (PP) (Pragma) or high-strength polyethylene (Corsis Pro) with a smooth inner surface and a structured outer wall. These materials perfectly withstand external pressure and low temperatures, do not rust, and are resistant to aggressive environments.
Criterias of choice
When purchasing a pipe for driving through a ditch, you should take into account the following indicators:
- Ability to withstand heavy loads. Trucks and special equipment can enter the construction site, so such a product must have high mechanical strength to withstand the pressure of heavy vehicles and embankment material weighing several tens of tons.
- Trench dimensions. The volume of passing wastewater directly depends on them. To ensure that the drains do not erode the embankment, but completely leave the ditch, the pipe must be of a suitable diameter.
- Cost indicators. There are many types of pipes on the construction market that can be used for laying in ditch. The choice often depends on the financial capabilities of the owner.
Reviews
I ordered steel pipes for the construction of crossings to a construction site. Delivered on time. All products are of good quality. Decent supplier.
I bought a plastic pipe, hardness 8, and ordered it with turnkey installation. Everything went well, it looks durable and beautiful. A 15-ton manipulator has already passed by, everything is OK! I recommend taking a plastic one, only SN8
Hello, dear readers! A ditch at the entrance to the courtyard of a private house or cottage performs an important function. It is into it that rain and melt water flows, which can damage the road surface of the roadway.
The pipe in the ditch must be installed correctly. Otherwise, it will not withstand external pressure and will collapse, or the drainage of precipitation and groundwater will not be fully carried out. They will wash away the entrance embankment and cause an emergency. This article will tell you how to properly lay a pipe in a ditch.
Design
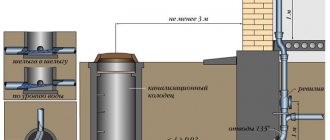
When drawing up a project, it is important to correctly determine the width of the entrance to the site. It must be at least 4 m to allow passage of not only cars, but also trucks. An additional one meter of protective zone must also be provided on each side. This means that a product with a length of 6 m must be placed in the ditch. The diameter is selected based on the amount of wastewater. In spring, melt water should fill the pipeline no more than ¼ of the volume. Typically, a product with a diameter of 300 to 500 mm is installed.
The ditch profile should have the shape of an inverted trapezoid with a flat bottom and be 10–20 cm wider than the laid structure on each side. To prevent the pipe from being sucked into the ground during operation, the bottom is deepened by 25 cm. The resulting pit is filled with crushed stone and compacted. The depth of the ditch should be at least 150–170 cm, depending on the thickness of the layer that freezes in winter.
The pipe itself in the ditch must have a strictly horizontal position or be located with a slope of 2 cm in the desired direction. Sometimes a concrete bridge is poured over the top of the trench to distribute the load.
Main nuances
The ditch along the perimeter of the road performs very important functions. It is into it that water from rain or melted snow flows, freeing the road from precipitation.
In villages and areas remote from the city, organizing a central drainage system for wastewater, especially atmospheric wastewater, is expensive and difficult, so people make do with more practical options.
The ditches also become a kind of drain, collecting all excess water both from the road and from the site itself . The only problem is the passage of equipment and the general connection of the site with the road.
Preparing a drive over a concrete drainage pipe
To do this, it is necessary to organize a bridge strong enough to support the car. And not only passenger cars, but also cargo ones. Nobody knows what you may need in the future.
For such tasks, a pipe is placed in a ditch. They also say that they place a pipe in the ditch for the drive, that is, they organize a bridge with a pipe integrated into it, which will not interfere with the flow of liquid through the ditch.
You need to place the pipe for the ditch on the drive in the correct way. And before that, you need to choose the ideal material, otherwise the pipe for the ditch for the drive will either not withstand external pressure, or will simply collapse over time (not too long).
Drainage device
A layer of crushed stone and sand enters the drainage system of the ditch through the entrance. They cover the top of the drain pipe, the underlying layer at its bottom, as well as the side protective zones. It is arranged so that water does not seep through the road surface material, but only passes through the pipe. To form protective zones along the ditch, pits 50 cm wide and 60 cm deep are dug. They are filled with crushed stone of the same fraction.
Why are drainage ditches needed?
A drainage ditch is needed to drain surface water after heavy rainfall, snow melting and from existing springs. In this case, shallow ditches are made that have a slope towards water drainage. They protect the roadway and adjacent land from destruction due to water flow. And also from the appearance of holes and potholes on the road and ravines in the surrounding area.
The depth and width of the ditch are selected sufficient to ensure the throughput of flowing water. Typically no more than 1 meter deep and 2 meters wide.
To drain wetlands, deeper canals are dug. The slope in them may not be observed. Water accumulates in the channel and evaporates. The deeper the canal, the lower the groundwater level will drop and a larger area will be able to be drained. There may be no slope for water drainage, especially if this area is located in a lowland and there is nowhere to drain the water. Sometimes they make an artificial pond with a canal connected to it. The depth of the channel can reach 2–3 meters, width up to 5.
Drainage channel for draining the area
How to install a pipe in a ditch with your own hands
To quickly and efficiently carry out work on arranging the entrance to the site, it is worth hiring an experienced team of craftsmen. But, if you are confident that you can handle it on your own, then prepare the necessary tools and materials in advance, and also organize timely delivery of special equipment.
Required tools and materials
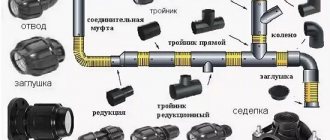
In addition to the pipe itself, the following materials are needed:
- Crushed stone.
- Sand.
- Geotextiles.
- Concrete.
- Reinforcement and binding wire.
- Boards for formwork.
- Nails.
- Paving slabs or asphalt concrete mixture.
- Curbs.
- Two decorative grilles to protect the pipe cavity from blockages.
- Moisture-loving plants for beautifying the entrance: irises, asters, vines, peonies, etc.
To dig a trench you need an excavator with a bucket capacity of 0.4–05 m3, and to lay heavy pipes made of metal or reinforced concrete - a truck crane. In addition to special equipment, you will need the following hand tools and accessories:
- Shovels - bayonet and shovel.
- Manual tamping.
- 2 buckets.
- Container for preparing concrete mixture.
- Vibrator for uniform concrete placement.
- Hammer.
Necessary equipment for beautifying the entrance
The beautification of the driveway is also not complete without the use of special construction equipment: an excavator and a bulldozer. If asphalt concrete is chosen as the road surface, then a special roller will be required to compact it.
Laying technology
The step-by-step installation technology is as follows:
- Marking the area for the ditch and trough of the driveway embankment.
- Digging a trench with sloped walls and cutting the soil around it to a depth of 35–40 cm.
- Cutting pits along the bottom of the trench and on the side walls.
- Compaction of soil at the bottom of pits.
- Filling the lower pit with crushed stone with layer-by-layer compaction.
- Construction of a crushed stone cushion 15–20 cm thick.
- Laying a layer of geotextile to prevent sand from going into the ground.
- Installation of a sand cushion 15–20 cm thick across the entire width of the ditch.
- Pipe installation.
- Installation of formwork and knitting of reinforcement cage for concrete caps.
- Pouring concrete into formwork with compaction using vibrators.
- Filling the ditch with a layer of sand 10–15 cm thick.
- Wrapping the edges of the geotextile fabric.
- Filling side pits with crushed stone.
- Backfilling of the trench with sand and soil with layer-by-layer compaction.
- Installation of a sand cushion under the embankment along the ditch.
- Laying geotextiles on a sand layer.
- Construction of a crushed stone base for the road.
- Road surface devices for crossing a ditch.
- Installation of curbs.
- Dismantling formwork from the ends.
- Layout of the site and layout of the flower bed.
- Planting and watering plants.
Installation video
Watch the video for a budget option for arranging the entrance to a dacha from craftsmen.
Prices for turnkey entrances
| Name | Cost per piece | |
| Economy option | Find out more | From 35,000 rub. |
| Economy Plus option | Find out more | From 42,000 rub. |
| Option "Cargo" | Find out more | From 49,000 rub. |
| Option "Standard" | Find out more | From 59,000 rub. |
| Option “Standard-Metal” | Find out more | From 59,000 rub. |
| Premium Option | Find out more | From 95,000 rub. |
We also offer arrangement of entry to your site. Everything is turnkey - from the pipe with delivery to its laying and concreting:
If you want to call an engineer to your site for free in one call, get an estimate and then ready to enter the site, then you are in good hands.
We have installed more than 80 entrances and know how to do it right!
Basic mistakes when laying pipes in a ditch
- Ditch section of insufficient depth.
- Laying the pipe directly on the ground, backfilling with local soil.
- Lack of layer-by-layer compaction of underlying layers.
- Using coarse crushed stone for backfilling. Under the pressure of heavy equipment, the edges of the crushed stone can damage the outer surface of the pipe, causing the wall to rupture.
- Installation of a pipe with a slope in the opposite direction.
- Small thickness of sand layers.
- Lack of protective structures on the sides of the ditch and embankment.
The use of plastic drainage pipes for driveways
Corrugated plastic pipe in a ditch can be used even under significant loads.
The profile of its cross-section makes it possible to distribute all the forces created during external influences over the entire surface of the product. Thanks to this, the load-bearing capacity of such a pipe is significantly increased.
In addition, such elements have other advantages over concrete and metal structures:
- Light weight with significant load-bearing capacity and strength.
- Simple installation technology; there are a variety of fittings that simplify the assembly of the line.
- Low cost compared to other elements.
- Resistant to corrosion and aggressive liquids.
- Such a pipe through a ditch will last at least 50 years (if the installation technology is followed).
How to save an embankment from erosion
To protect the embankment from erosion, its sides and longitudinal slopes are reinforced with various materials:
- For the construction of the sides, natural stone, white sand-lime brick or reinforced concrete slabs are used. Brick or stone walls are placed on both sides of the ditch. In this case, the ends of the pipe are left free. If it is necessary to strengthen the sides with concrete, then first install formwork with supports. A reinforcement cage is installed between the walls of the formwork, then the structure is filled with concrete. A week later, after the concrete mixture has set, the formwork can be removed from the top.
- Along the ditch, the slopes are reinforced with crushed stone and poured with cement mortar, carefully compacting each layer.
Coordination of ditch crossing arrangement
First of all, it is necessary to agree in writing on the crossing arrangement with the owner of the ditch or with the service organization. The owner may be a dacha or gardening partnership. Maintenance is most often carried out by road services. If there is no information on this matter, then you need to contact the municipal administration. All roads and structures for their maintenance are on the balance sheet of municipalities.
If the municipality declares non-involvement and does not know the owner, let it report this in writing to the request for approval. Then no one will be able to hold them accountable for arbitrariness and damage to hydraulic structures. This is how such objects are listed in the register of owners.
In response to the request, conditions and requirements must be issued; they can be called technical conditions that must be fulfilled and observed during the construction of the crossing.
They must contain conditions on the need to organize the passage of water, or allow the absence of a collector. For example, if there is no drainage when draining the area. The minimum pipe cross-section size and pipe type are indicated. As well as requirements for filling and strengthening the embankment. Specifications may contain other requirements. For example, notify about the completion of work and hand over the object according to the act.
Standard moving option
Crushed stone is used for the base, and it is laid and compacted not only at the bottom of the ditch, but also on slopes. Concrete can be prepared on site and poured into prepared formwork. If the wall thickness is less than 400 mm, then a frame made of reinforcement is required. The wall thickness must be at least 25 cm.
Above the pipe, near the masonry or concrete wall, it is worth making a gap of 5–10 cm, which is sealed with soft insulating material. This will prevent the wall from affecting the ends of the pipe if there is slight subsidence, and will protect it from breaking into two parts. Particularly important for concrete collectors.
To prevent the car from sliding off, you should raise the wall above the roadway by 15 cm.
Drive width and pipe cross-section
The technology for constructing a crossing without water passage is not fundamentally different from the option with a pipe. But a collector device is preferable, especially if there is even the slightest drain. In this case, the water will not stagnate and spread an unpleasant odor.
The width of the passage is selected taking into account the distance of the ditch from the road and from the border of the site. And also taking into account the possible use of the driveway as temporary parking for a car. If at a crossing there is no need to make turns when entering and exiting the road, or to park a car, in this case 3 meters is sufficient.
If such a need arises, the width should be increased to 4 meters. This will be enough for a turn-in ride. And when the car is parked, you can freely walk past it even with a baby stroller or a construction wheelbarrow. It is not worth building more than 5 meters; this will greatly complicate cleaning the collector, which will inevitably be needed in a few years.
The cross-section of the pipe must be at least 400 mm. Otherwise, the pipe will quickly silt and require frequent cleaning.
When selecting a section, you should also take into account:
- maximum volume of drainage in spring and during heavy rains;
- the minimum permissible thickness of the embankment above the pipe to protect it from loads, taking into account the pipe material;
- ditch depth;
- the height of the pipe above the bottom of the ditch to reduce siltation.