Independently connecting the hood to the central ventilation duct and power supply is a labor-intensive undertaking that requires knowledge of the technology of this process. An incorrect connection will lead to depressurization of the air duct, and the equipment will not be able to function normally. To avoid this, please read the following procedure for connecting the air vent and power supply in more detail.
Types of kitchen hoods
Exhaust devices connected to the central ventilation duct can be of the following types:
- Built-in. They are installed inside the cabinet, which is located above the gas or electric stove.
- Hanging. Mounted on the kitchen wall using brackets and screws.
- Island. Installed above a kitchen island with a built-in hob, attached to the base of the ceiling.
- Angular. Installed in the corner of the kitchen, mounted on the wall.
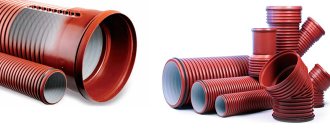
Characteristics of plastic air ducts
Plastic pipes can be round or rectangular in cross-section. Rectangular air ducts fit better into the kitchen interior. It should be noted that the best, in terms of efficiency, are round pipes , since they have lower air resistance. But in any case, it is better to immediately purchase various types of adapters along with the pipes. Pay special attention to the adapter from the hood outlet to the air duct and from the air duct to the ventilation hole. For a tighter seal, it is better to use regular sealant. Plastic pipes can be cut using a regular hacksaw and connected without much difficulty.
The advantages of plastic pipes are as follows:
- noise from ventilation operation is significantly reduced;
- grease, soot and dirt do not accumulate in such an air duct, since the surface is smooth;
- last longer than 10 years and do not require additional maintenance. Such pipes are very light, so they do not create additional load on the entire structure of the exhaust system.
Features of connecting a hood in the kitchen
To vent a kitchen hood into central ventilation, you need to determine what type of air outlet you will have to deal with and exactly how it will be routed when assembling it. The connection can be made in two ways:
- To already existing ventilation. To connect to the air shaft, it is enough to lay an air duct from pipes or extend a corrugation.
Connecting to an existing ventilation duct
- Connecting an air duct through a wall. The option is used mainly in the kitchens of private houses, with a pre-designed ventilation shaft. A hole is made in the brickwork to which the air duct is connected. The air will flow from the hood into the ventilation shaft, and then will be released through the roof to the street.
The first option is simpler, since it will be enough to simply connect the air duct. The second will require large financial expenses and time, but with the help of this technology you can completely hide the air duct by walling it up in the wall.
Avoid installing air ducts incorrectly
The Ukrainian channel Inter showed the installation of a hood using round, rectangular air ducts. The perimeter of the kitchen was a row of hanging cabinets. It was decided to strengthen a flat hood under the section. In the furniture located vertically above the stove, two holes were made with a milling cutter, accommodating a round air duct of 125 mm in diameter. Holes were punched through the floor and ceiling of the closet. The installation was carried out using a plastic air duct.
The hood was strengthened close to the section, under the bottom. A section of round air duct passed right through the cabinet, extended from above, and was connected with a special transition segment: the bottom side contains an inlet hole with a diameter of 125 mm, and on the side there is a rectangular outlet. A flat air duct ran from the segment to the ventilation hole for exhaust through the cabinets. Along the plastic path, the channel is invisible from the outside, the appearance of the kitchen remains the same. The rectangular air duct was connected to the ventilation hole by another segment similar to the one mentioned. The connecting element was a round section equipped with two turns, tightly gripping the opening of the ventilation network.
Types of plastic air ducts
Beautiful, but contains three serious errors from a practical point of view:
- Looking for a way to free itself, the air will travel through four 90-degree bends. Each turn reduces the efficiency of the hood by 10%. Four bends:
- directly above the hood on the joint segment;
- two corner turns on the second joint segment;
- bend inside the ventilation system.
Forty percent of efficiency is lost.
- A rectangular air duct with a smaller cross-section than a round one will significantly reduce the performance of the hood.
- The main drawback: the ventilation system was destroyed.
Let's look at three points in more detail. As for the number of turns, while paying tribute to the appearance, our installers lost 20% of the power just due to unnecessary bends. Obviously, the best solution was to use a round aluminum corrugation with one bend above the hood. Visible above the cabinet, it can be easily corrected with a decorative panel made of plasterboard or other material.
A flexible exhaust duct would be suitable to avoid losses when switching to a smaller rectangular cross-section. How to proceed. Find a segment with access to a square air duct of a similar cross-section or carry out work on a round one. It is harder to hide the channel, but the efficiency is maximum.
The main thing is the third point.
Which air duct to choose
A kitchen hood can be connected to ventilation using two types of air ducts:
- A corrugated hose is a metal outlet that costs less than sectional pipes, has better flexibility, and allows you to give it any shape. Since the corrugation is quite wide, it is more difficult to disguise it than pipes, but its connection is easier.
Corrugated sleeve
- Sectional pipes. A narrow outlet made of rigid metal pipes that is built to a specific shape. Such an air duct can be disguised inside the ceiling or wall of the kitchen, but it will be difficult to assemble a complex structure from it, since the sections are either straight or angular.
Metal sectional pipes
- Narrow plastic pipes. By analogy with metal segments, they are easily masked, but do not allow the sections to be formed into a complex shape.
Plastic pipes for air duct
Some models of kitchen hoods do not allow the use of narrow metal pipes, since their neck is wider than the outlet opening. In this case, corrugation or special adapters are used to connect to the central ventilation of the kitchen.
What is an air duct and how to choose its diameter
The main parameter that ensures high-quality operation of the exhaust system is the diameter of the air duct. What is an air duct? This is the main part of any ventilation or exhaust system. It is a pipeline (boxes are often used), with a precisely calculated internal diameter and a certain length. In large enterprises, the air duct is a whole network of pipes, connections and various additional elements.
The diameter of the exhaust pipe is as important a parameter as the material from which it is made. Basic rule: the air duct should not be smaller than the ventilation outlet in the room. The system will function properly only if the diameters of the hose and the hole through which the exhaust air leaves the room match.
If the diameters do not match, then it is necessary to use special adapters. Without them, the connections will not be tight enough, and some odors, burning or steam will still leak into the kitchen.
What will result from an incorrect choice of the inner diameter of the sleeve:
- The noise during operation of the device increases, which also affects other technical characteristics.
- The efficiency of the system decreases.
- The load on the main mechanisms constantly involved in work increases.
You should know that the dimensional pitch of the ventilation pipeline is 10 mm. Now the calculation is simple: sleeves of 180 and 200 mm are most often used. They are able to provide rapid release of air, provided that the system is installed correctly.
Connecting a kitchen hood to ventilation with your own hands
Before you start connecting the kitchen hood to the ventilation, you need to calculate whether the air duct that comes with the exhaust unit is long enough. If there are not enough parts, they must be purchased separately. The distance between the kitchen hood and the gas stove should be 75 cm; for electric stoves this distance is 65 cm.
Preparing the ventilation duct opening
It’s good if there is already a ventilation duct and the location of its neck matches the connection point mod. When the hood is installed further from the ventilation duct, you need to make the outlet hole into the shaft yourself.
To do this, mark a future hole in the wall or ceiling, depending on the geometry of the ventilation shaft. This can be done using one of the air duct sections included in the kit. The diameter of the future neck of the ventilation duct is marked along its edge. The marked area is hollowed out with a puncher. The hole made can be leveled with plaster or a plastic mounting adapter can be inserted into it.
Ventilation duct hole with adapter
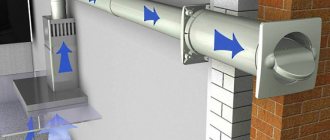
Air duct connection process
The entire assembly and connection process depends on what type of duct is selected. If corrugation is used as an outlet, it is put on the neck of the kitchen hood, the clamp is tightened on top, the sleeve is pulled along the wall to the hollowed out hole and inserted inside the ventilation shaft. The corrugated outlet is attached to the kitchen walls so that it fits flush against them. The connection on the hood is tightened with a clamp or sealant is applied to the joints.
Connecting and crimping the corrugation on the neck of the ventilation duct with a clamp
If a metal or plastic sectional pipe is chosen as the outlet, then it is correct to start assembling it from the neck of the hood, gradually building it up to the ventilation hole and attach it to the walls or ceiling of the kitchen with clamps. If the joints are loose, they are coated with sealant. After connecting, the air duct is masked.
How to properly connect exhaust pipes
Tightness is the main factor of the exhaust system, which contributes to its proper operation. If the density is insufficient, the connection may allow food odors, condensation or fumes to pass through. Therefore, when installing an exhaust system, you should pay attention to the joints between sections of the pipeline.
When using plastic, special adapters should be used when laying the exhaust pipe. Often, the insulated surface of two elements is treated with a heat-resistant sealant. Plastic is a fairly productive material: it has a long service life, can be easily painted, and is lightweight. But the installation of plastic adapters can take quite a long time, since after each installation the entire system should be checked for leaks.
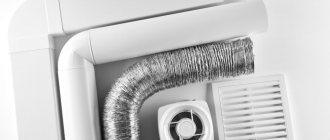
When installing an exhaust system, a corrugated aluminum pipe is also used. This building material has a lot of positive properties:
- Affordable pricing policy. Aluminum hose has an average price in the building materials market, so many customers choose it.
- Even an aluminum alloy can withstand temperatures up to 250 degrees Celsius, which is not always possible with both a gas oven and an ordinary electric hob.
- No specialized tools are required for installation - ordinary scissors are enough to cut the aluminum sleeve.
- Various corrugated hose sections are available. They come in very small increments, which allows the client to choose the most optimal option for himself.
To connect a corrugated aluminum hose, metal clamps are used, on the inside of which there is a rubber seal. There are 2 bolts on the sides - with their help you can both loosen the clamp and tighten it. The main advantages of such clamps are low price and long service life. The seal is made of a special material that is not affected by sudden temperature changes.
Rules for connecting a kitchen hood to electricity
Sometimes the presence of an outlet in the kitchen through which the hood is connected to electricity is not provided for by the design, then an extension cord is used. If this option is not suitable, then install the electrical point yourself, but for this you need to familiarize yourself with several mandatory rules in advance:
- Install the socket above the wall cabinets of the kitchen unit at a distance of 5 cm and 20 cm from the ventilation duct.
- The distance from the floor to the outlet should not be less than two meters.
- If the current strength of the kitchen hood is equal to or greater than 15 A, then there must be a grounding connection. But technology cannot have less than this importance.
- If the hood is not the only device connected to the network in the kitchen, then the total power of the connected electrical appliances should not exceed 4 kW.
There are also several rules that prohibit connecting an outlet in a certain area or with certain technical characteristics:
- You cannot install a hood in the kitchen, the current strength of which will be less than that required for normal operation.
- All wiring must be double insulated.
- Work when connecting an outlet to the central power supply system of the kitchen is carried out with the electric current in the electrical panel turned off.
Correct placement of sockets
Differences between a kitchen exhaust system and ventilation
A kitchen hood is a local exhaust ventilation system with artificial impulse and is fundamentally no different from ventilation. There are differences from general indoor ventilation: general ventilation in apartment buildings is designed with natural impulse and operates without the participation of fans. In addition, general ventilation serves to ensure air exchange throughout the entire apartment, and the hood removes polluted air in a specific place and only when necessary.
Which outlet to choose
In order to protect electrical components from water, it is best to select a kitchen outlet according to the following rules:
- It is better to purchase an electric current model with protection from moisture and dust with a degree of protection in the international IP standard.
- The housing should be made of thermoplastic and have a protective shutter that covers the holes when the plug is pulled out.
Kitchen socket block with moisture protection and curtain
Installing an outlet with wiring inside the wall
From the tools you will need:
- Hammer;
- Wires;
- Socket;
- Screwdriver;
- Socket box;
- Insulating tape.
The best place to install a socket under the hood is at the top of the kitchen unit, just above the level of the wall cabinet lid. A round hole is drilled in this area, with a diameter slightly larger than the socket box. The approximate size is 72 mm.
Electricity in the kitchen is completely turned off in the switchboard. The wires are first inserted into a hole in the wall, then threaded into the socket box body itself. Use a screwdriver to tighten the spacer screws.
Inserting a socket box and installing wiring inside it
The wires are attached to the contacts by tightly screwing the contact bolts; open areas are insulated with electrical tape. The socket is installed in the cradle, its body is screwed to the protective housing so that it does not play and is completely motionless.
Installation of a socket in a socket box
After this, turn on the power. At the testing stage, the kitchen hood is connected to electricity through a new socket, air draft and lighting are checked.
The process of installing a surface-mounted socket
To install a socket with an overlay, you do not need to hollow out a recess in the wall, since the wiring goes directly through overhead cable channels. Initially, the kitchen is completely de-energized. The wires are brought out to the connection point, fixing them with a cable duct or using clamps screwed to the wall. The body is disassembled, the base is screwed to the wall using self-tapping screws and dowels. The wires are screwed to the contacts.
Connecting cables to contacts
The housing is assembled by screwing the half with the wires to the installed part on the wall. Then the electricity is supplied and the functionality is checked.
Operating standards
In order for the hood to last longer, it is important to treat it with care and not forget about timely and systematic maintenance.
Interesting! Models with a warranty period of 1–3 years, if the operating rules are followed, last 8–10 years without requiring expensive overhauls.
Terms of use
Key points of operation:
- In order for the unit to work normally, it is installed without errors or distortions.
- When checking the hood after installation, its noise level is measured in order to correct errors in a timely manner. The indicator is measured not only with special devices, but also using an application on a smartphone.
- If the air purifier is not used for its intended purpose, the warranty for the device becomes void.
During a test check, the electrical appliance should work calmly, evenly gaining and decreasing speed.
Important! If, when you turn it on for the first time, you hear extraneous noises, crackling, creaking, or knocking noises, it means that the equipment was installed incorrectly or there is a manufacturing defect.
During operation it is prohibited:
- block or limit the free flow of air during operation of the equipment;
- clog openings on the equipment body;
- use a hood to remove smoke and other hot emissions;
- repair the device or change (clean) filters without disconnecting the device from the power supply.
Violation of these rules may disrupt the operation of the fan - the most important element of the entire structure. Without a backlight or a shutdown timer, the equipment will continue to function for its intended purpose, but without a fan, all work will stop.
Service
Service work and the frequency of its implementation depend on the intensity of use of the appliance itself, the selected mode and the dishes being prepared.
Important! Any maintenance of equipment is carried out only when disconnected from the network.
How to care for your hood:
- The primary grease filter is washed monthly. To do this, remove the element, remove adhering dust and soot with a soft sponge and soap solution. After complete drying, the filter is installed back.
- Every 3 years the air duct is coated with an anti-corrosion compound.
- For a combined or recirculation model, depending on the intensity of use, the deep cleaning filter is changed every 4–6–12 months.
Ignoring the rules for caring for household hoods can result in accidental fire and damage to the air purifier. A dirty filter has low throughput, which negatively affects the efficiency of the device.
By the way! Waste stuck to the fan blades reduces the power of the equipment.
The body of the device is systematically wiped with a soft cloth soaked in a soap solution. The internal parts of the unit, which become accessible after dismantling the grease filter, are cleaned in the same way.