A necessary condition for comfort in a private home is the creation of reliable ventilation. With proper design, the main problem will only be the installation and fastening of ventilation pipes on the roof. Its methods depend on the characteristics of the air duct itself and on the external covering of the roof.
General view of ventilation pipes on the roof of a house
Functional purpose and technological features
The task of any ventilation system is to maintain a fresh atmosphere in the house, remove foreign odors and substances that do not meet sanitary standards. Forced ventilation is rarely used in residential buildings. And for the natural movement of air to work correctly, it is necessary to create good draft in the exhaust air line. It is ensured by the optimal location of the outlet pipe above the roof and the correct calculation of its height.
Complete ventilation of the house should perform the following tasks:
- ventilation of all rooms in the building;
- air removal from household appliances (gas stoves and boilers);
- sewer line ventilation.
It is optimal for each task to create a separate ventilation circuit with its own exit to the roof.
Functions of home ventilation
Calculation of air ducts: methods and important nuances
To create a good ventilation system, you need to create fairly effective ways for air to enter and exit. The following simple rules will help reduce errors:
- Good sealing of modern rooms makes it necessary to create ventilation openings (1) for access to fresh air.
- To move it to other rooms, special channels (2) are installed.
- From the living area, air flow (3) can flow into the bathroom, bathroom, kitchen, but not in the opposite direction.
- Each meter of route (4) reduces the exhaust performance by 5% or more. To improve productivity, minimize the number of turns.
An accurate calculation of ventilation ducts can be made using the methods given below. But in any case, in addition to the recommendations noted, it is necessary to take into account the architectural features of the property
You should also pay attention to the expected mode of future operation, frequency of room ventilation, and other individual preferences.
How to calculate air productivity taking into account current standards
More accurate results can be obtained after calculating the power of the ventilation system in two ways.
| Name of the technique | Formula | Designation | Units | Decoding |
| Calculation of air exchange by multiplicity | MVS = K x P x V | MVS | m cubic in an hour | Ventilation system power. |
| TO | units | Multiplicity factor. In residential buildings they use from 1 to 2, in office and public premises they increase to 3. | ||
| P | m. sq. | Room area. | ||
| IN | m | Ceiling height. | ||
| Calculation of influx taking into account the number of people | MVS = H x N | H | units | The number of people “permanently staying” in the room. |
| N | m.cub. | Standard coefficient (30 - minimum for a bedroom, 60 or more - kitchen, children's room). |
For subsequent determination of the technical parameters of the channel, a larger value is taken. It is better to make a certain reserve so as not to experience inconvenience at maximum system loads.
Basic principles of correct calculation of the cross-section of ventilation ducts
The following formulas use the calculated capacity value as well as the air flow rate.
| Formula | Designation | Units | Decoding |
| SR = MVS x NK/S | SR | cm sq. | Cross-sectional area of the channel. |
| MVS | m cubic in an hour | The power of the ventilation system is from the previous section of the article. | |
| WITH | m/s | Air speed in the channel. For main sections it is set in the range from 5 to 9 m/s. In branches - from 3 to 5 m/s. | |
| NK | units | Standard coefficient. The value used for this formula is: 2.778. |
Types of ventilation pipes and requirements for them
*
Air ducts located inside and outside the house are exposed to completely different influences during operation. The main requirements are for the final ventilation sections facing the roof of the building. They must meet the following conditions:
- flow area of at least 150 mm in diameter;
- smooth internal surfaces that do not impede air movement;
- structural rigidity to withstand wind loads and the weight of snow in winter;
- at the same time as being strong, have low weight to ensure ease of installation and not load the roof structure;
- corrosion resistance both externally and internally;
- fire safety.
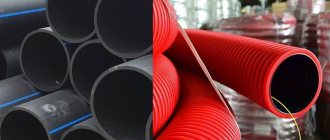
Most of these requirements are met by ventilation pipes made from various plastics or galvanized iron. But each material has its own characteristics, pros and cons.
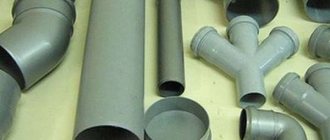
Plastic air ducts
Their main advantages:
- complete absence of a corrosive component,
- ease of processing during installation - cutting plastic of any cross-section with a regular hacksaw is allowed;
- the absence of welding seams ensures the smoothness of the entire internal surface,
- low cost.
A significant disadvantage of plastic pipelines is their low resistance to fire, which affects the fire safety of the entire structure.
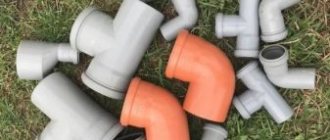
Elements of plastic ventilation pipes
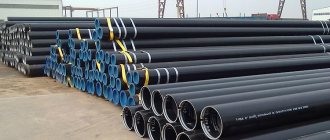
Galvanized air ducts
Their popularity is not inferior to polymer options due to the following advantages:
- small wall thickness (0.5 – 1.2 mm);
- mechanical strength ensures the reliability of external elements;
- high strength/weight ratio;
- variety of shapes and sections;
- availability of additional shaped elements of any configuration.
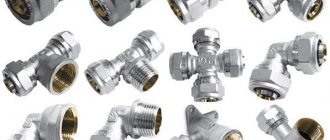
Galvanized ventilation pipe on the roof
Section shape
*
According to this parameter, ventilation pipes are:
- round;
- rectangular;
- non-standard section.
Rectangular shapes are considered more convenient when forming a passage through the roof. The original shape can provide additional strength. But for the unhindered passage of air, the best option is a circular duct.
Ventilation pipes with increased rigidity are made of galvanized steel using spiral-wound technology. With the same dimensions, they can withstand much greater loads. But their shape can only be round.
About air ducts in the boiler room
Particular attention should be paid to ventilation for a gas boiler in a private house. Usually a special room is allocated for the boiler room. Modern boilers require high-quality chimneys. To clean the room from combustion products, separate ventilation is installed from the hood and gas pipe.
To make it effective, a ventilation duct is installed in the boiler room in the form of two exhaust pipes that go outside and can be installed inside a brick duct. The first serves as a chimney and removes combustion products. The second channel is intended for cleaning and ventilation of the room. It is advisable to equip it with a fan that can rotate in both directions to enhance air exchange into the room. A special steel hood is used, coated with heat-resistant enamel and withstanding high temperatures.
Two pipes for boiler room ventilation
For a gas boiler in a private house, a coaxial chimney is also used, consisting of two pipes located one inside the other. Exhaust gas is discharged through the internal one. In addition, sections of pipes passing through the attic and other cold rooms must be insulated to prevent condensation from forming on the pipe. You can use special pipes insulated with insulation, or use fire-resistant mineral wool insulation.
Determination of ventilation pipe outlet points
They largely depend on the location of the air ducts inside the house. If possible, the location of ventilation pipe outlets on the roof should coincide with internal duct risers. The outer final ventilation section itself should be directed vertically. But at the same time, it is advisable to design an exit close to the roof ridge. With this arrangement, a minimum height of the outer part will be required. Therefore, the main air duct will be under the roof and will be protected from frost, snow and gusts of wind. And the entire structure will become more stable. An additional condition is the location next to the rafter beam. It will become an additional support to which the air duct will be attached.
Attaching ventilation pipes to rafters
If the exit point is located away from the load-bearing roof beams, then you will have to create a sheathing in the attic area through which the pipe will pass. And on the roof itself, install additional fastening elements to the roof.
Strengthening the air duct on the roof with guys
Choosing a location for the roof passage
All recommendations for choosing the location of the passage through the roof boil down to ensuring that its location allows the channel to be made with the least number of turns. In this case, the operational performance of the system will tend to maximum.
Sometimes, due to objective reasons, bends cannot be avoided. Corrugated pipes will come to the rescue. The use of corrugated pipes makes it possible to install air ducts with the necessary turns.
As noted above, the passage through the roof with the rafter system is carried out as close as possible to the ridge. Then, the largest part of the pipe will remain in the attic space, protected from temperature changes and ultraviolet radiation. The entire pipe will not be afraid of sharp winds, since only a smaller part of it will go outside.
Wind pressure indicators must be taken into account for any location of the exhaust pipe through the roof. Strong winds can cause poor air flow or direct air into the system.
Height of ventilation pipe above different roofs
*
This parameter largely determines the traction force in the entire system. The higher the top of the outdoor duct is located, the greater the efficiency of the hood. But a pipe that is too high is subject to excessive wind loads. Therefore, there are standards and recommendations to ensure the optimal balance between reliable traction and structural stability.
Flat roofs are not usually built over residential buildings. But such a calculation may be necessary when installing garage ventilation. In this case, it is recommended to install a pipe with a height of at least 50 cm above the roof surface.
For a sloping roof, the required size is determined depending on the distance of the outlet riser from the roof ridge.
- At a distance of less than 1.5 meters from it, the height above the roof should be at least 50 cm.
- When removed within 1.5 - 3 m, the upper edge of the pipe must be at the level of the ridge or higher.
- To calculate the height of a pipe installed at a distance of 3 meters or more, a little geometry is required. An imaginary line is drawn from the very top of the roof at an angle of 10 - 12 ° to the horizon. The top edge of the duct should be above it.
An additional factor may be the location of the ventilation riser near the chimney. In this case, the upper edge of the pipe cannot be placed below it. Otherwise, if the wind is unfavorable, smoke may enter the house through the ventilation.
Rule for all types of pipes
It sounds like this: the longer the air duct, the more bends there are in it, the lower the performance of the hood.
With each additional meter it works 5-10% worse. Each turn slows down the airflow. If the gas stove is firmly fixed and the window into the ventilation duct is located nearby, great. If at a great distance, nothing can be done. It is advisable to move a gas stove on a flexible hose or an electric one closer to the ventilation duct. It’s good when the arrangement of kitchen furniture allows you to do this. The worst option is when the ventilation duct and the hood are located on opposite walls. It is advisable that the ventilation pipe does not exceed 3 m.
Features of installation on the roof
Main installation steps:
- cutting a hole in the roof for ventilation;
- securing the sealing gasket;
- installation of a passage unit;
- bringing the pipe to the roof;
- securing it in the passage element;
- sealing the entire joint.
The set of fastening and auxiliary elements depends on the material of the pipe and roofing. If the roof is insulated, then you will have to cut through it to the entire depth of the roofing pie and install a passage element of the appropriate length.
Ventilation pipes are installed on a metal roof using a flexible sheet of the appropriate profile. Only such fastening will ensure reliable sealing.
But for any installation method a set of parts and tools is required:
- jigsaw for cutting a hole in the roof;
- metal scissors or a hacksaw for plastic pipes;
- level for determining the vertical;
- sealing gasket, sealing cover or curved sheet for metal tiles and ondulin;
- passage element fixed in the roof;
- drill;
- self-tapping screws;
- sealant.
Attaching the ventilation pipe to the roof
*
Finally, it is necessary to check the stability of the entire structure. If necessary, carry out additional strengthening. In the under-roof space - on brackets attached to a beam or sheathing. On the roof itself there are guy ropes.
Installation of a plastic air duct
When talking about installation, we will keep in mind the most common method of venting the air duct - into an exhaust duct with one entrance.
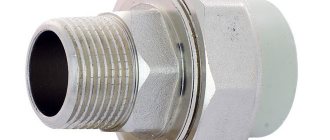
To assemble a plastic pipe, adapters are needed. In a general sense, adapters are elements for connecting in a straight line (without turning), at a right angle, for connecting the air duct to the hood and to the ventilation grille. When connecting, the joints must be insulated so that exhaust air does not pass into the kitchen.
A grille is installed on the ventilation duct for natural and forced ventilation. It is a two-part plate. At the top there is a round hole for the entrance to the ventilation shaft with a flange, and at the bottom there is a grille. If the diameter of the air duct does not coincide with the diameter of the flange, or if the pipe is rectangular and the flange has a circular cross-section, adapters are used in such situations.
Increased ventilation system performance
The best way is to create forced air flow using roof fans. But it is very expensive and difficult.
At the same time, passive additions to the pipe can lead to improved air movement. Here are some of them:
- Deflector. Special attachment for the upper part of the ventilation pipe. Its internal structure, under the influence of wind, creates an area of low pressure at the very outlet of the air duct. This leads to increased traction.
Roof deflector
* - Protective caps and droppers. They are attached to the top of the ventilation pipe and prevent precipitation from entering it. The absence of moisture in the system maintains its performance and reduces the risk of corrosion.
- Roof aerators. Devices designed to improve ventilation between the roof itself and its thermal insulation. They do not directly affect the microclimate in the house, but prevent the formation of condensation.
Practice shows that protection from moisture and installation of a deflector can increase the draft in the ventilation pipe by 10 - 30% in different weather conditions.
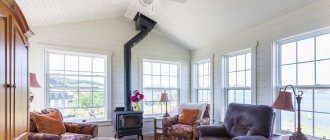
Masking the chimney
Aesthetics and beauty are one of the foundations of comfort. The exhaust pipe often spoils the interior, so homeowners try to hide it using drywall, building panels and other means. The installation is complete, and it's time to take care of the beauty. A box is made for this.
If the ceiling consists of two levels, then the task is even easier. Then the exhaust pipe can be hidden behind the lower level. The same can be done if the ceiling is suspended. In other cases, a special decorative frame made of plastic is purchased. It is produced in various colors and comes in different shapes.
For better camouflage, lamps are installed in such a box. Then additional lighting is implemented, which is also very useful. In some cases, homeowners choose built-in hoods. They are mounted into furniture, which completely hides the chimney. Don't want to bother? The exhaust pipe is simply painted to match the color of the walls. Some homeowners decorate the product, then the chimney becomes part of the interior. In this case, a lot of imagination will be required. Experts recommend purchasing exhaust systems produced by well-known companies, since in the struggle for the market, organizations offer a number of optimal conditions.
Main mistakes when installing ventilation
A typical mistake is to incorrectly determine the required stability of the entire ventilation riser. Fixing the pipe only on the top of the roof, without support on the rafters or other sheathing element, does not ensure the reliability of the structure.
You need to calculate the ventilation output on the roof immediately, taking into account additional attachments and devices. They not only increase the weight of the pipe, but also create additional windage during gusts of wind. Therefore, they require a certain margin of structural stability.
The sealing of the pipeline passage through the roof must be carried out not only on the outside, but on the inside of the roof.
A serious mistake is the unsystematic implementation of ventilation in interior spaces. Any additional turn of the line or an extra joint leads to a decrease in traction in the system and a decrease in the efficiency of its operation.
The evolution and development of air ducts for kitchen hoods
In high-rise buildings built during Soviet times, apartments had a small area. Ventilation in such rooms took not only harmful substances from the kitchen and bathroom, but also air from living rooms. Ventilation ducts were then built directly into the walls of buildings. In individual houses, ventilation was not provided at all, and residents were saved from the harmful effects of carbon dioxide by an ordinary chimney built into the home stove. The products of fuel combustion and decay elements formed during cooking evaporated there.
On a note! Before purchasing a hood and ventilation pipes, it is necessary to study the ventilation or exhaust system itself, which is provided for by the building design. This is an important point that contributes to the effectiveness of room air purification.
As a rule, the exhaust duct is not enough, so an additional hood with an air duct is installed.
Fresh air entered old houses and apartments mainly through loosely fitting doors and windows, and soot and soot gradually accumulated on the walls and ceiling, so whitewashing was required every year. In some apartments, ventilation ducts were provided - prototypes of kitchen hoods; the same ventilation was installed in bathrooms and toilets.
In modern apartments, in addition to the hood, an additional ventilation system is installed. It can be exhaust or supply and exhaust. In energy-efficient houses, installation of a supply and exhaust system with heat recovery is a prerequisite.
Is it necessary to insulate the ventilation outlet?
The question of the need to insulate ventilation and, in particular, its exit to the roof is often asked by independent developers. The answer to this is clear: insulation must be mandatory!
If you do not pay due attention to insulation, you may be left without ventilation in cold weather.
The ventilation outlet is located outside and is exposed to sub-zero temperatures, and the wind only accelerates the cooling process. Having frozen, the walls of the ventilation duct begin to cool the warm air passing through it from the room. As a result, the traction force is significantly reduced.
This creates two negative phenomena:
- If warm air from the room goes up, trying to go outside, then, having cooled from the walls, it begins to fall down again, creating counterdraft and turbulence, preventing the normal operation of ventilation;
- The warm air removed from the premises contains fumes from human activity. In contact with the cold walls of the ventilation duct, this moisture turns into dew and begins to flow back down the ventilation duct in drops, creating excellent conditions for the development of mold fungi.
In extreme cold, the condensed moisture does not have time to drain inside and freezes at the very exit. The ventilation outlet hole becomes smaller and may freeze completely.
To eliminate these problems, the ventilation outlet must be sufficiently insulated. The easiest way is to use factory-made ventilation outlets. The manufacturer makes the structure double-walled and puts insulation into it.
If the exit is made with ordinary ventilation plastic or metal pipes, then you can insulate them yourself. Tubular insulation made of foamed polyethylene (used for insulating sewer, water and heating pipes), rolled insulation or similar material is best suited for these purposes.
It is conveniently applied by simply wrapping it in several layers and secured with reinforced tape. Polyethylene and isolon are not afraid of water and sunlight, and birds and insects do not show interest in them.
It is not necessary to use foil insulation: it costs much more, and the effect of the metal layer is unlikely to be noticeable. The main thing is to ensure a sufficient thickness of insulation, which is recommended to be at least 30 mm.
When attaching roll insulation to the pipe, carefully seal all joints with tape. Thermal insulation, made in the form of a shell for pipes, holds well without additional tricks
Mineral wool is also suitable for insulating the ventilation outlet. However, you will have to make a protective cover on top of it from a durable material (fiberglass, galvanized or plastic sheet, etc.) to protect it from wind, precipitation and birds. Mineral wool in rolls is most convenient for such purposes: it is simply wrapped around the pipe.
In addition, if you are thinking about how best to fix the ventilation pipe on the roof and at the same time immediately insulate it, sandwich chimney elements are perfect. They are easy to install and are equipped with insulation installed at the factory.
Using such a pipe, you will save yourself from the problems of applying thermal insulation and protecting it from external influences
In addition, the chimneys have standard passage units that provide a tight connection, as well as standard deflectors and umbrellas for protection from precipitation and wind.
Another advantage of using chimneys for the manufacture of ventilation outlets is the possibility of connecting them with clamps for guy wires for subsequent reliable fastening. And the service life of stainless steel chimney pipes as a ventilation duct is practically unlimited.