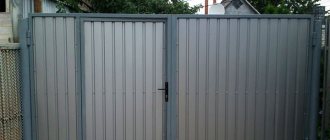
Metal sheds are reliable, functional outbuildings, durable, practical, but visually light, fit harmoniously into the landscape of the site, and do not clutter up the natural landscape. In the article we will look at the advantages and disadvantages of metal structures, what is best to build from, we will offer examples of simple projects, and we will tell you how to correctly calculate the dimensions of a building, as well as its individual elements.
We will provide detailed, step-by-step instructions on how to make a lean-to canopy from a metal profile with your own hands; the example drawings were chosen with medium dimensions; if necessary, they can be adjusted to individual conditions.
Invalid Displayed Gallery
Calculation of a truss for a canopy
When calculating a truss for a canopy, it is important to be guided not only by the overall convenience of the location, but also by aesthetics, as well as the angle of the roof, the configuration of the roofing system and other parameters. You can prepare a drawing of a truss for a canopy, compare the planned dimensions with the territory and ease of access, correctly place the gate, think over the water drainage system and snow slopes
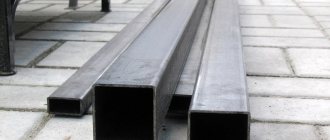
We will make a farm from a profile pipe. This is the most affordable material, easy to weld. We will learn the parameters of the profile pipe a little later, since they must be carefully calculated. To begin, determine the length of the overall metal structure.
The height of the ground to the ridge, as well as the type of roofing system, will depend on this.
The easiest way to equip a shed roof, but with this arrangement it is important to remember that the maximum step between two adjacent trusses should be no more than 1.75 m
Having determined the angle of inclination for yourself based on individual parameters, calculate the angle of inclination of the sheathing. On average, experts make it 30 degrees in the plane, or cut it at 45. This way the load will be distributed evenly.
No special calculation is required for canopies whose length does not exceed 30 m. But it’s also not worth saving, since when choosing rolled metal with thin walls, you cannot guarantee the rigidity of the welded parts. There will be vibration, and in the winter, due to snow, the metal frame may sag.
We propose to take a closer look at the preliminary calculation, having agreed that we will build a lean-to canopy, measuring 6 by 4 m. For strength, you should use a metal profile with a cross-section of 30 by 30 mm, with a wall thickness of at least one and a half mm. Having decided on the slope of the roof, we understand that the lower chord of the truss will be 4 m.
The top one will be about 4.5 m. First of all, it is necessary to arrange vertical guides from the same material. We make the largest side about 0.6 m, the smallest in fact, based on the calculated angle of inclination. Next, we divide the top row of the profile into equal parts.
We weld intermediate cross members to the lower part. These crossbars are also called diagonal lintels. They must be made of the same steel as the main frame. If you have the opportunity to save money, you can replace the crossbars with a pipe with a cross-section of 20 by 20 mm.
Previously, we said that with a single-pitch roofing system, you should choose a truss pitch of at least 1.75 mm. For greater reliability, we choose a step equal to 1 m. In total, about 5 similar trusses are suitable for 6 m. They should be mounted on pre-installed supports, then everything should be welded into a single unit, and then the polycarbonate should be secured using special jumpers made of a 20 by 20 mm profile.
More about farms
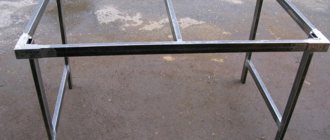
The basis of the canopy is the trusses that connect it into a single whole. They are manufactured in the form of a horizontal spatial structure assembled from elements connected by welding. The truss consists of a lower and upper chord, fastened by vertical and diagonal (braces) jumpers. The main advantage of profile canopies is their ability to successfully withstand wind loads and the weight of snow with low weight. Welding of trusses can be made from a channel, an angle, but more often profile pipes are chosen.
Trusses - the basis of the canopy
Roof
The lightness of the profiled sheet (on average 5 kg per square meter) makes it an attractive material for arranging the roof of new country houses or those being reconstructed - the pressure of the finished structure on the foundation and walls in this case is minimal.
When installing corrugated sheets on the roof, you do not need to build a powerful rafter system. The high strength of the profile allows you to double the sheathing pitch, which makes construction based on corrugated sheets more economical.
You can fasten the material alone, without involving assistants in the process. The sheets have a significant area and are installed quickly and easily.
A roof made of corrugated sheets will become a practical and aesthetic protective element of any structure in the country, be it a country house or a garage.
GOST
The process of erecting any building structures is regulated by current regulatory documents, canopies are no exception.
There are a lot of narrowly focused documents that interpret the requirements for the construction of these structures in different areas and industries. However, the basic conditions that cannot be changed or not complied with by the manufacturer are reflected in the following documents:
- GOST 23118 “Steel construction structures. Basic technical requirements"
- SNiP 31-01-2003 “Residential multi-apartment buildings”
- SP 31-107-2004 “Architectural and planning solutions”
Awnings diagrams drawings. Scope of application and construction of a canopy made from a profile pipe
Metal profiles today have become one of the most popular and sought-after materials for the manufacture of canopies of various types and types with polycarbonate coating, since its main advantage is its long service life. If such a building is properly cared for, it can last for decades. Such canopies can be used in a variety of places:
- in parking lots;
- in country private houses to create large covered areas;
- in various public places.
The scope of application of canopies made of metal profiles is quite extensive, since they are universal structures with a large number of different modifications.
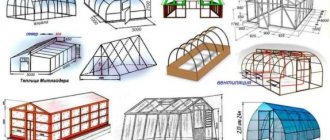
The most popular today is the arched type of product. It is much more difficult to make than a single or double slope, but it looks very impressive. Such a canopy is built separately from the house or adjacent to its side.
When choosing the type of roof, it is necessary to take into account the fact that the snow does not linger on it, but falls freely to the ground, without creating a large load on the roof.
In addition, there are canopies of dome, arc, pyramidal shape, as well as single-pitched and double-pitched.
In addition to polycarbonate, slate or metal corrugated sheeting can be used to construct the roof. Therefore, we can say that the complexity of erecting a canopy from corrugated pipe directly depends on the choice of frame design and materials chosen for the roofing.
Awning
One of the simplest deck roofing options is to use an awning. This material is lightweight and resistant to adverse weather conditions. If necessary, the awning can be dismantled. In this case, the canopy is usually installed only upon the owners’ arrival at the dacha. If owners rarely come here, then this is an effective way to protect the car without high expenses. Before leaving, the awning is simply removed from the frame.
To manufacture such a canopy, polymer materials are used. The awning turns out to be quite dense and rigid, resistant to average wind loads. The material is mounted on a metal frame.
You can choose any awning design that will go well with the main structure and landscape design. If necessary, the material is changed, which does not take much time and effort. The standard service life of an awning is 5 years. The indicator depends on the conditions in which the awning is used, how often it is pulled over the frame and dismantled.
Using an awning it is easy to create a canopy that is closed on 3 or even 4 sides. It looks like a tent, so it reliably protects the car. This is quite enough to ensure that the car is not covered with dust and dirt, and is protected from bad weather and the scorching sun.
Sheds made of corrugated sheets
Greetings, my readers. In this article I decided to consider the topic of single-pitched sheds made of corrugated sheets. This material has excellent characteristics, the main ones of which are strength, lightness, frost resistance, durability - its service life is 50 years. That is why we choose it as a canopy covering.
A canopy is a structure on supports made in the form of a roof. According to their purpose, canopies protect the space underneath from precipitation and scorching rays of the sun.
Often there is a need to build a carport over the porch in a private house or country house. It is performed over counters on the street, barbecues, over recreation areas in the country, over ramps, ramps installed in stores for unloading goods from cars and in other cases.
The main elements of a lean-to canopy are posts, purlins - longitudinal and transverse, which are installed on them, and a covering - in our case, made of corrugated sheets.
Single-pitch canopies made of corrugated sheets are:
- Separately standing.
- Attached to the building.
It all depends on its purpose. These are easily and quickly installed structures. But everything is in order. Let's look first at free-standing lean-to sheds.
Advantages and disadvantages of metal canopies
Making a canopy with your own hands from metal is a profitable, practical solution; subject to construction technology and proper care, the building will serve faithfully for several decades.
Metal structures are not afraid of temperature deltas and are resistant to natural physico-chemical, biological, and mechanical loads. But the metal quickly heats up and cools down, this should be taken into account when building canopies for relaxation over the barbecue, so it is better to provide protective elements, for example, make railings in the gazebo, as well as wooden seats.
The main enemy of metal canopies is rust, which can cause significant harm, even destroy the structure in a short period of time. Treatment and protection of the metal elements of the canopy will help to avoid fatal consequences.
Drawing of a metal canopy over the porch
Location of carport on a summer cottage
Before starting any construction work, you need to consider a place for the canopy. From the selected area you need to remove the turf to a depth of 12-15 cm, and then build a cushion of crushed stone and sand. In this case, you can build a slight slope, as well as drainage structures around the perimeter. Then you need to lay any parking covering on the pad. If the machine is too heavy, you can install a reinforced concrete screed.
Durable stone covering
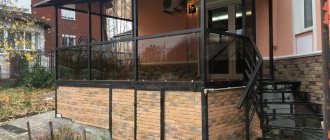
Depending on the method of location on the site, the structures can be autonomous, and can also be used as an extension to a garage, bathhouse or utility block. Also popular are the galleries that connect the house and the gate.
Individual devices stand on metal or wooden supports. If the structure is adjacent to another building, then it may have the following support options:
- beam-supported, when one side is supported on a beam, and the other on supports;
- cantilever-supported - fastening is carried out using brackets or corners;
- the console version is recommended for small structures.
Console device option
Carport in front of garage
Now let's look at the options for garage canopies and the features of their construction. The most common option is when the canopy is placed in front of the garage door. It can be made for one or two cars. A similar structure can be built between the garage and the house. In the photo you can see the most popular ideas. Sometimes a combination of a garage and a carport is used.
Design option in front of the garage
When deciding how to make a lightweight canopy, you can place it on the side of the main structure. For the construction of the roof, materials such as metal profiles, pipes, and wooden beams are used. The roof can be made of polycarbonate, corrugated sheets or metal tiles. Part of the canopy can also be placed over the garage. Similar designs can be of the following types:
open ones have a common wall with the garage;
This is what an open structure looks like
closed ones have three walls. In this case, cladding is performed using wood, awning fabrics or lining. If necessary, the canopy can be covered.
Closed shelter
In addition, such buildings can be collapsible or stationary. Often a garage with a canopy is built under a gable roof; this option is recommended for a wooden frame. If the structure is arched, then you can use a metal frame with supports.
Garage or shed - which is better: the answer to this question depends on financial resources, the purpose of the structure and the materials used. The most convenient solution is a combined option.
Carports attached to the house: photo
An extension near the house is popular because adjacent structures are easier to install. You can also use a simpler mount. Before deciding how to build such a canopy and how to attach it to the wall, you need to understand the materials.
The frame for construction near the house is often made of wooden beams or metal pipes. Also, structures next to the house are made of brick or stone, and are also filled with cement supports.
Design option near the house
The design of a canopy in front of the house requires the presence of strong supports that can withstand the weight of snow falling from the main roof of the house. You can see how to make beautiful designs in the photo.
Any similar structure consists of a roof and a frame
Particular attention should be paid to the base. You can choose the following material:
The wood is easy to process and does not require any complex tools. But this material requires special care. Over time, the tree becomes covered with fungus, rots and cracks. It must be protected with special impregnations;
Spacious and durable wooden canopy
The steel profile pipe is installed using a welding unit. Such material can last a long time;
Steel elements
the combined option involves the use of cladding a steel frame with wooden slats.
Combined construction
For the roof, a more aesthetic solution is to use cellular polycarbonate, or you can also use a profiled sheet.
Features of carports for 2 cars
Using carports, you can build practical structures for two cars. When choosing a specific design for two cars, you need to choose the right dimensions. The photo shows the best options for such buildings. You can combine this design with a utility unit. The spacious structure for two cars has dimensions of 8 by 6. The standard width should be at least 2.5 meters.
Gable structure for two carports
Features of types of canopies according to rafter systems
Each type of canopy has its own unique functions related to both technical parameters and physical structure.
Sheds
The main factor that sets them apart from other types of frames is the ability to use different materials to construct the structure. They may be:
- Tree
- Metal
- Alloys and mixed materials
The triangular shape suggests inequality in the height of the supports. One side is significantly higher than the other, while the smaller part has greater defensive capabilities. When creating free-standing canopies, the upper parts of the rafter legs are attached to the wall, the lower parts - to the suspension and supports.
Scheme of single-pitch structures
Gable awnings
These designs are the most balanced option between manual work and the use of industrial equipment, allowing you to obtain high-quality results by carrying out complex calculations and calculations.
The main feature that distinguishes gable awnings is the ability to choose an installation system. It is presented in two ways:
- Full work: performed in the absence of a concreted area or a large volume of foundation. First, there is a preliminary stage, during which the land is cleared of debris. Then individual leveling of the area for the canopy and concreting of the pillars takes place.
- Reduced work: performed if there is a concreted area. In this case, there is one stage during which 4 holes are drilled in the concrete. Next, the supports are attached to the site using anchor bolts.
Due to the fact that the upper ends of the rafter legs rest on each other, it is necessary to apply vertical and horizontal alignment techniques to increase the stability of the system.
Scheme of gable awnings
Tent awnings
It is one of the most difficult types in terms of implementation. When constructing it, it is almost impossible to carry out the results manually; you have to use artificial intelligence or industrial calculators.
The main unique feature of tent frames is their remarkable appearance and practicality, which not only provides beauty to the exterior of the house, but also increases streamlining and prevents precipitation from retaining on the roof.
The ideal shape, practically invulnerable to the influence of precipitation, is achieved by connecting the rafter legs at the top of the tent.
Scheme of tent canopies
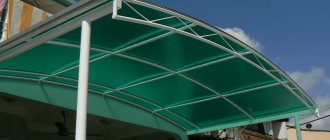
Arched canopies
These designs are ideal for residential buildings, cottages and places where personal vehicles are stored. Another advantage of the design is ideal streamlining due to the rounded shape.
The main point when constructing arched structures is the choice of material from which the canopy will be made. It is important to correctly calculate the bending radius, otherwise the structure risks collapsing or losing most of its properties.
The peculiarity of arched frames lies in the roof. It has the shape of a wave, or an arch or semi-arch. Rafter systems are assembled using arcuate supports and trusses.
Scheme of arched structures
How to do it yourself?
Step-by-step instructions, which describe how to choose a place, weld a canopy and install a roof, are very important for beginners. Experienced people can get by without it, but those who are building a shed for the first time have a lot to learn before getting started.
Selecting a location
Before you begin installing the canopy, you should decide on the location where this extension will be placed. Experts recommend refraining from building structures in lowlands. If there is no other place, then you will have to make a storm drain, which will entail additional financial investments. It should also be noted that the canopy should protect from sunlight throughout the day. Perhaps for this you should change the degree of inclination of the visor.
The next step is high-quality drawings of the canopy. Calculations should be made not only on the size of metal structures, but also on the cross-section of the profile material. Basically, for frames up to 6-7 meters in length, a 60×60 section is chosen; if the size exceeds the above length, then a pipe with a section of 80×80 is suitable.
Installation of supports and sheathing
After a suitable location has been selected, they begin installing the supports according to the finished scheme.
It is extremely important to install them smoothly and efficiently, otherwise the frame will not last long. To check the correct position of construction supports, use a level
Next, the racks are concreted and left for several days for the concrete to harden. During this time, the sheathing is assembled or welded. To do this, use a metal profile or profile pipe. Wooden beams are also used, but much less frequently.
The sheathing performs an extremely important function. The stability and safety of the entire canopy directly depends on how correctly this structure is installed. If everything is calculated and installed correctly, the roof will be able to withstand even the most severe snowfalls and downpours. The entire installation can be easily done with your own hands, without involving specialists. A lathing built independently can provide a long service life only with careful calculation and a high-quality approach to all work.
If the choice fell on wooden sheathing, then when choosing boards you should pay attention to some factors:
- boards and beams should not be wet;
- the best types of wood that are used for corrugated sheeting are considered to be coniferous;
- To avoid damage by fungi and various microorganisms, the wood must be treated with an antiseptic.
When choosing lathing from a profile pipe, the most important thing is its strength. In order to ensure the endurance of all load-bearing parts, you should choose a pipe with the most minimal dimensions. The optimal cross-sectional parameters for such elements are 40×20 mm. Absolutely all metal is treated with anti-corrosion agents.
Roof installation
In order to find out the amount of roofing material, you first need to calculate the entire surface area that should be covered. The resulting figure should be increased by 5-7%. Corrugated sheeting is recognized as the most popular material for canopies. This is a corrugated sheet that is coated with a polymer shell and zinc. It is not afraid of temperature changes, corrosion and rust, does not require maintenance, has a variety of colors, is environmentally friendly and does not ignite.
It is divided into three main types: load-bearing, wall and roofing. Experienced craftsmen advise using load-bearing corrugated sheeting rather than roofing sheeting in the construction of frames, since it is distinguished by its increased rigidity and is able to withstand heavy loads (for example, snow). The finishing touch is to secure the selected sheets. For this you will need self-tapping screws
The corrugated sheeting should be laid very carefully so as not to damage the polymer shell. The overlap is performed in one wave
To learn how to make a canopy from a metal profile with your own hands, see the following video.
Selection of materials and preparation of tools
The main requirement for the quality of profile pipe products is strength. To ensure the stability of the load-bearing parts of the structure made from them, you need to select pipes with minimum parameters equal to 80x80 millimeters. For additional elements, the optimal cross-sectional size will be 40x20 millimeters.
To determine the amount of roofing material, first calculate the area of the surface to be covered, and then increase the result obtained by 5%. Fastening is carried out with roofing bolts and special gaskets.
The structure is assembled in one of the following ways:
- Welding. But for this you need not only to have a welding machine with electrodes, but also to know how to properly weld a canopy from a profile pipe. Without skills, such work cannot be done.
- Using threaded connections. This requires metal corners and mounting bolts.
- Using special clamps.
A do-it-yourself canopy costs much less than a purchased one. It will meet the requirements subject to strict adherence to the technology of its construction.
Preparatory work
To successfully complete the task, it is necessary to draw up a rough sketch of the future canopy, prepare tools, purchase consumables and accessories. Required tools:
- building level and tape measure;
- grinder or saw for cutting metal;
- drill with a hammer drill and a set of drills and bits;
- riveter;
- metal screws or rivets.
A complete and objective assessment of the amount of consumables, as well as the required volume of fastening devices, depends on a clear drawing up of the drawing, so the preparation of this document should be treated with special attention. In addition, do not forget about safety precautions when working with metal products.
Dimensions and drawings
Option drawing of a canopy made from a profile pipe
First of all, you need to create a sketch. For example, let’s take a canopy whose roof will be made of polycarbonate. The sketch must show the appearance of the future structure and its approximate dimensions. Then you need to take all measurements at the site where the structure will be installed and create a detailed drawing. The canopy can be built either free-standing or attached to the house.
For example, you have a house 9x6 meters, and in front of it there is a free space of 9x7 meters. In this case, the width of the canopy can be equal to the width of the house wall, i.e. 9 meters. The reach can be made, for example, 6 meters. Thus, a canopy measuring 9x6 meters is obtained.
It is optimal to make a low paradise 240 centimeters high, a high one - 350–360 centimeters.
Simple mathematics calculates the angle of inclination. In this case it is equal to 12–13 degrees.
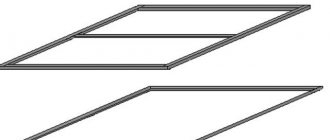
Now that all the measurements have been made, you can create a drawing. Rafter trusses must be shown on a separate drawing.
Roof truss options
After all the preparatory paper work has been done, you can calculate the required amount of building materials. Always purchase them with a margin of at least 5 percent. This is necessary in case you come across defective products or damage something during the process.
Methods for fixing the profile
- The most reliable way to fix metal profiles is argon or carbon dioxide welding. Welds created in a protective gas environment have fairly high strength and durability. Proper execution of welding work will eliminate the possibility of accidental destruction of the metal frame of a pitched roof.
- In the absence of welding equipment, bolts, rivets or crabs can be used as fastening elements.
A bolted connection has an important advantage - during the process of fixing elements, the tightening force can be controlled with high precision, especially if you have a torque wrench. To prevent backlash and spontaneous loosening of bolted connections, it is also necessary to use metal washers or locknuts. - When using rivets, it is impossible to adjust the strength of the fasteners: they are simply riveted all the way. In addition, this method of fixation is inconvenient for subsequent disassembly of the frame - for example, if the structure needs to be demolished, modernized or moved.
- Crab systems are used in the construction of relatively lightweight structures. They are suitable for connecting pipes with a diameter/width of up to 25 mm.
Construction tips
Any construction includes a whole range of works. This includes the purchase of materials, the selection and preparation of a site for installation, the engineering calculation of a canopy made from a profile pipe, and of course the assembly process itself.
Gable roof.
Preparatory activities
If you have several options for placing a canopy, you should first decide on the location. It is better to place such structures on a hill or on a relatively flat surface, where it is easy to arrange drainage. Water will collect in the lowlands, hence the additional costs for storm drainage.
A preliminary drawing of a canopy made from a profile pipe must be made
In addition to the location of the structures themselves, it is important to take into account the cross-section of the pipes. So, in the case when the length of the building does not exceed 4 - 6 m, and the width fluctuates around 3 - 4 m, for racks it is enough to take a pipe with a cross section of 60x60 mm
For a larger quadrature, a section of 80x80 mm is used.
The simplest drawing of a canopy made from a profile pipe.
The top frame, on which the trusses for the six-meter canopy will be based, is made from a 40x25 profile. The pipe for arches and cross trusses is selected depending on the amount of precipitation in the area. For courtyard structures with a small square footage, as a rule, products with a cross section of 30x30 mm are sufficient.
The material from which it is planned to construct the roof plays a big role here. For curved arched roofs, it is currently advisable to use lightweight, translucent cellular polycarbonate. It is better to make a straight single or gable canopy in the barbecue area from a fireproof metal roofing sheet or cover it with slate. Naturally, the heavier the material, the thicker the structures should be.
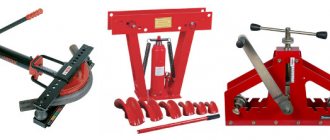
Roller pipe bender.
Canopy installation
Any work of this kind begins with marking and installing support columns. It is recommended to install supporting metal columns for light structures in the yard or at the dacha in increments of about 2 m. If the spans are larger, then the cross-section of the pipes will need to be increased, and the price will naturally increase.
Demountable connection.
Holes for installation are conveniently and quickly made using a garden drill with a diameter of 300 mm; a depth of 60 cm is sufficient. When all the holes are ready, the bottom of them must be compacted well, otherwise the column may shrink.
Before installation, a gravel or sand base 50 mm thick is filled and compacted at the bottom, after which the column can be installed and filled with concrete. All columns are mounted strictly level or using a plumb line. It is better to carry out such work with an assistant, since there is a high probability of making mistakes alone, and when the concrete sets, it will no longer be possible to correct it.
Straight trusses from profile pipes.
Concrete is poured to the level of the beginning of the pit for the construction of the screed. The floors under the canopy, depending on the financial capabilities and purpose of the structure, are laid with paving slabs or a concrete screed is made.
In both cases, you will need to make a small pit. To do this, the soil is selected to a depth of 100–150 mm, after which the surface is leveled and compacted. If paving slabs are being laid, it is recommended to cover the surface with geotextiles to prevent grass from breaking through.
To arrange the sole, you can use sand or gravel. The filling is done to a level of 50 mm and is also compacted. This layer is necessary to ensure normal drainage.
Next, the reinforcement frame is laid and a layer of concrete 50 mm thick is poured. This screed can withstand loads of up to 3 tons.
Covered parking on 4 pillars.
On top of the columns, a strap is made around the perimeter of the canopy. The transverse trusses for the sloping roof will be based on this horizontal frame. For a straight single or gable roof, trusses are installed in increments of 800 mm. The installation pitch for a curved roof varies depending on the width of the polycarbonate sheets, but, as a rule, it is about 500 mm.
The video in this article shows some of the intricacies of installation.
Frame assembly
To assemble the canopy frame, the narrow edge of the truss is placed on a stand and secured to a corner on the wall. It is necessary to weld the stand and the narrow edge together.
Before this, you need to check the level of the position of all parts of the assembly. The main thing is to weld the first truss correctly to prevent distortion of the entire structure.
When the first truss is installed, the others are installed in the same order, fastening them together with jumpers, at a distance of 500 mm across the width of the truss.
The result is a structure with rigidly fixed parts that will serve for a long time. Now you need to beat off the slag from all joints, check the quality and fullness of the seam.
In weak areas with large sinks, an additional seam must be installed. Use a grinder and a grinding stone to treat the welding areas, degrease all surfaces using any solvent, allow it to dry, and apply a layer of primer to the metal.
When the primer has dried, paint it any color you like. All that remains is to secure the polycarbonate sheets with special screws, and the canopy will be ready.
Tips for choosing a quality profile
Before erecting any structure, you should decide on the choice of material. When purchasing a metal profile or pipes, you should carefully inspect the workpieces to see if there are any cracks, cavities, sagging, inconsistencies along the seams, or a large number of dented and bent workpieces. When purchasing galvanized materials, it is advisable to check the quality of the coating - whether there are any peelings or sagging.
When purchasing, you must request a copy of the certificate and a receipt. It is imperative to ensure that the pipe wall thickness corresponds to that stated in the documents. You can’t make pipes in a garage on your knees, and there are no fakes, but you can come across poor quality material, so it’s better to buy in fairly large stores.
How to bend a metal pipe
A special pipe bender is used for this. With its help, you can easily bend various types of metal profiles. But if you don’t have such a tool at hand, then an angle grinder and welding will help you cope with the task.
It is very important when bending various pipes to prevent the appearance of cracks and large kinks, which should not be in the structure of the canopy. Also, they should not be flattened. When working with a manual pipe bender, considerable physical effort must be applied, so it cannot be used to bend profiles with a cross-section of more than 40 mm.
A manual pipe bender will help you make an arched canopy
Online calculator for pitched roof
This calculator will simplify the selection of materials for the rafter system and the final roofing covering, and will allow you to calculate the angle of inclination of the slope, the amount of sheathing and the size of the rafters.
Before making calculations, it is strongly recommended:
- Study the features of the rafter system for a specific roofing material. To a greater extent this applies to the sheathing. So, for bitumen shingles, the sheathing must be solid (the board can be replaced with sheets of OSB or plywood). For metal tiles, the lathing is installed taking into account the size of the wave.
- Check the reliability of the selected rafter angle and pitch. The program “Rafters 1.0.1.” will help with this.
Calculation results:
Roof angle: 0 degrees.
Common mistakes and recommendations
Most often errors occur in the following cases:
- Lack of design and drawings . By assembling a structure “by eye”, a number of technological inaccuracies can be made, which will negatively affect the service life of the structure. For example, the distances between beams and trusses may be incorrectly selected. Also, errors lead to peeling of welds due to temperature stresses (in winter the metal contracts, in summer it expands).
The location of the vapor and waterproofing layers in the roofing pie.
The first should be located below, on the main sheathing. The second (waterproofing) is on top, on the counter-lattice. If they are mixed up, moisture will penetrate inside the roofing pie and accumulate there, having a negative impact on the wooden elements of the rafter system.- Improper installation of waterproofing. The sheets should overlap, not end-to-end. To prevent moisture from getting into the joints, you should use construction tape - an adhesive tape that will seal the joints of the waterproofing sheets.
Design Features
A canopy is a small architectural form, part of a covered area that has a functional or decorative purpose. The main function of this structure is to protect the site from precipitation and sun.
Metal profiles compare favorably with other materials in their resistance to biological, chemical, and mechanical influences. Corrugated pipes with a square or rectangular cross-section are easy to design and install. They are equally well suited for installing a small canopy for a porch and creating a spacious covered area.
The canopy consists of:
- foundation;
- supports or suspensions - vertical and inclined load-bearing elements of the frame;
- lateral connecting elements - slopes and trusses;
- rafter system, consisting of rafter legs, trusses, sheathing;
- roofs.
In the case of erecting a canopy over a small area, for example, a porch or a sandbox, you can do without trusses - the structure will fully withstand snow and wind, since it will not have long horizontal sections.
If you plan to install a canopy over a parking space or a swimming pool, the horizontal ceilings and rafter legs will be longer. Such extended elements are vulnerable to load. To distribute it and give rigidity to the structure, in these areas they use not individual pipes, but trusses (reinforced structural parts consisting of two pipes and vertical and inclined elements connecting them - racks and braces).
The foundation for a canopy is most often made columnar, since its equipment does not require large excavations. The roof is made of polycarbonate, corrugated sheets, ondulin and other sheet materials.
Definition
Metal canopies are simple stationary or mobile street-type building structures that serve as a protective structure or a decorative element of the exterior. The main structural elements of this type of building are the roof, consisting of a frame and waterproof roofing material, and strong supports, which in some cases can be replaced by a wall.
Photo of a metal canopy
In the general understanding, this is a shelter from bad weather, ultraviolet radiation and other natural influences. However, in addition to their protective function, these structures can complement the architectural design of the building from an aesthetic point of view.
How to build a canopy with your own hands?
To make a canopy from corrugated pipe with your own hands, the first step is to prepare the area. It should be cleared of debris and large stones. Then the territory is marked according to the drawing. Holes for racks are drilled or dug. The diameter depends on the size of the structure, and the depth is up to 1 m. The higher the groundwater, the deeper the pillars should be buried. Each rack is poured with concrete. The installation of supports is preceded by work to fix each of them according to the level strictly vertically.
To install the roofing elements on the pillars, mark the position of all crossbars, etc. After this, they proceed to the manufacture of trusses and horizontal lintels. First, all the elements are cut and then welded together in the required sequence. Everything is assembled in accordance with the drawing.
When the entire structure is assembled, they move on to finishing work. The joints are cleaned, the entire structure is coated with a primer to protect it from corrosion, and lastly it is painted. After installing the frame, they proceed to laying the roofing material. It should be taken into account that on each side it protrudes by at least 20 cm. If necessary, the joints are treated with sealant.
The installation of a gable and hip roof differs only in the installation of the ridge. To make an arched canopy, you need a pipe bender, as well as the ability to make equally curved elements. Otherwise, the design will turn out to be asymmetrical.
Site preparation
When starting work, it is worth preparing the site for the structure. To do this, according to the drawn up sketch, we level and compact the earth at the site of the proposed construction. Then we dig holes around the perimeter for support pillars with a depth of 50 to 100 cm. The recesses are equipped in such a way that a rectangle is obtained, usually in two rows of 2-3 holes.