Air ducts are the transport networks of the ventilation system. Their design and installation are regulated by strict regulations and technological maps. Compliance with regulatory requirements during construction is a guarantee of flawless operation of the network, ensuring stable air exchange.
We will tell you how to install ventilation pipes in accordance with building requirements. Every developer must know the basic rules for laying and fastening air ducts. The information will also be useful for owners to understand the cause of the problem and decide how to fix it.
General rules for air duct installation
Each fastening of air ducts must meet general requirements that correspond to regulatory documentation, the so-called GOST fastening of air ducts:
| Regulatory act | Document's name |
| SP 60.13330 | Heating ventilation and air conditioning |
| SP 73.13330.2012 | Internal sanitary systems of buildings |
Along with the requirements specified in generally accepted documentation, there are installation instructions from air duct manufacturers.
Mandatory rules for duct systems
- Installation of flexible ventilation systems is carried out using full straightening.
- The installed structure should not sag. The sagging causes pressure to decrease.
- The ventilation system duct must be grounded. During operation, static electricity is generated.
- Aerodynamics must be taken into account when planning the project and its components. It occurs inside the structure when air moves.
- Flexible ventilation ducts should not be used in vertical two-story areas.
- Rigid ventilation outlets should be installed in basements and basements.
- If the ventilation structure was damaged during installation, it must be replaced with a new one. This also applies to external thermal insulation.
- If the ventilation system passes through the structure of buildings, it is necessary to use metal adapters and sleeves.
- When installing the connection, the ventilation sections must have a turning radius greater than at least two diameters. Otherwise, the aerodynamic properties of the channel are reduced.
Basic installation methods
Installation of the ventilation grille does not require special knowledge and skills. It can easily be done by a home craftsman with patience and accuracy. Most industrial products consist of two parts:
- main body, mounted directly on a hole in the wall or door;
- a removable part inserted into the openings of the housing, which allows you to inspect and clean the channels of the ventilation system without any problems.
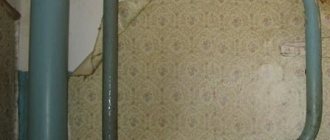
Begin to hang the internal ventilation grille from the first part, which plays the role of a frame. This is done using fastening materials or adhesives. Before this, the outer surface of the ventilation hole is prepared accordingly. It should be smooth and clean. Typically, the grille is placed on the wall after the finishing coat has been applied to it. This can be done in different ways:
- Fastening with screws or self-tapping screws is carried out on a solid wall made of concrete, wood or plasterboard. To do this, through holes are drilled in the grill body in places covered by the removable part, which are countersunk to the shape of the cap. You will have to install dowels in concrete or brick in appropriate places using a drill. When constructing a grating without a removable part, after installation, the screw heads are puttied and painted to match the color of the base material.
- Fastening with plinths or glazing beads is usually used for wooden products that fit well into a country-style interior made entirely of wood. In this case, self-tapping screws or finishing nails with a reduced head size are also used.
- Industrial models with standard spring-pressed spacer elements included in their device can simply be inserted into the ventilation hole, which must have standard dimensions for this.
- The easiest way to attach a plastic grill to any base is with glue. This is especially true for walls lined with fragile materials such as ceramic tiles. For this, compositions such as “liquid nails” are usually used. They are applied in a continuous stripe to the back side of the part, which is pressed against the wall and fixed with masking tape until completely dry. In this case, it will no longer be possible to dismantle the fragile part without destroying it.
The removable part of the grille is tightly inserted into the base fixed to the wall. In this case, for aesthetic reasons, it is better to rotate it so that the holes between the slats of the blinds are not visible to a casual observer standing on the floor of the room
When selecting and installing the transfer grids, pay attention to ensure that light rays do not directly pass through them. This can reduce sound insulation and does not look very nice
Plastic models usually include a thin mesh, which quickly becomes clogged with dust, reducing the effectiveness of the ventilation system. That's why most craftsmen don't install it. Otherwise, you will have to regularly clean the mesh.
Standard distances in relation to building structures and utilities
Along with the rules for installing ventilation, there are restrictions related to the distance from engineering and construction buildings. With them, fastening ventilation ducts is not allowed:
- between the ceiling and round-type ventilation communication - 100 mm, between walls - 50 mm;
- the structure of rectangular air ducts and reinforced concrete columns should be at a distance of:
— 100 mm with ventilation side 400 mm;
— 200 mm on the side of the ventilation system from 400 to 800 mm;
- 400 mm with ventilation side from 800 to 1500 mm.
- the distance between communications and ventilation should be at least 250 mm;
- the distance between electricity cables and ventilation should be 300 mm;
- building elements and joints of ventilation systems must pass at a distance of at least one meter.
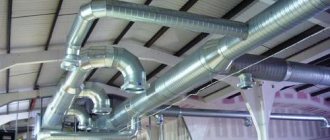
Attaching ventilation pipes to the wall and ceiling
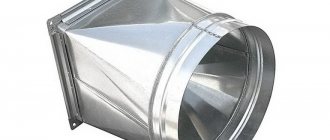
Metal air ducts without insulation with banded connections are attached to ceilings and walls using various structures: supports, brackets, hangers, clamps.
Features of installing rigid ventilation ducts
The distances between fasteners are strictly standardized:
- for round pipelines with a diameter of less than 400 mm - no more than 4 meters;
- for diameters equal to or greater than 400 mm - no more than 3 meters;
- for boxes with a cross-sectional side of less than 400 mm - no more than 4 meters;
- with a cross-sectional side equal to or greater than 400 mm - no more than 3 meters.
To remove the condensate that forms, horizontal sections of air ducts are laid with a slope of 0.01 - 0.015. Water drops roll down an inclined surface into drainage receptacles.
The axis of the horizontal ventilation pipe is parallel to the surfaces of the walls and ceilings; deviations are permissible when moving from one level to another
Laying a ventilation pipe with a diameter of up to 630 mm with flange and coupling (nipple) connections in a horizontal position is carried out using various fasteners. The distance between them does not exceed 6 meters.
In other options - no more than 4 meters. At points of insertions or turns, the stability of the air duct is enhanced by additional supports.
Suspensions and supports of horizontal sections of metal rectangular boxes with a perimeter of up to 1600 mm with flange or busbar connections are placed at a distance of no more than 6 m from each other. For other joints, the distance is no more than 3 m, and the tie-ins and turning angles are also additionally strengthened.
The installation step of fasteners for metal air ducts of any cross-section and dimensions with insulation, as well as for pipes without insulation with a diameter of more than 2000 mm or ducts with a side of more than 2000 mm, is indicated in the working drawings.
Vertical ventilation pipes are fastened every 4.5 m. In multi-storey buildings with a floor height of up to 4.5 m, air ducts are fixed in the floor ceilings. If the height of the premises from floor to ceiling is more than 4.5 m, the ventilation pipes are fastened to the walls in accordance with the instructions of the design documentation.
Vertical deviation of ventilation pipes is allowed within 2 mm per 1 meter of air duct length.
Uniform distribution of tension across the pendants is achieved by adjusting their length. It is prohibited to attach guy wires to the connection flanges. The mounting clamps should not dangle loosely on the duct, but should fit snugly around its circumference or perimeter.
Double hangers for attaching the ventilation duct are made every two single ones, with the length of both in the range from 0.5 to 1.5 m. For longer lengths, double hangers support the structure through each single hanger
All non-standard fastenings are calculated and displayed in working drawings.
The distance from the plane of the house wall to the outer surface of the round ventilation duct is at least 50 mm, from the ceiling surface - 100 mm.
For rectangular ducts, this parameter depends on the dimensions of the sides of the air duct section:
- for side 100 – 400 mm – 100 mm;
- 400 – 800 mm – 200 mm;
- 800 – 1500 mm – 400 mm.
The minimum distance to water, gas, and heat supply networks is 250 mm. At least 300 mm to power supply lines. The smallest interval between two round air ducts is 250 mm.
When passing through walls and ceilings, flanged and other types of air duct connections are placed at a distance of at least 100 mm from their surface. Fasteners are installed no closer than 200 mm from the detachable connection point.
Rigid Duct Fasteners
Below we will describe: with the help of what devices and how to attach the ventilation pipe to the ceiling.
Among the fastening elements used for these purposes are:
- The stud and shaped profile in the form of the letters Z or L provide additional support for the air duct from below. The method is suitable for installing heavy structures. The connection is fixed with self-tapping screws and a rubber gasket between the stud and the profile.
- A clamp with a pin is the best choice for ventilation ducts in the form of pipes.
- The cross-beam with two studs is suitable for main ventilation passages with a side rectangular cross-section of more than 600 mm. The air duct is laid on a traverse, which can be metal plates and profiles.
- Clamp without pin - used for short sections of flexible air ducts.
- Perforation tape – fastening for light pipes and rectangular channels with a diameter and side of up to 200 mm. To cover a round surface, a loop is made from the tape; in boxes, the punched tape is secured to bolted connections.
The opposite ends of the above fastening devices are connected directly to the ceiling of the room in the form of an anchor element or attached to metal beams using bolts or clamps.
The sideways movement of the box on the traverse is limited by the side studs. The displacement of the ventilation duct along the axis is prevented by the rubber seal between the surface of the traverse and the edge of the duct. This option is well suited for air ducts with heat and sound insulation
The ventilation pipes are fastened to the wall using embedded parts and cantilever structures.
To produce fixation use:
- Brackets. They are embedded in the walls of buildings or attached to them with dowels using a mounting gun PTs-52-1. Horizontal air ducts are laid on angle steel brackets.
- Tractions. They are used for hanging air ducts from building structures. Using adjustable hangers, the tension of the braces of the ventilation ducts is controlled. The standard is 1 fastening per 2 meters of air duct length.
- Clamps. Designed for fixing pipe air ducts on rods, grips, hooks. The width of the steel band of the clamp for a ventilation duct diameter of up to 400 mm is 25 mm, for a diameter of 450 – 1600 mm – 30 mm. Secure with anchor bolts or dowels.
Different types of fasteners are used in one ventilation system. How to properly fix the ventilation pipe to the wall is shown in the photo below.
The length and depth of embedding of the bracket into the wall depends on the dimensions of the ventilation pipe or duct. The minimum bracket size of 250 mm corresponds to an embedment of 150 mm depth, the maximum 1500 mm - 380 mm
Since extremely light-weight media are transported through air ducts, there are no special requirements for the strength of the brackets. The main thing is that they can support the weight of the highway itself.
Fixing flexible ventilation ducts
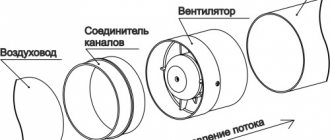
To connect air ducts to fans, inserts made of vibration-isolating soft materials are used, ensuring flexibility, tightness and durability of the connection.
Air ducts made of polymer film on straight sections can have bends of no more than 15 degrees. Metal liners help them cross building structures.
Flexible pipes are placed on wire rings with a diameter of 3-4 mm at intervals of 2 meters. The diameter of the air duct is 10% smaller than the diameter of the fastening ring.
A supporting cable made of metal wire with a diameter of 3-4 mm is stretched along the axis of the pipe, which is attached to the house structures every 20-30 meters. Steel rings are hung on the cable using wire or steel plates with a cutout.
Sagging of flexible air ducts between the fastening rings is not allowed; to eliminate this, a polymer film is stretched between the fastenings
Flexible pipes are used to connect:
- hard ducts to ventilation equipment;
- complex shaped parts;
- noise suppressors and other devices.
It is prohibited to use flexible corrugated pipes for main ventilation pipelines. Soft ducts cannot be used in vertical ducts longer than 2 floors.
Air duct mounting methods
The mounting of vertical air ducts is naturally installed in different ways. Horizontal round systems can be mounted in three ways. The methods for attaching them look like this:
- using a clamp and a pin, the air ducts are secured to the wall;
- thanks to the punched tape, there is no need for a clamp here;
- using a clamp for fastening air ducts and punched tape.
Rectangular systems are mounted using air duct fastening parts:
- z-shaped profile and studs;
- L-shaped profile and studs;
- traverse and pin. This is how the air ducts are attached to the ceiling.
Air duct fasteners can be fixed using a clamp, anchor and R, V-shaped bracket.
When installing hood mounts, it is necessary to maintain the distance due to regulatory, generally accepted standards.
Other types of ventilation installation
You can secure parts of the structure with bandages. This is done using the following technology:
Installation of round air ducts connected on bands: a – horizontal with the help of grips, b – vertical; 1 – block, 2 – clamp, 3 – mounting table, 4 – previously installed air duct; I, II, III – positions of air ducts during installation.
- A statement is drawn up for the assembly of enlarged fragments of the air duct.
- Fasteners and lifting mechanisms are installed on site.
- A round air duct is assembled from several large blocks, and the bandage is released on the first part.
- Its ends are separated and inserted into the second part.
- Tighten the ends of the bandage rings and insert the bolt.
- Alternately, assemble the parts of the air duct into each other and install them in the required places.
If you need to mount a structure with a rectangular cross-section, then use shaped tires and slats. The process for doing this is as follows:
- Fastening elements and lifting mechanisms are installed.
- Raise the air duct fragment and secure it in the desired place.
- If this needs to be done in a horizontal plane, then traverses are used. When installing vertically, a special grip is used.
- The joints of adjacent fragments are connected by securing the slats to the upper shaped rails.
- In places where this operation is difficult to carry out, composite strips are used.
If the diagonal of the air duct is no more than 40 cm, then C-shaped slats are used. The length of the block can be 600 cm without the use of traverses. And if you install them, you can increase the span of the air duct to 16 m.
Installation of a rigid rectangular duct
To connect ventilation pipes to each other and to fittings, various connecting devices are used. The flange method is considered the most popular in this matter. Here, metal corners and tire rails are used as flanges for grooves of various profiles. They are sealed in the form of a square.
In practice, there are several ways:
- An object of the required cross-section is first manufactured and then secured by welding.
- A common option is to connect the parts of the channel using anti-corrosion rivets. They look like special clamps. On the metal structure, in the groove of the bus bar, stiffening angles with technological holes for connection with bolts are installed. Connections between metal structures are sealed with a rubber seal of six to eight millimeters. You can use silicone sealant. If there is warm air in the ventilation system, then asbestos cardboard is used in its design.
Not everywhere, thanks to bolts, studs and nuts, sufficient tightness of the system is achieved.
If the pressure in the structural ventilation device is not more than 1000 Pa, but the dimensions of the sides of the structure are large, clamps in the form of a bracket are used:
- bracket more than 900 mm with twenty mm flanges;
- bracket more than 1100mm at thirty millimeters.
At a pressure of more than 1000 Pa in the system, the need to use staples is as follows:
- for 20 mm joints, from 700 mm is used;
- for 30 mm joints it is used for widths greater than 900 mm.
On straight sections of the structure, fewer clamps are required at joints than on curved and conical surfaces. After any installation, be sure to check it.
Advantages of duct fasteners
To ensure that the system is securely fastened, the use of clamps as fasteners is more than justified:
- The clamps are easy to install, having a simple and durable fixation mechanism.
- The possibility of unplanned detachment of fasteners is completely eliminated.
- The part is quite compact, so it is easy to install even in cramped conditions and limited space.
Note! The device with a rubber seal has sound-absorbing properties. Such a clamp is capable of reducing the noise level by 15 dts and reducing vibration of the system.
Installation of flexible air duct
Flexible systems are much easier to install than rigid systems. A hood over a gas stove is an example of installation. There are three types of system installation:
- Sealing. With this type, the connecting joint of the system is sealed with sealant, and is not the only method in horizontal installation.
- Cutting. According to this installation option, the flexible ventilation pipe is stretched. Measure the required length, and cut off the required part along the turn.
- Compound. In this case, the air duct is placed on the connector. At a minimum, the connectors must have a five-centimeter presence of part of the system on one side.
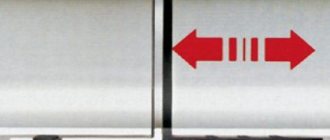
The flexible air outlet installation is installed taking into account the air movement in the system. Properly installed ventilation reduces noise. This can be achieved by installing excellent ventilation, with an arrow indicating the air flow.
Ventilation system in a private house
The design and installation of a ventilation system in a single-apartment residential building is carried out taking into account the requirements for operational characteristics prescribed in SNiP 31-02-2001 and SP 55.13330.2016.
Ventilation in a private house can be with either natural or mechanical stimulation of air exchange, with the removal and influx of air masses through air ducts. The main thing is to maintain clean air in the premises.
Exhaust air with an unpleasant odor or containing harmful substances, such as fuel combustion products, is discharged directly outside. That is, they should not penetrate into other rooms in any way.
To ensure air exchange in a large private house, a ventilation system is required, which includes a system of air ducts that ensure the removal of polluted air masses and the supply of fresh air.
Be sure to ensure the removal and flow of air in the kitchen, bathroom, and boiler room. The minimum performance of the ventilation system with full or partial air exchange in a given period of time is regulated.
When organizing a ventilation system that meets established requirements and is capable of providing a comfortable microclimate, it is important to correctly determine the configuration of air ducts, take care of sealing ventilation openings, places where pipes pass through walls and ceilings in order to prevent the occurrence of cold bridges and prevent rodents and insects from entering the house.
Installation of insulated air duct
Due to its affordable price, a flexible ventilation system with thermal insulation is in demand. When installing this type of system, several points need to be taken into account:
- When connecting two parts of a system or connecting to equipment, accurate measurements are required. It will be used to cut and adjust parts of the system.
- When putting the pipe on the connector, the insulating material is pressed out for convenient work with the internal component of the ventilation material.
- The joint of the internal parts of the system is connected with aluminum adhesive tape.
- After sealing the internal parts, the insulation is returned to its place and also connected with an aluminum adhesive strip. Then it is secured with a nylon or metal clamp.
IMPORTANT!
Connecting two parts of the system only with a clamp, without aluminum tape, will not give the desired result. During the use of the air conditioner, the connection point will become wet due to condensation and become unusable.
To prevent vibration from the fan from being transmitted through the ventilation channel, an anti-vibration gasket is installed from its outlet pipe.
The reduction in turbulence is reduced due to the length, which should be 1.5-2 times the diameter of the outlet pipes.
How to combine a plasterboard ceiling with air ducts
Air ducts “get along” perfectly with plasterboard ceilings. The hollow space between the ceiling and the gypsum board is excellent for laying ventilation lines. An alternative option is to cover the air duct with a plasterboard box.
ATTENTION! It is necessary to ensure reliable thermal insulation of the channels to prevent the possible occurrence of condensation and damage to plasterboard sheets.
Hiding in the ceiling space
If the ceilings in the room are high enough, there will be no problems with masking the ventilation ducts. For installation in such cases, flat channels of rectangular cross-section with a heat-insulating coating are most suitable. Attaching the air ducts is carried out as usual. In this case, contact with the metal profile frame must be excluded so that vibration and noise are not transmitted to it.
What is installed first is a matter of personal preference for installers. You can, for example, mark out the ceiling hangers, then assemble the ventilation, and after that - the frame for the plasterboard. It is important to combine the fastening fittings of both structures on the ceiling area without violating the standards. The sheets are hemmed after testing the ventilation system.
We close it with a box
When the apartment already has low ceilings, you can hide the air ducts in another way. To do this, the main gypsum board ceiling is “pressed” against the ceiling as much as possible, and ventilation switches are mounted along the walls under the second-level ceiling duct. Of course, in this case, the costs for air ducts and fittings will increase somewhat, and a two-level design will cost more.
If the space is really bad, the ceiling is plastered for painting, and a mini-box made of gypsum plasterboard is assembled for the ventilation duct. In this case, a small amount of starting profile and one sheet of drywall will be enough for the room. When calculating, it is necessary to take into account that there should be a small space between the air duct and the walls of the box for air circulation.
As in any business, a creative and innovative approach is encouraged when installing ventilation systems. However, we should not forget about the main thing: any violation of the standards and rules for attaching air ducts to the ceiling leads to unnecessary problems.
Safety precautions when installing an air duct
Each installation in construction must be guided by regulatory documents. When installing ventilation, equipment installers are guided by OST 36-108-83, which is interpreted as “Installation of air conditioning and ventilation systems.” Safety requirements". This act describes the “dogmas” of safety precautions. Indicators of hygiene and sanitation are reflected. Environmental requirements are also covered.
This document ensures the safety of all team members performing their proper duties during installation. The act contains a large list of important notes for carrying out labor activities at the work site:
- providing the employee with special clothing, footwear and personal protective equipment;
- the working day schedule and rest time are prescribed;
- lighting conditions at the work site;
- preventing onlookers from entering the installation area.
Safety precautions cannot do without fire extinguishing equipment at the equipment installation site. There must be essential medicines at the installation site to provide assistance to the injured.
According to this document, each member of the installation team must have access to the site. Admission is permitted after instruction regarding a particular object. Issues of safety and first aid are covered.
Before the installation of ventilation equipment begins, the installation plan and the availability of all components and components necessary for installation must be agreed upon.
Along with this regulatory document, installation specialists must also be guided by the air duct installation flow chart. Along with the above aspects of on-site work, installers can be given additional instructions if required by production needs - working at heights, with winches and hydraulic lifts. After this briefing, the employee is given a document certifying the acquired knowledge regarding work in special conditions.
APPLICATION AREA
1 AREA OF USE
A standard flow chart (TTK) has been drawn up for one of the options for the installation of air ducts for ventilation systems in industrial and public buildings.
The TTK is intended to familiarize workers and engineers with the rules for the production of work, as well as for the purpose of using it in the development of work production projects, construction organization projects, and other organizational and technological documentation.
Types and types of air ducts
Conventional ventilation systems are used to move air. In other words, these are ordinary pipes. They are distinguished by the material of production, rigidity and the presented shape.
The material from which the metal channel sheet is made. They are distinguished by characteristics and are applicable in different situations:
- Thin sheets 05-1.0 mm are suitable for air directions with a relatively cold flow of up to 80 degrees and no more than 60% humidity. In this case, cold-rolled galvanized steel is suitable.
- Sheets in the range of 1.5-2.0 mm are suitable for high temperature flows and humidity levels. Sheets made of carbon steel and stainless steel are applicable here.
- In buildings where there is the presence of gases and vapors, ventilation systems made of metal plastic and aluminum compounds are used. The protective layer of the structure will provide the necessary protection.
- In everyday life, ventilation systems made of polypropylene and fiberglass are used.
Stiffness is an indicator by which all air ducts are distinguished into:
- Flexible, which in turn can be framed or frameless. They are a corrugated sleeve. They are used for short air systems. Excellent replacement for corner bends. They stretch and contract many times. The steel spiral is covered with synthetic material and aluminum tape. They do not lose their properties.
- Semi-rigid ones are a little denser. They are based on a double-sided aluminum coating with a layer of mineral wool on the inside. There is also a wire frame. Semi-rigid systems include a pipe made of aluminum strip. It can only be stretched once. It is perfect for smoke exhaust systems and can withstand temperatures of 700 degrees.
- Rigid ventilation ducts are suitable for industrial premises. They are durable and reliable. There are both spiral-wound and straight-seam. The tightness of the joints is ensured at the highest level.
Materials and tools for installation
General diagram of the ventilation system.
There is nothing special in the list of materials and tools that will be needed during installation. You can easily buy everything you need at any store for construction work:
- permanent markers or felt-tip pens;
- sharp scissors, knife (both);
- construction meter;
- wire cutters for cutting wire (side cutters or pliers);
- protective gloves for working with insulated air ducts;
- mounting tape;
- tightening clamps;
- Phillips screwdriver for fixing with clamps;
- a set of brushes for applying a special sealing mastic.
Features of the materials used
When using different materials, pay attention to their characteristics, advantages and disadvantages. Consider the conditions in which the air ducts will be used
If we talk about water-based sealants, they can only be used indoors. Their action is highly influenced by humidity, and the drying time depends on it. But you can apply this sealant with a brush and stick it to a damp surface. It is easy to clean, environmentally friendly, non-flammable and lifeless.
When the sealant is based on a solvent, it hardens faster. This will save time on drying. It can be applied in any weather conditions and stick even to slightly greasy surfaces. Its disadvantage is that when wet it is very flammable: you can only use it in a well-ventilated area (due to its great harmfulness). This type of sealant has a more limited service life.
Air duct arrangement diagram.
Mounting clamps, which are essential for securing and stabilizing flexible air ducts, can also be found in all sorts of varieties. Among them there are simple standard ones, in the form of turning rings (this will help you ensure that the turning angles are fastened without kinks and without kinks), connecting and adapter pipes, as well as connecting rings (they are needed when the air duct is connected to an air distribution device, such as diffuser and others).
They all have different types and characteristics and are used depending on your requests and needs.
Follow the main rule when using any mastics, tapes and sealants: provide a dry, grease-free and clean surface.
Duct selection
In order to choose the right ventilation system, you need to contact specialists. Engineers will accurately design the future air direction in the canal, taking into account all factors. They will make the best decision on the diameter of the air duct and the material from which the ventilation will be used.
Rigidity
When designing knowledge of production significance, general building ventilation of a high-rise building under construction, rigid type systems are used. We apply to them:
| Regulatory document | Document's name |
| VSN 353-86 | Design and application of air ducts from standardized parts |
| TU-36-736-93 | Metal air ducts |
Material
If the air temperature is up to 80 ° C and the humidity is 60%, use the following systems:
- from thin-sheet galvanized cold-rolled steel, the thickness of which is 0.5-1.0 mm;
- made of hot-rolled sheet steel, the thickness of which is 05-1.0 mm.
If the humidity and temperature levels are higher than those noted, then stainless steel channels are used.
If there are particles of gases and vapors in the air, then use a channel made of metal plastic. If necessary, tightness is achieved in accordance with the regulatory document TU 36-736-93 for class “H” and class “B” according to EVROVENT 2/2.
Get a commercial offer
Get a quote for your property by submitting a quick quote now.
Briefly describe the essence of the task:
The group is ready to implement comprehensive solutions for the installation of internal engineering systems and building networks. We provide a guarantee for equipment purchased from us and all installation work!
We are waiting for your phone call
About the company, Reviews, Our objects, Contacts
Send a request and receive a commercial offer
Air duct calculation
To correctly calculate the cross-section of the air duct, professionals evaluate the length of the system line. Calculate the required volume of air exchange. The section calculation looks like this:
S (ventilation cross-sectional area)=L(required air exchange volume)/3600*V(system speed)
In the formula, 3600 is a fixed value
To calculate the ventilation diameter, resort to the following:
The size of a rectangular duct can be calculated:
S=A*B, where A,B is the width of the duct walls.
For installation, pipes and ducts are selected that correspond to and slightly exceed the received data.
Air flow standards are shown in the table:
Did you manage to solve your problem using the recommendations from the article?
Yes!
45.26%
No. More answers required. I'll ask in the comments now.
37.93%
Partially. There are still questions. I'll write in the comments now.
16.81%
Voted: 464
How many fasteners are required?
The type of fasteners and their quantity are determined at the design stage, taking into account the weight, dimensions, location of different types of air ducts, materials of manufacture, type of ventilation system, etc. If you plan to tackle these issues yourself, you will need to do the calculations and use reference data.
The consumption rates for fastenings are calculated based on the surface area of the air ducts. Before you begin calculating the surface area, you need to determine the length of the duct. It is measured between two points where the center lines of the highways intersect.
If the duct has a round cross-section, its diameter is multiplied by the previously obtained length. The surface area of a rectangular duct is equal to the product of its height, width and length.
All calculations are made at the preliminary stage, the data obtained is used during installation, markings help to maintain the calculated distances without allowing errors
Next, you can use reference data, for example, standard indicators of material consumption (NPRM, collection 20) approved by the Ministry of Construction of the Russian Federation. Today this document has an inactive status, but the data contained in it for the most part remains relevant and is used by builders.
The consumption of fastenings in the directory is indicated in kg per 100 sq. m. m. surface area. For example, for round seam air ducts of class H, made of sheet steel, 0.5 mm thick and having a diameter of up to 20 cm, 60.6 kg of fasteners per 100 sq. m. will be required. m.
A properly designed and installed air duct system not only functions flawlessly, but also organically complements the interior of a modern home.
When installing air ducts, straight sections of air ducts along with bends, tees and other shaped elements are assembled into blocks up to 30 meters long. Next, fastenings are installed in accordance with the standards. The prepared air duct blocks are installed in the places designated for them.
The following article will familiarize you with the regulatory requirements for organizing ventilation in a private house, which all owners of country property should read.
Types and characteristics of ventilation pipes
Air ducts for domestic use are often made of plastic or metal. But there are many more options: traditional brick and asbestos-cement pipes, ceramic and sandwich pipes, fabric pipes made from technical textiles. The characteristics of some types are worth considering in more detail.
Metal hoods
They have a number of advantages: strength and long service life, a smooth internal surface on which soot and dust deposits do not accumulate, immunity to high temperatures and the aggressive effects of moving gases. They are made from different alloys - black steel, galvanized and stainless steel. The usual thickness of products is 0.5−1.2 mm, the maximum is 5.
Sheet aluminum is rarely used; foil is more often used. Straight sections of air ducts with a diameter of up to 50 cm and a wall of 0.55 mm are made from tin, and for large sections the thickness is 0.7 or more millimeters.
Each of the subtypes of metal ventilation pipes has its own characteristics:
- Welded air ducts made of black steel are installed in smoke removal systems with a possible temperature jump. The cross-section can be round or rectangular with dimensions Ø10−160 cm, square 100 x 100 mm and above. Wall thickness - 1-2 mm, length of sections - 1.25-2.5 m, connection - flange. All shaped and straight parts are coated with anti-corrosion primer GF-021. Automatic electric arc welding guarantees the airtightness of the seam.
- Galvanized pipes, compared to previous products, have better protection against the aggressive effects of transported gas mixtures and are not afraid of contact with moisture. Round air ducts are made straight-seam or spiral-wound. In other respects, the characteristics coincide with those of black iron pipes.
- Stainless steel hoods are used to give an object an aesthetic appearance, hygienic properties and to move highly toxic and aggressive gas environments. In production, they use the techniques already mentioned, as well as the technology for the production of corrugated sleeves from multilayer foil with a size of 0.12–1.0 mm. In addition to flange connections, it is possible to join sections into a socket, lock fastening and welding with a special heat gun. Compared to other metal air ducts, stainless steel ones are tougher and can withstand higher temperatures - up to 900ºC.
All steel chimneys have a long service life and high strength. They operate at temperatures ≥140 degrees and rarely clog due to their perfectly smooth surface.
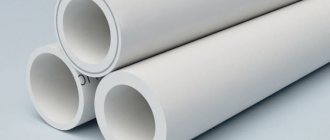
Plastic channels
These ducts are only a partial alternative to metal air ducts (the use of plastics in heating hoods is prohibited).
Polymer pipes are made of round, rectangular and oval sections and the following materials are used:
- PP - propylene: does not react to organic matter, acids and alkaline solutions;
- HDPE or HDPE is a malleable polyethylene with ordinary properties;
- PVDF is a fluoroplastic material that is resistant to all acids and designed to work in conditions of negative (from -40º) and hot (up to +140ºС) temperatures;
- PVC - heat-resistant smooth vinyl pipes, can be rigid or in the form of flexible corrugation, can withstand up to 80ºC and are not afraid of ultraviolet rays.
The sections are connected to each other by means of a socket, and are attached to fans and heaters using flanges. The cross-sections of the air ducts are standard, round diameters vary between 100-1250 mm.
Polymer hoods have many advantages over metal sections: they can be sawed with a regular hacksaw and joined by heating the ends. Light weight, lack of seams and smooth surface - all these properties allow you to choose lower power fans. There is no noise from air movement inside the plastic channel. The length of the lashes is 3−12 m.
Combined sandwich pipe system
This design is a pipe of a smaller diameter inserted into a channel of a larger cross-section. The space between them is filled with a heat-insulating layer - non-flammable basalt wool. Both shells are made of stainless steel. Cheaper options - the outer pipe is galvanized, the inner pipe is made of black iron. Other combinations of metals are possible.
Insulated air ducts are installed to extract flue gases from a stove, fireplace or heating boiler. The device has a high degree of fire safety.
- the versatility of the design allows installation inside and outside the building;
- ease of assembly - even an inexperienced craftsman can install a chimney from sandwich sections;
- the smoothness of the surface and the insulating layer reduce to zero the possibility of condensation and soot accumulation inside the pipe;
- the lightness of the structure makes it possible to ensure its stability without erecting an additional foundation, which speeds up installation and reduces costs;
- an attractive look that can decorate the design of a building or a specific room.
The air duct sections are connected using the socket method. Sandwich pipes have two disadvantages: high cost and relatively short service life - up to 15 years.
State standards
All rules are compiled into state standards - GOST, sanitary rules and norms - SanPiN, codes of practice - SP.
These regulations provide calculations of air flow into various types of premises, which depend on various factors. They regulate the necessary parameters of air exchange and a healthy microclimate, and also establish standards for the installation of ventilation equipment and its operation. For example, according to GOSTs, on average there should be up to three cubic meters of fresh air per square meter of an enclosed space. In addition, up to 30 cubic meters per hour is provided for one adult resident. They also indicate that for gasified kitchen premises the norm is higher than for kitchens with electric stoves - 90 cubic meters per hour versus 60 cubic meters. At the same time, 25 cubic meters is sufficient for bathrooms. m/h, and bathrooms - up to 50.
In addition to domestic standards, there are regulatory documents of the foreign engineering community Asare. If you plan to use American-made ventilation systems to furnish your own cottage, then you should familiarize yourself with them. In particular, Asare 62.1 defines the minimum acceptable coefficients and parameters for ventilation, and Asare 55 provides the necessary conditions for the microclimate and thermal comfort of buildings.
The initial stage of designing ventilation communications is to develop technical specifications, which necessarily indicate the requirements for the exchange of air flows in each room of the building. Drawing up such a document requires certain knowledge, so if you are not confident in developing it yourself, it is better to invite specialists.
Basic development steps.
- Determination of standards for the amount of air supplied to each room. This parameter is necessary for calculating the dimensions and cross-sections of air ducts, as well as for developing their branching diagram. Subsequently, using the calculated data of the first stage, the optimal solution for the location of ventilation ducts is selected.
- Selecting the air flow method. After analyzing the technical conditions of the premises, safety requirements and customer wishes, the most rational option is selected. It can be natural, forced or mixed.
- Calculation of flow distribution inside the ventilation complex. At this stage, the required fan power, the volume of air that must pass through a certain section, and the losses of each unit are calculated.
- Calculation of noise characteristics and calculation of the sound pressure exerted by air flows when moving through air ducts. According to SNiP, noise should not exceed 70 dB.
- The final stage is the preparation of drawings with full detail and specifics of each system component.
Based on the developed task, a ventilation system diagram is selected. It is necessary to coordinate and approve it before the interior finishing work of the building, since its implementation will require additional installation work for drilling various holes and channels. It should be remembered that some technical rooms require the installation of a separate ventilation circuit. For example, a boiler room and boiler room - according to fire safety requirements, a garage - according to technical requirements. The solution methods may be different, but they must comply with the technical specifications, ensure ease of installation and further operation, that is, adhere to the following criteria.
- The number of components in the system should tend to a minimum, since the fewer parts, the less often they break.
- Maintenance should be organized in such a way that it becomes accessible to ordinary users - residents.
- If the adjustment of air exchange and microclimate settings are understandable to non-specialists, this will significantly increase the rating of the equipment in the eyes of the buyer, as it will reduce the cost of its maintenance.
- The ventilation system must have backup units that will replace the main ones if they break down and during maintenance.
- Not the least factor is ergonomics: the complex must be correctly integrated into the interior of the house.
Mandatory rules
- Installation of flexible and semi-flexible air ducts is carried out in full tension.
- The air hose should not sag in any area - pressure is lost at each deflection.
- Grounding the air duct is mandatory: during operation, static electricity accumulates in the line.
- When the ventilation system operates, the air in the ducts moves in a spiral (aerodynamics), this must be taken into account during design and installation.
- Flexible air ducts cannot be used on vertical sections of the main line longer than 2 floors.
- In rooms below ground level (basements, ground floors), in contact with the ground, in concrete structures passing through floor/ceiling ceilings - only rigid air ducts.
- If the air duct is damaged during installation, it should be replaced. The same applies to the external thermal insulation coating.
- When passing through walls, adapters and metal sleeves must be used.
- When making a sharp turn, the aerodynamic properties of the pipe are reduced; the turning radius must be no less than twice the diameter of the air duct.
The process of attaching horizontal ventilation
All instructions for performing work boil down to the following points:
- Inspect the place where the air duct will pass.
- Place ventilation fastening elements on the walls.
- Install lifts and transport all parts.
- Assemble into blocks all the parts that are located separately, and strengthen the clamps needed to attach the suspension.
- Assembling air ducts using flange fastenings.
- The process of assembling and fastening the system to those elements that were previously attached to the walls.
- Check whether the installation was carried out correctly. Connect the section of ventilation that was carried out again, taking into account those blocks that are already in the building.
- Remove all devices that play only an auxiliary role and check how the assembled system works.
If the installation is carried out under the roof, parts and components must be supplied directly to the installation site. On site, they are independently connected, creating entire blocks, using special stands. Only after this, using winches, should the product be lifted and the flanges connected. They are pre-positioned in the places where they are needed. The section, which has already been assembled, is installed in place, the winches are moved, and work begins with the next link. In this way, the entire process is carried out until the work is finally completed.
Air duct installation
If the column itself is made in the form of a lattice, the process will be carried out between the braces or along the edges. When choosing the first option, you should initially secure the pipes and only then begin the main work. At the site where ventilation is installed, it is not introduced entirely, but in fragments. The second option is distinguished by the peculiarity of collecting large blocks, which should subsequently be lifted using a winch and attached with brackets.
Mistakes when installing a kitchen hood
1
Some people, of course, leave a grille for natural air movement, but still manage to block it with the air duct itself.
2
Recommended dimensions for round air ducts are d=125mm. For rectangular ones - 204*60mm.
3
In most cases, this is prohibited by the rules. Specific points will be given below in the text.
You can, of course, lay a separate box along the facade straight to the roof. But is it worth it? Although in restaurants and cafes located on the ground floors of high-rise buildings, this solution is widely used.
By the way, the ban on venting air to the street through a wall does not apply to private houses, but only to high-rise buildings.
4
First of all, this will affect the noise. Although, of course, the turns themselves are not the greatest evil. And sometimes you can’t do without them.
It is the turns that follow one after another, without acceleration sections, that are dangerous.
5
Remember that a productivity of 200-300 m3/h is quite enough to effectively remove all odors, with minimal load on the ventilation of the house.
6
The installation height directly depends on what kind of stove you have - gas or induction hob.
7
Believe me, sometimes this structure has to be disassembled.
8
Why this is a mistake, and when it is still possible to do this, is discussed below.
9
As a result, connecting it haphazardly, through carriers and extension cords. Do not forget that in the end this is not a portable device, such as a fan, heater or mobile air conditioner.
This means that the wiring for it needs to be done stationary and wisely.
10
It must be embedded and installed in compliance with the appropriate angles and inclinations. Otherwise it will work every other time.
In general, installation of a hood can be divided into two main stages. The first is its connection to electricity. The second is the air duct structure and everything connected with it.
Let's look at each of them separately.
Recommendations for installation and fastening
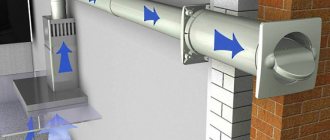
You can install the ventilation outlet on the roof with your own hands. The installation location of the pipe should be chosen in such a way that, if possible, it passes through the attic without turning. At the same time, it must not cross the rafters, much less the ridge girder.
The best option is when the ventilation pipe outlet is located directly above the internal ventilation shaft riser or air duct. If this is not possible, a corrugated pipe can be used for the connection.
The pipe must be connected to the riser strictly vertically
When placing pipes or an exhaust duct, the minimum permissible distance from the supply air intake must be taken into account:
- horizontally – 10m;
- vertically - at least 6m.
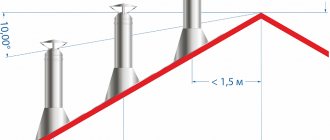
The height of the ventilation pipe is determined as follows:
- if it is located near the ridge, the final opening of the hood should rise above the ridge by half a meter;
- if there is from one and a half to three meters left to the ridge, the hole should be level with it;
- if the pipe is located more than three meters from the ridge, the hole is drawn along the side of an angle of 10 degrees to the horizon with the apex on the roofing ridge;
- if the ventilation outlet is located next to the chimney, the length of the pipes should be the same;
- on a flat roof, the height of the pipe is calculated according to a special table, but it should not be lower than 50cm.
When installing a pipe on a pitched roof, the ventilation outlet should be placed as close as possible to the highest point of the roof - the ridge. In this case, the largest part of the pipe will be located in the attic or attic space and will be protected from strong temperature changes and gusts of wind.
The height of the roof ventilation pipe is selected depending on the distance from the ridge. These conditions must be observed so that the exit does not end up in the backwater zone
For a flat roof, the main role is played by the geometry of the air duct, which should be located directly under the exhaust pipe so that the air can freely flow out into the street.
Manufacturing of ventilation flanges
If we characterize the types of ventilation flanges in general, we can say that the most commonly used are angle and tire flanges. This is explained by the fact that these types of ventilation products can be produced directly on site in the shortest possible time.
In turn, angle flanges are manufactured at enterprises using welding. This increases the labor intensity associated with their production, but makes them durable, and the attachment point using welded flanges from the corner is characterized by increased rigidity. Due to the above properties, welded flanges are expensive (we will talk more about the cost of different types of flanges below), so they are used for installing rectangular steel ventilation ducts with a thickness of more than 1 mm.
Plastic ventilation flanges are often manufactured in factories in the form of ventilation grilles with a flange. They are easy to purchase at any plumbing store at a low price. Mostly plastic ventilation flanges are small in size, these are diameters of 100, 150, 200 mm or square types.