It is difficult to imagine a mechanical working tool or functional part that would not work through the use of threaded connections. Cars, hand tools, household appliances, plumbing - this is just a small list of equipment that would not be able to function without modern threads.
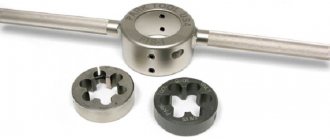
Set of dies for thread cutting
It is not surprising that so often a person has to sharpen the threads on parts himself. Fortunately, this is quite easy to do. In your work you will need a small set of basic tools, taps and dies.
So how to do thread cutting correctly? Let's figure it out now.
How to make a thread with a tap?
A hand tap creates a thread profile by pressing grooves into a piece of iron. This tool is not intended to remove excess material from a hole. Accordingly, working with a tap involves preparing the part for cutting. Before taking up the tool, you need to drill a hole of a suitable diameter in the workpiece and clean it with a countersink.
How to choose the right die?
Unlike universal taps, dies differ not only in size, but also in shape. So, depending on the tasks, you can choose a tool:
As for the sizes, the dies differ in thread pitch (indicated in mm) and diameter. The latter is calculated using a special formula: to obtain the desired number (D), add 0.2 to the diameter of the workpiece itself (it must coincide with the desired size of the external thread), indicated in millimeters.
How to use the tap?
When all the necessary tools have been found and drills of suitable sizes have been selected, you can begin cutting the part. Method of working with a tap:
- Secure the previously prepared part (with a hole drilled for the thread) in a vice of a suitable size. In all this, the surface to be treated must be placed strictly perpendicular to the equipment (fixed in the driver and an oiled tap).
- The crank is turned by grasping its handles with both hands. To facilitate the cutting process, for every 1.5–2 turns clockwise, make half counterclockwise, thus making rotational-translational movements.
- Having finished cutting, the tap is removed from the hole by unscrewing it by the knob in a counterclockwise direction.
What kind of thread is there?
Any thread has many significant parameters that are taken into account during operation of the part. Depending on the specified characteristics, it comes in several types:
| Classification | Varieties |
| According to the method of measuring diameter | Metric |
| Inch | |
| By the number of thread passes | Single pass |
| Two-way | |
| Three-way | |
| According to profile shape | Round |
| Triangular | |
| Rectangular | |
| Trapezoidal | |
| According to surface shape | Cylindrical |
| Conical | |
| In the direction of rise of turns | Right |
| Left | |
| By location | Internal |
| Outdoor | |
| By purpose | Fastening |
| Fastening and sealing | |
| Chassis |
To understand what specific type of thread we are talking about, it is customary to use symbols. So, when talking about the shape of the profile and surface, they resort to abbreviations: E - for round, Tr - for trapezoidal, J - for cylindrical and K - for conical. When indicating the diameter of a hole or part, be sure to indicate the units of calculation (for example, the marking “M8” literally means “8 mm in the metric system”).
Hole diameter, drill bit and pitch size
In order to evenly cut a thread of the required diameter, it is important not to make a mistake with the dimensions of the preparation hole. For the best result, the diameter of the preparation hole should be slightly smaller than the expected outer boundaries of the future thread. A special table compiled in accordance with GOST (all parameters are indicated in millimeters) will help you choose the correct, suitable-sized drill for making such a hole:
| Outer thread diameter | Thread pitch | Drill diameter |
| 2 | 0,4 | 1,6 |
| 0,25 | 1,75 | |
| 3 | 0,5 | 2,5 |
| 0,35 | 2,65 | |
| 4 | 0,7 | 3,3 |
| 0,5 | 3,5 | |
| 5 | 0,8 | 4,2 |
| 0,5 | 4,5 | |
| 6 | 1 | 5 |
| 0,75 | 5,2 | |
| 0,5 | 5,5 | |
| 7 | 1 | 6 |
| 0,75 | 6,2 | |
| 0,5 | 6,5 | |
| 8 | 1,25 | 6,7 |
| 1 | 7 | |
| 0,75 | 7,2 | |
| 0,5 | 7,5 | |
| 9 | 1,25 | 7,7 |
| 1 | 8 | |
| 0,75 | 8,2 | |
| 0,5 | 8,5 | |
| 10 | 1,5 | 8,5 |
| 1,25 | 8,7 | |
| 1 | 9 | |
| 0,75 | 9,2 | |
| 0,5 | 9,5 | |
| 11 | 1,5 | 9,5 |
| 1 | 10 | |
| 0,75 | 10,2 | |
| 0,5 | 10,5 | |
| 12 | 1,75 | 10,2 |
| 1,5 | 10,5 | |
| 1,25 | 10,7 | |
| 1 | 11 | |
| 0,75 | 11,2 | |
| 0,5 | 11,5 | |
| 14 | 2 | 12 |
| 1,5 | 12,5 | |
| 1,25 | 12,6 | |
| 1 | 13 | |
| 0,75 | 13,2 | |
| 0,5 | 13,5 | |
| 16 | 2 | 14 |
| 1,5 | 14,5 | |
| 1 | 15 | |
| 0,75 | 15,2 | |
| 0,5 | 15,5 | |
| 18 | 2,5 | 15,4 |
| 2 | 16 | |
| 1,5 | 16,5 | |
| 1 | 17 | |
| 0,75 | 17,2 | |
| 0,5 | 17,5 | |
| 20 | 2,5 | 17,4 |
| 2 | 18 | |
| 1,5 | 18,5 | |
| 1 | 19 | |
| 0,75 | 19,2 | |
| 0,5 | 19,5 | |
| 22 | 2,5 | 19,4 |
| 2 | 20 | |
| 1,5 | 20,5 | |
| 1 | 21 | |
| 0,75 | 21,2 | |
| 0,5 | 21,5 | |
| 24 | 3 | 20,9 |
| 2 | 22 | |
| 1,5 | 22,5 | |
| 1 | 23 | |
| 0,75 | 23,2 | |
| 27 | 3 | 23,9 |
| 2 | 25 | |
| 1,5 | 25,5 | |
| 1 | 26 | |
| 0,75 | 26,2 | |
| 30 | 3,5 | 26,4 |
| 3 | 26,9 | |
| 2 | 28 | |
| 1,5 | 28,5 | |
| 1 | 29 | |
| 0,75 | 29,2 | |
| 33 | 3,5 | 29,4 |
| 3 | 29,9 | |
| 2 | 31 | |
| 1,5 | 31,5 | |
| 1 | 32 | |
| 0,75 | 32,2 | |
| 36 | 4 | 31,9 |
| 3 | 32,9 | |
| 2 | 34 | |
| 1,5 | 34,5 | |
| 1 | 35 | |
| 39 | 4 | 34,9 |
| 3 | 35,9 | |
| 2 | 37 | |
| 1,5 | 37,5 | |
| 1 | 38 | |
| 42 | 4,5 | 37,4 |
| 4 | 37,9 | |
| 3 | 38,9 | |
| 2 | 34 | |
| 1,5 | 40,5 | |
| 1 | 41 | |
| 45 | 4,5 | 40,4 |
| 4 | 40,9 | |
| 3 | 41,9 | |
| 2 | 43 | |
| 1,5 | 43,5 | |
| 1 | 44 | |
| 48 | 5 | 42,8 |
| 4 | 43,9 | |
| 3 | 44,9 | |
| 2 | 46 | |
| 1,5 | 46,5 | |
| 1 | 47 |
After choosing a suitable drill, you should think about lubricant for the tool. For the best effect, its type must be suitable in composition to the metal or alloy from which the cut part is made:
Often recommended for such procedures, machine or mineral oil cannot be used with any type of material. By themselves, such lubricants will not harm the part, but their viscous structure will prevent the free removal of metal chips when cutting the workpiece, which can lead to damage to the tool used.
How to properly apply a thread with a die?
The technology of applying a thread with a die is similar to the principle of operation of a tap, but if the latter can be compared to a bolt driven into a workpiece, then the tool, which will be discussed below, is a “nut” that is screwed onto the part from the outside. In order to obtain a high-precision profile with good geometry using such a device, you need to select a die that is suitable in size and other characteristics.
External thread
The external thread is manually cut into dies (5) and plugs (4). The die is a round nut made of high-speed or high-hardness tool steel. In order to remove chips, special holes are provided in it. The dies are either solid or split.
Split dies have a slot up to 1.5 mm in size. Thanks to this, they allow you to adjust the diameter of the cut thread within 0.1-0.3 mm. Their disadvantage is less accuracy, so using such a tool in critical connections is not recommended. The diameters of the dies are presented in the table.
| Thread name | Nominal diameters |
| Metric | 1 - 76 mm |
| Inch | 1/4” - 2” (inches) |
| Pipe | 1/8” — 2” |
The dies are rotated using Skoda dies (3) and ratchets. These devices typically allow multiple cutting tool sizes, such as M16 - M20, 1/2" - 1". Ratchets are used for cutting pipe threads with dies in hard-to-reach places, for example, near a wall.
The dies are designed for cutting external pipe threads with a diameter of 1/2" - 3". Thanks to their design, they are securely fixed to the pipe, which ensures ease of operation, as well as high quality threaded connections. Clupps are usually equipped with replaceable cutters or heads. This significantly increases their service life. Depending on the design, both removable handles and ratchet holders can be used to rotate hand clamps.
How to properly cut threads with dies and taps - instructions
Often, when performing home repairs, it becomes necessary to make threads - external or internal. In order not to involve specialists in this, but to do it yourself, you need to purchase a special tool. Cutting with dies and taps does not require any special skills or abilities. It is enough to know their types and technical parameters.
A little about the features of the tool
The first step is to decide on the type of thread. It is divided into 2 main types: metric and inch. The first one with the left direction is most often used. In order not to measure the distance between the grooves, you can find out the type by the shape. A metric thread in cross-section is an equilateral triangle, and an inch thread is an isosceles one.
Types of thread
Which products use a certain type of thread? Fasteners use metric, while water pipes use inch. In addition, you need to take into account the following factors that influence the process of cutting connecting elements.
- If the thread is intended to be connected to a finished part, its geometric dimensions must be appropriate.
- When manufacturing complete fasteners, it is recommended to use the metric type.
- The diameter of the workpiece must be different from the thread size. For the outside - to a lesser extent, for the inside - to a greater extent.
Self-cutting of threaded connections is carried out using dies and taps. They are made of high-strength steel with a standardized working fluid size.
Outdoor
The die is a nut with internal slots and external clamps for turning the tool. It can be of various shapes - round, square or hexagonal. If the work is carried out at home, you will need a vice to fix the part.
Die holder and dies
Before performing work, the main thing is to choose the correct diameter of the workpiece. It should be 0.2-0.3 mm smaller than the size of the future thread. For metric, you can use the data from the table.
The workpiece should be prepared in advance. If its cross-section is not a circle, you need to turn it. Then a conical chamfer is removed from the end part to mark the first turn of the thread.
Next you need to follow the instructions exactly:
- Having secured the workpiece in a vice, the correctness of its location is checked.
- Installing the die into the die holder. Its surface must be in the same plane as the surface of the workpiece end.
- The first turn is performed with little effort. It is important to make turns in the right direction.
- Having reached the lower limit, the die must be turned in the opposite direction.
External thread cutting
One such pass will not be enough to form a thread with good geometry. It is recommended to repeat the procedure 3-4 times until the die is freely screwed onto the workpiece. To check the quality, tighten a nut of the appropriate diameter. If force is observed, you can treat the outer part of the workpiece with fine-grained sandpaper.
Internal
Taps must be used to form internal threads. They are a cylinder with an external notch. If you need to process small parts with a diameter of up to 20 mm, you can use a manual type of tap. Larger sizes require machining using a machine.
Working with a tap
It is best to use a complete set of taps. It includes three parts that are designed for roughing, intermediate and finishing threaded holes. If you have a drill in your home kit, it is recommended to purchase taps with a tail mount.
The workpiece should be fixed. If this is a large-sized part, this can be done using clamps. For small products, a vice is used. Having secured the part, its location relative to the tap is checked. The axis of the latter must be strictly perpendicular to the plane of the workpiece. The first pass will be made with great effort. Do not forget that for this you need to use a rough cutting tap. Having formed the primary thread, a tap is used for the intermediate thread. And only after it can you begin final processing.
To reduce friction, specialists use solid oil or a similar product. In this way, mechanical damage to the part can be avoided. The formed thread must have the same geometry along its entire length. Otherwise, the connection strength may be lost.
How to cut a left-hand thread with a die by hand
Cutting internal threads in a hole
To form an internal thread, the following tools are required: a hammer, a center punch, drills, taps, a driver and a bench vice.
Sequence of technological operations
READ Drilling Holes For Tapping
The first step is to mark the workpiece and core the center of the future hole. Select a drill corresponding to the required thread diameter. This can be done using lookup tables or approximately using the formula d = D – P. Here D is the thread diameter, P is its pitch, d is the drill diameter. For example, for M10 d = 10 – 1.5 = 8.5 mm.
How to cut threads by hand. Easy job
Threaded connections are widely used in various mechanisms and machines. Bolts, studs, screws, nuts are universal, interchangeable fasteners. However, there are times when it is necessary to cut threads by hand . A specialized tool will help you do this job efficiently.
In mechanical engineering, there are three main systems of fastening threads: metric, inch and pipe.
Metric thread has become the most widespread. It has a triangular profile with an angle of 60˚. Its main parameters, diameter and pitch, are expressed in millimeters. Designation example: M16. This means that the thread is metric, has a diameter of 16 mm with a coarse pitch of 2.0 mm. If the step is small, then its value is indicated, for example, M161.5.
The diameters of inch and pipe threads are expressed in inches. The pitch is characterized by the number of threads per inch. The specified parameters are standardized, so it is always possible to select the necessary tool.
Additional Threading Techniques
Regarding manual work, threads of only initial standard sizes . The larger the thread diameter is cut, the more force must be applied to the cutting tool.
In the past, serial and mass production of metal products did not exclude manual labor in the manufacture of threaded surfaces. Today, threads are almost completely cut using specialized equipment. Thread-cutting and thread-rolling units have become widespread.
There are even compact machines that make it possible to cut threads by machine on site.
screw cutting machines do this job well . Of course, you can trust the creation of threaded surfaces to an ordinary lathe. When using machine turning equipment, dies and taps are often used for manual cutting. But threads, internal and external, can be made even with an ordinary turning tool.
Thread cutting with tap and die
In the process of building radio-controlled models, especially ships, you almost always have to cut threads, since a fairly large number of detachable connections are used.
Today I want to tell and show with examples how this is done. To begin with, it must be said that the thread can be right-handed or left-handed, has a diameter and a pitch; on the right, the screw line rises counterclockwise, and on the left, clockwise. It follows that the name corresponds to the direction in which the product is twisted. A metric thread is designated by the letter “M”, followed by a number indicating its diameter, and the value after the “x” sign indicates the pitch, if it is not specified, then the main pitch is implied, which is preferred for each diameter.
If it is necessary to cut a thread in a hole, then taps are used to perform this work.
They can be universal or complete, which represent a set of two or three tools, which are used alternately: first - rough, and then. finishing
With a universal tap, all the work is done in one pass. First, a hole is drilled in the place where the internal threading is necessary. Its diameter is selected according to the table.
If the hole is drilled larger, the connection will not have a full profile and will not be of good quality. If the diameter is smaller, the tap will be difficult to move and this can lead to jamming and breakage, especially in hard materials. After drilling, the square shank is securely fixed in the driver and, well lubricated, for example, with grease, is inserted into the hole. Then, smoothly rotating the knob, making two turns forward and half a turn back, cuts are made. Every 4-5 revolutions, the tap is removed, chips are removed from it, and after lubrication, the actions are repeated.
Sometimes you need to re-thread or re-thread a rod, stud, bolt or shaft. A die is used for this . Unlike tapping in a hole, on a rod all the work is done in one pass.
One end of the rod is well fixed, for example, in a vice. On the second, in the form of a cone and well lubricated, you can use grease, install a die clamped into a knob. Then the knob rotates with smooth movements, and after every half turn it is advisable to turn the tool back a little to remove chips. Good lubrication ensures ease of movement and prevents premature dulling of the working surfaces of the tool.
How to cut a thread with a ruler without distortion
To cut threads on shafts, this “device” is used.
It works as a guide, since it is quite difficult to accurately install the die, even on a cone, and cut the thread exactly in the center. A hole with a shaft diameter, in our case 2 mm, is drilled in the thin part of the “device”. The tool under M2 is fixed in the thick part. During operation, the thin part is put on the shaft and then cutting is carried out. This guide allows the die to move strictly in the center of the shaft. Such a part is made on a lathe, individually for each section of the shaft.
Internal thread
The internal thread is cut into the hole using taps (1). They are metal rods with hardened teeth. Manufactured from tool or high-speed steel.
Taps are distinguished by purpose. They can be used for cutting metric, inch, tapered, pipe, and trapezoidal threads. According to the relevant technical specifications, as well as GOST 3266-81, the table shows the limits of applicability of this tool.
| Thread name | Nominal diameters |
| Metric | 1 - 52 mm |
| Inch | 1/4” - 2” (inches) |
| Conical | 1/16” — 2” |
| Pipe | 1/16” — 6” |
| Trapezoidal | 5.6 - 90 mm |
Taps for cutting metric and inch threads are manufactured in sets. The set can consist of either two, finishing and roughing, or three - roughing, medium and finishing taps. The roughing tap is designed to remove the bulk of the chips. Finishing is used for the final, precise shaping of the thread profile and calibration.
To identify the tap in the kit, its tail part is marked with one, two or three ring marks. It is also possible to designate using a number: I – rough, II – medium, III – finishing.
Nut taps are designed to cut threads in one pass. They are single-set, that is, sold individually.
To rotate the taps, use knobs (2). They can be non-adjustable with square holes for a fixed size shank, or adjustable. In addition, there are wrenches with a ratchet mechanism, providing ease of work in hard-to-reach places.
Classification of leroks
Today, the industry produces a large variety of different dies for cutting screw connections. It is clear that they all differ in many ways. In addition to such an obvious difference as size, there are a number of other characteristics on the basis of which classification can be made:
- Form;
- Housing design;
- Thread cutting method.
There are, of course, other differences, but the above are the most obvious.
The following types can be distinguished by shape:
- Tubular;
- In the form of hexagons;
- In the form of a square;
- Round.
Dies for cutting metric and imperial threads
By design the following are distinguished:
- Solid;
- Split;
- Sliding.
According to the method of cutting threads, they are divided into the following types:
- For round threads. Manufactured according to GOST 13536-68;
- For cylindrical. Manufactured according to GOST 9740-71;
- For conical. Manufactured according to GOST 6211-81;
- For inch, the regulatory standard is GOST 61111-52, and for metric - GOST 9150-81.
Die holder
Round-shaped materials are most widespread. They allow you to make carvings in just one pass. For example, sliding dies for cutting threads of other shapes can guarantee quality only after three or four passes. However, they also have a drawback. For example, their use is recommended only when the requirements for threads on pipes or other objects are no higher than the second accuracy class.
Round dies (GOST 13536-68) allow you to produce threads of fine and coarse pitch, both in the metric and inch systems.
When working, it is important to take into account that the diameter of the chip holes and the dimensions of the thread itself are directly affected by the outer diameter of the die for cutting threads.
Thread cutting order
Before cutting, it is necessary to chamfer the outer part of the pipe or workpiece at an angle of 45°. This is necessary to facilitate the first turns and fix the die.
- Secure the pipe or workpiece in a strictly vertical position. The best option to avoid distortions is a bench vise, but you can also use a gas wrench.
- Lubricate the tool with oil.
- Place the die on the head of the rod in a strictly horizontal position and start with the first few circles.
- If there is obvious misalignment in the first laps, remove the die, tap the workpiece and start again.
- When rotating on the first turns, simultaneously press evenly on the handles of the driver to begin the cutting process.
- After the first few turns, check that the thread is cut correctly. This can be done by checking the horizontality of the dies and the knob, which can be checked with a level. Next, with the correct position of the tool, you can continue cutting the pipe thread with a die to the entire required length.
- When approximately the middle of the length is reached, the pressing force can be weakened, then the self-tightening process begins.
- After one or two turns, it is necessary to turn the die half a turn back to remove chips.
- After cutting to the desired length, simply return the tool back along the finished thread.
It is necessary for Honor that the die can have several numbers, most often 2. In this case, after cutting the rough thread, you need to go through each of the numbers in turn to finally form the thread profile.
Currently, pipelines can be assembled from plastic or metal pipes. Plastic pipes are mainly connected by welding, for which a special apparatus is used. Metal pipes are connected with threaded fittings. The joint of pipes with a threaded connection is as strong as possible. However, to assemble a metal pipeline, threading on the pipe is required, the application methods of which are described in this article.
A section of pipe with a self-made thread for further assembly of the pipeline
Cutting with a hand clamp
In a home workshop, it is recommended to carry out the cutting using a hand clamp. Among the features of this process, the following points can be noted:
- The working part is installed in a special holder made in the form of a ratchet. It greatly simplifies the process of cutting coils on the pipe surface.
- You can start by cleaning the pipe. It is worth considering that when cutting turns, it is possible only in the absence of strong defects.
- The surface is cleaned down to the metal until it begins to shine.
- The outer edge is processed to obtain a chamfer. This ensures that the tool enters.
- The surface is treated with technical Vaseline. It reduces the degree of friction and makes the tool move smoother.
- The pipe is secured in a vice; you can also hold it with a gas wrench. It is important to eliminate the possibility of the pipe tilting or moving when a high load is placed on it.
READ Metal drilling and tapping
The work involves making several turns clockwise, and then in the opposite direction. This is done in order to remove chips from the cutting zone.
Threading set for pipes and rules for its use
You can significantly simplify the task of cutting threads by purchasing a special set for pipes. It is ideal for use at home. An example is a clamp - a slightly modified die , which is used together with a ratchet and a guide. The set may include various accessories:
- Monolithic ones are represented by a cylindrical body with an internal hole. For work, the kit also includes a special die holder.
- Sliding ones consist of incisors, the distance between which can be adjusted if necessary. It is used for cutting a threaded surface in several passes, thereby increasing quality.
The hole is selected depending on the diameter of the pipe and the direction of the thread. The cutting process is characterized by the following features:
- A special tool called a clamp is installed in the ratchet.
- Oil is also applied to the cutting part, which simplifies the movement of the working part.
- A guide is installed on the edge of the pipe being processed.
- The ratchet rotates around an axis, due to which threads are formed.
- During machining, oil is added from time to time.
It is worth considering the fact that the device may become dull after prolonged use. That is why you need to monitor the condition of the cutting edge.
Threading a pipe near a wall
The most problems arise with cutting threads on a pipe that is located near the wall. This is due to the location of the workpiece and insufficient free space. That is why a common question is how to cut threads on a pipe.
In such a case, processing is carried out using similar tools. However, threading a pipe near a wall is often only possible by partially removing the wall. Among other features of the procedure, we note the following points:
- If you need to cut a thread on one of the sections of the pipeline, it is recommended to first dismantle it. In some cases this is possible.
- Cutting pipe threads also requires a fairly large amount of oil, which facilitates the movement of the device. However, when the pipe is positioned horizontally, it begins to drain quickly, which creates significant problems with carrying out the process in question.
- The carving is made in several passes, which ensures a high quality surface.
It is quite difficult to cut a thread on a water pipe when it is in a horizontal position. This is due to the fact that it is quite difficult to control the strict position of the mechanism used parallel to the axis, as well as to apply the required load.
DIY thread cutting on a metal pipe
When installing metal pipes for water supply or heating, they have to be threaded. The threaded connection of pipes is quite reliable and can withstand significant pressure (if done correctly), so let's look at how to cut threads on metal. pipe with your own hands.
First of all, we cut off the required section using a grinder or a hacksaw, making sure to control the evenness of the cut so that one part of the pipe is not larger than the other - the cut must be perpendicular to the walls of the pipe.
The pipe must be cleaned of rust, old paint, etc., if there is anything on it. Next, we cut a chamfer from the pipe (internal or external, depending on what thread you are cutting) for easier movement of the cutting tool. The chamfer can be cut with a grinder with a metal disc (→ how to work with a grinder) or with a flap disk or file.
Beveled metal pipes
Cutting external threads on a pipe using a die (die)
Everything is the same as with the rods described above, but now with a larger diameter, which most likely will require some practice and you should practice or be extremely careful the first time. Also, to obtain high-quality threads and subsequent good pipe connections, you need to work first with a rough die, then with a finishing die (such kits are sold).
I recommend: Foundation bolt: characteristics, dimensions, types, scope of application and selection tips
The choice of die metal is also important. To work with hard alloys, you should use the appropriate dies made of certain alloys; please check this when purchasing.
But, a die is not such a good and powerful tool for cutting threads on pipes with your own hands; it is much more convenient to use clamps.
The die holder is practically the same die holder, only with a guide for smooth movement and thread cutting. The clamp is placed on the pipe of this particular guide.
We put on and attach the clamp to the pipe, screwing it in a little by hand, then you need to use either a special tool - a ratchet, which is convenient for twisting the clamp, but for household needs a large adjustable wrench or gas wrench is also suitable.
One part of the pipe must, of course, be fixed in a vice. If the pipe is cut locally, then make sure that it is not torn out somewhere due to the force applied to the clamp. The pipe can be fixed using a second gas wrench, but it is better for a second person to do this, because cutting threads with one hand is problematic.
What is a clamp and how to use it (video)
Cutting internal threads on a pipe with a tap
Sometimes you have to cut into meth. pipes and internal threads. This is done in the same way using a tap, only with a larger diameter.
To cut a good thread, you should use at least 2 taps - roughing and finishing. It is important to select the correct tap for the pipe diameter. So, the internal diameter of the pipe should be larger by the length of the tap turn (more precisely, by the thickness of the cut), this is indicated on the tap itself.
Cutting is done first with one tap, then with a second.
The main thing is to strictly observe the perpendicularity of the tap stroke and control it. That's all, good luck with your threading! Leave your tips and comments below. Subscribe to our newsletter. Good luck to you and good luck to your family!
How to cut internal threads?
In some cases, an internal thread is required, which can also be cut using hand tools. Often, for such work, a tap is selected, which consists of three main parts:
The intake is applied directly at the time of cutting, the calibrating guide guides the tool and ensures its vertical position. The tail part is required in order to secure the die in a special holder.
An internal thread can be formed as follows:
- The pipe is fixed in a vertical position.
- The tap and the workpiece being processed are lubricated.
- The device is placed strictly vertically, after which several rotations are made clockwise and one counterclockwise.
During operation, oil should be added from time to time. This ensures smooth running of the tool.
We cut the external thread with a clamp
Threading on a pipe with a die is carried out as follows:
- a die of the appropriate diameter is selected. To correctly select equipment, a caliper is used;
- the inner surface of the die and the prepared section of the pipe are treated with machine oil;
- The die is inserted into a metal pipe, which makes it easier to rotate. The holder is included in the kit for cutting threads on pipes;
- If the initial assembly of the pipeline occurs, the pipe is fixed in a vice. If you need to cut a thread on a water pipe during the reconstruction of a water supply system or other engineering system, you can make the thread directly on the installed pipe;
- The die is installed on the prepared pipe and its rotation begins, that is, the thread cutting process.
Die for cutting threads. Design and purpose. Types of dies. Lerka
After finishing cutting, the oil must be completely removed.
You can clearly see the process of cutting threads with a die in the video.
How to cut external threads using a die
To cut external threads manually, a special tool is used - a die holder with dies of various diameters.
Die holder with dies for different diameters
In hard-to-reach places, for example near walls, a die holder with a ratchet is used.
Selection of dies
Nominal thread diameter is the diameter at the vertices of the thread triangles. The die cuts the metal, forming depressions and leaving the tops intact, thus both the rod and the die must be the same diameter. The diameter of the thread, for example, is M3 - this is “M” - metric thread, and the number is the nominal diameter of the thread in mm. Accordingly, to cut a thread on a 3 mm rod, we take an M3 die. Measurements of the rod are made with a caliper.
To make the die cut better into the rod, a chamfer is cut off from its end.
Principle of thread cutting with a die
To secure the workpiece you will need a vice. The workpiece is firmly fixed in a vice and lubricated with machine oil for easier movement of the die, reducing friction and tool wear.
When cutting threads with a die, you must avoid large accumulations of chips in the chip removal holes.
The die is installed on the end of the part perpendicularly. With slight pressure, they begin to rotate the die holder clockwise if the thread is right-handed, respectively, if it is left-handed, then counterclockwise.
Cut the thread as follows:
- First make 2-3 turns.
- Then half a turn back to remove chips.
- Lubricate after every 3-4 turns, using a syringe.
- Etc.
I recommend: Collection and delivery of scrap ferrous and non-ferrous metals - how to make money on it
The thread is checked with a nut or ring gauge. You can buy nuts for your thread here → https://rus-metiz.com/categories/gaiki (RusMetiz).
Ring gauge
Cutting a thread with a die with your own hands (video)
Preparing to cut threads with a die
Before cutting a thread with a die on a rod or pipe, you need to select a tool of the required diameter and pitch. The die itself is a nut with conical cutting teeth with holes for fastening in the collar. The dies can be solid, split, sliding, round, square or hexagonal.
First of all, you need to select the material and tool of the required diameter. Below is a table of correspondence between the most popular diameters for metric, imperial and pipe threads with an example of selecting a workpiece for an M6 thread
As we can see from the table, to cut an M6 thread we need a rod with a diameter of 5.8 mm. For larger thread diameters, there is an acceptable minimum and maximum value for the rod thickness. You cannot violate it - if the diameter is exceeded, you risk breaking the die; if the value is less than the minimum, you will get a weak thread.
Before you start cutting external threads with a die, in addition to the tool itself and the workpiece, you need a driver suitable in shape and size, as well as machine oil. After this, you can proceed directly to the cutting itself.
Features of dies
A die is a cutting tool that is used when making external threads. The simplest example of an external thread is a bolt. While an example of an internal thread is a nut.
The dies are flat, from the outside they strongly resemble large washers or clamps for machine chucks. Only inside the die there is a cutting attachment with several rows of twisted cutters.
Dies can have different shapes, types of assembly and dimensions. There are both round and square models. Some options are completely solid, others can be disassembled and the cutting attachment can be replaced.
The cutting part consists of three working zones. The two zones located at the edges consist of teeth, while the inner zone is responsible for removing chips and adjusting the direction of rotation.
It is thanks to the inner zone that the dies have a self-tightening property. That is, after several rotations on the pipe, the die is fixed.
You can then rotate it without pressure, since it will tighten in the direction of the thread formation. While the taps must be rotated with force throughout the entire process.
The types of dies are essentially the same as the types of taps. If you bought a large set of tools, you will probably receive several of these parts at once.
Features of taps
Taps are cone-shaped or cylindrical parts that are designed for cutting internal threads. In particular, they are used to make threads on pipes, nuts, small washers, various kinds of clamps and even flanges.
The taps are quite convenient to use. They consist of a working and a rear part. The working part has a unique shape and diameter. On its edges there are special incisors or teeth with a certain pitch. The teeth, when rotated, cut the metal in parallel with the removal of chips.
The back side is made in a certain shape, which makes it easier to fix the tap on the working tool.
A variety of taps for household use
Taps with the ability to cut threads without forming chips are also used, but much less often, because they are more expensive.
Roughers make the first pass, remove most of the chips and form rough grooves for the threads. This is not a full carving yet, but the preparation has already been completed.
Semi-draft models are extremely rare. They are intended for finishing rough grooves, cleaning them and forming a workpiece for a clean thread. Semi-rough taps are used primarily in the manufacture of complex parts.
The last sample, a finishing tap, forms a ready-to-use thread of precise dimensions and shape.
READ How to cut threads inside a pipe
According to the type of actions performed, taps are divided into:
Note that taps, as well as dies, can cut threads of different sizes, directions and shapes. It all depends on the chosen equipment model.
Internal thread cutting
To cut internal threads, the master will need a tap and a driver. The tap consists of 3 main parts:
- cutting part
- Calibrating part
- Shank
There are 3-4 grooves along the screw thread of the tap, which are used to remove chips. The tap can have several types of heads:
- Elongated pointed
- Flat
Taps with an elongated pointed head are used for cutting threads in through holes . In this case, the pointed head helps center the cutting part of the tap when creating the first turns.
Flattened taps are used to make threads in blind holes . With such taps it is a little more difficult to cut the first turns of the thread.
The tail part of the tap is inserted into the driver. The head of the tap is placed in the hole and the tap is screwed in with a rotating motion, thus cutting the thread.
Tap kits are usually available for internal threading. If the thread is created in ordinary carbon steel, then for screw cutting it is recommended to use 2 taps, roughing and finishing .
The first pass is made with a roughing tap. The essence of a rough tap is to create a thread blank. In this case, when passing through a finishing tap, you can achieve the cleanest and most accurate helical groove . When working with a finishing tap, there is no longer any need to center the tool and make excessive efforts to cut metal.
If the internal thread is created in stainless steel or hard alloy, then it is best to use a set of 3 taps: rough, semi-finish, finishing. Triple passage with different taps allows you to achieve a high quality helical groove .
When making internal threads in titanium alloys, it is recommended to use a set of 5 taps!
What else do you need to know about the types of carvings?
Manual or machine internal thread cutting
As a rule, only metric threads are cut by hand. In this case, the diameter of the helical groove is usually no more than 20 (mm). If you need to create a larger thread, the craftsman will need the help of equipment. The same applies to pipe (inch) type threads.
For machine thread cutting the following are usually used:
- Lathe
- Drilling machine
- Threading machine
It is very easy to distinguish between hand and machine cutting taps. In manual type taps, the tail part has a square slot , which allows you to fix the tool in the driver. Machine taps have a shank for a collet clamp or a self-centering chuck. In some cases, the tap shank is created under a Morse taper.
A separate category of tools for machine cutting internal threads uses the so-called rolling taps . Such taps do not have grooves for chip exit. In this case, the thread is created without the formation of chips.
How to cut a thread with a die.
External thread cutting
Before cutting a thread on a rod, it is necessary to mark the depth of the cut and clamp it vertically in a vice. The surface should be generously lubricated with machine oil or lithol. A die of the appropriate size is installed in the holder. You should start cutting threads with the starting side of the die. It has gradually increasing depth of cutting edges, while on the back side of the die these edges are completely reduced in one and a half turns. The die must be put on the rod and cut until increased metal resistance appears. In this case, the holder handles must be strictly perpendicular to the workpiece. After cutting, the die must be returned a third of a turn, after which full thread cutting can begin by slowly turning the holder handles. The cut threads are lightly treated with fine sandpaper and cleaned with a fine wire brush.
A die, or popularly a lerka, is a thread-cutting tool for cutting external threads manually or by machine (on a machine) [1] [2]. Previously, the name die was used in relation to a typesetting and adjustable threading tool, preferably of larger diameters
[
source not specified 434 days
].
The die has a non-separable shape and has a threaded hole with grooves; the cut thread is more accurate than that of dies.
Currently, the division into dies and lerks has ceased to exist. Dies are designed for cutting or calibrating external threads in one pass. The most common dies are for cutting threads with a diameter of up to 52 mm. The die is a hardened nut with axial holes that form cutting edges. As a rule, 3-6 chip holes are made on the dies to remove chips. The thickness of the die is 8-10 turns. The cutting part of the die is made in the form of an internal cone. The length of the fence part is 2-3 turns. Dies are made from alloy steels (9ХС, ХВСГФ), high-speed steels (Р18, Р6М5, Р6М5К5, Р6М5К8), and more recently from hard alloys. They are marked with the designation and degree of accuracy of the thread being cut, and the grade of steel (9ХС is not indicated).
Types of dies: solid
,
split
and
sliding
(clamp).
Depending on the shape of the outer surface, dies are round
,
square
,
hexagonal
,
or prismatic
.
Round dies - secured for work in gates with locking screws or secured in thread-cutting chucks. For this purpose, there are conical recesses and an angular groove on the outer cylinder of the die. The latter allows you to cut the die with a grinding wheel along the bridge and partially adjust the diameter. For round split dies, knobs with five screws are used, with the help of which the diameter of the thread being cut is adjusted.
Solid dies - due to their high rigidity, they make it possible to obtain high-quality threads (metric, conical), but have low wear resistance.
Sliding dies - installed in dies that have special guides for this purpose. The die consists of two parts, secured in the die frame with a block and a screw. This screw adjusts the diameter of the thread being cut. The die comes with a set of dies, which allows you to make threads of different sizes.
Split dies - can spring a little, changing the diameter of the thread being cut by 0.1-0.3 mm. Due to their low rigidity, split dies do not produce clean and accurate threads.
It is difficult to imagine a mechanical working tool or functional part that would not work through the use of threaded connections. Cars, hand tools, household appliances, plumbing - this is just a small list of equipment that would not be able to function without modern threads.
It is not surprising that so often a person has to sharpen the threads on parts himself. Fortunately, this is quite easy to do. In your work you will need a small set of basic tools, taps and dies.
So how to do thread cutting correctly? Let's figure it out now.
Basic cutting methods
You can cut threads on pipes in one of two ways:
- automatic - on machines, power tools;
- manually - using hand tools.
For living conditions, of course, manual technology is more relevant. Cutting threads on water pipes or other pipes by hand is often done using a die.
Solid dies for pipe threads, made of strong alloy steel, are available with a body diameter of up to 65 mm. Dies with a body diameter of up to 120 mm are available for metric threads. On the body of metric products there is a symbol “M”
A die is a simple device for cutting threads on pipes at home. The same tool is successfully used on industrial machines.
The device looks like a disk with several axial holes drilled along its inner diameter. The edges of these holes form several incisors (usually 8-10). The material for the dies is alloy steel or other hard alloys.
There are several types of such devices:
- solid;
- spring-loaded (split);
- clamp (sliding).
According to the design, the die is produced in the form of a circle, square, hexagon, or prism. The most common are disc (round) instruments. They are used for threading water pipes up to a diameter of 36 mm.
For ease of working with dies, use:
- simple knobs with locking screws - hand tools;
- threading chucks on lathes.
Cutting threads (metric, conical) of the best quality on pipes manually or on machines is provided by solid dies.
However, this type of tool, due to the rigidity of its own design, has its negative sides. The cutters wear out quickly.
A spring-loaded thread cutting tool is distinguished by the presence of a cut in the area of one of the axial holes. The presence of a cut reduces the load on the cutters, but at the same time the degree of rigidity required to achieve high cutting quality is reduced.
Spring-loaded (split) dies have a less rigid design, which makes it possible to cut threads on pipes and at the same time change the thread diameter in the range of 0.1-0.3 mm.
Such devices are characterized by increased wear resistance of the cutters, but do not provide high accuracy and cleanliness of thread cutting.
Sliding dies consist of two working parts. They are designed for installation in a fastening module - a clamp.
Fastening in the clamp is carried out by a mechanism consisting of a cracker and an adjusting screw. The screw adjusts the diameter size for thread cutting. Usually the die is equipped with a set of dies for several different diameters.
Method #1 - making pipe threads with dies
The process of creating a thread on a pipe with a die or die requires the mechanic to perform some preliminary actions:
- The surface of the pipe in the cutting area must be thoroughly cleaned.
- The end part of the pipe should be processed with a file (make an entrance chamfer).
- Apply lubricant to the surface to be treated to reduce resistance.
If possible, it is advisable to secure the pipe vertically, for example, in a bench vice, leaving free access to the upper part - the cutting area. The fastening force must be correctly calculated so as not to deform the pipe body.
Then take a pre-prepared driver with a roughing die (No. 1) of the required diameter and suitable thread characteristics.
An example of cutting a thread on a water pipe using a hand wrench. A die is inserted into the working cylinder of the driver and secured with two (four) bolts located opposite each other
The tool is held horizontally - perpendicular to the end area of the pipe. Place the roughing die onto the chamfer of the edge using the internal hole. Light pressure and successive short turns of 25-30° make the initial cut.
This work should be done carefully, slowly, constantly monitoring the right angle between the horizon of the ram and the vertical of the pipe.
Using this technique, the first two or three threads are carefully cut. Usually, after cutting the first two or three threads, the tool is firmly in its working position. Further, the right angle can no longer be controlled.
But the technology of cutting with short (without particularly strong traction) circular movements should be maintained until the end of the cut. It is recommended to periodically add lubricant at the cutting point.
After the first pass, twist the device and then repeat one or two more times with a finishing die (No. 2).
Method #2 - clump cutting technique
The die is a variation of the same die for cutting threads, including on pipes. A distinctive feature of the die is the ability to adjust the cutters.
A set of clamps for different sizes of pipe threads. Each of these devices is equipped with screws for fastening blocks with cutters. These screws can additionally change the thread diameter within small limits
There are clamps for manual use, as well as similar devices with an electric drive.
Option #1 - cutting with a hand clamp . Manual cutting of pipes is usually done with a clamp, which is installed in a ratchet holder. This holder makes the work of cutting pipe threads convenient and less complicated.
Of course, depending on the conditions of plumbing work, you can use other types of hand holders. For example, a standard locking knob with two handles.
The principle of creating a thread with a die is almost the same as the method of working with traditional dies:
- Clean the working surface of the pipe and make sure there are no defects.
- Sand the cut area until it has a distinct metallic sheen.
- Process the outer working part of the end edge at an angle of 45-60º (chamfer).
- Lubricate the prepared surface with technical petroleum jelly.
- Secure the pipe in a mechanical vice or hold it with a gas wrench.
After these procedures, the cutting tool (blank) is placed with the internal hole on the pipe chamfer and, with moderate, uniform pressure, they begin to rotate it with short reciprocating movements.
A convenient tool for working with a clamp is the so-called “ratchet” - a lever with idle reverse. Using such a hand tool, it is easy to cut threads on a pipe under different installation or repair conditions.
If a ratchet clamp is used as a holder, only forward cutting is carried out. It should be noted that the ratchet clamp is convenient to use when working in cramped conditions.
For example, when it is necessary to process a pipe laid in close proximity to a wall.
Option #2 - cutting with an electric clamp . Along with hand tools, electrically driven devices are widely used. The obvious advantage for the mechanic is a significant reduction in labor intensity.
But on the other hand, not all electric machines are capable of performing work in cramped conditions. In addition, when working with hand tools, it is possible to obtain a better result.
To obtain a similar result from electrical sockets, extensive experience with this tool is required.
Equipment for the clamp, supplemented with an electric drive. A modern, effective tool that significantly reduces the physical load of a mechanic. True, electric sockets are more often used in the professional sphere than in everyday life
Working with an electric clamp:
- Preparation of the pipe surface in the cutting area - cleaning, chamfering, lubrication.
- Fastening the pipe with devices capable of providing rigid fixation.
- Fixation at the starting point of the die holder with the clamp included in the kit.
- Checking the stroke and direction of rotation of the die.
- Cutting the first two or three turns in the jog mode.
Next, pipe threads are cut automatically. The cutting length is considered optimal when the upper edge of the die cutting heads reaches the leading edge of the pipe.
At this point, the operation of the device is stopped, the reverse rotation function is turned on, and the bug is twisted from the pipe with a push feed. Be sure to periodically moisten the cut area with oil throughout the process.
Method #3 - using lathes
Large-scale construction and repair work, as a rule, excludes the use of hand tools. Here, lathes are usually used to process the pipes accordingly.
Threading functions are supported by many universal lathes.
Lathes are used to produce threaded parts on pipes of different diameters. You can make threads of any configuration on a lathe
Using the machines, both internal and external pipe threads are made efficiently and easily. The pneumatic (or mechanical) fastening module of the lathe ensures high-quality reliable fastening of the pipe and precise supply of the workpiece to the cutter.
To perform thread-cutting functions, different types of cutters are used:
- rod,
- lamellar,
- intercalary
Work on lathes is carried out by specialists trained in this field and having the appropriate qualifications. Without experience and professional skills, trying to cut threads with your own hands on a machine is not recommended.
For home craftsmen who decide to take up plumbing and carve metal workpieces, the following tips will help them in their work:
Threading
Now that we've sorted out the tools themselves, let's move on to the question of how to use them correctly.
Almost anyone can cope with such tasks, but there are several details and nuances in the work that you should pay close attention to.
The standard stages of work differ little from each other, and it does not matter whether you use dies or taps. In any case, it is necessary:
- Prepare and assemble the instrument.
- Lubricate parts and work area.
- Perform a rough pass.
- Check the quality of the thread.
- Perform a finishing pass.
- Perform final check.
There are also nuances that we will now pay attention to.
Carving with a die
Most often, a set of dies is used when it is necessary to obtain a result in the form of a pipe thread. At least in civil engineering.
Next it needs to be fixed. At the fixation stage, beginners very often make serious mistakes. The die is difficult to fix in the ideal position. In this case, it is necessary to start cutting using pressure, and even combining it with rotational actions.
As you understand, some skill is required here.
Mounting the part in a horizontal vice, as well as lightly turning the working edge, will greatly simplify the work. Turning is done with a file.
Then the work will go easier. The die is fixed onto the machined edge by turning it several tens of degrees in both directions. Then they press (it’s easier to work if the part is below the level of your belt, then it’s easier to concentrate the pressure from your own body) and rotate in the working direction.
The first 2-3 turns must be done with pressure from top to bottom, then the die is tightened on its own, and you only need to rotate the knob.
Rotation is performed with translational movements. Every few revolutions in the working direction, alternate with a reverse rotation of 0.5-1 revolutions, for better turning of the thread.
Thus performs a rough pass. The finishing pass should not cause any problems for you, since the part is already ready for processing, and the process there is identical
Selecting a workpiece for thread cutting
The diameter of the threading rod or hole is not equal to the nominal value of the finished product. When cutting external threads, select a rod having a diameter several hundredths of a millimeter smaller than the thickness of the finished product. This is due to the fact that when removing chips, the metal is partially squeezed out, completely filling the threaded profile of the die. For cutting internal threads, the hole is also made with a small allowance to the smaller side. The exact diameters of workpieces for cutting metric threads are specified in GOST 19257-73.
If drills of the appropriate size are used to drill holes with an inaccurate diameter, then finding a rod suitable for cutting external threads is quite problematic. This problem can be solved by preliminary grinding of a rod of standard thickness. To do this, the product is clamped into a drill chuck and treated with sandpaper evenly along its entire length, periodically taking measurements with a caliper.
Tool selection
Let us note in advance that threads can be cut in different ways. You can work either manually or by machine. In the first case, as we noted above, you need to have a set of tools with you for creating threads, in the second, the work is carried out on a lathe.
Manual threading is recommended if your task is to machine only a few parts. For example, when assembling plumbing equipment, creating household pipelines, etc.
Processing parts on a lathe involves performing large-scale tasks. A person with experience with this type of equipment is able to cut threads on an industrial scale, up to a hundred parts per hour, and sometimes more. However, you are unlikely to need such performance.
Most often, a set of hand tools covers all the household needs of home craftsmen. With their help, you will also be able to cut threads correctly and efficiently, but it will only take more time and effort.
The set of equipment mentioned above is mainly represented by taps and dies, as well as various additional parts.
Sources:
https://stankotec.ru/raznoe/kak-narezat-rezbu-plashkoj-vruchnuyu-%E2%9D%B6-kak-narezat-rezbu-plashkoj-%F0%9F%9A%A9-diametr-prutka-pod- rezbu-%F0%9F%9A%A9-kvartira-i-dacha-%F0%9F%9A%A9-drugoe.html https://booktube.ru/kak-narezat-rezbu-na-trube-plashkoj-vruchnuju / https://booktube.ru/narezanie-rezby-plashkoj-vruchnuju/
Some technical characteristics and certain types of dies
It must be said right away that all such tools are used only in conjunction with special holders.
Such clamping tools, as a rule, can function normally with several hole diameters at once. For example, one holder is used with all lerks with a diameter of up to 1 cm, the same one holder is used with all lerks with a diameter from 12 mm to 24 mm, and the same situation with tools with diameters from 27 mm to 42.
Thread cutting tool
As mentioned earlier, there are tools that are capable of cutting pipe threads in metric and inch systems. The above dimensions are based on the metric system. There will always be a marking in the form of the letter “M” on the case. The full designation will also contain the thread pitch, that is, 8.10 and so on.
It will look like this: M8, M33 and so on.