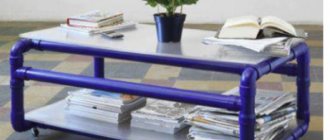
How to make an inexpensive computer desk
A very good option for a computer desk, it takes up practically no space, the height can be adjusted at your discretion, there is great depth, there is even a place where you can stretch your legs.
For the tabletop you need to buy a chipboard 60 centimeters wide or use a tabletop from an old table. The system unit is attached to the wall using special brackets, and you also install a socket block under the tabletop. Shelves above the table are at your discretion, you can have one tier, you can have three. Photo source eurosamodelki.ru/katalog-samodelok/mebel-svoimi-rukami/delaem-nedorogoi-komputernii-stol-svoimi-rukami Author Danov
Shape and design
Making wooden benches with your own hands
Design consists of a huge number of different aspects. All of them must ultimately form a holistic picture that will represent a certain stylistic direction and fit perfectly into a specific room.
The shape of such tables can be very diverse. The most popular options are square or rectangular models. Also, many users opt for tables with rounded elements. They usually do not have corners, and the center of the composition becomes the oval or round shape of the tabletop. The latter option can soften the interior of the room, because such a table is very delicate and neat.
You need to pay attention to the coloring. When choosing a color, there are several subtleties to consider
Black and brown colors, as well as natural light shades of wood, are rightly considered classics at this point. Gray and white tones look stylish. Bright shades are often used, for example, red, blue, green and their various tones.
The last point is to carefully evaluate the decor. Patterns and original shapes may, of course, be present, but they should be considered from the point of view of practicality. A complex design should not create hard-to-reach places where dust accumulates. The table itself should be non-slip to prevent the computer from accidentally falling.
Finally, you should always remember that a laptop table is, first and foremost, a workplace, which means it should help concentrate and not scatter attention. Contrasting combinations, bright colors, and large distracting patterns are not suitable for this piece of furniture.
They will greatly interfere with its main function.
However, a small decoration is possible, and it will certainly become a timeless decoration. These can be neat patterns on glass, maybe wood carvings, if they are not very voluminous; on plastic they are just drawings, including modern three-dimensional versions, or even photos.
Laptop stands made of plastic pipes
Models of laptop tables for beds, their advantages and disadvantages
Cuttings of water and sewer pipes after repair or construction work can be useful for making an original stand.
It will take very little time to make a laptop stand with your own hands from PVC plastic pipes. First, the pieces are cut according to the size of the laptop, and then they are connected using corners when heated, as shown in the video. The finished product is coated with spray paint. The color is chosen to match the interior or personal preference.
The result is a neat and convenient stand at a very low cost.
No less practical is the following version of the table, which is convenient to use while sitting on the sofa or bed.
The advantage of this option is that such a table-stand can be moved close to the sofa and take up minimal space, and its height allows you to work comfortably in a sitting position.
One year later
The stand has been working for over a year. If it weren’t for her, the laptop would have died long ago. Recently, during complex tasks it turns off.
The laptop's battery hasn't worked for a long time - I had to sit on the power cord. After the creation of the stand, mobility was further reduced, chaining the computer to a table within the nearest radius.
The laptop is quite powerful and has helped me out many times, but it’s time to change it - it has served its purpose perfectly. It was nice to do something with my own hands - the result was amazing! I didn’t expect it to turn out so neat and aesthetically pleasing.
Comments
Step-by-step algorithm for creating from wood
Do-it-yourself wood cuts for the interior
If device owners do not know how to make a laptop table, then step-by-step instructions will save time
It is important to observe safety precautions when working with tools
The first thing you need is a drawing
Ready-made or compiled independently - it doesn’t matter. The diagram must contain exact dimensions and sequential steps for processing materials
The best option would be to print the drawing on large sheets of paper. The next stage is creating forms. To do this, the required shape of parts is cut out of wooden blanks. An electric jigsaw is used, but you can also use hand tools, such as a wood saw. The further process of preparing folding tables for laptops involves sanding all surfaces without exception. You can use a grinder, a grinder with a special attachment, or regular sandpaper. Painting is done quickly; if a water-based composition is chosen, conventional paints will dry in about 24 hours. At the end comes the crucial moment - varnishing the surface of the table. This makes it possible to protect the wood from moisture and sunlight, as well as give the workpiece a unique shine. The last step towards creating a reliable table is assembly, the guideline for which is an accurate sketch.
Wooden components are often treated with adhesives that can hold different types of wood together.
Drawing
Creating Forms
Sanding all surfaces
Painting
Assembly
Ready product
Interior decorative items and gifts
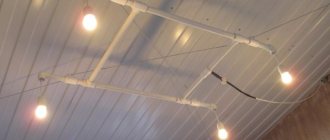
Curtain rod
Curtain rod
Nice cornice made of painted PVC pipes and decorative elements. Read more about production.
Dresser decoration
Decorating a chest of drawers
PVC pipes, cut into thin rings, can serve as decoration for furniture.
Creative mirror frame
Frame for the mirror
And again PVC pipes, cut into thin rings. Cut it out, put it in the right order, glue it together and admire the new frame.
Piggy bank
Piggy Bank Pig
This funny piggy with a base made from a scrap of PVC pipe can be given to someone or placed at home as a souvenir. Here
PVC pipes have long become something of a construction set. A variety of designs, simple and complex, are assembled from pipes. But before you think about assembling furniture or a gazebo, you should look at the simplest product, a laptop stand.
There are quite a few similar stands on the Internet; this example is one of the simplest. Dimensions are for a specific product, a 13-inch laptop. If necessary, the dimensions of the parts can be increased.
In total, you will need about a meter of pipes with a diameter of at least 20 mm.
. Six elbows for assembling corner joints. Two end caps. Saw or grinder for cutting. Tape measure, pencil, spray paint.
Plugs and 90* elbows must match the diameter of the pipe. During installation, the parts are glued together for reliability and durability.
Therefore, even before final assembly, it is necessary to accurately trim the workpieces to size and check the connection.
The overall dimensions of the product are 250/190 mm. . We need to prepare one longitudinal pipe 250 mm long. , two transverse 190 mm long. and two vertical ones of 85-90 mm. . It doesn’t matter so much if you make a mistake by a few millimeters, the main thing is that the paired parts are the same length.
First, it is advisable to assemble the structure “dry”, without glue. Try how the stand fits your laptop. If necessary, adjust the length of the workpieces. Then, starting with the longest part, disassemble it, apply PVC glue to the ends and reassemble it tightly, pushing the parts into place. It is necessary to constantly monitor the position of the knees to ensure that the structure is symmetrical and stable. A more serious product.
White or gray pipes look too plain. There are special spray paints that are designed for application to plastic and PVC. At the final stage of work, apply 2-3 layers of paint, with intermediate drying of each layer.
Pictures latesthandmade.com
DIY items made from PVC pipes are more popular today than ever before. The reason is the ease of using pipes to create the most unexpected interior items. Today we will assemble an original laptop stand. For manufacturing you will need the following tools and materials:
- meter PVC pipe with a diameter of 2–3 cm
- straight connectors (corners) – 6 pieces
- paint (the best option is aerosol)
- 4 silicone pads
- gas torch or glue
Instructions: how to make a stand with your own hands
- Cut two identical parts from wood or metal to create flat legs. The length of the parts should be greater than the width of the laptop, the height and level of inclination can be selected as desired. It is recommended to make oblong holes in the inner part of the “legs” - this will make the structure lighter and more convenient to move. The thickness is chosen to your taste; legs that are too thin will not be strong enough, and thick legs will leave less space for coolers.
- Coat the parts with varnish (for wood) or successively with primer for metal and paint (for metal) and let them dry completely.
- Cut a square or rectangle from metal, wood, chipboard, plywood or any other material that will serve as the base of the stand on which the mini-computer will be installed. The sides of this platform must correspond to the dimensions of future stands and be greater than the length of the laptop.
- Make round holes in the rectangle, corresponding in size to the dimensions of the coolers purchased for additional cooling. If you have purchased a lot of fans. It is advisable to distribute them evenly. And so that there is room for self-tapping screws. After complete processing, this part should also be coated with varnish/paint in several layers.
- Based on the size of the previous part, cut out four elements from wood or iron that will act as sides. Their presence will give the device additional stability, which is especially important when creating a tilted stand. The thickness of the parts depends on the difference in the lengths and widths of the base and the laptop; it is highly recommended to leave a few millimeters of free space. Holes should be made in the side panels, or in the front and back (depending on where the ventilation hole is located on the laptop) so that the internal fan can expel hot air.
The sum of the degree measure of adjacent angles should be equal to 90. When processing, you need to attach the parts to each other with cuts so that they form an even rectangle.
- Apply varnish (paint) to each of the sides.
- Mark the places for the screws on each of the wooden parts (so that they fit tightly together and the stand is stable), then drill holes in the marked places with a drill whose drill diameter is smaller than that of the screws. This measure will significantly reduce the likelihood that the piece of wood will burst when screwing in the screws.
- Screw the fans to the previously designated locations. The screws need to be fastened with the cap facing up towards the laptop. The blades must be positioned to exhaust air
- The wires from the coolers should all be connected to the power supply via Molex. This is where scissors and insulating tape come in handy to cover the exposed contact points. The operation of the fans should be checked to ensure that everything is done correctly.
- Assemble the entire structure and fasten it with self-tapping screws. All caps should face outward so that the sharp ends remain inside and do not scratch the laptop or fingers.
Where to begin
As with any work process, you should start by drawing up an estimate/plan and determining future stages of installation, which will be discussed below.
1 Step. Drawing up estimates and schematic plans
- To get started, it’s worth answering a few questions:
- “What expectations are placed on the future creation” - for example (for the author of the article hereinafter), this is a convenient substrate located at a slight angle, and 1/2 cooler for blowing in and out. And the goal is to achieve a decrease in temperature indicators by at least 5 degrees.
- “What amount can be allocated for this” - budget 500 rubles.
- “What size/dimensions” - since the device has a diagonal of 18.4 inches, taking into account the location of its legs, the length will be about 36*38 cm, width 35-37 cm.
- “What to make the body/base out of.” Taking into account that the ASUS K95VJ weighs more than 4 kilograms, the material must be durable, but at the same time it is desirable to achieve small dimensions and lightness. Polypropylene water pipes with a diameter of 20 mm should have been able to cope with these requests quite easily.
- “What to make a substrate for attaching a cooler from” - the weight of the cooler is minimal, and there will be no load on the substrate, so it is not required to be excessively strong. Accordingly, the choice fell on an assortment of stationery, namely a binder with a metal clip and the most dense/rough cardboard.
- “What is already available” - there is already an old cooling pad from a device of the same brand “Asus”, but with a screen diagonal of 13 inches, from which you can remove the cooler and power port.
- “What additional tools/items will be required”: Ruler, meter or tape measure.
- Stationery knife or scissors.
- Drill/screwdriver, drill bits and screwdriver.
- Metal hacksaw or jigsaw.
- Marker, electrical tape.
- Bolts, nuts, washers.
- Glue gun or double-sided tape.
- Furniture stapler or regular transparent tape.
Step 2. Purchasing materials
Considering that the list of items and tools given above does not require additional costs, since any average man has all this, all that remains is to purchase:
- “polypropylene pipes” - 1.5/2 meters of pipe (with a margin) on average costs about 100 rubles (in the example, in fact, it turned out to be 75 rubles * 1.5 m).
- “Angles and tees” - four 90-degree angles and two tees - cost a total of 27 rubles.
- “binder folder” - from what we managed to find in the nearest stores, there was a folder with quite thick cardboard costing 120 rubles.
Total: 222 rubles.
Drawing
Before making a piece of furniture, it is necessary to make a preliminary drawing. It indicates the exact dimensions of the table and the materials used to make it.
If you can’t make a drawing yourself, you can find a ready-made sketch on the Internet, you can contact specialists in this field, or simply use a special program for furniture makers. The last option is the simplest. After you draw or print a finished sketch of the future table, you will need to transfer it to the wooden surface of the prepared materials.
Attention: before making the table, you should once again carefully calculate the dimensions and place control points on the material.
What tools and materials need to be prepared to make a plywood stand?
The ideal option for a budget but quite decent stand would be plywood. The material is easy to work with, environmental friendliness and long-term operation are guaranteed. First you need to select the necessary tools:
- A jigsaw used to separate the plywood itself.
- Self-tapping screws that are selected according to the thickness of the plywood.
- Sandpaper of various grits.
- Plastic cable channel with plywood thickness parameters.
- 2 small sheds.
- Rubber pads for furniture.
- Sheet of plywood.
- File and grinder.
- Dish sponge or rag.
Some materials may be superfluous when making another model of plywood stand. Sometimes additional components are required for a list.
Operating procedure
All shapes of the future stand are drawn in advance. Using a ruler and pencil, mark the contours of the workpiece.
Using a stationery knife, cut out the blank. By pressing the cardboard along the marked line, we form a bend.
Using a glue gun, we glue our workpiece in the right places. Our wonderful craft is ready!
♻ Instructions: everything is very simple and step by step
The cooling pad itself is a simple product. I spent time only on doing everything as accurately as possible.
1. I measured the laptop and estimated the size of the future stand (I did this before the store, and then after the purchase).
2. Marked it with a ruler and cut out the lower part (bottom) with scissors, and processed it with a file.
3. I cut out the upper mesh part and processed it with a file so as not to get caught and cut during use.
4. I screwed the fan to the top (it had self-tapping screws included). The fan is very, very quiet. I was specifically looking for a large one, it is 20 x 20 cm.
5. I measured and sawed all the necessary boards with a hacksaw and sanded them.
6. I drilled the boards around the perimeter, on three sides, so as not to screw in the screws at once and not split the board into two parts.
7. Attached the bottom with self-tapping screws to pieces of wood.
8. I covered all the necessary places with black electrical tape, especially the sharp edges of the upper part (the mesh would still cling, given the structure).
9. Attached the mesh with the fan on top using self-tapping screws.
10. I cut out the walls from PVC corners (I had to measure everything very accurately) and processed them with a file.
11. I glued the walls with double-sided tape (after a while I removed the tape and glued them with epoxy glue).
12. Connected the rheobass (fan controller) to the power supply and to the stand, and correctly inserted the wires in the right place so that the power supply would start. The wires went through the switch.
13. I secured everything under the table, placing the switch discreetly but conveniently, under my arm, and screwed the power supply under the center of the table.