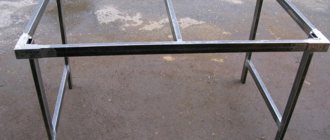
Electric welding is a technology for combining the structure of metals by heating and melting with an electric arc. It has become widespread in various spheres of the national economy, including the private sector.
In fact, this method can be used to weld any metals together, taking into account the temperature of the electric arc (7000-8000 degrees). But before turning to this technology, you will have to learn how to weld a vertical seam using electric welding, and understand the technique for obtaining a horizontal seam.
How to weld a vertical seam?
The difficulty of welding control when creating a vertical seam is due to a common physical phenomenon - gravity. This has an effect on the mass of molten metal, which, being in liquid form, rushes down.
Here, the actions of a professional welder are to prevent the molten mass from coming away from the welding site. A stably burning electric arc, held at the minimum permissible distance from the end of the electrode to the weld pool, will help to achieve this result.
Bottom-up technique
A vertical joint is usually welded by moving the electrode in the direction from the bottom to the top. This route provides more stable control, and the electric arc confidently holds the melt bath, preventing spreading. It is by passing from bottom to top that it is possible to form the highest quality vertical seam.
Technique for forming a vertical seam from the bottom up. To obtain the required seam width and penetration depth, craftsmen use different options for “drawing” with an electrode
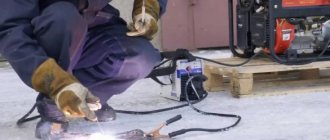
Of course, before starting to weld a vertical seam, the joint boundaries should be prepared and processed in accordance with the technical requirements. The welding machine needs to be adjusted to the welding conditions (set the current, select the electrode).
Initially, several spot “tacks” are made along the joint line - welding with a short seam (1 - 2 cm). The purpose of such actions is to prevent displacement of the parts being welded during the heating process due to temperature deformation.
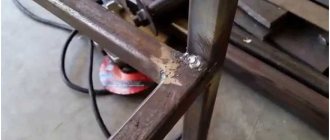
An example of a vertical seam obtained after welding two metal plates by a qualified welder. The technique of directing the movement of the electrode from bottom to top was used
When welding a joint vertically, the angle of holding the electrode relative to the plane on which the seam will lie is maintained within 45-90º.
The welder's instructions establish the following actions:
- The contact of the electrode with the metal ignites an arc.
- “Tacks” are made at 3-4 points along the joint line from its middle to the edges.
- Welding begins at the lowest point of the joint line.
- The electrode stroke is directed upward, the weld pool is held in the working area.
The electrode should be advanced at a moderate speed. The main speed criterion is the formation of the optimal amount of melt in the weld pool.
Simultaneously with the vertical stroke of the electrode, transverse zigzag movements in a “crescent”, “herringbone” or other “pattern” are permissible. But the transverse stroke technique seems relevant only on metals with a wall thickness of more than 4 mm.
It is recommended to weld metal with a vertical seam in one pass without stopping. For novice welders, this seems difficult. However, experience is gained quickly.
Top down technique
Having gained experience, welders can easily lay a vertical seam by moving the electrode from top to bottom. What is the trick to performing such an operation?
It's simple: when igniting an electric arc, the electrode is positioned relative to the working plane at an angle of 90º. As soon as the metal at the point of arc formation begins to melt, the angle of installation of the electrode is changed by 15-20º, lowering the holder slightly.
A technique for producing a vertical seam with the electrode moving from top to bottom. In this option, slightly different forms of transverse “drawing” with the electrode are used
Wiring of the electrode along the joint line of thick-walled metals is also carried out with transverse zigzags of a “sawtooth” or “rectangular” shape. Some welders use the “wave-like” melt distribution technique.
Meanwhile, the method of forming a vertical seam from top to bottom is accompanied by great difficulties for the welder. However, according to many experts, welding in this form gives the best result in terms of quality indicators.
Vertical joint welding technology
Without experience in welding, it is difficult to understand how to safely electric weld vertical seams to specifications and make it smooth and consistent. Professional metal adhesion is obtained when:
- The mutual perpendicularity of the electrodes and metal parts is constantly monitored.
- A shortened arc is used, due to which crystallization is accelerated. This reduces the number of drips and registration defects.
- Changed the angle of the conductor to stop the flow of melts.
- There has already been a leak. Then you need to increase the current readings and increase the steps to increase the crystallization time.
You can learn more about how to weld properly here.
When you need to lay a path from top to bottom in a hard-to-reach place, it is better not to rush and follow special standards. As a result, the iron will be pliable, and drips will not interfere.
Rules on how to carefully, correctly and professionally weld a local vertical seam when the metal sheets are very thin:
- pre-treat the product, remove dirt and other residues on the metal, remove galvanization;
- in targeted steps, reduce drips and burns of the material.
It is easy to understand how to properly weld a vertical seam using inverter welding if the welder takes into account the following factors:
- composition of connecting materials;
- welding techniques for such compositions;
- master's experience;
It is also necessary to find out in advance about the capabilities of the equipment used.
Horizontal seam welding technology
The specifics of welding a horizontal seam are almost the same as for a vertical one. Technical nuances - again, manipulation of the angles of electrode installation.
The direction of movement during the process of welding parts at a joint can be selected from its leftmost point to its rightmost point or vice versa. The specific choice of direction is determined by the welder, based on the degree of personal convenience.
Standard technique for forming a horizontal seam and practiced forms of transverse “drawing” used to obtain the desired width and depth of the seam
But how to properly weld a horizontal seam using electric welding in order to prevent the melt from flowing out of the rut due to the acting force of gravity?
Here the welder needs to select a position for the electrode in which the force of the electric arc would be equivalent to the force of gravity of the metal drops. It may be necessary to adjust the current strength and experimentally select the optimal speed of movement of the electrode.
Typically, horizontal seam welding is carried out continuously until complete completion. However, if you cannot keep the melt (welding pool) under control, you can try to change the technique - switch to a stroke with periodic extinguishing of the arc.
All these subtleties are developed with the advent of experience in performing welding work. Therefore, do not despair if nothing works out on your first attempts.
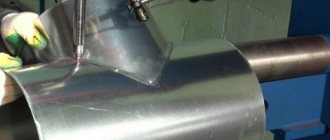
A practical example of horizontal welds made on metal plates mounted vertically. The top version was carried out in the direction from left to right, the bottom from right to left
The formation of a horizontal seam of the required width and penetration depth is, as a rule, achieved through careful transverse movement of the burning end of the electrode from the edge of one joined part to the edge of the other.
When welding metals up to 4 mm thick, different options for the “pattern” of the transverse stroke of the electrode are used. There are no specific recommendations in this regard. The main thing is to obtain the required seam width and penetration depth.
General definitions
There are several types of seams depending on where they are located. Towards:
- vertical;
- horizontal.
By plane:
- lower;
- upper;.
- side.
The simplest one runs along the horizon and is located below, on the desktop. Then it is very easy to monitor the weld pool being formed, and the deposition itself is laid down neatly and consistently, regardless of how the electrode moves.
Electric arc: control of optimal length
The size of the gap between the hot end of the electrode and the metal plane, sufficient for the formation of an electric discharge, is called the arc length. One of the main pillars of welder instruction is control of the optimal arc length.
Theoretically, in the welding mode, three arc gaps can be obtained:
- short (1 – 1.5 mm);
- long (3.5 – 6 mm);
- normal (2 – 3 mm).
The short arc combustion mode is characterized by insufficient heating of the metal across its width. In such cases, along the edges of the seam there is a so-called “undercut” - a small depression. The presence of such a defect indicates low quality indicators of the weld.
The length of the electric arc is of particular importance for welding technology. It is due to this parameter that the correct or incorrect structure of the weld is built
Long arc welding mode is usually accompanied by periodic extinguishing. Here there is a slight heating of the metal in depth. There is also no need to talk about good seam quality.
Thus, the only option left that a novice welder should focus on is the normal arc length, which should be no more than Ld = 0.5-1.1 * De (Ld - arc length; De - electrode diameter).
Technique for obtaining a good weld joint
When the rollers begin to turn out smooth, you can try to start making connecting seams. This operation can be performed by a fairly experienced trainee who knows how to weld using electric welding.
Read also: Double square antenna calculation by frequency
The electrode is ignited according to the technology described above. The only difference will be the movement of the welder's hand. She will perform oscillatory movements. The melt will seem to move from one surface of the part to another. Movement can occur along several trajectories:
For training, you can take a small metal blank. Draw a line along the surface with chalk so that it can be seen through the dark glass of the mask. It is along this that you need to move the electrode in order to get a kind of seam, in the form of any of the above paths.
After the seam has cooled, you need to beat off the slag with a hammer and examine the work done.
When you have a little experience, you can begin to make connecting seams, which have several types:
In addition, such seams can be horizontal and vertical, and can be welded in different directions.
Only after numerous trainings can you achieve uniform hand movement. After this you can get beautiful details.
Electrode position control
The welding process can be performed with the electrode positioned at an angle forward, at an angle backward, or at a right angle. Using any of these three technological methods, the welder is able to create seams in different production conditions.
Variants of angular positions of the electrode for welding work. Blue arrows indicate the direction of electrode movement
Thus, the “forward angle” method is traditionally used to connect elements with horizontal and vertical seams in conditions of the upper location of parts in space (ceiling welding). The same technique is successfully used for welding fixed pipe joints or when constructing a homemade stove from a gas cylinder.
By holding the electrode strictly at a right angle (90º), the welder ensures that work is performed in hard-to-reach places. Finally, the “back angle” technique allows for high-quality welding work on corner joints.
When installing the electrode at a forward angle, they usually work with thin-walled metals. In this position of the electrode, a wide seam of shallow depth is obtained. On thick-walled metals, on the contrary, they try to use the “backward angle” technique, ensuring the metal is heated to a sufficient depth.
Types of fillet welds (welding positions)
Compounds are classified according to many criteria. First of all, this is a method of installing blanks. Depending on the requirements for the strength of the finished structure, the seam is made one- or two-sided.
In the second case, the seam is reliable and holds its shape longer. When welding on one side, the structure may become deformed.
Lower
When working in this way, one part is in a horizontal position, the other in a vertical position. The seam is formed at a right angle between the surfaces.
If the thickness of the workpiece does not exceed 12 mm, cutting the edge is not required, but the lower part of the sheet installed perpendicularly is cut so that the distance between the edges is less than 2 mm. When working with thick parts, a V-shaped cut is made.
Vertical and horizontal
When welding parts located vertically, the melt flows down. Reducing the arc length helps eliminate the formation of droplets; to do this, the electrode tip is brought closer to the area being treated.
Seam welding has the following features:
Vertical welding seam and electrode movement pattern.
- The metal is prepared taking into account the type of connection and the thickness of the workpieces. The parts are secured in the desired position and short tacks are applied. This prevents the structure from moving during operation.
- The seam is formed both from bottom to top and in the opposite direction. The first method is considered more convenient. Under the influence of the arc, the weld pool moves upward. The seam is of better quality.
- Fillet welding can be carried out in a vertical position with arc separation. During the break, the melt has time to cool. In this case, the same movements of the electrode are used as when welding without separation: in different directions, in a circle or in a loop.
- When welding from top to bottom, the rod is installed at a right angle to the surface of the workpiece. After the arc is excited, the part is heated, the tip is released and welding is carried out in this position. The method is not entirely convenient, since it requires constant monitoring. However, the seam acquires the required characteristics.
Horizontal connections can also be formed in different directions. The method is chosen taking into account the preferences of the welder
The bath also moves downwards, so the angle of the electrode is increased, taking into account the welding speed and amperage.
As the melt drains, they make faster movements and periodically tear off the arc. During these breaks, the metal cools down and no drops form. You can try changing the voltage. These methods are used in stages.
Horizontal weld seam.
Ceiling seams
This is the most difficult way to form compounds. It requires experience and constant monitoring of the treated area. During the welding process, the electrode is held perpendicular to the ceiling.
The arc length is minimal, the speed of movement is constant. The rod is moved in a circular motion, expanding the melting area.
Welding ceiling seams.
Into the boat
Corner joints often have to be welded on both sides. To carry out the process correctly, the workpieces are installed so that their planes are at the same angle. This method is called boat welding. This simplifies the selection of electrode movements and improves the quality of the seam.
Boat welding.
Current parameters and electrode movement
The value of the current and the speed of movement of the electrode are significant factors that influence the quality of the seam. Welding with high currents is accompanied by heating of the metal to a great depth, which allows you to increase the speed of movement of the electrode. Provided there is an optimal ratio of current and speed of movement of the electrode, an even, high-quality seam is obtained.
Correspondence table for current, electrode, metal thickness
| Current strength, A | Electrode diameter, mm | Metal thickness, mm |
| 35-50 | 1,6 | 1-2 |
| 45-80 | 2 | 2-3 |
| 65-100 | 2,5 | 3-4 |
| 85-150 | 3 | 4-5 |
| 125-200 | 4 | 5-6 |
When moving the electrode at a certain speed, the magnitude of the arc power should be taken into account. Excessively fast supply of the electrode at low power will not be able to provide sufficient heating temperature.
As a result, it will not be possible to weld the metal to the required depth. The seam will simply “lie” on the surface, barely “grabbing” the borders of the edges.
Burnt metal at the point of unacceptably slow advance of the electrode. A common defect in welding thin-walled metals with a high-power arc
On the contrary, in conditions of excessively slow advance of the electrode, an overheating atmosphere will be created, which threatens the deformation of the metal on the welding line. If the metal elements have a thin structure, a powerful arc will simply burn through the metal.
You can successfully practice as a novice welder and hone your seam-making skills by making a working stove, the base of which is a metal pipe. We recommend that you read the useful information.
Instructions for a beginner welder
Welding work can only be performed if appropriate equipment is used.
Standard kit contains:
- Jacket, trousers, gloves, shoes made of fireproof, durable, strong materials.
- A headdress that completely covers the back of the head.
- A special protective mask for the face and eyes.
To carry out welding, you should use a working device, the electrical part of which is closed with a reliable housing. The electrical cables included in the device must have complete insulation and comply with the electrical characteristics of the device.
The welder's place must be equipped with a work table, light sources, a grounding bus, means of protection against electric shock and fire-fighting equipment.
And even before starting work, you need to carefully study the rules of electric welding, consider and study methods and options for making connections.
Conclusions and useful video on the topic
We invite you to watch a video welding workshop: how to weld horizontal and vertical seams:
It is not necessary to be a qualified welder, but proficiency in welding techniques is desirable. Thanks to existing welding skills, a person has more opportunities to implement various household projects.
If you wish, you can always study the technology, and practical experience will help you master the technique of performing work at a high level.
Would you like to talk about your own experience in making welds? Do you know the subtleties of the process that are not given in the article? Please write comments in the block below.
Arc ignition
For the quality of welding of vertical seams, it is very important to ignite the arc correctly. And it doesn’t matter whether you cook with an inverter, transformer or semi-automatic device. If the electrode runs out, it needs to be changed quickly, because the delay is a decrease in the temperature in the bath.
But even in this case, ignition must begin from the highest point of the crater. By the way, this can be in the center of the crater or on the side, it all depends on where the welding was completed before. The first pass into depth must be done quickly. This is how you can avoid slagging the gap. Because the arc is still unstable and the bath temperature is not at the required level. After raising the electrode, you need to pause to melt the starting point of welding, where the arc stabilizes and the bath reaches the required temperature. After this, you can go down deeper into the gap.
Cooking a vertical seam is quite difficult. No wonder there are so many options available. Beginning welders will have to spend a lot of time learning how to do this. Therefore, we suggest watching a video on how to properly electric weld a vertical seam.
Related publications
Leave a comment