An apartment, and especially a private house, needs regular maintenance and repair work. A home handyman has to be a generalist, capable of performing many different tasks. Therefore, masters want to master as many technologies as possible.
One of the most in-demand skills is the ability to perform welding work. Practice shows that electric welding is best suited for beginners - the technology is simple and accessible to anyone who wants to learn how to use it. Before you start mastering the method, you should familiarize yourself with the theoretical aspects of the issue, don’t you agree?
All the necessary information is described in detail in our article. We described the principle of operation of electric welding and indicated which device is best to choose for working at home. In addition, the article provides a step-by-step technology for welding parts, methods for making seams, and also lists possible defects in joints.
Welding theory
A novice welder is wondering which welding inverter to buy, and what devices are needed for welding metal with electrodes. If we ignore the professional use of welding, buy a welding inverter, not a transformer or semi-automatic machine.
The welding inverter converts alternating current from the electrical network into direct current.
The advantages of an inverter welding machine compared to a semi-automatic machine and a transformer:
- Light weight and dimensions, on average the inverter weighs 3-5 kg.
- Easy to use for beginners.
- Allows you to quickly master welding.
You can talk endlessly about the advantages of inverters, but it’s better to see it once to understand what advantages this type of welding equipment has.
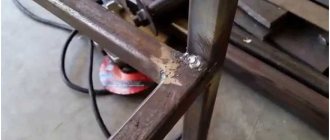
Now we will tell you what kind of process occurs during metal welding and how to evaluate the result. There are two metal blanks of different sizes. A constant voltage from a welding inverter is supplied to the metal through the electrode and ground. For an electric arc to occur, two conductive elements with a plus and a minus are needed. When electrodes of different polarities touch the metal, an electric arc is ignited, releasing high temperature. The metal begins to melt and, at the same time, when moving, the metal rod of the electrode melts with a special coating - coating.
When burned, the coating creates a gas protection for the seam, protecting it from the harmful effects of oxygen.
Also, during welding, a protective slag layer of the weld pool is formed, which is then beaten off with a special hammer from the welder.
After completing the welding of the parts, the metal cools, crystallizes, and a strong welded joint is formed.
Let's sum it up
Welding work requires special knowledge, skills and special equipment. Please note that this is a rather complex and dangerous process that requires strict adherence to safety precautions.
Welding skills require some time and practice. There is nothing wrong with training on a piece of unnecessary metal. This allows you to gain experience and understand the essence of the welding process.
Before you start welding parts, you should hone your use of a welding machine and the ability to weld seams on workpieces and then move on to more complex elements.
What do you need to buy to start welding?
This question is answered in the article - Tools and accessories for manual arc welding: a basic set. In short, to start welding with an inverter at home, you will need:
- Electrodes.
- Welder mask.
- Gaiters or protective gloves.
- Protective trigger, trousers and closed shoes.
- Welder's hammer and brush for removing slag.
A specialist talks about choosing a mask for metal welding in this video.
The optimal choice for a novice welder is a mask with a “chameleon” type filter.
Its invaluable advantage, compared to a conventional protective shield with tinted glass, is that the welder can see the parts being welded. He does not need to raise and lower the mask, because... “Chameleon” automatically darkens when a welding arc appears and reliably protects the eyes.
When the welding process stops, the glass is automatically cleared. This makes the job easier. A beginner in welding will not pick up the so-called. “bunnies” from a bright arc flash if the mask with ordinary glass is not lowered in time.
Protection of metal from corrosion after welding
Remember, at the very beginning of the article it was said that in order to weld correctly with electric welding, it is not enough to watch the video, but you also need to prepare theoretically? Agree that the text allows you to better understand the theory. In addition, the videos somehow miss the need to protect the parts later. We will try to eliminate this shortcoming.
Everyone knows that metal quickly begins to rust when exposed to oxygen in the air. Believe me, welds corrode even faster.
In order to protect metal surfaces from corrosion, painting is most often used. To avoid repeating this work every year, do it according to all the rules.
First of all, you need to remove old paint and rust. To do this, it is best to use metal brush attachments for a drill or grinder, but you can also work with a regular metal brush. Do not forget to protect your eyes with glasses or a shield.
After cleaning the surface, treat it with a rust converter and then coat it with a coat of primer. Choose a primer composition specifically designed for working on metal. After this layer has dried, you can begin painting. Acrylic and pentaphthalic enamels intended for outdoor use give good results.
It is best to use a spray bottle rather than a brush or roller for painting purposes. With its help, you can apply a uniform, thin layer of paint that will not crack or peel over time.
What are the types and types of electrodes by brand?
If you go to any specialized store selling welding equipment and look at the assortment, your eyes will simply run away from the offers of different types of electrodes. What to buy?
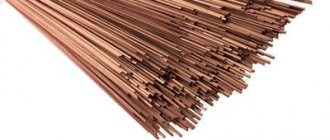
When choosing electrodes for welding, pay attention to the composition of the core. The metal of the rod must be identical to the metal being welded. There are the following types of electrodes. For welding:
- Carbon and alloy steel
- For welding stainless steel and non-ferrous metals.
Let's simplify the choice. In everyday life, ordinary “ferrous” metal is most often welded - profile and round pipes, angles, strips, fittings, channels, I-beams, water pipes, etc.
Also pay attention to the coating of the electrodes. There are four types of coatings - basic, rutile, acidic and cellulose. Let us leave the acidic and cellulose coating of electrodes outside the scope of this article. For home work, a welder needs only electrodes with a rutile coating (grades MP-3 and OK 63) and a basic coating (grade UONI 13/55).
Advantages of electrodes with basic coating:
- Suitable for welding critical structures with high demands on seam quality.
- The seam is plastic and impact resistant.
Disadvantage of electrodes with basic coating:
- Increased requirements for the cleanliness of the surface of the metal being welded and the processing of the edges of parts.
- For novice welders, re-igniting the electrode is more difficult.
Advantages of rutile-coated electrodes:
- There is less metal spattering.
- Easy re-ignition of the electrode.
- Stability of the arc in all spatial positions.
Choosing a welding machine
A good welding machine with the ability to adjust the current from 10 to 200A will help you learn how to weld properly. Of course, you can assemble a simple welding transformer with your own hands, but then you don’t even have to think about how to weld thin metal, because such work requires minimum power values. Factory-made devices are divided into:
- Welding transformers . Designed to reduce the network voltage while simultaneously increasing the current. Being inexpensive and productive devices, they can weld metal quite well, but they have disadvantages such as an unstable arc, a strong “drawdown” of the supply voltage and a large mass.
Welding transformer
Transformer device
- Welding rectifiers . Such devices are the same welding transformers equipped with a diode rectifier, thanks to which the alternating voltage of the network is converted into the direct voltage necessary for the appearance of an electric arc. Welding metal with straighteners is a little easier due to the higher arc stability. Otherwise, this type of welding machine has the same disadvantages as transformers.
Welding rectifier
Rectifier device We recommend wall-hung toilets. Let's consider all the pros and cons of such structures. Reviews about manufacturers
- Welding inverters . True electronic welding is possible thanks to the modern technological filling of such devices. They provide a lot of opportunities to cook with electrodes with the most optimal parameters. The electronic components of the circuit of modern inverters make it possible to regulate not only the current strength, but also the ignition speed, arc forcing, etc., which ensures excellent weldability of parts. In addition, inverters are compact and lightweight.
Welding inverter
Inverter device
The debate among welders continues unabated about which welding method is best. Some people like the simplicity and reliability of the transformer, while others are satisfied with manual welding with a rectifier. However, the best way to learn how to weld is with a welding inverter. The ability to precisely adjust the parameters will allow you to weld metal correctly literally from the very first steps.
Which polarity to choose when welding metal with electrodes
The inverter for manual arc welding produces direct current. If you look at the front panel of the device, you will see that there are two connectors for connecting welding cables marked + and -.
Straight polarity : a “clothespin” is connected to the plus of the device, and a holder is connected to the minus.
Reverse polarity : the electrode holder is connected to the plus of the device, and the “clothespin” clamp is connected to the minus.
Which polarity should I choose? Many copies have been broken about this issue. If you open educational materials on welding and ask on the Internet, you can often hear the opinion that with “straight polarity” the metal being welded is better heated and melted .
Practice refutes this.
When welding, more heat is generated at the contact with the plus, therefore, in reverse polarity , the holder is connected to the plus, the penetration is always deeper . As a result, it is better to weld metal with thick walls using reverse polarity. This is a profile pipe, plates, corner with a thickness of 4-5 mm. Conversely, with direct polarity it is necessary to weld thin metal, no more than 1.5-2 mm thick, in order to avoid melting of the walls and the appearance of holes.
You can verify the veracity of this statement in practice. Take a welding inverter, set the welding current to 100 A. Connect the electrode holder and ground to the connectors of the device and cut the metal - a plate 4-5 mm thick, an angle or fitting, first in direct and then in reverse polarity, without changing the current strength and electrode with a diameter of 3 mm. You will see that metal cutting is faster with reverse polarity.
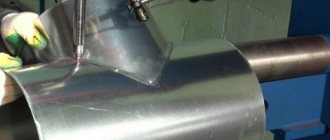
Features of electric welding of metal pipes
It is best to learn to weld profile pipes on thick-walled products using a welding rectifier or inverter. Depending on the diameter of the pipes, their wall thickness can reach more than 16mm, but you will most likely need to weld structural steel products with a wall thickness of up to 12mm. To weld a pipe, single-layer welding is often used, but to increase the strength of the connection it is better to perform two or more passes.
When welding pipes, the seams are made in two half-rings from top to bottom or bottom to top.
If the direction of movement of the electrode corresponds to the first option, then 4 mm rods with low slag formation and organic coating are used. This coating burns out more slowly, forming a visor at the end of the electrode, on which they rest, performing transverse vibrations of small amplitude.
When welding from bottom to top, the amplitude is increased to 3-5 mm, and the speed of the rod is reduced.
Pipe connections are made:
- Butt (exact orientation of the ends of one pipe relative to another);
- Overlapping (by placing pipes or parts on top of each other);
- Angle;
- T-joint (one pipe is perpendicular to the other).
In order to weld one pipe to another, their ends are first cleaned and prepared and the products are placed at the workplace. Next, the elements are centered relative to each other and secured in several places with spot welds. After checking the alignment of the pipes, they can be welded using one of the specified methods.
If it is impossible to rotate the pipes, their joints are made in multilayers . The first, root layer, serves to initially connect the parts. The following, filling layers, are designed to create the actual durable, monolithic seam. And, if necessary, they perform a finishing, facing seam, which covers all defects and irregularities. A video on how to weld a pipe will help you better understand the features of such work.
After cleaning the seams from slag, the surface is carefully inspected to identify lack of fusion, pores, cracks and burns. If necessary, defects are eliminated by welding. If the seam meets all the requirements, then it is cleaned using an angle grinder.
How to choose the diameter of the electrode for welding metal of different thicknesses
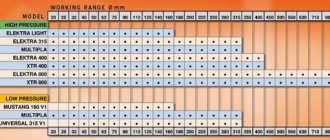
Remember a simple rule: the diameter of the electrode depends on the thickness of the metal being welded . Metal with a thickness of less than 1 mm is usually welded using semi-automatic or argon arc welding, rather than using electrodes. For reference, below is the table: “Ratio of steel thickness to electrode diameter.”
For each electrode diameter, its own current is set.
Advice for novice welders: you can calculate the current strength as follows: for every 1 mm of electrode diameter you need approximately 30 A of current strength. Those. for the “troika” electrode, set the current to about 90-100 A.
In practice, each welder selects the diameter of the electrode and the current strength on the inverter individually.
Welding methods
The following welding methods exist:
- Gas press , using an acetyl oxygen flame. The advantages of this type of welding are high productivity. Therefore, it is widely used in the oil and gas industry, in particular in the construction of highways for transporting oil and gas, as well as in mechanical engineering.
- Contact , carried out by electric current having a relatively low voltage at a sufficiently high current strength. This method includes the following varieties: butt welding, seam welding and spot welding.
In addition, in some cases, roller and electroslag welding, friction and thermite welding, as well as a number of other varieties, are used.
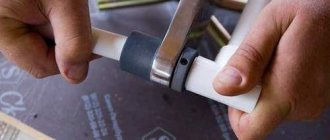
How to ignite an electrode
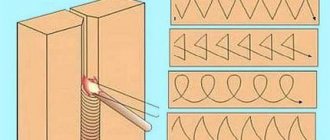
There are two ways. Option one: ignite the electrode - end-to-end (by touching). Option two: strike. The methods are clear from the photo below.
The second method is similar to lighting a match on a matchbox. The first method is sometimes replaced by lightly tapping the workpiece. When the electrode is new and the metal of the rod is visible at the tip, ignition of the arc occurs easily.
If the electrode has been in use, a coating may appear around the rod. The protective coating of the electrode does not conduct electric current. Therefore, it needs to be knocked off by tapping the tip of the electrode on the part to be welded several times. Easy ignition of the electrode is a skill that has been brought to automaticity.
Preparation of the workplace
The welder's workplace must be equipped in accordance with safety rules. Work is carried out in a dry, well-ventilated place, without flammable or explosive substances nearby. The best option is to create a cabin with an open top to allow the removal of welding gases. The cabin walls must be made of non-combustible materials. The cabin area must be at least 4.5 m2. There should be fire extinguishing means nearby - fire extinguishers, sand, water.
Welder workplace
Training is carried out in open areas, in simpler conditions, since the task is to master skills, and not to ensure high productivity. In this case, all safety requirements must be strictly observed:
Welder protective equipment
- The welder's clothing should be made of thick, dense fabric. There are ready-made canvas suits that are optimally suited for such work;
- patch pockets are prohibited;
- shoes must be durable and closed, protecting against splashes accompanying metal melting;
- Be sure to have a welder's mask and special gloves - protective gloves with high cuffs.
For ease of work, it is necessary to place the electrodes in a freely accessible area; the wires should not get in the way underfoot when moving.
How to guide the electrode and the correct angle of the electrode
After igniting the arc, monitor the weld pool. Hold the electrode at a distance of 2-3 mm from the surface of the workpieces to be welded. You should be able to see and separate the weld pool from the slag.
A weld pool is a bright white spot of hot metal.
Hold the electrode at an angle from 30° to 60°, while maintaining the optimal distance, because the rod melts. Monitor its position and the condition of the weld pool. Speed up or slow down your hand movement depending on different conditions and occasions.
The welder selects the angle of inclination of the electrode depending on the spatial position, the weld and the set current. The faster you move the electrode, the less heating of the metal and the amount of penetration. If you move the electrode slowly, you can overheat the metal and burn a hole in the product.
A beginner should first train on his own on a thick sheet of metal. Task: learn how to ignite a welding arc and move the electrode along a horizontal surface to create a high-quality seam.
After this, you can begin welding in other spatial positions. A good help for beginners will be the video - Welding for dummies from FORUMHOUSE , in which technical specialist Denis Zamyslov will talk about the basics of welding skills and choosing an inverter machine.
How to cook using electric welding
Thanks to the reliability and durability of welding joints, there is not a single industry that does not use this technology. In the household, it is also sometimes impossible to do without welding work. Having the skills to work with an electric welding machine will allow you to create any metal structures, from a simple fence in a summer cottage to an openwork garden swing or a multifunctional barbecue. We will talk about how to properly weld and reveal all the tricks and secrets of this craft so that your first seam is not only strong, but also neat.
Secrets and techniques of welding with an inverter for beginners
In this part we will answer the most common questions from novice welders.
benyaFORUMHOUSE user
I'm making a fence from corrugated sheets. I want to weld corners to the posts. I've never done welding before. No experience. Please advise where I should start in order to do it reliably, and how to weld correctly with a welding inverter?
Tips from a FORUMHOUSE member with the nickname vodovoz:
- For welding, take a regular household welding inverter.
- The optimal diameter of the electrode is 2.5 mm; the “three-ruble note” requires more current.
- Light up the electrode. To do this, scratch it on a flat metal surface.
- Lead the welding seam in figure eights. Starting from bottom to top in increments of no more than 1 mm.
- Do not cook the product immediately from start to finish. Make a couple of tacks so that the metal does not move due to heating on different sides.
- If there are voids left after welding and beating off the slag, boil these places again.
- Beat off the slag. Take care of your eyes! Wear safety glasses or do this with a chameleon welding helmet.
HukToFORUMHOUSE user
The most popular electrode in everyday life is the “troika”. Standard inverters pull “four”, and you don’t need more. You can change and select the current strength during the welding process, selecting the optimal mode. Set it too high and you will burn a hole; set it too low and the electrode will stick.
To the treasury of knowledge:
- Welding seams can be horizontal, vertical and ceiling.
- The easiest one for beginners is horizontal.
- It is especially difficult to make a high-quality vertical seam due to uncomfortable working conditions.
The welder’s task is to “blind” the two edges of the metal being welded together and deposit molten metal from the electrode rod on top of the seam.
To weld a steel angle to a metal pole, it is better to use clamps or magnetic angles. If you ask a friend to help hold the workpiece, he may catch the “bunnies” and get burned due to splashes of molten metal.
JamesDouglasFORUMHOUSE User
How to accurately determine the optimal welding current?
Sergeyb3MODERATOR FORUMHOUSE
Take a metal blank. Set the current to higher and cook. If you are burning through metal, reduce the current. Find the amperage at which you will be comfortable cooking without burning through the metal. Experience is gained through practice. Practice on rusty pieces of metal, get your hands on it. After several electrodes burned on tacks due to rust, then, on good metal, things will go faster.
efhFORUMHOUSE user
My advice: carefully clean the welded parts and joints from rust and paint to bare metal.
Sergeyb3MODERATOR FORUMHOUSE
Good advice. You can also learn how to weld beautiful seams vertically. After completing this training, the horizontal seam becomes ideal.
Learning to cook with electric welding. Video tutorial
In order to learn how to weld using electric welding, it is not enough to study the theoretical fundamentals and learn the secrets of the craft. Only the experience that is gained with every centimeter of the weld can bring you closer to the ability to weld metals.
A video on how to weld using electric welding will help you understand all the nuances of this craft and tell you what other materials and tools, in addition to a welding machine, will be needed when carrying out the work.
The video of the welding process, presented in the form of step-by-step lessons, begins with a talk about preparing surfaces before welding. Next, you will learn how to make simple seams and only after that you can start joining parts.
Thanks to the recommendations from the video, welding your first structure will not be difficult, and quality control of the seams will show how well you have mastered the welding technique. Watch a video on how to weld with electric welding, prepare yourself theoretically, and then pick up an electrode and start creating.