When assembling and connecting water supply or drainage systems, it often becomes necessary to connect pipes, and it is better to do this without the use of a welding machine. However, not all home craftsmen are familiar with the specifics of such delicate work. Do you agree?
We will tell you how to insert into a pipe without welding when laying pipe structures. The article offered for your perusal examines all the methods for making connections for pipes made of various materials. Taking into account our recommendations, you can create a strong, reliably cohesive knot.
How to connect pipes without welding?
There are several ways to connect pipes to the main line without welding. Some of them are classified as one-piece, which are almost impossible to disassemble without destroying the pipeline. Others are detachable joints that can be easily dismantled and, if necessary, reassembled.
The choice of option depends on what material the pipe is made from.
Connecting pipes without welding, without any special skills, is a feasible task even for a novice master; you just need to strictly follow the installation instructions
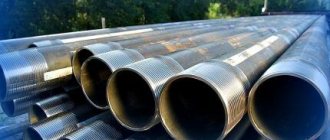
All rolled pipes are divided into two main groups:
- hard - pipes made of cast iron, copper and steel;
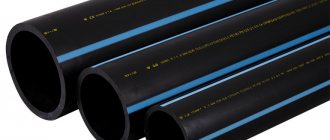
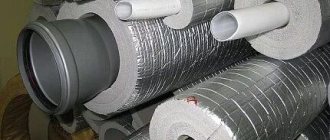
- flexible – products are made of polymer materials (polypropylene, metal-plastic, polyethylene).
This separation is based on the need to use a larger engagement area when connecting parts of polymer structures. For comparison: inserting metal pipes can be done in limited conditions, using the minimum engagement area of the parts being joined.
Image gallery
Photo from
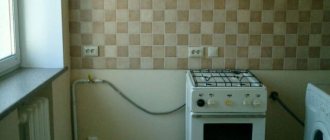
Insertion into a pipe when connecting additional branches
Line connection units for household appliances
Using aroma when inserting
Elbow fittings
Joining of profile pipes
The most affordable way to connect profile pipes is by installing fastening clamps. Using these simple devices, it is convenient to assemble any type of small-sized metal structures, erecting canopies and shelving, greenhouses and fences, canopies and modular partitions.
The use of fastening clamps makes it possible to ensure the connection of pipeline elements, the stability and strength of which is not inferior to welded
The undeniable advantage of using fasteners is ease of installation and the ability to disassemble the assembled structure an unlimited number of times.
To implement this method you will need only three components:
- Rolled pipes cut to size.
- Required number of fastening clamps.
- Wrench.
Crab clamps can be “X”, “G” and “T”-shaped elements, with the help of which it is convenient to join straight sections of pipes, corner structures and simultaneously connect up to four segments within one unit.
When assembled, they have the shape of a square or rectangle, the sides of which tightly fit the joined parts of the metal pipes.
Crab clamps are made from galvanized or powder-painted sheet metal having a thickness of 1.5 mm
Fastening with crabs should not cause any particular difficulties. Anyone can insert the cut pipes into the clamp and secure the clamping sticks by tightening the bolts on the system.
But this method can only be used for profile pipes with a cross-section of no more than 20 x 20 mm, 20 x 40 mm and 40 x 40 mm. In addition, joining of elements can only be done at right angles.
You can connect square pipes without welding by installing fittings of a given profile.
For joining and inserting pipes, an adapter coupling is used, the diameter of which is one unit larger than the cross-section of the structural elements being joined
There are several types of fasteners in the form of fittings:
- Couplings - at joints on straight sections.
- Crosses and tees - for installation in branching areas;
- Elbows and turns – if it is necessary to change the direction of the pipeline.
With the help of fittings, you can obtain a fixed fastener, the only vulnerable point of which is the susceptibility to corrosion, which is typical for the ends of the joined elements inserted into it.
This situation occurs as a result of the accumulation of condensate inside the fastener. It will cause rusting if the metal pipes are not treated with an anti-corrosion compound.
Electrode tilt
To weld parts at right or acute angles, you must be able to move the electrode correctly. During the welding process, the end of the electrode melts along with the coating, which releases protective gases and partially turns into slag, which also protects the weld pool from atmospheric oxygen.
It is necessary to ensure that the bath is constantly covered with liquid slag, otherwise a high-quality weld will not be obtained. The metal must remain in a liquid state for at least three seconds, which is required to release harmful gases.
In this case, it is necessary to move the electrode along the seam, making complex rotational or zigzag movements with the end of the electrode. Such control over welding can only be achieved with the correct angle of inclination of the electrode. But the tilt angle is needed not only to control the welding progress. It can be used to influence the characteristics of the weld.
Welding at an angle forward makes the penetration depth smaller, while the width increases. This can be used when welding thin metals. With this method, the edges are well fused and the welding speed increases.
When welding at an angle backwards, the penetration becomes deeper and the seam is higher, but the width decreases. The edges do not warm up enough, so lack of penetration and the formation of pores are likely.
But the ability to cook is not enough to obtain a high-quality weld. Sometimes a certain position in space is required to make a good seam.
And this is achieved by using special devices that fix the parts to be welded in space as required by the welder. For example, when electroslag welding it is required to position the seam vertically.
When welding, it is often necessary to secure the parts to be joined together so that the welder can do his job. If the products are heavy and have complex shapes, then you cannot do without special devices.
In small workshops, universal type devices have become widespread, capable of fixing the assembled product before welding and changing its position during the work. They come in installation and fixing types.
Methods for inserting metal pipes
The choice of the optimal tapping method depends on the type of pipes being installed and their operating conditions. The connection can be made at an angle of 90 and 45 degrees, placing them vertically upward or to the side.
Threaded connection option
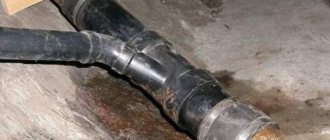
Non-pressure systems are assembled using a threaded connection, for example, drainage systems made of steel and cast iron or chimneys made of stainless steel.
Threaded connections are made only in sections of the pipeline where it is possible to control the reliability of the connection, and if necessary, it will not be difficult to tighten it
In most cases, pipe threads are rolled using special equipment. But if desired, this procedure can be performed manually using a cutting tool equipped with teeth - a die. To do this, cut the workpiece to a given length, making allowance for the threaded part.
The work is performed in the following sequence:
- Pipe sections are strengthened in a bench vise, thereby eliminating the risk of the workpieces twisting.
- To make it easier to fix the die, the outer part of the workpiece is chamfered at an angle of 45°.
- A die is carefully attached to the stripped end of the pipe, being careful to avoid distortion. If this is detected during the first laps, the die must be removed, the workpiece must be tapped, and the procedure must be started over again.
- The baited die is gradually screwed onto the pipe. After several turns, you need to use a level to check the correctness of the cutting.
- Having completed the pipe cutting to the required length, remove the tool by turning it in the opposite direction along the finished thread.
If the tool at some point stops turning, you need to make one revolution in the opposite direction and remove the stuck piece of chips from the thread, then continue working. To simplify the work of creating a threaded connection, it is recommended to lubricate the ends of the workpieces and the cutting tool with machine oil.
The threaded connection needs a seal, the role of which can be performed by plumbing winding using flax fibers or FUM tape
If you have to make cuts in conditions where the pipe is located close to the wall, it is quite difficult to make a full rotation of the tool around the pipe. Using die holders will help make the task easier. They are equipped with ratcheting mechanisms.
Before tightening the threaded connection, it is important to make sure that there are no settled chips or burrs at the ends of the pipes. Tightening the thread should be done with some force.
This article will introduce you to the methods of cutting threads on pipes for installing a plumbing system. We recommend that you read this very useful information.
By installing a clamp
This connection method is chosen to create a detachable pipe connection in cases where it is necessary to join elements without welding and without threads. Clamps are flat rings with or without connecting projections, which have holes for studs and bolts.
To create such a connection, a fitting called a clamp is used, which has a truncated cone at the end and is equipped with a rubber gasket
Assembly sequence for a unit with a flange connection:
- At the site of the intended insertion, a cut of the pipe is made, maintaining a right angle. There is no need to chamfer the end of the pipe; it is enough just to create the most even cutting line possible.
- A clamp is put on the cut that has been cleared of burrs.
- To seal the connection, insert a rubber gasket so that it protrudes 10 mm beyond the cut line.
- The flange is pushed onto the gasket. It is connected to the mating part installed at the end of the second pipe being joined and fixed by screwing the bolts.
When tightening the bolts of the connecting clamps, it is important not to overtighten so as not to damage the fragile elements of the assembly.
When joining the elements of the assembly, the clamp placed on the pipe is combined with the second mating part of the fastener and fastened with clamping bolts
Tightening must be carried out evenly, carefully turning the fastener threads around the entire circumference. It is better to tighten the nuts of the mating parts of the clamp not sequentially, but in pairs. To do this, it is recommended to tighten fasteners diametrically located opposite each other.
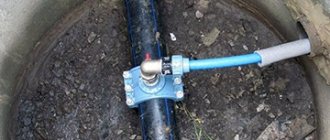
Installation of a clamp for connecting a communication line to it is carried out as follows:
Image gallery
Photo from
Step 1: Drilling a hole at the connection point
Step 2: Installing the Clamp with Holes Aligned
Step 3: Connecting flexible hose
Step 4: Painting the metal pipe after connection
By installing couplings
To obtain a hermetic connection of both non-pressure and pressure pipelines, crimp fittings are used. Collets or compression fittings are equipped with ferrules, which are “permanently” pressed during installation.
Couplings are a type of fittings that are used to extend straight pipeline segments. They are effective when assembling a rectilinear system in the house
Couplings are conveniently used for connecting pipes of different diameters and made of different types of materials. They are ideal when it is necessary to connect plastic pipes to metal ones.
Tapping into a pipe using a coupling is performed in the following sequence:
- The ends of the pipes to be connected are cut strictly at right angles.
- A coupling is applied to the joint, placing it in such a way that the central part of the device is located strictly along the connection line.
- Marks are made on the pipes to indicate the correct position of the fitting.
- The ends of the pipes and the internal cavity of the coupling are treated with liquid sealant.
- The ends of the first and second pipes are sequentially buried in the coupling. Both workpieces are aligned strictly along the axis.
- When putting on the fitting itself, follow the previously applied markings.
When connecting pipes to external communication lines, couplings with a flange connection type are mainly used:
Image gallery
Photo from
Installing a flange coupling on an external pipeline
Flanges in the connection of polyethylene pipes
Application for installation of shut-off valves
Tapping into a pipe under pressure
The connection using the Gebo coupling has also found wide application. This compression fitting is equipped with a compression and sealing ring. The element can be installed without using any special tools.
Homemade retainer
If the workpieces are small, then a device for securing them at an angle of 90 ° can be made independently from available material.
You need to take a metal corner, a strip (two pieces) and two clamps. To set a right angle, you will need a square; no other tool is required. The length of the corners can be any. The strip is welded at an angle of 45 degrees to each corner so that they form an isosceles right triangle.
Moreover, the corners (legs) do not reach the vertex of the triangle by several centimeters. This will allow you to safely weld rods or profile pipes at the joint in the future. If necessary, clamps can also be welded to the corners. They will firmly fix the products being welded.
In order to prevent the structure from moving, you first need to grab it in four places and only then boil it completely. The resulting device, when secured to the table, will last for more than one year.
Working with polymer reinforcement
It is even easier to insert into a polymer pipe. One of the methods does not require complex and most precise cutting of the pipeline. This is especially true when it is necessary to insert plastic elements of large diameters, which can be deformed under the influence of the insertion.
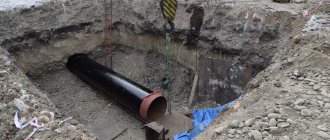
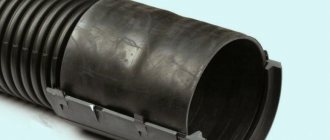
Insertion with pipe installation
To implement this method, you must first purchase a piece of pipe equipped with a pipe from a hardware store. The diameter of the workpiece must correspond to the cross-section of the water supply pipe.
From the purchased blank, a pipe is cut out in such a shape that one of its ends is equipped with a “half-pipe” type element, the main task of which is to ensure the overlap of the future insertion site
The manufactured blank will create, as it were, a second wall of the pipe. In the workpiece fixed on the pipe, a hole is drilled with a core drill, the diameter of which corresponds to the size of the pipe.
Liquid silicone sealant is applied to the inner surface of the mounted flange. The area around the hole is covered with the same composition, not reaching the cut line by 1 cm. The prepared flange is mounted on the pipe.
To tighten the edges on both sides, two additional fasteners are used. They should be tightened very carefully so as not to squeeze the sealant out from under the flange. The remaining glue that has come out is removed with a napkin.
If you have to make a connection on a plastic pipeline, the system pressure of which is minimal, you can safely use wide construction tape instead of a clamp.
Installation of adapter and saddle
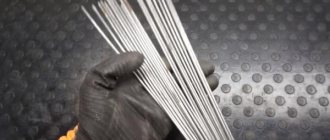
For a sealed and at the same time quick connection of the pipeline, it is convenient to use ready-made elements:
- Adapters – used for inserting pipes D 100-110 mm.
- Saddles - chosen for inserting thin pipes D 32-40 mm.
The saddles are two-part crimp structures that are convenient to install if you need to tap into an unplugged system.
There are modern models of the device on sale, equipped with a heating coil and a cutting cutter with which a hole is made.
To set the required accuracy of welding parameters, when carrying out the procedure, it is necessary to focus on the bar code located on the body of the part
Cutting into a pipe using an adapter is quite simple. The work is carried out in several stages:
- If the pipe is connected to communications, shut off the water in the system.
- Use an electric drill equipped with a crown to make a suitable hole in the desired location.
- Install the adapter onto the prepared area, not forgetting to lay a soft rubber seal.
- Tighten the structure with bolts.
If the design of the embedded element does not provide bolts, construction sealant is used for fixation. To do this, the composition is applied to a degreased surface. The nut is carefully tightened, and any excess product that comes out is removed.
This article is devoted to the technology of inserting pipeline branches into a plastic water main, which we recommend that you read.
Connection of asbestos-cement pipes
Asbestos-cement pipe products, the material for which is Portland cement mixed with asbestos fibers in a ratio of 4:1, are connected by installing couplings and fittings.
The choice of method depends on the operating pressure in the system:
- For pipes with a working pressure within 3 kgf/cc, when inserting, use asbestos-cement double-breasted couplings equipped with rubber seals. Sections 150-200 mm long have a slightly larger diameter than the size of the pipes being connected.
- For pressure pipelines with a working pressure of 3 kgf/cc, special fittings called Gibot couplings are used. They are collapsible structures with flanges and cast iron bushings, complemented by rubber sealing rings.
In both options, rubber sealing rings play a key role in achieving joint tightness.
When choosing fittings and couplings for inserting asbestos-cement pipes, the main attention is paid to the elasticity of the sealing rings of the fasteners
The technology for performing tapping using couplings and fittings is the same as when working with metal fittings. The only thing is that since asbestos-cement products are quite fragile, the insertion should be done with the utmost care.
The intricacies of the process of inserting into an existing water supply system under pressure are described in this article, which we recommend reading. It provides step-by-step guidance on how to make a difficult connection.
About technology
What is the technology of electric welding pipes based on? This process is high temperature. For the work, you will need a special apparatus and electrodes, thanks to which it becomes possible to form an electric arc running from the rod to the edge of the products being connected. As a result, the material of all contacting elements melts, forming a so-called “welding pool”, which is a kind of “boiler” in which all metals are mixed and become one.
The scale of this bath varies and depends on factors such as the size and shape of structures, welding mode, nuances of arc control, etc. On average, you can focus on the following parameters: length - 1-3 cm, width - 0.8-1.5 cm , depth - up to 0.6 cm. The electrode material is special - forming a gas environment above the connection. Thereby displacing air from the bath, protecting the molten material from interaction with oxygen. Slag appears at the weld site, which also protects the hot metal from reacting with air.
As you understand, during this work the air acts as a pest, so beware of it. At the end of the electric arc, the metal crystallizes, turning into a seam that unites two elements into one. Excess slag above the connection is removed as unnecessary.
The technique of welding pipes using electric welding is not difficult, but interesting. Now let’s discuss how to properly weld a pipe using electric welding yourself – on your own.