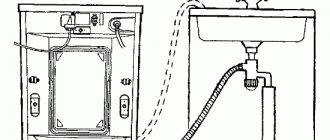
Connecting a toilet to the sewer system is a process in which not only the installation of the device is carried out, but also the supply of water to it, as well as a sewer pipeline. If there are no problems with supplying water to fill the toilet tank, then when arranging a sewer drain the situation is much more complicated. In order for a novice master to cope with connecting the toilet on his own, you need to read the step-by-step instructions for its correct installation.
How to connect a toilet to a sewer
The toilet outlet is standardized and therefore there are no problems when purchasing a connecting pipe. Connecting a toilet causes difficulties when you need to connect the pipe to the sewer pipe. Typically, the sewer pipe has a diameter that is larger than the outlet from the toilet. Before installing a toilet, you need to think about what diameter the sewer inlet should be, and what, in addition to the toilet, will need to be included in the drain. In addition to the pipe, the connection also involves the use of adapters, cuffs and fittings.
Types of toilet flares
The design of toilets from different manufacturers is almost the same, the only difference is the outlet. There are three types of toilet outlets or socket types:
- Vertical;
- Horizontal;
- Oblique.
Depending on the above socket options, connection to the sewer inlet can be made by placing the pipe in a horizontal, vertical or oblique form. The photo below shows three existing types of bells.
Vertical and oblique socket toilets are the most popular. This is due to the absence of the likelihood of sewer clogging. The horizontal type of descent is used very rarely when the entrance to the sewer pipe is located not in the floor, but in the wall at the level of the outlet from the device.
Connecting a toilet with a horizontal outlet requires a high-quality connection between the pipe and the sewer hole, otherwise the pressure when draining water from the tank can lead to unpleasant consequences.
Materials and tools
Even when purchasing the installation, you need to check the completeness. In addition to the frame itself, the tank, the inlet valve and the flush elbow must be:
- drain elbow;
- key;
- fastenings and fastening elements;
- plugs for flush and drain pipes (to prevent debris from getting in during operation);
- gasket for mounting a wall-mounted toilet (sound insulation).
In the case when you are installing plumbing fixtures yourself for the first time, it would be good to find out if the seller has spare parts for installation (if something goes wrong). All leading manufacturers produce spare parts and repair kits for installations - pipes, elbows, inlet and flush valves, membranes, seals and transitions. In addition, there should be a variety of different types of fasteners and fasteners that can be purchased separately.
You also need to purchase a set of pipes for connecting the wall-mounted toilet to the installation, silicone sealant for the joints of sewer pipes and fum tape for installing a stop valve on a water pipe.
To install a wall-hung toilet with installation, you will need the following tools:
- level, tape measure, ruler, construction corner, pencil or marker;
- hammer drill and concrete drills;
- hammer;
- a set of wrenches (as well as an adjustable or gas wrench);
- screwdrivers;
- pliers.
If you immediately install a frame from a profile for subsequent sheathing with plasterboard, then you also need a tool for this work:
- metal scissors;
- drill;
- knife or hacksaw;
- screwdriver
Types of pipes for connection
Often sewer systems do not have connectors for direct connection, so you will need to purchase connectors first. The following elements are considered as such connectors:
- pleated cuffs;
- eccentrics;
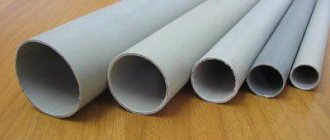
- plastic corners;
- outlet tubes;
- fan pipelines.
What each of these elements represents should be understood in more detail.
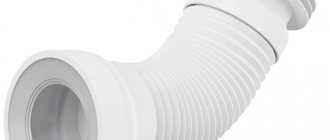
Corrugated cuffs or pipes are used when there is a misalignment when connecting pipes. The advantage of corrugation is the ability to bend the pipeline in any direction and at any angles.
Eccentric tubes consist of two branches, the axes of which are shifted from each other by a certain distance. To select the appropriate eccentric cuff, it is necessary to measure the difference in displacement between the outlet from the toilet and the inlet into the sewer.
Corners and bends made of plastic are used mainly where it is not possible to place corrugation. Such connector options have one big drawback - their rigidity, due to which leaks occur, which are formed due to the occurrence of distortions. Along with the disadvantage, one advantage should be noted. Compared to fan pipes, plastic materials can be cut to the required length.
Toilet drain pipes are used in plumbing only when there is a significant risk of water seal failure. A water seal is a special design of a toilet that does not allow unpleasant odors from the sewer to penetrate into the house. If the sewer riser has insufficient capacity, this may be reflected negatively in the form of water being drawn into it from the siphon. If the functioning of the water seal is disrupted, the owners will notice an unpleasant odor emitted when the toilet lid is opened.
To prevent the functioning of the water seal from being disrupted, the riser is connected to the toilet using a drain pipe with a valve. This valve opens when water is drained from the tank, thereby drawing in air from the room or street, which eliminates the possibility of a water seal malfunction.
When installing sewer connections, it is recommended to use a waterproof sealant, which will prevent damage to the integrity of the connections when the rubber seals are loosened.
Connecting cast iron sewerage with plastic pipes
In most apartment buildings of old construction, not only old-style toilets are installed, but also risers made of cast iron. The hole diameter of the cast iron riser is 123 mm, and that of a similar plastic pipe is 110 mm. If you need to install a new toilet, you will need to connect it with a plastic pipe to a cast iron riser, unless you plan to replace it. For such cases, there are special rubber cuffs that ensure a reliable connection.
Although a cast iron toilet drain pipe is a product with a long service life, it has a significant drawback - the occurrence of stagnation and blockages. In old apartment buildings, in order to improve the quality of functioning of the sewer system, it is planned to replace cast iron pipes with plastic ones. However, such replacements are carried out only in cases where cast iron sewer pipelines are in disrepair.
Construction of a sanitary unit
Connection node
The sanitary unit consists of:
- toilet bowls,
- platforms for installing a cistern,
- toilet siphon,
- siphon holes,
- toilet outlet (ceramic branch from its body),
- toilet drain pipe.
This list includes the connecting elbow, sewer riser and connection elements.
The installation method of the unit is based on the nature of the drainage of wastewater into the sewer pipe. Taking into account the features of the equipment, taking into account the design standards of sewer systems from Western and Chinese manufacturers, the choice more often falls on horizontal and vertical discharge. Domestic manufacturers have increasingly begun to resort to the same schemes for arranging a bathroom, along with the oblique outlet that is still available for connection to a vertical common riser, which leads to the need, when repairing such a toilet, to look for a rarely found outdated model of a bathroom and its elements.
How to connect a toilet to a sewer with your own hands
In a private house, the toilet connection diagram is simplified by the fact that even if a cast iron pipe is used as a sewer pipeline, it can be replaced with a plastic one. The rationality of carrying out such a replacement arises only if the cast iron pipe has been in use for a sufficiently long period of time.
In the apartment, the connection of the toilet to the cast iron sewer is carried out due to the hopelessness of the situation. Replacing a cast iron sewer along with the main riser will not only be expensive, but also requires major renovations in the apartments. That is why many people resort to replacing the cast iron pipe up to the main riser with a plastic one. Let's look at the possible ways to connect a toilet to a sewer system.
Dismantling the cast iron pipeline and replacing it with a plastic insert
Initially, work on replacing a toilet begins with the dismantling of the old product. The products are fastened to the floor using two slots secured with nuts. After removing the old product, you should resort to dismantling the cast iron pipeline.
When removing a cast iron pipe, you must use a hammer and chisel, or a grinder.
Using a hammer drill or impact drill, a layer of concrete is removed, in which the cast iron pipe is often located.
After the cast iron pipe is freed, it needs to be removed and we begin to clean plaque, rust and oxides on the inlet pipe into the main riser. To clean, it is recommended to use a drill with a special brush. The inner walls of the pipeline are treated with special substances that corrode rust. After the internal cavity of the cast iron pipeline has been cleaned, it is necessary to install a plastic pipe with a cuff.
All work should be performed with special rubber gloves and a respirator. The better the internal walls of the cast iron pipe are processed, the more reliable the new connection will be.
To simplify the process of installing a plastic tee inside the socket of a cast iron pipe, the inner walls are coated with Vaseline. Before installation, you should put a cuff on the plastic pipe to connect the toilet to the sewer. During the installation process, the plastic tee should be rotated in different directions, which will simplify the installation process. After the plastic tee or pipeline has been installed, you can proceed to the next stage - installing the toilet and connecting it.
If it is planned to replace a cast-iron pipeline with a plastic one, which is often done in private homes, then for this purpose the cast-iron pipe is initially dismantled and a plastic one is installed in its place.
Niche for installation
For a block structure, a niche is knocked out in the wall, and a groove is placed under the pipes (it is also allowed to write a groove). If this is not done, the point of purchasing this type of installation is lost - you will have to install a false wall or a protective box. In such a situation, it is easier to buy a frame system or install a monoblock toilet, with the same effect in design and spatial solution, but much cheaper.
Help for beginners in the construction business: a groove is a shallow groove in the wall for various communications: cables, wiring, pipes, etc.
Below we will provide detailed instructions for constructing a niche and laying a groove, but now let’s talk about the fact that such work is PROHIBITED in load-bearing walls .
A niche can be knocked out only after obtaining permission from the management company and developing a project for additional reinforcement of the wall. The cost of the project not only eats up all the savings from purchasing a block structure, but also significantly goes into the owner’s pocket.
If a niche can still be legalized, then with a fine for pipes everything is much worse. By Decree of the Government of the Russian Federation No. 508 (clauses 10.3 and 10.11), it is categorically prohibited to make grooves in concrete walls, and to lay horizontal grooves in brick walls. The same requirement applies to aerated concrete. The explanation is simple: the walls lose their load-bearing capacity.
By and large, a wall with a niche and a fine can stand until the building is demolished. There is another unpleasant point here: if unauthorized influence on load-bearing walls is detected, the owners face a fine, which can be survivable, and a requirement to legalize the alteration. But here a bad trend has been observed lately - engineering design bureaus set the price for retroactively changing a project in the region of 500.0-800.0 thousand rubles. Refusal to legalize the completed alterations may result in forced eviction through the courts. Such a resolution of the conflict in Russia has already been recorded. And more than once.
For those who will still install the installation in a niche, here is the sequence of work:
- a center line for the tank is drawn on the wall, and then the location of the panel with buttons is marked;
- taking the panel point as a reference, draw a rectangle 100 cm high and 60 cm wide;
- On top of the rectangle, a place is marked for the supporting beam of the niche arch (it will always be there in the project);
- using a grinder with a special circle, a slot is made along the drawn lines to a depth of 15-20 cm;
- Mark the location of the water supply with a pencil;
- Using a grinder or a grinder, lines are cut for a channel for laying a metal-plastic (polypropylene) pipe connecting the installation tank to the water supply system. The size of the fine depends on the outer diameter of the pipe used;
- using a hammer drill with a spatula, a niche is knocked out in the wall - a depth of 15-20 cm and a fine;
- A beam made of metal channel is installed on the cement mortar.
Having completed all the above work, you can begin installing the installation.
Corrugated pipe for connection
There are different ways to connect a toilet, and which option to choose depends not only on the situation, but also on the type of toilet. Corrugated pipe is used when it is impossible to use other types of materials.
Step-by-step instructions for connecting a toilet to a sewer using a corrugated pipe are as follows:
- The product is initially installed. To do this, 2 holes are drilled in the floor, having previously marked their location.
- After drilling the holes, dowels are installed into which two slots are screwed. The toilet is installed into these slots with holes, after which it is fixed with plastic nuts.
- After this, the toilet is connected to the sewer. A corrugation is used, one end of which is initially put on the sewer hole, and the other on the outlet of the device.
- It is recommended to treat the joints with a waterproof sealant.
- After installing the corrugated pipe, the reliability of the connection is tested.
- If after draining the water there are no leaks or drips, then the process can be considered complete. All that remains is to install the tank and connect the water supply.
To prevent dirt and dust from penetrating under the toilet, it is recommended to lubricate its base with silicone grease.
Hanging models
Recently, hanging varieties with installation have become increasingly popular, the connection methods of which involve hanging the bowl on a false wall and placing a cistern behind it. To do this, a strong metal vertical frame is mounted behind the wall, threaded studs with nuts are removed from it to hold the bowl, and a plastic drain tank is placed inside the frame; a button is placed on top of the wall to turn on the flush.
The advantages of a hanging design are space saving in a small toilet, aesthetic appearance, ease of cleaning (the floor is easier to clean under a hanging bowl).
Features of connecting a product with an oblique outlet to the sewer system
Connecting devices with oblique outlets is typical for houses that were built back in the 1950s. Often, the installation of such products occurs in conjunction with cast iron fittings. To connect oblique outlets of devices with cast iron fittings, a cement mortar is used, with which the cracks are sealed.
Before inserting the device into the cast iron socket, a mixture of red lead and drying oil is applied to its surface, and a resin strand is wound on top. After this, the outlet hole is re-coated and inserted inside the socket. This connection option is called dirty. Before final installation of the device inside the socket, holes should be pre-drilled, and it should be secured after installation in the slots.
However, this is not the only option for connecting a toilet with an oblique outlet. The clean version involves the use of a rubber cuff. This cuff is placed on the toilet outlet pipe, after which the connection is made.
Features of installing a toilet with horizontal outlet
The connection of the toilet with the sewerage system made of plastic pipes is carried out for devices with horizontal outlet. This connection method is convenient due to its ease of installation. First, the sewer is removed from the wall, after which the device is installed close to the incoming sewer hole.
Such a requirement as installing a toilet with a direct outlet from the socket at a short distance must be taken into account at the planning stage of the sewer system. In apartment buildings, this release option is irrelevant, since it is necessary to build a 110 mm pipe into the wall.
A horizontal pipe should come out of the central sewer system, into which the toilet is installed through a cuff or using a corrugation. It is recommended to seal the joints to prevent the penetration of unpleasant sewage odors.
Installation covering
After completing the installation, the transition from plumbing work to general construction work takes place. All elements of the system, as well as engineering communications, are hidden behind a false wall, protective screen or in a box. The priority option is a gypsum plasterboard partition from floor to ceiling. To install it, a guide metal profile is attached to the walls and screed.
Stiffening ribs from the CD (ceiling) profile are screwed to it with metal self-tapping screws. In this way, a sheathing is formed for fastening the sheet material. Holes are drilled in the drywall for toilet pipes and studs, and a window is cut out for a panel with buttons, after which the installation is sheathed with plasterboard.
To help self-taught people, we recommend that you look at the work “How to sheathe an installation in a toilet,” which describes in detail how to install the sheathing and correctly attach the gypsum board to it.
Features of installation of a product with a vertical outlet
Toilets that have a vertical outlet form are installed mainly in old houses. The product includes a siphon and a pipe, so the outlet is located at the bottom of the device. Devices of this type can be placed in close proximity to the wall, since there is no need to leave free space for connection to the sewer.
The toilet is mounted on the sewer inlet. Devices with vertical outlet are equipped with all the necessary elements that make it possible to ensure a leak-tight connection. The tightness of the connection is ensured thanks to the sealing ring. At the final stage, after installing the toilet on the sewer hole, all that remains is to secure it with 2 nuts.
The disadvantage of this version of the product is that it is impossible to install it on a cast iron sewer. In addition, you will need to install the pipeline directly into the floor, which causes some problems.
Common Difficulties
The main problems arise due to the limited size of most bathrooms. This is especially true for strictly residential buildings, when in addition to the small “dimensions” there is added poor geometry of the room - the absence of right angles and parallels in the enclosing surfaces. In this case, even the slope of the wall is checked before installation. And leveling the walls further reduces the room for “maneuver” when installing the installation under the toilet.
The correct choice of type and model of installation, as well as the accuracy of markings, frame location and adherence to the installation diagram will help you avoid mistakes and alterations.
And the main condition is careful handling of mechanisms and sanitaryware. Even “tightening” the fastenings of the intake and exhaust valves or the hinged bowl can lead to a violation of the tightness of the connections or damage to the device itself.
What is important to know. It is necessary to buy installations and plumbing from reputable brands. It is better to do this with dealers or trading companies that have appropriate agreements with service centers and provide a guarantee for the purchased product. In addition, if necessary, you can buy additional accessories or a repair kit for the selected installation model from such sellers.
How is the toilet connected to the water supply?
Water supply and sewerage have no relationship. To connect the toilet to the water supply, you will need to connect a plastic pipeline to the installation site of the device. It is recommended to install a valve on the pipeline near the toilet so that, if necessary, you can always turn off the water supply in an emergency.
The connection between the water supply and the tank is made using a rubber hose in a steel braid. The water supply must be connected to the tank immediately after the device is connected and installed.
Connecting a wall-hung toilet to the sewer system is carried out in the same way as devices with a horizontal outlet. In this case, the device is fixed not directly to the floor, but to the wall. A significant disadvantage of such products is their inability to withstand a person’s heavy weight, so if there are obese people in the family, then this option should be abandoned.
Now you know what connection methods exist, so you can install a toilet in your house or apartment yourself without the help of specialists in a convenient and acceptable way. If installing the device is difficult, you can always use the services of plumbers.
Installation nuances
Every business has its own secrets. There are also some nuances when installing the installation.
Block installation
With the advent of a block design with a wall-hung toilet, mounting it to the wall became a serious problem. At the same time, the method of installing pins on which the bowl is hung, proposed by plumbing manufacturers, is unlikely to be liked by the owners, since it steals some of the space and hardly fits into the design of the toilet.
Briefly about the method. The formwork is being assembled. Studs with a washer and a nut are installed on the back side. All this is poured with concrete, which is then tiled.
Plumbing experts have adopted other methods. More on the secrets below.
1. The solid wall is drilled through with a hammer drill with a long drill. Here's another little trick: the drill is cooled with oil very often, literally every 20-30 seconds. On the reverse side, a countersunk hole is drilled under the washer and nut (bolt head).
A long pin is installed if from inside the apartment or a bolt if from the outside of the wall. The potay is sealed with putty and lined. This method is ideal for private homes. In a high-rise building, it is unlikely that the neighbors will allow the decoration of their walls to be destroyed. Therefore, it is necessary to adopt the following method.
Scheme for attaching a tank with studs through the wall.
2. Anchors are driven into the concrete wall if it is monolithic, or special dowels are used if there are cavities. There is another secret here. Before installing the toilet with studs, you need to open the spacers. You can't just turn a hairpin - there's no head. For these purposes, plumbers use a mushroom nut, that is, not a through nut.
Dowel “petal” for concrete structures with cavities.
Tightened anchor pin.
Anchor pin.
They advise those who do the work themselves to do the same. It is impossible to find such a part for sale. Therefore, there is only one option left: look for a turner and order an unusual nut from him. However, being a professional in one business does not mean that a person is a pro in another.
Our grandfathers also knew how to screw in and unscrew studs using two nuts: you screw them onto the stud, and then use two keys to lock them tightly. The stud is screwed into the top nut, and unscrewed through the bottom nut.
Frame installation
When installing a frame installation, professionals advise:
- use a more modern panel with two buttons, which will save water;
- place the drain panel either between two tiles or in the center of one of them;
- set the upper edge of the toilet bowl to a height of 40-44 cm;
- the thickness of the protective screen or false wall should not be more than 7 cm;
- Carry out thorough quality control of work at each stage of installation.