- December 20, 2020
- Miscellaneous
- Alisa Krasnova
Ceramic toilets have thick walls and a heavy glaze. The latter acts as a barrier to prevent damage. Ceramic is a brittle material and can easily chip, crack or break when trying to drill into a surface. Drilling holes requires not only special tools, but also the steady hand of a plumber to avoid irreparable damage. Now you will learn how to drill a toilet carefully and safely.
Step-by-step instruction
Before you begin installing porcelain plumbing fixtures, you need to familiarize yourself with a number of tips on how to drill a hole in a toilet.
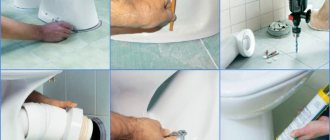
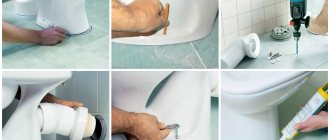
- Step 1: Inspect the plumbing fixture. Some manufacturers produce toilets with ready-made slots for screws and bolts.
- Step 2: Mark on the toilet where the holes will be placed.
- Step 3: Place 2-3 layers of masking tape over the mark and then redraw it over the tape or tape. This will help you prevent the glaze from chipping and the ceramic base from cracking. And the tip of the drill will not slide on the surface.
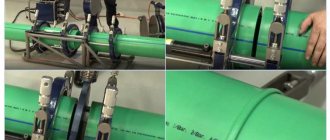
- Step 4. How to drill a toilet during installation? Install a carbide or diamond ceramic drill bit into a drill or hammer drill.
- Step 5: Place the drill bit on top of the mark and then turn on the drill. Using light pressure, begin drilling the hole.
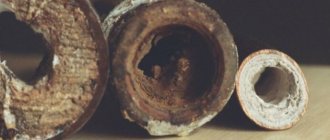
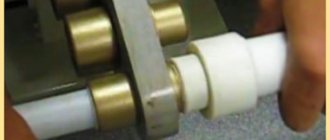
- Step 6: Stop drilling as soon as you get a small hole. Important! Do not try to drill the entire hole right away if you do not want to encounter chips and cracks. In the worst case scenario, your porcelain piece will become unusable. Before drilling into the toilet, look at the photo of the unsuccessful example below.
- Step 7. Brush off the dust with a brush or damp cloth.
- Step 8: Use plain water to wet the start of the hole and the drill bit. This will allow the drill bit to remain sharp and slide down the surface easily. Place the bit back into the drill and start drilling again.
- Step 9. Stop periodically to clean the hole of dust with a dry brush and damp cloth.
- Step 10: Continue through each step until you have drilled all the way through the ceramic coating.
Ideas for equipping an outdoor bathroom in a country house
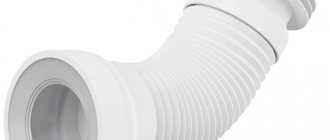
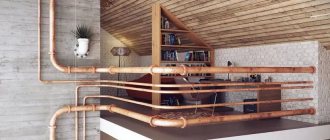
You can always improve the design of a simple toilet house in the country by equipping it with a full-fledged toilet and washbasin. If you equip the room with plastic piping elements and a bathtub, you will be able to create a full-fledged summer room for bathing procedures. For the winter, the structure is dismantled and the water is drained. A similar device is used to create a bathhouse. In this case, problems with draining water from the water seal should not arise at all, because it is enough to direct the hose into the sewer pipe.
If you are afraid that expensive earthenware will crack, or are simply not confident in your abilities when equipping an outdoor bathroom, then you can resort to other, simpler methods of constructing a toilet in the country. Improvised seats and durable structures will be similar in functionality to a simple toilet. Only the need to drill a hole will disappear, since all waste will be sent to the sewer pit.
Some of the most popular options include:
- A toilet from a shop with a toilet seat, which is only relevant if you are just building on a summer cottage. The peculiarity of the design is that two-thirds of the floor is covered with wooden boards. The remaining area serves as a reinforced foundation for the construction of the toilet. The open area of the floor is equipped with a metallized frame, which is sheathed with suitable material. A hole is cut out of the top and covered with a simple plastic toilet seat.
- Do-it-yourself toilet from an old chair, made quickly and easily. To do this, you need to prepare a durable chair from which the seat is removed. Instead, a sheet of plywood is screwed to the chair, and a hole is cut out in it. A plastic toilet seat is installed over the hole made. To level out the appearance of the chair, its legs are covered with plastic, after which the chair is installed above the drainage hole in the toilet house. To strengthen the structure, fixing corners for the legs are used.
- Installation of a plastic portable toilet, which is also called a bio-toilet for a summer residence, resembling a simple bucket with a lid in design. The design, made of durable plastic, can easily support the weight of an adult. On top of such a toilet there is already a plastic seat. All that remains is to install the dry closet in a floor hole corresponding to its size.
You just need to choose the best toilet option for your dacha and enjoy a comfortable stay and dacha work, which will be facilitated by a well-equipped toilet house.
How to drill tiles for a toilet and install a bidet and urinal
The tiles, like the toilet itself, are made of ceramics. Tiles tend to crack, break and burst. Especially if drilled incorrectly. Therefore, most plumbers cannot guarantee that after installing sinks, toilets, bidets, and boilers, the tiles will remain intact.
Required materials and tools:
- Drill or hammer drill.
- Bubble or laser level.
- Pencil or marker.
- Drill bit.
Some craftsmen recommend holding a screwdriver to the tile and lightly tapping it to break up the glaze. But we should warn you right away that this is a bad idea. You can easily break the tiles. There have been cases when unscrupulous tile workers applied the glue unevenly, which caused voids to form in the wall behind the ceramic base. They were heard by tapping.
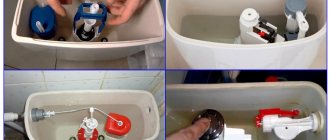
How to open (remove the cover)?
Modifications are currently being made to allow the cover to be removed without any additional operations. The buttons in them are equipped with rods that transmit force to the control elements of the tank fittings.
But most plumbing manufacturers continue to produce models that require certain manipulations to remove the cover.
To remove the cover in single-button modifications, you need to moderately press the ring surrounding the button and turn it in the direction opposite to the clockwise movement.
If this operation does not succeed immediately, you should drop a couple of drops of any liquid oil or use a screwdriver, pressing its tip onto the ring and turning it. Once the ring comes off, it can usually be easily unscrewed by hand.
Next, you should carefully move the cover to a position perpendicular to its normal position, and carefully release the button block from the plastic clothespins. After this, you can remove the lid from the tank and set it aside.
How to disassemble (open) a toilet cistern with a button for subsequent repairs with your own hands - learn from a short video:
To dismantle a cover equipped with a two-button block, it is usually enough to press any button, after which the technological groove on the adjacent button will become accessible . All that remains is to pick out this button and remove it, and then dismantle the second one. Then unscrew the fixing screw and remove the cover.
Never use old or worn drill bits - they are completely ineffective
Drilling through tiles is impossible without a special drill. It is best to choose carbide or diamond tips. They are expensive, but you don't have to remove damaged tiles and buy new ones.
Step-by-step instructions will help you with this:
- Using a level (any kind) and a pencil, mark the area where you need to drill holes for mounting.
- To prevent the drill bit from slipping on the surface of the tile, place adhesive tape over it.
- It is important to consider the quality of the tiles. For example, stone is so strong that it is almost impossible to break. But thin ceramics burst very often.
- Start drilling the tiles at a low speed so that the resulting vibrations do not cause cracks.
- Distribute pressure evenly while drilling.
- Once you've drilled a small hole, it's time to gradually increase the speed and pressure.
- Now you have passed through the tiles and felt the surface of the wall. At this point, hold the drill firmly while continuing to drill slowly and steadily.
If you want to drill a hole in a toilet cistern or a tile to mount wall-hung toilets, you must avoid overheating the drill. Periodically unplug the drill and immerse the drill bit in cold water for a few minutes. You can moisten it with a damp sponge, which will not only have a cooling effect, but also collect the resulting dust and debris.
Getting rid of unpleasant odor after draining
If you want to prevent the occurrence of an unpleasant odor after draining the water from the water seal, you can do this by inserting a ball chamber into the pipeline element, which will be filled with gas.
It must be lowered until a sealed air plug is formed. A more modern and at the same time complex option for eliminating odor is to install a check valve with a damper. Some gardeners make the mistake of pre-filling the water seal with an aromatic liquid or detergent. This contributes to the destruction of the autonomous sewer system or the evaporation of added substances throughout the year right in the toilet house.
Difficulties in drilling a toilet cistern
The main problem here is that the tank is empty inside. Therefore, cracks and chips are very common.
- First, fill the reservoir with towels, foam, foam, whatever you can to reduce vibration. You can even fill the tank completely with water.
- Secondly, use a carbide drill bit. The smaller and faster the drill action, the less likely you are to ruin the ceramic.
- Third, use your drill's highest speed, but press the trigger as slowly and lightly as possible.
- Fourth, monitor the heating of the drill and ceramics. Wipe the drill bit and reservoir periodically with a damp cloth to cool the surface.
General information
In older models of drainage tanks, it is usually quite easy to remove the panel; just unscrew the top of the release mechanism and lift it up. Modern tanks have a drain button and a push-button cup, the design of which prevents the removal of the lid.
However, in any case, this design is collapsible, so this operation should not cause any special problems. The main thing is to perform any actions carefully, without exerting excessive effort and slowly.
Before opening the toilet tank lid, you need to prepare several tools that may be required during the work process:
Note! When working with the tank, the water must be turned off. Otherwise, it may overflow and flood the bathroom.
In the photo - a tank with an upward draft
What drill to use to drill bathroom tiles
In bathrooms, the need to drill a hole in the tile arises either when you need to hang a shelf, hanger, cabinet, mirror, or during renovation, when you need to drill large-diameter holes for pipes and socket boxes. In the first case, the tile is already glued in place, the holes are small, for a dowel Ø 4 - 12 mm. In the second option, the work is carried out before gluing the cladding, since the cold water/hot water supply pipe, sewage pipe is already sticking out of the wall/floor, or there is an air duct hole. The holes are large; crowns, contour drilling, and figured cutting with a diamond disc of an angle grinder or an MFP attachment are usually used.
Small diameter holes (4-12 mm)
To solve such problems, exclusively drills for tiles of small diameter, but not of the same design, are used. You will need a drill, hammer drill or screwdriver with adjustable speed.
The technology actually consists of two stages. First, at low speeds, a hole is created in the tile or porcelain stoneware. Then the wall or floor screed is drilled to the required depth.
Regardless of the design, before starting work it is necessary to check the sharpness of the cutting edges of the drill. Glazed glossy tiles are inconvenient to mark with a pencil or marker, so the cladding surface in the required areas is usually covered with adhesive tape or masking tape.
Spear drill
The industry produces two types of similar equipment that allow you to quickly drill tiles in the bathroom with minimal expenditure on the renovation budget:
- two-blade spear - cylindrical shank, tip made of hard VK8 alloy (tungsten carbide with 8% cobalt content);
Spear-shaped, two-blade drill. four-blade spear - hexagonal shank, cruciform working part.
Four-blade spear drill.
A two-blade drill can be sharpened as the cutting edges wear. The equipment is inexpensive (diameter 6 mm from 60 rubles), drills very quickly. The four-bladed spear cannot be sharpened by hand; it costs more than the previous version (diameter 5 mm from 170 rubles). In fact, this is a disposable, expensive, maintenance-free tool.
Both types of drills are not suitable for passing through concrete/brick walls. After obtaining a hole in the tile, the drill will have to be replaced with a standard drill bit for a hammer drill or an analogue for an impact drill with a cylindrical tail.
The tip of the spear is sharp enough, so you can do without piercing. It is enough to place the tool in place, lightly hit the back of the drill or screwdriver with your free hand.
Drill or drill bit with pobedit tip
Drill tips for hammer drills and drill bits for drills are made of carbide material - Pobedit, that is, VK4 - VK10 alloy. However, the shape of the cutting part is designed for quick, accurate destruction of homogeneous structural materials - concrete, brick.
Drill and auger with pobedite alloy tip
In order not to damage the ceramic tiles, drilling should be done without impact, at a speed of 800 - 900 rpm, preferably with a new, unused drill/drill. This method is only suitable for ordinary ceramics; it is not suitable for porcelain tiles, since the drill is initially quite blunt and it is problematic for them to drill through porcelain tiles in a non-impact mode.
This is the only option for drilling with one tool without changing the drill. After passing the tile, the hammer drill or hammer switches to impact mode.
Regardless of the diameter of the drill, the tip of the tool always slides over the glazed tile. To improve drilling accuracy, several options are used:
Suction cup conductor. homemade conductor from a block;
Conductor made of timber. masking tape applied in a crisscross pattern.
Masking tape instead of punching.
In principle, it is enough to slightly damage the enamel at the drilling site with a steel scriber, a self-tapping screw, or a dowel in order to drill quite accurately into porcelain stoneware or tiles at low speeds. A drill with a cylindrical shank costs from 30 to 50 rubles. depending on diameter. A drill for a hammer drill costs a little more – from 50 – 70 rubles apiece.
Tubular drill
There are two types of tubular special drill for ceramics/glass:
- classic - a standard tube with a window for removing destructible material, galvanic, or less often vacuum application of diamond chips to the end of the tool;
Fastening without drilling
For those who do not want to sacrifice the tile surface, there is a method of attaching the toilet without drilling.
Often this method is not durable enough, and over time, this procedure must be repeated. And if the fixed toilet is not handled carefully, its stability will fail in the near future. Before using this method of fixing the toilet, do not forget that water may often be present around the toilet. In this case, before installing the toilet, you should remove all remaining water that is on the surface. The next step is the selection of a fixing agent. Currently, there are many relevant substances, the most popular of which are:
- glue for tiles and ceramics;
- waterproof sealant;
- cement mortar;
Fixing the toilet with glue
This method of fixing the toilet to the tile is the simplest. Glue can be purchased at a hardware store. Before using glue, both surfaces must be completely degreased and clean. This will ensure maximum connection between the toilet and the tile. After the surfaces are cleaned, it is necessary to draw an outline of the location of the toilet. To do this, just circle the toilet with a pencil at the place where it will be located. After that, apply glue to the surface of the tile in the form of the thickness of the connecting part of the toilet. After that, apply glue to the bottom of the toilet and let the glue sit for 3 to 5 minutes. Then connect both surfaces and press firmly.
Large diameter holes
Large holes are made into the tiles before they are installed on the wall or laid on the floor. They are necessary for bringing engineering systems outside - water sockets, sewer pipes, socket boxes, ventilation system duct.
There is no point in drilling them on the wall, since electrical wiring and pipes are installed in the concrete of the wall or behind the false plasterboard panel. There are two types of special tools that allow you to make holes in the cladding very carefully. In the absence of such equipment, you can use a small-diameter drill, a grinder with a diamond blade, or a multifunctional tool.
Crowns
Ceramic crowns for making through holes in tiles are classified according to several criteria:
- presence of a guide element - with and without a central drill;
Crown with and without a guide drill. type of abrasive – diamond for porcelain tiles, tungsten carbide for ceramic tiles.
Crowns with tungsten carbide.
Tungsten carbide bits are used to cut holes in ceramics. With the same diameter as diamond equipment, their cost is 2–3 times lower. However, the abrasive layer begins to fall off when you try to drill porcelain stoneware.
Tools with a cylindrical shank are considered the cheapest; a hexagonal tip raises the price, but not by much. Drill bits with a shank have the highest price. In addition to ceramics and porcelain stoneware, diamonds confidently and evenly cut glass and mirrors.
Crowns are sold individually and in sets. A tool coated with tungsten carbide Ø33 mm costs 420 rubles, a set of 4 bits (33 mm, 53 mm, 67 mm, 83 mm) with an adapter costs 1600 rubles.
The cost of diamond crowns from domestic and foreign manufacturers starts from 700 rubles. or 1000 rubles, respectively. Depends on the type of shank (SDS+, cylindrical), diameter, shape of the cutting edge (tubular, with cuts), the presence of a centering drill, brand and other factors.
In a set, crowns are cheaper; special devices and accessories are added to them. However, the required tool diameters are rarely available there; you have to buy them individually.
Angle grinder with diamond blade
With a limited budget, a confident angle grinder user will always be able to carefully cut a large-format hole with a diameter of 50 mm or more (a sewer pipe connection) in a tile with a diamond disc.
To do this, use a Ø115 mm disc. The work is performed at an angle to the surface of 45° from the front side of the cladding.
You can partially remove the tiles inside the marked hole using straight cuts. For example, crosswise in the middle, then a square inscribed in a circle.
Then the remnants of the tiles inside the circle are removed with pliers with side jaws.
Angle grinder work can be done from the reverse side of the finishing material. In this case, the markings should be applied symmetrically on both sides of the tile. The tool with the diamond blade rotates evenly in a circle relative to its center. The tiles must be secured with a clamp with a soft pad.
When marking the hole, the gap between the tiles should be taken into account to ensure a standard joint thickness. If you have insufficient experience in using an angle grinder, it is recommended to use a special holder, with the help of which the required offset of the disk relative to the sole of the device is set.
If the hole is not hidden under the ventilation grille or decorative washers of the mixer, the edges must be additionally processed with an abrasive tool - a rasp, a file, or sandpaper attached to a piece of handle.
Multifunctional tool
For particularly precise, critical work with almost any structural and finishing materials, a separate category of power tools has been created. Different manufacturers (or different stores) have different names for them:
- MFI is a multifunctional tool;
- renovator - universal cutter, electric chisel;
- multitool – vibration cutter, multimaster, oscillating tool.
The principle of operation is similar to a delta grinder, the dimensions are much more compact:
- the renovator spindle fluctuates within 3 – 4° relative to the central axis;
- vibration frequency is 10,000 – 25,000 min-1;
- Several types of attachments are used for wood, ceramics, metal, and plastic.
There are network and battery-powered versions of MFIs that allow you to make holes of any size and shape in the tile before and after gluing it to the wall. With equal success, the renovator connects a heated towel rail or attaches a wall shelf.
Diamond disc for renovator.
For tiles and porcelain tiles, diamond-coated segment saw blades are used. Or hammer-shaped, teardrop-shaped attachments.
Engraver
Another highly specialized tool for precision work, often found in the arsenal of a home craftsman, is a miniature drill - an engraver.
This power tool can be used independently - the equipment is mounted in a collet clamp, or with a flexible shaft.
Moreover, flexible shafts for drills and sharpening machines with emery wheels are available for sale.
By analogy with MFIs, the industry produces a huge number of attachments for engravers. However, they cut material due to rotation, not vibration. To make holes with an engraver, it is most convenient to use a device that turns this power tool into a miniature analogue of a router.
Engraver with a device for milling holes.
Use a tile bit (Dremel part number 562) or a diamond blade (DSM part number 540).
Due to the high strength of the hardened porcelain stoneware layer, the tool life is reduced compared to drilling ceramic tiles.
Drilling around the perimeter
When installing an electrical or water outlet in the absence of an angle grinder, crowns, engraver and other special tools, you can use a drill with a spear-shaped, tubular, small-diameter Pobedit drill:
- after marking the circle, a large number of holes are drilled from the inside of the line close to each other;
Making holes with a drill around the perimeter. the inside of the tile is knocked out;
Removing the inside of the tile. after which, all that remains is to break off large irregularities with pliers;
Removing large irregularities with pliers. at the last stage, the edge is processed with an abrasive tool or file.
Sanding the edge with sandpaper.
Attention: This method is not recommended for making holes close to the edge of the tile, as the lining may break off.
Ballerina
A special tool for making holes in ceramic tiles - a ballerina - is available as an attachment on some manual tile cutters or is sold separately as an accessory for an electric drill.
In any case, destruction of the facing material occurs when the cutter rotates around the central guide. The process is long, dusty, and the resulting material may crack.
Recommended drill speed is 200 - 500 min-1, the tile is attached to the sheet material with a clamp, water is added to the groove.
Lubricating the area to be drilled
In order to successfully drill through any material made of metal (stainless steel, steel, cast iron) in a short period of time, it is recommended to use special lubricants. The area in which drilling will be carried out is treated with lubricant before performing work. Thanks to this, the drill used glides better and does not heat up too much. For example, to process stainless steel, you can make your own special lubricant from machine oil and colloidal sulfur. To do this, you need to take pieces of sulfur, grind them and mix them with oil. In this case, during material processing, lubricant must be supplied to the drilling area on a constant basis.
There are many different ways to use fine drill bits to make large holes in thick, strong materials. During their use, it is recommended to set low speed on the electric drill. Also, when using power tools, when carrying out such work, safety precautions should be observed. It is necessary to use safety glasses or a mask, and wear gloves to avoid accidental injury.