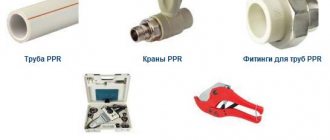
PVC pipes are also popular because they are very durable, reliable and easy to install.
Initially, such products were not soldered. Polypropylene pipelines were connected by gluing with special adhesives.
In some countries of the world, polypropylene pipes with small diameters, which are used indoors, are still connected by gluing today.
However, a more reliable and simpler method of fastening is soldering. From this article you will learn how to solder polypropylene pipes with your own hands.
And so that you better understand the technology of work, we recommend reading articles and watching videos on how to solder polypropylene pipes.
Description of the pipe welding procedure
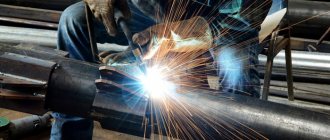
Once a constant arc has been achieved, it is possible to begin welding. During welding, move the arc as follows:
- progressively throughout the weld, due to which the arc will be stable;
- longitudinally for a narrow seam with a height depending on the speed of movement of the electrode along the surface;
- transversely in order to ensure the required thickness of the seam, moving the rod with oscillatory movements.
Pipes with small wall thickness and diameter are welded with a constant seam, while pipes with thick walls are welded with an intermittent seam. Welding of joints should be carried out until the joint is completely welded without interruptions. When welding joints with a wall thickness of up to 6 mm, two welded layers are made, with a thickness of up to 7 mm - three layers, and with thicker walls - four.
In most cases, the first layers are welded in stages, starting from the edges of the pipes with fusion, and the subsequent layers are welded evenly in a continuous layer. The stepped option is used for pipes with a thickness of more than 8 mm: the base layer is applied by dividing the surface of the pipes into certain areas with a small area and welding through one area, and later the missing ones are welded. After welding of the first layer is completed, it is inspected for cracks, since the quality level of the entire seam depends on this. If there are any, they are melted down and welded again.
Subsequent layers are welded by turning the pipe or uniformly moving the electrode along the surface of the seam, and the starting point of welding is shifted rather than the end point by about 20–30 mm relative to the previous layer and the direction of movement of the electrode is changed to the opposite. The last seam is made with a smooth transition and a smooth surface to the size of the pipe diameter. If pipes with a square cross-section are welded, their ends must be firmly secured so that the metal does not lead and the pipe does not deform. Upon completion of welding work, the surfaces are cleaned of slag.
Welding pipes using electric welding is a simple process, but important, requiring adherence and care to the sequence of actions performed.
Impact of errors on welding quality
Unhurried, carefully considered actions are a guarantee against mistakes that can ruin all the work. You should take into account all the little details of soldering technology and not deviate one step from them.
Common mistakes that result in defective components of the installed propylene water supply network:
- The surface of the pipe has not been cleaned of grease film.
- The cutting angle of the mating parts differs from the value of 90º.
- Loose fit of the end of the pipe into the fitting.
- Insufficient or excessive heating of the parts being soldered.
- Incomplete removal of the reinforced layer from the pipe.
- Correcting the position of parts after the polymer has set.
Sometimes on high-quality materials, excessive heating does not produce visible external defects. However, internal deformation is noted when molten polypropylene closes the internal passage of the pipe. In the future, such a unit loses its functionality - it quickly becomes clogged and blocks the flow of water.
An example of a soldering defect resulting from erroneous actions. The master overheated the plastic pipe, which, in turn, became deformed from the inside
If the cut angle of the end parts differs from 90º, at the moment of joining the parts, the ends of the pipes lie in a beveled plane. A misalignment of parts occurs, which becomes noticeable when a line several meters long has already been installed.
Often for this reason it is necessary to redo the entire assembly again. Especially if pipes are laid in grooves.
Poor degreasing of joint surfaces contributes to the formation of “rejection islands.” At such points, polyfusion welding does not occur at all or occurs partially.
Pipes with such a defect work for some time, but a burst can occur at any moment. Also common are errors associated with loose fitting of the pipe inside the fitting.
A common mistake when soldering polypropylene pipes is that the end of the pipe does not fit tightly into the socket. The pipe must extend to the border of the rim or marking line
A similar result is shown by connections made with incomplete cleaning of the reinforcing layer. As a rule, a reinforced pipe is installed on high pressure lines. Residual aluminum foil creates a non-contact zone in the soldering area. It is at this point that leaks often occur.
The biggest mistake is an attempt to correct the soldered elements by scrolling around an axis relative to each other. Such actions sharply reduce the effect of polyfusion welding.
However, adhesions are formed at individual points, and a so-called “tack” is obtained. With a small tensile force, the “tack” holds the connection. However, as soon as you put the connection under pressure, the solder will immediately fall apart.
Additional information on welding polypropylene pipes is presented in this article.
Welding steel pipes
Welding of round pipes is carried out using a continuous seam. That is, if the process began from one point, then it should end at that same point, without lifting the electrode from the surface to be welded. When welding large-diameter pipes (over 110 mm), it is impossible to fill the seam with one electrode. Therefore, it is necessary to use multilayer welding, where the number of layers is determined by the thickness of the pipe walls. Eg:
- If the wall thickness is 6 mm, then two layers of metal are sufficient.
- 6-12 mm – welding is carried out in three layers.
- More than 12 mm - more than four layers.
Attention! Multilayer welding is carried out with one requirement. Before applying the next layer, the previous ones must cool down.
Pipeline assembly
Before welding pipes, to simplify the task, it is necessary to assemble the welding joint. That is, you install the pipes according to the assembly design, clamp them so that they do not move or shift. After which the tack is done. This is when spot welding is done in one place; if the pipeline is assembled from large-diameter products, then tack welding can be done in several places.
In principle, everything is ready, you can weld the pipeline. It would seem that this could be the end of the conversation about welding. But for novice welders it is just beginning, because the welding process associated with pipeline assembly involves a large number of nuances. Here are just a few of them that need to be taken into account.
- Pipes with a thickness of more than 4 mm can be welded using a root weld, this is when the metal fills the space between the edges to the full depth, and a roll weld, when a roller 3 mm high is formed on top of the seam.
- When connecting pipes with a diameter of 30-80 mm with a vertical seam, the technology is slightly different from the bottom location of the seam. First, the volume is filled to 75%, then the rest of the space.
- With multilayer welding technology, a horizontal seam is welded in two layers so that the next one is applied in the opposite direction than the previous one.
- The connection point of the lower layer should not coincide with the same point of the upper layer. The locking point is the end (beginning) of the seam.
- Usually, when welding pipes, the latter must be rotated all the time. This is done manually, so you need to know that the optimal rotation sector is 60-110°. It’s just that in this range the seam is located in a place convenient for the welder. Its length is the maximum, and this allows you to control the continuity of the seam connection.
- The most difficult thing, as many welders believe, is to turn the pipeline 180° at once and at the same time maintain the quality of the weld. Therefore, with such a rotation, it is recommended to change the welding technology. That is, first the seam is welded to a depth of up to 2/3 in one or two layers. The pipeline is then rotated 180°, where the seam is completely filled in several layers. Next, there is a 180° turn again, where the seam is completely filled with the electrode metal. By the way, such joints are called rotary joints.
- But there are also non-rotating joints, this is when pipe is welded to pipe in a fixed structure. If the pipeline is located horizontally, then the joint between its parts must be welded by dividing it into two parts. Welding starts from the bottom point (ceiling) and moves to the top. The second half of the joint is welded in the same way.
And the last stage in pipe welding technology is seam quality control. It must be tapped with a hammer to knock off the slag. Then visually check for cracks, gouges, chips, burns and lack of penetration. If the pipeline is intended for liquids or gases, then after assembly, water or gas is introduced into it to check for leaks.
The welding process is actually a responsible undertaking. And only the experience of a welder can guarantee the quality of the final result the first time. But experience is a gain. We invite you to watch a video on how to properly weld steel pipes.
Soldering of unreinforced pipes
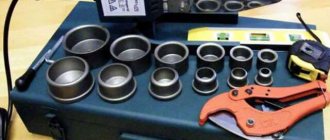
It is recommended to weld PPR pipes at an air temperature of at least +5°C, since the plastic becomes brittle in the cold. For installation you will need fittings, a soldering iron, a hexagon for tightening attachments, scissors, a tape measure, a pencil, and gloves. Nozzles of large diameters are installed closer to the base, smaller ones - to the edge of the heating platform.
The temperature on the thermostat is set in the range of 240-280°C. After turning off the control indicator, you can start soldering.
cutting
The pipe must be prepared before welding. It is cut into sections according to the pipeline diagram in advance or directly during installation. For cutting, use special polypropylene scissors, which give an even cut.
Scissors can be of various designs - with a return spring, a ratchet or roller mechanism, or an electric drive. The wide base allows you to install the pipe correctly in relation to the cutting part.
The use of hacksaws for metal is allowed. To obtain a high-quality cut, the tool must be held strictly perpendicular to the axis of the pipe.
Chamfering
According to the technology for installing polypropylene pipelines, it is necessary to remove a chamfer with a depth of 1 mm from the ends at an angle of 30°. This operation is often neglected, believing that it is not necessary. However, by cutting off excess volume and forming a thinner end of the pipe, the heated connection is much easier to assemble and less deformed. The molten material is not forced into the lumen and does not reduce its area.
The chamfer can be removed with a construction knife, a special sharpening machine, or a homemade device with a cutting blade.
Video on how to chamfer aluminum and non-aluminum pipes
Cleaning and degreasing
Remove dust, dirt and grease with a rag moistened with acetone. This measure promotes more uniform diffusion between the heated boundaries of the pipe and fitting and increases the service life of the unit.
Marking
If you do not have sufficient welding experience, it is recommended to make preliminary markings. To do this, measure a distance at the end of the pipe equal to the depth of the fitting socket plus 2 mm, and make a mark with a pencil. You can install a limit clamp.
Recommended distances to marks depending on pipe diameter:
If the work front is large, it is convenient to use a homemade template.
Warm-up and connection
The heating time of the nozzles depends on the thickness of the pipe wall. The larger it is, the longer the temperature effect should be. The values recommended by manufacturers are indicated in the instructions for the welding machine.
The pipe is placed on the heated sleeve up to the limit mark, and the fitting is placed on the mandrel. After a few seconds, the parts are carefully removed, connected with little force, a technological pause is maintained and cooled naturally without mechanical influence. After each use, the nozzles are cleaned of any remaining adhering material.
It is not recommended to exceed the heating time. As a result, polypropylene becomes too viscous and forms sagging, which can narrow the lumen and impair the patency of the joint.
Misalignment of the apparatus and parts during welding must not be allowed. In areas longer than 2 m it is necessary to place supports. It is better to solder complex links in advance on a horizontal platform - a floor or table, and then weld the finished unit into the pipeline.
Indications
The instructions for using the product indicate the following ailments:
- the occurrence and accumulation of a large volume of gases in the esophagus, called flatulence, as well as Roemheld syndrome;
- intestinal colic in infants;
- symptoms of increased gas formation, which are formed due to functional dyspepsia;
- preparatory process for ultrasound examinations, x-rays, computed tomography;
- severe intoxication with cleaning solutions that include foaming ingredients such as detergents.
Weld joint quality control
Having completed the electric welding, an external inspection determines the presence of burns, pores, fistulas and other visible defects. To detect microcracks that are invisible to the naked eye, the mounted area is usually connected to the heating system. If water droplets do not appear on the seams, the work has been done efficiently. This method of checking is acceptable in a private home, where the system can be filled at any time.
In apartments with central heating, the quality of welded joints is checked in the summer using a compressor. Plugs are placed at the ends of the pipes, the joints are coated with soap foam, and air is pumped in under pressure. Places where there are flaws are identified by bubbles on their surface.
It is better to replace or install new heating pipes in the summer, so that most of the welding operations can be performed outside. There should be no flammable materials in the room near the place of work. If you still don’t have enough experience in welding pipes, you can first weld a few unnecessary scraps, so as not to spoil the new workpieces later.
Which polypropylene products to choose
For low-pressure cold water supply networks, PN16 products are the most practical. They can easily withstand pressure up to 2 atmospheres at temperatures up to +40 degrees. This is quite enough to withstand the loads of a water supply system in a private home or a watering system in a greenhouse or garden.
Watch the video
Polypropylene products of the PN20 brand are more resistant to various influences, which are considered universal and can be used, among other things, for heating with a coolant temperature of up to 95 degrees.
But the most reliable pipes in any water supply system are PN25 pipes reinforced with aluminum or fiberglass.
Other methods of threadless pipe connection
Pipe connections without welding or threading are also now available. To do this, use one of several devices:
- a special coupling, which you can purchase in a store or make yourself;
- Gebo fitting;
- flange.
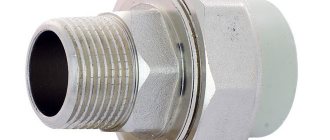
Connecting pipes using a coupling
The connection of metal pipes without welding and threading can be realized using a special coupling.
This fitting consists of the following elements:
- body (3), which is best made of cast iron or high-strength steel;
- two nuts (2) located at different ends of the coupling. If you make a fitting yourself, then brass or bronze is used to produce nuts;
- 4 metal washers (4) installed inside the coupling;
- rubber gaskets (5) used to seal the joint.
Connection fitting device
The diameter of the nuts, washers and gaskets must correspond to the diameter of the pipes being connected.
To install the coupling you will need:
- insert the ends of the pipes (1) through the nuts (2) to the middle of the coupling. The pipes must also pass through washers (4) and gaskets (5);
- the nuts are tightened all the way, while squeezing the gaskets. The connection is quite strong and durable.
Connecting pipes using a Gebo fitting
To connect pipes without welding and Gebo threads with a fitting made of plastic, you will need:
- purchase the required item. Gebo fitting consists of:
- housings;
- O-rings;
- clamping rings;
- clamping rings;
- nuts
Device of a special fitting for joining pipes
- Carefully place the coupling in the unscrewed state onto the ends of the pipes requiring connection;
- secure the joint with nuts.
To obtain a more reliable connection, the nuts can be tightened using wrenches.
Gebo fittings are available for plastic and metal pipes. PVC pipe couplings are also made of plastic. Accordingly, fittings for metal pipes are made of metal.
Gebo fitting for metal pipes
The connection of metal pipes without threads with a Gebo coupling occurs in a manner similar to the one described above. It is recommended to clean the pipes before joining.
Gebo fittings allow you to make pipe joints as airtight and aesthetically pleasing as possible.
Ready-made connections are not subject to temperature changes and pipe vibration. Couplings can be used for all types of pipelines.
Flange connection
A flange is a product designed for joining pipes and installing additional equipment on the pipeline.
The flange consists of several mounting bolts and nuts located around the perimeter of a metal or plastic surface. There is an O-ring in the middle.
Fitting used to join pipes
Currently, a large number of different flanges are produced. Joint elements may differ:
- by diameter (corresponding to the diameter of the pipes);
- in shape: square, round, rectangular and so on;
- by material of manufacture: plastic, metal. Metal products can be made of stainless steel, copper, brass;
- by purpose: for pipes carrying cold and hot water, gas, aggressive substances, and so on.
It is necessary to select a flange based on the parameters and characteristics of the pipeline.
Using a flange, you can connect a metal pipe to a plastic pipe without threads. To connect pipes, you must:
- install flange parts at the ends of the pipes being joined. For reliability, you can resort to the welding method (how to do this is described above);
- install the o-ring;
- secure the connection using fastening bolts.
Particular attention must be paid to installing the O-ring. It must be clearly fixed between the pipes, otherwise the joint will not be reliable
It is not difficult to connect pipes without using threaded elements. Before choosing a method for joining pipes, you need to determine their diameter and the type of material from which they are made. Some methods require special equipment and initial skills to use, others can be performed by novice craftsmen.
Properties of polypropylene
One of the many materials from the family of plastics - polypropylene - is a product of the polymerization of two gases: ethylene and propylene, mixed in a certain proportion. The result is granules, from which various products are produced by extrusion.
Water supply products are made from PPR plastic with the following characteristics:
- operating temperature range from -10 to +90 degrees;
- plastic melting begins at 149 degrees;
- nominal pressure from 1.5 to 2.5 atmospheres.
The given parameters are suitable for cold water supply, but the need for a wider range of characteristics is obvious. Therefore, certain technological methods are being taken to strengthen them.
One of them is to reinforce the walls with fiberglass or aluminum. To do this, a layer of fiberglass or aluminum foil is placed on top of the finished pipe, and then another layer of polypropylene is applied.
This design makes it possible to obtain polypropylene pipes suitable even for use in heating and hot water supply systems.
The fundamental way to reinforce polypropylene products is to install a metal layer. For this, aluminum foil in the form of a strip is used.
It is wound along a helical line onto the workpiece along a layer of glue, and a second adhesive layer is applied on top of the metal foil. The outer shell is made of the same polypropylene.
Such products are suitable for use in water supply systems with high pressure up to 6 atmospheres.
Layout of polypropylene pipes
Polypropylene pipes are used for installation of cold or hot water combs and heating. The choice of diameter in each case is individual - it depends on the volume of liquid that needs to be pumped per unit of time, the required speed of its movement (formula in the photo).
Formula for calculating the diameter of polypropylene
Calculating the diameters of pipes for heating systems is a separate topic (the diameter must be determined after each branch), for water supply systems everything is simpler. In apartments and houses, pipes with a diameter of 16 mm to 30 mm are used for these purposes, with the most common ones being 20 mm and 25 mm.
Counting fittings
After determining the diameter, the total length of the pipeline is calculated, and fittings are purchased depending on its structure. With the length of pipes, everything is relatively simple - measure the length, add about 20% for errors and possible defects in the work. A piping diagram is required to determine which fittings are needed. Draw it, indicating all the outlets and devices to which you need to connect.
An example of the layout of polypropylene pipes in the bathroom
To connect to many devices, a transition to metal is required. There are also such polypropylene fittings. They have a brass thread on one side and a regular solder fitting on the other. You should immediately look at the diameter of the pipe of the device being connected and the type of thread that should be on the fitting (internal or external). To avoid mistakes, it is better to write everything down on the diagram - above the outlet where this fitting will be installed.
Next, according to the diagram, the number of “T” and “G” shaped connections is calculated. Tees and angles are purchased for them. There are also crosses, but they are rarely used. By the way, there are corners not only at 90°. There are 45°, 120°. Don't forget about couplings - these are fittings for joining two pieces of pipe. Do not forget that polypropylene pipes are not at all elastic and do not bend, so each turn is made using fittings.
When purchasing materials, agree with the seller about the possibility of replacing or returning some of the fittings. Problems usually do not arise, since even professionals cannot always immediately determine exactly the required assortment. In addition, during the installation process, sometimes it is necessary to change the structure of the pipeline, which means the set of fittings changes.
Compensator for hot water supply and heating made of polypropylene pipes
Polypropylene has a fairly significant coefficient of thermal expansion. If a polypropylene hot water supply or heating system is being installed, it is necessary to make a compensator, with the help of which the lengthening or shortening of the pipeline will be leveled. This can be a factory-made compensator loop, or a compensator assembled according to the diagram from fins and pieces of pipes (pictured above).
Laying methods
There are two ways to install polypropylene pipes - open (along the wall) and closed - in grooves in the wall or in a screed. Along the wall or in the groove, polypropylene pipes are attached to clip holders. There are single ones - for laying one pipe, there are double ones - when two branches run parallel. They are attached at a distance of 50-70 cm. The pipe is simply inserted into the clip and held in place thanks to the elastic force.
Fastening polypropylene pipes to walls
When laying in a screed, if it is a warm floor, the pipes are attached to the reinforcing mesh; no other additional fastening is required. If the lines to the radiators will be sealed in, the pipes do not need to be fastened. They are rigid and do not change their position even when filled with coolant.
Option for hidden and external wiring in one pipeline (the wiring behind the bathroom was made open - less work)
Soldering nuances
The process of welding polypropylene pipes itself, as you have seen, does not leave much work, but there are a lot of subtleties. For example, it is not clear how to adjust sections when joining pipes so that the pipes are exactly the length required.
Another aspect of welding polypropylene pipes is soldering in hard-to-reach places. It is not always possible to fit a pipe and fitting onto a soldering iron on both sides. For example, we solder in the corner. The soldering iron has to be shoved into a corner, on one side the nozzle rests directly on the wall, you can’t pull the fitting onto it. In this case, install a second set of nozzles of the same diameter and heat the fitting on it.
How to solder polypropylene pipes in hard-to-reach places:
How to switch from iron pipe to polypropylene:
Mistakes when soldering plastic pipes
An inexperienced plumber or owner who decides to carry out the installation of a polypropylene water line with his own hands often makes mistakes, not fully knowing the technology of pipe soldering and not knowing how to work with a soldering iron.
The most common errors include the following.
READ ALSO: HDPE pipes: advantages, applications, types, installation and operation features, user reviews
Rice. 8 Differences between budget and expensive irons
Wrong choice of soldering iron
The most popular and inexpensive devices for soldering are electric couplings with attachments for different diameters of PPR. When purchasing and using, you must consider the following factors:
- You need to purchase the device with a convenient holder so that you can easily and quickly install it in place when working independently. This will reduce the time that heated elements are in an undocked state, which can lead to cold welding and further depressurization.
- It is also better to choose the units used with the regulator and power buttons placed in such a way that you do not touch them with your hand during operation, thereby lowering the temperature or turning off the heating.
- If the device is used for regular use, it is better to purchase an expensive model with high-quality Teflon nozzles - this will prevent polypropylene from sticking and improve the quality of connections.
Rice. 9 PPR heating table
- Modern devices are produced with electronic indicators that maintain a constant temperature using a built-in processor, which is reflected on its display. This factor also helps to improve the quality of soldering, the time of which is determined based on the degree of heating of the couplings, which cannot be determined on old-style units.
- The device must maintain a given temperature, which increases with increasing pipe diameter. Many Chinese irons have high temperature parameters, which should be taken into account when choosing a manufacturer; Turkish-made models are considered to be some of the best units in terms of price and quality ratio.
- The shape of the iron and the location of the couplings play an important role in cases where polypropylene pipes are welded in hard-to-reach places. A narrower iron and placement of the couplings on the edge of the pointed end in this case are much more convenient to use.
Repay
Overexposure of elements in the soldering iron for more than the required time leads to their surface overheating and after connection, accompanied by excessive force, the pipe passage becomes clogged with molten plastic. If such an error occurs at a large number of joints of heating or water pipelines, the system will not be able to function normally. In order to avoid this situation, you should strictly follow the time intervals specified in the instructions for each type and diameter of pipes and carry out several test solderings of small sections.
You should also always clearly mark with a pencil the distance to which the pipe is deepened for a diameter of 20 mm. it is usually 14 - 17 mm.
Low heating, incorrect angle and other errors
Many beginners make a fairly large number of mistakes, which include the following:
- Soldering of dirty elements near the walls or with water remaining in the line, while due to dirt or water cooling, the plastic does not connect well and subsequently depressurization of the joint occurs.
- Insufficient deepening of pipes into sockets of larger diameter. It often occurs when there is a minor error in the installation of faucets - if its valve is not turned at a small angle, the air in the joined area will not have an outlet, preventing the mounted area from being completely immersed in the hole.
- If the elements being connected are not heated sufficiently, the plastic will not have a uniform structure and the joint will depressurize. This defect can be identified by the absence of a skirt at the edge of fittings with a large diameter.
- When manually joining elements, a single axis must be maintained - otherwise distortions will lead to insufficient density and depressurization.
- Also, after joining, the joined area should be kept motionless for a certain time until it cools completely.
Rice. 11 Method of repairing polypropylene pipes by heating the surface of the pipe being repaired with a nozzle
For high-quality soldering in hard-to-reach places, a high-quality choice of soldering iron is of great importance - the model should provide easy access and the required heating temperature without sticking of the PPR. For convenience, all work is divided into two stages - first, long chains are installed in a convenient place, and then they move to the walls, joining sections in weight.
Types of electrodes
An electrode is a thin metal rod that is coated with a special compound. It protects the metal from the occurrence of corrosive deposits and determines how the weld will turn out. To figure out which electrodes to weld pipes with, you need to consider the properties of each of them. The main parameters by which electrodes are classified are the type of coating and the type of core. Products come with a melting and non-melting core.
- To make a melting core, welding wire with different diameters is used, which is selected depending on the type of work.
- To make a non-melting core, tungsten, graphite or electrical coal are used.
The electrodes are coated with cellulose, rutile, rutile-acid or rutile-cellulose coating.
How to choose a soldering iron
If you solder polypropylene pipes once, skip this point, but when such a tool is needed for work or you plan to install a system of plastic pipes for your mother-in-law, godfather, brother, matchmaker, etc., then buying a soldering iron is issue No. 1.
Soldering iron characteristics:
- The compactness of the device, how comfortable it sits in the hands;
- Equipment power;
- Basic equipment (over time you buy different attachments, but at first, if the required attachment is not in the set, it is better to buy it right away, so as not to run to the store for it later);
- Soldering iron material.
Compactness is important. After all, you will have to keep the device suspended for a long time. Because of this, after the next pipe, your hands will begin to get very tired. Therefore, before buying a soldering iron, take it in your hands and try how convenient it is to work with it.
Power determines which pipes can be welded. The voltage of 220 V is taken as the reference point, to which the soldering iron is connected. Builders use very powerful devices. But in private practice, completely different characteristics are needed (power depends on the diameter of the hole):
- 16 – 63 mm. – 700 W;
- 63 – 73 mm – 850 W;
- 125 mm. – 1200 W;
- 125 – 150 mm. – more powerful heating tools.
The equipment consists mainly of attachments. The more nozzles the manufacturer provides, the more pipes the device can solder. All of them have a pair (for two products at the same time). Some devices join several pipes at the same time with different diameters. It is recommended to use Teflon coated tips. They are more durable.
Manufacturer. The Czech Republic is a country that produces the best soldering irons. It is their equipment that is considered the most expensive and high quality. Following the Czechs are the Turks, but among them there are many Chinese fakes.
China is not considered a very bad manufacturer. But it depends. You can get a good quality one from China or buy a cheap model that will fail after several repairs. To solder two polypropylene pipes, you need to be patient, attentive and, preferably, a good partner. The presence of a soldering iron plays a very important role, but there are analogues in the absence of a heating tool. If you do not understand the work, it is better to hire a specialist.
Currently reading
- Three ways to lay pipes in the toilet and bathroom
- Six ways to disguise pipes in the bathroom and toilet
- Overview of the operation of end caps for all types of pipes
- We select the diameter of polypropylene pipes ourselves
How to properly solder polypropylene pipes: 3 modern methods
A true home craftsman always tries to do without the help of professionals in any repair. And if necessary, you can also do it yourself to replace PVC heating pipes or water supply in the apartment.
The use of polymer pipes for water distribution provides the advantage that there is no need to work with welding or threading, and therefore the work is greatly facilitated.
Before installing polypropylene pipes, you need to have an idea of how to work with a soldering iron for PVC pipes and purchase the necessary tools and materials.
How to solder correctly
How to make connections correctly so that they are airtight?
For the three most common soldering methods, below is a detailed description of all operations:
Bell-shaped
- For soldering pipes of small diameter (up to 50 mm), a simple manual apparatus is used. If you need to connect large diameter pipes, then use a device with centering devices.
- Two heating nozzles are a sleeve onto which a PVC pipe is placed. This design also has a mandrel (a device for moving the workpiece in the hole of the sleeve), into which the coupling is inserted.
- The apparatus for soldering polypropylene pipes must be installed on a flat horizontal surface and left to warm up to the required temperature. The heating process lasts 10-15 minutes - it depends on the power of the device.
- When soldering pipes that belong to the categories PN 10 and PN 20 (difference in operating pressure), the joints must be cleaned of dirt and burrs. If you need to solder reinforced PVC pipes, you need to remove the top part of the pipe with a shaver so that it can easily fit onto the fitting. Shearing is done to the depth of the pipe entering the coupling.
- The fitting and pipe are put on the soldering iron nozzles and kept for heating for the required time, which is determined by the power of the soldering iron and the room temperature. Instructions for time exposure are in the documentation for the device.
- Heated parts must be quickly removed from the device and connected to each other in a forward motion. Circular movements are not allowed.
- The connected parts must be kept in a stationary position for some time so that the pipes do not deform. After the area has completely cooled, the connection is ready for use.
Installation of a pipeline with a diameter greater than 50 mm is done in a different way - using butt joints of fragments. This soldering method is effective and justified only for pipes with a wall thickness of more than 4 mm.
- Before soldering, the ends of the pipes must be aligned so that they are parallel to each other.
- It is necessary to use centering devices, since strict alignment of the axes must be observed.
- To heat surfaces, a disk heating element is used, whose heating surface is ideally flat.
- The remaining technological operations are the same as for socket soldering.
Soldering saddles
This is a type of butt soldering. With this soldering method, you need to solder a special saddle to the surface of the pipe, which has a socket with an angle of 90˚. When assembling a pipeline from polymer pipes, use a special soldering iron for polypropylene pipes.
After this fragment has cooled, you need to drill a hole in the PVC pipe through the saddle. Then you need to solder another pipe to the saddle. You should end up with a pipe structure that is shaped like the letter “T”.
Your movements should be clear and fast. If you have no soldering experience, try making a few test seams.
Soldering polypropylene pipes yourself is not difficult, but this work requires care and attention. The main thing is to observe the heating time of the elements and the cooling time of the parts - the quality of the seam of the joints depends on this.
At what temperature should polypropylene pipes be soldered?
Polypropylene begins to melt at 140°C, and the operating temperature of the soldering iron is usually 260°C to ensure complete diffusion of materials.
How to properly solder polypropylene pipes: 3 modern methods
Electric and gas soldering irons are used to connect polypropylene pipes. You can solder pipes at home yourself - for this you need to study the soldering technique and buy a set of necessary tools.
How to repair polypropylene in hard-to-reach places
You will need a soldering iron, or as it is also called an iron with attachments. There is an opinion that when repairing a pipeline in a hard-to-reach place, the entire assembly is removed. But you can replace exactly the part that is damaged.
Working with PP is not as difficult as it seems at first glance. But problems arise when pipes are soldered in hard-to-reach places. They don't have enough space. Here they resort to various tricks.
- The surface must be degreased. This can be done with a solution. Apply this solution to the surface with a rag or napkin. Then, when it dries, you can move on to the next steps.
- The soldering iron must be preheated in advance. The operating temperature is 260 degrees. Good devices, which are expensive, reach this temperature very quickly. Literally in five minutes. More economical models of soldering irons will require 10-15 minutes for this process. Before heating, install the nozzles.
- When the tool is warmed up, the end of the pipeline and the fitting are inserted into the nozzles at the same time. After heating, they are joined. You need to wait a while for everything to “get set.”
- We solder everything else in the same way. There are situations when it is not possible to heat both edges at the same time. Then we take the internal fitting and heat it longer.
It happens that it is necessary to replace the damaged area. Then it is pre-cut with pruning shears and scissors. You can do this as follows:
- The water supply to the damaged area is shut off. There is always a shut-off valve. And in modern water supply systems, every section is blocked.
- Secateurs are used to cut damage evenly at an angle of 90 degrees.
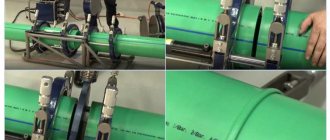
Electro-coupling soldering technology
The method is applicable for structures whose diameter starts from 20 mm and above. Before starting, preparatory work is carried out. Then the surface is cleaned of grease and dirt and welding occurs directly.
The whole process consists of stages:
- Equipment check. Before starting work, the serviceability is checked so that faults are not discovered during welding work.
- Prepare all tools and work area.
- Cut off the ends evenly. The ends of the pipeline must be cut strictly at an angle of 90%.
- The edges of the pipelines to be welded must be degreased. This can be done using wet lint-free wipes, white spirit, and solvent. Before welding, you must wait until the degreaser evaporates. It is also necessary to remove the excess oxide layer and remove the necessary chamfers.
- In case of severe deformation, the ovality is removed from the edges. This is done with hydraulic clamps.
- The parts are clamped in the positioner. This gives them stability. During cooling, movement is eliminated, which means that even adhesion to each other is ensured.
- Welding with an electric coupling.
- Cooling the welded
- Removing all fasteners and wiping off dirt. It is possible to clean the protruding parts of the material.
American adapter coupling
The classic fitting with a nut, invented in the USA, is called “American”. It has many advantages. The main thing is that it does not require much space to work with it. Therefore, in difficult areas when working with polypropylene pipes, use an American one.
What advantages does it have over others?
- It is easy to install and remove, and you can quickly use it to cover areas for partial replacement.
- Provides good sealing.
- It is possible to install such fittings in hard-to-reach places.
American women have many varieties, they differ not only in size. There are fittings with external, internal threads, and mixed. American women can be made from different materials. Such products are made of brass, steel, and other metals. Different metals can be used in one product.
Products intended for use may vary. There are couplings that are double-sided fittings. They produce tees, crosses, plugs, and adapters of different diameters.
What are the tools for stripping polypropylene pipes?
Proper pipe stripping begins with tool selection. Its type and design depend on the type of reinforcement (external, internal) and diameter. For end brazing, special edge removal machines must be used. But polypropylene products are rarely made with a diameter of more than 60 mm. For this purpose, polyethylene pipelines are used.
Drill attachments
To install a pipeline with your own hands, you can buy several manual strippers for standard diameters - 16, 20, 25 and 32 mm. An example of a tool for external processing is the MasterProf or Newton series of models. Each is designed for two diameters, for example - 20x25 or 16x20. The knives are arranged vertically, they can be replaced and position adjusted.
Manual removal is convenient for small jobs. If this needs to be done en masse, it is recommended to purchase special drill attachments. They also differ in size, but all are designed to fit in a standard drill chuck. These are the optimal stripping tools for 20-25 mm polypropylene pipes.
How to choose manual or drill type cleaning:
- made of tool steel;
- corrugated surface for easy fixation;
- for manual models, the length of the knob is from 15 cm, it is possible to replace it;
- Drill attachments (shaver) can be of different diameters. This is achieved by adjusting the position of the blades.
An additional tool is a vice or clamp for fixing the pipe. This will make it more convenient to treat the surface; removal will not require much effort.
Working with a trimmer
A trimmer is necessary for cleaning the ends. It differs from attachments and shavers in the arrangement of the knives. Their plane is in a horizontal position at a slight angle. The aluminum layer is chamfered up to 1 mm. The advantage of this tool is its versatility. It is used to level the plane of the pipes, which affects the soldering accuracy.
Features of end trimmers:
- the ability to adjust the location of the knives, which will allow you to use one nozzle for pipes of several diameters;
- There are models for manual processing or installed in a drill;
- standard diameters are 20/25, 32/40 and 50/63.
The depth of chamfering depends on the evenness of the cut of the pipe. Often a trimmer is used first to level the plane of the end and then to clean the surface. Only a small part of the foil layer is removed, which eliminates its appearance at the soldering site.
Tip: according to reviews from craftsmen, plastic end caps have proven themselves well. They are suitable for arranging central and autonomous water supply and heating.
Variety of models
Product 'Ermak'
There are two types of soldering machines on sale. The first type is equipped with a flat tip. In the second type of device, the soldering element is made in the shape of a cylinder. Each variety has its own characteristics. According to many experts, models with a cylinder-shaped sting are more convenient. Since the soldering element is compact in size, the device can be used even in small spaces.
Each type of device is equipped with its own type of replaceable attachments. For models with a flat tip, the nozzle is installed using a special bolt. The plate has several holes for connecting two or three nozzles.
For models with a cylindrical tip, the heating elements look like clamps. They crimp the cylinder and are secured with several bolts. The replaceable nozzles of the second type of device (unlike the first) do not scroll relative to their axis. This greatly simplifies the soldering process. Because there is no need to tighten the bolts.
You also need to pay attention to the configuration of the nozzles. Most often, a set contains at least three attachments. Some models are equipped with six replaceable heating elements to work with structures of different sections.
Today, the most popular manufacturers of soldering irons for polypropylene structures are the following brands:
- Ermak;
- Storm;
- Quick;
- Wavin ekoplastik;
- Kraftool;
- Lava;
- Neo.
To choose a tool you need to know which one is better. To do this, just read consumer reviews. Note that it is better to spend a little more money and purchase a quality tool from a well-known brand than to purchase a cheap Chinese device.
Also pay attention to the power of the equipment. As a rule, for devices this figure can be from 800 to 1500 W. Such devices are used for soldering structures with cross-sectional sizes of 15, 20, 32 and 50 millimeters. If we are talking about joining products with a diameter of up to 63 millimeters, it is better to use equipment with a power of 1700 watts or more. There are also models designed for soldering products with a cross-section of 75, 90 or 110 millimeters.
Typically, the equipment package includes a standard set of additional elements.
As a rule, the list contains:
- replaceable nozzles;
- bolts;
- shipping container;
- stand;
- thermal gloves;
- roulette;
- level;
- instructions.
Try to choose a tool that is as complete as possible with everything you need. This will allow you to save money and time. Equipment from well-known manufacturers in most cases comes with all the necessary additional elements. Often soldering irons can be equipped with scissors for cutting pipes.
Features of welding a pipeline with an inverter
The electric arc welding method is suitable for creating a vertical seam, provided that it is located at the end of the pipe. If a horizontal seam is created, the latter should be on its circumference. If you have to make ceiling and bottom seams, then they should be at the top and bottom. Among all those mentioned, it is the last one that creates fewer problems in implementation.
If you have to deal with steel pipes, then the butt welding method is most often used, which involves welding each edge along the height of the walls. To minimize sagging inside the pipe, the electrode should be positioned at an angle of no more than 45 degrees relative to the horizontal. Such a seam should reach a height of 2–3 mm and a width of 6–8 mm. If the products are overlapped, then the seam will have a height of 3 mm and a width of 6–8 mm.
Preparation
Before you begin electric welding of metal products, you need to complete the following preparatory measures:
- It is necessary to remove the top layer from the welded aliment.
- If there are any irregularities at the ends of the pipe, they need to be cut off or straightened.
- Next we begin to process the edges. Here it is necessary to smooth out at least 10 millimeters of the surface adjacent to the edges of the pipe outside and inside until a metallic sheen appears.
Main stages
If the walls are 6–12 mm wide
Particular attention should be paid to creating the first seam, since a lot depends on it. It must be performed in such a way that it melts every edge and dull areas
It is very important to examine it very carefully, as there may be cracks on it. If they are found, they must be melted down or cut down, after which the area is welded again
When creating the remaining layers, you need to slowly turn the pipe. It must be remembered that the beginning and end of each layer should be located with an offset relative to the previous layer at a distance of 15–30 mm.
How to make a connection?
Let's figure out how to connect two parts of a pipeline without using welding and threaded fittings. Most often, the following methods are used:
- installation of Gebo coupling;
- installation of a clip or clamp;
- flange connection.
Gebo coupling
This is the name given to a special fitting; it can be used to manually combine two pipes into a single line. The coupling contains:
- frame;
- three rings - sealing, clamping, clamping;
- screw.
To install the coupling, put the nut and all other parts on the pipe in order, the coupling is put on last, it needs to be put on halfway, tightening the nut. Then the part that they want to connect to the pipe is joined to the fitting in the same sequence.
The reliability of the connection when using a Hebe coupling depends on how correctly the work was done. If everything is done correctly, the joint will be absolutely airtight and will last a long time.
Installing a repair coupling or clamp
The pipeline can be repaired or modified using a mounting clip. This part consists of two halves, which are bolted together, tightly gripping the pipe.
Carrying out work:
- If repairs or joining of previously used pipes are carried out, then the joint must be cleaned of scale, paint and any other contaminants. The surface must be completely clean and smooth;
- then a rubber seal is installed at the connection point, detachable parts are placed on top on both sides;
- the parts are tightened with bolts.
This method is very simple, but it does not provide a sufficient degree of reliability, so it should be used on non-pressure pipelines or as a temporary measure. Installation of the clamp is carried out in the same way. The difference between this part and the repair clip is that the clamp is tightened on one side, and the clip on both sides.
Flanges
Another simple way to connect pipeline parts is to install flanges. Flanges are parts in the form of a ring into the center of which a pipe or pipe is inserted.
Identical flanges are put on the ends of the parts to be connected, which are then connected to each other and tightened with bolts. A gasket is installed between the flanges. Making a connection:
- The parts to be joined are prepared; the ends must be cut exactly at an angle of 90 degrees, cleaned of paint and dirt. Chamfering is optional;
- flanges are put on the prepared parts;
- rubber or paronite gaskets are installed;
- two parts with flanges installed on them are connected;
- The bolts holding both flanges together are gradually tightened. The bolts should be tightened gradually and crosswise, not in a circle.
How to connect two different pipes
Sometimes the design involves connecting two systems of different types (for example, polypropylene and metal-plastic). This happens very often. Especially in old houses, where it is very difficult to replace the metal type section, but the rest of the pipeline needs to be changed.
The hardware store has threaded fittings. The figure shows that the device looks like this. On one side of the fitting there is a metal thread, which is connected to the metal part using a nut, flax tow (or fum tape) and an adjustable wrench. And on the other side there is a plastic protrusion. It connects to the plastic part.
How to weld pipes using electric welding
Using electric arc welding, you can create the following types of connections between metal elements:
- A connection in which products are joined to each other along the same axis;
- Perpendicular pipe connection;
- Gusset. In this case, you need to know how to weld pipes at an angle of 45 degrees;
- Overlapping connection.
The hardest thing to work with is the ceiling seam, which causes a lot of unpleasant nuances:
- The connection is extremely inconvenient to install - the liquid metal constantly tends downwards, and given that the pipes are located high, drops can also fly towards the person working with the welding machine.
- The welding site is very hard to see, so to create a high-quality seam you have to use a mirror - and this is extremely inconvenient, especially alone.
- Sometimes situations arise in which it is simply impossible to reach the junction with the electrode, so it has to be bent.
A person who does not have sufficient experience in welding is unlikely to be able to weld round pipes using a ceiling seam. However, it is not always necessary. When connecting, the pipe can sometimes be rotated, and this possibility should not be neglected. In any case, before finishing welding the structure, it is worth taking a couple of pipe scraps and practicing on them.
Conclusion
Knowing how to properly electric weld a pipe will help in carrying out welding work. By choosing the electrodes correctly and performing all the work efficiently, you can create a reliable weld that can work for many years without any complaints.
How to work with an electric coupling
The technology of welding using a soldering iron is electrofusion welding. Couplings for heating pipes and fittings are included with the tool and are attached to it as needed. One person can work with such a soldering iron. In this case, it is more convenient to fix the welder with your feet while kneeling.
The tool is heated to 260 degrees - this is the standard recommended temperature for work (at an external temperature not lower than +10). The pipe and fitting are simultaneously inserted into the electric coupling and held for the required time. The pipe should be pulled out first, then the fitting. The parts are connected manually and fixed until they cool.
Things to consider:
- Parts inserted into the electric coupling must not be rotated. The movement of polypropylene will cause it to stick, deforming the part and damaging the tool.
- Overheating will cause the material to melt and the internal lumen of the pipe or fitting to float.
- Underheating will not allow the material to melt enough to join.
- Low air temperature will lead to rapid cooling of parts that have been removed from the electric coupling. This will not give a good connection, or the master will not have time to adjust the direction of the joint.
How to fix leaking pipes yourself
When a leak is detected, many people try to repair this leaking polypropylene pipe on their own. Mostly the following malfunctions occur:
- Wear of gaskets. As a result, a leak appears. Replacing the gasket helps eliminate it.
- Violation of tightness. If the connection is threaded, then replacing it yourself will not be difficult. It is enough to purchase the same part at a plumbing store and replace it.
- Soldering the assembly on the fly - In this case, you can use this simple technique: heat the soldering iron, disconnect the nozzle, and use an adjustable wrench to place the hot nozzle on the pipe. Next, remove the nozzle and make connections.
- Installation of a ready-made soldered assembly - It happens that you need to solder an assembly on site and it is not possible, and then we solder the required part. And then we replace the damaged section of the pipe with it.
Pipe under pressure
Sometimes it is necessary to eliminate a leak in a polypropylene pipe under water pressure. It will not always be possible to turn off the water supply. So, we repair the PP joint in the plumbing or heating system under pressure. There are several ways. The most effective ones should be indicated first.
- Installation of the clamp. A rubber seal is applied to the damage and tightened with clamps.
- Special glue. Modern technologies help solve this problem. The glue sets quickly, if possible, you can use it.
- Small leaks are eliminated by screwing in a self-tapping screw with a rubber gasket.
- A bandage impregnated with cement is applied to the damage. Everything on top is covered with solution. This method is suitable for eliminating small leaks.
Pipe without pressure
For repairs without water pressure, replacement may be required. This is done by installing a new mechanism with a threaded connection, or by soldering. When soldering, their ends and surfaces of the nozzles are treated with a degreaser.
Once a leak is detected, the water is shut off. In modern water supply systems it is possible to block certain areas. Next, we repair the joint in the non-pressure system.
- We disconnect the damage.
- If you can replace some part in it, this would be an ideal option, we change it.
- If replacement is not possible, another one is purchased and assembled.
- Then we install the already corrected one.
HelpfulUseless
Important points in assembling a piping system
Before starting welding work, it is necessary to carefully consider the entire structure and sequence of connections. It’s a good idea to prepare a sketch showing key elements, turns, tees, and expansion joints. Since the polyfusion joint is permanent, situations may arise when the manufacture of the next welding unit is impossible. This is a typical case for soldering polypropylene pipes in hard-to-reach places.
Consider temperature deformations
When installing polypropylene plumbing materials, one should take into account their special physical property - they stretch noticeably when heated. Of all types of pipes, in terms of the thermal expansion coefficient (0.15 mm/m*K), they are slightly inferior only to polyethylene. Therefore, soldering, in particular long straight lines or sections for termination, must be carried out taking into account compensation for their elongations.
When laying openly, U-shaped (1) or L-shaped (2) segments, manufactured on site or factory-made loop-shaped expansion joints for polypropylene pipes, are cut into the routes. It is also possible to compensate due to rotations in the system, and they must be able to move freely on supports
When embedding, the routes are laid in corrugations or canisters with a margin of diameter or in elastic sleeves with thick walls, such as Energoflex.
Temperature deformation in reinforced products is noticeably lower (about 3-5 times), which makes them more suitable for laying hot water supply and heating systems.
Important! The lack of temperature compensation leads to significant sinusoidal changes in pipeline geometry. The result can be torn fasteners when the installation is open, tiles or plaster torn from the wall when installed hidden.
Follow the rules for fastening the engineering structure
Reliable fixation for communications made of polymers is even more important than for their steel counterparts. The installation pitch and type of supports depend on the diameter of the polypropylene pipes, as well as on the temperature of the liquid transported through them. Violation of fastening rules can lead to sagging of pipelines, especially hot ones, their “bouncing” and knocking under the influence of pressure pulsation.
Table 2. Recommended support spacing for typical horizontal residential hot water and hot water supply lines, mm.
| Outer diameter of PP pipe, mm | Water temperature, ºС | ||
| 20 | 30 | 40 | |
| 16 | 500 | 450 | 400 |
| 20 | 550 | 500 | 450 |
| 25 | 650 | 550 | 500 |
Water risers with a diameter of up to 32 mm can be secured less frequently. The distance between the fixing clamps is taken to be no more than 1000 mm. If the diameter of the risers is larger, then a step of up to 1500 mm is allowed.
When installing fasteners, it is necessary to ensure that they do not interfere with linear deformations of the polymer material. It is preferable to install sliding supports. Along the line of rigid fastenings, it is planned to install expansion joints on polypropylene pipes.
You should be aware that shut-off and control valves in systems with a nominal diameter of 40 mm must be firmly fixed. With smaller diameters, fastenings are also desirable to prevent the transfer of loads from the use of plumbing fixtures to the pipes.
Features of soldering in corners
Soldering under such conditions is no different from carrying out similar work on other sections of the walls, with the exception of some factors.
Fillet welding requires precision and compliance with increased requirements for the geometry of a right angle; a square is used to check it. To join the sections, special corner couplings with a rotation angle of 90 degrees are used, which should be purchased together with pipes from the same manufacturer - this will ensure high adhesion between the connected elements.
Rice.
5 Sequence of soldering a PPR pipeline Date: September 25, 2021
Welding and installation of a separate part of the pipeline system
When soldering a polypropylene water main, they always try to install individual sections of the water supply in a place with large free space and at a convenient height. To do this, you will need basic tools, a drawing of the highway and the correct procedure for carrying out the work.
Typically the hardest side to weld is on the wall with the two corner fittings, so it is welded first and secured with clips or dowel sleeves. Afterwards, from the corner fittings, further installation of sections of the line is carried out, moving on to soldering work directly near the walls. For ease of installation, it is necessary to provide in advance a place to install the soldering iron on a stand or organize its hanging.