Air pressure testing of heated floors
If it is not possible to add water, pressure testing of the heated floor can be done with air.
We check that all taps are hermetically closed, including drain taps, Mayevsky taps, etc. During air pressure testing, unscrew the automatic air vent and put a plug in its place.
To create pressure, you will need a compressor, a car pump with a pressure gauge, etc. To connect the hose from the pump (compressor), there must be a fitting, and after it a tap (the tap is here because all compressors let air through, they don’t hold when we stop sway).
The recommended pressure for pressure testing with air is 2-3 times higher than the working pressure. That is, if the working pressure is 1.5-2 atmospheres, then during pressure testing it is about 4...5 atm.
Important! Pressure is 4-5 atm. is created only in a warm floor, and NOT in the area from the boiler to the collector. Reason: many boilers are designed for pressure up to 3 atm; higher pressure can damage the boiler
We then check the “boiler-collector” section separately at the pressure permissible for the boiler.
There are special crimpers:
- however, this pleasure is not cheap; if we are making a system for ourselves, then there is no point in shelling out money for one time.
So, we pumped air to a pressure of 4 atm, then close the tap and leave the system under pressure for a day, observing the pressure drop. There shouldn’t be a drop in pressure, but there will still be a slight drop, because when pumping, the compressor heats up the air a little, which then cools down.
Attention! We leave the pressure in the warm floor until the finishing screed is poured. After the pressure has been created, you need to wash all connections with a soapy solution, or even glass cleaner
So, by the air bubbles that appear, we will see where the connection is not tight
After the pressure has been created, you need to wash all connections with a soapy solution, or even glass cleaner. So, by the air bubbles that appear, we will see where the connection is not tight.
Why is it necessary to switch the phase?
The above circuit will function even if the polarity is reversed, but despite this, it is the phase wire that must be connected to the contact group (input “1”). This condition, set by the Electrical Installation Rules, is directly related to safety. If you switch zero, the voltage will always remain on the contacts, which can lead to serious consequences during maintenance or repair.
How to start a heated floor
After the system is assembled, before pouring the screed, the water floor must be checked for functionality. This way it will be possible to eliminate any shortcomings that might have been made during installation. To do this, first the water floor pipes must be washed, drained well, and then filled with the coolant that will be used.
There are three methods for checking the functionality of the system and identifying installation defects:
- bring to operating temperatures and leave in operation for several days;
- test with cold coolant at high pressure;
- Pressurize heated floors with air.
Before pouring screed or laying rigid base slabs, the underfloor heating system is pressure tested - pressurized
The choice is yours, but running the system at high pressure without a tie may result in the pipes being torn out of their sockets. This is if you used mounting tapes or single fasteners. To prevent this from happening, you can install beacons for the screed before the test run, and secure them with small sections of mortar at a certain step.
Pressure testing must be carried out after the solution holding the guides has set. You will get a kind of frame that will hold the pipes, so they will not break out of their sockets. Will the guides interfere with troubleshooting? No. If the pipes were not bent during installation and the coil was rolled out, then your pipes are intact and there will be no problems in this part. If leaks can occur, they will occur at the junction of the pipes and the manifold, in the boiler piping.
Now let's talk about how to test the system using each method.
The first method is running at operating temperatures. The system must be brought to operating temperature gradually, starting from 20°C. After a few hours, raising it to 5°C. All this time you need to monitor the joints, connections, contours. If leaks are detected, stop the system, drain, repair, refill and test.
A manual device for pressure testing water supply systems, with which coolant is pumped into a heated floor system
Second method: with excess pressure. Here everything is somewhat simpler: having filled the system with a “working” coolant, create a pressure 1.5-2 times higher than the working one and leave it for a day. If in a system made of PERT or PEX the pressure drop during this time does not exceed 1.5 Bar, there is no leak - you can fill the floor. If there are any shortcomings, everything is exactly the same as when reaching the temperature: stop the system, drain it, fix the breakdowns, fill it, test it.
The third method of dry pressure testing is used if it is impossible to fill in coolant for some reason or for special cases. Then, using a compressor, air is pumped into the system. But in this case you will have to create a pressure that is 2-3 times higher than the working one. This method is not entirely reliable, especially if you use a heated floor with antifreeze.
More about which testing method is used with which pipes. For metal-plastic pipes, testing with cold water at high pressure (6 bar) is recommended. If the pressure in the system has not dropped within a day, then the system is reliable and you can pour the solution or lay base sheets when using flooring systems.
The automatic crimping machine does everything yourself, you just need to control it
But that is not all. According to German standards (this country has the most stringent safety requirements for construction technologies and materials), after pressure testing in cold water, the system must also be run at operating temperatures. Smoothly bring the system to operating temperature and leave for several days. After successfully passing all tests, we can confidently say that the system is reliable.
The heated floor is brought to the operating temperature of the coolant within a few days. First, set the supply temperature to 20-25°C. Then every day you raise it by 5-10°C. The temperature can be increased by 5°C if antifreeze is used, and by 10°C if water is used. Also, the rate of temperature increase depends on the size of the heated area.
If the area is small and the screed array is small, then you can reach the specified mode faster. But this is the case when it is better not to rush: with uneven and rapid heating, the screed may crack, and if non-freezing liquids are used, they may overheat, which will immediately lead to system failure.
Selection of options
When using metal-plastic pipes for water circuits, it is advisable to test with cold water, creating a pressure with a reading of 6 bar. The system is maintained in this state for 24 hours. If the pressure remains unchanged, the pipes can be filled with concrete. It is important to consider that the pressure gauge readings do not change during the installation of the screed, that is, the circuit remains under pressure.
Test table for underfloor heating system pipes
If pipes made from modern cross-linked polyethylene are used, the instructions stipulate that the pressure created in the system must be twice the operating indicators, and it cannot be less than 6 bar. After 30 minutes, when the pressure subsides, it should be restored to its previous values.
A similar procedure is repeated twice. The pressure is then brought back to its original value and the water floor system is left for 24 hours. It is considered operational and has passed the test if after 24 hours the pressure drops by no more than 1.5 bar.
Sometimes it is recommended, after test control with cold water under pressure, to additionally check the system at the maximum temperature of the coolant, inspecting all connections again and making sure the integrity of the pipes. The temperature rises smoothly to the desired value. The circuits should remain in this mode for several days. If the need arises, the connections are tightened. A working system can only be refilled after it has cooled, without reducing the pressure.
Table for determining water pressure in a heated floor system
If you choose between the method of performing pressure testing with water or air, many experts prefer the second option. It is believed that if pressure testing is carried out in the warm season, there is a risk that before the onset of cold weather, the system, already filled with screed, will not yet be ready for operation. Because there is water in the circuits, it can freeze and cause irreparable damage. Air can be present in the system at any time of the year without fear.
Air crimping
Unlike hydraulic testing, air testing involves filling the system and testing it under pressure using air.
It is performed at the same stage as in the previous case, but with some differences, namely:
- Instead of a hydraulic press, an ordinary automobile pump is used. Both electric and hand (foot) tools can be used. In this case, you will need to independently assemble the device from several elements - a fitting with a fitting for connecting the pump hose, a fitting with a check valve or valve to prevent air from escaping back into the pump hose, and, if necessary, a fitting with a pressure gauge to control the pressure level.
Pump connection
- The assembled structure is connected to the heating system and, by analogy with the previous method, the circuit is sealed from the external supply/exhaust pipes and all valves inside the system are open.
If the boiler is already connected to the system, it may be necessary to close the supply valve to it as it may have a pressure relief valve and affect the integrity of the test.
- Using a pump, air is pumped into the system until a pressure of 2 atmospheres is reached (about 2 bar) and left in this state for a day. A drop in pressure after a day is allowed up to 0.5 atmospheres, since temperature fluctuations in the volume of air in the system occur, as well as expansion and contraction of plastic pipes. If the drop is greater, you will need to find a leak.
Finding the area with the leak
- A leak can be detected by pressurizing the system again. The problem area can often be determined by ear by checking the entire length of the heating main. If it is not possible to determine it by ear, prepare a soap solution, which is used to coat the joints of the system elements - as a rule, these are the most problematic areas in the circuit. The leak site will begin to bubble and, if it turns out to be a joint, it is disassembled, a few words of fum tape are added, the system is reassembled and tested again.
Thus, we have described two ways to perform pressure testing of a heating system with your own hands, and indicated what tools you need to use for this. If you need to test your water supply, you can do this in a similar way. Read about installation and repair of the heating system in our following articles.
Malfunctions in the floor heating system - why it doesn’t work
It happens that after the installation is completed and everything is connected, the heated floor does not work - how to check why? If there is no heating, it means that an error was made during the installation process or that unsuitable equipment was used.
Before checking the serviceability of the heated floor, it would not hurt to find out about the main errors that occur in its elements:
- Thermostat. Malfunctions of the heated floor thermostat occur as a result of the failure of the capacitor or relay. Since its repair is expensive, it is much easier to replace the device with a new product. The main thing is to find out which company made it. Both the temperature sensor and the thermostat must be from the same manufacturer. Sometimes it is not clear why a warm floor does not heat well, but as a result it turns out that the thermostat is simply not configured correctly or is not working correctly.
- Thermal sensor. If necessary, it can be easily replaced. Depending on the quality, this device can work for both a long and short time. The service life is affected by correct installation. To make sure it is working, you need to know how to check the heated floor temperature sensor. This device must be placed inside a corrugated tube and installed in a certain place and at a specific angle in relation to the wires.
- Cable. It only deteriorates if installed incorrectly. Its most vulnerable part is the coupling.
Water crimping process
Professional equipment is used for crimping
The use of the hydraulic method involves pumping up pressure to 6 bar, but in fact the indicator in the system is 3 bar. Several devices are used to obtain the optimal level.
Crimping operator - professional equipment
Manufacturers produce manual and electric models, the main difference between which is cost. It is advisable for a home craftsman to use a manual crimping machine:
- The device hose is connected to the system, and water is poured into a special container.
- Pumping is performed manually with periodic opening and closing of the tap.
When working with an electric pressure tester, you will need to connect it to the water supply system or water tank. Further actions are carried out according to the manufacturer's instructions.
Garden sprayer
You can use a garden sprayer
The device is selected according to the operating pressure parameters indicated on the body or in the passport. When using the sprayer you need to:
- Pour water into the reservoir.
- Connect the device hose to the supply valve.
- Create a pressure of 4 to 6 bar - one filled tank is enough for this.
- Pump manually until the desired pressure appears.
One filled container is enough for one circuit.
Deep Vibration Pump
The devices create pressure up to 6 atm, so they are excellent for crimping. The work is carried out with an assistant - one person opens the taps, and the second monitors the pump. The vibration device hose is connected to the manifold.
The pump is activated after the valve opens. The return hose is connected to the supplied container. After the air is completely drained from the circuit, the return valve is closed. Next, you need to monitor the pressure gauge until the pressure reaches 6 atm. After this, the supply tap is closed and the pump is turned on at the same time.
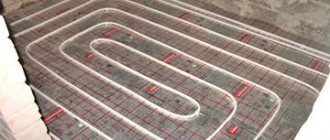
Installation of water heated floor
Before you begin laying the heated floor system itself, you should prepare the surface for it. It should be clean and not have sudden changes in floor level.
Then the following stages of work are carried out:
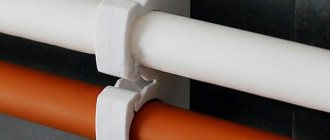
- A film is laid on the floor, which serves as waterproofing. Its joints are taped with tape. It is folded along the walls and secured with a special tape.
- You can put a layer of heat-insulating material on the film, the thickness of which depends on where the heated floor is installed. For example, on the first floor, if there is a basement below, you can use high-density insulation, which will help significantly reduce heat loss. But if there is no need for serious thermal insulation, then it will be enough to use ordinary foil, which will reflect heat.
- Then the pipes are laid according to the pattern that was chosen in advance. The optimal distance for them is 25-30 cm from each other. They can be attached either using special profiles or using plastic clamps directly to the reinforcing mesh, which should be placed on top of them. It is possible to use special insulation, on which means for fixing the pipes are already formed in the form of protrusions. It is very comfortable.
- The ends of the pipes of each circuit are connected to the manifold using fittings. The collector is installed in a special box that can be mounted into the wall.
- After laying the pipes, you can install beacon profiles and fill them with an even layer of cement screed, preferably at least 3 cm thick. A prerequisite is the presence of a reinforcing mesh, which will not allow the screed to collapse over time due to temperature changes. The mesh is mounted directly on the underfloor heating pipes.
- After the screed has dried, you can lay any finishing coating on it.
Method of performing pressure testing using water
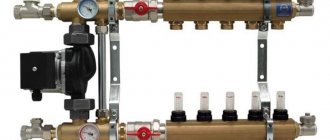
Before performing pressure testing yourself, you need to install the collector box at the selected location and connect the mounted heating water circuits.
Installation of the manifold cabinet
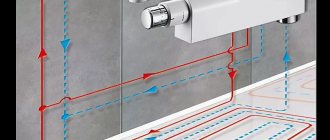
Then the circuits are filled with water from the supply. To do this, close the caps on the return manifold, and open the tap on the supply. The water entering the pipes begins to displace air from them with a clearly audible hiss through an automatic air vent.
After this, the return valve opens to also bleed off the air. If there are several circuits, then the actions are repeated with each of them until all the air has left the system. After this, you should close the valve located on the supply at the inlet to the manifold.
The next action is to open the valve located in front of the return line.
The process of crimping a heated floor
- If a control check method is chosen in the form of setting operating temperatures, then this should be done gradually. The initial temperature of the coolant in the circuit should be 20°C. After waiting several hours, it is raised another 5°C, carefully monitoring the condition of the joints, external surfaces of pipes, and connections.
- If leaks appear, the water is drained from the system and corrective measures are taken. After this, the coolant is supplied again and when the design temperature is reached, the system remains for two to three days. Having determined after a visual inspection that there are no malfunctions, the temperature is reduced so that the water in the system is cool, and the screed is poured.
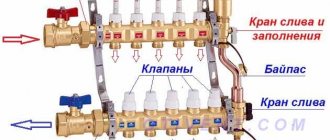
Collector diagram
- The second method is based on creating excess pressure. In this case, after the system is completely filled with cold coolant, a pressure is created that should be 1.5–2 times greater than the working one. The water circuit remains in this state throughout the day. During this time, places are identified where water leaks due to defects in the pipes themselves or loose connections. Troubleshooting is carried out after draining the coolant, and then the tests are repeated.
Recommendations from experts
When filling heated floors with water at high pressure, there is a real danger of pipes jumping out of their seats. This usually happens in places where mounting tape was used. To avoid such situations, it is necessary to first install the beacons for the screed, securing them with small piles of mortar to be sure. This will allow you to acquire an additional holding frame after the mixture has hardened. If the contour was attached to the mesh, then there is no need for additional strengthening measures. Before laying the solution, it is recommended to rinse the pipes to remove possible contamination with clean running water. It is better to repeat the washing several times: the signal to stop the procedure is that the water coming out will be completely clean.
Crimping technologies
In order not to dismantle the water heated floor, you can create high pressure conditions before starting. Testing is also performed after assembly to determine leaks, ruptures, and areas of corrosion. The procedure consists of pressure testing and flushing of the line, checking and replacing components, and restoring the insulating coating. Depending on the state of communications, you can select the appropriate technology.
Using water
The excess pressure in the pipes should be 2 times higher than the norm. The system should withstand 2 days in this mode
Before pressing the heated floor, install a collector box and connect the water circuits for heating. The system is filled with water from the supply tap - the caps are screwed on the return manifold, and in supply mode the tap is brought to the open position. The liquid enters the line, displacing air through the diverter, as evidenced by hissing.
To bleed air masses, the return valve of one or more circuits is opened. The steps must be repeated until the air is pumped out of the pipes. Once bleeding is complete, the collector inlet valve closes.
The hydraulic method is also divided into several types.
The control check is carried out with a gradual increase in operating temperature. Initially, water is supplied to the circuit at +20 degrees, after a few hours the temperature increases by 5 degrees. After this, joints, external sections of the pipeline, and attachment points are checked.
If there are leaks, water is drained from the system and the faults are repaired. After re-supplying the coolant and reaching the desired temperature, the system is not operated for 2 days. Breakdowns are determined visually, the temperature is lowered to a cool state, then the screed is poured.
High pressure is created by filling the line with cold water. Pressure parameters should exceed the norm by 1.5-2 times. The valves are closed and the circuit is not operated for 24 hours.
During this time, water flows out from ruptured pipes or connections. Damaged areas are determined visually. Repairs begin after removing the coolant. Upon completion of work, re-inspection is carried out and the system is filled.
Air crimping
If there is no water in the house, carry out pneumatic pressure testing, increasing the pressure by 2 times
The procedure for pressure testing a heated floor system using air is performed when it is not possible to test them with water. To create excess pressure, use a floor compressor, a car pump or a sprayer with a pressure gauge. The air pressing technology is implemented as follows:
- Checking the condition of the taps. They close hermetically.
- Removing the automatic air vent and installing a temporary plug in its place.
- Connecting a device that pumps pressure. A hose is attached through the fitting, and then a tap.
- Creation of increased pressure. They work only with pipes; the area from the collector to the boiler is not tested, so as not to damage the heating devices.
- Shut off the valve after the required pressure has been reached. The line remains in the received state for 24 hours. The pressure indicator is constantly monitored.
- Checking and clarifying damage. Leaky joints are treated with soapy water. Soap bubbles indicate the need for repairs.
- If the pressure test is successful, air remains in the communications until the screed is filled.
Crimping sequence
Pressure testing using an automatic pump
Pressure testing is a quality check of laid pipelines, especially at their connections. For this purpose, the pipelines must be filled with coolant and tested at high pressure. If the test is successful, after some time you can fill the screed and lay ceramic floor tiles or parquet.
The instructions for crimping a water heated floor include checking in two stages:
- Test the water floor pipe system for the maximum coolant pressure - this will determine the rigidity of their installation.
- Test the fittings for leaks, for which it is necessary to gradually increase the temperature of the pumped coolant. You can also use compressed air for this.
Filling and laying the floor, as well as laying tiles, is carried out only after satisfactory results of both checks, when the pipes can be filled with coolant and the heating circuit can be turned on.
Pressure limit test
Pressure testing of water heated floors using a hand pump
In this case, at startup set:
- How much coolant can be poured into a water floor system;
- The quality of installation and connection of all heating circuits with the distribution manifold;
- Are the pipe materials and diameters selected correctly?
Before starting pressure testing with your own hands, you should expel the air in the pipes. Before turning on the pump, place a bucket near the open inlet. In order to find out how much air is in the system, you should shut off all branches of the water circuit, except one, to which you should connect the pump and turn it on. Next, you need to pump up the pressure in the network to the nominal pressure (4-5 atm). After the coolant begins to flow steadily from the pipe, we can assume that there is no air in the pipes. To guarantee, you can release some more coolant, making sure that no air bubbles appear in the stream. If the installation is done correctly, then after 2-3 minutes the pump can be turned off and the system can be started with coolant until it is nominally filled.
Technological parameters for testing yourself are determined by the material of the pipes. For metal-plastic, for example, the crimping pressure must be at least 8 atm, and the first time the system starts up must last at least 24 hours. After 24 hours, the pressure should not drop by more than 1.5-2 atm. For cross-linked polyethylene pipes, start-up is performed by gradually increasing the pump power, since such pipes, by expanding, can reduce the pressure in the system. When the pressure drops, it is brought up to nominal, repeating the process three times. After this, it is possible to expel all the air and at the same time check the quality of the connections.
If immediately after the check and after the next 24 hours there are no leaks, then we can assume that the air was completely removed; It is allowed to pour screed, lay tiles, etc.
Temperature limit check
Pressure testing is performed with a coolant with a gradually increasing temperature. At the first start, the temperature is adjusted to 25-30 °C, gradually it is raised to 80-85 °C. This check is performed faster when the pipes are made of metal-plastic. Pipes made of cross-linked polyethylene, when heated, increase in diameter, and therefore the warm floor made from them takes a long time to heat up.
By doing pressure testing yourself, you can also check the quality of installation of heating circuit elements, in particular, air vents and valves. After a positive result, you can fill the floor, lay the tiles and complete the installation work.
After checking, it is advisable to increase the temperature of the coolant gradually, by several degrees per day. Over the next week, the system can be brought to nominal levels, but for polyethylene pipes the time frame can be extended by 2-3 days, since this material warms up more slowly.
The nuances of filling the system with coolant
First of all, before starting the heating of the floor covering for the first time, you should organize the circulation of liquid through the heating circuits and remove any air pockets.
The method in which the coolant will be supplied depends on the design features of a particular system. If you plan to use tap water, then a tap is specially installed for this purpose, which opens its supply.
When you need to fill in other liquids, then use the tip with a shut-off valve located in the manifold, in its supply part. Pressure testing equipment is connected to it, which is used, among other things, to fill the working medium into the system. Such devices are produced in manual and automatic types.
You don’t have to purchase a crimping machine, but rent it from a specialized store. But when the coolant is water, it must be used for a heated floor system annually before the start of the heating season in order to replace the working medium. Perhaps then it is better to purchase this device. To start the equipment, there must be a special tap on the output manifold.
Before filling the underfloor heating system with coolant, it is washed with running water. After completion of the installation work, lubricant and other materials from which the elements of the heat supply structure were made remain inside it. Often small shavings and construction debris get into pipes when they are laid.
For this reason, flushing is a must. For this purpose, the system is filled several times with water and then drained. Once the liquid becomes clear, the flushing is complete.
In addition to the first launch of a warm water floor, this procedure must be performed before each coolant replacement. When using soft or distilled water, this activity is carried out annually.
Pipe distribution
Installation of a warm water floor
When distributing pipes, it is necessary to create a laying route. Passing through the pipes, the water heated in the boiler cools, and this circumstance must be taken into account when determining the route for laying the pipe circuits. You should remember several rules, the violation of which can later affect the quality of heating and the inconvenience of operating the entire heating system. What are these rules?
- Laying pipes should begin from the coldest areas of the area - from windows, balconies and external cold walls.
- If the hot water inlet does not come from a cold external wall, the part of the pipe between the inlet and the wall must be carefully insulated, wrapped in waterproofing material.
- The water should be hotter near the outer walls, and as the pipe moves towards the warm center, the temperature should gradually decrease. In order to ensure this effect, the pipes are laid in a “snake” pattern.
- In rooms with internal walls (dressing rooms, corridors, bathrooms), pipes are usually laid in the form of a spiral leading to the center of the room. A double step is taken between the turns of the spirally curved pipe. In the center of the room, the pipe is bent, turning back, and the reverse installation occurs - to the outlet (to the outlet and to the control manifold).
- Hydraulic resistance must be taken into account. The longer the pipe, the more turns it has during installation, the more intense the resistance. It is advisable to ensure that the resistance is uniform where the separate collector is located. To do this, long pipes (100 meters or more) must be divided into parts, but you need to buy one pipe for one room, in a single piece.
- You cannot use various devices, couplings, joints on pipes laid in a screed; this will complicate repairs and lead to deterioration of heating. Therefore, pipes are purchased after preliminary and final calculation of the laying route.
- You should not use a single circuit in several rooms. That is why the calculation of the length of the contours must be done separately.
- Loggias, attics, balconies, and verandas are also laid separately. It is impossible to combine one pipe circuit with adjacent rooms due to different degrees of heat transfer. If you break this rule, then, for example, more heat will be spent heating the veranda, and the adjacent room will be poorly heated.