The most reliable way to organize water supply for a country house is to connect the internal water supply network to the existing system.
But it is not always possible to shut off the main water supply, so the question arises about making a connection to the water supply under pressure. This operation can be performed either with or without welding. But in any case, such work must be carried out by qualified specialists if they have special permission and a formalized permit to carry out the connection.
Obtaining permission to carry out work
Considering the importance of the water main as an object for providing a vital product, permission to make a tie-in must be obtained from the local water utility department. The method of execution is not important - with or without welding.
A connection made without permission is considered illegal and is followed by administrative measures with financial penalties.
An approved copy of the site plan is issued by the Federal Center, which registers land ownership, and the technical conditions for connection are formulated by the Vodokanal department. They must contain the following information:
- place of insertion;
- main water pipe size;
- data that may be needed when making inserts.
Such a document can be executed by a specialized design organization, but this does not negate its approval by the water utility.
The document for the production of the insert will be registered at the local sanitary and epidemiological station office. The set of documents submitted to the SES is accompanied by a statement about the need to connect to the central water supply network.
Taking into account all sorts of restrictions, it is obvious that saving money by applying your own efforts is only possible when performing excavation work. The rest can only be performed by specialists with special permits.
Connecting to a water supply under pressure is prohibited under the following conditions:
- the pipeline is made of large diameter pipe;
- in the absence of a connection to the central sewerage system;
- if the tie-in does not provide for the installation of water flow metering devices.
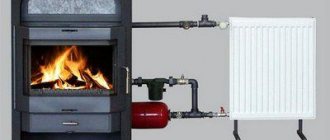
What to choose: single-pipe or two-pipe heating system
Two-pipe heating system
There are only two types of heating systems: single-pipe and double-pipe. In private homes, they try to install the most efficient heating system
It is very important not to go cheap when trying to reduce the cost of purchasing and installing a heating system. Providing heat to your home is a lot of work, and so as not to have to install the system again, it is better to understand it thoroughly and make “reasonable” savings.
And in order to draw a conclusion about which system is better, it is necessary to understand the operating principle of each of them. Having studied the advantages and disadvantages of both systems, both from the technical and material side, it becomes clear how to make the optimal choice.
Device for tapping into water supply under pressure
Crashing into a pipeline system and stopping pumping is associated with significant material losses. To perform such an operation, you must:
- Relieve the pressure in the water supply and drain the water in it. This is due to a significant interruption in water supply to all facilities involved in this pipe.
- Make a hole in the pipe wall using an accessible method.
- Install the outlet pipe and mount a tap or valve on it.
- Install a connection unit from the outlet to the internal wiring in the house and on the site.
- Check all connections for leaks.
- Fill the pipeline with water, remove any air pockets, and increase the pressure in the system to the required value.
It is obvious that the time and energy costs of this connection technology are very significant.
Therefore, a technology has been developed and used to install bends on pipes under pressure without stopping the functioning of the water supply system.
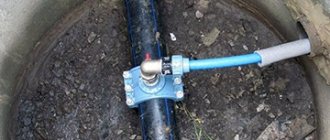
Before making a tap into a water supply under pressure, a special saddle clamp, the so-called “saddle,” should be installed on the pipe. It is a split coupling that is tightened with screws.
A rubber gasket is used for sealing. At the coupling half, a flange or piece of pipe is made for inserting a drill. The rubber seal option is used when making inserts into plastic pipes.
When drilling pipes made of cast iron or steel, a saddle is used in the form of a covering layer of plastic material applied along the inner surface of the coupling.
Currently, universal transactions made from metal strip are widely used. Their design is reminiscent of a car clamp.
Taking into account the constant improvement of the tool, we pay attention to the device in which the cutter is installed and a tap installed on the side is used to drain water when passing through the wall.
When cutting into a plastic water pipe under pressure, built-in heating elements are used, which allow the wall to be melted without cutting.
For use with large diameter tubes, three-piece saddles are used.
Installation of the saddle
This structural element is fastened with screws.
In this case, tightening must be done by tightening the screws alternately so that the halves of the coupling converge evenly, without distortion. On steel pipes, careful surface preparation is required, including treatment with a wire brush or emery cloth.
When drilling to insert into a cast iron water pipe under pressure, the axial force on the tool must be applied with less pressure to avoid breaking the wall, since cast iron is fragile.
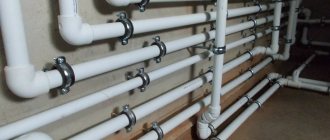
Welding machine for plastic pipes: device and purpose
The use of welding machines for plastic pipes has now become almost universal due to the widespread use of the latter both in the housing and communal services sector and in industrial engineering structures. Let us consider the design of such devices and their purpose. Main components
A welding machine for plastic pipes consists of several main parts: a heating element equipped with a control panel for conducting an adjustable and controlled welding process, a stand on which the heating element itself is attached to fix it in the desired position during welding, paired nozzles that are mounted using screws to attach directly to the heating element itself.
Internal organization
From the point of view of the internal structure, such a device is very similar to an ordinary iron for ironing clothes. (In everyday life, many people call such a welding machine an iron.) Inside the heating element there is a spiral, usually made of wire with high electrical resistance.
The energy of the electric current passing through such a conductor is converted into heat, which is transferred to the surface of the heating element through the use of materials with high thermal conductivity (usually stainless steel or aluminum).
Work management and process control
For convenience and safety, any welding machine has a power on/off indicator, which lights up when the welding machine is connected to the electrical network and is heated, and a temperature controller (thermostat) to set the temperature required for welding.
Also, many models have a temperature control indicator, which lights up when the heating element of the device has reached the heating temperature set by the thermostat and is ready for operation.
In the most expensive models of welding machines, you can often see liquid crystal displays instead of indicators, which show all the parameters necessary for the welding process: heating and fixing time, current temperature, etc.
The physical parameters themselves required for welding are usually given by the manufacturer in the operating instructions, which indicate the heating, rearrangement, fixing and cooling times depending on the diameter of the plastic pipes used.
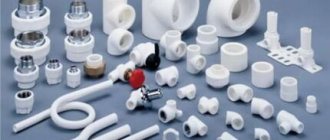
Accessories
Typically, the device comes with some accessories to make work easier. Among them are paired nozzles. Paired nozzles have different diameters and are designed for inserting polypropylene pipes into them (with their ends facing the heating element) and their subsequent heating and welding.
Power
The power of most device models is 0.5 - 2 kW. All devices are capable of heating polypropylene pipes to the optimal welding temperature - 270 degrees Celsius. It follows that power does not affect the quality of welding, but the speed of the welding process, that is, the productivity of the machine: the more powerful the welding machine, the faster it heats up to the required temperature.
Application
The main application of such welding machines is welding polypropylene pipes of various diameters (usually from 20 to 50 mm). They can also be used for welding reinforced plastic pipes, but this usually requires purchasing an additional device, which by default is not included in the standard set supplied with the welding machine.
Methods of cutting into a pipeline
Connection to the pipeline is made in different ways. The simplest of them is as follows.
Watch the video
How I make a pressure tap into a water pipe
Let's consider the simplest method
It consists of installing a transitional locking element before drilling the wall on the pipe. For this purpose, a ball valve mounted on a saddle is used. In the open position, it passes the drill through the through hole.
To protect against water splashing onto it, the top edge of a plastic bottle is put through the hole in the lid. After passing through the pipe wall, the drill is removed from the hole and the ball valve is closed.
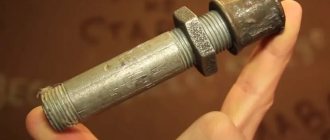
If the tap into the water pipeline is made into a steel pipe, you can do it even simpler - just weld a branch with a threaded end to the pipe and install the same ball valve on it. Further actions are performed according to the specified scheme.
Built-in cutters
Such tools are equipped with a core drill to make a hole and a safety valve to contain the back pressure of water.
The tool is rotated manually by acting on the handles. The professional tool operates using an electric drill drive. The end of the pipe is equipped with a locking device through which the tool is inserted inside.
In the non-working position, the pipe is locked with a valve, which opens when you press it. A rubber seal in the shape of a ring is installed around the circumference of the pipe.
Devices of this design are most often used for inserting into polyethylene pipelines
Once drilling is complete, there may be a small amount of water leaking through the nozzle. The cutter is moved in the opposite direction until it touches the valve, it closes and stops the leak.
The side outlet must be in the closed position and opens only after the installation of the water supply system in the house and on the site is completed.
Using Drill Clamps
Quite often, drilling clamps are used for tapping into pipelines under pressure. The sales package for such products usually includes attachments and rotary connectors.
Structurally, such products can be made in several versions and are used to connect pipes with a diameter of 80 millimeters or more. When drilling, be sure to deep core the pipe to avoid the drill slipping along the inclined surface.
Other insertion methods
You need to pay attention to the standard tapping device, popular among water utility workers. It looks like a pipe with multilayer seals. It is put on the main pipe and secured with long pins.
Watch the video
The tightness of the device is so perfect that no leakage occurs when the drill passes through the wall. This device is equipped with a pressure gauge, a change in the indicators of which indicates the completion of drilling.
What installation tools are needed?
Installing a tap on a polypropylene pipe will require certain tools, without which installation is simply impossible.
Such tools include:
- welding (soldering) machine for PPR pipes with a set of nozzles,
- pipe cutter,
- adjustable wrenches,
- knife for cleaning roughness,
- marker and tape measure for marking the welding depth,
- FUM tape for sealing threaded connections,
- a clean rag for wiping the joints.
According to SNiPs, the joint must be degreased and wiped with alcohol, especially if the materials were lying on a dusty floor. Not everyone adheres to this, but at least wiping it with a clean rag certainly wouldn’t hurt.
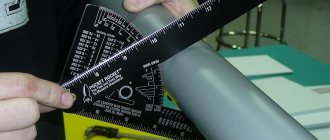
Rules for determining the insertion location
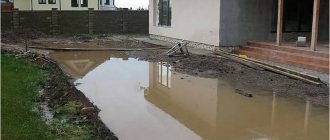
Typically, the connection to the water supply is made in the nearest inspection well on a straight section. The basic rule is that the outlet pipe must be laid below the freezing level of the soil.
For middle latitudes it is 1.2-1.5 meters. But the trenches should be about half a meter deeper, since a drainage layer of sand and gravel will have to be constructed.
In some cases, the pipeline is additionally insulated with foam plastic materials, and a heating cable is installed with automatic switching on at a temperature of 0-+2 degrees.
The water supply branch is equipped with a drain valve installed directly behind the tap.
Before you start digging a trench, you need to make sure that it does not intersect with other communication systems - communication cables, power supply or sewerage.
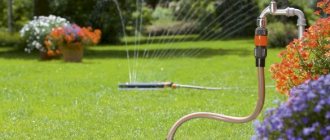
Watering using ready-made components
1. First of all, we determine the source of water intake. This could be a water supply, a well or a borehole. An open reservoir is not suitable for organizing drip irrigation, since the water in it will be excessively polluted and the equipment will quickly fail.
If you plan to connect the system directly to the water supply, then there is no need to purchase a pump, however, due to unstable water pressure, a pressure reducer may be needed.
If the source of water intake is a well or a well, then the water from it is first pumped into a storage tank (barrel, Eurocube). The volume of the container should correspond to the volume of water spent on one watering. It is calculated using the following formula:
Number of plants * water consumption per plant per hour * watering time
For example:
60 strawberry bushes * 2 l/hour * 2 hours = 240 liters required for one watering.
From the storage tank, water flows through the main pipeline to the drip tape or droppers.
2. What to choose: drip tape or drip tube with droppers?
Watering with drip tape is more designed for uniform plantings of plants, for example, potatoes, beets, herbs, onions, garlic. Can be used to irrigate narrow or complex lawns.
The drip tape is a flat, thin-walled tube, inside of which there are special built-in devices for supplying water. High unregulated pressure can cause the tape to break, so if the irrigation system is connected directly to the water supply, you need to purchase a special reducer that regulates pressure up to 1 bar. The maximum length of the bed on which drip tape can be placed is 100 meters.
There are several types of tapes:
1. Slotted.
This tape has a built-in labyrinth along its entire length that distributes water pressure evenly. Water outlets are made at certain distances in the labyrinth. Slotted tape is prone to clogging, so when using it, a good filter must be installed in the drip irrigation system.
2. Emitter.
Emitters are special flat droppers equipped with a complex system of passages (labyrinth), built inside the tape and supplying water to the plant. The emitters can be located at different distances from each other - 10, 15, 20, 30 cm. The smaller the distance between the emitters, the higher the price of the tape. The choice of distance depends on the type of crops being irrigated. Emitter tape is more reliable than slotted tape, and its price is generally higher.
https://www.youtube.com/watch?v=60LreRf_RXM
An important parameter is the thickness of the tape, on which its strength depends. The thinnest tape will serve in open ground for only one season; it is most suitable for greenhouses.
Pros and cons of drip tape:
Minuses:
- installation of high-quality filters is required before supplying water to the tape
- short service life
- may burst due to high water pressure
Pros:
- low price
- watering can be operated from a container without a pump (by gravity)
The drip tube is more rigid, made of HDPE and is intended for self-installation of external droppers; it is produced without holes. Connectors, tees and repair couplings for drip tapes and tubes are required to be different, since the diameter of the tape is measured inside, and the diameter of the tube is measured outside.
External drippers are used for irregular plantings, for watering shrubs, trees, and flower beds: where it is important to water each bush of the plant individually. Drippers require high water pressure to operate.
Droppers are connected either through thin special hoses, or directly to a drip tube - in this case, the principle of their operation is similar to a drip tape with built-in droppers.
Some drippers provide regulation of the volume of water poured out; such drippers are called adjustable.
Types of droppers:
Compensated
Provide uniform watering with a long length of tape, as well as in areas with a slope. They work well only at a certain water pressure, so they are not used when watering from a container by gravity. Less sensitive to water contaminated with small particles.
Uncompensated
Such drippers are used on flat areas without a slope, with a short length of drip tape. Suitable for watering from a container, as they can operate at low water pressure.
Dropper pegs are used for spot watering, as they are installed directly in the root zone of the plant.
Pros and cons of IVs
Pros:
- the installation step is selected independently
- water outlet volume can be adjusted
Minuses:
- higher price
- Individual adjustment of adjustable droppers and their cleaning takes a lot of time
Conclusion: if you need to organize watering of crops such as onions, potatoes, beets, carrots, garlic, radishes, lawn grass, and the source of irrigation water is a storage tank, choose a drip tape. If there is a pressure reducer, the drip tape can also be used when watering from the water supply.
If drip irrigation is required, regulated, individual for each plant (flowers, shrubs, trees, strawberries, tomatoes, cucumbers, eggplants), and the water supply source provides sufficient operating water pressure - choose drippers with micro-supply hoses.
Watch a video illustrating the use of drip irrigation using one of the ready-made systems as an example:
3. We purchase the necessary components.
1. Pump. Necessary for supplying water from a well or well to a storage tank or directly to the main hose of the system when installing a pressure reducer.
2. Storage capacity. To water by gravity when there is no connection to a water supply, the container must be raised to a height of 50 cm to 2 meters to create the required operating water pressure. If it is not possible to install the barrel at the required height, you can use a submersible pump by connecting automatic equipment to it to adjust the irrigation system.
3. Hoses. To connect to a water source, a main hose or pipe with a diameter of 13.16 or 19 mm is required.
Drip tapes or smaller diameter tubes are connected to this hose. For droppers, thin supply hoses with a diameter of 4-7 mm may be needed.
4. Pressure reducer. Helps regulate and maintain the necessary pressure for proper operation of water outlets.
Reducers up to 1 bar – used for drip tape.
Reducers from 1 to 2.8 bar - used for irrigation with a drip tube with external droppers.
5. Filter for drip irrigation. It is used to purify water from contaminants; it is necessary when drawing water from a well or well.
6. Drip tape, drip tube, droppers, microtubes. The choice of these components depends on the purpose and purposes of drip irrigation.
7. Fittings. Required for various connections:
- start connectors – with their help the drip tape is attached to the central line
- taps - combine the functions of a strat connector and a tap, providing zone-by-zone watering
- repair couplings - needed to repair the belt when it breaks
- corners and tees - useful for creating branches and turns
- racks - press the tape to the ground, protecting it from displacement during gusts of wind
8. Plugs. Necessary for sealing the end of a tape or hose.
9. Installation tools.
A piercer or punch is needed to make holes in the “blind” hose for connecting droppers.
10. Automation for irrigation control.
Timers (mechanical or electronic), controllers (mains-powered or battery-powered), weather sensors, solenoid valves. With the help of timers and controllers, the regularity and duration of watering is set, and its process is fully automated.
If there are several dissimilar irrigation zones, together with the controller, it is necessary to purchase solenoid valves that connect the main line and the drip irrigation lines. The program will first turn on one zone for watering through a solenoid valve, and then another.
Do-it-yourself drip irrigation system: the simplest installation option using a storage tank.
- We connect a pump to the water intake source to fill the container with water.
- We install the container at a height of 0.5-2 meters from the ground, and connect a main hose with a tap and filter to it at a distance of 10-15 cm from the bottom.
- We lay the main hose perpendicular to the drip irrigation tapes, and install a plug at its end.
- Using a drill, we drill holes in the main hose according to the number of drip irrigation lines; we connect the lines using start connectors or taps.
- Lay out the drip tape or tube with the water outlets facing up.
- If it is necessary to attach droppers to the tube, we make holes in it using a special punch, insert the supply micro-hoses and connect the droppers to them.
- We close the ends of the tapes with plugs, having previously driven water through the system so that all the air comes out of it.
Drip irrigation installation diagram using an automatic controller
How to choose materials for insertion
Connection to the main water supply is made using pipes made of various materials - polyethylene, cast iron, steel, including those with protective coatings.
When using cast iron materials, its properties should be taken into account, especially such as increased fracture capacity. It is necessary to choose pipes made of spheroidal graphite cast iron, which is more ductile, and during the processing process do not apply significant force to the tool.
The pipe used for tapping must be smaller in diameter than the main pipe.
Watch the video
5-2 Insertion of cold water into the city water supply network
The connection is made with pipes measuring 50 millimeters or more.
When connecting to a plastic pipeline, products with built-in heating elements are used that can thermally make a hole, while at the same time a calibrating cutter is installed to obtain an accurate joint.
At pressures up to 1.6 MPa, saddle clamps are used in the plastic line, creating uniform pressure over the entire contact area, which prevents deformation of the plastic product.
The use of saddles with a built-in cutter and check valve allows welding in the connection, after which the service life of such an insert increases to 50 years.
The century-old history of groovelock
Joining pipes using O-ring couplings was invented during World War I as a way to prevent flamethrowers from leaking fuel. In 1919, the technology was patented by English military engineer Ernest Tribe, and its commercialization began in 1925, when Victaulic was founded in New York.
For some reason, it was the military who were the first to appreciate all the advantages of this method of pipe installation. During World War II, bolted mechanical coupling pipelines began to be widely used by Allied forces to speed up the installation of water and fuel pipelines at airfields, seaports, and directly in the war zone.
Nowadays, the advantages of groove joints are also appreciated in civil engineering. In Russia, pipelines with bolted couplings are most often used in fire extinguishing systems in office and shopping centers, residential complexes, underground parking lots, etc. Also, such connections are recommended for use in seismic zones (which include more than 20% of the territory in Russia), in the energy sector and shipbuilding, where vibration loads are high.
General rules for recusal
The insertion is made using one of the described methods. In this case, the front end of the pipe is connected directly to the embedded element, and the second - through a water flow meter - to the distribution of the internal water supply.
Thus, the installation location of the meter is the gap between the valve/valve of the insert and the valve connecting to the internal water supply network. When installing the device, it is also necessary to use a reverse valve to prevent the formation of reverse flow of liquid.
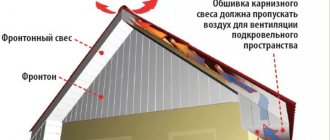
For cases where the introduction of water supply into a house involves crossing a wall or foundation, the hole in them should be larger than the diameter of the pipe itself, approximately 200 millimeters.
Once installation and necessary testing have been completed, it must be sealed using resin strands or a waterproof seal. The finishing of the surface is done with cement mortar.
Droppers
Sometimes it is more convenient to use droppers rather than tapes. These are separate devices that are inserted into a hole in the hose and through which water is supplied to the root of the plant. They can be installed in arbitrary increments - put several pieces in one place, and then several in another. This is convenient when organizing drip irrigation of shrubs or trees.
Separate drippers that are installed in a hose are more convenient to use when watering shrubs, grapes and trees
There are two types - with standardized (constant) and controlled water release. The body is usually plastic; on one side there is a fitting, which is inserted with force into the hole made in the hose (sometimes rubber rings are used for sealing).
There are also compensated and uncompensated droppers. When using compensated ones at any point in the irrigation line, the water release will be the same (approximately), regardless of the terrain and location (at the beginning or end of the line).
There are also spider-type devices. This is when several thin tubes are connected to one output. This makes it possible to simultaneously water several plants from one water outlet point (the number of droppers is reduced).
Spider-type dripper - you can water several plants from one water distribution point
You can read how to make a small greenhouse here. And how to make a garden beautiful is written here.
Testing and adjusting water pressure
Pressure tapping into plumbing equipment is the final stage of its installation. The purpose of such an event is to check the quality of the connections made during assembly.
To do this you need to perform the following steps:
- Fill the water supply completely with water. To do this, you need to open all several taps in the house so that you can bleed air from the system. In addition, an automatic valve must be installed in a normally designed water supply system to remove air.
- Measure the water pressure at the location where the outlet pipe is inserted. For water supply in areas with low-rise buildings, it is maintained within 1.5-2.8 atmospheres.
- It must be taken into account that some types of household appliances and plumbing equipment can only operate at a minimum pressure of 4 atmospheres, otherwise they either do not turn on or quickly fail. Obviously, the inside of the house water supply must reliably withstand a load of at least 4.5 atmospheres.
- After filling the water supply network with water, the supercharger is connected, and the pressure in the system increases to 6 atmospheres. At the same time, all connections are inspected to identify leaks at its connections. The load continues for at least an hour.
The pressure in the system is a decisive factor for the successful operation of the water supply system. If it is insufficient, the consumer is plagued by failures of household appliances, and its excess can damage the entire system. In this case, threaded connections are the most vulnerable.
One atmospheric unit can lift a column of water to a height of 10 meters. For normal operation of a massage shower or Jacuzzi, the minimum pressure is 4 atmospheres. A dishwasher or washing machine needs a pressure of 2.5-3.0 atmospheres, and in this article you will learn how to connect a washing machine to the water supply and sewerage system.
We suggest you read the article on how to connect a dishwasher to the water supply and sewer system yourself.
Watch the video
The pressure in the water supply system is an unstable indicator. It depends not only on the settings of the system itself, but also on the level of fluid intake from the system at a given time. At maximum flow, it can decrease all the way to zero, and then suddenly disappear.
At the same time, it must be remembered that excessively high pressure in the range of 4-10 atmospheres contributes to the rapid failure of ceramic valve inserts and breakdown of control equipment of household appliances. The critically high pressure is 6.5 atmospheres.
A decrease in pressure to 1-4 atmospheres leads to the shutdown of most models of household appliances and low water pressure in the taps.
The pressure value is checked instrumentally using a standard device - a water pressure gauge. It must be installed during the installation of the water supply network.
The pipeline owner has the right to make any decision on setting pressure in its own network. But professionals recommend treating this process very carefully, taking into account the number of water withdrawal points and the characteristics of the pump to increase pressure, especially the boundary conditions of its operation.
How to increase water pressure
This is the most pressing task for owners, which arises for everyone from time to time.
The problem can be solved in several ways:
- install a pressure booster;
- introduce reserve storage capacity into the system.
The first method is preferable for apartment water supply systems, since in a standard room it is difficult to find a place to place a reserve tank. But they are widely used in summer cottages and country houses.
An additional pump can be installed at the entrance to the building. During operation, such a device additionally saturates the water with oxygen.
The traditional way to increase pressure in any conditions is pumping stations with a hydraulic accumulator. The volume of the additional capacity is 24 or 50 liters, and the pressure can be stabilized within 1-5 atmospheres.
A reserve tank installed in the attic, in addition to stabilizing the pressure in the system, allows you to always have a supply of water for drinking and cooking, even during interruptions in the water supply.
Why does condensation appear on the toilet tank?
It is harmful to health when the air in the apartment is dry, but high humidity also leads to not very good consequences. This may also cause the tank to sweat. This often occurs where clothes are dried indoors, there is a large aquarium, or lovers of indoor flowers, trying to create conditions for their green pets that are close to natural, constantly spray them.
The most common cause of condensation is high humidity in the apartment.
These reasons can be easily eliminated - you can install air dehumidifiers or take the laundry out to the balcony after washing. It is more difficult when there are leaks in the plumbing or heating systems, or ventilation does not work well. The most common reason is the continuous flow of water at a low temperature due to problems in the design of the drainage device or due to frequent drains. Condensation in these cases is the result of contact of warm room air with the constantly cooling surface of the drain tank.
When can you do without soldering?
Craftsmen have to look for an answer to the question of how to cut into a polypropylene pipe without soldering in several cases. Firstly, not everyone has such a device “lying around” in their household. But you are either reluctant to search through friends, rent or buy welding equipment, or don’t have the time/opportunity. Sometimes tapping into a PP pipe without a special device can be considered the optimal way, which is why even experienced craftsmen do this. This decision is consciously made in several cases:
- when installing temporary pipelines;
- when there are only a couple of joints to be connected;
- after purchasing meters or additional plumbing fixtures;
- if you need to quickly replace a section of the pipeline where a defect has appeared;
- when work with polypropylene pipes is carried out on a system where the hydraulic load is low, the first example is sewerage.
An alternative installation method may be required in one more case: when it becomes necessary to make the connection detachable, so that there is a chance to disassemble the area from time to time for maintenance.
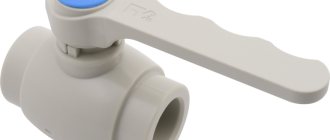
Three options for mounting a ball valve on a polypropylene pipe
Nowadays, the Internet is replete with various tips on any technical issue. Since the topic of construction is in great demand among DIYers, the desire of an unprepared person to obtain information on the Internet is understandable. We all have different professions and cannot be specialists in all areas. But how to understand these tips if they are sometimes contradictory?
Very simple. You just need to be critical of what is written. Let me give you an example:
This is a rather clumsy assembly using polypropylene threaded couplings and an American ball valve. If you close your eyes to the build quality, the option is quite workable. It makes it quite easy to replace the ball valve during operation if it fails for any reason.
And what do they offer us online as an alternative? Here's what:
Ball valve made of polypropylene for welding. The author of this proposal
provides arguments in support of this rather controversial decision:
The cheapest drip irrigation: from plastic bottles
There is the cheapest and fastest way to organize water supply to plants without hoses and large containers. You will only need plastic bottles and small lengths - 10-15 cm - thin tubes.
Partially cut off the bottom of the bottles. So that you get a lid from the bottom. This way the water will not evaporate. But you can cut off the bottom completely. At a distance of 7-8 cm from the cap, make a hole in the bottle into which a thin tube is inserted at a slight angle.
The same design can be made by turning the bottle upside down. But this option is less convenient: it is more difficult to pour water, you will need a watering can. What this looks like, see the figure below.
Drip irrigation from plastic bottles
As you can see, there is a second option for drip irrigation from plastic bottles. A wire is stretched over the bed, and bottles with holes in the bottom or lid are tied to it.
There is another photo option for using bottles, but with standard droppers for watering. They are fixed to the neck of the bottles and in this form are installed under the bush.
How to make drip irrigation at the dacha from bottles
This option, of course, is not ideal, but it will give the plants the opportunity to develop better if you can rarely visit the dacha. And two liters from a bottle can be decisive in the battle for the harvest.
Metal-plastic water conduits
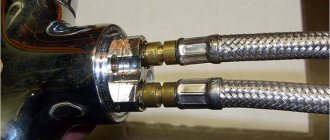
The material is a multilayer composite, where a layer of aluminum foil is located between the layers of plastic. On the one hand, this makes the process of welding a product a rather specific task. On the other hand, it facilitates the connection of shut-off valves to the water supply system.
For metal-plastic water pipelines, metal taps are used. Their installation does not require welding, which greatly facilitates the work. The latter consist of a nut, a collet ring and a fitting (it is located on the body). How to install a ball valve on a metal-plastic heating system?
- Cut the water pipe with a diameter of 25 or 32 mm so that the cut is exactly perpendicular to the axis, and clean the end.
- Slide the nut and collet ring on. Then the product is put on the fitting.
- Unscrew the collet ring at the connection point and tighten the nut. If higher tightness is required, fum tape is wound.
- The docking on the other side is performed in exactly the same way.
Connecting bath and sink faucets
Connecting a bathtub faucet can be done using one of two types of fittings: a mounting strip and a water outlet. For connecting the mixer, the mounting plate is more convenient, because it already provides for the correct relative position of the holes for connecting the mixer. However, the water outlet is also suitable for these purposes, thanks to the presence of special holes for mounting to the wall. In the latter case, it is necessary to fix the sockets at a distance equal to the center-to-center distance of the nozzles of the mixer.