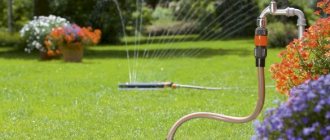
During the renovation or construction of your own home, one of the most important stages is the laying of new utilities. In turn, among them the most important is water supply. Previously, only steel pipes with all their disadvantages were used for its installation. But now they are being replaced by products made from polypropylene, which even those who do not have much experience in plumbing can work with on their own. Are you planning to update utilities in your home? Then try to make a water pipe from polypropylene with your own hands, and this article will give you basic information on how and with what help to do this.
Do-it-yourself polypropylene water supply
Advantages of polypropylene pipes
Polypropylene is a thermoplastic polymer obtained from ethylene derivatives. Today this material is the second most common plastic in the world, second only to polyethylene. And pipes made of polypropylene are increasingly replacing outdated steel analogues every year. This is largely due to increased durability and resistance to aggressive environments. Where steel pipes deteriorate relatively quickly, polypropylene pipes can last up to 50 years or more. But besides this, there are other advantages.
- The inner surface of high-quality polypropylene pipes undergoes a special treatment at the production stage, which during their operation reduces the rate of formation of solid deposits on the walls. Thus, polypropylene pipes clog much more slowly than their steel counterparts.
Diagram of a polypropylene pipe
- Low thermal conductivity of polypropylene - condensation does not appear on the surface, which can spoil the appearance of the wall and floor finish next to the pipe or lead to increased humidity and mold in the room.
- Light weight - transportation, loading, unloading and manual carrying of polypropylene pipes is not a problem for anyone.
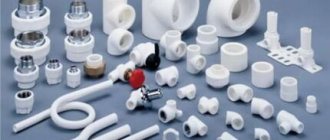
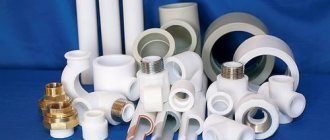
- High availability and a large selection of components - in any plumbing store you can easily find and purchase various fittings, taps and other parts necessary for installing networks of polypropylene pipes.
MeerPlast polypropylene pipes and connecting parts for them (fittings)
- Low price - installing a high-quality water supply system made of polypropylene does not require large expenses.
- Versatility - there are many brands of polypropylene pipes, differing in their characteristics. Therefore, it is possible to lay not only cold water supply lines, but also hot water supply and heating lines. The main thing is to choose a high-quality pipe of the appropriate brand.
- Ease of installation - the combination of the advantages outlined above makes polypropylene pipes a material that even those who do not have much experience in plumbing can work with without problems. Therefore, you can make a water pipe from them with your own hands.
Polypropylene pipes have many advantages
Important! In addition to the advantages, you should also remember the disadvantages. The problem with polypropylene pipes is that their varieties without reinforcement are not best suited for heating systems, since the polymer softens when in contact with water heated to a temperature of +90°C.
The most common mistakes and how to avoid them
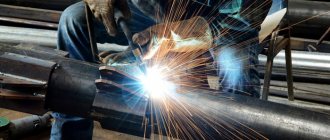
Most often, those who do such work for the first time overheat the parts being welded. This comes from the desire to “weld reliably, because I’m doing it for myself,” and the result is a crooked joint and a narrowed hole in the inner surface of the pipe.
Installation of water supply does not tolerate fuss, it’s like the saying goes: measure seven times, cut once. Inaccuracies in marking greatly affect the result.
- In order to make plumbing with the least cost and rework, first make units for hard-to-reach places, fit them to the structures and devices being joined, and secure them. When you achieve the desired result, you can remove everything from the fasteners and devices, and then weld it with the remaining straight sections.
- Before starting soldering, prepare the premises: remove all unnecessary items. Read the welding machine instructions and follow them.
- During operation, remember that the welding machine heats up very much (260-270 degrees). You need to work with your hands closed (in a long-sleeved robe) and wearing gloves.
- The most important advice is to follow safety precautions, work carefully and only with working tools.
https://youtube.com/watch?v=3NQ6eyjoFqk
Polypropylene pipes - types and markings
You may be interested in information - water pipes
In the previous section of the article it was already mentioned that there are many types of polypropylene pipes. They differ from each other in the type of additives added to the polymer in production, in diameter, wall thickness, presence and type of reinforcement, and purpose. All this information can be obtained by examining the markings on the outside of polypropylene pipes. Let's try to bring more clarity to these codes of letters and numbers.
Marking on polypropylene pipes
You may be interested in information about a device for soldering polypropylene pipes
The marking of polypropylene pipes begins with the name of the manufacturer. Then the range of polymer from which the product is made is indicated. You can familiarize yourself with the types of polypropylene used in the production of pipes below.
- PPH or PP – homopolymer polypropylene. The simplest type of this material. Has high strength and rigidity. Pipes marked PPH or PP should be used only for cold water supply and exclusively inside heated rooms - the material does not tolerate both very high and very low temperatures.
- PPB – block copolymers of polypropylene. Compared to the previous range, they have better heat resistance and flexibility with the same strength. Recommended for use in cold water pipes and “warm floors”. But it is not advisable to use PPB polypropylene for hot water supply and heating lines.
- PPR are polypropylene random copolymers, also known as static copolymers. Differs in the best indicators of thermal stability. PPR pipes are universal and suitable for both cold and hot water supply and heating (where the constant temperature does not exceed +90-95°C).
PPR pipes
Important! It is also worth special mentioning PPs-polypropylene, which is a flame-resistant variety. It, like PPR, manifests itself well as the basis of hot water supply and heating lines.
In some cases, to improve performance characteristics and resistance to high temperatures, polypropylene pipes are reinforced. You can familiarize yourself with its varieties using the images below. You can find out what the standard water pressure in the water supply in an apartment should be in our article.
Reinforced polypropylene pipes
Polypropylene pipes with aluminum reinforcement. Also known as Stabi
Glass fiber reinforced pipes for heating
Polypropylene pipes with fiberglass reinforcement
Also, the marking of polypropylene pipes must contain a code indicating the recommended scope of application of the product. It is a combination of the letters PN and two numbers.
You may be interested in information - pipe for a pumping station
Table. Commonly accepted codes indicating the scope of application of polypropylene pipes.
| Alphanumeric code | Designation |
| PN10 | Inexpensive thin-walled pipes designed exclusively for cold water supply lines. The maximum permissible pressure is 10 atm. Due to not the best performance characteristics, they are not widely used. |
| PN16 | More advanced polypropylene pipes. Withstand pressure up to 16 atm and temperature up to +60°C. Like PN10, they should be used exclusively for cold water lines. |
| PN20 | Universal polypropylene pipes that do not lose their strength and other characteristics at pressures up to 20 atm and temperatures up to +95°C. The most common product option, suitable equally for cold and hot water supply. |
| PN25 | The most advanced subtype of polypropylene pipes. As a rule, it has reinforcement. Successfully performs its functions at a temperature of +95°C. Withstands pressure up to 25 atm. Suitable for pressure pipes in heating and hot water supply lines. |
Important! Often, in addition to the alphanumeric code, simple and understandable explanations are made for which utilities in the house a particular brand of polypropylene pipes is suitable for.
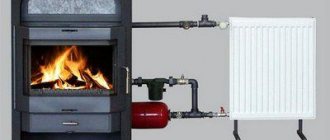
PP products are suitable for heating systems
You may be interested in information: do-it-yourself soldering iron for polypropylene pipes
Also, polypropylene pipes are marked with their internal diameter and wall thickness. When purchasing, you should pay attention to these characteristics and purchase all components and fittings of the appropriate sizes. The choice of diameter and wall thickness of polypropylene pipes depends on several factors.
- The length of the system - the shorter it is, the smaller the internal diameter of the water pipes is permissible and vice versa. As an example: for systems up to 10 m, products with a cross-section of 20 mm are suitable, from 10 to 30 m - 25 mm. And for a water supply system with a length of 30 m or more, only those polypropylene pipes whose internal diameter is 32 mm or more are suitable.
- The number of hot and cold water consumers on the line and their flow rates - the higher they are, the larger the internal diameter of polypropylene pipes should be.
- The number of turns, joints, fittings and other similar elements in the plumbing diagram.
- Pressure and temperature of water in the main.
In some cases, it makes sense to perform a preliminary hydraulic calculation of the entire water supply system in a house or apartment.
Table of typical sizes of polypropylene pipes of brands PN10, PN20 and PN25
Prices for polypropylene pipes
polypropylene pipes
Closed and open installation of polypropylene water supply
Arranging a polypropylene water supply system with your own hands begins with drawing up a primary diagram - take a piece of paper and a pen, or use a 3D editor and draw up a plan. First, indicate and place all devices that are consumers of water - taps, bathtub, shower, washing machine, etc. Then place sources of hot and cold water on the diagram - these can be either risers or the heating boiler of a private house. Complete the plan by connecting hot and cold water supply lines to consumers from their sources.
You may be interested in information about what a polypropylene faucet is and how to install it.
Closed installation of pipelines
Then you should decide how the polypropylene pipes will be laid. There are two ways to do this - closed and open installation. The first implies that all water supply lines will be “hidden” behind the exterior decoration of the room. To do this, the walls in the house or apartment should be grooved, and polypropylene pipes should be laid in the resulting channels. The advantages of the closed mounting scheme are as follows.
- Attractive appearance - water supply lines are hidden from view and do not spoil the beauty of the rooms in which they are laid.
- Saving useful living space - the pipes are laid in the walls and do not take away such valuable square meters.
- You can arrange furniture and other objects during a closed installation of the water supply system without any fear.
Water supply made from polypropylene pipes
But at the same time, closed installation of polypropylene water pipes is associated with many difficulties and problems.
- The need to perform gating is a complex, time-consuming and not the most pleasant job.
- Only those pipes that have a low coefficient of linear thermal expansion are allowed to be installed in the channels.
- Not all walls are suitable for grating - some are too thin and fragile, as a result of which it is undesirable to carry out such work with them.
- The number of fittings and various connections during closed installation of the water supply system should be minimal - for repairs it will be necessary to remove the external finishing of the walls.
- It is almost impossible to carry out a preventive inspection of a water supply system installed in a closed manner.
You should choose such an installation scheme only if you are ready for hard work and are absolutely sure that the pipes will not leak. Otherwise, it makes sense to give preference to open installation - when all communications are laid on top of the finish. It doesn’t look as nice, but such a scheme is more reliable - any problem or leak can be fixed in the shortest possible time and with minimal effort. In addition, a water supply system installed in an open way can be modernized without any problems, new lines can be added to it, or simply replaced.
Open installation of pipeline
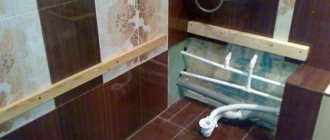
Interesting! An intermediate scheme between open and closed installation is the laying of polypropylene water pipes in false plasterboard boxes.
DIY pipe box
What will be required at work
Equipment for installation of water supply:
- welding machine for plastic pipes with nozzles;
- electric jigsaw or regular hacksaw for metal;
- perforator;
- die - a special device for cutting threads;
- Bulgarian;
- marker;
- corners and screws for fastening to walls.
Necessary materials:
- PP pipes;
- fittings, detachable or permanent;
- tees;
- couplings;
- corners (for installation of inclined sections of the highway).
The ambient temperature during operation must be at least +5ᵒС. All parts are checked for defects, cleaned of dirt, and directly during welding/installation they are located away from open sources of fire.
Series and parallel distribution of polypropylene water pipes
When creating a preliminary diagram of a polypropylene water supply system, the owner of an apartment or private house should decide how the cold and hot water supply pipes from the riser or heating boiler will be routed. As in the previous case, there are two methods - sequential and parallel.
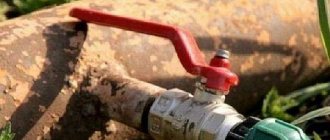
You may be interested in information: brass ball valve
Series wiring, also known as tee wiring, is simple and economical in material. It is structured as follows - a line is laid from the source to the very last consumer of water. There are tees embedded throughout its entire length. Through them, water consumers are connected to the common cold water and hot water pipes. But the simplicity of the sequential circuit hides one significant drawback - when several devices operate simultaneously, the pressure will drop significantly. For small city apartments this is not so critical, but for a large country cottage the problem can be quite significant.
Sequential piping
Interesting! Sometimes another disadvantage of sequential water supply wiring is voiced - the need to completely shut off the cold water and hot water lines to repair/replace a particular device. But this problem can be solved extremely simply: a ball valve is inserted between the branch from the common pipe and the water consumer. In this case, there is no need to completely shut off the water supply for repair work.
Parallel distribution of polypropylene water pipes is more complex - a collector is installed immediately after the riser or boiler, and separate hot water and hot water lines extend from it to each sink, shower and other consumers. All pipes leading to them are equipped with valves that can be closed for maintenance, repair or replacement of the device. Parallel water distribution prevents changes in water pressure and temperature at each individual consumer when the number of devices turned on simultaneously changes. But at the same time, such a scheme requires more pipes. In addition, it takes up a lot of space and, if possible, parallel wiring should be done in a closed way.
Parallel water distribution
Connection diagrams for water intake fittings
Dismantling the old water supply
You need to start laying a polypropylene water pipeline with your own hands by dismantling old pipes, if any, of course.
You may be interested in information: soldering iron for polypropylene
Step 1. Write to the management company or HOA an application to block the riser. On the appointed day, the plumber must come and turn off the water supply. Don't forget to warn your neighbors about the planned work.
Step 2. Disconnect the apartment's water supply from the common riser. If the pipes were laid a long time ago and all the connections are “stuck” to each other, cut them off with a grinder saw.
Dismantling of water supply
Step 3. If you plan to replace the riser, then cut the old one so that sections of pipe approximately 0.5 m long come out of the floor and ceiling. Then clean them using a special cable. Next, cut the threads and mount a new polypropylene riser. Install shut-off valves on the outlet to the apartment.
Step 4. Disconnect all consumers from the cold water and hot water lines in the apartment - sinks, bathtub, toilet, washing machine, etc.
Step 5. Remove the clips or other fasteners used during the installation of the old water supply.
Dismantling the old water supply
Step 6. Cut with a grinder or simply remove the old pipes from the fastenings. Be careful when doing this as there may still be water in the pipes. In addition, try not to damage fragile plumbing during the dismantling process.
You may be interested in information - soldering temperature of polypropylene pipes table
Checking the quality of joints
Before operation, the water supply system is checked for leaks by subjecting it to pressure 1.5 times higher than the nominal pressure, but not lower than 0.15 MPa. In this case, the system is filled with water and the pressure is increased to the required level using a car pump. The indicators are controlled with a pressure gauge with a division of 0.01 MPa. During testing, joints and connections are checked for leaks. If necessary, the problematic joint is cut out and new elements are installed, after which the control process is repeated from the beginning. If the size of the new elements is not enough, then the pipeline is extended using a piece of pipe of the required size and a pair of couplings.
Installation of water supply from polypropylene pipes
Now that the old pipes have been removed, you can begin installing new products. First, check the plumbing diagram drawn earlier. Compare it with the system you just dismantled. Make changes to the plan if necessary. After this, the diagram must be transferred to the walls - take a marker and draw lines where the pipes will be laid. Also mark the locations of tees and shut-off valves.
Marking of polypropylene pipes and fittings for water supply
Important! For tees, elbows and other fittings, choose places so that during the installation process you can easily organize the soldering of polypropylene pipes.
Further work looks like this. You can read how to install an expansion tank for water supply in our article.
Step 1. If possible, install filters on the cold water and hot water lines - the quality of tap water leaves much to be desired, and the presence of such products will only be beneficial and will increase the service life of your plumbing and the polypropylene pipes connected to it.
Step 2. Install hot and cold water meters. It is advisable that this work be performed by a specialist who has the appropriate clearances and permits. After installation, the meters must undergo acceptance and sealing - for this you will need to invite a person from the management company or the HOA.
Installation of water meters
Step 3. When installing polypropylene water pipes in parallel, install the collector yourself.
Step 4. Install the clips on which the polypropylene pipes will be attached. If you are planning a closed installation, then pre-drill the channels in the walls with a hammer drill.
Installing clips
Step 5. Using soldering, assemble the main cold water and hot water lines with tees, other fittings and components. You can learn how to join polypropylene products in the next section of this article.
Assembly of main lines
Installation of polypropylene pipeline
Plumbing installation process
Advice! When cutting a pipe for a specific section of water supply, consider not only the length of the line, but also the part of the product that will be inserted into the fitting during the soldering process. On average, each of them takes about 15 mm of polypropylene pipe.
Step 6. Next, install supply pipes and shut-off valves to each cold and hot water consumer.
Installation of supply pipes and fittings
Step 7. Connect the polypropylene water supply to one of the sinks and check the functionality of the entire system.
Step 8. If any problems were identified during the check, fix them. Then connect all the necessary appliances and plumbing to the water supply.
Step 9. Clean up construction debris generated during the work.
Step 10: If desired, cover the water lines with decorative boxes made of plastic or drywall.
Plasterboard box in the bathroom
Conclusions and useful video on the topic
To simplify installation work, it is better to familiarize yourself with the training materials and useful videos that are available on thematic portals and forums. They describe in detail each stage of assembling and installing the system, helping beginners complete the installation themselves.
Existing pipeline installation methods are not very complicated, so if you study the technology and visual examples, you can understand all the intricacies of the process in a couple of minutes.
It is also worth preparing special equipment, tools and materials, as well as following step-by-step instructions.
Compliance with all the rules will allow for high-quality installation of a pipeline made of polypropylene structures.
Installation of water supply lines - basic recommendations
When laying polypropylene water pipes with your own hands, consider the recommendations given in this list.
- When working with threads on risers, be sure to use FUM tape, plumbing thread or flax to seal the connection.
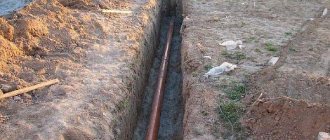
- Install the water supply only after laying the sewer pipes.
- Lay cold water pipes above the hot water supply line, not vice versa - this will prevent condensation.
- Make marks on the pipes in advance for connections with fittings - there will be no time for this directly during the soldering process and for maintaining the exact dimensions “by eye”.
- Pipes for both hot and cold water supply should, if possible, be laid strictly vertically and horizontally. Check this with a level.
- Connections of polypropylene pipes with tees, elbows and other fittings should be made at right angles - the misalignment may subsequently have a detrimental effect on the tightness and durability of this section of the water supply system.
- To solder polypropylene water pipes in hard-to-reach places, it makes sense to break the lines into small sections connected to each other using couplings.
- Prepare in advance a comfortable and spacious enough workspace for soldering polypropylene pipes. The equipment for such work itself is quite expensive, so it is advisable not to buy it, but to rent it.
Video - Secrets of installing polypropylene pipes
How much to buy
Calculation of the required number of pipes and fittings should be based on an accurate and understandable water supply diagram. The following must be taken into account:
- Clips for attaching pipes to walls are installed in increments of 50 cm.
- When making a connection with a coupling or other part, the pipe inserts approximately 1.5 cm into it, therefore, at each section between the fittings, 3 cm should be added to the estimated length of the pipeline.
- The total length of the thermal insulation sleeves corresponds to the total length of the purchased pipes.
Pipes and parts should be purchased with a small margin.