It is unthinkable to imagine comfortable housing, be it an apartment, your own cottage or a small country house, without running water. The supply of cold and heated water has long become a prerequisite for comfortable living. Homeowners try to choose the most practical water supply option.
Statistics show that the majority prefer polypropylene water supply: even an inexperienced plumber can install such a system with his own hands. To ensure that the result of your efforts is impeccable, we suggest that you familiarize yourself with the detailed technology for assembling the polymer system.
We presented all the methods for connecting polypropylene pipes and listed the types of fittings used in the construction of circuits. Typical errors indicated. The information we offer is supplemented with diagrams, photo collections and videos.
Accessories for polypropylene pipes
Various components are used to install water pipes from plastic pipes. Their assortment is very extensive and amounts to dozens of items in the price lists of manufacturers. The parts vary in shape, size and purpose. Let's look at the most common types of such elements.
A large number of components are produced for polypropylene pipes. When purchasing them, it is important to choose parts from the same manufacturer as the pipes
Couplings. The simplest connecting part. The shape resembles a small barrel, the inner diameter of the hole exactly matches the cross-section of the pipes being connected. The element is intended to connect two sections of pipe.
Adapters. These parts are designed to connect pipes of different diameters. Outwardly, they are very similar to couplings, but their main difference is that the internal diameter at the two opposite ends of the element is different.
Adapters are selected according to the diameter of the pipes being connected and come in various sizes. Parts are produced with internal or external threads, designed for transition to threaded connections.
Corners. As you know, polypropylene pipes cannot be bent. Therefore, to perform the rotations necessary during installation, the manufacturer produces special connecting parts bent at an angle of 90° and 45°.
The corners can end with holes for pipes or have threads, both internal and external. For example, such parts are used to install a mixer. Moreover, they can be either double or single.
Some home craftsmen argue that there is no need to complicate things and use corners. After all, polypropylene is plastic and can be bent. They heat the pipe to softening temperature and bend it the way they want.
Indeed, it is very easy to bend a part, but you need to understand that unpleasant changes occur in it: the wall on the outside of the bend becomes thinner. This will significantly reduce the life of the pipe and lead to its breakthrough.
A shut-off ball valve made of polypropylene is installed in the water supply using soldering
Crosses and tees. These are the names of elements designed to connect three or four pipes at the same time, which is often required for installing a water supply system. They are produced in a wide variety of variations: with hole diameters of different sizes, with fittings for other types of pipes, for example, for metal-plastic or copper, with internal and external threads of various sizes.
Contours. This is the name given to specially formed bends that are used to guide the pipe around a small obstacle. In this case, it is desirable that the distance from the pipeline to the wall be minimal. The bypass is welded into the gap in the water supply section so that the sections of pipe lying before and after it are straight.
In addition to these components, other elements are also produced. Among them are plugs used to shut off unnecessary branches of the water supply system, and special ball valves for polypropylene pipelines.
To secure the pipes to the wall, special clips are used, which are selected to match the diameter of the part. Can be single or double. Experts advise choosing pipes and components from the same manufacturer. This way there will be fewer problems during installation, and the system will be of higher quality.
For PP pipes of all sizes, a wide range of connecting parts are produced, allowing you to quickly install the plastic circuit and, if necessary, connect it to metal branches
Which pipes to choose for installing water supply in an apartment
The water supply in the apartment comes from a central riser and includes taps, filters that protect against mechanical and chemical impurities, meters, outlets to plumbing and other connections.
For the installation of water supply pipes made of metal-plastic and plastic are suitable.
The use of steel pipes is a thing of the past; copper pipes are still found, but their popularity is also falling.
Copper
The advantages of copper pipes include versatility - they can be used for hot and cold water. They do not clog and resist corrosion well, and their service life can be about 70 years.
But the disadvantages of copper pipes compared to the advantages of plastic products make their use undesirable. Copper parts are expensive, installation of joints requires special skills - without a specially trained worker it is unlikely to be able to do this, which will lead to additional costs.
Joints in copper pipelines are soldered with tin. Therefore, in hard-to-reach places, assembling the water supply system will be difficult.
Now developers and residents renovating apartments use polymer pipes, which are divided into metal-plastic and plastic.
Metal-plastic
Metal-plastic is durable, has a smooth inner surface, and is highly resistant to corrosion. Metal-plastic pipes are easy to install yourself. This is due to the high elasticity of the material, the ease of making joints and the available tools for the job. The ability to bend at any angle leads to lower costs as the number of fittings is reduced.
The pipes are connected by crimping or threaded connectors. The use of a compression fitting eliminates the possibility of bricking up metal-plastic connections - as a result of temperature fluctuations, the tightness is weakened. This leads to the need for preventive crimp tightening approximately once a year.
To join plastic products yourself, all you need to do is purchase or rent a pipe cutter.
If you use a compression fitting, you will need pliers for crimping it, and if you choose threaded connectors, you will need adjustable wrenches. In both cases, you should not neglect the calibrator and anchor to remove burrs on the cuts.
Another advantage is the many connectors that allow you to join metal-plastic pipes with products made from other materials.
Plastic
Plastic pipes for transporting water are divided into several types based on their chemical composition and properties. The most common are:
- polybutylene;
- polyethylene;
- PVC;
- polypropylene.
Polybutylene can withstand temperatures of +90°C, so pipes made from it are most often used for installing heated floors. The ease of installation of such networks is facilitated by their high elasticity - the pipes can be bent rather than using connectors. Joints soldered without violating technology do not leak. The disadvantage of polybutylene is its high price.
Polyethylene pipes are considered a budget option, so their capabilities are limited. They cannot withstand the pressure of the city water supply and temperatures above +60°C.
This leads to a limitation of the area of their use to watering household plots and water supply to unheated premises. This application is possible due to the important advantage of polyethylene - products made from this material are not destroyed due to liquid frozen in them.
PVC, or polyvinyl chloride, also belongs to budget materials. Pipelines made from it are resistant to aggressive environments and can withstand temperatures up to +80°C. Pipes are connected using soldering or glue, but the joints are less durable than the product itself. To prevent accidents, it is recommended to use Aquastop.
Replacing a damaged section is a complex and time-consuming task, so you can choose PVC pipes when the length of the branch does not exceed 10 m and the number of water points is less than seven.
Polypropylene is used for water supply installations more often than pipes made from other materials. Despite the budget price, it is durable, can withstand water temperatures up to +130°C and can operate under a pressure of 12 atmospheres.
Polypropylene products are joined by welding. As a result, the connector material is fused with the pipe material, which allows for leak-free joints. The internal surfaces are smooth and do not form clogs.
Disadvantages include deformation from thermal expansion. Therefore, polypropylene pipes are not laid in grooves. Parts heated by hot water begin to deform, which leads to the destruction of the finish in the places of installation.
Starting stage: where to start?
First of all, you need to draw up a competent design of the future system. This means a schematic plan of the pipeline made to scale, on which all design features are plotted and consumers are indicated.
To do this, it is necessary to take accurate measurements, which are subsequently used to construct a drawing of the building. After it is completed, a pipeline diagram is built.
For routing water pipes, you can choose one of two options: tee or manifold
When creating a project, different options for arranging plumbing fixtures are considered and the optimal one is selected. In addition, several factors must be taken into account during the design process. The first is the type of wiring.
It can be tee or manifold. In the first case, water collection points are connected sequentially, one after another. On the one hand, this is good, since a minimum number of pipes is required and, therefore, low costs.
However, the pressure in water consuming devices will be different. The further from the beginning of the pipeline, the lower the pressure. This is extremely inconvenient, and in the case of a large number of water points, unacceptable.
Collector wiring presupposes the presence of a special distribution unit that separates water flows and directs an individual branch to each consumer.
For manifold assembly of a pipeline from PP products, you can use a ready-made distribution unit or assemble the manifold yourself using connecting parts
In this case, there is practically no pressure loss in the system; all devices operate with the same water pressure. The main disadvantage of collector wiring is the high consumption of pipes and, accordingly, the higher cost of the entire structure.
The second important point is the method of installing the pipeline. This can be done openly or covertly. The second is more aesthetic and involves laying pipes inside walls or partitions.
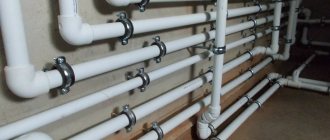
The open laying method assumes that the pipes are fixed on top of the wall. Closed - fit into grooves made at the base
In addition, when designing a pipeline, experts recommend reducing its length as much as possible. The number of folds and joints should be minimal. This is explained by the fact that it is in these areas that the threat of leakage is most likely.
Turning the pipe at right angles reduces the pressure in the main; this must also be taken into account. Using the finished diagram, the required amount of materials for laying the water pipeline is calculated.
Technical characteristics and the 50 years of impeccable pipe service promised by the manufacturers. PP allows for laying water supply branches in a hidden way
Why is it important to make a plan?
Pipe routing begins with a drawing. Water supply design cannot be neglected. The task of delivering water to all water distribution points in a residential area is not an easy one.
The home owner will want to install a shower cabin, a dishwasher and an automatic washing machine. The bathroom is located in a separate room, where a bidet is placed next to the toilet. The floors in the apartment are heated.
An increase in the number of water distribution devices complicates the water supply scheme and requires greater productivity of the water supply system.
In order to correctly determine the size of the pipes and the number of plumbing fixtures, fittings and other parts necessary for the water supply system, you need to carefully consider the wiring around the apartment.
The result of competent design will be efficient operation of the system and reduced costs for materials, installation and operation of the water supply system.
The pipeline diagram is drawn on the apartment plan and the names and locations of plumbing fixtures and auxiliary parts are indicated. Here the directions of pipes for hot and cold water, cross-sectional size, and material of manufacture are determined.
Such a plan is not difficult to draw even for a homeowner inexperienced in plumbing matters. To do this, it is enough to know the types of wiring and the list of devices that ensure stable operation of the water supply network.
How to connect polypropylene pipes?
Soldering is used to connect polypropylene pipe sections. This is done using a special soldering iron. Using such a device is easy. Anyone, even the most inexperienced plumber, can learn this very quickly.
The process of soldering polypropylene pipes is as follows. First you need to prepare the parts that need to be soldered. To do this, pipe fastening areas are marked on the wall.
After that, using a level, the correctness of the marking is checked, then so-called clips or mounting supports are installed on the wall. Then you need to measure the pieces of pipe that will need to be connected, and then cut them with a cutter or special scissors.
Now you can start soldering. First you need to choose a nozzle for your soldering iron. The device comes with several of these items.
A soldering iron for installing polypropylene pipes can be rented. It also comes with attachments for different diameters of pipes and fittings.
They differ in the diameter of the working surface. The nozzle is selected in accordance with the cross-section of the pipe and fitting. The part is installed in place and the soldering iron is turned on. There is always a temperature regulator on the body of the device, with which you can control the heating of the nozzles.
To work with polypropylene, it is recommended to choose the range of 250-270ºС.
The fitting and pipe are put on the corresponding heated soldering iron nozzles and heated for about 5-10 seconds. This depends on the diameter of the elements. The larger it is, the warming up time is correspondingly longer.
After the parts have warmed up, they are removed from the attachments and immediately pressed together. In this case, a twisting movement must not be made. The elements do not rotate, but are pressed against one another.
They are held in this position for about half a minute. During this time, the plastic will have time to harden and you can remove your hands. After the polypropylene has completely cooled, a strong monolithic connection of the two units is formed.
A sign of quality work is a uniform bead that is visible along the entire circumference of the pipe. It is also inside the fitting, you just can’t see it there.
The parts are heated to the required temperature on the soldering iron nozzles, after which they are pressed tightly against one another.
The bead is formed when the part is heated. If it is uniform, then heating occurred normally. If the parts are heated unevenly, the height of the bead will be different. Where it is least, a leak is likely to appear later.
An important point is the quality of soldering iron attachments. They are coated with Teflon to prevent plastic from sticking to them. During operation, the Teflon layer becomes thinner and even disappears.
Experts strongly do not recommend using nozzles that are partially coated with a non-stick coating. This is due to the fact that when heated, the plastic will definitely stick to those areas of the nozzles that are not covered with Teflon.
This does not mean that the part cannot be removed from the attachment. It will come off perfectly, but the connection will be of poor quality. There is a very high probability that where the element has stuck to the nozzle, a leak will subsequently appear.
Nuances for different types of bathrooms
In apartment buildings there are several types of bathrooms:
- separate, in which there is a concrete wall between the bathroom and the toilet;
- combined, without internal partitions (some owners dismantle them, further increasing the area of the room).
Combined
In such a bathroom, the water supply lines are routed along the wall along the perimeter of the room from the riser through cut channels. Couplings are provided at consumer connection points.
Ball valves are placed in a shield or covered with a box. After laying the mains, the channels in the wall are sealed with a cement mixture, and finishing material (for example, tiles) is installed on top.
Perimeter wiring in a combined bathroom.
Separated
When wiring in a separate bathroom, a hole is cut in the wall necessary for supplying a sewer drain or water supply to the riser.
The lines for supplying liquid to consumers are located inside the walls.
If necessary, provide an additional connection point for a washing machine, heating radiator or heated towel rail (the coil on the wall is heated by circulating hot water).
Wiring in a separate bathroom.
Common mistakes and how to avoid them
Errors in operation are quite possible. To prevent an unpleasant situation, it is worth finding out what the most common mistakes are in order to try to prevent them. All pipeline branches near water collection points must end with couplings with external threads, which are used to connect plumbing fixtures. This is true for all devices except the bathroom faucet.
This requires fittings with internal threads. This is often forgotten, and you have to either buy new couplings or install fittings. Many mistakes are associated with soldering pipes.
If during the alignment process the pipe is not inserted into the fitting all the way, then a small gap will remain between its inner part and the end of the part. It is a section with a smaller wall thickness and a larger internal diameter than the pipe itself.
For this reason, the operating pressure in this section will be lower than in the rest of the system. Another problem can arise when excessive force is applied when connecting two parts.
In this case, the shoulder formed during the compression process will be too high. It will become an obstacle to the movement of water through the pipeline. Overheating of elements has a similar effect.
The performance characteristics of the new water supply system depend on the quality of soldering of polypropylene pipes. There should be no underheating or overheating of parts
The internal cross-section of the parts is reduced, and from the outside it is completely invisible. Insufficient heating of the elements is also dangerous.
The connection will look absolutely normal, but it will be extremely unreliable and will leak quite quickly. To prevent this, it is important to always pay attention to the temperature of the soldering iron and remove heated parts only when the control light goes out.
Step-by-step work algorithm
To install water supply distribution in an apartment, it is not necessary to undergo special training. It is enough to understand the principle of its operation and what devices perform this work. Work begins with the installation of an emergency crane.
Installation of ball valves
Ball valves are used as a throughput device, which makes pipe routing safe.
One such tap is installed for hot and cold water supply immediately after the central riser. With their help, the water supply to the apartment is regulated and an emergency shutdown of the entire water supply network is performed.
Installation of meters for hot and cold water
After the ball valves, units are equipped to measure the flow of hot and cold water. Each of them consists of a coarse filter, a check valve and DHW and cold water meters.
Gearbox installation
The reducer is needed to stabilize the pressure. Use mechanical and electronic devices. The latter prevent water hammer, which causes damage to washing machines, dishwashers, and other plumbing fixtures.
If you connect a boiler, you need to install a check valve, which also belongs to the control devices. It will prevent the backflow of water from the boiler tank into the riser. Reducers and check valves are installed after water metering units.
Collector installation
If the distribution system is radial, then the next step will be the installation of plumbing collectors. These devices are needed to distribute water between consumers. Collectors are selected with a number of outlets corresponding to the number of water collection points.
For emergency shutdowns of branches, a ball valve is installed at the beginning of each of them. If there is a need, pressure gauges for measuring pressure and devices for protecting against leaks are also placed here.
Installation of water pipes
The final stage of the distribution installation is the installation of individual sections of pipes through which water is supplied to consumers. They are laid according to a previously drawn up project.
The connection is made using the technologies provided for each type of pipe.
Step-by-step scheme for installing water supply and sewerage systems
Installation and replacement of water supply and sewerage systems requires a certain sequence of actions, which can be schematically presented as follows:
- Drawing up a plan and diagram that takes into account in detail the location of the network and each element.
- Preparation of tools necessary for installation, selection of materials suitable for installation on an internal water supply system and for installation of an external network.
- Dismantling of outdated devices for replacement.
- Carrying out excavation work to lay external communications at the required depth.
- Installation of water supply and sewerage pipelines for external networks.
- Restoring the normal appearance of the site where work and landscaping was carried out.
- Connection to internal networks. Transition to installation and replacement of individual devices related to internal networks.
Before starting any work, you need to draw up a diagram of the future pipeline and determine the type of material for its installation
Important! Special attention is given to the construction of the base for laying water supply and drainage pipes and backfilling in order to prevent incorrect operation and defrosting of the systems.
Choosing the appropriate installation method
In modern bathrooms, all engineering communications are hidden. To achieve this, you can use false panels or make grooves in the walls. An alternative is open installation when laying pipes in the bathroom. It is less aesthetically pleasing, but it will require less effort and time. You can do this yourself, without the help of a plumber.
To choose a method, you need to analyze the pros and cons of each.
- Open gasket. All engineering communications are mounted to the wall or floor. This makes it possible to carry out installation even after final repairs. Advantages: constant monitoring of the condition, minimal cost, and the possibility of prompt repairs. Disadvantages - the likelihood of mechanical damage, pipelines spoil the appearance of the room.
- Hidden routing scheme. For laying in walls or floors, grooves are made. However, there are restrictions - they cannot be done in load-bearing walls. An alternative is installation on top of the wall, followed by installation of a false panel. Advantages - only the connection points to the devices remain outside, it is impossible to damage the pipes. The disadvantage is the complexity of installation.
In some cases, you can combine the two methods. Some communications remain open, the rest are covered with decorative materials. This is true if one of the bathroom walls is load-bearing.
Important: the width and depth of the grooves should be 2-3 cm larger than the diameter of the pipes. This is necessary to compensate for thermal expansion.
General information about communications
As a rule, piping refers to plumbing in bathrooms and kitchens. But in addition to these engineering systems, there are also heating, gas, and in some cases electrical communications hidden in the pipes.
Important! The installation of gas pipes in a private house and apartment is usually carried out by specialists.
As a rule, people who decide to undertake a major overhaul with their own hands are interested in whether it is even possible to cope with laying a new pipeline without being a specialist in this matter? Much depends on the material of the pipes - installing “plastic” is not difficult even for beginners in this matter.
But, in addition to choosing the material for the pipes, in order to correctly carry out the wiring, you should decide on the following points:
- Type of installation (hidden or external);
- Wiring diagram.
Of course, for this you need to become familiar with the various nuances of possible pipeline options.
Copper pipe
