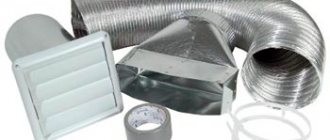
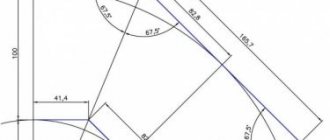
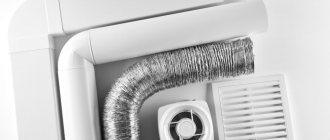
Determining the diameter and design of the duct
It is very important to correctly determine the diameter and design of the pipes.
To do this, it is important to follow the following rules: it is desirable that the diameter of the air duct be equal to or greater than the diameter of the outlet from the kitchen hood and be equal to the diameter of the outlet ventilation hole. If the pipe has a smaller cross-sectional size, this will worsen the performance of the ventilation, since additional resistance to moving air will be created. At the same time, the background noise will increase, and the hood motor will have to work in increased mode. All this will lead to rapid equipment failure. There is no point in making an air duct of a larger diameter if the tract narrows in the area of the ventilation hole. Therefore, it is most effective to accurately measure all the elements even before purchasing a kitchen hood; There should be a minimum of bends throughout the entire duct
If they are present, it is important that the angle is not greater than 90 degrees, since each such angle reduces productivity by approximately ten percent. If there are bends in the installed system of more than ninety degrees, this can lead to the formation of backdraft
In this case, the use of special valves is mandatory; The length of the air duct should not exceed three meters. Each meter is another 5-10% of the efficiency of the ventilation system.
Thus, the ideal performance option is to use round plastic pipes for installing the kitchen hood air duct.
Remember that installing a hood does not replace the ventilation system. They must work together. It is for this reason that check valves are used, which ensure effective joint operation of ventilation and exhaust systems. The grille of such a valve consists of a hole to which the path is connected and special slots. If the hood is not working, then air can pass through both types of openings, and as soon as the exhaust system starts working, the valve is activated and air flows only through the air duct.
Pros and cons, scope
Plastic air ducts are perceived negatively by many, as they are not sure that plastic does not emit harmful substances during operation.
Poor quality plastic may be unsafe, but even household appliances contain so many plastic parts that this consideration seems irrelevant. For example, in a kitchen hood with filters, most of the components are made of plastic. And here are the most difficult operating conditions - high temperature, large amounts of fat, evaporation of chemically active substances. Even open laying of plastic pipes does not spoil the appearance
In general, experts recommend installing plastic on exhaust ventilation ducts. There are no restrictions here. But for the inflow, you need heat-resistant ones made of special plastic. Especially if the inflow is heated or recuperated.
Where can I use it?
Another reason why plastic ducts are not recommended is fire service concerns. There have been cases where permission to use gas equipment was not signed if the ventilation was made of plastic. But it was a frame house, and there the requirements are different. If in doubt, it is best to check with your local fire inspector. In general, there are recommendations in regulatory documents.
Extract from SNiP 41-01-2003
According to SNiP 41-01-2003, paragraph 7.11, plastic air ducts can be used in low-rise residential, public, administrative and industrial buildings of category D. They cannot be laid in basements, undergrounds, attics and technical floors, in rooms with regulated fire safety conditions.
Advantages and disadvantages
Plastic air ducts have both supporters and opponents. Their main disadvantages:
- Flammability. Everything is clear here. Only metal air ducts do not spread fire. Although not all plastics burn and spread combustion, such materials with “reduced” flammability are expensive. Therefore, plastic air ducts are allowed only in one-story houses.
- The accumulation of a static charge, which leads to the accumulation of dust (it can flare up again). In fact, much more dust accumulates in corrugated areas. To reduce its amount, it is necessary to install a plastic air duct after completing “dusty” construction work and install filters that catch most of the dust. In addition, plastic ventilation pipes are treated with a special compound. It forms a film on the surface that prevents the accumulation of static charge.
- With low quality workmanship, thin walls or a large cross-section, gaps may form at the joints due to changes in geometry. This can be fixed, but there is such a drawback.
These are the disadvantages of using plastic ducts. There are more than enough advantages:
- Easy installation. The presence of fittings and shaped elements allows you to create a system of any configuration. Plastic is easy to cut and weighs little.
- Due to the perfectly smooth walls, the air encounters less resistance.
- Easier to ensure tightness. For reliability, the joints can be coated with sealant.
- Modern plastic air ducts are joined using end-to-end joints without overlaps, which reduces resistance to air movement.
- Low noise level. With a capacity of up to 100 cubic meters per minute, air movement is almost silent.
- Not subject to corrosion.
Overall, plastic ductwork is not a perfect solution, but the ease of installation and good performance outweigh the disadvantages. In general, experts recommend installing plastic on exhaust ventilation ducts. There are no restrictions here. But for the inflow, you need heat-resistant ones made of special plastic. Especially if the inflow is heated or recuperated.
Also, when selecting, you should proceed from the operating conditions. For example, it makes sense to use a plastic air duct for an exhaust ventilation duct from wet rooms, since galvanized ones are susceptible to corrosion, and stainless ones are very expensive.
Recommendations for installation and operation
When installing a kitchen hood with your own hands, you should focus on the following recommendations:
- Before the installation process, try to obtain as much information as possible on operating principles and installation methods, using available sources of information. As well as provided photo and video materials.
- Be sure to read the document such as the installation and operating instructions, which should be provided by the manufacturer.
- When installing exhaust pipes, they should not be allowed to bend at an angle greater than 90 degrees.
- Try to avoid narrowing the outlet of the outlet pipe. Otherwise, its narrowing will lead to a significant increase in the noise level of the hood. The fact is that the resistance to air movement increases.
- To achieve the best results from the hood, it must be installed at a distance of 70 cm from the surface of the stove.
- To improve the performance of your kitchen hood, clean the filters regularly.
- If the design of the hood provides a return valve, or you install it yourself, this will prevent the movement of contaminated air in the opposite direction.
Of course, installing a kitchen hood will require some effort and time. But the ability to quickly remove bad odors and excess moisture will give your kitchen comfort and a cozy atmosphere.
Great article 0
Rules for installing ventilation structures
Installation of ventilation ducts is the very last stage in the process of arranging an indoor air ventilation system. First, it’s worth designing it. The effective operation of the air ventilation system in the future depends on a well-designed project. It is the drafted project that determines the type, power level, dimensions, specific layout, required area and type of cross-section of the air ducts.
You can design a ventilation system yourself, but to do this you need to have at least basic knowledge in this area. After all, incorrect calculations can lead to excess noise from the air duct, insufficient air exchange through it, etc. Therefore, if there is even the slightest doubt, it is better to entrust the design to professionals.
The second stage is the purchase of all necessary materials, components and tools, if necessary. The quantity and parameters of all necessary parts must be purchased in full accordance with the project in order to avoid unnecessary costs of money and time. After all, if you buy components at your own discretion, you will subsequently have to spend time again searching for and purchasing the necessary parts.
Rules for choosing the duct cross-section
Air ducts are made of plastic and aluminum, corrugated and round. Rectangular designs look harmonious against the background of rectangular cabinets.
Round ducts are more efficient because there is less resistance to air flow. Corrugated pipes are soft, easy to bend at any angle and weightless.
They do not insulate noise well and, having a ribbed structure on the inner surface, quickly become dirty. During installation, it is recommended to stretch the folds of the corrugation as much as possible in order to reduce the relief for dirt accumulation.
To obtain the result of good cleaning and fresh air flow, and also to ensure that the air duct operates without interruption and noise, it is necessary to calculate the dimensions and diameter of the air duct.
The diameter of this structure should match or be slightly larger than the diameter for the outlet at the hood. A smaller diameter reduces throughput and operating efficiency, as the resistance of the air being passed through increases.
The power of the hood used is also reduced. When installing the air duct, you cannot plan sharp corners or 90° angles. To prevent air from returning, a check valve must be installed.
Ventilation ducts should be located above the cooking surfaces. The length of the air exhaust pipes is provided for no more than 3 meters.
To ensure maximum use of the hood and to work correctly, the distance between the stove and the hood is kept no more than 75 cm.
When choosing hoods for the kitchen and boxes for decoration, you need to rely on technical parameters, the size of the kitchen, personal preference, and financial situation. Also study the characteristics of materials and their functionality.
Taking into account all the points, you can choose suitable hood options for your kitchen. Buy a box or make it yourself to hide bulky and ugly parts of the air duct. And your kitchen will take on an individual, stylish look.
What is a plastic box
All existing ventilation systems use several types of plastic air ducts:
- Rigid tubular channels, round, oval or rectangular in cross-section, colloquially called boxes for their appearance;
- Flexible air ducts or simply corrugations, photo;
- Special fittings for fastening and joining various sections of ventilation;
- Control elements include plastic straightening grids, deflectors, confusers and check valves.
For your information! To install home forced air exchange systems, plastic ventilation ducts are predominantly used, usually made of polyvinyl chloride or polypropylene. For garages, workshops, general industrial facilities, vehicles and underground communications, composite high-pressure plastic boxes and pipes reinforced with fiberglass inserts and meshes can be used. In apartments and private houses, the use of industrial ventilation systems, as a rule, does not make sense. The cross-section of such a box significantly exceeds the required size, and the ventilation system itself is designed for high air speed, therefore it is always heavier and has an unattractive appearance.
Select and buy air ducts online
We have agreed on DISCOUNTS for our readers in the LEROY MERLIN store.
Leroy Merlin has a huge range of air ducts - more than 70 varieties. You can’t look through such a quantity in a regular store - you don’t have enough time or energy.
Buying online is cheaper than buying in a store (online price is lower)! It is very profitable, convenient and safe: you can buy goods without leaving your home or visiting a store. All purchases will be delivered to your home. And if something doesn’t work, you can return the product.
In addition, in the online store, on each product page you can see the exact characteristics and real customer reviews.
Plastic shaped elements
Ventilation systems from the hood to the shaft have different geometries and topologies due to individual approaches to kitchen layout. Therefore, special elements are provided to implement almost any configuration of a plastic box.
Ventilation ducts are straight air duct elements of rectangular or round shape. Their standard length is 0.35; 0.5; 1; 1.5 and 2 meters, however, you can cut off a piece of the required size yourself using a hacksaw or grinder.
If you need to get a straight section more than two meters long, then it is mounted using several fragments of standard length using special connectors for plastic channels.
In this case, there is no increase in the length of the section due to the size of the connector.
Another necessary element is the elbow, which is used to rotate the air duct at an angle of 90 or 45 degrees. For rectangular boxes, elements for changing direction horizontally and vertically are distinguished.
To turn at angles not multiples of 45 degrees, use the so-called multi-angle elbow. Depending on the required angle, one side of the connector is cut off.
Shaped elements: 1 – rectangular channel; 2 – round channel; 3 – connector for round channels; 4 – vertical elbow; 5 – horizontal elbow; 6 – unequal-angled knee
To change the shape of the box from round to rectangular (or vice versa), special adapters are used.
Their use, as a rule, is due to the difference in the shape of the ventilation ducts with the outlet hood funnel or the hole in the overhead grille. They can be either straight or angular in shape.
The most common transition options on sale are:
- from a diameter of 100 mm to a size of 110x55 mm;
- from a diameter of 100 mm to a size of 120x60 mm;
- from a diameter of 125 mm to a size of 204x60 mm.
If it is necessary to switch to another size of a plastic box without changing its shape, then reducers are used. For round options, there is a special universal adapter that can be used to connect all standard sizes.
For structures with complex topology, tees are provided, with the help of which air flows from several hoods, for example from the kitchen and from the bathroom, can be connected towards the exit.
They can be rectangular, round, or combined shapes.
Shaped elements: 1 – flat channel connector; 2 – round elbow; 3 – straight adapter; 4 – corner adapter; 5 – round gearbox; 6 – rectangular gearbox
The elements of the box are fastened to the wall using holders. Since plastic structures are lighter than metal ones, their installation is not a difficult task.
These factory-made parts are inexpensive and fit well into the interior of the room, so the use of home-made structures is impractical.
The wall trim or grille is attached over the hole in the wall leading into the ventilation shaft or to the street. The grille, if necessary, may contain additional slots for natural ventilation.
In this case, it is necessary to provide protection against the penetration of the air flow generated by the hood through these openings back into the room.
To prevent the occurrence of reverse draft when the hood is not working, a check valve is used. It can be integrated into the plastic duct connector, or its function can be performed by the louvers of the ventilation grille.
In the absence of such a device, air may enter the room from the street or from a ventilation shaft.
Shaped elements: 1 – universal round gearbox; 2 – round tee; 3 – rectangular tee; 4 – round holder; 5 – rectangular holder; 6 – cover for round channels
Overview and characteristics
Plastic ventilation ducts are made from different types of plastics and vary in rigidity, profile shape and size.
They are easily assembled into a single structure due to a wide range of connecting elements and fittings.
What are plastic air ducts made of?
Parts of ventilation systems made of plastic are formed under the influence of high pressure; they do not have seams. Different groups of polymers are used as raw materials:
- Polyvinyl chloride (PVC). PVC pipes are absolutely safe for human health, resistant to ultraviolet radiation, resistant to alkalis, mineral oils, many types of acids and alkalis, and do not ignite when exposed to open fire. The operating temperature range is from -15ºС to +66ºС.
- Fluoroplastic (PVDF). Retains strength and elasticity at temperatures ranging from -70ºС to + 140ºС. PTFE products are heat-resistant, resistant to aggressive acids and alkalis, resistant to moisture, and can be easily processed by cutting, drilling, and milling.
- Polypropylene (PP). Boxes for ventilation made of polypropylene are resistant to high temperatures (melting temperature is 175ºC), steam - and gas-tight, wear-resistant, have high impact strength, and resistance to repeated bending.
- Low-density polyethylene (HDPE). Air ducts are not subject to rotting, rusting, do not crack from exposure to low temperatures, are hydrophobic, elastic, and can be used for the manufacture of ventilation systems even in buildings with complex configurations.
When choosing plastic air ducts for arranging ventilation systems, you should focus not only on the cost, but also on the technical characteristics of the plastic. For example, polypropylene products are suitable for constructing a hood over a kitchen stove.
Ventilation ducts in residential and technical rooms can be installed from HDPE.
Advantages and disadvantages
Plastic air ducts have a fairly extensive list of advantages:
- environmental safety;
- mechanical strength;
- plasticity;
- resistance to chemically active and organic substances;
- resistance to temperature changes;
- low specific gravity;
- moisture resistance;
- not subject to corrosion;
- easy to install and maintain;
- a large assortment of standard sizes, shaped elements and fittings, allowing you to assemble a system of any configuration;
- wide color palette;
- at an affordable price.
One of the main advantages of plastic ventilation boxes is their ability to fit well into the interior of any room without cluttering up the space.
Plastic products, after installation, do not require additional finishing. Air ducts with an aesthetic appearance and smoothed shapes look good in residential buildings and administrative premises.
Rigid air ducts made of plastic also have a smooth internal and external surface, which does not create obstacles to the passage of air flow through them.
Their main disadvantages are:
- low fire resistance. Only metal boxes are not subject to fire. Although not all plastic (for example, fluoroplastic) can burn and spread fire, the cost of fluoroplastic products is quite high. Therefore, the installation of air ducts made of other types of plastic is allowed only in low-rise buildings.
- The ability to accumulate a static charge, leading to the adhesion of fine dust, which can ignite. Especially a lot of it collects on corrugated pipes, so such air ducts are equipped with filters that prevent dust from entering, and are also treated with a special mixture. It forms a thin film on the surface, which reduces the accumulation of static charge.
Where is it used?
Plastic ventilation ducts are used for the device:
- natural ventilation. The ventilation duct shaft is installed in the load-bearing internal walls of the kitchen with an outlet through the roof. Supply valves are installed in window blocks of living rooms. Ventilation of the room is carried out due to the intake of fresh air from the window valves, which moves towards the low pressure zone (into the kitchen), simultaneously ventilating the corridor;
- a supply system that supplies air to the room, with the possibility of heating in the winter season. With this type of ventilation, a channel is created in the kitchen wall or assembled in the form of a wall structure, and a silent supply fan cuts into the outer wall of the room;
- an exhaust system that removes exhaust air from the room, as well as natural gas combustion products from gas appliances.
Duct Selection Options
For the normal functioning of the ventilation system using a hood, it is necessary to correctly calculate the parameters of the air duct. In most cases, plastic boxes of standard shapes and sizes can be selected for household purposes.
Calculation of the optimal cross-section of the ventilation duct
The main parameter of the ventilation duct is its internal cross-section. The speed of flow through the channel depends on it and on the exhaust power. The cross section is selected based on the maximum volume of air passed through.
There are no regulatory documents regulating the speed for household plastic air ducts, so they focus on practical tested values of 3-7 meters per second.
The cross-sectional area of the duct is taken to be equal to or slightly larger than that of the exhaust air duct branch pipe, the size of which is indicated in the device passport.
If it is not planned to regularly turn on the maximum mode, then in this case a proportional reduction in the cross-section of the ventilation duct relative to the size of the outlet opening is permissible.
For small kitchens, you may not need to use the maximum hood power. This makes it possible, using an adapter, to use an air duct of a smaller diameter than indicated in the instructions
So, if S is the cross-sectional area of the exhaust air duct pipe, N is the volume of air passed through at the maximum mode of the device, M is the volume of air passed through at the planned mode, then the required cross-sectional area of the duct is calculated by the formula:
P = S*(M/N)
An insufficient cross-section of the box leads to significant air speeds and an increase in friction force.
This is fraught with the following negative effects:
- the load on the ventilation mechanisms of the hood increases, which leads to a decrease in the operating life of the device and additional energy costs;
- due to an increase in resistance, a decrease in maximum performance occurs, which reduces air circulation in the room;
- as a result of aerodynamic effects in the ventilation duct, the noise level during operation increases;
- there is an increase in air pressure from the inside on the system elements, as well as vibrations, which requires more reliable fastening and sealing.
If the cross-section of the duct is larger than necessary, this will not negatively affect the functioning of the forced ventilation system, but will lead to unnecessary financial costs.
In addition, ventilation ducts and other large components are more difficult to install and integrate into the design of premises.
The table for calculating the dependence of the flow speed on the exhaust power and the diameter of the round air duct allows you to correctly select the size of the ventilation duct
Consideration of shape and size
Plastic boxes for ventilation are round or rectangular in shape. A circle has the smallest perimeter compared to other geometric shapes with the same area.
Therefore, from the standpoint of minimizing the resistance of the inner surface of the duct to the movement of the air flow generated by the hood, a round channel shape is preferable.
The most common round plastic boxes on sale for household purposes are the following diameters:
- 80 mm, cross-sectional area 50.3 sq. cm;
- 100 mm, cross-sectional area 78.5 sq. cm;
- 125 mm, cross-sectional area 122.7 sq. cm;
- 150 mm, cross-sectional area 176.7 sq. cm.
Rectangular ventilation ducts are easier to fit into the interior of the room. They can be placed in niches above kitchen cabinets, above a suspended or suspended ceiling.
The most common boxes are the following sizes:
- 110 x 55 mm, cross-sectional area 60.5 sq. cm;
- 120 x 60 mm, cross-sectional area 72 sq. cm;
- 204 x 60 mm, cross-sectional area 122.4 sq. cm.
If necessary, larger ventilation system elements can be found. These are plastic boxes for household purposes, round in shape with a diameter of 200 mm, rectangular - from 220x90 mm.
However, before making a choice in favor of non-standard sizes, you need to make sure that you can purchase all the elements necessary for arranging an exhaust duct of the required geometry.
A wide range of colors of plastic pipes and ducts for ventilation of residential buildings makes it easy to fit the air duct into the interior of the room
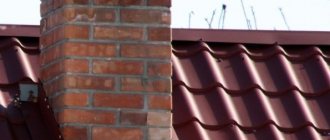
Rules for placing ventilation outlets
There are two standard ways to route ventilation pipes outside the house: through the wall and through the roof. In the second case, pipe fragments located above the roof level are often placed inside a special box.
The ventilation duct performs two functions:
- Insulation. When the air leaving the room cools, condensation forms. It begins to leak back through the ventilation system, and can also narrow or completely close the cross-section of the duct.
- Waterproofing. A compromised roof can allow water to enter the attic space. It is also necessary to ensure that the ventilation duct is protected from direct precipitation in the form of rain or snow.
The box will also serve as an excellent supporting structure for fastening cladding material and for providing a retreat from unstable building structures made of lumber.
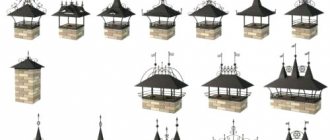
The box on the roof of the house should look harmonious. Therefore, you need to think through its design in advance: colors and decorative elements
If the house has several ventilation outlets to the attic planned or already implemented, then there are 3 options for how to bring them to the roof:
- You can make your own box for each channel. This is the most expensive method, but in this case it is possible to remove the pipes without bending, which increases draft with natural ventilation.
- Bring all the pipes together and bring them to the roof in one box. This reduces the amount of work on the roof, but increases the load in the attic space.
- Make a single system of ventilation ducts with one exit. This minimizes the size of the duct, which will greatly simplify work on the roof, but can lead to problems typical of branched air exchange systems.
The use of a channel system with several points of air entry and one point of air removal must be well calculated in advance. It is necessary to properly arrange the supply ventilation and install check valves, otherwise the air flow may reverse.
The hole in the roof should not damage the rafters, otherwise this will lead to the danger of redistributing the load of the supporting structures
The lathing does not play such an important role, since it only holds the covering
Since there can be a lot of ventilation pipes, you need to place them in the attic so that they take up little space
You also need to carefully approach the issue of determining the location of the ventilation outlet so that it does not end up in the zone of wind pressure.
Failure to comply with the rules for the position of pipes relative to the roof elements prescribed in clause 6.6.12 of SNiP 41-01-2003 “Heating, ventilation and air conditioning” can lead to a decrease in draft or its overturning, which will immediately negatively affect air exchange.
Using this diagram, you can determine the sufficient height of the ventilation outlets on the sloping roof of the house. If there are tall objects nearby, the calculations will be more complex
Therefore, for a pitched roof, it is better to plan a place for the box closer to the ridge. This will allow the height of the structure to be reduced, which will simplify the work on its construction.
Air duct decoration methods
Plastic box for exhaust pipe
Pipes adjacent to the hood and vent can ruin the design of the room. For this reason, the apartment owners decide to hide it. There are several ways to disguise the air duct:
Sheathing with plasterboard. A sheathing is made along the air duct, onto which sheets of drywall are fixed. Next, the resulting box can be finished in the same way as the entire room. An important disadvantage of this method is the difficult approach to pipes if necessary. Plastic box. Manufacturers offer ready-made plastic structures into which the air duct can be placed. This is a simpler and cheaper analogue of plasterboard sheathing. Installation of pipes above a suspended or suspended ceiling. In this case, the structure should be planned at the repair stage before finishing work. The air duct is laid over the ceiling structure, after which the covering itself is installed. If you need access to the pipes, you will have to disassemble the ceiling, which is a significant drawback.
Integrating hoods and air ducts into furniture and kitchen units. A cabinet is hung on the wall through which the pipes will pass. This method has an important drawback - a visual reduction in space. A budget option for the previous method is to use a hanging canopy on the cabinet. Then the box is not mounted under the ceiling, the air duct pipes are led out of it to the top and connected to the ventilation shaft. They are covered with a visor on top. Laying the air duct close to the wall. Suitable when using tall and deep cabinets that protrude significantly above the surface. Then the pipes will not be noticeable. Painting. This is the cheapest way. The air duct is painted in colors that match the interior
It is important to choose the right coloring composition so that it also protects the pipes.
For small kitchens, methods with a cabinet are not suitable due to the visual reduction in space. The best option would be to lay pipes above the suspended ceiling or use boxes and paint.
Restoring an outdated ventilation duct using modern tools and materials
As a rule, restoration is required for the duct that provides general house ventilation. There are different reasons for recovery, the most common are:
- previous illegal redevelopment;
- violation of air exchange, characteristic of old premises.
Tools you may need:
- level;
- roulette;
- circular or regular saw;
- hammer;
- screwdriver;
- container for solution;
- trowel (trowel).
Different materials may be required:
- pipes;
- building blocks;
- brick;
- masonry mortar;
- drywall;
- Fibreboard, chipboard;
- metallic profile;
- screws.
Restoring the box:
- clear the ventilation ducts; to do this you will have to remove the floor and ceiling coverings where the air ducts pass;
- study the cross-section;
- select suitable materials;
- Build a structure using the selected materials according to the level;
- Provide an opening in the ventilation shaft for air exchange in your apartment.
After erecting the box, let it dry. Afterwards you can begin to design and decorate it.
Use of furniture
The easiest option would be to entrust the measurements to professionals. Based on the measurements taken on site, a kitchen set will be made that smoothly “flows around” the ventilation duct and makes it invisible.
In extreme cases, it is possible to use false doors. In this case, you only need to order doors that match the color of the kitchen unit. Then decorate the resulting niche in the form of a cabinet.
If furniture replacement is not planned, it is best to hide the unwanted element behind the most voluminous kitchen item - the refrigerator.
Kitchen with successful lining of the ventilation nicheSource arxip.com
Working kitchen apron passing through the ventilation ledge Source roomester.ru Interior of a small kitchen with a ventilation box Source cstor.nn2.ru
DIY box
If none of the options presented in stores suits you, or you don’t want to pay for a product that you can easily make yourself, we suggest making a hood box with your own hands. In this chapter we will look at the features of creating a cabinet box, since this is the most convenient and common type.
What you need to know to make a quality box:
Before purchasing building materials and assembling the product, draw its detailed diagram. It should display the size of the hood box: its height, width and depth, number of shelves, door fastenings, etc. To fit it neatly into the kitchen set, the depth of the box must be the same as that of the kitchen cabinets, otherwise it will stick out. The same applies to the height, but if desired, you can vary it at your discretion (for example, make a cabinet up to the ceiling or a little lower than the cabinets, and then put a beautiful flower or figurine on top). The width of the box is determined by the width of the hood itself. To build the box, use the same material from which the rest of the kitchen cabinets are assembled. Usually all kitchen furniture is made from chipboard
It is important to cut out the parts correctly, which is not so easy to do at home. It is necessary to cut strictly at an angle of 90° so that during assembly there are no distortions and cracks
Also, the cut must be without chips, so that it is almost impossible to do using a jigsaw. As a rule, after the first trimming, all ends of the chipboard parts are sanded with a grinder and an emery disc. Accordingly, it is necessary to cut with a small allowance for grinding, 3-5 mm wide. After sanding, all ends must be covered with a special furniture edge of a suitable color and texture. To glue the edge, attach it to the end and run a heated iron over it. If you can handle cutting the parts, assembly should not be difficult. For fasteners, use not nails, but special furniture screws - confirmats. Before screwing them in, drill a hole using a special shaped drill bit. Such a drill not only makes a hole for the thread of the confirmat, but also chamfers its head. Each part of the box must be fastened with at least two confirmations. Cover the back side of the box with a sheet of fiberboard, nailing it with small nails. The facade is the most problematic part of the structure and requires special care. Instead of the usual doors, which still need to be manufactured, many people prefer to use roller shutters. If you like classic doors, then they can be made in two ways: two vertical doors or one horizontal one, opening from bottom to top. You should choose based not only on personal preferences, but also depending on the height of the residents - short people may find it inconvenient to lift a horizontal door. Do not use transparent glass to create a facade, as it will negate all attempts to disguise the pipe and other parts of the hood. Installing a mirror in this case is also not a very good idea, since it will be located above eye level and will not be able to visually enlarge the space.
Of course, there are other ways to install a hood duct, but chipboard is the easiest material to use. If the kitchen set is made of wood, or you want to dilute the abundance of metal surfaces with a wooden box, then be prepared for the fact that it will need to be coated with a special antiseptic impregnation and several layers of moisture-resistant varnish. If you choose drywall as a material, then use a special moisture-resistant type, otherwise such a box will not last long.
Installing a hood duct is not that difficult if you approach the work responsibly. This detail allows you to transform the interior and use the kitchen space more efficiently. When ordering the production of a box in a furniture workshop, you overpay a certain amount, since the order size is small. It is much more profitable to do it yourself, but this will require at least basic carpentry skills. If there are none, you can try to assemble a box from plasterboard or still use the services of professionals.
Subtleties of ventilation network installation
The layout of ventilation networks must contain a minimum of connections. Air ducts are connected using two methods: flanged and wafer.
Flange connection. Parts with flanges located at the edges are fastened with screws or rivets, which are located at a distance of 20 cm from each other. To make the seams stronger, they can also be welded.
To ensure that the joints are airtight, it is recommended to seal the flanges with rubber gaskets.
Scheme of assembling an air duct from several elements using the flange method. The elements that will be used to attach the structure to the load-bearing surface are also indicated (+)
The wafer method involves connecting parts using a band made of metal slats. This method is considered more economical because it allows you to quickly assemble the structure with minimal use of additional components.
What should you pay attention to?
The assembly of the air duct from rigid parts should be carried out in the following sequence:
- Before carrying out work, the system must be divided into several blocks. The length of each of them should not exceed 15 meters.
- Connection points are marked on all parts of the site - air ducts, shaped elements.
- At these points, holes of the required diameter are drilled.
- Clamps secured with bolts are connected to them. The joints are treated with special tape or sealing compound.
- Then the complete installation of connecting components and air ducts is carried out into a single unit, which is secured with clamps and other parts.
- The assembled block is lifted and suspended on a bracket or other fastener.
- The element is connected to a previously completed ventilation section, and the diameter of the seams must be sealed.
Installation of a system made of flexible or semi-rigid elements is somewhat simpler, since in this case it is easier to make turns and bends
It is important not to forget to carefully seal the seams
The distance between the air duct fastenings is 1.8 meters when the system is placed vertically and 1 meter when placed horizontally. The permissible sagging rate of a flexible element is 5 cm per 1 meter
When assembling a system from flexible semi-rigid elements, you need to pay attention to the following details:
Before installation, the fully flexible element should be stretched; When stretching a corrugated hose, it is important to follow the direction of air movement indicated on the pipe packaging; When placing the air duct, you need to avoid its proximity to heating systems; the bending radius must correspond to twice the diameter of the duct or exceed this figure; The sections are fastened using plastic clamps, foil tape, hangers, and clamps. All joints should be carefully sealed; when laying the system through a wall, you need to use special adapters - sleeves. Installation of air ducts can be carried out both with and without insulation
Thermal insulation prevents condensation from forming in the supply ducts, so it is recommended to install it when laying ventilation elements in unheated rooms or outside buildings
Installation of air ducts can be carried out both with and without insulation. Thermal insulation prevents condensation from forming in the supply ducts, so it is recommended to install it when laying ventilation elements in unheated rooms or outside buildings.
If the air duct is installed in a living room where it is desirable to maintain a reduced noise level - a study, a bedroom, a children's room, you should think about sound insulation. A good effect is achieved by using air ducts with large wall thicknesses, as well as wrapping structural elements with sound-absorbing materials.
Shapes, types and design of boxes at the entrance to the kitchen area
The classification of kitchen ventilation ducts occurs according to several criteria. Based on the size of the element, there is a division into small-sized (up to 600 mm in diameter) and large-sized (more than 600 mm).
According to their geometric shape, ventilation ducts can be:
- Round.
- Rectangular.
- Square.
- Curvilinear.
- Made in the form of complex geometric shapes (with a combination of several channels in one niche).
In most cases, the boxes are located in the far corner of the kitchen. In some apartments they are placed on a straight section of the wall or near the door.
Ventilation duct located in the corner of the kitchen Source 1zoom.ru
Ventilation shaft designed in accordance with the interior of the kitchen Source www.remontbp.com
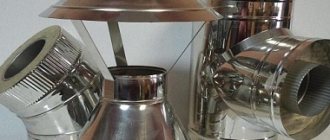
Another classification of boxes is related to the material from which they are made:
- Galvanized metal. Soviet-made “galvanization” is not subject to corrosion and is characterized by increased durability, strength, and low weight. There are options made in the shape of a rectangle, square, and in rare cases – round.
- Asbestos cement. In modern construction, such materials are not used due to their heavy weight and poor tightness. You can find these in houses built during the perestroika period. The developer (a cooperative or an organization constructing buildings for its own employees) used asbestos-cement pipes in order to save money.
- Reinforced concrete. It can be observed everywhere, including in modern construction. They are present in economy-class panel houses, assembled from solid reinforced concrete panels cast in specialized factories.
- Polyvinyl chloride. A unique type of plastic that is popular in the construction of modern high-rise buildings. The advantage of the material is its light weight, simple installation technology, and combustion resistance.
Ventilation duct built into the kitchen unit Source roomester.ru Ventilation ledge lined with porcelain tiles Source modus-dendro.ru
Exhaust systems
Exhaust systems in the kitchen are installed above the hob. During the cooking process, they draw out air containing steam, fat particles, combustion products of vegetable oils and other residual substances. With the help of exhaust systems, all specific odors are removed from the room, leaving the air in the apartment fresh.
There are several types of kitchen hoods:
- wall-mounted – located near the wall above the hob or stove;
- island - mounted to the ceiling above a free-standing stove or island element, a set with a built-in hob;
- built-in - flat models, as a rule, are embedded in a hinged module of a kitchen unit located above the stove;
- corner - a type of wall-mounted model that has a triangular shape for installation in the corner of the kitchen.
The design of the exhaust system, regardless of the type of hood, consists of an exhaust unit with fans and an air duct through which the drawn air is removed from the room to the outside.
The air duct is connected to the indoor ventilation or led outside through a window.
Most often in apartment buildings you can find the first type of connection of the air duct to the ventilation grille in the wall.
Due to the peculiarities of the kitchen layout, a fairly large space is formed between the ventilation grille in the wall and the installation location of the hood. Although it is technically easy to extend the air duct from the hood to the ventilation using a flexible corrugated pipe, in practice this spoils the aesthetics of the kitchen.
To mask the air duct pipe or as an alternative to it, special ventilation ducts are used. They perform both decorative and utilitarian functions, masking parts of the exhaust system that should be hidden from view.
We recommend that you read: How to make scaffolding from a profile - drawings and instructions
Preparation for installation
Before starting the main work, you need to free up the space where the work will be carried out, remove unnecessary fasteners and old coating from the wall and ceiling surfaces. Then you should prime the walls and ceiling. Next, markings are made for the frame. You need to start from where the pipe will be located. As a rule, it rises vertically upward and runs horizontally under the ceiling.
The marking order is as follows:
- The required distance is measured from the lowest point of the ceiling and marked on the wall. A horizontal line indicating the lower boundary of the box is drawn using a level.
- A distance is set aside from the top of the wall, a mark is made and a horizontal line is drawn across the entire ceiling.
- From the two extreme points on the wall and ceiling, two more lines are drawn, perpendicular to each other. It is better to use a plumb line and level for this. On the other edge they do the same. As a result, the outlines of the future box should form.
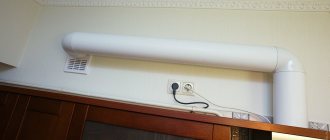
Air duct in the kitchen interior: design and disguise possibilities
Not every ventilation duct model will look good in the interior. In this regard, a better option are plastic pipes, which can be painted in the color of the kitchen unit or walls. Corrugated models cannot be improved with the help of coloring agents, so you need to know some tricks for disguising them.
To hide the ventilation pipe, you can cover it with a decorative plasterboard box. First, a metal frame is made, which is mounted on the wall above the air duct, then it is covered with plasterboard and decorated to your taste.
The advantage of this method is that the box can also be used to hide the hood, for example, if it has a built-in design or does not fit into the interior. The structure can be decorated using decorative plaster, paint, ceramic tiles or wallpaper - in any way that suits your imagination
You shouldn’t overdo it with the amount of decorations, because the purpose of the box is to disguise the ventilation, and not to focus attention on itself
Instead of drywall, you can use plastic profiles to create the box. They will look good in an interior where there are already plastic elements, for example, in the design of the ceiling. A plastic box can often be purchased at a store that sells pipes for air ducts. In this case, you will receive a ready-made structure that can be safely mounted on the wall.
There are several options for masking a pipe using kitchen furniture. To hide the air duct laid under the ceiling, you can purchase a set with a protruding visor in the upper part, which will create a shadow and hide the visible part of the pipe.
A more reliable option is to allocate a separate kitchen cabinet, into which you can install both the hood itself and communication pipes.
Hood box in the kitchen: design options for non-standard situations
The location of the common ventilation shaft, especially in older homes, is often a problem that must be addressed when trying to rationally place an air purification system. If the shaft is located in the corner and protrudes by 40-50 cm, then there is practically no other way to beat the ventilation duct in the kitchen by making it an element of furniture.
It is most appropriate to make a false pencil case from the box. If the furniture is of two colors, then this design should be made dark: it will visually divide the corner furniture into two zones, which in practice may have different purposes: for example, a work wall with a hob and sink on one side of the room and household appliances on the other.
An example of the location of the hood and duct in a kitchen with a ventilation shaft in the corner
Extending the common channel by less than 40 cm expands the design possibilities for a kitchen with a ventilation duct in the corner. The upper and lower parts can be covered with a wall cabinet and a cabinet, respectively. This will increase the working surface, and the furniture elements will be functional. It is recommended to decorate the open parts of the channel with the same material that is used above the entire tabletop. Or you can organize a separate area where you can place kitchen utensils or interior items.
The proposed photos of kitchens with a ventilation duct in the corner show ideas that will help you choose an option that allows you to turn the problem of a protruding duct into an interesting design element.
In a situation where the common ventilation duct is located in the wall and protrudes slightly, resorting to creative solutions by making an electric fireplace or a rock out of it is only possible if the room size is at least 16-20 m². With a smaller area, it is better to decorate the ledge with a material common to the walls and decorate it with non-voluminous interior items. Alternatively, you can place a TV on it.
Decorative boxes for hoods in kitchen interiors
The desire to decorate ventilation ducts is quite natural. After artistic processing, the simplest design of regular geometric shapes acquires an aesthetic appearance and complements the design. The main materials for the manufacture of decorative boxes are:
Decorative hood boxes are made of wood, metal and plasterboard
- tree;
- metal;
- drywall.
Wooden boxes go well with classic kitchen furniture that has front parts made of wood or imitating this material. Such a box retains its style, organically fitting into the overall interior. Wooden structures are quite heavy and require strong fastening.
Until recently, metal boxes served both as decoration and as an air outlet. Most modern metal products are covered by corrugated pipes or telescopic systems placed inside, used in suspended structures. Metal boxes harmonize well with similar or glass hob surfaces. They perfectly complement a modern interior in modern and high-tech styles.
By themselves, plasterboard boxes cannot perform the function of air exhaust. They only hide the pipes through which the air flows. Typically, this device is used in cases where it is necessary to close a channel in a hard-to-reach place or the designed box has an irregular shape. The advantage of this model is the variety in the choice of options, allowing you to show your wildest imagination. The inability to clean the air vent without damaging fragments of the plasterboard structure can be considered a serious disadvantage.
Metal decorative boxes fit perfectly into high-tech, loft and modern styles
Helpful advice! When choosing or manufacturing a decorative ventilation duct, the dimensions must be correlated, first of all, with the parameters of the room as a whole. Otherwise, it may obsessively dominate or, conversely, get lost in the interior as an unnecessary addition.
DIY installation features
If you decide to install the air duct yourself, then this process consists of several stages:
Initially, you should determine the location where the air duct will be installed. This area requires preparation. The hood is installed locally, based on the purchased model. Use a tape measure to measure the required installation level. After this, you can apply markings.
If you cannot make the required level due to the surface of the cabinet, which is installed above the stove, you will need to cut it a little. In most cases, you will be able to determine the height of the bottom of the hood using the device's motor. As a rule, the size is 0.5-0.7 meters.
Once you have checked the level of placement of the structure and made marks, you can begin sawing off the side parts of the cabinet to the required length. For tools, you can use an electric jigsaw, which has a “clean cut” wood saw.
With this device you can make a good quality cut. If you do not have the opportunity to find such a device, an ordinary hacksaw can replace it.
This work can only begin when you have removed the cabinet from the wall. To obtain a high quality surface, when interacting with hand tools, you need to maintain an angle of 20-30 degrees between the working area and the surface of the cabinet itself. If this condition is not met, then chips will appear on the back side, which will affect the aesthetics of the furniture.
To install a through-type metal duct, you will need to make a large diameter hole. The role of a metal air duct can be a corrugated pipe or a pipe with a smooth surface. You need to attach a flange to the place where you plan to form the hole. It will play the role of a template, due to which the holes are marked.
You will need a drill with a wood drill with a diameter of 8 mm to drill a through hole inside the intended marking.
It is necessary to insert a file from an electric jigsaw into the resulting hole, with the help of which you should cut out the required component according to the markings.
If you have selected a suitable file, the cutting quality will be as high as possible. Otherwise, additional processing of the edges with sandpaper will be required. After this procedure, you can install the prepared cabinet in place.
To provide the motor with electrical energy and lighting equipment, start connecting the wires from the hood to the network. Attaching the ventilation system to its location is the penultimate step in installing the ductwork. You will need to install the device body and make markings for mounting. Create a hole 2/3 the size of the screw in diameter. After this, you can hang the structure body.
When you complete the installation of the hood, connect the air duct to it using steel clamps. Now you should check the operation of the system.
With the help of this guide, you can install the air duct yourself, saving on the services of specialists.
Causes of blockage and procedure for restoring the ventilation duct
Any working system, after a period of time, requires repair of individual elements or complete replacement of all components. The ventilation system is no exception. The main signs indicating a decrease in the efficiency of the air duct are:
- musty air;
- mold and mildew on the walls;
- accumulation of condensation on windows;
- odors are not removed;
- The results of ventilation are noticeable for a short time.
If one of the signs appears, it is necessary to check the condition of the duct and the ventilation as a whole, i.e. the functioning of the engine, the condition of the filters. If problems are not found in the residential part, you need to contact specialists with a request to examine the condition of the general ventilation shaft. Often, signs of poor functioning of ventilation ducts appear due to the following reasons:
The main signs of poor functioning of the hood are a reduction in the cross-section of the air duct, clogging or complete blocking of the duct
- channel blockage;
- reducing the cross-section of the air outlet;
- complete blocking of the channel.
The cause of channel clogging may be the gradual deposition of contaminants on the walls. Sometimes the residents themselves throw construction waste into the ventilation shaft when carrying out repair work. Reducing the cross-section or completely blocking it is often a consequence of illegal redevelopment in apartments, when communications are built into the ventilation duct, or it is dismantled at the level of one apartment, thereby completely blocking the air outlet.
Only specialists who have a certificate for carrying out this activity have access to the inspection and performance of canal cleaning work.
The main signs of poor ventilation are a musty smell in the kitchen, mold and mildew on the walls
If the reason for the failure of the common ventilation shaft is the illegal activities of the residents, restoration is carried out at their expense.
Dismantling of ventilation ducts, price in estimate
Ventilation ducts that have become unusable need repair or complete replacement. Often it is the dismantling stage that becomes problematic due to the difficulty of accurately determining the volume of labor costs and their cost. In order to correctly outline the types of work to disassemble the system, you need to conduct a thorough examination and determine the degree of damage and the number of failed components. Then it is necessary to analyze how many people will be needed for the work, what equipment will be used, what materials will be needed for replacement. Only after this can you calculate the cost of dismantling.
In the case when the entire shaft structure is subject to replacement, the cost of dismantling will increase significantly, because it will be necessary to disassemble the box and remove all air vents and louver grilles.
Prices for dismantling work can be found in GESNr-65-(28-32) and FERr-65-(28-32). The cost of labor costs must also include debris removal and waste removal. The use of reducing factors regarding direct costs of dismantling work (according to MDS-37, paragraph 3.2) is carried out as follows:
The price for dismantling will depend on the volume of work performed
- if the equipment will be used after dismantling, then, taking into account disassembly and preservation for the purpose of preservation, the applied coefficient will be 0.7;
- if the equipment will be used, but disassembly, preservation and storage work is not performed, a coefficient of 0.6 is used;
- if the equipment is not intended for use, but is disassembled and cut into parts, a coefficient of 0.5 applies;
- equipment is disassembled, cut and thrown away - the coefficient will be 0.3.
Drawing up an estimate for dismantling work is a complex and painstaking process; it requires special education and certain skills.