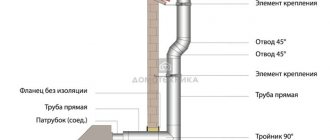
The construction of the bathhouse has been completed, but sometimes it seems that something is missing in the design. And only looking at the chimney, many realize that the most impressive element is missing - the cap.
But first you need to determine what it is needed for, besides decoration, and whether this design will harm the draft. This is where the fun begins.
At first glance, the cap on the chimney is designed to protect it from foreign objects, precipitation, birds and debris.
From a fire safety point of view, this design should help, because debris in the smoke exhaust system can catch fire when the stove is lit.
A chimney clogged with fallen leaves will definitely reduce draft. But this can also happen due to the presence of an umbrella on the pipe.
Important! Umbrellas, caps and other structures reduce draft and can cause reverse draft.
Form and function
The main tasks of the chimney cap:
- Increased air draft;
- Protection against birds accidentally flying into the pipe;
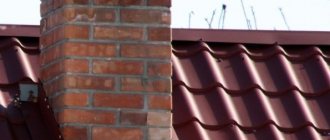
- Preservation of the chimney masonry;
- Protection from snow and rain.
Please note: the use of a hood increases the efficiency of the chimney by almost 20 percent.
The pommels differ in geometry, shapes and sizes. Their varieties are determined by the style of the facade of the house and the peculiarities of the weather vagaries of the area.
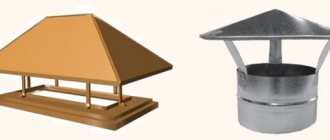
- Umbrella (cover) – protects the pipe from rain and snow. Can be made in the form of a weather vane, flat cover or gable cover.
- Drip cap - removes moisture from the pipe walls and stops the formation of ice.
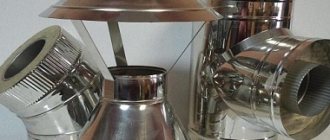
Caps are made from materials that are resistant to the destructive effects of weather conditions. This product is fixed in a very hard-to-reach place, so it is better not to save money and purchase stainless steel or sheet copper.
Some features of the use of caps:
- The semi-circle shaped deflector is more suitable for European design;
- An umbrella with a flat top will look natural on a cottage in the Art Nouveau style;
- A wind vane with a weather vane installed can be equipped with a damper, which will make the pipe work effectively even in the absence of wind;
- A weather vane with a gabled top promotes intensive ventilation;
- Hoods with a movable roof make it easy to clean the chimney.
The difference between a smoker and a weather vane, umbrella, head and cap
In order to have a clear understanding of the chimney, you should understand how this element differs from those that are often confused with it. By definition, it is a metal cap at the top of the chimney. However, a chimney is often called any structure that is installed on an air duct, regardless of its shape and purpose.
Wind vane
It has a slightly different meaning: in addition to the element located at the top of the pipe, the weather vane has such a specific design that it is capable of rotating, thereby accelerating the air, preventing it from entering the chimney. The weather vane helps to enhance the removal of air from the chimney.
Wind vane
Umbrella
A cap-shaped element, similar to the top of a chimney, but designed for round and square pipes. Used exclusively for protection against precipitation . As a rule, it is made in the form of a cone.
Umbrella (right)
Heading
The concept of a top for such an element is small: it is a complex of all elements that are installed on the pipe to protect it . These include caps, chimneys, casing, and connections. That is, this is the entire structure fixed to the smoke outlet.
Heading
Cap
The cap protects and decorates the neck of the pipe itself. The upper part is connected to it. The cap is placed on the chimney, and then the protective element brackets are attached to it.
Thus, each element has its own purpose, name and differs in function.
Cap
How does a chimney cap work?
The air, entering the wall of the lid, turns upward and with its movement draws up the smoke. The chimney begins to work more efficiently and draft increases significantly. When the wind is angular or vertical, an umbrella also helps increase traction. To avoid problems when lowering, you need to install a reverse cone on the lid. In addition, by protecting the pipe from moisture, the deflector prevents the development of fungus and saves fuel.
Please note: a properly made and securely fastened cap should not make noise or vibrate even in a stormy wind.
Installation of a chimney on a brick pipe
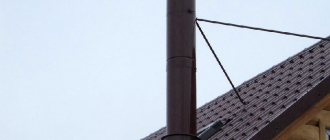
When installing the chimney, first of all, you need to take into account that its weight is impressive (can reach 70 kg) . Therefore, before installing this accessory, you need to decide on the principle of fastening.
CAREFULLY!
The chimney mount must be as reliable as possible and resistant to strong wind gusts.
Otherwise, if the wind blows away this massive element, then, at best, it will damage the roofing, or, worse, cause harm to the health of children playing in the yard, or passers-by.
You can secure the tops of the pipes:
- dowels with self-tapping screws (if the pipe is made of lightweight brick);
- anchors (if the mass of the element is significant).
The chimney should be fastened with self-tapping screws to the very top row of the brickwork of the pipe. Since pipes are often made from lightweight material, holes for dowels should be drilled in the cement joints of the masonry. The diameter of the drill (as well as the dowel) should be 8 mm.
Installation of smoke vane
In order not to waste significant time on the relationship between the holes in the pipe and the accessory, it is better to drill through the holes in the cap that is already put on the chimney. For greater reliability, it is recommended to dip the dowels in cement mortar before inserting them into the wall.
After drilling all the holes and installing the dowels, secure the element with self-tapping screws.
The sequence of work for installing a forged chimney with anchors:
- Assemble box-shaped aprons according to the size of the pipe;
- place the manufactured box on the pipe;
- install the chimney with brackets on the box so that it is possible to mark holes for drilling on the pipe and brackets;
- drill the necessary holes in the box (8.5 mm);
- Drill holes in the pipe at the marked places for 10 mm anchors. Entry depth is at least 3 cm;
- install anchors in the holes;
- Place a lid with brackets on the box;
- According to the holes, secure the elements with bolts.
IMPORTANT!
Pipes for anchoring must be made of dense (not hollow) materials.
Otherwise, the heavy structure of the chimney will not be firmly fixed.
In the context
Next, to protect the chimney from moisture and complete its equipment, casings are installed, which also have decorative functions.
Making your own chimney cap
Making a cover for a fireplace or chimney yourself is not difficult.
To work you need to prepare:
- Sheet of galvanized metal, copper or stainless steel;
- Cardboard and markers;
- Metal scissors;
- Devices for bending sheets;
- Welding machine.
Before starting fabrication, it is important to carefully measure the chimney pipe. Then you need to make a model of an umbrella from cardboard. Pattern drawings:
The umbrella should fit onto the pipe without much effort, so when drawing up the drawing you need to leave an overlap of half a centimeter.
After trying on the layout, the drawing is applied to a metal sheet. The workpiece is cut out with scissors. Using bends, the material is given the desired shape. The joints are fastened with 3-4 rivets. Making droppers is similar.
The brackets are cut from metal plates and attached to the apron and top by welding. Welding points must be treated with a primer. The entire cap is additionally coated with anti-rust compound and paint.
Afterwards all that remains is to put it on the fireplace chimney. All joints must be treated with fire-resistant sealant.
The umbrella must cover the entire plane of the chimney. Some structures have a half-brick protrusion, which also needs to be covered from rain.
Please note: in winter, ice or snow may form on the cap. It is important to choose the thickness of the metal so that it does not get pressed under such a weight.
An excessively high or too low lid will not fully remove smoke, so it is worth making drawings taking into account all the necessary parameters. It is not difficult to use a cap to correct defects in the chimney, for example, if it is not of sufficient height.
You can decorate the deflector using a forged weather vane. This will be a durable and practical solution.
Even novice craftsmen can make a chimney cap on their own. It is important to take measurements carefully and choose high-quality metal. A well-made deflector will correct shortcomings in the operation of the chimney and provide constant draft in any weather. And if you apply a little creativity in your work, the product will become a decoration for the facade of the house.
Classification
When choosing a visor, consider several characteristics.
By material
The durability of the visor depends on the quality and type of materials. When choosing options, pay attention to copper fixtures. Such material, as it ages, becomes more attractive and will serve reliably for 50 years.
The main part is the umbrella, which is best made of stainless steel or galvanized. Or you will have to remove the cap every year and re-paint it.
Inferior to a copper visor in terms of service life by 15-20 years, stainless steel parts are much cheaper.
Titanium is attractive for its durability and good metal properties, but is more expensive than stainless steel.
Therefore, in this question (which cap is better?) there is no clear advice.
Someone buys a copper cap with an architectural composition, or a simple galvanized umbrella - any design must reliably protect the chimney. And appearance is a secondary concept.
By shape
Here the choice is so individual that it is impossible to give advice. We’ll just list the shapes of the caps, and the choice depends on the preferences of buyers or home craftsmen:
- semi-cylindrical or vaulted;
- hipped, the simplest and most popular design;
- hipped - closer to the European style of buildings and roofs;
- with two slopes, found on half the roofs in the country;
- made in the form of a tower spire, reminiscent of caps in Gothic castles;
- flat with a slight bevel - this design is usually installed on the modern style of building architecture.
You can often find hoods with built-in weather vanes, with a special damper designed to provide sufficient draft and exhaust gases to escape even in strong gusts of wind.
The air flow entering the chimney creates an air lock and reduces the amount of oxygen in the combustion chamber to a minimum.
By purpose
According to their purpose, protective devices are divided into:
- a cap installed on the chimney of a stove operating on solid fuel;
- for servicing heating boilers and pyrolysis furnaces, install canopies with open nozzles;
- Boilers operating on gas or diesel fuel are equipped with deflectors with an open nozzle. Such devices create additional draft and can serve to ventilate the entire room and create favorable conditions for fuel combustion.
Purpose and functions of the chimney cap
The cap on the outer part of the chimney pipe is a rather important element that performs several functions at once. A correctly selected pipe part complements the appearance of the building well, emphasizing the design style. At the same time, the cap has compact dimensions, is easy to install and increases the efficiency of the chimney.
A chimney cap can become an original decoration for the roof of a residential building
The chimney cap is made of metal, as this material ensures the strength and durability of the product. The simple design performs the following functions:
- protection of the inside of the chimney from moisture, debris and dust;
- increased draft in the pipe for efficient combustion of fuel in the furnace;
- aesthetic addition to the building design;
- extending the life of the chimney as a result of its protection from precipitation.
A rectangular or square shaped cap is the most common option. Such an element provides effective draft and complements the chimney design well from an aesthetic point of view.
Materials for the chimney
The cap is located outside the chimney and is exposed to climatic factors and ultraviolet rays. Therefore, for the manufacture of the chimney, only high-quality, durable materials that are resistant to various factors are used.
Metal is a practical basis for a chimney
To make a cap, various types of metals are used, each of which has different properties and characteristics. The main options are:
- sheet steel;
- sheet aluminum;
- rolled copper metal;
- stainless steel in sheets;
- zinc - titanium alloy.
Depending on the material that served as the basis for the cap, the characteristics of the product differ. For example, the service life of steel chimneys is about 5 years, and models made of sheet aluminum can be used for 8 years. The most durable caps are made of stainless steel, zinc-titanium alloy and copper, the service life of which reaches 50–100 years.
Design options
There are many options for chimney caps that differ in appearance. Moreover, the design of all types of products includes a base, an upper roof and vertical posts. This cap is simple and protects the chimney well from precipitation. More complex options are deflectors, one of the main functions of which is to enhance traction.
Deflectors are varied and can be either simple or more complex.
Among the most popular smoke vent options, the following are especially noteworthy:
- cap with opening lid;
- flat chimney for pipe;
- cap with weather vane;
- cap of multi-slope design;
- deflector with ventilation holes.
The choice of a specific option is made depending on the type of roof, the design of the house, the shape and design of the chimney. For example, for a round metal pipe, metal deflectors are optimal, providing enhanced traction.
Photo gallery: types of chimney caps
Choosing a hood depending on the chimney
The correct choice of a chimney cap is the key to effective heating of rooms in the house and the absence of chimney breakdowns. The choice of chimney type is made depending on the type of pipe and heating system. For example, for the chimney of a gas boiler, only elements in the form of a nozzle with an open top are used. This model eliminates the possibility of ice covering the entire surface of the hood during the winter season.
Products in the form of a pipe are optimal for a gas heating system
For brick outlets, multi-slope, rectangular or square elements are often used. Precipitation does not accumulate on the surface of such caps and therefore the chimneys are not subject to significant load. The shape of the deflector is selected depending on personal preferences and the design of the building. Many cap options can be easily complemented with a forged weather vane or twisted elements.
Architectural form
As for the architectural shape of the cap, a multi-slope weather vane can perfectly protect against precipitation and snow. This chimney looks very impressive, especially if you place figures of any animals made of metal on top.
Models with a flat surface are more often used. There are caps with an opening lid, which are also popular. They are convenient for preventive maintenance and unhindered maintenance of the chimney. The deflector, which has a ventilation hole in its body, significantly improves traction.
But the smoker is not always used. There is virtually no need for it in areas where there is rarely precipitation and virtually no wind. But for Russian latitudes it is a necessity.
Making a cap with your own hands
The most common and universal option is a rectangular cap with four slopes. Such a product is easy to purchase, but you can make a simpler, but no less effective semicircular version with your own hands.
The semicircular smoke vent is simple and easy to use
To do this, you will need a sheet of galvanized metal with a thickness of 1 mm, rivets, and metal scissors. A set of devices complements the marker for marking. The dimensions of the structure are preliminarily determined and a life-size drawing is made on cardboard. You can make a drawing yourself or take a ready-made diagram as a basis and adjust its parameters.
For a semicircular chimney, you can use a drawing of a pitched structure by changing the shape of the lid
The complex of works for the manufacture of a chimney involves the following stages:
- A rectangle is cut out of a sheet of metal, which will become a semicircular roof of the chimney. To do this, transfer the drawing to the metal and cut out the element with scissors.
Galvanized steel is easy to process
Metal strips or profiles allow you to make a frame for attaching the cap
The frame can have a stepped shape
Making a cap for a chimney pipe with your own hands is not difficult, but precise determination of the parameters of the product is important. High-quality materials are also the key to creating a durable structure.
How to make a smoke box for a chimney with your own hands
Despite the fact that the design of the cover is simple (which we have already discussed several times), making such a device at home is quite difficult. Therefore, if you do not have experience in this area, first make an accurate drawing and transfer it to a piece of cardboard of the appropriate size, cut it out and carefully consider possible methods of fastening and connections. Then, as soon as the situation is more or less clear, cut out the corresponding parts from the metal and you can begin assembly. Let us repeat, it is very important to correctly measure the chimney pipe, as well as strictly adhere to the obtained data during the manufacturing process.
Cap function
Before starting work, you need to know exactly the full range of functions that the cap can perform in order to take into account all the subtleties during manufacturing.
It is installed in order to:
- the following did not enter the pipe space: debris, snow, rain, birds;
- for a long time the pipe itself did not collapse under the influence of temperature changes, moisture, or icing, because in most cases the pipe is laid out of brick;
- strengthen the top layer of the chimney masonry;
- increase traction up to 20%;
- create a windproof exhaust gas outlet;
- decorate the highest point in the house structure.
Atmospheric phenomena put pressure on waste gases, even if the ventilation pipe is made according to technological requirements.
However, according to the physical law of aerodynamics, when a flow of cold air comes into contact with the hood and goes around the installation, a discharged area is obtained, then the air begins to move at a higher speed, which increases the draft in the chimney and allows heating devices to operate more efficiently.
Types and material of manufacture
The element can be made of various materials (copper, steel, galvanized steel, any other stainless metals). Most often, the coating of the material from which the upper part of the pipe accessory is made is polymer or powder-coated.
NOTE!
If you plan to insulate a house using firewood, then chimneys should be used without special painting.
The paint will fade quite quickly under the influence of high temperature, and the protective element will become covered with a layer of soot.
Smokers are classified according to their manufacturing method:
- standard _ The size of such an element directly depends on the cross-section of the pipe. It consists of the lid itself and the skirt element. In addition, there are connecting elements of these parts. Installed on most types of pipes, as well as false pipes;
- increased traction . Such additional parts are installed in places where enhanced exhaust air removal is required. They come with a double lid, and may have an additional forced exhaust function;
- chimney with additional cover . The presence of a cover on the top allows the pipe to be cleaned or repaired;
- with a flat roof . It is advisable to install on flat roofs. Optimal in warm climates where there is no snowfall. In colder zones for flat roofs, wave-bent chimneys can be used, but the roof slope must be at least 40°;
- chimney with mesh . It differs from the standard version in the presence of a metallized mesh, which protects against nesting birds, debris and other external blockages.
The manufacturing options for pipe elements are different, however, they all must be larger than the pipe itself and equipped with additional parts.
Materials and tools used
Among people, the cap is called a visor, a chimney, a fungus. Its scientific name is deflector.
Forged deflectors are very original, but their price is not always justified. After all, you can make a cheaper structure from the following metal material:
- galvanizing;
- stainless steel;
- steel with paint and varnish coatings;
- aluminum;
- copper
The most convenient, practical and cheapest is galvanized sheet.
You need to have the right tool. List of what you may need during work:
- rubber or wooden hammer;
- small iron hammer;
- screwdriver;
- electric drill;
- drills of the required fastener diameter;
- rivets;
- fastenings;
- roulette;
- marker;
- construction corner;
- bends;
- special clamps;
- metal scissors;
- metal ruler;
- iron corner up to 1 meter in size.
Purpose and design features
Typically, pipe waterproofing is chosen at the stage of completing a house heating system project, but sometimes it becomes necessary to install a new pipe of an already erected structure, for example, during reconstruction or major repairs of a roof or heating supply circuit with a replacement of the thermal energy source.
In order to select a chimney seal, you need to analyze the following data:
- Passage installation location.
- Schemes and method of equipment for passage through the ceiling and roof, in order to create guaranteed thermal insulation and waterproofing.
Important parameters of the functioning of a residential property and its engineering equipment will depend on this choice:
- Chimney capacity;
- permissible high temperature conditions of flue gases;
- efficiency of boiler equipment;
- sanitary safety and absence of carbon monoxide pollution in premises;
- Fire safety;
- aesthetic appearance of the roof;
- heat protection and moisture protection at the connection point between the pipe and the roof;
- roof tightness;
- choosing the location of the chimney.
Experts believe that the best option for the location of the pipe is to install it near the edge of the roof.
Advantages of placing a pipe with a roof edge:
- It makes it possible to reduce the accumulation of snow drifts near the pipe, and prevents the formation of snow pockets, which prevents the roofing from leaking.
- This arrangement ensures a small pipe height, reducing emissions of harmful substances into the atmosphere and the possibility of acid condensate forming in chimneys.
The structural complexity of connecting the chimney with the roof is due to the fact that such a transition must satisfy the following requirements:
- Impermeability and resistance to atmospheric phenomena;
- heat resistance that can withstand flue gas temperatures;
- ease of implementation and durability in operation;
- elasticity or flexibility to withstand temperature changes in smoke ducts caused by heating/cooling of walls when starting or stopping a heating source.
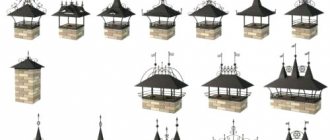
Deflector shapes
The shapes of the deflector or head can be striking in their diversity.
Therefore, you need to decide which shape of the deflector will be ideal for the ventilation pipe, while still looking neat.
- round,
- square;
- hip;
- conical;
- tent;
- standard hipped;
- with a flat umbrella;
- with a semicircular umbrella;
- gabled with four slopes and a high roof;
- with weather vanes.
Step-by-step instructions for making a simple cap
Initial data: stainless steel chimney pipe Ø 120 mm, solid fuel boiler, cap made of galvanized sheet steel 0.45 mm thick and painted with polymer paint.
Stainless steel chimney pipe
We will look at the simplest, but very effective version of the cap. It can be done at home without the use of special tools and equipment available from professional tinsmiths.
Step 1. Decide on the diameter of the cap. Practitioners recommend that its edges protrude beyond the perimeter of the pipe by at least 10 cm on each side. Using this value, you can find out the diameter of the circle that needs to be cut out of metal.
A circle is drawn on a sheet of metal
Calculations are made this way.
- Add the amount of cap overhang on each side to the pipe diameter. In our case, the pipe diameter is 120 mm, add 200 mm to this value (100 mm + 100 mm), we get 320 mm.
- Now this amount needs to be increased by another 50 mm. This increase is required to compensate for the reduction in size due to the bend of the cap. The fact is that it will have the shape of a cone, and when bent, the diameter of the flat circle decreases. In our case, to make a cap, we need to cut out a circle with a radius of (320+50):2=185 mm.
Of course, these are not real mathematical calculations; they are much more complex. But for the cap there is no need to accurately calculate all the dimensions; tolerances of a few centimeters do not play any role.
Drawing metal with bending allowance
If you want to make a simpler cone design, then do not cut out the segment, but only cut a vertical line to the center of the circle. During bending, the excess metal will overlap; in this place it is convenient to drill holes and place rivets.
Step 2. Using hand metal scissors, cut out the workpiece and remove the wedge from the circle.
Cut blank
Step 3. Make special folds on both sides of the workpiece to secure the cone. This should be done in cases where rivets will not be used to secure the cone. Hems must be made with a hammer.
Bends for fixing the cone are made with a hammer
Height is approximately 0.5 cm, twisted in opposite directions. Do not squeeze the folds all the way; this is done at the final stage of making the cone. If it is difficult to work with a mallet, then you can bend the metal with ordinary pliers. The line won't be as smooth, but that doesn't matter. The cap is installed very high on the chimney; from the ground, such minor problems are completely invisible.
You can bend metal using pliers
Step 4. Bend the cone, inspect the connection. If any parts interfere with fixation, they should be bent or cut off. The lock must operate clearly along the entire length of the cap.
Bent Cone
Step 5. Shape the cap. To do this, it needs to be gradually bent using the so-called straightening. This is a piece of pipe with a diameter of ≈ 50 mm, fixed in a vice. Gradually bend the circle until it takes the shape of a cone. Constantly check the product, do not bend it too much.
Bending the cap
Step 6. Connect the lock and rivet it. Try to keep the line as straight as possible.
You can rivet a castle with a mallet
At this point, the most difficult stage of making the cap is completed, you can begin preparing the legs for fixing it. First, the legs themselves are made; for them it is necessary to have three strips of metal approximately 2 cm wide and up to 15 cm long. To give the legs greater rigidity, a fold should be made along the edges.
Folds are made on the legs - fold
Leg making, process
The cap is fixed to the pipe with a clamp. You can buy it ready-made in a special store or make it yourself. The second option will require more time, but the design has a finished design in the same style.
The last stage is to mark the places where the legs are attached to the cap, drill holes and secure the elements. It is better to use rivets for fastening. The lower end of the legs is attached to the clamp using the same hardware. Now all that remains is to secure the cap to the chimney pipe.
Attaching the legs
Attaching the ring to the legs
Cap on the pipe
Fixing the cap ring
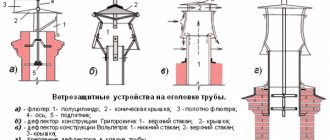
Types of exhaust hood
The types of exhaust hood also have a variety, but the most popular are:
- tsags are a simple model that can be made in a workshop;
- Grigorovich;
- It is difficult for a beginner to make a spherical “Volper” with his own hands, since machines are required;
- H-shaped;
- star shape "Shenar";
- ASTATO open.
You can find plastic hoods on sale; they are best used for basements and garages; for high-rise structures they are fragile and do not last long.
Grigorovich deflector
Aerodynamic chimney caps. One of the options
Experts recommend installing deflectors on the metal pipe of solid fuel boilers. In all other options, chimney caps are recommended. The shape of the cap is chosen in accordance with the shape of the chimney: round umbrellas are usually placed on round ones, and in the form of a small pitched roof on square and rectangular ones.
Experts do not have a very good attitude towards weather vanes: constant vibration and considerable weight quickly destroy even well-built pipes. So if you wanted to have a weather vane, think about it carefully: it not only has an adverse effect on the chimney, but also wears out quickly due to constant friction.
Another time-tested design is the Grigorovich deflector. which is installed on round chimneys to stabilize draft. The Grigorovich deflector consists of several parts:
- deflector in the shape of a truncated cone;
- a cap that protects the pipe from precipitation;
- a reverse cone that creates an area of reduced pressure under the hood and improves traction.
The Grigorovich deflector can be made from the same materials as the above models; their manufacturing technology is generally similar. Dimensions are determined based on the diameter of the pipe. It is taken as a basis and, using the coefficients, the remaining dimensions are calculated:
- The diameter of the cone-shaped diffuser in the lower part is taken to be 2d, in the upper part - 1.5d, the height of the truncated cone - 1.5d.
- The cone-shaped umbrella cap and the return cap have a diameter of 2d and a height of 0.25d.
- The distance from the top of the return hood to the top edge of the diffuser is also 0.25d.
- The distance from the top edge of the pipe to the bottom edge of the diffuser is 0.15-0.2d.
The last two sizes are provided with brackets of the required height, which are made from scraps of tin and secured with rivets, bolts or by welding.
Manufacturing and installation technology:
- A sketch is made using the calculated dimensions, transferred to sheet metal and the elements are cut with metal scissors.
- The cones are bent on a mandrel and the edges are fastened with rivets or by bending. The umbrella and the reverse cone are connected in the same way.
- Using brackets, the parts are fastened together, maintaining the calculated distances.
- Attach the deflector to the pipe. To facilitate its installation, the deflector can be equipped with a lower cylinder, the diameter of which allows it to be pressed onto the pipe.
The service life of a cap or deflector made of stainless steel is 25 years, and that of galvanized steel is at least 10 years. To extend it and give galvanization an attractive look, you can coat it with black heat-resistant paint from a can. In this case, soot and soot will not be visible on the cap.
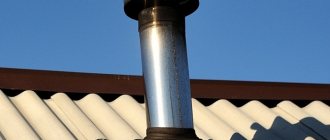
Installing a cap on a chimney is quite simple, and the benefits of it are obvious - you no longer have to waste time cleaning the chimney from leaves, fluff, and dust at the beginning of the heating season. Precipitation will not get into the pipe, which will allow it to be used without corrosion or destruction of the brick. Installation of the deflector, in addition, will make the draft stable even with a small pipe height, regardless of weather conditions.
Manufacturing technology of the Tsaga deflector with drawing
Manufacturing drawing of the Tsaga deflector. (Click to enlarge)
First you need to decide on the dimensions of the external and internal pipes. Measurements must be accurate.
The outer diameter of the stove hood fits tightly onto the chimney pipe.
The main parts are made in proportion to the internal diameter:
- the inlet pipe is placed on the pipe;
- the outer cylinder is a diffuser, its size should be approximately 30% larger than the internal diameter of the pipe;
- cover, its size should be about 90% of the pipe diameter.
In order to correctly calculate the dimensions of the deflector, a table is provided.
- A drawing is made on paper to match the shape and dimensions of the cap.
- The patterns are applied to a metal surface and cut out with metal scissors.
- The resulting parts must be bent according to the design and connected with rivets.
- The finished parts of the deflector are assembled in the workshop, and at a height they are only fixed above the pipeline.
Pros and cons of materials
The space where the combustion pipe passes through the roof is a particularly sensitive structural element. If this area is not properly protected, leaks will occur during operation. The negative consequences of technological violations in the arrangement of the chimney at the junction with the roof include possible fire and destruction of the roofing system.
The most typical materials for seals are: cotton wool, filter rolls and kaolin boards.
Cotton wool, it is sold in the form of rolls or crushed powder, with short mullite-siliceous fibers. Properties of cotton wool:
- Highest heat-resistant qualities;
- low thermal conductivity and low heat capacity;
- especially chemical-resistant material;
- high resistance to vibration, deformation loads and thermal shocks;
- insignificant density and flexibility;
- strong fit to the installation site;
- fire resistance;
- excellent sound insulation.
Currently, only one significant disadvantage of mineral wool is known - hygroscopicity, which in a humid environment spoils the thermal insulation properties of the material. Self-moistening of mineral wool by 2% shifts the thermal insulation characteristics to the worse by 10%. As a result, there are established layout schemes - the use of hydro- and vapor barriers, the installation of ventilation openings. Some experts consider dusting to be a disadvantage of cotton wool. However, as a rule, no master uses mineral wool in open systems, as a result of which dusting is difficult to classify as a defect in the material.
Roll filters. Produced from fibers with a mullite-siliceous composition. They are distinguished by their elasticity and can be easily cut with a regular knife. They can be simply fixed mechanically or using an inorganic glue composition.
Asbestos or kaolin boards. They are also made from mullite silica. They show resistance to alkalis and acids, however, when working in high temperature zones, auxiliary insulation of the slabs from the influence of aggressive acid condensate is necessary.
Distinctive properties of kaolin/asbestos boards:
- Stability to the influence of moisture, steam, mineral oils;
- stability to the influence of molten metals;
- low thermal conductivity;
- elasticity and low density;
- good sound insulation;
- high electrical insulation parameters at T 700-800o C;
- stability to vibrations and deformations.
The disadvantage of such slabs is their exposure to acids at high temperatures, which requires additional insulation.
Manufacturing technology of a rectangular exhaust unit with a weather vane
Drawing of a rectangular chimney cap. (Click to enlarge)
- Cut a rectangle out of a sheet of iron, taking into account when bending it so that there is 10 cm for the chimney to fit.
- Oblique cuts are made on the sides at equal distances; when joined, these cuts will produce trapezoidal segments.
- Next, four posts are made, attached to the corners of the rectangle, secured with rivets.
- Bend the ends, you get a hole, as in the drawing.
- Separately, cut out a rectangle: bend it into an arch, fasten it - this is a ready-made hood; for originality, you can make a weather vane.
- The finished structure is installed in the chimney pipe.
The pipe is attached to the installation according to what the chimney is made of.
Smoker weather vane
A type of chimney is a weather vane, which is a mechanism for attaching to the chimney and the main body.
This type of element protects from rain and snow falling into the chimney, helps to increase the draft of air masses, and protects the roofing well from damage by sparks.
The top of the entire structure of the weather vane is made in the form of an inclined flat element, its area is larger than the cross-section of the chimney itself.
The plate covers the chimney, and the side structural elements form a gap between its bottom edge and the air duct.
The weather vane has a rotating body, which is mounted on a rod . The rod is mounted on a special bushing. The sleeve has a connection with a cylinder-shaped base, which, in turn, is equipped with a flange.
Operating principle
The functioning of the weather vane consists of the rotation of its moving upper part, which rotates along an axial guide along the air flow. Due to the fact that the air flow envelops the very top of the weather vane, it turns.
As a result, a rarefaction of the air flow occurs between the chimney outlet and the weather vane itself. This increases the air draft from the chimney.
Principle of operation
The weather vane can be presented in various designs: in the form of eagle heads or dragons, a stork or a falcon. The variety of forms of such elements allows you to complement the architectural ensemble of the building with an appropriate solution for choosing an additional element.
Materials
The material from which the head is made affects the durability of the structure. Common samples made of steel, copper and zinc-titanium alloy:
- Steel canopies for chimneys are the cheapest. But they have a short service life. After 5 - 10 years, this additional element will need to be changed. When operating TT boilers, the service life of steel caps is even shorter (3 – 5 years). Galvanized iron is even less durable. It burns out quickly. Using stainless steel will extend the life of the head up to 30 years. This material is resistant to corrosion and high temperatures. But its price is higher.
- Copper caps are leaders in quality and aesthetics. The high cost of copper products is justified by their durability (from 50 years). The only caveat is that for their installation you will need copper fasteners and hardware. Copper will react with other metals and oxidize, which will lead to wear of the head at the attachment points.
- Zinc-titanium structures also perform well at a similarly high price.
Not long ago, additional roofing elements made from polymers appeared on the market. The relatively low price of such visors did not justify itself. The polymer is not sufficiently heat-resistant, weather-resistant, and is also fragile. Time-tested options made of copper, zinc-titanium and stainless steel are worth the money spent on them.
We make a visor with our own hands - how to cope with the task?
In order to make a pipe cap yourself, it is enough to have a minimum of plumbing skills and, of course, a great desire. There are many drawings on the Internet for making both complex and very simple umbrellas. It will be easy to choose the option you need. And we’ll talk about how to make a basic mushroom house with four slopes.
DIY fungus
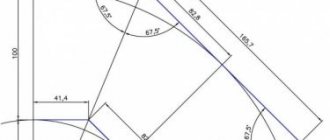
You need to decide on the geometric dimensions of the chimney, apply them to the sketch presented above, and then, using the scan below and a special formula, calculate the exact parameters of the hood.
We recommend making an umbrella from 0.5 mm thick metal, coated with a powder composition, or galvanized. In order not to be mistaken in size, cut out a pattern for the future cap from thick paper (preferably cardboard). It should be made 1 to 1 (life-size). And then apply the pattern to the metal sheets and mark cutting lines on them with any sharp tool.
Cut the metal along the marks and make a visor according to the following algorithm:
- Bend the workpiece along the lines marked on the pattern with the letter D, then along all the dotted lines.
- Drill out the connecting areas of the umbrella with a drill and create a single structure using rivets.
- The supporting legs and base are made from galvanized or powder-coated metal. The supports also need to be connected with rivets to each other.
- Install the made umbrella on the base, fasten it with the same rivets.
- Mount a self-made cap on the pipe.
What is Master Flush
Cuffs with a good degree of compaction are called Master Flash. Flash master for pipes has good elasticity. The cuff performed well when passing through the junction of the roof and the chimney pipe. For the manufacture of Master Flash, different materials are used.
Structural properties of the seal
The differences compared to other systems are as follows:
- Installation in any weather;
- Self-installation. Significant savings on specialist services;
- Long service life. At the same time, companies provide a long-term guarantee;
- Fire resistance at a high level;
- Restores previous dimensions after exposure to maximum temperatures;
- A low degree of looseness gives high tightness;
- Does not rust. Doesn't rot. Does not flake;
- Serves stably under constant temperature changes;
- Elasticity contributes to good envelopment of the pipe.
The big advantage was the reduction in material costs during installation. Waterproofing is not needed.
Differences between seals
Pipe aprons, used previously, became a thing of history after the appearance of the cuff. They are similar in their properties, but the chimney roof seal shows the following advantages:
- Made of silicone, sometimes rubber;
- Cone shape with bendable cuff;
- The cuff ensures that the pipe adheres tightly to the roof without gaps;
- Protection from water and dust is an additional bonus;
- The top of the cone copies the shape of the chimney;
- At the bottom there is a connection with a seal.
Flange base. Made from different types of materials. Silicone, rubber coated roof assembly base with heavy duty ribs, includes metal plates. It helps ensure that the flange matches the shape of the profile.
For a flat roof, insulation cuffs are used that stand at a slight angle. A cone-shaped corrugated element that forms round holes with marks along the radius allows you to arbitrarily change the angles, making a slope in certain ranges. It often turns out that the base is perpendicular to the axis. In this case, a cuff is used for a smooth, flat roof.
General installation principles
Innovative flexible seals have left obsolete seals behind in several ways. The ability to withstand sudden, constantly recurring temperature changes.
No repair required. Service life is not limited, subject to quality compliance by the manufacturer. Assembly does not require extraordinary abilities. The top of the cone is cut to create a small hole. The cone is threaded onto the pipe and then moved down to the base. In order for the work to proceed quickly, you need to smear the pipe with laundry soap. As a last resort, if you don’t have soap on hand, you can simply wet it with water.
The method of fastening the system is directly dependent on the roof covering. Bitumen mastic and silicone glue are used in the case of a flat, smooth roof made of rolled material. If there is a slope on the roof, self-tapping screws are used.
The base of the flanges and the cut of the cone are covered with silicone sealant after installation is completed. This is done to obtain increased reliability. You can additionally put on a clamp for the top of the edge. Regardless of the fixation force, the system will be movable. For example, when exposed to strong heat, Master Flash will not crack or lose its water resistance. When the house shrinks, the cuff will repeat the shape of its surroundings.
Select Master Flash
Dimensions alone will not be enough to select a Master Flash. There are important points to consider. Bendable cuffs with a rounded and square base are suitable for roofs that are designed for an inclination angle of less than 45 degrees. The roof can be made of roofing steel, bitumen shingles, corrugated sheets and other coverings. The seals are mounted on silicone and then attached to self-tapping screws.
A seal complete with a flange on a flexible basis is used for roofs with a slope angle of less than 60 degrees. If the roof is flat and the slope angle is more than 60 degrees, use a compactor where a base with an increased area is used. Master Flash on sloping roofs is the best option available.
Silicone or bitumen mastic is used to attach cuffs to flat roofs. They are placed perpendicular to the base. If the roof is slate or tiled, use a metal-based seal with an area larger than conventional seals. Master flash on metal tiles is installed in the same way.
In the production of Master Flash they use:
- Rubber material of the highest quality, withstanding large temperature changes. The rubber seal lasts much longer;
- Silicone, which is not afraid of changes in temperature conditions, holds about 200 degrees.
Types of chimney boxes?
Today, manufacturers offer two main types of casings:
- Galvanized.
- Corrugated (stainless steel).
The first type of “case” is considered more suitable and in demand. It has high fire-resistant properties. In addition, in terms of service life, such a casing for a chimney on the roof is considered the most durable. Galvanization is, in principle, easy to install, which is certainly considered an important point when choosing. As a rule, metal with a thickness of 0.40-0.50 mm is taken as the basis.
The corrugated stainless steel cover is also very easy to install. In addition, it is the corrugation that has a decisive advantage, namely, it has the ability to take any structural shape, which is quite convenient. By the way, such pipe boxes are highly resistant to temperature and atmospheric changes. And they are less susceptible to corrosion.
You can even make the casing yourself, if you have the necessary tools at hand. So, which material is right for you:
- Aluminum.
- Roofing metal.
- Galvanization.
- Profiled sheet.
- Plastic.
- Slate.
Metal casing
In addition, do not forget that in addition to the box, you also need to select a thermal insulation material characteristic of each product. So, when choosing, focus on:
- Smoke exhaust duct materials.
- The temperature regime is at its peak values.
- Heat-resistant properties of the material itself.
Pay special attention to the choice of chimney insulation if the choice fell on plastic. Like any polymer, it has a number of specific nuances that must be taken into account in any case.
How to choose a chimney umbrella
When choosing an umbrella designed for chimneys, as well as ventilation outlets, you need to pay attention to the quality of the material, and also take into account the diameter of the outlet and the purchased element.
The system of protection from external adverse factors must be thought out at the design stage of the smoke exhaust, with mandatory consideration of all design features.
Umbrella with protective mesh