The efficiency of the stove and ensuring normal draft is influenced by such factors as: changes in climatic conditions (wind, snowstorm, various types of precipitation), the presence of debris, which often falls directly into the chimney and clogs it.
To ensure the normal operation of a pipe in which there is no pressurization, a high-quality chimney is needed, which is able to ensure the timely and regular removal of combustion products. If the option under consideration is not possible for some reason, the presence of such a mechanism as a chimney deflector is an excellent assistant in this matter. Let's take a closer look at the topic - how to make a chimney deflector with your own hands: instructions and drawings.
What causes a chimney pipe to smoke?
A deflector is a device on a chimney pipe, the use of which creates obstacles in the path of air flow created by the wind. To put it simply, this is a very simple, but at the same time highly effective device for protecting the chimney from various types of litter, precipitation, etc.
Experts say that to increase the efficiency of the stove by 25%, it is enough to install a deflector on the smoke exhaust pipe. In order for it to work efficiently, correctly and without problems, it is necessary that the chimney itself be installed as expected (the required height of the structure, its location, the correct cross-section, etc.).
It often happens that the chimney pipe begins to smoke, and in order to eliminate this problem, you first need to find out what are the reasons for this behavior of the structure. So, the first reason is the increased speed and power of air flows due to strong, gusty winds. In this case, the smoke is simply “not allowed” to come out, crushing it with a strong flow entering the pipe.
The second reason is the incorrectly selected chimney diameter (the importance of this factor was previously mentioned). If the diameter is too small, the smoke will not have enough space to exit the pipe normally.
Smoke will be a regular process even if the chimney itself is not located correctly on the roof (as it turns out, even such seemingly insignificant details can affect the efficiency of the structure).
Installation technology
Before installing a particular deflector on the roof, you need to familiarize yourself with the recommendations from the manufacturer and the standards that are specified in the regulatory documents. For example, some of the requirements are present in SNiP 41-01 of 2003. They apply to heating, ventilation and air conditioning systems.
Among the recommendations, we can highlight several comments on the overall height, depending on the removal of the deflector on the exhaust pipe relative to the top point of the ridge strip:
Diagram of the dependence of the height of the wind nozzle on the distance to the top point of the house Source drova-pil.ru
- less than 1.5 meters - the cap rises by more than 500 mm (the same happens on flat roofs, only an enclosing structure is used as an additional guideline - the exit should be higher);
- from 1.5 to 3 meters - at the same level or with a slight excess;
- more than 3 meters - the lower limit is limited by the intersection of a vertical and inclined line relative to the horizon 10 degrees down.
There are also a number of general recommendations. For example:
- a ventilation duct and a chimney located at a close distance must be vented outside using air ducts of identical height (otherwise there is a possibility that one or another exhaust medium will flow back);
- the area for installing the deflector is chosen to be open and out of the influence of aerodynamic structures from neighboring buildings (the airflow must be free);
- rotating types of nozzles are not acceptable for servicing chimneys in regions with cold winters;
- in climates with frequent gusty winds, it is better to consider H-shaped devices;
- connection of pipes of different geometric cross-sections is permitted only with the use of appropriate adapters.
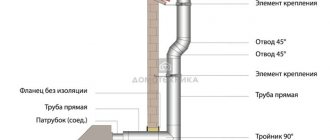
It is more convenient to start installing the air duct deflector by attaching it to the pipe, and then installing the assembled structure on the air duct or chimney.
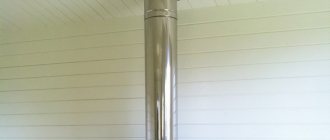
Roof-ready structure Source forsler.by
Types of deflectors for the chimney pipe
After we have figured out the reasons, we can begin to solve the existing problem by analyzing the available types.
By design, there are several types of the device in question:
- “Volper” (has a fairly simple design and round shape)
- deflector for the Grigorovich chimney (looks like a gazebo)
- spherical (the name speaks for itself)
- N-type deflector
- "Shenard" (available in star shape)
- TsAGI
- Double
- "Deflector-Weather Vane"
How much does a deflector cost?
Ventilation devices are calculated together with the entire system. Deflectors of a specific model can be purchased for the required pipe diameter.
Table. Prices for deflectors
| Name | Model | Type of steel | Channel diameter, mm | Price, y. e. |
| "Vent-Class" D-120 | Khanzhenkov deflector | galvanizing | 120 | 18 |
| "Vent-Class" D-250 | Khanzhenkov deflector | galvanizing | 250 | 42 |
| "Fireplace Stoves" TsAGI-100 | TsAGI deflector | galvanizing | 100 | 17 |
| "Fireplace Stoves" TsAGI-220 | TsAGI deflector | galvanizing | 220 | 40 |
| Turbovent "Stabil 120" | Volpert-Grigorovich | galvanizing | 120 | 21 |
| Turbovent "Stabil 260" | Volpert-Grigorovich | stainless steel | 260 | 46 |
| Turbovent "Dragon" Dr-150-CH-A | Turning | stainless steel | 150 | 100 |
| Turbovent "Dragon" Dr-200-CH-A | Turning | stainless steel | 200 | 115 |
| Turbovent "Dragon" Dr-300-CH-A | Turning | stainless steel | 300 | 140 |
Deflectors are often made in artisanal workshops and small workshops (in this case, the product may not have a specific name or connection to the model). An indicator of the quality of the company’s work will be the product passport indicating the dimensions of the parts, steel grade and other details.
Drawings, dimensions and parameters
Each of the available types has its own parameters and manufacturing methods. In order to understand the designs and parameters of such a device, we will consider several of them, and also find out how to make a chimney deflector with your own hands using drawings.
Deflector for the Grigorovich chimney pipe: this type is characterized by its simple design and high efficiency. The height of the device in question is 1.6 d, the width of the manufactured cap should not exceed 1.9 d. During manufacturing, it is also worth paying attention to the carefully selected width of the diffuser; in this case, the parameter in question will be equal to 1.3 d (it is also worth noting that the d value means the selected diameter of the chimney, or more precisely, its channel).
TsAGI deflector: in the form under consideration, the correctly selected size of the diffuser (more precisely, its wide part) plays an important role. This parameter is equal to 1.25 d, since it is necessary to make a ring here, you need to know its dimensions (height 1.3 d, diameter at this height should be equal to 2.5 d). Since this design contains a part in the form of an umbrella, its parameters must also be calculated accurately - the width of the part is 1.8 d.
How to build a deflector yourself
The deflector has its own parameters. So, its height should be 1.6-1.7 from the internal diameter of the chimney duct, and its width should be 1.7-1.9. Diffuser width – 1.2-1.3. But first, let's decide on the material from which it will be made:
If your chimney has a hole, birds often find it tempting to get inside. Small brownish black birds with a penchant for building nest in chimneys. Having these birds in your chimney can be quite annoying - they are vocal little buggers!
When you find yourself in difficulty with smokestacks, which are classified as an endangered species, there is little that can be done legally. The Migratory Bird Treaty Act, a federal regulation, prevents the removal of swift eggs and chimney chicks. The best thing you can do with quickies is to clean up after they leave. Technicians can be called in later to clean and remove nest residue from the chimney.
- Copper;
- Galvanized iron;
- Stainless steel.
Why copper if it is such an expensive material? The fact is that the deflector is located in one of the most inaccessible places in the bathhouse, and therefore, so that it does not have to be repaired, it is better to make it as resistant to atmospheric conditions as possible. And copper is the best in this regard.
Chimneys and most other birds are less likely to return to a nesting site if the nest has been removed. Several animals can get into your chimney, including squirrels and bats. Raccoons, usually females, enter chimneys to give birth and care for the pups. Terrible as they are, mother raccoons sometimes manage not only to get inside the chimney, but to pass through the smoke shelf or directly above the fireplace. If they have gotten this far, there is a good chance they will eventually break into your home. If not, you'll probably have to at least deal with various animal odors.
And here's how to make a deflector:
- Draw on cardboard an outline of all the main parts, such as the cap, diffuser and outer cylinder.
- Transfer everything to metal and cut using metal scissors according to these patterns.
- Connect the parts to each other using rivets, bolts or welding.
- Make brackets from a strip of metal - you will use them to secure the cap to the surface.
- Attach a reverse cone to the cap.
The deflector itself must first be assembled, and only then installed on the roof. We first install the lower cylinder and secure it with bolts and nuts. Using clamps, we attach the diffuser to the lower cylinder, and on it - a cap with a reverse cone.
A raccoon is an animal you never want to hang as they are known for carrying various diseases. Raccoons are home to bugs like fleas and ticks that you or your pets can get, as well as diseases like rabies and roundworm.
Luckily, there are ways to remove mom and her babies from the chimney. If you don't mind the smell, items such as predator urine can get rid of raccoons. A humane method of removal is a live trap. You'll probably want to catch the mother while she's going through or even trying to scare her in some way. The babies still can't handle most of the fighting, so it's fairly easy to reach the fireplaces and grab them.
Operating principle and design of the chimney deflector
Before you start making a deflector for a chimney with your own hands, you need, first of all, to know its structure, drawings and understand the principle of its operation. So, such devices, despite their multiple varieties, consist of three main parts: a diffuser, a cylinder and, directly, a cap. We should not forget about the seemingly insignificant, but in fact, important component of the deflector - ring-type rebounds.
Despite the variety of types of chimney deflectors, the principle of their operation is identical:
- The movement of air flows that enter the chimney is hindered by the walls of the cylinder, which is located in the upper part of the deflector. It turns out that the air flows hit it and a portion of the air mass from the jet moves up the cylinder itself, taking with it the smoke that comes out of the chimney.
- As a result, it turns out that the speed of smoke exiting the chimney becomes greater, while the draft increases significantly, which in turn increases the efficiency of the chimney itself.
- If there is a deflector, it does not matter at all what the speed of the air flow from the outside is, and from which direction the wind blows, because there are special gaps in the cylinder that suck the smoke into the air.
Self-production of the device
To work you will need:
- galvanized or stainless steel sheet 0.5-1 mm thick;
- metal scissors;
- riveter;
- drill;
- a sheet of thick paper or cardboard.
The most important stage is drawing up a drawing. To do this, you need to measure the internal diameter of the chimney and calculate the product parameters according to the table.
If the internal diameter of your chimney differs from the parameters given in the table, calculations are performed as follows:
- the diffuser width is 1.2 d;
- width of the protective umbrella – 1.7-1.9 d;
- the total height of the structure is 1.7 d.
Both measurements and calculations must be as accurate as possible so that there are no difficulties during the installation of the structure and its subsequent operation. If the pipe has a square cross-section, then the deflector must be made square, although the angularity of the body slightly reduces the efficiency of the device.
| Step, No. | Description | Illustration |
| Step 1. | A life-size drawing of the deflector parts is made on paper and cut out. | |
| Step 2. | The blanks are fastened and fitted to each other. If all the elements match, you can begin cutting the galvanized sheet. | |
| Step 3. | The templates are laid out on galvanized sheets, carefully outlined with a marker, and cut out with metal scissors. On the cuts, the metal is bent 5 mm with pliers and tapped with a hammer. | |
| Step 4. | In places of bends, the metal must be riveted with a hammer to make the edges thinner. | |
| Step 5. | The diffuser blank is rolled into a cylinder, holes for fasteners are drilled and connected with bolts or rivets. You can also use welding, but not arc welding, but semi-automatic, so as not to burn through the metal. | |
| Step 6. | The outer cylinder is made in the same way. Next, the cap blank is rolled into a cone and also connected with rivets or welding. | |
| Step 7 | 3-4 strips 6 cm wide and up to 20 cm long are cut out of galvanized steel. The strips are folded along both sides and tapped with a hammer along the entire length. From the inside of the cap, stepping back about 5 cm from the edge, drill the required number of holes for the bolts around the circumference. Fasten the galvanized strips to the cap and give them a U-shape. | |
| Step 8 | Using these homemade brackets, the cap is attached to the diffuser, and then the entire structure is inserted into the shell. |
If the design must have a reverse cone (Grigorovich deflector), the diameter of the protective umbrella is made 3-4 cm larger than the diameter of the cone. After assembling both elements, the cone is applied to the inside of the umbrella and outlined around the perimeter with a marker. Then make two cuts on the protruding part of the umbrella and bend the resulting strip inward. In the same way, make another 6-8 strips at an equal distance from each other, bend them inward and securely fix the reverse cone without additional fasteners or welding.
It is more convenient to attach a cap with a reverse cone to the diffuser with construction pins. To do this, before installing the cone on the umbrella, three holes are drilled around its circumference, the ends of the studs are inserted and the nuts are tightened. Then put the umbrella on top and fix the cone in the manner described above. At the top of the diffuser, on the outside, hinges made of tin or aluminum are riveted and the lower ends of the pins are inserted into them. This design withstands strong gusts of wind, serves for a long time and reliably.
In a similar way, you can assemble a deflector of any type, the main thing is to draw up the correct drawing. The only difference will be in the number and shape of parts. The finished device only needs to be mounted on the chimney.
Features of this design
If the wind blows from below, some turbulence is formed under the structure’s hood, which causes the smoke output to slow down (this is a minor, but still a drawback of the products in question). But here there is a way out, namely a solution to this problem - installing an inverted cone under the umbrella of the device itself.
Chimney deflectors are quite simple devices in design and operating principle, but at the same time, their efficiency can undoubtedly be called high. Each device, and deflectors are no exception, has certain disadvantages, but if we conduct a general analysis of all the available characteristics and capabilities of this device, then the pros and cons clearly have advantages over the cons and disadvantages.
Advantages and disadvantages
To increase draft, an electric fan is additionally installed in the ventilation duct.
A ventilation deflector to increase draft effectively protects the ventilation system from dirt and precipitation. If the deflector was calculated correctly, the ventilation efficiency increases by 20%.
If there are weak winds in the area, it is best to install a device on the system to enhance the exhaust and inflow of air. In this case, the effect of thrust overturning will be completely eliminated.
The device has a number of disadvantages:
- If the wind direction is vertical, the flow will come into contact with the top of the structure. This will result in the air not being able to be properly vented outside.
- In winter, ice forms on the base of the pipe. To avoid problems with the functioning of ventilation, you need to regularly arrange preventive examinations.
To combat the first disadvantage, designs were invented that are equipped with two cones.
Installation of a deflector on a chimney pipe
Correct manufacturing of such a design is not the key to the success of its operation, because installation, which is the final stage for using the device, plays an equally important role.
The deflector is installed on the chimney, and it will be easy to install both a self-made structure and one purchased in a store. Since the device consists of many parts, before climbing onto the roof and proceeding with installation, it must be assembled into a single whole. Making a deflector, the instructions and drawings of which will be discussed below, is quite simple to install, and in this case no additional skills and knowledge are needed.
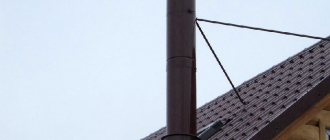
The installation method will depend on the chimney pipe itself on which the deflector will be located. Most often, for a strong attachment it is enough to use a couple of drill holes and a clamp (you cannot do without drilling holes in the chimney itself). If the material with which the roof is covered is flammable, then you will have to additionally purchase a spark arrester, which must be installed on the deflector.
Application of deflectors
The main quality of deflectors for which they are used is the ability to increase traction by diverting external air flows. Regardless of the design, any deflector works on a single principle - the air bypassing the obstacle creates a low-pressure zone, due to which the draft in the chimney increases. A good deflector can increase the efficiency of a smoke exhaust system by 20%.
In addition, the deflector has an additional function that occurs indirectly - an obstacle installed on the chimney pipe prevents precipitation and various debris from entering it.
A simple deflector consists of two cylinders, one at the bottom and one at the top, and a protective cone, also called an umbrella. The bottom cylinder is usually part of a chimney made of metal or asbestos cement. Galvanized metal is used to make the deflectors themselves.
There are several standard options for deflectors:
- TsAGI deflector;
- "Volper" with a round body;
- Grigorovich deflector;
- Open deflector Astato;
- H-shaped;
- Star-shaped "Shenard".
Different types of deflectors are used in the following types of structures:
- Collective and private ventilation shafts;
- Collective and private chimneys;
- Systems for the removal of gases and combustion products;
- Garbage chutes.
Drawings on how to make a deflector for a chimney with your own hands
The sequence of actions during the manufacture of the device will be as follows:
- We make a drawing of all the parts on paper (and their hollow size), cut them out and connect them together.
- If all the parameters match on the paper model, we do the same on the metal sheet.
- A diffuser shape is cut out of a piece of metal and rolled into a cylinder.
- To connect all the parts of the deflector, you need to carefully drill holes in the elements and use bolts or special rivets to create a single structure.
- Then the cap is made, the strips are made, and all the separately made parts are joined together.
What is a chimney deflector video review
There is nothing complicated in the process of making a deflector for a pipe with your own hands, the main thing is to follow the assembly rules and do not forget about the correct selection of all design parameters.
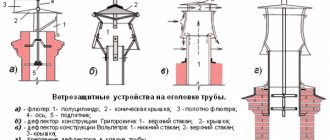
Protection of deflectors from low winds
Due to the presence of this feature of wind flows, deflectors began to be equipped with special protective devices that help increase the level of draft in the pipe in any weather. To do this, an axis is installed inside the chimney on two bearings located at different levels.
A semi-cylindrical screen, a weathervane and a cover are installed on the axis. It is this design that protects the entire chimney from the effects of the lower wind flow.
After the direction of the wind flow changes, the weather vane rotates, thereby closing the chimney from the wrong wind flow. Thus, any direction and strength of the wind is not able to block the path of the exhaust smoke, and the draft in the chimney remains the same power.
Do not forget that the deflectors are designed for round pipes, which can become a problem if you have an old brick pipe with a square cross-section. In order to solve this problem, special pipes are used that act as adapters.
For chimneys with a large square cross-section, which are built for fireplace heating systems, it is necessary to use adapters in the form of spacer legs that connect the pipe and the deflector itself. These legs are made of metal strips that can be galvanized or high-quality painted.
Brick pipes require an appropriate transition with an inlet in the desired direction, which allows you to connect a round deflector and a square chimney. In other words, it is not difficult to secure this element of the chimney system in the presence of any type and shape of chimney structures.
You don’t have to buy a deflector at a hardware store, because you can make it extremely easily with your own hands. To do this, you need to calculate the size and shape of the element, after which you can begin the manufacturing process.
On galvanized steel sheet it is necessary to draw the upper and lower cylinders of the future deflector, which can be easily done using an ordinary pencil. You can cut out the necessary elements using metal scissors, which can easily cope with this task.
Once these two parts have been cut and filed, which is required to properly join the two edges of one part, you can begin to secure these edges. As a rule, a welding machine, bolts or rivets are used for this.
It’s worth noting right away that connecting a galvanized steel workpiece using a welding machine is extremely difficult, because it burns through thin metal quite quickly. It is for this reason that rivets or small bolts are most often used.
The finished cone cap must be secured to the upper cylinder of the deflector. This is done using small brackets made of the same sheet steel. The brackets are secured to the pipe using rivets. Do not forget that the brackets should be attached only to the outer side of the deflector, so as not to create additional interference in the internal part for proper air flow and smoke extraction.
A reverse type cone must be attached to the element umbrella. In addition, the assembly of all parts of the deflector must be carried out directly on the pipe itself, which will allow for high-quality installation and fastening of each individual part of the structure.
Otherwise, it is possible to connect two elements of the system poorly, which will subsequently cause a malfunction of the structure and the entire chimney as a whole. In some cases, it is simply impossible to make this design on your own.
As a rule, this happens with brick chimneys, which require high-quality adapters or stands. From this we can conclude that it is much easier, more profitable and faster to buy this inexpensive element of the system than to try to make it yourself.
It is worth recalling that only galvanized steel can be used to make the deflector, which successfully resists the formation of rust, which negatively affects the life and quality of service of such a system element.
Manufacturing of the Grigorovich–Wolpert deflector
It is made by analogy with a conical cap:
- Two umbrellas are made and the edges are connected to each other. In the upper cone, cuts are made along the edges for attaching racks to them. The diameter of the cones is twice the diameter of the chimney pipe.
- The deflector has a width of 1.5 and a height of 1.6 times the diameter of the smoke channel. The outer cylinder is manufactured similarly to the diffuser cylinder. Having rolled the blanks, they are joined with rivets.
- The umbrella is connected to the diffuser using claws, and the entire structure is inserted into the outer cylinder.
Pros and cons of a spark arrestor
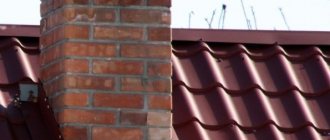
Sometimes a spark arrestor is installed between the chimney and the cap. Most often, this function is performed by a metal mesh. This is true for boilers operating on solid fuel. In addition to protecting the roof and the environment from possible sparks, the mesh additionally protects the chimney from debris and does not allow birds to land on its edge.
But the spark arrestor mesh has its drawbacks. Along with the smoke, water vapor comes out as one of the elements of combustion products. Having a high temperature, in winter it condenses on the cold metal of the head and mesh, immediately turning into ice. As a result, icing of the spark arrestor prevents further smoke from escaping. Backdraft is created. Moreover, smoke and gases enter the room and can lead to poisoning. To avoid this, the grid cells must be large. But sometimes that's not enough. For boilers with high efficiency, the installation of a spark arrester should be completely eliminated.
*
Types of heads
*
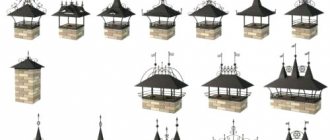
Chimney caps come in a variety of shapes. There are two main types of caps: a simple visor (of various configurations) and a deflector.
A regular cap, which is a lid that covers the top of the chimney, protects the system from debris and moisture. When installed correctly, it increases the useful effect of the ventilation system by 15-20%. It comes in several forms:
- gable;
- hipped;
- hip;
- umbrella;
- flat;
- conical cap
Gable and four-slope are the simplest types of pipe caps. They resemble an ordinary roof of a residential building. They do a good job of protecting the pipe. They are easy to make yourself.
The hip cap also has 4 sides, 2 of which are triangular, 2 are trapezoidal. Most often installed on square and rectangular pipes. Provides good chimney protection and facilitates snow removal.
*
A flat head is the easiest to install, but it is the least effective. A layer of snow on its surface can deform the product and lead to rapid failure of the fastening points. Umbrella and cone caps differ only in the angle of inclination of the slope. The cone retains less snow, but both perform their functions of protecting and increasing traction. Making such a cap for a chimney pipe from a galvanized sheet with your own hands is not difficult.
Attention! For the head to function, several installation rules must be followed. The main thing: the distance between the upper edge of the chimney and the lower edge of the visor should be 10 cm. A smaller distance will impede the passage of exhaust gases and smoke, a larger distance will contribute to the boiler blowing out. The distance of 10 cm has been time-tested; changing it is not recommended.
*
Materials
The material from which the head is made affects the durability of the structure. Common samples made of steel, copper and zinc-titanium alloy:
- Steel canopies for chimneys are the cheapest. But they have a short service life. After 5 - 10 years, this additional element will need to be changed. When operating TT boilers, the service life of steel caps is even shorter (3 – 5 years). Galvanized iron is even less durable. It burns out quickly. Using stainless steel will extend the life of the head up to 30 years. This material is resistant to corrosion and high temperatures. But its price is higher.
- Copper caps are leaders in quality and aesthetics. The high cost of copper products is justified by their durability (from 50 years). The only caveat is that for their installation you will need copper fasteners and hardware. Copper will react with other metals and oxidize, which will lead to wear of the head at the attachment points.
- Zinc-titanium structures also perform well at a similarly high price.
Not long ago, additional roofing elements made from polymers appeared on the market. The relatively low price of such visors did not justify itself. The polymer is not sufficiently heat-resistant, weather-resistant, and is also fragile. Time-tested options made of copper, zinc-titanium and stainless steel are worth the money spent on them.