9314 0 0
MesterulManole October 10, 2017Specialization: many years of experience in finishing works of residential and office premises, dachas, country cottages, etc. Hobby: cycling in all its forms
If you properly arrange the perimeter of the chimney, you can prevent leaks and protect against fire
Do you need to get around the chimney pipes on the roof slope and don’t know how to do it? I will talk about four simple methods that are suitable for solving this problem with different types of chimneys on different types of roofing systems. As a result, you will be able to choose one of the proposed methods and apply it when building your house.
How to bypass a pipe with metal tiles?
- When going around a pipe with metal tiles on a roof whose slope width does not exceed 80 centimeters, two problems must be solved.
- In the first case, you need to intercept the water from the slope above the pipe and disperse it in different directions from the pipe, and also release water from the lower part of the pipe junction.
- Task 2 is not to let moisture through, which will go down the walls of the pipe into the house.
- To solve two problems when installing metal tiles, it is necessary to mount a metal apron around the pipe, part of which will be located in the plane of the roof and secured.
- The other part will rise along the pipe 200 millimeters above the roof plane.
- An abutment strip is mounted on top of the apron using sealant.
- After installing the apron, the part of the pipe under the apron will remain inaccessible.
- Therefore, it is worth checking that the waterproofing is carefully placed under the side edges of the pipe and that drainage gutters should be built in outside it.
- For such installation, it is necessary to make an additional sheathing on the back edge of the pipe, and cut the sheet of metal tile adjacent to the pipe to length in such a way that the cutting lines are located above the stamping lines.
- The distance from the top edge of the pipe for these lines should be approximately 15 centimeters.
- Cuttings of metal tile sheets can be used for further installation.
- First of all, it is worth noting that lines are drawn on the side edges of the pipe 15 centimeters above the top of the roofing; it is also necessary to prepare the lower side right and left parts of the apron.
- Precisely made parts should rise to the side edge of the pipe by 15 centimeters, extend onto the pipe by 20 centimeters, the side parts should extend beyond the upper crest of the metal tile wave, and the bottom part should reach the bottom of the lower part of the apron.
- The upper part of the apron should end with the flange facing up.
- All joints of the apron are sealed.
- Mount the seal at the top.
- Cut the top sheets of metal tiles horizontally at the bottom with a standard cutter.
- Where the lower standard cuts are made, add one long sheet at a time and bring the joint level next to the slope.
- Fix an apron on top, the upper part of which should be sandwiched between the pipe and the sheets being mounted.
- To prevent water from getting into the side edges of the pipe, firmly secure an abutment strip around the perimeter of the pipe under the apron and carefully seal the gap between the side edges of the pipe and the abutment strip.
the moderator chose this answer as the best.
Nowadays, this is not a problem (previously, everything began and ended with a cement-sand mortar, which was used to seal this junction) specifically for metal tiles, there are devices for connecting metal tiles to chimney pipes, and to any, any cross-section and size.
Popularly, this device is called an “apron”, and these same “aprons” are internal (under the metal tiles) and external (on the metal tiles).
But work begins with the installation of additional sheathing around the chimney pipe.
Next is waterproofing (special film) with an overlap on the chimney pipe).
Installation of the internal “apron”.
Then we trim (cut) the metal tiles to the required sizes (I advise you not to use an angle grinder, you will ruin the protective layer) and the standard fastening (usually these are roofing screws).
If the chimney (pipe) is made of brick, then a groove is made in the brick (here you can and should use a grinder, it is better to cut the groove rather than gouge it out with a hammer drill), for the installation of an outer apron (attached to a strip which in turn is mounted in the groove), which is installed with an overlap on the chimney pipe, 200 mm higher than the metal tiles (approximate figure).
This is general, there may be nuances, since chimney pipes are made of different materials (for example, metal pipes are covered with metal tiles differently, there is a need to maintain clearances, other materials are used), their cross-section and diameter are different.
In general, this work requires a certain amount of experience and it is extremely difficult to do it yourself.
1. Wetting of the thermal insulation layer and, as a result, heat loss from the room,
2. Moisture getting into the wooden elements of the rafter system and, as a result, their rotting,
3. Impaired air ventilation in the under-roof space,
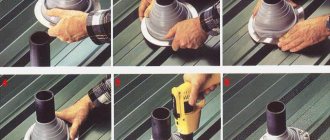
First, before installing the apron, you need to place waterproofing material on the chimney and cover it with the apron already on top of it.
Some craftsmen bring the upper edge of the apron deep into the chimney; to do this, using a grinder, they make grooves in the chimney, and the upper edges are bent inside these grooves (this is clearly visible in picture number 1).
Waterproofing self-adhesive tapes: a flexible approach
One of the most popular and proven methods for arranging the connection between the roof and the chimney pipe is the use of special waterproofing tape.
For example, it is difficult to come up with something better for a roof made of piece materials, for which a galvanized steel apron is not suitable. It is easy to work with such tapes, the main thing is to adhere to the temperature regime – from +5 to +40°C.
In this article we will look at the highest quality and most popular tapes. In general, there are many options, because each manufacturer of roofing material tries to produce its own roofing element, which will be most suitable for a specific brand.
For example, if you need to go around a round chimney, an Ecobit type tape will help you. It is good because it has a self-expanding base and can be sealed without problems.
Its lower part must be placed under the tiles, and the upper part must be placed on the roofing. Next, press both layers and glue them to the walls of the chimney and to the tiles. Next, cover the edges of the top tape with metal profiles.
This is what these waterproofing tapes look like:
In total, today tapes are produced on two bases. Thus, butyl rubber has the highest waterproofing qualities, and aluminum allows you to hermetically fit even the most complex shapes.
Easy-Form: the strength of aluminum
Easy-Form is an aluminum tape with a butyl layer on the surface. The elongation of such a tape is 70%, and at the same time there is a rigid lining made of polyester material.
It is self-adhesive and is great for waterproofing a chimney. Does not rot, is resistant to frost and temperature changes, does not lose its properties within the temperature range from -20° to +80°C.
This tape completely replaces the use of lead sheets, and is cheaper and much easier to install. It comes with a 10-year warranty. And the work is quite simple, although the instructions look voluminous:
- Step 1. Even at the stage of construction of the sheathing, include additional elements made of timber with a section of 40x40 or 50x30 mm. Secure them along the chimney walls.
- Step 2. Cover the front of the pipe with a covering apron. Usually this is recommended by the manufacturer himself, from a specific material for each type of roof.
- Step 3. Install the apron in its place - along the lower edge of the pipe.
- Step 4. Make markings on the apron and make cuts along it. Make sure that the top of the apron is exactly the width of the pipe, and that the wavy part has one wave on each side.
- Step 5. Make markings with a pencil and cut off excess material along the lower crest of the wave with a sharp knife.
- Step 6. Press the finished apron onto the pipe and fix it to the surface with proprietary roofing nails, directly into the sheathing beam. Drive nails into the top of each wave, strictly vertically, except for the waves that extend on the sides beyond the dimensions of the pipe.
- Step 7. Now attach the cut piece to the installation site and give it the shape of a corner relief.
- Step 8. From the back of the tape, remove the protective film that covers the adhesive layer. Apply the tape to the pipe so that it covers the top and bottom of the apron by 70-80 mm. To ensure that the tape fits tightly to the roof, trim its corner.
- Step 9. Press the tape onto the entire surface with a little force. Do this on one bottom corner of the pipe, and then on the second.
- Step 10. Attach the side apron to the pipe, press it and mark the cut line. You will need to cut along the vertical boundaries of the pipe with a sharp knife. Do not press the knife itself too hard, so that it enters the apron only 2/3 of the thickness of the material. Then bend it and carefully break it off.
- Step 11. Nail the prepared side parts of the apron to the roof, three nails in each part: one in the center and one more at the bottom and top.
- Step 12. Cut a piece from the self-adhesive tape that will be 200 mm longer than the width of the pipe. This length is suitable for sealing the back of the chimney pipe.
- Step 13. Now glue the tape to the front side of the pipe. Now the length of the tape should exceed the width of the pipe by 200-300 mm. The tape itself will bend over the sides of the pipe and go under the side parts of the apron.
- Step 14. Press the top edge of the tape with the metal fixing bar and secure it to the dowels. Bend the edges of the apron away from the surface of the pipe.
- Step 15: Seal the corner between the pipe wall and the folded edge with a layer of polyurethane sealant.
- Step 16. Lay an additional piece of ondulin on the back side, from the ridge to the pipe.
Sealing by arranging a box
There is a method of sealing by arranging a box.
- Leave a distance between the edge of the cut roof and the pipe in accordance with fire safety standards.
- Treat the adjacent edge of the roof to the chimney and the chimney itself with heat-protective material.
- A box made of galvanized steel or corrugated sheeting is installed in this area. Cut strips up to 40 cm must be sheathed around the perimeter and the angle of inclination of the slope.
- The elements of the box (collar) are overlapped and soldered.
- When the roof slopes at an angle of more than 30 degrees, a metal outlet is installed to drain rainwater around the chimney.
- Fill the space between the pipe and the box with thermal insulation material. You can use basalt wool.
The principle of arranging a passage with thermal insulation materials is applicable to a chimney on a slope and a ridge with minor differences. The installation of a chimney along the ridge involves changes to the design of the rafter system.
The roofing deck is covered with roofing felt, overlapping the pipe walls, and the apron is installed, followed by filling the gaps between the apron and the wall with polymer sealants.
Method of laying protective materials at the pipe outlet
- webs of material are cut into the shape of envelopes;
- the material is brought to the edges of the passage from beams or rafter profiles, ensuring a tight junction of the materials;
- the canvas is attached to the beams using steel staples or ordinary nails;
- The seal is additionally pressed against the rafters with wooden blocks.
In order to reliably protect the assembly and roof insulation from water, the junction points of the protective material with the wooden elements of the sheathing of the pipe passage are additionally glued with your own hands until complete tightness is achieved.
There is a widespread opinion among experts that the outer surface of the chimney pipe passage is sufficiently distant from the fireplace so as not to heat the exit near the roof - metal tiles or a layer of corrugated sheets - at the point of contact to more than 60 degrees, so the protective materials are not in danger. Thanks to this, you can install stone wool close to the chimney with construction tape.
Installation of an external apron at the junction with the pipe
The next step is to install the main cover over the inner apron and tie. A top sheet of metal tile is installed around the chimney. At the same time, it should cover the junction strip and go onto the bottom sheet of the coating, capturing the first wave in the upper part of the chimney. Thus, the mounted lower apron, bypassing the pipe, is clamped between two layers of metal tile sheets and completely prevents water from entering the under-roof space.
Having installed sheets of metal tiles around the chimney, the installation of the outer apron begins. This element has practically no protective function, but is considered a decorative finish for the passage of the pipe through the roof. Its installation is carried out using almost the same technology as the installation of the lower apron.
If a brick or other pipe is located at a distance of 1.5 m, then during installation its height should exceed the height of the ridge by at least 0.5 m. When the distance to the ridge is within 1.5 - 3 m, then the building is placed at the same height as the ridge.
In a situation where the distance from a brick or any other pipe is more than three meters, the height of the building is determined by a conditional line. It passes at an angle of 100 from the ridge shoot to the horizon.
The apron is the same valley, but with more load!
The closest functional analogue of the internal apron is considered to be a valley. This significant element of the roof is made in the form of a gutter. The main purpose of the valley is to drain water from the roof slopes.
note
If we compare the capacity of the channels of the apron and the valley of the same width, it turns out that the capacity of the valley is several times greater than the capacity of the apron.
And the amount of precipitation is the same! When installing the apron, you need to be careful not to accidentally jam the flange. After all, even a slightly wrinkled flange can significantly reduce the capacity of the apron
Today, aprons are made in various shapes. Most often, structures have a uniform width along the entire length.
Although some instructions recommend making them tapering towards the bottom or with narrow elbows. Undoubtedly, such a design does not add capacity to the apron, but rather reduces it.
What material to use for the valley of metal tiles
How to cover a pipe with an aluminum apron
Sheathing pipes on the roof using an apron made of galvanized metal with a polymer coating is a modern method of sealing. In general, the process involves installing an apron and filling the resulting gaps with polymer sealant.
Another option is to install an aluminum apron. The pipe is wrapped with aluminum tape so that part of it is located in the gap between the pipe and the roofing material. Fill the gap with bitumen-based mastic and additional gluing tape. A metal profile is fixed along the line where the apron joins the pipe and is additionally insulated from moisture.
Bypassing the pipe with corrugated sheeting is done in the process of arranging an apron from adjacent lower strips.
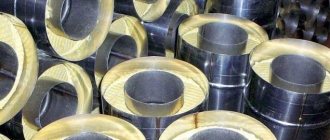
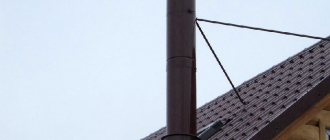
Sandwich pipes
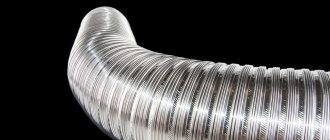
Another excellent option for arranging a chimney is to use sandwich pipes. Such a chimney consists of two pipes, one in one, having different diameters, and between them there is basalt wool. Such pipes are protected from condensation accumulation and severe overheating.
Sandwich pipe
This is the simplest option for arranging a chimney; even a novice builder can handle the installation tasks. Such pipes serve for a long time and have excellent performance characteristics.
Sandwich chimney device
Calculator for calculating the internal diameter of a sandwich chimney
Go to calculations
Arrangement of an apron made of aluminum tape
The second method of sealing a pipe is done by installing an apron made of aluminum tape. You should go around two layers of aluminum tape around the perimeter of the pipe, so that part of the tape is buried in the gap between the pipe wall and the roofing. What can I cover it with? It should be covered with bitumen mastic followed by gluing the tape. The lines connecting the apron to the pipe are fixed with a metal profile and covered with a waterproofing film.
Bypassing the pipe on the roof with corrugated sheeting can be done by arranging an apron using adjacent lower sheet strips. The installation principle boils down to organizing the first plank to the side wall of the chimney and fixing the upper level mark. A fine is made at the mark, followed by filling with sealant. The next work process is the organization of a metal tie with the arrangement of sides along the edge to drain water. Then the tie is attached to the top edge.
To ensure high-quality corrugated sheeting around the pipe, it is necessary to make a sheathing. It will ensure reliable fastening of the lower junction strip and the edge of the corrugated sheet along the walls of the chimney.
Vaka strips: reliable connection
So, to protect the abutment seams:
- Step 1. Install the strips and fill the top flange with sealant. In traditional units, a brick overlap is usually used, but here the plank performs exactly this function.
- Step 2. Cut the bottom strip to the required length - so that the length of the strip is the width of the pipe and 5 cm on the sides.
- Step 3. Cut the top of the strip and bend it along the line of the pipe itself.
- Step 4. Now cut the bottom part of the pipe and bend it along the line that will be 1 cm further from the corner of the pipe.
- Step 5. Cut the strips to 1 cm and bend the top flange with a hammer to the pipe.
- Step 6. On the bottom, cut a corner parallel to the slope line.
- Step 7. On the top part, drill holes in increments of up to 20 cm, for dowels 6 mm. The holes for them need to be drilled 6x40 mm.
- Step 8. Attach the strip directly to the chimney with heat-resistant dowels.
The finished chimney bypass should look like this from all sides:
Next, attach the side bar so that it is parallel to the line of the slope, and follow these instructions:
- Step 1. Mark the outline of the bottom strip on the inside surface of the plank.
- Step 2. Cut the top of the strip along the line of the pipe, and the bottom of the strip along a line that is 1 cm away from the corner of the chimney.
- Step 3. Cut the side strip along the contour of the bottom strip that is already attached.
- Step 4. Secure the plank with screws in increments of up to 20 cm, and do the same with the second plank.
- Step 5. Now cut the top strip to the width of the pipe with a 2cm overhang on both sides.
- Step 6. On the inside of the top plank, mark the contours of the already installed side strips.
- Step 7. Cut the top strip and bend it along the line of the pipe. Make the necessary cuts, drill holes in the pipe for dowels, 6x40 mm. Secure the bar.
Finally, apply sealant to the flange around the entire pipe. For convenience, take a construction syringe, and to make the seam neat, stretch it with cardboard.
Sealing by arranging a box
There is a method of sealing by arranging a box.
- Leave a distance between the edge of the cut roof and the pipe in accordance with fire safety standards.
- Treat the adjacent edge of the roof to the chimney and the chimney itself with heat-protective material.
- A box made of galvanized steel or corrugated sheeting is installed in this area. Cut strips up to 40 cm must be sheathed around the perimeter and the angle of inclination of the slope.
- The elements of the box (collar) are overlapped and soldered.
- When the roof slopes at an angle of more than 30 degrees, a metal outlet is installed to drain rainwater around the chimney.
- Fill the space between the pipe and the box with thermal insulation material. You can use basalt wool.
The principle of arranging a passage with thermal insulation materials is applicable to a chimney on a slope and a ridge with minor differences. The installation of a chimney along the ridge involves changes to the design of the rafter system.
The roofing deck is covered with roofing felt, overlapping the pipe walls, and the apron is installed, followed by filling the gaps between the apron and the wall with polymer sealants.
Traditional galvanized steel: durable "tie"
To ensure a tight connection of the roof to the chimneys, make an internal apron from the strips:
- Step 1. Place the bar itself against the walls of the pipe and mark the level of the top edge on the wall.
- Step 2. Then carefully remove the dust after the groove and rinse the groove with water.
- Step 3: To install the inner flashing, start at the bottom of the pipe. Here the abutment strip needs to be trimmed.
- Step 4. Install the apron in other places in exactly the same way and do not forget about the 150 mm overlap to protect against leaks.
- Step 5. Next, the edge of the strip, which is inserted into the groove, needs to be sealed using a special roofing tape.
- Step 6. Now place a tie (a flat sheet with flanges) under the bottom element of the inner apron.
- Step 7. Point the tie into the valley or down, right up to the cornice.
- Step 8. Now you can proceed to the installation of the roofing.
Connection of corrugated sheeting to a chimney pipe with a rectangular cross-section
Currently, manufacturers have made sure that the junctions and joints between some elements of the roofing structure are reliably protected from the penetration of precipitation. For this purpose, additional elements are produced for the valley, ridge and abutment areas. The same additional materials are also available for sealing the gap between pipes passing through corrugated sheeting. And this element is called an apron.
The main purpose of the apron is to collect all the water flowing down the stove chimney and along the roof slopes, and divert it to the eaves into the drainage system. But there is one very important point in the installation process of installing an apron. It is necessary to carry out waterproofing correctly
Everyone knows that a waterproofing film must be installed under the corrugated sheeting, and it does not matter whether the roof is insulated or not. So, in the place where the pipe passes through the roofing structure, it is necessary to make a cut for the installed chimney, leaving the edges of the cut 50-100 mm wide, which will subsequently be fixed to the pipe itself
But that is not all. A reinforced waterproofing layer is required at the junction points. Therefore, most often a special waterproofing tape is installed under the apron. In addition, it should be located under the upper strips of the apron and lie partially on the corrugated sheet. In essence, you get double protection. The waterproofing installation scheme is as follows:
- First it is applied to the lower edge of the chimney.
- Then the abutment joints on the sides of the pipe structure are sealed.
- And the last one is the upper edge closest to the ridge of the roof.
Situations often arise when it becomes necessary to install a stove chimney through an already erected corrugated roof. It’s not difficult to do this today, but there is one caveat. It is necessary to make the hole (passage) in the corrugated sheet smaller than the size of the pipe by approximately 1.5-2.0 cm. It is clear that the chimney will not fit into such a passage, so the edge at the corners of the hole is cut and bent. After installing the chimney, these edges are tightly applied to it and secured. This is another protective barrier against leaks. In this case, under the corrugated sheeting itself, be sure to lay the lower strip of the apron and a waterproofing tape on top of it.
Let us add that the complexity of constructing a waterproofing barrier depends mainly on where the pipe is installed.
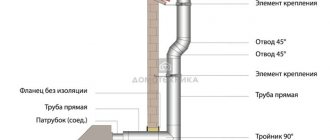
Base roof cut CADP 60 for Bofill insulated chimney
Model range of the series Chimney base (roof cut) CADP 60
Description Chimney base (roof cut) CADP 60
The chimney base “CADP 60” (roof cut), produced by , is used when the chimney duct passes through the roof in accordance with the angle of inclination of the roof to the horizon (internal angle from 45 to 60°). Installed on top of an insulated chimney pipe passing through the roof. The lead sheet base can be pressed against the surface of the roof covering or placed under the surface of the roof. The angle of inclination is adjusted using the conical part of the roof cutting pipe made of stainless steel. The gap at the junction of the base and the chimney is closed using an adjustable VDP apron using sealant.
Double-walled (insulated) chimneys are designed to remove flue gases from boilers, fireplaces, water heaters, generators, and heat generators. They consist of two layers of stainless steel, between which there is insulation (basalt wool with sealing gaskets), which solves the problem of condensation. The inner walls of the pipe are made of high-quality austenitic stainless steel AISI 316L to withstand the aggressive action of acids formed during the interaction of condensate and exhaust gases. The external contour is made of austenitic acid-resistant stainless steel AISI 304L. The round cross-section of the duct and the smooth surface of the chimney reduces the formation of deposits and clogging. The chimney elements are connected by installing the next one on the previous one and clamping it with a clamp.
Main features and advantages of the chimney base “CADP 60”:
- Diameter: from 80 to 300 mm (over 300 mm on request)
- Roof slope: from 45 to 60°
- Lead sheet base
- Cone made of stainless acid-resistant steel AISI 304
- Wall thickness: 0.4 mm
- Operating temperature: up to 550 °C
- A short-term increase in temperature up to 750 °C is acceptable
- Possibility of installing a gasket to improve sealing
- High corrosion resistance
- No condensation
- TIG butt welding
- Unlimited service life
- Attractive design
- Ease of installation and maintenance
- Compliance with fire safety standards
How to cover a pipe with an aluminum apron
Sheathing pipes on the roof using an apron made of galvanized metal with a polymer coating is a modern method of sealing. In general, the process involves installing an apron and filling the resulting gaps with polymer sealant.
Another option is to install an aluminum apron. The pipe is wrapped with aluminum tape so that part of it is located in the gap between the pipe and the roofing material. Fill the gap with bitumen-based mastic and additional gluing tape. A metal profile is fixed along the line where the apron joins the pipe and is additionally insulated from moisture.
Bypassing the pipe with corrugated sheeting is done in the process of arranging an apron from adjacent lower strips.
Making the sheathing
lathing for metal tiles
Sheets of metal tiles are mounted on a lathing, which is assembled from boards with a cross-section of 30x50 millimeters. The initial lathing, located at the very bottom, is made a little thicker - 15 -20 millimeters, since it is used to support overhangs. The first of the battens is aligned with the cornice. The distance between the first sheathing board and the second should be 280 millimeters, and subsequent ones are fastened at intervals of 350 millimeters. Thus, it is necessary that the pitch of the metal tile matches the pitch of the sheathing. When the sheathing is created at the location of the valleys, the location of the chimneys and other elements, additional (reinforcing) strips are installed.
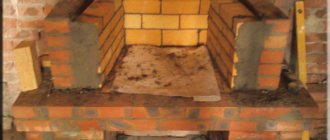
Sealing a brick chimney - how to bypass and close it correctly
After lining the brick chimney with a stainless pipe, you need to seal it. The joints of the roof and brick chimney are more difficult to seal, so the process should be approached more responsibly. The fact is that the pipe and combustion products have different temperatures, as a result of which condensation can form in the pipe. It is known that when exposed to moisture, a brick pipe collapses very quickly, therefore, the protruding part of the pipe requires mandatory insulation
When choosing materials to decide how to cover a pipe on the roof with corrugated sheeting, it is important to take into account their appearance and resistance to certain conditions.
Direct insulation is carried out as follows:
The pipe is lined with clinker bricks. Then coated with plaster mortar or sheathed with suitable material
In this case, it is very important to use materials that are resistant to fire. In addition, the free space between the pipe and the roofing material is sealed using a cement collar, which has an increased moisture resistance coefficient
Further arrangement of such a chimney involves the use of a frame made of metal profiles and fastening of a decorative collar or sheet steel.
In addition, the free space between the pipe and the roofing material is sealed using a cement collar, which has an increased moisture resistance coefficient. Further arrangement of such a chimney involves the use of a frame made of metal profiles and fastening of a decorative collar or sheet steel.
In this situation, some features should be taken into account:
- The gap, the width of which does not exceed 0.5 cm, is filled with heat-resistant silicone sealant.
- Gaps larger than 1 cm are filled with cement mortar and an apron is placed over it.
Methods for sealing pipes of various configurations
The method of sealing the gap between the chimney and the roof depends not only on the capabilities and preferences of the craftsman, but also on the size of the hole, the shape of the pipe, and the roofing material.
You can seal a corrugated roof at the junction with a pipe:
- Special adhesive tape. The industry offers ready-made insulation material made of butyl rubber with aluminum coating. Insulating tape is available in different colors, which, when sealed, allows you to maintain the aesthetics of the roof. Has exceptional adhesiveness to any materials. It is the best option for sealing a stove chimney with small gaps on flat roofs.
- Polyurethane, bitumen, silicone, or acrylic sealant. The sealant is used as an independent material for sealing or during the installation of a waterproofing apron.
- Galvanized (or specially coated) steel apron. The apron has different configurations for round and square chimneys. You can make it yourself from sheet iron or buy it ready-made.
- Elastic penetration. A special elastic nozzle for a round or oval chimney. Suitable for use on different diameters. It is the most convenient and reliable device for sealing a stove chimney on a corrugated roof.
Note! All insulating materials used to seal the chimney must be non-flammable!
Since the corrugated sheeting itself is a non-flammable material, the gap between it and the chimney during installation can be made minimal (5 mm). This will make sealing easier, allowing you to use a heat-resistant sealant. If the gap is left more than 1 cm, then technologies and materials are used to seal it, depending on the shape of the chimney.
How to seal a pipe passage on a roof made of corrugated sheets with your own hands
With proper installation of corrugated sheeting on the roof of a house, you can be guaranteed to avoid leaks during rains and spring melting of snow. By this criterion one can judge the reliability of the roof. It should be remembered that any roof structure consists of many elements. The list includes valleys, front strips and ridge. However, based on practice, the most risky element in terms of leaks is the chimney.
Several decades ago, stove makers dealt with this problem by thickening the brick chimney. However, such work requires certain knowledge and skills, and modern structures are increasingly being built from metal. Typically, chimneys are made with a round cross-section. Simple instructions will help you figure out how to seal a pipe on a roof made of corrugated sheets.
Installation of a passage box for dissimilar materials
There is also the practice of running a pipe through the roof using a passage box. This is beneficial when the roof itself is made of different types of materials, which have different resistance to fire.
In this case, make a box of the required size from a fire-resistant material, pass a pipe through it so that at least 15 cm remains to the walls, and fill the space with expanded clay.
Here is an example of organizing such a box:
When installing a chimney on the roof, did you encounter any difficulties?
Source
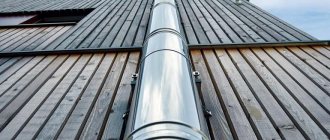
Connecting the roof to a round pipe
In the private sector, ventilation or chimney outlets are also common using round pipes. Most often this concerns a sandwich (insulated) heating pipe. It would seem that a solution with a hermetically sealed connection to a round pipe is much simpler and does not require professional installation skills. In addition, in any construction market there are ready-made materials for insulating the joint between the chimney pipe and the roof. The most popular and almost the only ones are Master Flash roofing penetrations with a wide range of sizes and colors. Simplicity of installation, versatility (suitable for different types of roofing) and affordable price have long made this material “national”.
The Master Flash seal consists of heat-resistant corrugated EPDM rubber and an aluminum base. Another advantage of the material is the ability to install it on already installed pipes, which is very convenient in case of quick roof repairs (for example, when fixing a leak or replacing roofing material).
Installation is as simple as the material itself.
Installation Master Flash
It is necessary to lubricate the junction of the Master Flash base with the roof with roofing sealant, and then secure the sealant to the surface using roofing screws. However, as practice shows, after some time the tightness of the junction begins to gradually deteriorate. This is primarily due to the quality of the sealant and atmospheric phenomena (temperature changes, gusty winds, rain or snow can disrupt the tightness of the connection).
In order to maximally protect the roof from leaks in roof assemblies with a round pipe, it is recommended to partially “wind” the upper part of the penetration under the roofing material or ridge strip.
Installing Master Flash next to the ridge
In this way, you can reliably install the junction of the pipe and the roof.
Connection complexity
- Difficulties with snow sliding in the winter season.
- Proper sealing of the gap between the roof and the chimney.
- The high temperatures to which the pipe is heated. There is a risk of the wooden frame under the roof catching fire.
IMPORTANT. Correctly make pipe and roof connections in order to minimize the risk of fire.
The process of arranging waterproofing
Let's consider the sequence of the technological process of arranging waterproofing.
For a round chimney made of galvanized steel, the space between the pipe and the roof covering is much easier to seal. In this option, factory-made elastic penetrations are used, which are as close as possible to the profiled sheet.
The gaskets are an aluminum flange with a connecting part made of silicone or EPDM rubber. They can be of different sizes from 3 to 600 mm and designed at different angles, solid and split. Their service life is long. Such devices can be used for flat roofs and at an angle.
Sealing with such penetrations is the simplest method of insulation at the junction of the roof and the outlet.
So how does the process work?
- First, determine the size of the hole on the roof and cut the rubber corrugation according to these parameters. When organizing a chimney outlet on pitched roofs, a hole of 2-5 centimeters in diameter is required.
- Then they put on a pad.
- For the flange, select the desired shape.
- The grooves on the underside of the flange are filled with sealant and pressed tightly against the roof deck, and additionally secured with self-tapping screws with rubber heads, which are flattened during the tightening process. They are used for roofing work to prevent water from getting inside. When working with conventional self-tapping screws, rubber gaskets are used.
Important: the surface of the penetration and roof must be dry and clean
Parameters for proper operation of the device
A properly installed chimney creates natural draft and removes combustion products through a channel, preventing them from entering the room. Sometimes you can even evaluate the operation of a chimney visually - by the presence of smoke in the room or the color of the flame. Excessive draft is determined by a white flame and a characteristic hum, while a bright orange flame indicates insufficient draft. A special device, an anemometer, will help you take more accurate measurements.
If traction needs to be strengthened, you can use one of the following methods:
- Install the deflector. However, it must be taken into account that deflectors improve traction only in the presence of strong wind.
- Install a special umbrella on the chimney. Using a sensor located under the hood, the umbrella regulates the combustion temperature.
- Increase the height of the pipe.
- Use a turbine nozzle.
Features of installing a chimney on metal tiles
The construction of a passage unit on a profiled metal roof is practically no different from cutting a pipe on other types of roofing coverings:
A brick chimney on a metal roof can be installed with or without a heat-insulating casing, but the chimney walls adjacent to the sheathing and rafters must be insulated with metal and thermal insulation; Due to the wavy profile, the roofing covering collects and holds snow on the roof surface much better than slate or corrugated sheets
This means that the pipe passage through the metal tile roof will be constantly filled with melt water in winter; Particular attention is paid to choosing a place to install the pipe. The closer the chimney is to the roof ridge, the better the draft and the fewer problems with backflow.
But in this case, you will need to raise the chimney to its maximum height, which means you need to install fasteners and increase the rigidity of the chimney. For a massive chimney, the passage through the metal tile will need to be additionally fixed to the ceiling beams. If you use modern double structures, then to install the sandwich pipe you will have to use guy wires and belts. Otherwise, a flexible and unstable pipe under the blows of the wind will quickly destroy the passage unit, skirt and waterproofing of the edge of the metal tile.
Speaking about fixing the valley, it is worth noting that according to the standards, the self-tapping screws must be tightened at a distance of 25 cm from the axis of the valley. The shape of the gutter of this roofing element promotes the organized movement of water. Therefore, there are no leaks.
No gaskets or seals are placed at the entrance of the self-tapping screw into the apron, which means it is impossible to guarantee the absence of leaks in the future.
Today, many manufacturing companies are busy developing technologies for the production of aprons for bypassing pipes.
note
Do not neglect such important elements of the roof as pipe bypass.
You can ensure a good connection between the roof and the pipe in other ways that allow you to reliably protect the under-roof space from moisture, and they are not at all difficult to do. The bypass can be done using a metal apron, as presented in the installation instructions for M28 metal tiles from UNIKMA, also using an apron using seam technology, using universal flashings from FAKRO or corrugated aluminum tape.
I would like to remind you that our team is always ready to help you install your roof. Call.
Installation of a chimney pipe on a roof whose slopes are located at a slope must be carried out according to certain rules:
The chimney can be located at a distance of no more than 150 cm from the ridge and rise no less than 50 cm above it. It is important to locate the exit no closer than 150 cm and no further than 300 cm from the ridge. The ridge line in relation to the top of the chimney, located at a distance of up to 300 cm, can have a slope of no more than 10%.
Laying tile sheets
correct laying of sheets
Before laying the material, logs are assembled, which are necessary to lift the sheets onto the roof. Metal tiles are allowed to be laid on both sides of the first sheet. If the next sheet is placed on the left side, then the last wave is covered on top. When this is done on the right side, the subsequent material is overlapped under the previous sheet. Regardless of whether a hip roof is created from metal tiles or it will have a different shape, it is customary to align the sheets of material horizontally along the eaves. There are several ways to install this roofing material. The operating procedure is as follows:
- the first sheet is placed on the slope and the material is leveled along the cornice and end;
- this sheet is attached to the ridge with one self-tapping screw - it is screwed into the center of the strip of material;
- the next sheet is laid next to an overlap of 15 centimeters, it is aligned with the cornice and connected with a self-tapping screw to the first;
- Similarly, several sheets are mounted and fastened together;
- the block formed from fastened sheets is once again aligned along the eaves and attached to the sheathing, except for the last of them, which is used to create the next blocks of metal tiles.
The technology for creating a roof covering looks like this:
- the first sheet is placed on the slope and aligned along the cornice and end;
- the second sheet is placed above the first and secured with one screw at the ridge - the screw is placed in the center;
- both of these sheets are connected to each other using screws;
- the third sheet is placed next to the first, and the fourth is placed above the third;
- the prepared block, consisting of four sheets, is leveled and mounted to the sheathing.
To implement it:
- on a triangular slope, find the center and draw a line along it;
- a similar line is marked on the first sheet in the center;
- the first sheet is placed on the slope, aligning the axes, and secured with one screw at the ridge;
- further installation is carried out on the right and left sides of the first sheet;
- On a triangular slope, when installing metal tiles, the sheets will have to be cut, which will require a special tool called a “devil” - a standard tool for a tin roofer. You can make it yourself from 10-centimeter boards. They are assembled into a rectangle, the elements of which are held in place using hinged fasteners. This tool will help you mark sheets of material directly on the roof (see also the article: “Installing a metal tile roof - features and rules”).
Installation and operation of a metal tile roof, detailed in the video:
How to seal a pipe on a roof made of corrugated sheets with your own hands
If you correctly lay corrugated sheeting on the roof, then this is a 100% guarantee to avoid leaks. And this is the most important criterion for the reliability of a roofing covering. However, it should be noted that in any roof structure there are several elements that create an abutment to the profiled sheets. These are ridge, valleys, front strips and so on. But, as practice shows, the most dangerous element where leaks can occur is the pipe sticking out of the roof. Most often these are chimneys.
Old stove makers, knowing about this problem, made a special thickening when erecting a brick chimney. Nowadays, almost no one remembers this, especially since modern pipes have a round cross-section and are often made of metal or other materials, but not brick. Because the latter option is difficult to execute and requires knowledge of certain nuances of the structure, which young craftsmen do not even know about.
What needs to be done to ensure that leaks do not occur at the junction of the pipe and corrugated sheeting? Good sealing of joints is required. Although experts note that the location of the chimney will also affect this problem, because installing it closer to the overhang (eaves) creates conditions for increasing the volume of water that flows down the roof slope. The more water there is, the more likely it is to leak.
But that's not all. Experts note that the chimney installed higher up the slope has the shortest length, which is located in the cold air zone. And this is minimal condensation of moist air, which causes the growth of soot and dust on the internal surfaces of the pipe structure. Plus, when the exhaust gases condense, acid forms on the walls of the pipe, which corrodes the material (brick, metal, etc.). By the way, in SNiP number 41-01-2003 under the title “Heating, ventilation and air conditioning” the installation height of the chimney is precisely indicated, but nothing is said about the exact installation location.
Let's look separately at several designs of chimney pipes passing through a corrugated roof. And let’s decide how to seal the joints between them.
Metal apron and flexible tapes for rectangular chimneys
So, let's start with the traditional, although rather outdated, option - a square brick chimney.
After all, its installation, starting from a special separate foundation to sealing the joint with the roof, is quite complicated. But at the same time, of course, the quality is still not guaranteed, because a lot depends on the selection of materials and the professionalism of the stove maker.
Design and fixation of the chimney
A conventional brick chimney has a regular rectangular cross-section, which is not always good for internal aerodynamics. At the same time, more modern metal and ceramic chimneys are much easier to maintain and install.
In any case, the chimney is located as close as possible to the ridge, which reduces the snow load on the pipe itself and reduces the volume of water that will flow around it. This means that the risk of leaks will be significantly less.
Typically, a rectangular pipe is placed along the direction of the slope:
In general, you need to proceed with the rafters in such a place as follows. Here's how to install the apron:
- Step 1. First of all, use the lower junction strips, which are applied to the chimney wall and mark a line at the top.
- Step 2. Using a grinder, make a groove along this line.
- Step 3. Next, remove the dust so that small particles of cement and sand do not fall on the surface of the roof waterproofing. It’s just that over time they will turn into an abrasive that can damage the roofing material.
- Step 4. If the chimney does not fit into the hole between the rafters, and you have to cut more than one rafter, then the outer rafters need to be strengthened. To do this, they are made paired.
- Step 5. If the pipe passes directly through the ridge, then the ridge run is installed on both sides of the pipe, and the rafters of the upper part are supported by the crossbars.
- Step 6. If the chimney is located away from the ridge, then place one edge of the apron over the chimney, and hide the other end under the roofing material. If the pipe is located close, then place a protective apron directly under the ridge beam and secure it with special elements, and then treat it with a moisture-resistant sealant.
Here is the layout of the rafters:
But when using additional bars in the rafter system, remember that wood and polymer materials are sensitive to high temperatures. Therefore, SNiPs indicate the minimum distance between the chimney pipe and the elements of the roofing pie - at least 130 mm.
If you use a ceramic pipe without insulation, then this clearance should be at least 250 mm. And right where it passes through the roof, the pipe must have an indentation - a special thickening.
In addition to support bars, today many chimney manufacturers recommend using special fastening kits:
The very passage of the chimney through the roof also implies the use of a special fastening called a okapnik. It is installed directly on the chimney pipe as a decorative and functional element.
And to ensure the required draft, the height of the pipe must be at least 5 meters from the grate to the mouth. In this case, the mouth of the chimney must be reliably protected from precipitation. For this purpose, there are such special elements on sale as deflectors, an umbrella and other attachments, including metal mesh catchers.
Let's move on. If the pipe is sufficiently less than one meter wide and falls directly into the valley, then it is positioned so that one of the upper corners of the bases is as close as possible to the middle of the valley. In such a solution you will need non-standard additional elements.
If the chimney width is more than 80 cm, then a small gable roof is created on the side of the ridge - a slope. Moreover, it is important to make it from the same material as the roof itself, although sometimes it makes sense to give preference to metal.
Just remember that the slope itself is a problematic element, which creates two valleys on the roof at once (and valleys are always the weakest points). In such a structure it is difficult to install heat, vapor and waterproofing, as well as to ensure the required level of ventilation.
Also, a rather wide chimney usually prevents the ventilation of an insulated roof, and additional ventilation elements must be installed next to it before and after the chimney. For example, aerators or ventilation tiles.
Also, the lower the chimney is in the valley, the more snow will accumulate behind it. Therefore, it will be necessary to install reliable snow retainers above the pipe level. But avoid placing the chimney close to the attic windows, otherwise combustion products will constantly be drawn into the under-roof space.
And finally, most often the fact that the chimney pipe is installed incorrectly is discovered already at the stage of assembling the roof rafter system. At this stage, it is still allowed to move the chimney pipe, if possible. For example, if it is not yet made of brick, although this is more an exception to the rule than usual practice.
Sealing passages through different types of roofing
Here, for example, is how to install a chimney through a roof made of composite tiles:
These are the instructions for passing a square chimney through a soft roof:
As you can see, the chimney is protected from any leaks by an apron with special components. In addition, today for natural roofing, such as ceramic or cement-sand, very convenient flexible abutment tapes are produced. They are made from lead or aluminum, and an adhesive layer is applied to the inside.
The junction of the pipe passing through the passage in the roof slope
Unfortunately, the layout of the house does not always allow the pipe to be brought out through the ridge on the roof, and, accordingly, to make a passage through it. Therefore, another option remains - passing through the corrugated sheeting on the roof slope. And this option, as practice shows, is the most difficult in terms of carrying out waterproofing and protective work.
To begin with, the main task is to correctly install the top of the apron. Therefore, the main requirement is to install this element under the corrugated sheet.
Look at the photo below and you will immediately understand everything. This is similar to a breakwater that diverts water flowing down the roof in two different directions from the pipe.
Installing such an apron is quite difficult. In addition, at the junction of its parts and the corrugated sheeting, two valleys are formed, which are sealed in the same way as the valleys on the corrugated sheet roof itself. That is, installation of additional metal strips and enhanced waterproofing.
Bypassing the pipe located on the ridge
This arrangement of the chimney or ventilation can be called the most correct. In this case, in principle, it is possible to avoid such an unpleasant phenomenon as a snow pocket, and the water that gets on the roof instantly goes down the slopes, without even stopping. The only drawback of this method is the need to cut into the ridge beam.
Here it is more advisable to use an apron made of smooth tin. The part that is located below requires sealing with sealants. The ideal option is a strip of butyl rubber with an adhesive layer. On top, the protection is arranged in exactly the same way as on other lines of contact - with slats.
Principles of chimney outlet
When installing a chimney, it is important to remember fire safety. To construct the roof of a private house, a large number of materials are used, which may have varying degrees of flammability.
For example, wood used for rafters and sheathing is prone to fires. Also dangerous are the materials used for insulation and waterproofing. Do not forget that the pipe that removes hot smoke gets quite hot. That is why, if possible, all parts of the roof must have a certain level of fire safety and be located at a distance of at least 13 cm from pipes made of brick, concrete, or ceramics. If you use pipes that do not have thermal insulation, the distance will have to be increased to 25 cm.
Junction of roof to wall
Thus, in the place where the pipe is laid, it is necessary to create a significant opening through which, willy-nilly, heat loss will occur. And here its own rafter system will be equipped, and a certain type of insulation will be used. As for waterproofing materials, if a chimney is installed in a finished house, these materials are cut out with an envelope, and their edges are then fixed to the rafter system. If we are talking about square pipes, then it is necessary to arrange both internal and external aprons, the purpose of which is to prevent leaks.
Calculation of heat loss through the roof
Where to place the chimney
The shape of the chimney passage will directly depend on the shape of the pipe used. It can be round, square or rectangular in cross-section.
Regarding water, there are two main problems that arise when installing a chimney. This is the need to divert (redirect) water flowing down the roof away from the pipe, and provide the necessary level of protection from liquids trying to get inside the house. That is, moisture flowing down the chimney wall must also be sent to the roof to drain from it. That is why metal aprons are constructed or special factory cuttings and penetrations are used.
Connecting the roof to the chimney
Chimney passage with a “square” or “rectangle” cross-section
In order for the passage of a chimney with a square cross-section to be as airtight as possible, it is necessary to make external and internal aprons (thin sheet metal is often used for this). Usually, the internal one is installed first, and then the external one, installed directly on the surface of the roofing pie. When creating a lower apron, markings are made on a brick pipe that correspond to the location of all the parts of the apron. Then the groove is made along the intended lines - the groove is done with a grinder to a depth of at least 1.5 cm. It needs to be cleaned of dust and dried.
Roofing apron made of steel with polymer coating
Important! The groove should not pass along the seams of the brickwork - only along the surface of the brick itself!
Next, all the apron strips are mounted, with their edges inserted into the groove made and secured with sealant. Fixation to the pipe itself is carried out using roofing screws. If there is a need for joining somewhere, then it is important to remember that the overlap of individual elements on each other should be approximately 15 cm - only in this case will it be possible to achieve the recommended level of tightness. A special tie is mounted at the bottom of the apron to drain water. It is directed towards the valley or cornice.
Diagram of the connection between the chimney and the roof
Afterwards you can move on to arranging the outer apron. It must be remembered that at this moment the metal tiles should already be laid on the roof. The parts of this apron no longer have to be inserted into the groove - it is enough to simply screw it to the pipe itself with roofing screws. It is important to ensure a good connection between the apron and metal tiles and not forget about waterproofing. By the way, the waterproofing coating should extend about 5 cm onto the chimney. You can secure it with construction tape.
Output through the metal tile of a round pipe
Roofing passage units with a round cross-section are equipped with the help of roof penetrations, which allows for good sealing of the chimney on a metal tile roof. Antennas, masts, ventilation ducts and electrical communications can also be routed through roof penetrations. They are used on various roofing materials. The foundation of the roof penetration is a steel sheet, hermetically connected to the cap. A special hole in the cap allows you to bring out a sandwich pipe through the metal tile; all you have to do is find out how to assemble a chimney with your own hands.
To make penetrations, silicone or EPDM rubber is used: both of these materials comfortably tolerate temperature fluctuations from -74 to +260 degrees. Before installing the pipe, the penetration is equipped with a hole, the diameter of which should be less than the diameter of the pipe by 20%. The process of pulling the adapter onto the pipe can be made easier with a soap solution. After joining the sealant and the roofing surface, it completely repeats the texture of the roofing material. The area under the flange is coated with roofing sealant. Roofing screws are used as fasteners (installation pitch - 35 mm).
In most cases, it is recommended to use a sandwich pipe instead of a brick chimney. It consists of two liners with different diameters, separated by a layer of thermal insulation (usually basalt wool). Due to its good performance characteristics, ease of installation and long service life, a chimney made from a sandwich pipe is far superior to brick or concrete elements. Such a smoke exhaust duct does not overheat and does not accumulate condensate.
When independently arranging a chimney and cutting a pipe on a metal roof, you must strictly comply with all existing building codes and regulations: they can be found in the relevant documentation. It is best to carry out such work during the construction of the house. However, sometimes this has to be done on an already constructed building.
This usually happens in the following cases:
- The roof is undergoing major repairs.
- The truss structure is being replaced.
- A home heating system is being installed or replaced.
If you do not have confidence in your abilities, it is better to invite professional roofers to carry out the work.
Round chimney passage
If the choice was made in favor of a pipe with a round cross-section, then usually special cuttings with a round cross-section produced at enterprises are used to ensure a tight fit to the roof and eliminate the risk of leaks and heat loss. In appearance, they resemble corrugated cuffs equipped with wide brims. They are made of rubber, but a special one - heat-resistant, synthetic. Aluminum cuttings are also available for sale. The convenience of their use lies in the fact that they easily follow the wavy profile of metal tiles and can be secured both with fasteners and with adhesives.
Chimney seal
On a note! Similar penetrations are also used when installing antennas, masts, ventilation shafts and other elements that violate the integrity of the roof.
A hole is cut into a synthetic rubber penetration that is 20% smaller than the diameter of the pipe itself. Next, it is pulled onto the pipe itself (to facilitate the process, you can use a soap solution applied to the pipe). After this, the rubber product is pressed against the roof and fixed to it with sealant and roofing screws in increments of about 3.5 cm.
Switching from a brick duct to a metal one may be necessary when installing a new chimney or when repairing an old one
Output location
The reliability and tightness of the roofing pie depends on the correct choice of the outlet of the chimney and ventilation ducts through the roof. The finishing of the joint depends on the location of the passage. If the roof is made of profiled sheets, the pipes are installed in the following places:
- On a ridge. The ridge of the structure is considered the most advantageous place for the pipes to exit. This arrangement eliminates the formation of snow pockets and condensation, reduces the likelihood of leaks, however, it violates the integrity of the ridge beam. If a chimney or ventilation duct is discharged through a ridge, then the joint between them and the roofing material is sufficient to fill it with silicone-based sealant and then cover it with a decorative apron.
- At a distance of 50-70 cm from the ridge. This arrangement is considered advantageous, as it minimizes the formation of snow pockets and prevents leaks. When the chimney is brought out at such a distance from the ridge, the rafter structures are not disturbed. To protect the joint between the pipe and the roofing material, elastic penetrations and additional elements are used to assemble the apron.
There is a simple rule: the lower the pipes are located along the roof slope, the more effort it takes to waterproof the joint between it and the roofing pie.
https://youtube.com/watch?v=sq_0rFRMc70
Strengthening the rafter system
Often when installing a chimney, the question arises about strengthening and strengthening the rafter system, because it is necessary to form a hole in the roof pie for the pipe. That is, you will need to install a couple of spacers. When creating a roof made of metal tiles, the pitch between the rafters is rare, and the formed opening or the distance between the rafters may be too large. Therefore, it is necessary to install vertical spacers.
Pipe outlet box arrangement
Sometimes you have to break the integrity of the rafter leg, that is, cut it. Then, in certain situations, purlins or crossbars are also sawn. In this case, at the place where the rafter leg was cut, it must be fastened to adjacent, undamaged ones. For this, additional spacers are also used, between which bars are inserted vertically. Their function is to replace the rafter leg at the chimney passage.
On a note! Strengthening the rafter system with supports is rarely used. This method is advisable when the angle of inclination of the slope is more than 35 degrees, if it is necessary to cut out sufficiently large fragments of the rafter system.