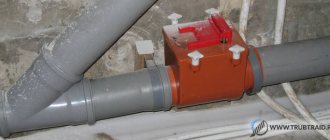
In the bathroom, the plumbing system is a whole plumbing system, the crown of which is the mixer. The axle box valve for the mixer is a shut-off and regulating device; it is this part of the device that is susceptible to the most frequent mechanical influences. The wear of this part can be recognized by the ever-flowing water when the tap is in the closed position and by the characteristic rattling sounds, then the faucet axlebox in the mixer will need to be replaced or its complete replacement.
The faulty condition of this part can cause a lot of troubles, but they can be quickly eliminated by replacing the axle box. Replacing and repairing valve axles are fairly simple operations in themselves and, as a rule, do not require special skills or calling a specialist. Before starting a review of its replacement, it is necessary to consider what crane axle boxes are, how they differ from each other and what advantages and disadvantages they have.
How to replace the crane axle box?
The need to replace the faucet is clearly indicated by the water mixer, which begins to leak in the closed position.
Even a small stream of water, thinner than a match head, which will flow from a faucet in the bathroom, can significantly increase money expenses; in addition, the irrational use of water has an extremely negative impact on the ecology of our planet. It is necessary to replace the part in the mixer with an identical one.
To replace, in addition to screwdrivers and keys, you need to arm yourself with pliers - a multifunctional tool that can act as wire cutters, pliers and pliers.
- Turn off the tap using the valve. Pipeline fittings related to shut-off and control products are located in front of the mixer.
- Look for a small shut-off valve if there is no valve on the supply pipe. This is a large diameter ball valve in the form of a metal ball with a hole in the top.
- If such an element is missing, turn off the water in the riser.
- Remove the decorative caps. Use the screwdriver.
- Unscrew and remove the screw. It is easy to “calculate”. The part secures the flywheel.
- Remove the bushings. They are located at the top of the crane box.
- Unscrew the axle box. Apply the key.
Nuances of work
When unscrewing an old faucet axle box, you may encounter some problems. If it is thoroughly stuck to the body and it is not possible to remove it with handy tools, you must apply the following:
- Place a pipe wrench around the edges of the bolt. Try to rip it off by moving it from side to side, as if swinging it. Here it is important not to overdo it, namely not to damage the threads and not ultimately break the mixer.
- Use chemical-containing products. They will help loosen the threaded connection. Take some vinegar, Cillit-type detergent, or other acid-containing compounds. If they don't help, then try making a small plasticine container around the bolt. After this, pour in the liquid again.
- Move the threads using the thermal method. Use a heat gun to warm up the threaded part. It is necessary to achieve complete weakening of the bolt.
If the tried methods do not help, you should remove the valve axle by drilling. To do this, cut off the protruding part of the bolt and drill out the remaining elements. The drill can be replaced with a milling cutter.
Installing a new
Installing a newly purchased or repaired part does not require anything complicated. Perform the same steps as when unscrewing, only in reverse order:
- Check if the water is turned off.
- Screw in the faucet axle box by hand and only then use a wrench or pliers to be extra sure that it fits snugly to the rest of the structure. You should not put too much pressure on the product, as the gasket may become deformed. Violation of the integrity of the element leads to blocking of the water supply channel.
- Be careful not to damage the sealing gasket on the valve seat with the tool.
- Tighten the locknut and secure the entire body of the part from turning.
- Open the water. The absence of smudges indicates that everything was done correctly.
Cartridges for single lever mixers
Replacing seals does not always eliminate problems that have arisen.
In such a situation, it may be necessary to replace the cartridge for the single-lever faucet. You can carry out repair work yourself. The main thing is to purchase a suitable repair part. Replace mixer cartridge
How to replace the cartridge in a faucet in the kitchen or bathroom
Let's take a closer look at how to replace the cartridge in a kitchen faucet so you can do it yourself. The work is performed in the following sequence:
To ensure that the new cartridge lasts as long as possible, you should pay attention to products with good reviews
Mixer cartridge repair
Before buying a new cartridge, you should make sure that the old one cannot be repaired. How to repair a mixer cartridge is carried out, we will consider below:
Varieties
Deformations of the crane axle box occur for many reasons. This part of the mixer is used every day, so it is often subject to breakdowns. The design is based on a metal rod and sealed gaskets. The latter are available in rubber or with movable ceramic plates. Based on this, a distinction is made between a ceramic faucet and a model with rubber inserts.
Ceramic options are reliable. Allows you to open the water in half a revolution of the mixer handwheel. Options with rubber inserts (also called worm inserts) wear out quickly. To supply water, you need to make several turns of the valve.
Advantages
Most parts have advantages and disadvantages. The crane axle box has four main advantages, which you need to familiarize yourself with in advance.
Durability
For many people, the main benefit of a part is its durability. Most product models are made from high-quality materials that take a long time to deteriorate. Therefore, the service life of the faucet axle box often exceeds the service life of the mixer itself in which it is installed.
However, sometimes there are defective spare parts that break down much faster, within a year or several months after purchase.
Control speed
Another important advantage of the part is its control speed. This product is much easier to use than mixers that have a worm head installed.
When using an axle box, a person will not need to spin the flywheel for a long time. To completely shut off or open the flow of water, you need to turn the tap only half a turn. At the same time, turning such a valve does not even require much effort.
Easy repair and replacement
There are times when axle boxes fail and you have to repair them or completely replace them with new ones. Some people think that doing repair work is difficult, but this is not so. Repairing this part is very simple, and therefore anyone can handle this work. However, before doing this, you need to familiarize yourself with the recommendations for carrying out the work.
Silence
Some types of faucets begin to make noise during operation. However, models that are equipped with a crane axle box do not make noise or make any sounds. If extraneous noise appears during operation, it is better to disassemble the product and inspect it.
Crane axle box with rubber inserts
- Wear of ceramic plates. Occurs rarely and requires replacement of elements. The work is labor-intensive, so it’s easier to purchase a new part.
- Foreign objects between the plates. In the future, to prevent such defects from appearing, it is advisable to install a device for purifying water from impurities.
- The appearance of a thread between the rod and the body of the valve axle box. In this case, it is necessary to change the entire part.
Before repairs of any complexity, it is necessary to turn off the water and prepare the tools for work. The minimum set should include a flathead and Phillips screwdriver, pliers, a gas wrench and a spanner.
You can select a team of builders on the website www.stroitel.od.ua
In order to correctly perform operations to restore the functionality of the mixer, everything must be done in stages. The repair plan is as follows:
- Remove the flywheel from the crane axle box. To do this, remove the colored decorative plug from the valve. Next, pull the flywheel up. There should be a bolt underneath. Unscrew it and remove the valve.
- Clean the threads and flywheel. Run the parts under water a couple of times, use cotton swabs or other similar objects.
- Unscrew the decorative insert of the faucet. At this stage, use a socket wrench with a 17mm head.
How and what to use to unscrew the faucet axle from the mixer? Counterclockwise with an adjustable wrench. The main thing is to hold the mixer. Then clean the threads with a brush.
Gasket repair
Operating procedure:
- unscrew the valve axle;
- apply a little silicone to the gasket;
- install the part back.
Grains of sand contribute to the leakage of the axlebox and its failure. Foreign objects cause leakage. The order of work in this case is as follows:
- unscrew the valve axle and disassemble it;
- clean the plates, treat them with waterproof lubricant;
- return the part to its place.
Important! The plates must not be turned over.
The best way is to replace the plates.
Read more: How to choose a bathroom faucet; types; useful tips; classification
Leaking is a sign that something is wrong with the part. Water leaking from under the flywheel indicates a breakdown of the valve axle.
Gasket wear is the most common cause of failure. The solution to this problem lies in replacing the part. The rubber ring (1 mm) should fit tightly to the metal ring. When making it, you need to take this fact into account.
It happens that at the most unexpected moment the faucet begins to leak. Moreover, it can flow either directly from the tap or from the locations of the valves. If such a nuisance happens, don’t be too upset. To do this, in most cases, it is not necessary to call a plumber and buy a new faucet. Here we will talk about how to make a faucet yourself if it leaks.
With two flywheels. Here, as a rule, rubber gaskets or ceramic plates wear out.
Single lever. Here, mainly, the moving plastic plates become unusable.
Let's look at how to fix a faucet with your own hands in each case.
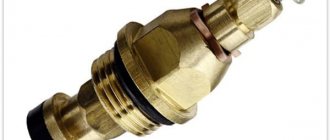
Fig.1 Crane axle box rubber
In Fig. 1 we see the crane axlebox assembly. This is an axle box faucet for an old design mixer. Below you can see the rubber insert. This is exactly what needs to be changed. In addition to the lower insert (gasket), there is also a rubber O-ring on the thread at the top. It should be borne in mind that if two pipes with hot and cold water are connected to the mixer, then there will be two valve axle boxes in the mixer, and the one that is faulty must be replaced.
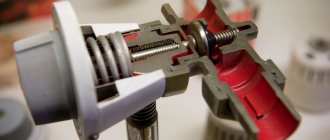
Fig.2 Sectional view of axlebox crane
Home repair of the faucet axle box in the mixer will not be a problem if you know its structure. The section shows its basic design. Shutting off the water in the pipeline occurs when the “lamb” of the tap rotates to the right or left. A rod with a rubber insert lowers and blocks the movement of water. This picture shows an imported product with a splined rod. All threads in the valve axle boxes are right-handed. That is, close to the right, open to the left.
Rubber inserts are cheap, but they wear out quickly and require frequent replacement.
Summarize
Sooner or later, everyone is faced with the need to replace shut-off valves on faucets in their apartment. So, is it worth paying specialists for work if it’s easy to do it yourself? And it’s not a fact that an invited professional will replace the faucet axle on the mixer better than the home master himself. After all, you always do things for yourself “with your soul.” The only thing I would like to remind you in conclusion. Do not rush to purchase fittings without disassembling and inspecting the one currently in place. This will help you save money, which is important these days.
The mixer must always be in good condition
We hope that the information presented today was useful to our readers. If you have any questions while reading the article, you can ask them in the discussions below. The Seti.guru editorial team will definitely answer them. There you can also share your experience in installing or repairing a crane axle box - this will be useful for beginning home craftsmen. Write, ask, communicate. And finally, according to the already established good tradition, we suggest watching a short but very informative video on today’s topic.
Types of crane axle boxes
Bath and kitchen faucets use two types of faucets: with a worm gear and rubber gasket, and with movable ceramic plates that block the flow of water.
Crane axle boxes of two types
In order to change the crane axle box, you must first buy a new one. It’s easier to do this if you unscrew and bring to the store the one that needs to be replaced, since faucet axles in mixers can differ in some parameters, including the length and diameter of the threaded part (1/2 or 3/8 inch), the seat for the handle (square or spline connection for 20 or 24 splines). As a rule, consultants in stores selling plumbing fixtures are able to select the required product based on a sample.
The difference between a crane axle box, which has a rod with a rubber gasket, and a design with movable ceramic plates, is as follows.
• The first ones include a rod that is extended using a worm gear and locks the valve seat with a rubber gasket. When worn out, such a gasket is easy to change, and it costs a penny. Unfortunately, gasket replacement is required quite often;
Crane axle box with rubber gasket
• The faucet with ceramic plates does not require rotation of the mixer rod (handle) in order to open the faucet completely. It is enough to turn its flywheel just half a turn. The design of a ceramic faucet box is simple: a ceramic plate with a hole is fixed on the rod, the second plate (with a hole of the same shape) is fixed motionless. A slight turn of the tap and alignment of the holes on the plates opens the way for water.
Crane axle box with ceramic plates, its structure
In principle, the ceramic plates inside the mechanism can be changed. However, they break quite rarely, and replacing the entire crane axlebox is much easier. Compared to a rubber gasket, replacing a faucet with ceramic is more expensive, but the convenience of everyday use of the faucet is worth the money, and the service life of such products is very long.
The only thing that can limit the use of ceramic faucets is hard tap water, which has a large number of solid inclusions that have abrasive properties due to which the ceramic plates wear out and no longer fit tightly to each other, allowing water to pass through. Often by disassembling and cleaning these plates from scale and rust, the problem of water leakage is solved.
How to unscrew and remove the valve axle box
Before carrying out any work on the → mixer, including changing the faucet, you should turn off the water, both cold and hot. If the apartment does not have taps for this, you will have to shut off the entire riser in the entrance. Before starting work, it is a good idea to make sure that the water is turned off by opening both taps.
To replace the crane axle box you will need: a screwdriver (flat) and an adjustable wrench (preferably size zero).
The work sequence is as follows.
1. The flywheel is removed from the crane axle box, for which the colored plastic plug is removed using a screwdriver, the fastening screw is unscrewed, and access to the rod and the crane axle box itself is opened;
Read more: Replacing a gas tap in compliance with safety rules
2. In order to “unscrew” the valve axle, sometimes it is enough to have a key set to “17”. Ceramic valve axle boxes are often equipped with lock nuts that must first be loosened using an adjustable wrench. You can unscrew the valve axle with a square head of the rod using a wrench set to “7”, rotating the rod counterclockwise, as shown in the photo.
Install the crane axle box in the reverse order.
It should be remembered that when installing a ceramic faucet, you cannot tighten it too much, otherwise you can break the fragile ceramic discs. It is enough to screw it tightly into the hole of the mixer and secure it with a lock nut.
Faucets for bathrooms and kitchens use 2 types of faucet axle boxes: with moving ceramic plates that block the flow of water, and with a rubber gasket and stem.
To replace the crane axle box, you must first purchase a new one. To avoid mistakes, it is preferable to remove in advance and take with you to the plumbing department the one that needs to be replaced, since faucet axle boxes in faucets can differ in a set of characteristics, for example, the length and pitch of the thread, the seating area for the valve. Most often, managers in departments that sell plumbing fixtures are able to select the right model using a standard.
The main differences between crane axle boxes, which have a rubber gasket and a worm gear, and the model with moving ceramic discs, are as follows.
- The first category has in its design a rod and a rubber plug that moves using a worm stroke and closes the valve hole. In case of corrosion, this gasket can be replaced quite simply, fortunately, it is not expensive. The disadvantages include the fact that the gasket is replaced quite often;
- The valve axle box, which has ceramic discs, does not provide for rotation of the valve to fully open the mixer. You just need to turn its handle. The design of a ceramic faucet axlebox is not complicated: a ceramic disk with a hole is attached to the rod, another disk (with an identical hole) is installed permanently. A slight turn of the mixer and the alignment of the holes removes all obstacles to the flow of water.
how to remove the crane axle box?
Theoretically, ceramic discs inside the structure can be replaced when worn out. But they rarely fail, and replacing the assembled product is much easier. If compared with the first option, replacing a ceramic faucet axle box will be somewhat more expensive, but the comfort of frequent use of the faucet pays for this price, in addition, the service life of these products is quite long.
Before starting any repair work on the faucet. including replacing the faucet axle box, you must first completely turn off the water. If there are no shut-off valves (or do not work) in your home, you need to turn off the entire riser in the entire entrance. Before you start work, make sure that the water is really turned off by opening the tap.
To replace the faucet axle box you will need: an adjustable wrench and a flat-head screwdriver.
- We remove the valve from the faucet box; to do this, remove the colored plastic plug with a screwdriver, unscrew the fastening bolt, thereby gaining access to the rod and the faucet box itself;
- To dismantle the crane axle box, sometimes it is enough to have a number seventeen key. Ceramic crane axle boxes are usually equipped with lock nuts, which must first be loosened using an adjustable wrench. It is possible to dismantle a crane axle box with a square-shaped rod head by using a number seven wrench and turning the rod in the opposite direction.
Mount the crane axle box according to the same scheme.
We must not forget that when installing a crane axle box made of ceramics, you cannot tighten it too much, otherwise you can deform the rather fragile ceramic plates. You just need to screw it tightly into the tap hole and secure it with a lock nut.
That’s all, if there is anything you don’t understand, then we are waiting for your comments below.
Step 1. Stop the water supply directly to the mixer by closing the valves. They may be located somewhere on the water pipes that lead to the faucet. Read about how to make plumbing in your dacha in this article.
Fig.1 Turn off the water
Step 2. Using a screwdriver, carefully so as not to damage the flywheel, remove the plug from it, which indicates the temperature of the water from this tap.
Fig.2 Remove the plug
Step 3. Underneath it you will see a bolt that needs to be unscrewed.
Fig.3 Unscrew the bolt
Step 4. Having turned it out, remove the flywheel itself.
Step 5. Now we take either an open-end wrench or sliding pliers, or an adjustable or gas wrench and unscrew the locking ring.
Step 6. After this, using the same tool, carefully unscrew the valve axle itself.
Fig.4 Unscrewing the faucet axle Of course, you can repair the mixer by replacing the gasket or ceramic plates, depending on the design of the mechanism. But it is better to completely replace the crane axle box. Moreover, the cost of this part is very low.
Fig.5 Pull out the crane axle box
Step 7. Regardless of which route you decide to take, the next step is to go to the store to purchase the required part. Be sure to take your crane axle box with you. as a sample, since there are a huge number of options.
Read more: Replacing a gas stove in an apartment, where to go and how to do it for free
Step 8. After purchasing everything you need, screw the new valve axle into its seat, having previously cleaned the threads from rust and various deposits. If you decide to make do with the method of replacing the gaskets, then before screwing in, accordingly, we first replace them.
Screw in the valve axle carefully. Do not overdo it, as you can ruin the rubber bands if you overtighten.
Step 9. Screw on the retaining ring.
Step 10. Put on the valve and secure it with a bolt.
Step 11. Install the plug.
Half-turn system
As for such a service as repairing crane axle boxes with ceramic plates, it is quite in demand precisely because the reliability of these mechanisms is appreciated by many. Half-turn taps did not appear yesterday, immediately becoming an attractive replacement for tight and inconvenient worm mechanisms. They allow you to turn off the water almost at lightning speed, without any effort, and also quickly, but at the same time smoothly control the pressure. It is also pleasantly pleasing that they are produced with different diameters, as well as thread pitches. Thus, they can be installed instead of outdated mechanisms.
Repairing a crane axlebox made of ceramics, in essence, also comes down to replacing it. The main parts of the shut-off valve are ceramic plates, the perfectly processed surfaces of which act as curtains blocking access to the water supply system. To repair a ceramic crane axle box, service personnel must perform the following operations:
— Shut off the water supply;
— Remove the decorative plugs on the mixer (at the same time getting rid of factors interfering with the work);
— Remove the half-turn module and, if necessary, clean the plates from deposits of heavy fractions;
— Replace the damaged module, having first selected a suitable modification or install a cleaned axlebox, if it can continue to function.
Most faucet repairs are carried out in the order indicated above. And the normal functioning of the system in the future largely depends on a qualified approach to all necessary measures. After all, many of us still remember inadequately humming taps, after a visit from a regular plumber, and the constant noise of falling drops, which could only be gotten rid of by plugging something into our ears.
In fact, the same noisy faucet is the result of illiteracy or carelessness of the master. Poor quality or incorrectly installed gaskets led to such incidents. So how can you avoid these problems now if you still need to repair the crane axle box?
- There is no need to look for a master from the “gateway”, trying to save money;
- Inexpensive parts are not always of poor quality, but savings should be backed by guarantees;
- Using the services of an official service, you can always make claims regarding the poor quality of the work performed.
Even if you think you can fix the crane axle box yourself, don’t rush to grab a dusty tool chest or run to your neighbor to get the necessary keys. Consider whether you have sufficient experience and knowledge. After all, rash actions can easily turn a faucet capable of serving for a long time into a useless piece of hardware, or simply cost you a lot of money by throwing out unnecessary parts. Therefore, try to correctly assess the situation and allow the crane axle box to be repaired or replaced, if this is not possible, by those who will definitely achieve the required result.
Is the faucet leaking? Repair the crane axle box once and for all. Checked!
Step 1. We also turn off the water supply.
Step 2. Remove the plug.
Fig.6 Remove the plug
Step 3. Using either a screwdriver or a hex wrench, unscrew the fixing bolt.
Fig.7 Unscrew the bolt
Step 4. Gently shaking the lever, remove it from its seat.
Step 5. Unscrew the retaining ring by hand.
Fig.9 Unscrew the locking ring
Step 6. If there is a fixing nut, unscrew it.
Fig. 10 Unscrew the fixing nut
Step 7. Remove the cartridge itself.
Fig. 11 We take out the cartridge itself. Here you can also try to replace the moving plates themselves, which are located below, or change the entire mechanism.
Step 8. We go to the store along with the sample.
Step 9. Install a new or repaired mechanism.
Step 10. Screw in the fixing nut.
Step 11. Screw on the retaining ring.
Step 12. We put on the lever and fix it with a bolt.
Step 13. Install the plug.
It happens that the handle becomes difficult to turn to the sides. In this case, drop a few drops of acid-containing detergent into the slots of the cartridge, move the lever in different directions and leave it in this state for a while. Afterwards, rinse the mechanism and install it in place. It should help. The main thing is not to use products designed to remove rust. Like WD.
Here, in principle, are all the step-by-step instructions. Now you know how to repair any type of faucet with your own hands, without involving plumbers. And this, of course, will save your money. Moreover, as you already understand, fixing a faucet is not at all difficult and does not take long.
Read Toilet design with a button
Why does the door start to creak and how can it be fixed?
There are several main reasons why the front door begins to creak. Let's look at them in more detail:
- The most common reason is improper manufacturing of the door itself. For example, the hinges are welded incorrectly. You can solve this problem yourself, or contact a specialist. As a rule, for high-quality rearrangement of hinges, the door must be temporarily dismantled and the necessary work performed. Experts strongly recommend not to experiment with self-digestion of loops, because this process is quite important for further functioning;
- There is no lubrication in the hinges. This problem is very easy to fix with your own hands. The door leaf is slightly raised on its hinges, and lubricant is added to the resulting gap. If everything is done correctly, the squeak disappears very quickly;
- Incorrect lubricant selected. A striking example is the use of ordinary grease to lubricate the entrance street door. The fact is that at low temperatures, some types of lubricants begin to thicken and turn into a classic abrasive. If this problem is not corrected in a timely manner, very large wear will appear on the hinges, which may cause them to be forced to be replaced;
- There are no balls in the loops. To eliminate this problem, the door leaf must be carefully removed from the hinges, small balls must be placed inside the hinges and the door leaf must be installed in place;
- The door trim touches the hinges. The most relevant solution to this problem is a careful “adjustment” of the cladding. Typically, this can be done using a regular knife. In some cases, the cladding must be removed before fitting.
Recommendations from experts
Experts strongly recommend adhering to a few simple rules.
First of all, we are talking about new doors, which are covered by the manufacturer’s warranty. There are often situations when, after installation, the door begins to creak slightly.
Most often, installers assure the owner of the apartment or house where the door is installed that the creaking will go away very soon, since at the moment the hinges are still completely new and the lubricant has not been completely distributed. In fact, new hinges should not creak, which means you need to immediately inform the store about this shortcoming.
The next important nuance is the independent reinstallation of the hinges. As mentioned earlier, it is better to entrust this work to specialists. The fact is that for proper functioning, the hinges must be located clearly along the axis. The slightest deviation will lead to very unpleasant consequences, and all efforts will be in vain.
Ceramics take over
All hot and cold water mixers fail after a while. Their design provides for quickly wearing elements - the axle box tap for the mixer. In faucets made in old Soviet times, these are rubber gaskets. Time does not stand still and faucets have begun to improve, replacing rubber or bronze wear parts with ceramic ones.
Ceramics is not the clay from which dishes are made. These are powdery mixtures of various metals sintered at high temperatures. They have qualities superior to modern steel. Due to their increased hardness, ceramic parts are tens of times more durable than rubber parts.
Axlebox tap in the mixer - Photo 02
Ceramic products have such beneficial properties.
- mechanical strength,
- hardness,
- chemical and thermal resistance,
- do not rust.
- high cost compared to rubber ones.
Repairing other minor damage
Switches with a push-button mechanism often “sin” in that, with low water pressure, they spontaneously return to their original position. And this problem is associated with an excessively tight return spring.
Removing one or two turns of the return spring will help eliminate the problem of the button spontaneously returning when the water pressure is low.
If the opposite situation occurs, in which the button does not return to its original position when the water is turned off, the cause is excessive sealing of the rod. Loosening the gland nut or applying silicone grease under the rubber ring will help correct the situation.
The reason why the button does not return from the “shower” position to the “spout” position may also be the loss of elasticity of the spring. In this case, it is better to replace the part with a new one. But if there is no possibility, to return the spring to its elastic properties, use a proven method:
- Stretch the spring well.
- In this position, heat it at high temperature.
- Quickly cool the hot workpiece by immersing it in a container of cold water.
If the cause of water leaking from the tap is lime deposits on the seat and rubber, chemical cleaning will help correct the situation. For these purposes, you can use Domestos, Belizna or any other household chemicals that can cope with lime.
If water from the tap begins to flow poorly, then before repairing the faucet, make sure that the mesh covering the neck is cleaned
If the quality of tap water is poor, the mesh may become clogged with dirt. In this case, you just need to carefully remove it from the neck, and then clean it with a brush under water pressure and put it back in its original place.
There is nothing difficult about repairing a bathtub faucet. The main thing to remember is that any minor repairs to plumbing fixtures installed in the house require strict adherence to the disassembly rules.
The process of replacing a crane axle box
Replacing the crane axlebox - Photo 04
- Remove decorative caps or trims using a screwdriver or knife. They are made of plastic or can be metal and are inserted into the hole with a slight interference fit.
- Unscrew the screw that secures the flywheel and remove it.
- There may be decorative bushings on top of the axle box. Take them off too.
- Using a wrench, unscrew the axle box and inspect it.
- If the rubber gasket is worn out, replace it with a new one. To do this, you need to unscrew the screw that holds it.
- Replace the faucet axle box in the mixer and insert the decorative bushings, flywheel, screw, and decorative caps in reverse order.
- Open the valves on the pipe and check the mixer for water leaks. When installed correctly, the mixer works immediately.
- Before replacing the mixer parts, it is necessary to drain the water from the pipe,
- all parts must be stacked in the order in which they were dismantled, so that later after assembly there are no “extra” spare parts,
- you need to tighten the faucet parts “with a sense of proportion” so as not to break the threads,
- if we install an old valve axlebox after replacing the gasket, then clean the threads, if necessary, from deposits.
Installation instructions
Replacing a worn core involves purchasing a valve head of the same model from an identical manufacturer. It is recommended to have an old sample with you so that a specialist consultant in the store can select an analogue if the required product is not available.
Installation is in the reverse order. Before installing the core, it is necessary to check the seat and clean it of dirt or rust, and also wind several layers of plumbing thread onto the threads to ensure a tight fit and tightness. Tightening with excessive force is not recommended, especially when working with a ceramic structure. It is fragile and may not withstand excessive stress. It is best to tighten it by hand, and only tighten it with a wrench at the final stage, making sure that the thread is intact.
Prevention
Repairing a mixer may not always give good results; in some cases, a complete replacement of the device is required. Experts advise adhering to a few simple rules, with which the equipment will serve for a long time:
- If possible, install filters for rough water purification to prevent the entry of debris and other dirt from the water supply;
- if you install a filter to remove salts, the parts will be protected from lime, so you can forget about leaks and repairs for a long time;
- The highest quality and most durable faucets are considered to be brass, while low-quality faucets are made of silumin. Often, cheap faucets are produced by Chinese and Turkish manufacturers;
- single-lever designs are more modern and convenient, they are easier to repair.
- To clean the body and other parts, it is better to use cream-like substances or gels that are suitable for the metal of the mixer. Do not use brushes or alkaline cleaning products;
- to preserve chromium, all traces of detergents must be removed immediately with plain water;
- Gaskets and other parts need to be changed once every 2-3 years, possibly more often. This preventative measure is much cheaper than replacing the entire faucet;
- The valves must be opened and closed completely, but without effort.
Kitchen decoration with PVC panels: pros and cons, application options, design ideas. PVC panels for the kitchen: varieties, installation methods, disadvantages, recommendations for selection
Knowing what to do when a kitchen faucet leaks, you can replace parts or the entire faucet yourself. Often the described schemes are suitable for all appliances, including those in the bathroom. Before carrying out work, it is important to determine the cause of the leak, and when choosing new faucets, you should buy only high-quality products and not give preference to cheap products.
Best answers
Wicked:
Either break the “lamb”, or take hold of it with an adjustable wrench and unscrew (counterclockwise) the entire knob, buy another one along with the “lamb”. Well, if I understood you correctly.
Nikolay Mogilko:
drill out the bolt or at least its head
K-GOLEM:
only experienced managers or merchandisers can cope with this problem... :)))
dZen:
You can use a household drill to cut a new slot. Or just drill it out.
Alexey from Russia:
If the valve is no longer needed, cut it off with a grinder. There is an option to unscrew the valve itself from the mixer. but first turn off the water completely - both cold and hot.
Grandfather Au:
I would post a photo, otherwise how do we know. Spray white onto the bolt for half an hour. If it’s copper-plated, they should turn away
researcher:
It’s easier to find a man than to master repair technology. Just don’t say that it was the husband who wrote this, because this is not a husband, but a boy!!!!
Alexander:
You can’t even imagine what kind of nightmare faucet your imagination conjures up regarding your question. The valve from the faucet is unscrewed with an adjustable wrench and is not attached to it with any bolts. The head of the bolt is a wrench and does not have a slot for a screwdriver. If you can’t remove the valve from behind the flywheel, break it, drill out a screw, etc., whatever you like best. If anything, a set of new flywheels for the mixer is not that expensive.
uncle Ivan:
Send me a photo in a personal message, then we can suggest something. Valves and mixers are now different, and it’s so easy to tell. As I understand it, you need to first remove the wing and then unscrew the axle box.
What to do if the hinges are rusty
If you see that the hinges are covered with rust, do not despair. In most cases, this problem can be solved fairly quickly.
First of all, you need to take any oil and a small cloth. Next, wet the cloth well with oil and apply it as tightly as possible to the areas covered with rust. Given the fact that the rust removal process is quite lengthy, the oiled cloth should be left for some time.
If you still managed to completely neutralize the oxide, then you need to think about preventing it from appearing in the future. To do this, you should take a few simple steps:
- First of all, to prevent the door from creaking, it is necessary to regularly lubricate all moving parts using a regular pipette or oiler, as shown in the photo;
- If there are hinges, then such a way out as installing grease fittings is allowed. To do this, drill a small through hole and cut a thread. Next, a special grease fitting is screwed into the prepared hole, through which, in the future, oil can be added to the cavity so that the door does not creak.
- If you don’t have a factory grease fitting at hand, you can simply fill the internal space with lubricant and screw in a plug, which can be a small bolt.