Before starting the assembly and installation of a chimney made of stainless steel, experienced specialists carry out preparatory installation work. To do this, experts suggest using a special type of sealant that can withstand temperatures up to 1000 C. It is with this substance that all seams and subsequent joints in the internal cavity of the chimney pipes will need to be treated.
In addition, the sealant serves as an additional guarantee of the tightness of the product, because in some cases even welding can “retreat.” There is no need to use sealant on the outer surface of a stainless steel chimney. You can find a review of stainless steel sandwich chimneys here.
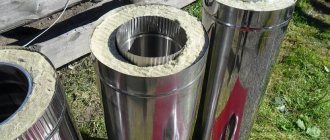
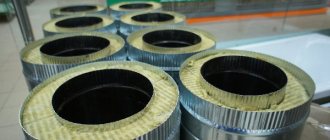
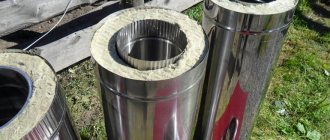
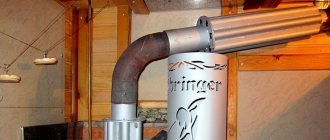
The photo shows stainless steel chimneys.
How to assemble?
The entire design of the stainless steel chimney is very simple. Therefore, you can assemble such a chimney with your own hands. Review of technical characteristics and elements of stainless steel chimneys here: https://mykaminz.ru/dymoxod/vidy/nerzhavejka/obzor-texnicheskixe-xarakteristik-i-elementov-dymoxodov-iz-nerzhaveyushhej-stali.html.
The main rule to remember when assembling is to treat the connecting elements of the stainless steel chimney pipe with special care and precision.
The entire structure must be strengthened with additional elements in the form of clamps. If the chimney is purchased, then all elements must be included. Clamps are placed at each joint of the product - this is approximately every 1.5-2 meters.
In order to assemble a stainless steel chimney, it is necessary to take into account many nuances. In the event that actual experience is not enough, then you need to take the advice of professionals. If there are no such specialists around, then before assembling such a structure you need to carefully study the video material presented below.
Only if the assembly of the device is done correctly will it be possible to obtain a sealed and reliable chimney.
How to install?
In accordance with the general rules for installing stainless steel chimneys, installation should be done from bottom to top. This means that first they fix the part of the chimney that is attached to the heating device and only then move on to the remaining elements of the structure.
Then each pipe is fixed.
They are mounted as follows: the side with a smaller diameter is attached to a pipe with a larger diameter. This method of forming the structure will prevent moisture and dirt from entering the internal cavity of the chimney. Read an overview of the characteristics of a galvanized steel chimney on this page.
Attention! The maximum depth of the mounting area is 0.5 times the outer diameter of the stainless steel pipe.
The maximum size of one element of the “highway” cannot exceed one and a half meters.
At the joints of the product, clamps made of brass or stainless steel should be used. In order to fix the device, you should use special brackets and bolts marked M10 and M8.
Attention! All components of the structure should under no circumstances interact with gas pipes and the electrical wiring system.
To care for a stainless steel chimney, you need to install a small door at the very bottom of the device.
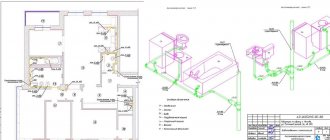
In order to simplify the entire process of installing a stainless steel chimney as much as possible, you should prepare a design diagram in advance. In addition, such a drawing will allow the owner of the building to orient himself regarding the overall dimensions of the entire structure and determine the number of all component parts of the device.
Advice: you should purchase 30% more material, because during the installation process it will be difficult to be distracted from work. It requires composure and attentiveness.
If some elements are a little taller or longer, they can be shortened a little. If the fastening element fails for some reason, you will not need to run to the store “for more.” Read the review of stainless steel chimneys.
To carry out installation work on stainless steel chimneys, you must follow the instructions and use high-quality fasteners. If your own experience is not enough to install such a chimney, you can use the video material presented below:
Installation of a stainless steel chimney with a passage through the ceiling and roof
According to experienced specialists, if even after studying the material and the advice of the experts, confidence in your own abilities has not increased, it is worth using the services of specialists. This is the only way to save your own time and money.
Types of chimneys
Pipes are made from different materials, which we will consider in more detail.
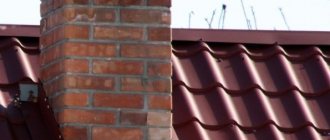
Brick
Classic brick chimneys for gas boilers are still in demand, regardless of their many disadvantages and weak thermal characteristics. At the same time, they meet sanitary standards and rules, which state:
- The pipe is made of fireclay bricks.
- To build the walls, a clay solution or special glue is used.
- To improve draft, the chimney rises above the level of the roof ridge.
Standards regulate the height of the pipe in relation to the roof ridge depending on the distance between them. Source kamin-estet.ru
- The masonry ensures tightness.
- At the internal hole, the deviation is no more than 3 mm per 1 m.
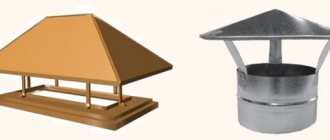
- To protect against precipitation, a deflector is installed on the head of the pipe.
The chimney can also have a mono design, which, due to low thermal characteristics, is repaired every 5-7 years.
Galvanized pipe
The “sandwich” type device today is the most effective option for chimney designs. The undoubted advantage of these chimneys is their resistance to aggressive environments and various mechanical influences.
The product consists of two pipes of different sizes, with one inserted into the other. Basalt wool is usually used as a filler between them.
Coaxial chimney
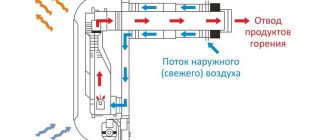
Currently, gas boilers use closed combustion chambers. Here, air enters and smoke is exhausted by a coaxial pipe. This is an original device, relatively recently introduced, but already very popular among users.
The non-standard solution lies in the supply of air through a pipe that removes combustion products. It turns out that one pipe performs two functions due to the design features.
A coaxial chimney is a pipe in a pipeSource rubankom.com
And its characteristic difference from ordinary pipes is the following... A smaller pipe (60-110 mm) is located in a larger diameter pipe (100-160 mm) in such a way that they do not touch each other.
At the same time, the structure is a single whole due to jumpers along the entire length and is a rigid element. The inner pipe serves as a smoke exhaust, and the outer pipe serves to supply fresh air.
Air exchange at different temperatures creates draft and sets the air mass in directional movement. The air in the room is not used during operation of the boiler, thus maintaining the microclimate in the room.
Ceramic
Such a chimney is a composite structure that includes:
- Smoke exhaust duct made of ceramic material.
- A layer of insulation or air space.
- Expanded clay concrete outer surface.
This complex design is due to several reasons. First, the chimney pipe is too fragile to be left unprotected.
Secondly, ceramics have high thermal conductivity, and therefore it needs reliable insulation. The inner round pipe has a smooth surface, while the outer one has roughness that does not affect the integrity of the product.
Typically, such chimneys are produced in lengths from 0.35 to 1 m, depending on the manufacturer. The connection of the inner and outer pipes occurs through a lock, which is a thinning in outer size at one end and an expansion of the inner pipe at the other end.
The expanded clay concrete outer surface is made of a square shape with a round hole inside. In addition, this product provides space for insulation, which is held in place by metal bridges. At the same time, they are fixed on the outer surface and make the pipe securely fastened.
Stainless steel
A steel gas chimney seems to be more reliable than a brick one. They are resistant to corrosion, immune to temperature fluctuations, and are not affected by increased air humidity and aggressive environments.
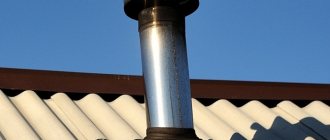
Stainless steel chimneySource pech-kamin.ru
In addition, such stainless steel pipes have a number of advantages:
- Long period of operation.
- Multifunctionality.
- Relatively low cost.
- Great strength.
- Possible implementation of a product of any complexity.
Chimneys made of this material are characterized by an assembly of modules, which allows the replacement of a damaged segment if necessary. The installation of chimneys is done using special outlets that allow them to fit harmoniously into certain roof elements.
How to clean?
Any device requires good treatment and care, the same goes for a stainless steel chimney.
It is in order to be able to clean the device that a small door or so-called glass is installed in its lower part. This element can be removed and the inner surface of the pipes can be cleaned. Read an overview of the types of chimneys for a fireplace.
Dirt in a system is the formation of a space with a high level of roughness, and this has a direct impact on the functionality of the device and the operation of the entire system.
An ash pan is also specially installed for comfortable maintenance of a stainless steel chimney. Solid combustion elements will collect in it.
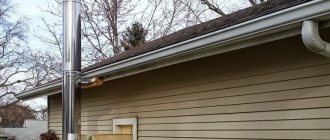
The picture shows the installation of a stainless steel chimney.
A stainless steel chimney burned out, what should I do?
The service life of a stainless steel chimney can last several decades.
But, troubles also happen. For example, one of the parts of the device may burn out. Repairs can be carried out in two ways:
- complete replacement of the element; local repair.
The first option involves replacing the entire section of pipe, but the second option involves the use of additional construction equipment. The damaged area is repaired using welding. It should be reinforced with stronger metal.
Video
Watch the video for a description of the characteristics of a stainless steel chimney:
Stainless steel chimney. How to do it?
Everyone should remember that the life of household members depends on the quality of installation work. If the structure is installed and assembled incorrectly, a fire may occur, which will subsequently lead to a fire. You need to be as careful and careful as possible.
Catalog: “Pipes and chimney elements”
Heat-producing equipment using natural gas, liquid and solid fuels - boilers, stoves, fireplaces - requires removal of flue gases.
Chimneys are designed for this, which can have different designs - made of brick or concrete; steel, ceramic, stainless steel chimney pipes. Brick chimneys are installed for the same brick stoves and fireplaces. For a number of reasons, for modern stoves and fireplaces made of metal, solid fuel and gas boilers, it is more advisable to install chimneys from metal pipes. Next, we will look at the types, advantages and range of chimney pipes.
Materials for the chimney
The chimney is constructed from various materials:
- bricks,
- asbestos cement pipes,
- ceramic sectional pipes,
- galvanized steel and stainless steel pipes.
Traditional brick chimneys and asbestos-cement chimneys are rapidly losing popularity. Their main disadvantages: hygroscopicity, the formation of abundant soot deposits and deterioration under the influence of water.
Modern chimneys are increasingly assembled from smooth and durable materials such as ceramics and high-quality steel: galvanized or stainless.
Also, for the equipment of the smoke exhaust system, combinations of an internal steel or ceramic pipe, insulation and an external brick or expanded clay concrete shaft or steel casing are used. This design is preferable, combining smooth and corrosion-resistant internal walls with protection from weather vagaries and mechanical damage.
Types of metal chimney pipes
The main classifying characteristics of metal pipes for chimneys are the material of manufacture and design.
Materials for chimneys can be:
- black steelgalvanized steelstainless steel
By design, chimneys made from pipes differ in:
The main trends in the market for heating boilers, stoves, and fireplaces are increasing their efficiency and reducing heat loss to the outside through the chimney. Such equipment includes pyrolysis boilers and bulleryans. Their exhaust gas temperature is lower than in traditional solid fuel boilers, which leads to increased condensation formation.
The resulting condensate contains sulfuric acid and other chemically active substances, so experts recommend installing stainless steel chimney pipes on them. Reviews of metal chimney pipes received from both sellers and installers inform that steel and galvanized ones do not last long. Considering , minimum wall thickness (about 0.40 mm), such pipes can fail within a year or two. For long-term service, it is better to buy stainless steel chimney pipes. Their advantages: resistance to high temperatures, fire resistance 100% (more than 500 deg.
C) exceptional corrosion resistance to destruction by condensate from flue gases; smooth surface contributes to greater smoke draft and less soot deposition; quickly warms up; a wide selection of components allows you to quickly install a chimney of the desired diameter and design; easy to maintain; look more aesthetically pleasing than lightweight steel; Double-wall chimneys are a pipe in a pipe between which a layer of basalt insulation is laid. They are much more convenient to install, more reliable in operation, more durable, but their price is appropriate. In order to reduce the cost of a chimney, you can buy a single-wall pipe and wrap it with a layer of basalt insulation, then with heat-resistant foil or fiberglass. Pipes made of special, acid-resistant stainless steel with a high molybdenum content (for example, AISI310S, AISI321) are used for chimney installations.
The principle of operation of the chimney
Any existing thermal unit that generates heat by burning fuel requires a smoke exhaust structure.
The chimney provides gas exchange, without which the heating device cannot operate normally: it expels smoke containing combustion products, replacing it with oxygen necessary for combustion.
This process, called draft, occurs due to the difference in the physical characteristics of the air inside the chimney and outside it. In the pipe, the gases have a higher temperature, low density and high pressure, while the air outside is colder, denser and its pressure is lower. Hot smoke rushes to where there is less air resistance - to the street. At the same time, the pipe is filled with air from the room.
Assortment of fittings and stainless steel chimney pipes
Manufacturers produce a whole set of stainless steel fittings that allow you to assemble a chimney of the desired configuration. For technical characteristics and the right choice, you can consult and find out more details at kotlant.ua - the leading Ukrainian manufacturer of solid fuel boilers. Below is a list and purpose of elements for a chimney made of stainless pipes:
TrumpetTrumpet is a trumpet in Africa too. Lengths - 0.5, 1, 3 meters. Tees 45 and 90 degrees Allow you to make a chimney outlet to the side with the appropriate angle. Elbow 45 and 90 degrees. If you need to change direction. Transition Serves for transition from a smaller diameter to a larger one. Mushroom Protects the chimney from falling from above precipitation. foreign objects. Deflector Protects the chimney from precipitation and increases draft. Okapnik Prevents moisture from entering the chimney. Kryza has nothing to do with the current political situation in Ukraine.
Available in different angles. Allows you to pass through the roof. Inspection Designed for checking and cleaning the chimney. Stands (floor, wall) Provide support for the chimney. Watering can. Placed at the lowest point. Serves for condensate drainage and cleaning.
Depending on the power of the boiler or furnace, a certain diameter of the chimney pipe is required. They are produced:
- from 100mm to 160mm in 10mm increments from 160mm to 220mm in 20mm increments250mm300mm
It is important!
Installation of the boiler and chimney must be carried out in accordance with the requirements of the standards and it is better to entrust this activity to specialists. If you decide to do it yourself, strictly follow the instructions for the purchased equipment. Heating boilers and furnaces are objects of increased danger!
Chimneys - brick chimneys have existed since ancient times - since the advent of the first stoves and fireplaces made of brick. One of the disadvantages of these chimneys is their cross-sectional shape - rectangular.
The presence of corners impairs the flow of gases from the combustion of wood around the chimney, which reduces draft. However, the main disadvantage of a brick chimney is its slow heating, which leads to condensation. The result is an acidic cocktail of water and soot that penetrates the brick and joints, reducing the strength and destroying the chimney.
Do-it-yourself sandwich chimney installation: instructions and installation rules
Perhaps only electric boilers do not need to install a chimney. All other thermal energy generators using solid, liquid or gaseous fuel cannot operate without a system for exhausting combustion products into the atmosphere. Therefore, when thinking through the issues of organizing autonomous heating and water heating, a lot of attention will have to be paid to the design of the chimney.
DIY sandwich chimney installation
Such a problem currently has many solutions, from old traditional schemes in the form of stationary brick pipes to prefabricated structures made of metal or composite materials. Each option differs in its degree of complexity, labor intensity, and efficiency of working with a specific heating device. One of the modern solutions that has gained wide popularity in both industrial and private construction is metal sandwich chimneys. And along with the high performance qualities of such a system, one of its significant advantages is that it is quite possible to install a sandwich chimney with your own hands, without inviting expensive specialists. The main thing is to thoroughly understand the principle of its operation, plan and choose correctly, and strictly follow the assembly technology. The manufacturer has already thought about everything else - installation is not particularly difficult and can be carried out quite quickly.
The main advantages of sandwich chimneys
Metal pipes, as an element of the smoke exhaust system, have been used for a very long time. There are many reasons for this.
- Firstly, the round cross-section is in any case optimal for the passage of gases.
- Secondly, even and smooth internal walls do not create obstacles for the passage of smoke and are less susceptible to the formation of soot build-up.
- Thirdly, installing a chimney from large parts is much simpler than brickwork.
Flue gases are saturated with chemically aggressive substances, which, against the background of frequent thermal changes, can activate corrosion processes leading to rapid failure of the chimney and its burnout. This problem has been solved to a certain extent by the development and introduction of resistant stainless steel alloys. However, the use of stainless steel has not eliminated several serious disadvantages inherent in metal chimneys:
- The high thermal conductivity of the metal leads to rapid cooling of the exhaust gases, especially in sections of the chimney located outside the building. This entails a decrease in overall thrust - it will be very dependent on external temperature conditions.
- Such a temperature difference causes another negative phenomenon - the active formation of condensation. Excessive moisture on the inner walls of the pipes reduces the efficiency of the chimney, prerequisites for its overgrowing with soot and increased corrosion.
- In the initial areas, and especially in the immediate vicinity of the heating device, the outer walls of such a chimney heat up to temperatures that can pose a serious threat both in terms of the flammability of building structures and materials, and for the personal safety of people living in the house - accidental touching them ends burn.
The developers of sandwich chimneys were able to successfully resolve these problems.
Schematically, its structure can be described as follows.
Scheme of the structure of a sandwich element for a chimney
Actually, the chimney channel itself is formed by a pipe (item 1) made of stainless steel using TIG welding technology in a protective argon gas environment.
The outer pipe is also very often made of stainless steel using a welded method (item 2). You can also purchase a more affordable option, when the outer casing is made of galvanized steel (item 3). On sale you can find models in which the casing has a decorative enamel coating of one color or another.
The pipes are separated by a layer of high-temperature-resistant and non-flammable thermal insulation material (item 4). Most often, high-density basalt mineral wool (about 200 kg/m³) is used for this. The thickness of this layer can be different, from 25 to 100 mm - the selection is based on specific operating conditions.
All chimney elements have a special interface system (item 5). Typically, this is a combination of bells and narrowed sections that ensure a tight and durable fit of the parts. For greater reliability, the connection of the nodes is reinforced with clamps (item 6). Individual parts of some models of sandwich chimneys may have a different connection principle, for example, using flanges.
The end of a sandwich pipe for installing a chimney
Such a device reliably protects the smoke exhaust duct from external temperature influences. This determines the main advantages of such sandwich chimneys:
- It was possible to reduce the formation of condensation to an acceptable minimum.
- Due to the relative evenness of the temperature inside the channel throughout its entire length, the required stable draft increases significantly.
- The outer casing pipe does not heat up to significant temperatures and does not pose a serious danger.
- Such a chimney design can easily be placed outside the building - this facilitates and speeds up installation, and saves space inside residential or technical premises.
- When a chimney passes through walls, ceilings or roofs, the cut-out openings need to be much smaller than with conventional single-wall pipes. In addition, it is possible to purchase and install special pass-through modules.
Of course, such a chimney will cost a little more than a regular one, and its installation is a little more complicated, but all this is paid off handsomely by its other advantages.
How to choose a sandwich chimney for your home
In order for the chimney to work efficiently and be durable, and for the owners not to experience disappointment after just a few years of operation, it is necessary to take a very responsible approach to the problem of choosing the necessary set of parts. The entire selection procedure can be divided into several main areas - quality control of the material and execution of parts, determination of the optimal installation scheme and, finally, selection of the necessary components for its practical implementation.
Materials used for sandwich chimneys
At first glance, all sandwich chimneys look the same. However, it should be remembered that the production of such systems is a fairly profitable area of business due to high demand, and this inevitably entails the appearance on the market of a large number of low-quality products. Purchasing such products only based on their external metallic luster is the height of recklessness. Increased attention should be paid to the quality of steel, and in particular, that used for the internal chimney duct.
Burnt out internal pipe of a low-quality chimney
On the Internet you can find a lot of photographic evidence that a seemingly durable steel structure burns through and becomes deformed, and this is a huge probability of fire or carbon monoxide poisoning. The conclusion is that low-grade steel was used for the inner pipe, or the grade of steel did not correspond to the specific operational characteristics of the heating unit.
1. So, what do you need to know about the grades of stainless steel used to make sandwich chimneys?
- AISI 430 stainless steel is one of the most inexpensive. It is good for the outer casings of sandwich pipes, since weathering cannot harm it. But it is better not to use it for internal channels - the durability is clearly not enough. In addition, there are certain difficulties in making high-quality welds.
- AISI 439 differs from 430 by the inclusion of titanium additives in the alloy. This increases its resistance to corrosion and mechanical strength. Such pipes are suitable for gas and solid fuel stoves and low-power boilers.
- AISI 316 stainless steel includes alloying additives - molybdenum and nickel, which ultimately gives high anti-corrosion protection even to highly aggressive acidic environments and good heat resistance. Such pipes will be the optimal choice for gas boilers of any power.
- AISI 304 is in many ways similar to 316, but has fewer alloying components. This predetermines its lower price, but the quality, of course, is not so high.
- The most universal include stainless steels AISI 316i and AISI 321. Along with excellent corrosion resistance, they have excellent ductility and can easily withstand heating to high temperatures - about 850 degrees.
- The most expensive, but also the highest quality alloy used for the manufacture of chimneys is AISI 310S stainless steel. Its heat resistance limit reaches 1000 degrees, so it can be safely used in the chimneys of high-power solid fuel pyrolysis boilers.
If you purchase a truly high-quality sandwich chimney system, then its technical documentation must indicate the grades of steel used. If there is none, and the products themselves are not marked, then the purchase will involve a certain risk - it is quite possible to run into a low-quality fake. There is also a “folk” way to check stainless steel - in the presence of alloying additives, it does not hold the magnet, it slips along its surface. If the magnet is attracted and fixed on a vertical surface, then you should not purchase such a “stainless steel”.
What should be the diameter of the inner pipe? This depends on the characteristics of the heating installation, furnace or boiler. There is a system for calculating the cross-sectional area, depending on the thermal power of the device. In order not to go into the complexity of the formulas, we can give average values:
| thermal power of a boiler or furnace | Minimum chimney cross-section | cross-sectional area | in terms of pipe - diameter |
| up to 3.5 kW | 140 × 140 mm | 19600 mm² | 158 mm |
| from 3.5 to 5.2 kW | 140 × 200 mm | 28000 mm² | 189 mm |
| from 5.2 to 7 kW | 140 × 270 mm | 37800 mm² | 220 mm |
The values given are minimum values and are rounded up. But in any case, the cross-section of the chimney in no section can be smaller than the cross-section of the outlet pipe of the boiler or furnace.
2. The next important parameter is the type and thickness of the thermal insulation layer. When choosing, preference should be given to products from well-known brands, for example, PAROC ROB 80 t or MAT 30 or ROCKWOOL WIRED MAT 80. This is basalt wool, absolutely non-flammable, with a high coefficient of thermal resistance.
The required thickness of insulation depends on the type of heating installation (boiler or furnace) and on the average temperature of the exhaust combustion products. Approximate values are given in the table:
| type of furnace or boiler | average temperature of exhaust combustion products | sandwich pipe insulation thickness |
| Gas condensing boilers | 60 | 25 mm |
| Gas boilers | 110 — 180 | 25 mm |
| Diesel boilers | 150 — 250 | 25 mm |
| Gas piston and diesel generator sets | 450 — 600 | 50 mm |
| Solid fuel boilers | 400 — 700 | from 50 to 100 mm |
| Wood stoves and fireplaces | 300 — 600 | from 50 to 100 mm |
Sandwich chimney installation diagrams
When choosing a chimney placement option, two main schemes are usually considered: internal installation with passages through the ceilings and roof, and external installation, with passage through the wall and installation on the outside of the building wall.
Basic layout of a sandwich chimney - outside and inside the building
- When the chimney is placed internally, it is less susceptible to external influences, and the formation of condensation is practically reduced to zero. This option is appropriate, for example, for a sauna stove, since it is possible to install a tank for heating water on the initial section of the pipe (before inserting into the sandwich structure), as shown in the figure, or a mesh section for laying the heater.
Mesh module for installing a sauna heater
In any case, an intermediate section that does not have a thermal insulation layer must be installed between the boiler (stove) and the sandwich chimney. Usually it is equipped with a damper (gate) to be able to regulate the heat removed into the chimney, which is especially important for sauna stoves.
The main disadvantages of such a scheme are the rather labor-intensive and complex technological processes of organizing pipe penetration through the ceilings and, in particular, through the roof. In addition, such a chimney “eats up” the space of the premises.
- When placing the chimney externally along the outer wall, installation work is greatly simplified - only one pass through the wall is required. The elements are secured using support platforms and brackets. There is more free space in the room, and the risks of accidental fire or carbon monoxide poisoning are minimized.
Disadvantage - pipes are more susceptible to aggressive environmental influences, condensation formation becomes much larger, which should be taken into account during installation. In addition, not everyone may like the appearance of a building with a pipe located on the wall.
Necessary parts for installing a sandwich chimney
When purchasing a chimney, after choosing a diagram, it is necessary to determine the necessary details for installation in order to draw up a project. In principle, a heating engineer or, as a last resort, a store consultant should come to the rescue here, but you need to understand this issue yourself.
Main parts and components of a sandwich chimney
Almost all leading manufacturers of sandwich chimneys produce all the necessary parts and components to assemble a complete system. There may be some technological differences between models of different brands, but in general the detailing is similar and looks like this:
- 1 – adapter element for connection to the boiler or furnace pipe.
- 2 – bend (elbow) at 90°.
- 3 – for transition from horizontal to vertical section. Considering that it is recommended to give the horizontal section a slight slope away from the heating device to ensure condensate drainage, this tee from many manufacturers does not have a right angle, but 87 °.
- 4 – an element with a hole closed with a sealed lid for inspection and cleaning of the chimney.
- 5 and 6 – support platforms for the inspection unit with taps for releasing accumulated condensate. They can be in two versions - when mounted on a wall, the outlet is made downwards (5), when placed at the bottom - with a side tap (6).
- A tee with an outlet at an angle of 45 ° (7) is used if it is possible to connect two heating devices, for example, a boiler and a gas water heater, to one vertical section of the chimney.
- Bends at an angle of 45 ° (8) are used to change the direction of the chimney, for example, to bypass the roof slope.
- In those places where the transition from a sandwich structure to a single-wall pipe is made, the thermal insulation layer is covered with a special plug - it will not allow moisture to penetrate into it.
- All pipe connections between each other and with bends are additionally reinforced with clamps (10), which can be secured with bolts or with a special lock.
- The pipes are fixed to the wall at a certain distance using brackets (11). In different models they can be solid or adjustable in length.
- The main elements of the sandwich chimney themselves are pipes 0.5 m (12) or 1 m (19) long.
- 13 – wall brackets for placing a support platform with an inspection at the bottom of the chimney, and a discharge platform with a passage pipe (14), which is installed closer to the roof and serves for optimal distribution of the total weight of the structure.
- To pass the pipe through the roof covering, a special element is used - a conical roof (16 and 17). It can be performed at different angles and is selected depending on the steepness of the roof slope (0° ÷ 15°; 15° ÷ 30°; 30° ÷ 45°). From above, in order to prevent leakage, it is closed along the edge with a comfrey - a metal apron (18).
- At the top, the chimney ends with a cone (20) on which, depending on the design, a regular fungus (21), a thermal fungus (23), a weather vane (22), and a deflector (24) can be installed. If the roof is made of flammable material, and a solid fuel boiler is used as a heating installation, then a spark arrestor (25) must be installed.
What else needs to be taken into account when pre-designing the system:
- The total height of the chimney in any of the versions cannot be less than 5 meters.
- The length of the horizontal section should not exceed 1 meter. Moreover, as already noted, it is performed on slopes of 3° to ensure condensate drainage in the direction from the heating unit.
- The distance of the outer surface of the sandwich pipe from the building wall is determined by the system manufacturer - the brackets are made to maintain the required clearance. In the case of adjustable brackets, they are oriented at a distance of at least 250 mm.
- The distance between adjacent brackets on vertical sections of the pipe should not exceed 2 m, on horizontal or inclined sections - no more than a meter.
- Particular attention is paid to the height of the chimney above the roof:
The ratio of the height of the pipe and the roof ridge
- So, when the pipe is at a distance of up to 1.5 m from the ridge, it should rise above it by at least 0.5 m. At a distance of 1.5 to 3 m, the upper cut of the chimney coincides with the height skate. At large distances, the head should be placed on a conventional line drawn from the top of the ridge at an angle of 10° to the horizon.
- If the roof is flat, then the height of the pipe above it is at least 0.5 m, and if the roof is made of fire hazardous materials - 1.2 m
— In the case when there are any vertical extensions on the roof, or it is adjacent to a building, the level of the pipe should always be higher than these structures.
If the height above the roof level is more than 1.2 meters, it is necessary to install guy wires
- In the case when, regardless of the steepness of the slope and the distance of the pipe from the ridge, the height of the upper section of the pipe exceeds 1.2 meters, special clamps must be installed on it, to which metal braces are attached.
- The number of bends and turns of the pipe should be minimized. The allowed quantity is no more than three.
Prices for different types of chimneys
Chimneys
How to install sandwich pipes
Installation of a sandwich chimney always starts from the heating device.
- First of all, an adapter is put on the boiler or furnace pipe, which is pre-coated with a heat-resistant sealant (withstanding temperatures from 1000 to 1500 degrees) and clamped with a metal clamp.
Heat-resistant sealant required for chimney installation
- If the chimney goes vertically (for example, in a sauna stove), then the installation of another single-wall pipe is required, on which a tank for heating water or a heater grid can be placed. It is impossible to install a sandwich right away, since the thermal insulation layer from severe overheating will very soon sinter to the state of stone, cease to perform its function, and this section of the chimney will fail.
If the chimney is installed on a heating boiler with outlet to the street, then after the transition pipe a horizontal section is installed, which should go outside. The length of this section, as already mentioned, is no more than a meter, and it needs to be given a slight slope outward. The remaining open layer of thermal insulator must be closed with a special plug.
- To pass through the wall, a hole is punched in it so that there is a gap between the pipe and the wall material. If the wall is made of hot material, then the gap should be at least 200 mm. Usually a square opening of 400 × 400 mm is made. The inside of its walls are lined with mineralite (basalt cardboard). Then a factory or homemade pass-through block is inserted.
Box-shaped block for penetration through a wall or ceiling
A sandwich pipe is passed through it and connected to the boiler. The space of the passage block is densely filled with basalt mineral wool. From the outside, this unit is closed with a metal plate or a decorative rosette included in the kit. The remaining cracks can be filled with sealant.
Ready-made pass-through unit operating on the “sandwich-within-a-sandwich” principle
Some manufacturers provide special pass-through blocks with an already filled thermal insulation layer. The choice of a specific model will depend on the material and thickness of the wall or ceiling.
If the walls are made of fireproof material, then you can place a sleeve made of asbestos-cement pipe for the passage, and fix the sandwich element inserted into it in the center using mineral wool padding, and also cover it on both sides with decorative metal plates.
Starting node on the external wall of the building
- At the exit, support brackets are installed on the outside of the wall, on which the plate rests. It will serve as the main support of the vertical part of the chimney. Structurally, it can immediately include an inspection unit with an outlet valve for condensate.
- After the pipe is brought out, the installation of the vertical part begins. And here you need to understand the intricacies of installing pipes “for smoke” and “for condensate”.
Two principles of installation: “by smoke” and “by condensate”
- If the upper section of the pipe with a wider socket fits onto the lower one, then this is called a “smoke” connection - rising gases have no barriers to free exit outside. However, in this case, a small gap inevitably remains, directed upward (shown in the diagram by a red arrow), into which the flowing drops of condensate formed will fall. This will have the most negative impact on the operation of the chimney - the insulating material will soon become damp and will no longer cope with the task of thermal insulation of the internal channel. And this, in turn, means even more condensation, a decrease in draft and, as a result, a decrease in the efficiency of the boiler.
— In the case of “condensate” installation, drops of moisture freely flow down the surface into the condensate receiver. And in order to prevent exhaust gases from escaping, the outer pipe of the sandwich structure must be mounted “along the smoke” (blue arrow in the diagram). In addition, a layer of sealant is applied in this place and a clamp is applied, so that a reliable seal against smoke escaping through the sandwich pipe is ensured. And a small amount of gases that can penetrate the insulation layer will contribute to its ventilation.
Therefore, during installation, the following rules are followed: in the first, horizontal section up to the tee, installation is carried out “through the smoke.” Throughout the rest of the sandwich chimney, the inner pipe is installed “for condensate”, and the outer pipe is installed “for smoke” using sealant and carefully tightening the unit with a clamp.
Installation of the inner pipe “for condensate”
- It is almost impossible to efficiently install both the outer and inner pipes of a sandwich chimney at the same time. Usually they do it this way. The inner pipe with its narrowed end extends slightly outwards (by 150 - 200 mm) and is tightly inserted into the socket of the element already mounted below until it stops. Then the narrowed part of the outer pipe located below is coated with sealant, and the block of thermal insulation and outer pipe remaining on top is moved down to the tightest possible connection. The clamp is put on and tightened in the area of the top pipe skirt (as shown in the diagram).
Sectional connection of two chimney elements
- Installation continues in the same order from bottom to top. At certain intervals, brackets with clamps are attached to the wall, which fix the pipe in a vertical or inclined position at the required distance from the surface of the building.
- If the structure turns out to be heavy, then a relief bracket is provided with a corresponding plate equipped with a connecting element for continuing installation above.
- The installation ends with the installation of the cone and the required head.
Special clamp with eyes for attaching guy wires
- If necessary, a special clamp with three eyes is attached to the pipe for attaching guy wires. The guy wires are attached on the opposite side to the fixed parts of the roof or building.
Video: master class on installing a sandwich chimney outside the house
Installation features for internal chimney placement
When installing a sandwich chimney indoors, nuances arise when it passes through the ceilings and roof.
- First of all, it can be noted once again that after the section with a single-wall pipe, at the inlet from the boiler, an element with a gate valve is installed so that the heat does not immediately escape vertically into the atmosphere.
Block with gate valve
- At the transition to the sandwich, a starting plug must be installed, which will cover the protruding edge of the thermal insulation layer.
The starting plug will reliably cover the thermal insulator layer
- The passage of a pipe through the ceiling in general terms corresponds to the already described passage through a wall made of combustible materials.
A cut opening for the passage of a pipe through the ceiling.
A passage unit (box-shaped or cylindrical) must be attached from below to the ceiling, which must be tightly filled with thermal insulating material - mineral wool, or in this case expanded clay is allowed.
The passage element is tightly filled with mineral wool or expanded clay
The passage unit is then closed from above with a metal plate.
As already mentioned, some manufacturers include special pass-through modules in the detailing of systems, which are a kind of “sandwich within a sandwich.” Working with such elements is even simpler - an opening of the desired shape and size is cut out for them, the block is installed in it, and then a sandwich pipe is threaded through the hole.
Very neatly designed sandwich pipe passage through the attic space
- When designing a chimney system, the location of the floor beams and roof rafters must be taken into account - the pipe should run approximately in the middle between adjacent elements. If necessary, sometimes it is necessary to slightly change the direction of the chimney, using 45° bends for this. It is prohibited to use rectangular bends for these purposes.
Sometimes you have to slightly change the direction of the chimney
- Joining of pipes in the thickness of the ceiling or at the roof level is completely excluded. It is necessary to maintain a distance from the joint to the floor or roof level of at least 250 - 300 mm.
Opening for passage through the roof
- When a pipe passes through the roof, an opening is first cut, usually rectangular in shape.
Sandwich pipe passed through a cut-out window
- Then the next section of the chimney is passed through this window.
- It is necessary to ensure accurate positioning of the pipe in the center of this opening. This can be done using a metal sheet with an elliptical hole cut out, reinforced on the back side of the roof, or even simply by fixing the chimney with metal profiles.
Option for fixing the pipe in the center of the roof opening
- Then a special roofing module is put on the pipe - a conical roof, which has an angle corresponding to the steepness of the roof slope. It is attached to the roofing deck, and the top is closed with a hopper, which is secured with a clamp or a locking screw.
Metal roof with comfrey
- The upper edge of the metal support plate of the roof, if possible, is placed under the roofing material. If this is not possible, then a thorough seal is performed using sealant.
Elastic canopy “Master Flash”
Elastic canopies are very easy to use (they are often called “Master Flash”). They can be used at almost any slope slope, and can also be mounted on a textured roof deck (slate, corrugated sheeting, etc.). The hole in the conical part is cut with a slightly smaller diameter than the pipe passing through it to ensure maximum compaction. The supporting part of the “Master Flash” can be given the required shape, and then, after coating the lower surface with a layer of sealant, this unit is attached to the roof with self-tapping screws.
Completed section of sandwich chimney on the roof
The final stage has no special features - the same installation of the head with the necessary elements.
Video: installation of a sandwich chimney with penetration through the ceiling and roof
So, at first glance, installing a sandwich chimney yourself is not so difficult. However, this event requires stable skills, increased accuracy, and caution, especially when working at height. There are no trifles in this matter, because an incorrectly assembled system can cause a fire or other small or large troubles.
Features of stainless steel chimneys
The advent of stainless steel chimneys has greatly simplified both the tasks of constructing and installing stoves and fireplaces, as well as their operation.
Now you can buy sections of a chimney and assemble it yourself, combining the parts into a single structure, which almost every homeowner can do. However, there are some peculiarities here that are well known to professionals, and which you should pay attention to if you decide to assemble a chimney from individual sections yourself. Beforehand, it wouldn’t hurt to find and watch a video on how to do the installation of sections yourself and correctly install a stainless steel chimney <span class=”mce_SELRES_start”>.</span>
Unfortunately, it is most likely impossible to make stainless steel chimney sections yourself. Their production includes a large number of special machines.
Installation and welding of seams in sections is especially difficult. It is also very difficult to do high-quality circular rolling outside of production conditions. Therefore, you can only perform high-quality installation of the chimney with your own hands, following the video instructions.
What is a sandwich: chimney assembly
Assembly of the chimney begins from the bottom. First, after the stove or fireplace, a section with a valve is installed, which allows you to close the chimney completely or create a draft of a given force. Next, either a single section of one pipe is installed, or a sandwich pipe - a two-circuit chimney. A single pipe can add much more heat, but only if it does not damage the coatings on the ceiling and wall near the pipe, where overheated heat will accumulate air.
To prevent overheating, a sandwich pipe is used. It is required when crossing floors and roofs. In this case, a pass-through oblique lining is used - a flange fixed to the roof.
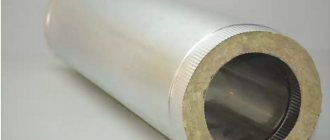
The stainless steel sandwich pipe includes several parts:
The sleeve is the outer part, which is usually made of a sheet 0.5 mm thick.
by the roller welding method, when the edges of the rolled sheet are overlapped. The packing is a layer of thermal insulation, special mineral wool, for example, PAROC for stuffing sandwiches. The internal chimney pipe, coaxially located relative to the sleeve, usually made of a sheet 0.8 - 1 mm thick, by the method special welding with filling the seam with solder, when the edges of the rolled sheet are laid end-to-end, and the wide part of the pipe is not rolled around the circumference; Plugs installed at the ends of the sleeve and the inner pipe, made of compressed packing. They center both pipes and hold the thermal insulation. In order to hide the packing from external influences, a glass is placed on the sleeve on each side.
Pipes made of stainless steel grade 430 have the lowest price. Such steel does not contain additives that significantly increase the cost of the material.
Additives, to one degree or another, enhance the anti-corrosion properties of stainless steel, which can be useful against condensation that forms inside the pipe. However, the price of the pipe increases by about one and a half times. In addition to the material, the price of the pipe is influenced by the status of the manufacturer in the world market.
But neither more expensive grade steels nor famous brands provide real tangible benefits for stainless steel chimneys. Products from domestic enterprises will also serve reliably and for a long time. Therefore, it makes sense to purchase domestically produced stainless steel chimneys.
Please note that if the pipe is bent by hand, it is intended for:
- use as a sleeve; use in furnaces in which the fuel is gas.
For clarity and a better understanding of the structure of the sandwich, it would be correct to find and watch the corresponding video. Watching the video will also help you install the sandwich and install related accessories at the intersection of floors and roofs.
Pros and cons of stainless chimneys
The list of advantages of these alloys is headed by resistance to acid condensate, which appears when hot air cools passing through the cold part of the chimney. This negative impact gradually destroys the metal, but a stainless steel chimney can withstand the threat much better than all other metal structures. Often this property becomes the main criterion when choosing a material.
Advantages of a stainless chimney
The list of advantages does not end there; it includes:
- Versatility of design, comparative ease of installation of a stainless steel chimney. These pipes can be combined with any heating equipment. Self-installation is possible in any season, and special skills are not required for such work.
- Safety for people. Stainless steel channels heat up quickly, so they guarantee fairly effective traction, which will prevent any force majeure from happening.
- Long service life of the chimney pipe. It is not as outstanding as that of brick or stone structures, but if the installation of the chimney was carried out according to all the rules, then the pipes promise decades of trouble-free operation.
- Excellent maneuverability. Plus - the complete absence of corners that can cause turbulence in combustion products. The rounded shape allows you to avoid settling of a large amount of soot, because there are no obstacles for the smoke to escape.
- Light weight of the smoke exhaust duct, maintainability. The lightness of the design allows you to avoid constructing a serious foundation for the furnace. Replacing any module is simple; it does not require dismantling the entire system.
- High level of heat resistance. Such a chimney will be able to withstand temperatures up to 600° or more, but in this case the exact figure depends on the grade of stainless steel.
- Frost resistance, anti-corrosion properties, no fear of aggressive environments.
- Aesthetic appearance and a wide range of models.
- Reasonable price for the kit.
The list of advantages is quite impressive, but chimney pipes also have disadvantages. But are they serious?
Possible reasons for dissatisfaction
Among the large number of advantages, there is only one significant disadvantage. This is a need to take care of insulation. However, this disadvantage is often missing. Thermal insulation measures are needed only if the chimney is located outside the room, and when a model with single-layer modules is selected.
If desired, a higher price can be considered a disadvantage when comparing a stainless steel chimney with structures made of black steel. The most fastidious critics will add inconsistency with the architecture, the need for additional supports when the chimney turns out to be very high.
Correct installation of the chimney
Installation of a stainless steel chimney must be done with gloves, as the edges of the pipes are very sharp and can easily damage the skin. For the connection, it is recommended to use black oven sealant rated at 1500 degrees Celsius. It gives rigidity and strength to the chimney.
If the chimney is not made dismountable, the sealant is applied to the edge of the inner part of the connection. If you plan to disassemble the chimney, the pipes are first connected, and then a sealant is applied to the edges of the joint, which either dissolves or chips during disassembly. For additional reliability, clamps can be installed at the joints of the sections, tightening the joint with screws.
Often, when installing chimneys with your own hands, a fundamental mistake is made. Therefore, it is necessary to follow this rule:
The vertical pipe is installed with the thin end down, which is necessary for condensate to drain inside the pipe without leaking at the pipe joints.
It is especially important to correctly assemble the pipes in a bathhouse or sauna with your own hands. Lighting up the stove, especially in winter, here begins as in an unheated room, at a temperature almost equal to the outside one.
The process of heating the stove is accompanied by the appearance of a large amount of condensate on the metal surfaces of the chimney. Condensation containing substances harmful to health will leak through incorrectly connected sections, even if there is a sealant connection. The sealant hardens and cracks over time, and condensation causes cracks to enlarge. Therefore, if the chimney sections are incorrectly positioned with your own hands in a sauna or bathhouse, condensate will protrude from the cracks and evaporate, causing harm to the health of people in the room.
A brick chimney or its stainless steel equivalent is one of the most important parts of a heating system.
The quality and safety of the entire ventilation system will depend on the quality of its assembly. If previously, in order to install such a part, people had to turn to professionals who assembled the stove, today it is possible to equip a cottage or country house with a chimney without outside help. So that you can easily and quickly cope with this task, let's look at how to properly install a chimney.
Chimney design
The design of a system for the removal of combustion products begins with the selection of a modular system and preparation of the project. Since the requirements for chimneys for gas boilers are increased, their design must be submitted to technical supervision services and permission for installation work must be obtained.
- The minimum permissible total height of the chimney is 5 meters, otherwise the draft will be insufficient.
- The maximum length of the horizontal section of the channel is 1 meter;
- Outside the building and in unheated rooms, the chimney must be thermally insulated, unless it is a sandwich system.
- The height of the chimney pipe above the roof:
- at least 50 cm if the roof is flat or the distance from the ridge of the pitched roof to the pipe is less than 150 cm;
- flush with the ridge or higher, if the distance from the pipe to the ridge is from 150 to 300 cm;
- below a line with a slope of 10° from the horizon of the ridge, if the distance between the ridge and the pipe is more than 300 cm;
- above the level of buildings attached to the building.
- If the roofing material is not resistant to fire, regulations require the installation of a spark arrestor.
- The minimum distance between a single-wall stainless steel pipe and the floor and roof structures is 1 meter; (for a sandwich - 20 cm), the pipe must be insulated with non-flammable material (basalt wool).
- A gap of 13 cm is required between the pipe and the roof (including those made of non-combustible materials).
- Pipe connection points should not be located inside structures (ceilings, walls). The minimum distance from the joint to the structure is 70 cm.
- Horizontal and inclined sections of the chimney duct must be assembled “according to the smoke” - the next element is put on the previous one so that combustion products are removed as efficiently as possible. The vertical channel is mounted “along the condensate” - so that the moisture flows freely, the subsequent element is inserted into the one located below.
- Throughout the entire length of the chimney duct, its internal diameter must be no less than the diameter of the outlet pipe of the heating unit.
- No more than three turns are allowed along the entire length of the chimney.
Chimney installation diagram
There are various installation schemes for stainless steel chimneys. In the case of using a sandwich system, it is easier to bring the pipe outside so as not to punch holes in the ceilings and roof. The pipe is secured to the external wall using special brackets. The external chimney can also be mounted inside a metal profile frame to prevent accidental mechanical damage, especially in the case of high wind loads.
Methods for assembling a stainless steel chimney
There are two main approaches to assembling a chimney for a gas or solid fuel boiler or wood stove: condensate and smoke. They have significant differences:
Type of assembly By smoke By condensate When used If there is a tee in the system If there is no need to install a tee in the system Features of chimney assembly Before the tee, each part is put on the socket of the previous one, and after the tee, each part is installed in the socket of the previous one. Each subsequent part of the chimney is installed in the socket of the previous part.
If you are in doubt about which type of assembly you should choose, you should contact specialists in this industry for advice.
Step-by-step chimney assembly
Figuring out how to properly assemble a chimney is not difficult. The first thing you need to do for this is to check the configuration of the structure. It should include:
- inner tube; outer tube; flame retardant fiber.
Please note: all sandwich parts have a stretched “bell” part, also called a plus, and also a flat part – a “minus”. This is important to consider during assembly.
Once you are sure that you have all the necessary parts, you can begin assembly. To do this you need:
- Remove protective films from parts. If you do not do this, the design will not work. Connect the chimney components together according to the type of assembly. Check the strength of the connections and the tightness of the chimney.
If no problems are identified, the structure can be connected to other elements of the heating system.