Here you will learn:
- What is a self-regulating cable
- How to choose a suitable self-regulating wire
- Laying and connection
Water has one interesting property - when it freezes, it does not compress, but rather expands. Thanks to this, water pipes burst in winter, and jars of cucumbers explode in cellars in bitter frosts.
Therefore, pipes running along street areas or shallow underground are emptied for the winter so that they do not burst. To protect them, a variety of means are used, including a self-regulating heating cable for water supply.
In this review we will tell you:
- How does a self-regulating heating cable work?
- How to choose it;
- How to install a self-regulating cable;
- How to choose its length.
After reviewing the material presented, you will be able to protect your home water supply system from ruptures.
How to choose and use a self-regulating pipe heating cable
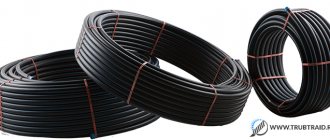
Self-regulating heating cable for heating pipes is an electrical device in the form of a cable designed to protect pipe communications, drainage systems, oil and gas pipelines from freezing, to ensure snow melting, maintain a certain temperature level on the external surface of technological installations, equipment and containers, floor heating, highways, if necessary, individual sections of soil.
Self-regulating heating cable for heating pipes
Today, three types of heating cables are known:
Types of heating cable damage
Let's look at the most common types of heating cable damage.
As a rule, damage can be mechanical or due to overheating.
Mechanical damage to the cable can lead to its breakage, and as a result to a short circuit.
Mechanical damage usually occurs due to the following reasons:
- Carrying out various works after laying the cable, without taking into account its layout, i.e. drilling holes in the floor covering, installing equipment, etc., not taking into account the location of the cable during installation;
- Too frequent pitch of the cable snake during installation. Often the cable cannot withstand mechanical stress due to the bending radius being too small.
- Damage to couplings. Often, under the influence of a humid environment, oxidation of the contacts of the heating cable core occurs and, as a result, their oxidation. This leads to the destruction of the coupling connecting these contacts.
The most common causes of cable overheating:
- Local overheating can occur if the cable is located under furniture that almost never moves, or under carpets.
- When laid, the cable intersects with other cables, tubes or materials that, in their thermal conductivity, contrast with the screed or base in which the cable is laid. This creates a temperature difference, which subsequently leads to constant overheating of the cable.
Of course, not all possible causes of cable damage or overheating are listed above. Most of them can be avoided by strictly following the heating cable installation instructions.
How to check a heating cable with a multimeter
How to check the heating cable for integrity after its installation? It is necessary to ring the heating cable; this can be done using a multimeter. This device measures the resistance of the cable cores.
To do this, set the multimeter to the electrical resistance measurement mode. We apply the multimeter probes to the cable cores respectively. At this moment, a number is displayed on the device screen; this is the actual resistance of the cable (for example, 216 Ohm/m). We compare it with the resistance indicated on the marking or in the cable passport (for example, 208 Ohm/m ± 10%). If the readings are within the values indicated on the marking, then this cable meets the declared characteristics and is not damaged.
If a figure close to infinity is displayed on the multimeter screen, then the cable has a break. After you can check the functionality of the heating cable, you can begin to localize the damage.
How to search for damage using a thermal imager and perform repairs
It is better to start searching for damage to the heated floor using a thermal imager. This is the most visual and fastest way to diagnose heating cable damage.
This device displays on its screen an image of infrared radiation from a heated floor. The uniformity of this radiation indicates that there should be no damage.
However, if the thermal imager shows a picture of uneven thermal radiation, then there is still damage, and the heating system will have to be repaired.
To do this, you first need to open the floor covering at the site of the suspected cable fault (naturally, the system must be disconnected from the network at this moment). It is necessary to break the tie very carefully so as not to further damage the cable.
Then it is necessary to strip the cable at the break point and connect the current-carrying conductors and the shielding braid of the cable using insulated sleeves. Heat shrink tubing is placed over this connection. The tube can be shrinked using a hair dryer.
Then we restore the floor covering: if necessary, fill in a cement screed, leaving no air voids, and after it dries, lay the floor covering. If these are floor tiles, then it is recommended to wait until the tile adhesive and screed have completely dried. As a rule, this process takes up to 21 days (for screed) and from 24 to 48 hours (for tile adhesive), depending on the room temperature. After this, we turn on the heating system to the network.
Why does the heating cable not work if the test showed that the cable is normal?
After checking the heating cable for continuity with a multimeter, it may turn out that the cable is OK, but the system still does not work.
In this case, the most likely causes of the system malfunction are:
There is a fault in the switchboard. We recommend checking the residual current device (RCD), automatic or difavtomatic, depending on what type of switch the electric heating system in your panel is connected to.
Low voltage in the electrical network can also cause improper operation of the heating cable. In this case, installing a voltage stabilizer may be a solution to the problem.
Laying and connection
We have considered all the most important issues, starting from the principle of operation of a self-regulating heating cable to issues of its choice. It remains to find out how to install it. First, let's discuss the most interesting method - inside the pipe.
Hidden installation inside the pipe
The most interesting task before us is to lay a self-regulating heating cable for water supply inside the pipe. Being in a heated state, it will prevent the pipe from freezing and bursting. Let's see how it's done. We will need the following materials and tools:
Such a connection scheme requires much more effort, but gives a disproportionate increase in efficiency
- Self-regulating heating cable of suitable length;
- Sharp knife for removing insulation;
- Heat shrink film for insulating conductors;
- Rubber seal;
- Tee for installing a self-regulating cable inside the pipe;
- Hair dryer for shrinking the film;
- Electrical wire with plug.
First, we determine the insertion location - it can be an internal or external area (everything is individual here, we look at the situation).
The end section is located where the pipe goes into the ground or enters another building.
Remember that there should be no taps or valves throughout, as they can damage the self-regulating heating cable.
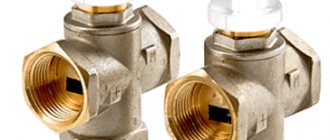
A special coupling used for connection. You can buy it at any plumbing store
If the water pipe rises from the floor and goes further horizontally, this will make the installation easier - we cut the pipe and install a tee in this place.
Next, we place a heat-shrinkable tube on the tip of the self-regulating heating cable and heat it with a hair dryer - this tip must be reliably sealed to avoid contact of water and live parts. Through the upper outlet we insert a self-regulating heating cable into it, not forgetting to put the gland on it.
Next, we push the cable to the required length - it needs to be calculated in advance and with a small margin. At the other end we need to mount a wire with a plug. Carefully remove the insulation and braiding so that we can see two conductors - we solder the wire to them, not forgetting to put a heat-shrinkable coupling on it (after soldering, we put it on and blow it with hot air from a hairdryer).
Now we fix the oil seal, open the water supply, and check for leaks in the place of our work. If all is well, we plug the wire with the self-regulating heating cable connected to it into the network. Even though the water supply is now protected from freezing, it is highly recommended to wrap the pipe with insulation. Remember that good protection is multi-layered protection.
Open outdoor installation
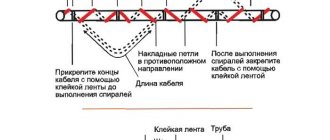
If necessary, you can lay a self-regulating heating cable outside the water supply. It is used to wrap not only the pipes themselves, but also the flanges, couplings and valves installed on them. The simplest option is to lay several self-regulating cables parallel to the pipe, securing them with aluminum tape. Laying in a spiral or double spiral is also possible, which only increases the heating efficiency.
Attaching the heating cable with this connection is a real pleasure. The main thing is not to skimp on aluminum tape.
You can also use a double installation method - lay one heating cable in parallel, and wrap the second around the pipe in a spiral. It is attached to the pipe using the same aluminum tape, with rings every 20-30 cm . After the winding is completed, we apply tape to the cable along its entire length - this way we will achieve maximum efficiency of the system.
After you have laid the self-regulating heating cable on the water pipe and made all the necessary electrical connections, wrap the resulting equipment with a layer of thermal insulation - this will prevent heat from escaping into the atmosphere. There are also recommendations for installing protective circuit breakers on the heating system of the water supply system - they will prevent electricity leakage when the insulation is depressurized.
Where are heating systems used?
The scope of application of heating cables for pipes (and not only) is quite large. They are installed in places where controlled heating of adjacent (surrounding) surfaces or materials is required.
Some types of cable are specifically designed for underfloor heating systems. They are laid under ceramic tiles, boards, laminate, carpet, and sometimes filled with concrete screed.
The last option is the least effective, since the screed “steals” heat, and only part of it passes through the finishing coating.
Cable heating is common in water supply and sewerage systems. Communications buried in the ground or passing above the ground in the northern regions of Russia are at risk of complete freezing for six months - from October to April.
If the pipeline is laid above the freezing level of the soil and is not insulated enough, it will quickly lose its functionality. Therefore, we recommend that you learn more about the types of heating cables for heating water pipes.
If the pipes are already buried in trenches and dismantling is impossible or undesirable, the cable is installed inside the water (sewer) pipe through a tee cut into the most convenient place.
The next application of self-regulating cable is heating systems for roofs and gutters.
Under the influence of high temperature, snow and ice gradually turn into water, which flows down through trays and pipes. Roofs become safe for people and vehicles in the yard.
Structural elements
Cable electric underfloor heating consists of several elements, each of which can break down . Let's take a closer look at them .
- The heating element is a cable.
- Thermostat.
- Temperature sensor.
The heating cable can be single- or double-core, can be mounted on a synthetic base in the form of mats, it depends on its brand and manufacturer. Particular attention should be paid to the installation of the temperature sensor - it must be made in a removable form; usually it is placed in a corrugated pipe, plugged at the far end, mounted on the floor. The thermostat is placed in any convenient place, usually close to an electrical outlet.
Marking of self-regulating heating cable
There is no single marking system. Each manufacturer applies the markings that it deems necessary, but you can still find out some information from the markings. For example:
VMS 40-2 CT. The first three letters indicate the brand, model and application. The figure following or preceding them is the linear power consumption (40 W/m). The second digit is the network voltage (220 V). The last two letters are the material of the outer shell:
- CT – fluoropolymer
- CR – modified polyolefin
- PR, PS – polyolefin
- AT – thermoplastic elastomer
Installation of resistive heating cable
Resistive heating cables are mounted on short sections of pipes of small diameter (up to 40 mm). A single-core product requires looping using a coupling or extending the supply wire to create conditions for supplying voltage from both ends. This complicates the connection of the heating cable. In a two-wire product, voltage is applied to one end, which simplifies installation.
The advantage of the resistive option is low price, the disadvantage is the impossibility of installing the coupling with your own hands and high energy costs. Knowing how this type of heating works, the question arises of how to control it. In order for the system to operate without human intervention, automatic control is required. These are additional costs, which can also be considered disadvantages.
This type of heaters cannot be cut; you can connect 2 pieces together. It is necessary to remove small sections of the protective sheaths, wrap the braid, remove some insulation, and connect the wires by crimping or soldering.
Important! The best insulating material is heat shrink tubing.
Repair of snow melting cable systems in open areas
Diagnostics and repair of cable anti-icing systems for open street areas is required if the heating system does not work at outdoor air temperatures in the operating range from -15 to +5°C, snow lies on the heated area and does not melt, and ice forms.
If a fault is detected on the heating cable, both resistive and self-regulating (break, short circuit, insulation damage, burnout), we begin to search for the problem area. If the damage site is successfully located in an open area, the Customer is required to have a construction worker remove the tiles (granite, screeds). Next, we restore the integrity of the heating cable, which allows the anti-icing system to operate for many years to come.
The appearance of snow on a heated surface at temperatures below -15°C does not apply to abnormal operation, because Most anti-icing systems of any Russian and foreign manufacturers operate in a narrow range of air temperatures (-15 to +5°C).
Consumer rating
Today, several product brands are the most popular. They have the best reviews among consumers on the modern market . These include:
- Raychem;
- Ensto;
- Devi;
- Lavita.
Inside the pipeline, products from Ensto (20 W/m) and Lavita (16 W/m) are most often used. Raychem products (10 W/m) are installed outside the communications. The Danish company Devi produces a cable for a wide range of applications (9 W/m), but its cost is the highest. The most reasonable price is for Ensto and Lavita wires. Consumers also noted the high quality of these products.
The Finnish company Ensto is not inferior to Devi in terms of durability, but these products will cost the buyer much less. Therefore, many consumers choose products from this particular brand.
Having studied the design of self-regulating cables, you can correctly use them in everyday life. Their installation is quite easy to do yourself. The choice depends on the power of the product and the conditions of its use. This is a very effective and durable system. It will serve its owners for many years provided it is properly used and installed.
Malfunctions of electric heated floors
Job complaints can be divided into two categories. Correct identification of the fault is the key to successful repair.
- It doesn't work well.
- Doesn't work at all.
Let's consider the options for poor performance, there are also two of them: either underheating - overheating, or uneven heating of the surface - it heats here, it doesn’t heat there. If the heating is uneven, everything is clear - the installation technology is broken and, if this deficiency is critical, then it is not the repair of the heated floor that is needed, but its reinstallation in accordance with all the rules and conditions for the production of this type of work.
If there is insufficient heating, you should first of all pay attention to the voltage parameters in the network; if the voltage is low, you cannot do without a voltage stabilizer of sufficient power; sometimes this can be a solution to the problem. But in any case, as with excessive heating, you need to check the temperature sensor and thermostat with a multimeter; the parameters must correspond to those specified by the manufacturer in the operating instructions. If the characteristics do not match, these devices must be replaced; their repair is impractical or impossible.
When the source of additional comfort does not work at all, and the supply voltage, temperature sensor and thermostat are working properly, the repair of heated floors enters the most, as a rule, labor-intensive stage.
Advantages
In addition to the main ones listed, there are several more “tricks” that complement the picture
- The cable can be cut to any length, starting from 20 cm. This will not affect its properties in any way. There will be no unheated areas, as well as areas with elevated temperatures
- You can cross them during installation. This is especially true when warming water supply units. The cable at the crossing point does not overheat and does not fail
- Remains operational in the event of a break. If for some reason the current-carrying core inside the cable breaks, then it will still heat up to this point
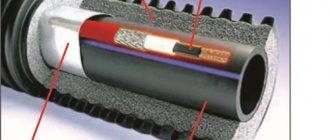
- In the case of heating pipes with a self-regulating cable, there are modifications for placement inside the pipe, which significantly increases efficiency
- Does not require a heat sensor or thermostat. Plugs directly into an outlet or switch
- Easy to connect, there are special kits for connecting to electricity, inside the pipe, and sealing the end of the cable.
Results
Thus, we have looked at what a heating cable is and as a result of which it can be damaged. However, if a similar problem occurs to you, you need to use professional equipment that will help you quickly find out the location of the breakdown and fix it. Alas, you cannot do this on your own; you will need the support of a specialized company.
But you can minimize the possibility of such a situation occurring. To do this, just take into account a few tips that were given in this article.
How to check a self-regulating heating cable
In winter, the entire water supply and sewer system needs special protection from freezing. Modern capabilities make it possible to protect water pipes from freezing easily and simply, using a self-regulating or other heating cable that is installed both outside and inside the pipes. Recently, cable heating systems have become widely used for frost protection; they are also used for heating external pipelines, floors and roofs of buildings. Both resistive and newer self-regulating heating cables are widely used.
The operating principle of a heating cable is to convert electricity into heat. Electric current passing through a closed circuit of the heating cable heats it along its entire length. Special wires are used with a sealed and durable sheath that is resistant to large temperature changes.
The tangible advantages of using a heating cable are its versatility; it can be used both outside and underground, while it has an excellent insulation system and protection from chemical and thermal influences. It is easy to install and economical to use since you can adjust the desired heating temperature.
Diagnostics of heated floor Devi
Diagnostics of a heated floor is required in case of abnormal operation of the heating system. Symptoms of malfunction:
- the warm floor does not heat up;
- the warm floor does not turn off (works constantly), excessive heating, and it is not possible to reduce the temperature of the floor surface;
- the warm floor does not heat up well - the temperature on the regulator is set to maximum, the heating is constantly on, but the floor is barely warm;
- the floor is heated in places;
- Error messages began to appear on the screen of the electronic thermostat.
Diagnostics of a heated floor is carried out on the basis of instrument readings based on measurements of the electrical physical quantities of the heating cable, temperature sensor, regulator and the state of the electrical network. Based on the measurement results, it is concluded that it is necessary to replace the regulator with a sensor or carry out search work to repair the heating cable.