Combating freezing of external pipelines in a private house during the cold season is an urgent task when introducing water into the house from water supply sources and discharging wastewater. One of the effective options for combating pipe freezing is to connect a heating cable to utilities, in particular, water supply or sewer lines.
The construction market offers a wide range of electrical cable products for heating from both domestic and foreign manufacturers. Modern developments, thanks to feedback, make it possible to regulate the heating temperature of the wire by changing the current consumed. When choosing products, it is important to know the technology for correct installation of electrical cables on various types of pipelines and the required heat transfer power, which is associated not only with electrical parameters, but also with the length of the conductor.
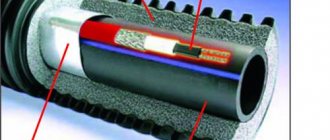
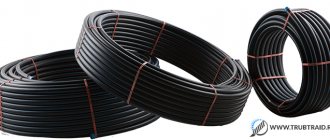
Rice. 1 Complete set of heating cable for water supply
What is and why do you need a heating cable?
The operating principle of any heating cable is quite simple and is no different from all electric heating devices. The technology is based on the resistance of materials to the passage of electric current - the higher it is, the more heat is generated on the heating element. The heating cable is connected to a 220 V alternating voltage network and generates heat when alternating electric current passes through it.
Almost all devices have manual or automatic adjustment, which allows you to change the heating temperature of their core (matrix). In everyday life, electric cable heating systems are widely known called heated floors, in which a zigzag wire in the form of a mat on a mesh is laid under a screed or tile.
A similar device with higher protection against moisture has a heating cable for external pipelines, most often used for the following domestic purposes:
Heating of water supply
When drawing water from a well or well, HDPE (low-density polyethylene) pipes are most often used, which flow from the source into the house through the foundation, and are buried underground at a distance from the surface below the freezing depth of the soil.
In accordance with building regulations, the distance from the ground surface to the point where the water supply pipe is located should be 0.5 m greater than the freezing depth, in some cases the calculated value reaches 2.5 meters. In real conditions, when using a standard caisson well 2 m high, from which a casing pipe extends half a meter, the average depth of the water pipe is 1.5 m, which is not always enough to protect it from freezing.
At the same time, the use of thermal insulation of the pipeline with building materials along the entire length may be ineffective, because the insulation does not heat the working environment, but only increases the time it freezes.
In this case, using an electric cable to heat water inside or on the surface of the pipes is guaranteed to protect the line from freezing, while it is possible to reduce the depth of the water supply underground and make the water supply unfreeze.
Rice. 2 Use of heating cable on roofs and gutters
Heating the wellhead and pipe entry into the house
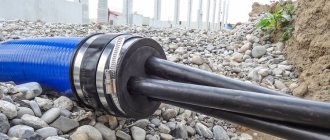
When a well is located in a caisson pit, the problem of freezing of the external pipeline in the head zone, as well as the equipment and surface pumping station when using it, is relevant. If you use an electrical cable immersed at a shallow depth in a pressure pipe or in one of the sections of water supply located on the surface, the problem of freezing of pipes in a coffered chamber can be easily solved.
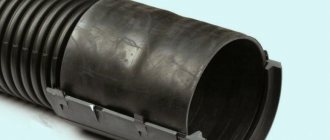
Not every house has a strip foundation located below ground level. For example, modern country houses made of blocks or SIP panels are placed on stilts above ground level. Therefore, open entry points of water pipes into the house require insulation, which is provided by using building materials or electrical cables.
Warming up the sewer pipe
If a water pipe can be lowered deep underground to combat freezing, the sewer pipes leaving the house should technologically be located a little closer to the surface. This is due to the fact that for normal sewerage operation it is necessary to maintain a slope depending on the diameter of the pipes. With standard dimensions of 110 mm, the pipeline level should be reduced by 20 mm per linear meter.
It is clear that if the sewer septic tank is located at a great distance, for example 50 m from the house, then the slope will be 1 meter. It should also be taken into account that the sewer pipes must enter the upper point of the septic tank, and if the entry point is located at a great depth, it will be very difficult to assemble a technically workable structure. Therefore, it is important to ensure thermal insulation of sewer pipes, and even better, heating them at the highest point at the exit from the house.
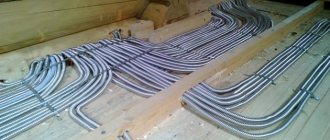
Rice. 3 Heating by connecting a cable to a water outlet
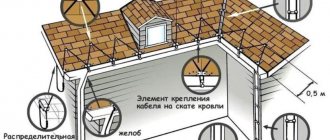
Heating with cable for storm water system
During the cold season, sudden temperature changes cause snow to melt on roofs with periodic freezing of water - as a result, drainpipes become clogged with ice, and icicles form along the perimeter of the drains. Heating cable can be used to combat freezing by laying it on surfaces or inside drainpipes, or by running it down storm drains.
It should be noted that in addition to placement in pipelines, special modifications of cables are produced designed to melt ice and snow on roofs.
Heating of surface pipelines and fittings
When constructing coffered pits, a pipe with a shut-off valve is often installed outside to use water for household purposes in the garden; usually, in warm weather, a hose is connected to it for watering the garden. Sometimes they drill an Abyssinian well and use not a surface pumping station to collect water, but a hand pump through which they pump water using physical effort.
In all these cases, using surface water intake equipment at subzero temperatures, you can heat it with an electric cable connected to an alternating current network, which is mounted on the external surface.
Rice. 4. How to lay the cable for heating gas tanks
Cable heating of gas tanks
With an autonomous gas supply, many owners install gas cylinders outside the house, which must be kept warm for normal operation. In winter, it is convenient to heat them with a two-core electric cable used for working in pipeline systems - unlike a single-core loop for heated floors, it is much easier to install. It is known that many mobile gas tanks on trailers are equipped with a similar gas tank heating system from the manufacturer.
Ground cable heating
The technology can be used by gardeners when growing plants in greenhouses, greenhouses and underground basements in cases where external frosts can damage the crop. In this case, the heating cable protects the root system of plants from damage and warms the air in the area where it is located.
Thermal systems
When heating individual houses with liquid or gaseous fuel, you can use a warm electric cable as an additional heat source to warm up the coolant. It can be placed in a pipeline heating system and turned on at night at reduced electricity consumption rates - this will help save money and reduce the gap between cycles of filling gas tanks with gas or supplies of liquid fuel.
Similarly, you can increase the water temperature in hot water supply systems. On the construction market, modifications of heating electric cables are available for sale in environments with hot coolant.
Rice. 5 Cable heating of external shut-off valves
How does a heating cable heating system work?
Heating of pipelines with a heating cable, which is connected to a 220 V AC electrical network, is carried out using two main methods:
1. The cable is placed outside the pipe. This method is used to insulate an already laid highway or sewer pipes, while the wire fits tightly to the outer surface of the pipe. On the construction market, pipes with a ready-made channel for placing a heating cable are sold - this allows to reduce heat losses; also, to save energy, additional insulation of underground pipelines is used with a shell made of foam plastic (penoplex) or polyurethane.
The electric cable is laid along the pipeline; to increase the heating temperature along the entire length or in critical nodes, spiral winding is used.
Rice. 6 Heating diagram for well water supply
2. Heating inside the pipes. The main disadvantage of external insulation with electric cables is low efficiency - most of the heat goes into the environment and additional insulation has to be installed, which leads to higher costs of work.
Therefore, in water lines it is better to lay the heating cable inside the pipes - this applies to water mains. In the sewer system, the presence of foreign objects inside can cause a blockage.
It is not profitable to lay wires located inside pipes along the entire length - the cable is quite expensive and will increase hydraulic losses, reducing the useful cross-section of the pipeline. Therefore, it is more rational to install it in the area of the well head in front of the water supply system and pressure pipe that supplies water to the house. In this case, warm water will prevent freezing in the well, automatic devices and surface pumping station, and heated water will also flow into the water supply system leading to the house.
The main difficulty when installing an electrical cable internally in a pipeline is choosing an installation method and a sealed fitting for connecting it to the pipe when immersing the wire.
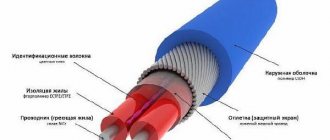
Heating cable device
All types of electrical cables have a device, the main components of which are:
- Lead wires and plug. The heating element is connected to a power cable that comes from the house, therefore, to supply electricity to it, the working core is connected to the electrical cable using special methods that ensure reliable sealing of the joint.
- A heating element. In a device with a resistive principle of operation, heating is produced due to the high resistance of the core passing inside; in self-regulating modifications, the temperature rises near the plastic matrix located between two current-carrying conductors.
- Insulation. Protecting exposed electrical wires from the aquatic environment in which the electrical cable is located is the main task in its manufacture, therefore all devices have at least two layers of internal insulation. Also, in its manufacture, to reduce heat losses, they strive to use synthetic materials with the best thermal conductivity. It should be noted that there are two main options for insulation: for placement inside and outside the water supply; in the first case, food-grade outer plastic is used.
Rice. 8 Zone-resistive cable for roofs - design
- Shield and ground wire. Braided shielding is used in all high-quality cable products; it not only performs protective functions against interference, but also additionally increases the safety of cable use by solving the problems of a grounding wire. The fact is that when connecting, the shielding braid is grounded or connected to the neutral wire, and if the cable is damaged, the current-carrying conductors are likely to come into contact with the screen and the machine will turn off the power supply.
- Thermal sensor. If heating cables did not have feedback that allows them to regulate the current passing through them and, accordingly, the heating temperature depending on the state of the environment in which they are immersed, their operation would become ineffective and lead to increased energy consumption. In addition, the physical parameters of the heated water-containing medium would go beyond acceptable standards - all this would lead to the impossibility of using the cable for its intended purpose. Therefore, all heating cables are equipped with sensors that allow the current to be automatically changed depending on the temperature of the environment at their location; in self-regulating modifications, the temperature change is associated with the conductivity of the interconductor matrix.
Rice. 9 Resistive two-core heaters for pipes - device
Resistive heating cable
Resistive cables are manufactured in single-core and two-core versions; the first type must be connected at two points and is widely used in modifications for heated floors, where the wire forms a winding zigzag heating circuit and returns back to the starting point.
This option is too inconvenient to be placed on pipelines, so pipe heating systems use a two-core design, that is, the heating circuit passes and returns inside the wire.
The heating core of a resistive cable must have high resistance to electric current, so it is made of a chromium-nickel alloy that has the necessary characteristics. The connection of the supply wires with the braid and the heating core is carried out in a closed sealed coupling; the powered conductors are connected to an automatic control unit, from which a two-wire temperature sensor extends.
Distinctive features of resistor heaters:
- Slightly lower cost compared to its main competitors - self-regulating electrical cables.
- A resistive cable is supplied with the thermostat; the system is designed to work only with this product, which has a calculated resistance to electric current - the wire cannot be cut, lengthened or shortened.
- During installation, it is necessary to have a temperature sensor, which should be located in the area where the cable is located - this complicates its external installation and makes it impossible to use inside pipelines due to the interfering head of the temperature sensor.
- If the wire is damaged or broken at any point, it must be completely replaced. The exception is specially designed resistive heating cables for deicing roofs and gutters. In their design, current-carrying conductors are connected by a heating coil running inside at many points, so the heater can be lengthened or shortened at the user’s request.
- The minimum power of most resistive devices is 10 W per linear meter (you can find modifications with a power of 8 W); the maximum value can reach 60 W in zone-resistive modifications to combat roof icing.
Fig. 10 Self-regulating heating cable - operating principle
Self-regulating heating cable
Currently, self-regulating heating cables have practically replaced resistive competitors in the field of pipe heating due to their simple design and ease of connection. Structurally, the cable is made in the form of two conductive cores, between which a temperature-dependent matrix containing finely dispersed graphite powder is placed.
In a cold state, an electric current passes through micrographite contacts from one wire to another, heating the surface of the matrix, and accordingly the wire warms up the environment. As the outside temperature increases, the heating of the matrix increases even more, its material increases in volume as a result of thermal expansion - this leads to an increase in the distance between the conductive graphite grains. The resistance of the electrical circuit increases, the current and heating power drop, the cable cools - thus self-regulation of temperature occurs.
Self-regulating heating cable has the following features:
- Versatility. Self-regulating cables can be used to heat pipelines inside and outside, roofs and storm drains, in heating system pipes and on various tanks.
- Economical. Unlike a resistive cable, a self-regulating cable heats up most at the point with the lowest temperature, while current consumption is minimal in warm areas.
- Ease of installation. The cable consists of two parallel sections of wire with a heating matrix between them; when installing self-regulating heaters, they can be shortened or extended by a significant distance.
Rice. 11 Self-regulating cable device
Example 2: Underfloor heating
Calculation of cable heating
General floor heating scheme
In addition to protecting pipes from frost, heating cables are also used to install floor heating systems. Unlike film heated floors, the cable is convenient primarily because its laying density can be adjusted.
The efficiency of floor heating with a cable laid in a screed is ensured by its correct layout. In this case, it is necessary to focus on the power consumption of the room:
| Room | Required specific power for heating, W/m2 |
| Open area | 180 and above |
| Balcony/loggia | 140 |
| Bedroom | 120 |
| Children's | 120 |
| Living room | 100 |
| Kitchen | 100 |
| Hallway | 100 |
| Bathroom | 130 |
When calculating a warm floor, please note that heating cables are laid only in areas free of furniture. Conductors located under a heavy headset may suffer from either pressure or overheating due to poor heat dissipation. Well, heating the bottom of the cabinet or kitchen cabinets at your own expense is also not a good idea.
Example of power of different models of heating wires
We carry out the calculations as follows:
- We calculate the required cable length. To do this, we multiply the usable area of the room by the specific power consumption and divide by the linear power of the cable itself (indicated by the manufacturer).
- Determine the installation step. In this case, we multiply the area of the room by 100 and divide by the length of the cable in meters, calculated earlier. We obtain the optimal distance between the turns of the heating conductor in centimeters.
The optimal step value is from 6 to 15 cm. In this case, the heating is both intense and fairly uniform (we do not feel the difference between the temperature of different areas of the floor).
If the cable is laid too infrequently, the temperature difference will be significant - this is noticeable in the photograph taken by the TV
If according to calculations the step is more than 15 cm, then you can go in two ways:
- Increase cable length. If we take a conductor of the same power, we will get a performance margin. If, when increasing the pancakes, we buy a smaller cable, the heating will remain at the same level, but there is a chance to save money.
- Increase the thickness of the screed. Due to the thicker layer of cement on top of the conductors, the floor will warm up more slowly. But the uniformity of underfloor heating will increase.
Thick screed allows for more even heat distribution
When using mats, everything is quite simple: we simply select products with suitable power density. Considering that the market mainly offers 120–160 W/m2 models, there should be no problem.
Cable heated floor installation technology
If you have calculated everything, then all we have to do is figure out how to properly install the floor itself.
| Illustration | Cable heating installation technology |
| Preparing mounting holes. We make a hole in the wall to install the distribution box and thermostat. We cut a groove in the floor for installing a temperature sensor. | |
| Connecting wires. We install a socket box into the hole, through which we insert the wire from the panel. It is from this that the cable heated floor will be powered. | |
| Primer of floors. The floor on which the heating cable will be laid is cleared of debris and treated with a penetrating primer. If the coating has significant unevenness, leveling with a screed may be required. | |
| Laying thermal insulation. If the heated floor is not laid under glue or screed, but under another floor covering, then it is advisable to lay an additional thermal insulation layer. Rolls of foil material are laid end-to-end and sealed with tape. | |
| Layout of heating mats. When using mats with a cable attached to a polymer mesh, lay the products on the floor. When making a turn, carefully cut the mesh, trying not to damage the cable. | |
| Attaching mounting plates. When using cables not secured to mats, install steel mounting plates on the floor. We fix them to the base with anchors with plastic sleeves. | |
| Laying cable from a coil. We lay the cable with the pitch that we determined during the calculations. To fix it, we press the cable with the protrusions of the mounting plates. | |
| Laying the temperature sensor. We insert the temperature sensor into a corrugated pipe, close it with a plug and place it in a groove in the floor. We seal the groove with mortar. We connect the wire from the sensor to the thermostat. | |
| Connecting the thermostat. We connect the wires from the temperature sensor, heating cable and power cable to the thermostat terminal block. When connecting, we focus on the terminal block markings - it is important not to confuse the zero and phase from each wire. | |
| System check. We install the thermostat in the socket and apply voltage. We check the functionality of the entire system: the cable should heat up evenly and quickly enough. We carry out the check in one or two minutes to prevent overheating. | |
| Laying the adhesive mixture. Apply about 5-10 cm of tile adhesive mixture on top of the cable mats. We level the mixture with a spatula and a notched grater, forming furrows without touching the conductors. We lay the glue without gaps, which can lead to poor heating of the floor covering due to the low thermal conductivity of the air. | |
| Floor covering. Lay the tiles on the adhesive mixture. We try to ensure that the entire surface of the cladding is in contact with the glue - this way the heat transfer will be more efficient. |
Connection diagrams for different types of heaters to the thermostat
Heating cable power for water supply
It is quite difficult for a user even with an engineering education to determine exactly how much power is required for the effective operation of a resistive or self-regulating heating cable - the calculation formulas are too cumbersome and the calculation takes a long time. The task is only possible for qualified specialists, and its solution in everyday life is carried out by manufacturers and distributors of heating electrical cable products.
It has been experimentally established that for heating pipelines, an electric cable with a power of 10 W per linear meter is sufficient when using a 50 mm shell made of foam plastic or penoplex insulation and a pipe diameter of no more than 50 mm; the ambient temperature should not fall below -30º C.
For household water pipes made of HDPE with a standard diameter of one or one and a half inches, the optimal thickness of the insulation shell is 30 mm; when using sewerage, you will need a higher power cable of about 20 W per meter or spiral winding, with an insulation thickness of 50 mm.
For external heating, the power of the heating cable is linearly related to the ambient temperature and the state of the heated elements; for pipelines, its average value is about 20 W per linear meter; on roofs and in drainpipes, powerful resistive electric cables of up to 60 W per linear meter are used.
Rice. 12 Connection diagram for heating cable of single-core and double-core design
Diagram and connection to the heating cable network
Any heating cable is connected to a temperature control unit, on which the contacts for connecting the temperature sensor, heater and external electrical network are marked; if there are no markings on the case, you can always use the connection instructions.
The procedure for connecting a cable to a box is not particularly difficult; the task is made easier by knowing the color markings: the blue and brown wires are connected to the electrical network, the yellow-green wire is connected to the neutral or ground bus.
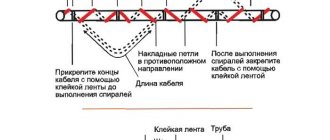
Cable connection technique for heating pipes
For all types of heating products, during the installation process it is necessary to insulate the end and connect it to the connection wires. To complete this work, you will need a small set of tools and materials. A knife, pliers, a side cutter and a hair dryer are used for construction work.
Preparing the cable for connection.
The set of materials includes insulating tubes and sleeves of various lengths and diameters, which are used as terminals. The insulating material is special, heat-shrinkable, with a layer of glue applied inside, which helps improve the quality of protection of the connection. To insulate the end of the cable, you can purchase a ready-to-use plug instead of heat shrink tubing.
Installation of the end coupling is performed in the following sequence:
- cut off 2 cm of outer insulation;
- remove the braid;
- put on the muff and warm it up with a hairdryer;
- clamped with pliers.
If you are working with a self-regulating product, one wire is cut along with the matrix 10 mm shorter to make 2 wires of different lengths. Instead of an expensive plug, you can use heat shrink tubing. It is put on the prepared wires, heated with a hairdryer, and filled with glue from a hot-melt gun. For reliability, you can wrap it with electrical tape.
The procedure for connecting 2 segments or connecting supply wires is in many ways similar. The step-by-step instructions are simple:
- Using a knife, cut the general insulation and free the cores. One of them is shortened to create a ladder. Do the same with another piece.
- The ends of the wires are stripped and a heat-shrinkable tube is put on each. On one of the conductors - a common long one.
- The stripped ends are inserted into the sleeves and clamped. Start with a shorter wire. On the other side, the cores of the second cable are inserted and crimped. Make sure the connection is strong by pulling in different directions.
- Stretch small thermal tubes, blow them with a hairdryer, and press. The same operation is performed with a common thermal insulating coupling.
Video: how to connect a heating cable
There are some nuances in installation. In particular, there is a braid on the cable, and many people do not know what to do with it. It serves for grounding, which must be followed according to all the rules or abandoned. There are several options for how to proceed in this case, and each requires its own approach. After watching the video, it will become clear how to connect the heating cable and what points to pay special attention to.
Basic methods and types of laying
When deciding how to properly lay a cable in a pipeline, they take into account its purpose, location, presence of additional insulation, and heater power. When laying, linear and spiral installation is used, and the cable is placed inside or on external sections of the water supply system. The main condition for installation is the prohibition of the use of metal materials and polymer adhesive tapes for fastening the cable, and its intersection with contacting surfaces is also unacceptable.
Rice. 13 Linear installation and connection of the heating cable
Linear installation on underground pipelines
When deciding how to connect a heating cable for a water supply system, they often choose linear installation, which refers to the main types of connecting the heater to the pipeline, in which the wire is placed on the surface and secured with adhesive tape.
A significant disadvantage of the method is that plastic pipes have low thermal conductivity and simply placing the cable on their shell does not always provide the necessary heating.
Higher heat transfer can be achieved by using special pipes with a channel recessed inside - the electrical cable located in it releases much more thermal energy. During installation, adhesive tape made of aluminum foil is used; the process of installing the heater on an underground pipeline consists of the following operations:
- For linear installation, the cable is placed on the bottom side of the pipeline; for this, a strip of aluminum foil is glued along the entire length - this is necessary to increase heat transfer to polymer pipes, which have low thermal conductivity.
- Wrap the cable with transverse sections of tape in increments of 300 mm, trying to achieve good tension and a tight fit without gaps.
- An aluminum tape is glued on top along the entire length of the cable, ensuring its tight contact with the surface of the pipeline; if there is a temperature sensor, its wire and measuring element are connected separately with transverse ties.
- Then the cable along its entire length is additionally secured with nylon ties (fastening is done in the absence of tight-fitting outer insulation) - this will prevent it from peeling if the aluminum tape loses its adhesive properties due to high temperature or aging during operation.
- Upon completion of the work, put a heat insulator on the pipeline and fix it with glue or ties. If two or more conductors are used, they are fastened in a similar way from below at some distance from each other.
Types of heating wire with characteristics
Heating cable for water supply.
Heating wires convert electrical energy into heat due to high internal resistance. These are flexible products that can be laid on surfaces of any configuration. The wire has at least 2 layers of reliable insulation that protects from harmful external influences. The design may include a foil screen or copper braid that prevents short circuits and neutralizes the magnetic field.
There are 2 types of heating wires produced - resistive and self-regulating. The action of the former is based on the ability of metals to heat up when electricity passes through them. In self-regulating designs, heat is generated by a special matrix, and the conductors remain cold.
The main characteristic of all heating cables is the electrical power they consume per 1 linear meter. m. To place a heating product inside the pipeline, 10 W/m is enough. Outdoor installation requires an increase in power density of 20 W/m and more.
When choosing a heating wire, other characteristics are taken into account, including:
- Maximum permissible line length including branches. The parameters are directly influenced by the thickness, resistivity of the conductor, and the number of cores. If the permissible length is exceeded, the entire heating system may fail.
- Limit operating temperature - characterizes the ability of the product to maintain it for a long time. 3 lines are produced, each of which is designed for operation in appropriate conditions.
- Maximum permissible temperature when switched off.
Heating cables are available in round and flat sections. The latter are more suitable for outdoor placement. Sold complete with a wire for connecting to the working part. To save energy consumption, a temperature sensor with automatic control is used. Self-regulating options are used with a compact thermostat, which is installed on the supply wiring.
Connecting the heating cable to the network and controlling the temperature
On the market you can most often find modifications of cable heaters complete with thermostats, while the length of the cable, which is connected to the heating elements through special sealed couplings, does not exceed 3 - 5 meters.
When heating pipelines, the thermostat is installed in a convenient place, protected from harmful environmental factors, as far away as possible (a residential building), and there is a need for a hermetically sealed connection between a short cable and a long wire coming from the house. To do this, use a household hair dryer, special couplings and clamps, installation work is carried out as follows:
- The conductors of the connected cables are cut at different distances (with a ladder) and removed from insulation to a length of 10 mm.
- Heat-shrinkable sleeves are placed on each conductor, and a common large-diameter sleeve is placed on top of the cable.
- Insert the ends of the wires into the sleeves and clamp them on one side with pliers; after inserting the other ends, the sleeve is crimped on the other side.
- Internal couplings of small diameter are pulled onto the wires and heated with a hairdryer; after compression, an outer coupling is placed at the junction and also heated with a hairdryer.
- In self-regulating cables, it is necessary to seal the two end wires; to do this, they are cut with a ladder, a special heat-shrinkable sleeve with a closed end is put on top and heated with a hairdryer.
To control the heating temperature, a thermostatic regulator is used, which is placed in a convenient place near the electrical panel; to increase safety, automatic RCD circuit breakers are installed in its circuit, which open the circuit when a short circuit occurs in the line.
Rice. 19 Thermostats to which the heating cable is connected
Thermostats and sensors for heating cables
Thermostats allow you to reduce energy costs several times when using cable heaters; with their help, you can set the temperature limits for switching on and off depending on the application.
Manufactured thermostats, depending on their purpose, are divided into several groups:
- for heated floors,
- de-icing on roofs,
- for heating water supply and sewerage,
- maintaining heat in hot water pipelines.
The main difference between all types of thermostats is the temperature thresholds for operation; when used in wells, the switch-on temperature is set within +2 - +3 degrees, the switch-off temperature is +10 C; to save energy, the threshold values can be lowered. Thermal sensors with response thresholds from -15 to +5 C are installed in external systems to combat roof icing.
Thermostats are made in the form of manual or touch devices; when using several wired heating systems, multi-channel devices are installed, the temperature threshold of which varies within a wide range.
Industrially produced thermal sensors with two wires and a tube at the end differ in their operating principle; the most popular are resistive and semiconductor types. The operating principle of the former is based on a change in the electrical resistance of the resistor depending on temperature; in semiconductor devices, when the temperature conditions change, the characteristics of the pn junction change.
In both cases, the electric current passing through the resistor or semiconductor changes its value with temperature, and the electrical signal from the sensor controls the operation of the electronic circuit that supplies power to the heating cable.
It should be noted that modern semiconductor devices operate in a wide linear temperature range from -55 to +150 C, have a high measurement accuracy of about 2% and a response to temperature changes of 0.125 C.
Rice. 20 Connecting a heating cable and subsequent methods of thermal insulation of the pipe
Thermal insulation of heating cables
When laying outside, thermal insulation must be used - it prevents heat from escaping from the cable into the environment, thereby increasing the heating efficiency. When immersed in the ground, hard types of waterproof insulating shells made of polystyrene foam, penoplex or polyurethane foam are used.
When laying pipelines externally, there is no earth pressure on their insulation; you can install a heated sewer entrance to a house using soft materials - polyethylene foam, all types of mineral wool, glass wool. It should also be taken into account that the thickness of the protective shell of the insulation for external installation should be greater than the underground version.
Installation and maintenance tips
To ensure that the operation of the heating system does not cause trouble, it is advisable to perform all the steps recommended by the manufacturer during installation. It’s good not to forget about stickers - place/stick notices about heating on the heated area.
In the future, especially if repairs are necessary, such forethought will come in handy. It is also worth carrying out regular inspections of the pipeline, and if problems are found with the heating cable or it is damaged, repairs should be carried out correctly.
Why remove the damaged piece and instead attach a new, undamaged piece in this area. There is no point in repairing the damaged area - replacement is the right solution.
If you are not an electrician at all, then it is easier to buy a ready-made kit for internal/external heating. With such a system, all you have to do is read the instructions carefully and follow what is written exactly
Experienced installers advise using metal tape to remove rough areas of the pipe where the heating cable is to be installed.
Another useful tip concerns saving: you should not save by buying a cheap Chinese counterfeit cable - removing pipes from the ground and changing the heating system on frosty days will cost several times more than buying a high-quality system from a trusted manufacturer.
It is better to immediately buy a reliable cable and other components with a long-term warranty from a reputable manufacturer; in addition, it is advisable to consider one of the alternative options for heating pipes as a backup addition.
What to look for when choosing a heating cable
When choosing a heating cable for pipes, the following factors are taken into account:
- Operating principle. The disadvantage of resistive cables is their uniform heating temperature along the entire length. In order to save energy, it is better to use a self-regulating cable on underground pipes. In addition, its design, in the absence of a remote sensor, is convenient for placement inside pipelines, and the minimum power of the device is 10 W. per linear meter is sufficient for its linear placement underground in a heat-insulating shell.
- Power. For external heating, devices with high power are used; the best performance is achieved by linear cable modifications with a spiral winding of the heating wire inside.
- Insulation. When installed internally in water pipes, devices with insulation made of food-grade plastic should be used; it is better to choose modifications with a copper screen - the presence of the element reduces interference and protects the user from electric shock if damaged. Also, a braid of tinned copper wires promotes more intense heat removal from heating cores or matrices.
- Manufacturer. The market offers a wide range of models of heating cables from various manufacturers; among foreign suppliers, the products of Raychem, Nelson, Lavita, Ensto, Devi are well known; a wide range of cable heating products from a domestic manufacturer - a company from the Moscow region - is sold on the construction market. Special systems and technologies SST .
Rice. 21 Table of dependence of heater power on pipe diameter and insulation thickness
The use of a heating cable for sewerage and water supply is the most effective method of combating icing, because any thermal insulation does not heat the pipeline, but only increases the time it freezes. Self-regulating cables, which have recently appeared on the construction market, are slightly more expensive and more efficient compared to resistive devices; they are the best option when lowering into water supply.
Pros and cons of cable heating
Cable heating systems have become a real salvation for owners of private houses and cottages. If previously such a solution was available only for large industrial facilities, in recent years the market has been replenished with a variety of offers, and the range of manufacturers has expanded significantly.
Moreover, there are quite a lot of options for using heating systems. The most popular among them are water pipes, sewer pipes, drainage systems, roofs of houses, steps, small areas for various purposes, etc.
Image gallery
Photo from
External heating of water pipe
Cable roof heating
Heating of the drainage system
Heating the garage area
This type of heating prevents the formation of ice, which can cause a breakdown of the water supply network and result in large expenses.
In addition, the heating cable also has the following advantages:
- affordable price;
- a wide range from various manufacturers, including kits for installation in hazardous areas;
- high efficiency of systems;
- low power consumption;
- ease of operation;
- availability of ready-made kits with instructions for independent connection;
- long service life.
As for the disadvantages, the biggest one of the heating cable is its volatility. After all, for the heating system to operate, it requires a constant power supply.
Users also note that without skills, self-installation can cause some difficulties. And the issue of cost is not entirely clear - products from famous manufacturers are not cheap at all.
True, experts advise not to skimp on high-quality cable, because it is installed for more than a dozen years. For example, the service life of Raychem cable systems is 50 years.
The photo shows a ready-made kit for installation inside the pipeline. All the disadvantages of such a cable, except for its volatility, are quite insignificant, especially in comparison with the benefits brought by the use of heating cable systems