Due to the fact that the temperature at this time of year very often passes through zero (in both directions), such changes lead to the formation of pieces of ice and icicles.
In addition to the fact that roof elements suffer and deteriorate as a result, the entire perimeter of the house turns into a potential minefield.
You don't know where and when someone might fly from above. And it’s good if this block falls on a parked car, and not on your head.
Not only private owners, but also city services face the same problem. For example, in Moscow alone, the total length of the entire roof is greater than the length of the equator!
The main places where ice accumulates are:
- valley
- drainpipes
- gutter
- drip
This problem can and should be solved preventively in the summer. You can't really climb on the roof in winter.
Anti-icing systems for roofs and gutters, made on the basis of a heating cable, help with this.
What does this all look like in general? The cable is spread along the drain and the edges of the roof, the “cold” ends from it are fed into junction boxes on the walls. Temperature, humidity and precipitation sensors are placed along the perimeter and on the roof.
The cables from them are also fed into a common box under the canopy. And from there all the wiring goes down to the control panel with automation.
Although the pleasure is not cheap (from 100,000 rubles for a small private house), it is effective.
How does a roof heating system work?
Let's figure out what basic elements are part of the system and how they should be located.
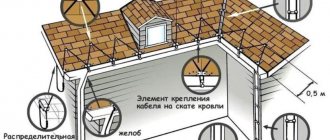
Approximate diagram of the installation of a heating system on the roofSource dom-electro.ru
The entire complex of heating equipment usually consists of three main components.
The heating unit includes a network of single or double heating wires. Also at this point it is worth pointing out that a special film can be used as a heating element
It is important that the heating elements meet certain requirements. They must be adapted to sudden temperature changes, as well as power surges
The system must also be resistant to excess moisture. If you plan to walk on the roof, then resistance to mechanical damage is a mandatory requirement for the heating unit. The information and distribution unit is designed to control the transfer of electricity from the network to the heaters. This part of the system provides information in the form of sensor readings and powers all components of the anti-icing complex. It is better to install all sensors and elements of this unit in places where moisture does not enter. For example, in the attic or under the roof overhang. The control unit includes thermostats, weather sensors, as well as devices that allow you to manually change the roof temperature and power supply. An option with a self-regulating control system is possible. Here there is no need to constantly regulate the operation of the heating complex, and the necessary changes are introduced automatically. In this case, the mini-computer makes decisions based on weather sensor readings.
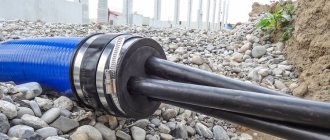
The icing cable is also laid in the drainage channelSource eximtec-plus.com.ua
Gratings and dirt-proof coverings
A large amount of debris and dirt accumulates in the door dirt protection system, so electric heating systems are installed in them extremely rarely. Since gratings most often cover a sump without drainage, heating can be mounted around or under the sump directly in the concrete base of the porch or under the facing tiles.
Why is this necessary?
The obvious goal is to get rid of ice buildup, prevent narrowing of gutters and making gutters heavier. The accumulated ice is quite capable of completely blocking the outflow of melt water from the roof. The consequences are quite unpleasant: the roof overhang will be decorated with massive icicles, the fall of which will not bode well for either pedestrians or vehicles.
Why do gutters and gutters become filled with ice?
There are two reasons:
- During thaws and the off-season, temperatures often fluctuate around zero during the day. A very typical situation is when snow melts in the sun and immediately freezes in the form of ice on the inner wall of a pipe hung in the shade.
- In addition, so-called “warm” roofs with residential attics or exploitable attics underneath can cause accumulated snow to melt at temperatures down to -10C. It is clear that a significant part of the melt water will not have time to escape down.
The roof of a house with a residential attic on a thermal imager.
Heating system installation technology
Heating cable laying areas
The heating cable should be laid in places where melt water drains and in areas where ice forms:
One or more threads are pulled along the entire length of the gutters. The linear power of the cable, depending on the diameters of the elements of the drainage system, is selected from 200 to 300 W per square meter.
Layout diagram for cable heating system for gutters and roofs
- In drainpipes. Heating of funnels and pipe outlets requires additional reinforcement. Typically, two cable lines with a power of 20-30 W per linear meter are laid in pipes, depending on the diameter of the pipes.
- In roof valleys the cable is laid up and down. The laying length is chosen to be at least 1 m from the beginning of the overhang, but it is better to be 2/3 of the entire length of the valley. The estimated power is 250-300 W per square meter of valley.
- To prevent the formation of ice on the roof eaves, a “snake” cable laying pattern is chosen. This heating scheme involves laying the cable along the edge of the eaves. In this case, the snake pitch on hard roofs is selected as a multiple of the pattern, and on soft ones - depending on the power consumption per square meter (35-40 cm). The height of the “snake” triangle is chosen so that the heated surface does not have cold zones on which ice can form.
- Along the drip line on the water separation line. 1-3 strands of cable depending on the drip design.
Step-by-step instructions for installing a cable heating system for gutters and roofs
Installation of heating gutters and roof eaves is carried out according to the following rules:
- It is recommended to fasten the cable in gutters using a special mounting tape across the gutter in strips. The greater the thickness of the mounting tape, the longer its service life. The installation pitch of the tape strips is 0.25 m for a resistive cable and 0.5 m for a self-regulating one. It is most often fixed to the gutter with rivets, after which the installation sites are treated with sealant.
- In drainpipes, the cable is secured using heat-shrinkable tubing or mounting tape. If the height of the pipes exceeds 6 m, it is better to additionally attach the cable to a metal cable in an insulating sheath to transfer the load-bearing load to it.
- In the pipe mark and funnel, the heating cable is secured with mounting tape with rivets.
- The cable is secured to the roof using mounting tape and sealant.
Rules for installing a self-regulating heating cable with braid (if the cable is without braid, points 2 and 6 should be excluded)
Pro Tip: It is highly recommended to avoid drilling into the roofing to install fasteners to avoid leaks.
- The procedure for installing a cable heating system involves inspecting the installation site, which should not have sharp edges or third-party objects that could damage the cable.
- Cable sections are checked to ensure their length matches the heating zones.
- If necessary, sections are cut to the required size, coupled, laid out and secured.
- Install the mounting boxes, ring and measure the insulation resistance of the sections.
- Thermostat sensors are installed, signal and power cables are laid.
- Install the control panel.
- Resistance is measured and power and signal cables are rung.
- Testing the residual current device.
- Adjust the thermostat.
- Perform commissioning work.
So, we looked in detail at how you can organize cable heating of a drainage system with your own hands, we figured out the structure of the system and the rules for choosing its components. We hope that our tips and recommendations will be useful to you and you will be able to put them into practice.
Selecting a heating cable manufacturer
To ensure maximum functionality and reliability of expensive roof heating systems, it is necessary to use only original components from manufacturers with a solid business reputation. Monitor compliance with this requirement by suppliers. Savings at the stage of purchasing cables and other elements during their operation most often result in additional costs for repairing failed areas. And, on the contrary, a high-quality cable allows you to significantly save on energy costs.
The correct choice of heating cables is not enough for the full functioning of electric heating. In addition, proper installation of the system is required. Installation should only be entrusted to companies that specialize in this type of work and officially represent the cable manufacturer. In this case, the proper experience of specialists, a responsible and competent approach to carrying out calculations and direct installation of equipment are guaranteed.
Important nuances when choosing a heating cable
The ideal option for organizing and performing work on the installation of heating systems for roofs and gutters is the participation in the process of one specialist who is capable of:
- design the system taking into account technical and operational conditions;
- select components;
- supervise the installation.
It is advisable that the specialist has a certificate from the manufacturer
Availability of certificates for cable roof heating systems is a guarantee of their uninterrupted and long-term operation. Pay attention to the power of the proposed heating cable. If this figure exceeds 50 watts per linear meter of the product, you should not immediately agree
As a rule, designers of heating systems make such proposals to be on the safe side, or the fastening of the heating cable does not provide effective heat transfer to the heated surface. In this case, the cost of purchasing a cable with too high power is not justified. The higher the power of the cable, the more expensive it is. And energy consumption will be approximately 2 times higher than required for efficient operation of the system. It turns out that most of the heat will be spent on heating the air, which means that almost half of the cost of paying for electricity will be in vain. In addition, during operation, leaves, dirt, dust, etc. may get under the heating cable, resulting in a significant reduction in efficiency. When using the unique Raychem cable heating systems we offer, such problems are eliminated.
The choice of other components, in particular the control unit, also significantly influences the functionality of the system. Such devices should be selected individually for each project. It is also necessary to specify the operating mode of the heating system, depending on the type and other features of the roof.
When designing anti-icing, many factors need to be taken into account, in particular to determine:
- points where power cables exit onto the roof;
- installation locations of junction boxes and thermostat;
- areas of the roof where heating is required (valleys, abutments, etc.);
- problem areas and drainage defects taking into account the functioning of the heating system (slopes of gutters, unrolled pipe funnels, etc.).
In addition, you need:
- take into account the presence of drainage, snow retention, etc.;
- use fasteners that maximize heat transfer from the heating cable to the heated surface of the roof elements.
If you count on stable and correct functioning of heating systems, you should use only original components (cables, boxes, heat-shrink sets, etc.), entrusting their installation to experienced professionals who have been trained by the component manufacturer.
When installing a roof heating system, we use the method of continuous foiling of the heating cable, which ensures high heat transfer efficiency. This method has an additional advantage - over time, neither foliage nor dirt gets under the heating cable, which means that its heat transfer to the heated surface does not decrease.
Our advice will help you make the right choice. We are ready to provide additional advice, as well as develop a technically competent, most effective and cost-effective roof heating system project and implement it.
Why does ice form on the roof?
There are two main reasons:
- If the day is warm, the snow begins to melt. The resulting water flows down the gutters. At night, when the temperature drops, the remaining water turns into ice. Such a difference in temperature in winter and spring is observed within the city. When a large number of houses are clustered, the air is always warmer. Metal gutters are sometimes covered with a thick crust of ice, which is very difficult to remove from the gutter without breaking it.
- The reason for the formation of ice is the roofs themselves, especially if the roof is of the attic type. The snow melts from the heat emanating from the house. Water flowing onto the cornice cools and freezes again. Unreliable or poorly designed thermal insulation can trigger snow melting. Through cracks and unreliable joints in the thermal insulation material, internal heat comes out, warming up the snow. It turns into water and then into ice.
To get rid of this problem once and for all and protect the drainage system, it is necessary to install heating for the drainpipes. There are a number of anti-icing systems.
Causes of ice formation
Those that restrain snow from falling off the roofing and heat cables that serve to heat gutters. Their main function is to free the roof from the ice crust and prevent dangerous icicles from forming.
Modern storm drainage systems must be equipped with an anti-icing system for the roof surface. What is she like?
Causes of Ice Formation
This unpleasant phenomenon is caused by several factors: both external and internal. The reasons for this include:
- Frequent temperature changes. The fallen layer of snow begins to melt during its rise, and when cold weather returns, it freezes again. After the next snowfall, it is covered with a new portion of precipitation, and with the next warming/cooling it undergoes the same changes. As a result, the ice layer inevitably grows and “becomes better.”
- Mistakes made during roof design. To a greater extent, this relates to the insufficient angle of the roof slopes. It must always be calculated based on the climatic conditions of the area in which the building is being erected.
- Channels for draining liquid that were not cleaned in time. In the autumn they are often clogged with foliage. If it accumulates in large quantities, it can become an insurmountable obstacle even for water.
- The presence of an attic in the house. The living space always becomes a source of steam, so the temperature of the roof invariably rises. This leads to snow melting and freezing in cold weather.
There are other reasons: mistakes made when insulating the attic space (insufficient insulation), and irregular removal of snow on the roof.
How the system works
A private house is heated by a boiler, from which hot liquid flows into radiators, which release heat into the air inside the room. But for heating gutters, a fundamentally different approach is used. Storm drains are heated using a heating cable. It maintains the temperature at a constant level. This system is used not only for roofing, but also for drainage pipes, water supply and drainage systems, etc.
The drainage heating system is installed in all areas of the storm drain. Heating occurs due to electricity. For proper and adequate functioning there are many auxiliary elements. Among the main ones there are devices that automatically turn on or off heating elements, measure the outside temperature, and act as fuses. The electricity heats the cord, producing heat. There are two main types of wires with which you can insulate a storm drain - resistive and self-regulating. They are very different from each other, but both successfully fulfill their task.
This heating is installed over the entire drainage area
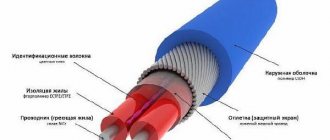
Resistive looks like an ordinary wire with protective insulation, inside which a metal core runs. He has constant resistance. This allows you to maintain the same temperature in all areas if the wire has no mechanical damage. It heats itself using a closed circuit. There are single-core and double-core cord types on sale.
They also install a heating system for gutters and drains with a self-regulating cable. It works differently. This is a pretty high tech device. The current flows through copper conductors, and the insulation is made of thermoplastic material. The top of the cable is covered with a main insulating layer. This heating element is based on a self-regulating matrix that independently changes the resistance of the wires in the cable when interacting with the outside temperature. Due to this, the degree of heating in different areas differs.
Means for heating gutters and roof overhangs
To prevent the formation of ice, various systems for heating gutters and roofs are currently used, but almost all of them are based on the use of a special heating cable and automation equipment.
Let's take a closer look at what types of heating cables and control equipment exist, and which ones would be preferable for selection.
Which heating cable to choose
There are two main types of heating cables for roofs and gutters:
Resistive cable. In practice, it is a regular cable consisting of a metal core and insulation. A resistive cable has constant resistance, constant heating temperature during operation and constant power. Heating of the cable occurs from a closed circuit connected to electricity.
Design (diagram) of a resistive heating cable
Self-regulating cable for heating gutters and roof overhangs is more technologically advanced. It consists of a heating self-regulating element (matrix) that reacts to the temperature of the environment (drainpipe) and changes its resistance and, accordingly, the degree of heating depending on this, as well as an insulating shell, braid and outer shell.
Each type of heating cable is capable of providing equally effective heating of the roof and gutters. However, each of them has its own unique advantages. Thus, the main advantage of a resistive cable is its much lower price compared to a self-regulating one. At the same time, the second type is more efficient in terms of energy consumption and is unpretentious to installation conditions.
As the outside temperature rises, the number of current-carrying paths in the cable matrix decreases, due to which the power and amount of electricity consumed decreases. The temperature of the self-regulating cable also decreases. All this avoids the need to use a temperature sensor that automatically regulates the cable.
Advice from a professional: The most effective in terms of cost and quality ratio is considered to be a combined heating cable system. Typically, inexpensive resistive cables are used in the roofing portion of the system, while heating of gutters and gutters is provided by self-regulating cables.
Design (diagram) of the self-regulating heating cable Devi
As for calculating energy consumption and choosing the power of heating cables, the norm for resistive-type products is a cable with a power in the range of 18-22 W per linear meter, for self-regulating ones - 15-30 W per meter. However, it should be taken into account that if there is a drainage system made of polymer materials, the cable power should not exceed 17 W per linear meter, otherwise there is a risk of damage to the drainage due to excessively high heating temperatures.
Composition of a heating system for drainage and roofing
In addition to the heating cables themselves, heating systems also consist of the following main components:
- Fastening elements.
- Control panel, usually consisting of:
- input three-phase circuit breaker;
- residual current devices, usually 30mA sensitivity;
- four-pole contactor;
- single-pole circuit breakers for each phase;
- thermostat control circuit protection circuit breaker;
- signal lamp.
Distribution network components:
- power cables used to power heating cables;
- signal cables connecting thermostat sensors to the control unit;
- mounting boxes;
- couplings that ensure tightness of connections and ends of all types of cables.
Heating cable connection diagram
Thermostat. The operation of the cable heating system can be adjusted using two types of devices:
- Actually, the thermostat. This device is designed to operate the heating system in a given temperature range. Typically the operating range is set within -8..+3 degrees.
- Weather stations. In addition to a certain temperature range, the weather station is capable of monitoring the presence of precipitation and its melting on the roof. The station includes not only a temperature sensor, but also a humidity sensor, and some weather stations are equipped with both a precipitation sensor and a melting (humidity) sensor.
When using a conventional thermostat in a cable system, the user will need to independently turn the system on in the presence of precipitation and turn it off in the absence of it. The weather station allows you to fully automate the process of system operation and even program time delays for its shutdown. However, in terms of cost, conventional thermostats are significantly more profitable.
Installation of a cable system for heating the roof covering
The most important point in the process of assembling a cable system is to correctly distribute them in the required areas. Therefore, installation involves bundling several sections of cable into one assembly. This ligament is called a knot.
Which areas are connected to each other:
- Part of the roof is closer to the eaves. Here the width of the area is determined as needed, most often from the snow guards to the edge. The heating cable is secured to the plane of the roofing material with special strips and clamps or rivets. Installation is carried out in a zigzag manner.
- Gutters of the drainage system.
- Vertical drainage pipes.
Look at the photo above, it shows how you can install one heating cable that would immediately cover both the roof plane and the gutters of the drainage system. And this is one of the options that can be called economical in terms of material consumption.
After the heating cable for heating the roof and drains has been completely installed and secured, it can be connected to the power network through a switchgear. Therefore, even before installation begins, you need to decide on the installation location of the two components. The best option is to install it under the roof structure in the attic; there should be easy access to this place.
If all installation processes have been completed, it is necessary to proceed to commissioning work.
Please note that this work is a mandatory condition, which is fixed by the UE Rules in Chapter 1.8. what needs to be done:
- Carry out a resistance test on all installed cable systems. That is, the resistance value of each core is measured and this value is checked with the passport data of the heating cable itself.
- The entire system must be grounded.
- A check is being carried out to ensure that it is turned off in emergency situations.
- Each cable is called, where the phase and zero are checked.
- The automation is also tested to ensure proper operation.
- An acceptance certificate for the entire heating system must be drawn up.
So, everything is ready, you can start the process of heating the roof and gutters. The simplest scheme is a start-up on a relay, which removes the blocking of the power cable. More complex circuits include a time relay. That is, the starting relay is turned on for a certain time, which is set by the operating temperature of the entire heating system. As soon as the time relay turns off, the precipitation and water sensors turn on. They control the amount of precipitation that falls on the roof of the house.
If there is a lot of precipitation, the roof heating system works; as soon as the precipitation stops, all cables are turned off simultaneously. At the same time, the drain heating system continues to operate until the water sensor (meaning melt water) signals. That is, there will be no water in the trays and pipes of the drainage system, and the system will not work either. It turns out that automation controls the entire process and regulates which unit should work and which should not. Typically, a gutter heating system lasts longer because the meltwater running through the gutters and pipes cannot be allowed to freeze.
In principle, there is nothing complicated in the process of laying a cable system. The main thing, as mentioned above, is to correctly distribute the sections and nodes, and also securely fasten the cable. The photos above show several mounting methods, although this is not the only option. Melting snow and water flow are quite serious loads at low temperatures outside. So the fastening must be carried out in accordance with all the rules, taking into account the requirements of the operating conditions.
Let us add that, having understood the layout of the heating wires and taking into account some technical aspects, you can carry out the installation yourself.
Installation of automation in the panel
Control of the heating system is done in the control panel located in the room. The entire system is thoroughly checked and if there are problems, they are eliminated. The entire system must be thoroughly examined before use. After everything has been thoroughly checked and the problems have been resolved, you can connect the thermostat and the entire system.
Heating of roofs and gutters is necessary for houses located in climate zones where significant amounts of snow fall. Under its weight, the roof structure and drainage system may collapse. This problem is especially relevant for private houses that have a heated room under the roof. This design leads to active melting of snow in the ridge area and the formation of ice build-ups on the edge of the roof and in the storm drain system.
Means for heating gutters and roof overhangs
To prevent the formation of ice, various systems for heating gutters and roofs are currently used, but almost all of them are based on the use of a special heating cable and automation equipment.
Let's take a closer look at what types of heating cables and control equipment exist, and which ones would be preferable for selection.
Which heating cable to choose
There are two main types of heating cables for roofs and gutters:
Resistive cable. In practice, it is a regular cable consisting of a metal core and insulation. A resistive cable has constant resistance, constant heating temperature during operation and constant power. Heating of the cable occurs from a closed circuit connected to electricity.
Design (diagram) of a resistive heating cable
Self-regulating cable for heating gutters and roof overhangs is more technologically advanced. It consists of a heating self-regulating element (matrix) that reacts to the temperature of the environment (drainpipe) and changes its resistance and, accordingly, the degree of heating depending on this, as well as an insulating shell, braid and outer shell.
Each type of heating cable is capable of providing equally effective heating of the roof and gutters. However, each of them has its own unique advantages. Thus, the main advantage of a resistive cable is its much lower price compared to a self-regulating one. At the same time, the second type is more efficient in terms of energy consumption and is unpretentious to installation conditions.
As the outside temperature rises, the number of current-carrying paths in the cable matrix decreases, due to which the power and amount of electricity consumed decreases. The temperature of the self-regulating cable also decreases. All this avoids the need to use a temperature sensor that automatically regulates the cable.
Advice from a professional: The most effective in terms of cost and quality ratio is considered to be a combined heating cable system. Typically, inexpensive resistive cables are used in the roofing portion of the system, while heating of gutters and gutters is provided by self-regulating cables.
Design (diagram) of the self-regulating heating cable Devi
As for calculating energy consumption and choosing the power of heating cables, the norm for resistive-type products is a cable with a power in the range of 18-22 W per linear meter, for self-regulating ones - 15-30 W per meter. However, it should be taken into account that if there is a drainage system made of polymer materials, the cable power should not exceed 17 W per linear meter, otherwise there is a risk of damage to the drainage due to excessively high heating temperatures.
Composition of a heating system for drainage and roofing
In addition to the heating cables themselves, heating systems also consist of the following main components:
- Fastening elements.
- Control panel, usually consisting of:
- input three-phase circuit breaker;
- residual current devices, usually 30mA sensitivity;
- four-pole contactor;
- single-pole circuit breakers for each phase;
- thermostat control circuit protection circuit breaker;
- signal lamp.
Distribution network components:
- power cables used to power heating cables;
- signal cables connecting thermostat sensors to the control unit;
- mounting boxes;
- couplings that ensure tightness of connections and ends of all types of cables.
Heating cable connection diagram
Thermostat. The operation of the cable heating system can be adjusted using two types of devices:
- Actually, the thermostat. This device is designed to operate the heating system in a given temperature range. Typically the operating range is set within -8..+3 degrees.
- Weather stations. In addition to a certain temperature range, the weather station is capable of monitoring the presence of precipitation and its melting on the roof. The station includes not only a temperature sensor, but also a humidity sensor, and some weather stations are equipped with both a precipitation sensor and a melting (humidity) sensor.
When using a conventional thermostat in a cable system, the user will need to independently turn the system on in the presence of precipitation and turn it off in the absence of it. The weather station allows you to fully automate the process of system operation and even program time delays for its shutdown. However, in terms of cost, conventional thermostats are significantly more profitable.
The anti-icing system is “on guard” – the roof is in order!
The anti-icing system for roofs and gutters is a complex of elements that prevent the formation of crust, ice and snow debris on the roof in any weather. The system includes heating devices for the roof gutter and eaves, a temperature control subsystem, a current distribution box and a set of fastening parts:
The main element of the system is the heating cable. Its structure is similar to a conventional electrically conductive wire, with a fundamental difference - the cable core (or one of the cores) converts electricity into heat. Warm wire prevents snow and ice from accumulating on eaves and in drainage systems. Thus, your roof receives guaranteed protection from icicles, ice crust, snow and the corresponding destructive consequences, and you and all household members have the opportunity to safely walk near the roof of your house.
Which heating cable to choose?
In order for the roof anti-icing system to work effectively and for as long as possible, experts advise paying attention to the following points when purchasing it:
- Reliable moisture resistance and UV resistance of the main cable;
- Integrity and tightness of the outer layer of the cable and electrical box;
- Thermal resistance of all materials from which the system elements are made;
- Mechanical stability of the cable and fasteners.
You can purchase cables in ready-made sections or coils. Ready-made sections are the best option for standard roofing structures. Adaptation systems formed from coils of cable to match the shape and texture of the roof will help equip the eaves of complex roofs.
There are two main types of heating cables: resistive and self-regulating. Which one is right for you? To answer this question, let's look at each type separately.
I. Resistive cable for drain heating
This is the traditional and most affordable heating cable option. Heating is evenly distributed along its entire length.
Resistive cables can be series or zone. The first are a copper core (or wires) covered with a layer of insulation. They are easy to operate, easy to install and affordable. A zone cable is an improved version of a serial cable. It has two cores, connected in places by a spiral wire, which forms independent zones. The “plus” of this structure is that when one zone burns out, the others continue to work. Once a serial cable burns out, it cannot be repaired.
Serial cables:
Zone cables:
It is better to use resistive cable on a homogeneous surface (eaves, gutter, pipe) without overlaps. An important point that should be taken into account when purchasing it is that the high energy consumption is ultimately not justified by the low price.
II. Self-regulating cable in a roof anti-icing system
The more complex structure of this wire determines its increased efficiency and reliability. The cable has two cores, between which a semiconductor matrix is laid. It is this layer that allows the system to adapt heat to different sections of the cable, changing resistance under the influence of ambient temperature. The internal and external layers of the cable are made of modern high-tech materials and are resistant to mechanical, thermal and other influences:
This self-regulating ability helps save a significant amount of energy and makes the system practical and durable. These advantages can be considered as compensation for the high price of a self-regulating anti-ice system.
How to mount the system
In order to be fully equipped to begin installing the system, let’s look at a clear example of a heating scheme for a roof and gutters and adhere to a certain sequence.
First, we select the location for installing the automation and control system indoors. Often the main controller and protection devices must be located near the electrical distribution panel. This is done for ease of installation, and allows you to reduce the length of cable and wire routes and increase the reliability of the circuit. Connecting the controller will not be difficult, since all its pins and terminals are signed and marked. A person who is familiar with the basics of electrical wiring and knows how to handle tools will quickly find his bearings and do such work with his own hands.
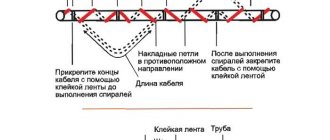
The installation of a heating conductor in gutters should be considered based on the fact that it is divided into four component parts (gutter, waste pipe, funnel and water inlet), each of which must be heated. First, you need to feed a loop of wire into the drainpipe and screw it into the water inlet using steel clamps. Then we attach the cable to the bottom of the drain pipe as high as possible, placing it at a distance of 5 cm from each other in the part of the pipe located closer to the house (melt water usually flows through it). In the same way we attach the conductor at the top near the bottom of the funnel
It is important that if the pipe consists of several collapsible parts, then in each of them it is necessary to organize an intermediate fastening of the heating system. In the funnel, the cable is laid in the shape of a ring and screwed with clamps in this position. Moving on to the gutter
In it, the wires need to be placed on opposite side surfaces. Next, the ends are connected in the distribution junction box to the terminals
Let's move on to the gutter. In it, the wires need to be placed on opposite side surfaces. Next, the ends are connected to the terminals in the distribution junction box.
Advice! The self-regulating conductor does not have to be laid in a loop. Installation into one core is suitable, the end of which is insulated with a special plug.
As an example of installing a heating element, let's take a flat roof. The cable is laid in the lower part along the perimeter of the water drainage line and laid in the internal funnel of the drain at a distance of 400 mm, if the drain pipe is located in the building. If the pipe is installed outside, then a “dripping loop” scheme is used. Where the parapet and roof touch, the laid conductor should have a power of about 60-70 W/m2. It is also necessary that a wire be laid around the heated funnel at a distance of 2 m as shown in the figure below:
The sequence of cutting the heating wire is shown in the photo:
Finally, when the previous steps are completed, the control system for heating the gutters and roof is connected to the heating elements using power cables through adapter junction boxes. Also, all the necessary sensors and protection equipment are connected.
You can clearly see the installation process of the anti-icing system in the video:
That's all I wanted to tell you about how to heat the roof and gutters with your own hands. We hope that the instructions provided were useful and interesting for you!
Self-regulating wire
This cable has a more complex structure. The wire has 2 cores, around which there is a matrix. It is she who records the environmental conditions and based on this the power is controlled.
Advantages of a self-regulating cable:
- no additional control panel required;
- no need to install sensors;
- the circuit does not overheat;
- It is possible to divide the wire into pieces of 20 cm.
Even if the wire is twisted during installation, this will not affect its functionality in any way.
The downside of this self-regulating roofing cable is its price. It is many times larger than a resistive wire. But such a cable will be much cheaper to maintain. Another disadvantage is the possible breakdown of the self-regulating matrix and the entire system as a whole.
The instructions for laying the cable yourself are very simple, with the help of it you can complete the entire process yourself.