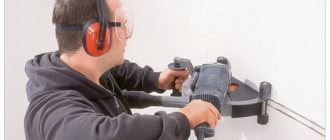
Installing a sleeve for pipe passage through ceilings should be done in certain cases, for example, when the pipeline is subject to thermal expansion.
And the need to install the sleeve must be taken into account at the highway planning stage. All nuances of use should be taken into account not only when laying a new pipeline, but also when replacing old communications. The area where the pipeline is laid through the walls and ceiling becomes the main point of deformation stress. In such places, the pipe is exposed to the chemical environment and mechanical loads. Due to such circumstances, in the SNIP building codes, pipelines are equipped with additional structural parts, which are called sleeves. What they are and why they need to be installed will be discussed in detail below.
The device for passing the pipe through the wall is an important element, and it performs the following functions:
- mechanical;
- protective;
- waterproofing;
- fire protection;
- sanitary.
In addition, this element can increase the service life of the highway and facilitate the replacement of structures.
The sleeve is arranged as follows:
- a case for which a steel structure is used;
- packings made of soft, fire-resistant material.
The sleeve for the passage of the pipe is made in the form of tubular products. And the free space between the structures is filled with fire-resistant material. It must not be rigid in structure. This is necessary so that when the pipe heats up, it will begin to change its dimensions, and if there is hard material, it may become damaged.
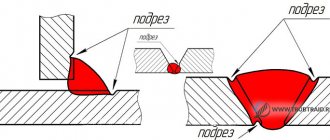
The diagrams provided above show that the highway can pass through any building in two planes. Thus, the ceilings between floors are crossed by vertical networks (risers), and the walls are crossed by wiring running horizontally. The provided figure shows an example of the arrangement of a part, first in the ceiling, and then in the wall.
In both the first and second cases, the cover of the part must be firmly secured. The tubular product must move freely through it. The diameter of the cover in one and in the second case must be 10 mm larger than the diameter of the pipeline. And the cover itself is securely fastened in the passage hole.
Installation and caulking of the main line cartridge is carried out by calculating the height that the screed has. The length of the sleeve should be 20 mm greater than the thickness of the ceiling. If this point is not observed, then there is a risk of water entering the floors located below.
What parts does an outdoor chimney consist of?
As already mentioned, the most popular and most reliable of the street ones are sandwich chimneys. A standard pipe sleeve must be routed through wood with particularly careful fire protection, which only sandwich technology can provide. At the same time, there should be no pipe joints at the point of transition through the wall! So, what parts does an outdoor chimney usually consist of, which is led out through the wall? This:
- Pipes;
- Tees;
- Elbow for bending the pipeline in the desired direction;
- Chimney support;
- Clamps. Distance between clamps when attaching to the wall: 60-100 cm;
- Tee with revision, i.e. door for cleaning the chimney;
- A condensate collector with a spout for removing it.
Purpose
Passing through the ceilings of any structure, the pipeline is exposed to heavy mechanical loads and chemicals. Additional structural elements – sleeves – help reduce the influence of an aggressive environment.
Sleeves for sewer pipes, passage through the ceiling is an important structural element, which has a protective function against the following factors:
- Mechanical impact from the structure.
- The destructive influence of water and open fire.
- Prevents the formation of harmful microorganisms.
The installed pipe product is designed to perform the following tasks:
- Provide protection against erosion in the event of an unexpected accident in the form of sewer pipe leaks. Thanks to the cartridge, the building will not be damaged in an emergency.
- The protective element must protect the surface of the pipeline in the area of passage through the ceiling from mechanical stress, deformation and the influence of an aggressive environment.
- The sewer liner protects against temperature changes that have a destructive effect on the main line and the structure.
- The installed pipe product allows you to quickly dismantle the sewer pipe without causing damage to the main structure.
Types of ceiling penetrations
When crossing the ceiling, it is necessary to protect the “pie” materials from heat, and also somehow fix the pipe in a certain position. This task is accomplished by a ceiling cutout or, as it is also called, a “passage unit.”
The pass-through units are industrially manufactured. They are a box made of metal or mineralite, to which a stainless or galvanized steel plate is attached on one side. A hole is made in the middle of this assembly into which a sandwich is inserted. The plate on the side of the room closes the hole in the ceiling, decorating it. It also serves as a support for the heat insulator, which is used to fill the gap between the pipe and the floor beams for better thermal insulation.
This is a mineralite ceiling penetration. View from the attic
There is no disagreement regarding what material to use for the penetrations in the bathhouse: only stainless steel. The fact is that at temperatures that are typical for steam rooms, galvanization releases far from the most useful substances. Therefore, there is only one option: stainless steel.
Everything is installed simply. If the ceiling was made without taking into account the passage of the pipe, a square hole is cut in the right place (between the beams), which is 1-2 cm smaller than the size of the decorative panel. Beams and boards are covered with a layer of thermal insulation. If available, you can nail down strips of mineralite, basalt or asbestos cement cardboard (asbestos is harmful, so use it only as a last resort), just a strip of stone wool insulation. In some cases, padding of the insulation with metal strips is required (when it is needed, see below).
You can't do that - you had to cut a square hole. And the lining on the ceiling near the pipe is already charred...
When installing a pipe on a stove, the device is placed on a straight section that will cross the ceiling. The passage unit simply rises to the desired level. A strip of thermal insulation is placed under its edges that touch the ceiling boards, then everything is fixed with self-tapping screws. In many units, manufacturers even make perforations for self-tapping screws, so even this is not a problem.
The configuration of these products varies. Sometimes a metal cylinder is made around the hole for the pipe. The edges of the decorative plate protrude significantly beyond this cylinder. When installing a pass-through unit of this type, the hole is still cut in a square shape. A circle is also possible, but from the pipe to its edge there must be a distance of at least 130 mm if the pipe is insulated, and 250 mm if it is without insulation
With this option, please note: the size of the plate should be sufficient to mask the hole. In addition, with this form of passage through the ceiling, it is imperative to protect the wood of the ceiling not only with heat insulators, but also to cover it with strips of metal
Pass-through units through the ceiling come in different configurations
There are passage units in which there is no cylinder around the pipe, but there are outer sides around the perimeter. They are made of metal, and can also be made of mineralite. If the sides are made of metal, the edges of the cutout in the ceiling must be lined with a heat insulator (for example, basalt cardboard or the same mineralite). If the sides are made of mineralite, then they themselves are a good heat insulator. So additional thermal insulation of the edges of the cutout is not necessary (but you can play it safe).
Material
To make a sleeve for sewer pipes, a passage through the ceiling can be used:
- Metal. Steel products are characterized by strength, reliability and durability. They can be installed in any ceiling. Steel products can withstand loads of more than 100 kg per 1 m2. Pipeline protection can be installed directly at the construction site and at one of the stages of manufacturing a reinforced concrete structure. Before concreting, the edges are sanded to prevent damage to the polypropylene pipeline.
- Polymer materials. A polymer sleeve is used to arrange the sewerage passage through the ceiling between floors. The material is resistant to wear and low temperatures.
The most important installation rules
- If you are planning to install a chimney through a wooden wall with your own hands, take the trouble to accurately calculate the diameter of the pipe from the beginning. This value is determined by the boiler power and other characteristics. Incorrect calculation leads to poor traction or large excess fuel consumption;
- Remember that the sleeve has a hole only for the chimney pipe! There should be no communications nearby;
- Any chimney outlet into the wall must strictly observe an angle of 90 degrees, that is, it is advisable to make the chimney outlet through the wall strictly horizontal, and it should not be longer than 1 m. Optimally, a 60-centimeter horizontal transition;
- All vertical structures must be strictly perpendicular, and this is the most important answer to the question “how to bring a chimney through a wall”;
- No matter what the wall is made of, and even more so, installing a chimney through a wall in a wooden house with your own hands requires strict adherence to fire safety rules! The wall must be reliably protected with fireproof and heat-insulating material.
§ 4. PIPELINES FROM STEEL WATER AND GAS PIPES
1. Laying a pipeline from ready-made units. 2. Installation of sleeves at the intersection of the pipeline with ceilings and walls. 3. Installation and sealing of fasteners. 4. Flushing the pipeline. 5. Chlorination of the pipeline (gr. 3-5).
Table 16-7
| Name of cost elements | Unit | Heating | Water supply | Gas supply | ||||||
| Pipeline diameter, mm, up to | ||||||||||
| 40 | 50 | 40 | 50 | 80 | 40 | 50 | ||||
| 1 | 2 | 3 | 4 | 5 | 6 | 7 | ||||
| 1. Labor costs | person-hour | 34,5 | 43,2 | 37 | 47,6 | 57,1 | 33,1 | 41,7 | ||
| 2. Salary | rub. | 21,1 | 26,5 | 22,5 | 29 | 34,7 | 20,7 | 26,1 | ||
| 3. Machines | “ | 1,29 | 2,59 | 1,36 | 3,37 | 3,98 | 1,5 | 2,88 | ||
| 4. Pipelines with fasteners and sleeves | m | 100 | 100 | 100 | 100 | 100 | 100 | 100 | ||
| 5. Coupling fittings | PC. | According to design data | ||||||||
| 6. Other materials | rub. | 1,49 | 1,74 | 1,63 | 2,6 | 4,62 | 1,38 | 1,44 | ||
1. Laying a welded pipeline from ready-made units (groups 1-5) and from individual pipes with the installation of bends (groups 6-9). 2. Installation and sealing of fasteners. 3. Pipeline flushing with chlorination.
Table 16-8
| Name of cost elements | Unit | Pipeline diameter, mm, up to | ||||||||||
| 50 | 65 | 100 | 150 | 200 | 250 | 300 | 350 | 400 | ||||
| 1 | 2 | 3 | 4 | 5 | 6 | 7 | 8 | 9 | ||||
| 1. Labor costs | person-hour | 66,3 | 76,7 | 86,3 | 124 | 160 | 205 | 234 | 266 | 295 | ||
| 2. Salary | rub. | 41,3 | 47 | 53,2 | 73,5 | 94,1 | 124 | 142 | 161 | 178 | ||
| 3. Machines | “ | 4,6 | 5,21 | 6,78 | 9,07 | 14,8 | 23,1 | 27,7 | 33,9 | 38,2 | ||
| 4. Pipelines | m | 100 | 100 | 100 | 100 | 100 | – | – | – | – | ||
| 5. Steel pipes | “ | – | – | – | – | – | 93 | 93 | 94 | 95 | ||
| 6. Steeply curved bends | PC. | – | – | – | – | – | 11 | 9 | 7 | 5 | ||
| 7. Mounts | kg | According to design data | ||||||||||
| 8. Other materials | rub. | 2,8 | 3,44 | 4,24 | 9,61 | 12,8 | 38,4 | 41 | 45,2 | 48,1 | ||
1. Laying a piping pipeline from ready-made units. 2. Pipeline flushing with chlorination.
Table 16-9
| Name of cost elements | Unit | Pipeline diameter, mm, up to | |||||||
| 40 | 50 | 80 | 100 | 150 | 200 | ||||
| 1 | 2 | 3 | 4 | 5 | 6 | ||||
| 1. Labor costs | person-hour | 45 | 60,6 | 86,4 | 89 | 132 | 162 | ||
| 2. Salary | rub. | 28,4 | 37,2 | 52,5 | 53,7 | 76,9 | 93,8 | ||
| 3. Machines | “ | 1,22 | 3,43 | 5,2 | 6,31 | 8,97 | 13,3 | ||
| 4. Piping pipelines with flanges | m | 100 | 100 | 100 | 100 | 100 | 100 | ||
| 5. Fittings | PC. | According to design data | |||||||
| 6. Other materials | rub. | 0,73 | 1,58 | 2,23 | 3,06 | 6,65 | 9,36 | ||
1. Fitting and welding flanges to the ends of pipes. 2. Connection of flanges with bolts and gaskets.
Table 16-11
| Name of cost elements | Unit | Diameter of pipes and flanges, mm, up to | ||||||
| 50 | 100 | 200 | 300 | 400 | ||||
| 1 | 2 | 3 | 4 | 5 | ||||
| 1. Labor costs | person-hour | 0,92 | 1,39 | 2,31 | 4,14 | 5,85 | ||
| 2. Salary | rub. | 0,59 | 0,88 | 1,44 | 2,67 | 3,76 | ||
| 3. Machines | “ | 0,12 | 0,17 | 0,28 | 0,58 | 0,81 | ||
| 4. Steel flanges | PC. | 2 | 2 | 2 | 2 | 2 | ||
| 5. Bolts with nuts and washers | kg | 0,62 | 1,37 | 2,48 | 4,01 | 6,62 | ||
| 6. Other materials | rub. | 0,07 | 0,17 | 0,43 | 1,43 | 2,93 | ||
The main stages of installing a sandwich chimney
How to install a chimney quickly? The answer is simple: buy a sandwich pipe. This material is an ideal solution for a private home, especially if you do not have much experience in construction. You don’t even need an assistant to install this material; you can complete all the steps yourself.
We connect all structural elements
The sandwich pipe has one design feature - a ribbed coating on both sides. This device allows you to connect elements to each other by simply inserting different parts into one another. To drain condensate that will arise during operation, additional tees should be installed.
Series connection of the chimney pipe
All joints must be fastened efficiently and reliably with steel clamps. To connect the starting part to a boiler, fireplace or other heating device, you should purchase an appropriate adapter with two different diameters.
A simple method is used to connect internal products. Take one inner pipe out to a distance of 10 cm, connect it to the second (using a steel clamp of a smaller diameter) and push it inside the outer pipe. For greater tightness, it is not enough to use only clamps; you will also need a special sealant designed to work at high temperatures.
We will secure the floors
When installing a chimney made of sandwich pipes or other material through a wall, fire safety rules should be taken into account. If it is concrete or brick, then it will be enough to simply treat the joint with sealant. It is much more difficult in wooden houses, where contact of the chimney with a wooden wall will lead to a fire.
Sealing the pipe passage
How to secure the junction of the drainage system with the ceiling:
- Use galvanized sheet, which should be fixed to the ceiling. A hole is cut in the middle of the sheet and a chimney is inserted into it. Galvanized sheet does not heat up completely and does not transfer excessive heat to the wooden surface.
- Treat the distance from the pipe to the nearest wooden surface with insulation. Almost all modern insulation materials are heat-resistant and do not ignite at high temperatures.
Instead of galvanized sheet, many builders use asbestos material. It also has increased resistance to high temperatures.
We bring the pipe to the roof
Installing a chimney from sandwich pipes and laying it through the roof is the most painstaking part of the work. Here you will need not only to apply physical strength, but also to calculate everything accurately and correctly.
Protective structure for chimney pipe
The procedure for bringing the chimney to the roof:
- Make a hole in the roof. To make it neat, the place should be marked in advance using a construction marker. There is no need to rush, because a crooked hole will not add to the aesthetics of the entire structure. It is most convenient to cut out the roof from its inner part.
- An under-roof sheet is installed from the inside, securely fastened, and a roof trim is installed on the outside.
- All that remains is to bring the outer part through the hole and securely seal the edges with sealant.
Now you can once again check the quality of the design, and as a final step, remove all the protective film. You can safely light up the boiler or fireplace and look at all the joints and holes treated with sealant.
Description of the problem
When laying water supply pipes, heat supply pipes, cables through walls, foundations, building floors, well walls and in many other similar cases, gaps are inevitable: - between the working pipe and the hole in the building structure; - in the case of laying the working pipe through the sleeve (case) - between the inner surface of the sleeve and the working pipe;
First of all, water penetrates into the room from a poorly sealed gap (space) between the working pipe and the inner surface of the sleeve (hereinafter referred to as gap 1). Then, as the metal sleeve corrodes and due to the lack of adhesion of the metal to the wall material, a leak begins at the point of surface contact of the outer surface of the sleeve with the wall (hereinafter referred to as gap 2). In practice, as a rule, it is this gap that causes flooding of basements and cannot be sealed without major work.
Rice. 1. Drawing of the ActiveRing sealing unit. Shown: sleeve, support-guide ring, annulus seal, waterproofing collar, sealing collar
| Rice. 2. View of the installed sealing unit | Rice. 3. The passage of a heat supply pipe in a sleeve through the foundation of a multi-storey residential complex. Leakage through the gap between the inner surface of the liner and the working pipe. The remains of the casing are visible; below, under the end of the casing, there is a barrel installed to collect groundwater flowing from the casing. The passage of the second heat supply pipe has a similar appearance. |
| Rice. 4. Leaks, standing water, flooded thermal chambers |
Carrying out installation
When carrying out installation, they are guided by the requirements of SNiP.
Technological hole
- Smoke ducts are allowed to be attached (this option is discussed in the article).
- The technological hole in the wall in diameter (dimensions) must correspond to table K (SNiP 41-01-2003).
- The minimum distance from the chimney to the wall is 260 mm for combustible walls and 200 mm for walls made of bricks, blocks, and concrete.
- The free space should allow for the laying of a layer of non-flammable heat insulator, ensuring a surface temperature of less than 40°C.
Channel location
Requirements for gas outlet channels:
- The height of the pipe cannot be less than 5 m and lower than the height of the roof ridges of attached buildings.
- It is allowed to route pipes at an angle of up to 30° to the vertical line with a distance from it of more than 1 m.
- The inclined sections are made smooth-walled inside, without narrowing, the internal cross-sectional area is no less than that of vertical pipes.
- The length of the horizontal section is no more than 1 m.
- The number of bends is no more than three.
After installing the horizontal section, the hole in the wall is insulated and covered on both sides with a screen.
Fastening metal sheet screen
A sheet screen on the hole is needed to protect the thermal insulation from getting wet, direct sunlight, and to prevent the insulating material from falling out. Screens are installed inside and outside.
Collection of structural elements
The structure is assembled according to the drawing. When connecting elements, follow the manufacturer’s recommendations:
- Special brackets are used for mounting to the wall.
- Bypassing the roof overhang is performed at angles of 30° or 45°.
- The top of the pipe must be decorated with an umbrella or deflector, which should not interfere with the free exit of combustion products.
- The horizontal and outer vertical sections are connected through a tee with an opening lower hole to remove soot, soot, and soot.
Fireproof box and thermal insulation
Single-walled pipes of the house are protected with a thermal insulation layer.
Several options are possible:
- construction of a fire-resistant box around the pipe;
- wrapping with thermal insulation and then a second layer of metal.
When choosing the second option, it makes sense to calculate the economic benefits compared to sandwich products.
GENERAL PROVISIONS
1.1.
When constructing new, expanding and reconstructing existing pipelines and water supply and sewerage structures, in addition to the requirements of projects (detailed designs)** and these rules, the requirements of SNiP 3.01.01-85*, SNiP 3.01.03-84, SNiP III-4- must also be observed 80* and other rules and regulations, standards and departmental regulatory documents approved in accordance with SNiP 1.01.02-83. _______________** Projects (work projects) – in the following text “projects”. 1.2. Completed pipelines and water supply and sewerage structures should be put into operation in accordance with the requirements of SNiP 3.01.04-87.
Installation of a chimney
There are two ways to exit the chimney through the wall:
- The pipes inside the room must be raised a short distance from the ceiling, where they are brought outside.
- From the boiler nozzle, pipes lead immediately through the wall in a horizontal position. The advantage of this method is that fewer bends are formed, and this has a positive effect on the performance of the chimney.
Assembling a sandwich pipe when installing the vertical part of a chimney can be done in two variations - “smoke” or “condensate”.
Assembling a chimney “for smoke” and “for condensate”
When installing a pipe along the smoke, gas and combustion products move upward, but here you will have to deal with such a negative aspect as the formation of condensate that accumulates in the pipe. This method has gained popularity in cases where the chimney is assembled through the roof. Here, almost the entire pipe is located in the house, and not much condensate is formed.
Condensate installation is an installation method in which the pipe with its expanded end is directed upward.
With this assembly, the condensate simply flows through the pipe into the glass. The disadvantage of this method is that smoke can leak out if the areas at the joints are not properly sealed.
9.2. Safety valves
Table 16-12
| Name of cost elements | Unit | Diameter of fittings and flanges, mm, up to | |||||||||
| 50 | 100 | 150 | 200 | 250 | 300 | 350 | 400 | ||||
| 1 | 2 | 3 | 4 | 5 | 6 | 7 | 8 | ||||
| 1. Labor costs | person-hour | 1,51 | 2,67 | 6,03 | 7,76 | 9,59 | 11,4 | 13,8 | 15,1 | ||
| 2. Salary | rub. | 0,97 | 1,71 | 3,68 | 4,75 | 6,1 | 7,19 | 8,74 | 9,53 | ||
| 3. Machines | “ | 0,13 | 0,29 | 0,51 | 0,76 | 1,08 | 1,38 | 1,85 | 2,24 | ||
| 4. Fittings | PC. | 1 | 1 | 1 | 1 | 1 | 1 | 1 | 1 | ||
| 5. Steel flanges | “ | 2 | 2 | 2 | 2 | 2 | 2 | 2 | 2 | ||
| 6. Bolts with nuts and washers | kg | 1,1 | 2 | 3,91 | 4,96 | 7,74 | 8,02 | 8,02 | 13,2 | ||
| 7. Other materials | rub. | 0,07 | 0,2 | 0,37 | 0,74 | 1,27 | 1,81 | 3,26 | 3,67 | ||
| Note. When installing flanged fittings on pipelines made of cast iron pressure pipes, steel flanges are excluded from the standards. | |||||||||||
Table 16-13
| Name of cost elements | Unit | Single lever | Double lever | Self-polishing | ||||
| Diameter of valves and flanges, mm, up to | ||||||||
| 50 | 100 | 80(50x2) | 150(100x2) | |||||
| 1 | 2 | 3 | 4 | 5 | ||||
| 1. Labor costs | person-hour | 1,92 | 3,03 | 3,89 | 8,6 | 2,38 | ||
| 2. Salary | rub. | 1,21 | 1,9 | 2,45 | 5,21 | 1,52 | ||
| 3. Machines | “ | 0,1 | 0,2 | 0,18 | 0,37 | 0,18 | ||
| 4. Valves | PC. | 1 | 1 | 1 | 1 | 1 | ||
| 5. Steel flanges | “ | 1 | 1 | 1 | 1 | 1 | ||
| 6. Bolts with nuts and washers | kg | 1,24 | 2,02 | 1,3 | 3,91 | – | ||
| 7. Other materials | rub. | 0,05 | 0,12 | 0,11 | 0,22 | 0,09 | ||
Table 16-14
| Name of cost elements | Unit | Diameter of valves and flanges, mm, up to | ||||||||
| 50 | 100 | 150 | 200 | 250 | 300 | 400 | ||||
| 1 | 2 | 3 | 4 | 5 | 6 | 7 | ||||
| 1. Labor costs | person-hour | 0,95 | 2,05 | 3,38 | 4,69 | 7,8 | 9,19 | 11,8 | ||
| 2. Salary | rub. | 0,62 | 1,3 | 2,11 | 2,92 | 4,9 | 5,78 | 7,42 | ||
| 3. Machines | “ | 0,07 | 0,12 | 0,22 | 0,32 | 0,56 | 0,75 | 1,07 | ||
| 4. Valves | PC. | 1 | 1 | 1 | 1 | 1 | 1 | 1 | ||
| 5. Steel flanges | “ | 1 | 1 | 1 | 1 | 1 | 1 | 1 | ||
| 6. Bolts with nuts and washers | kg | 0,62 | 1,01 | 2,48 | 2,48 | 3,87 | 4,01 | 6,62 | ||
| 7. Other materials | rub. | 0,06 | 0,14 | 0,23 | 0,42 | 0,65 | 0,94 | 1,49 | ||
Table 16-15
| Name of cost elements | Unit | Diameter of valves and flanges, mm, up to | |||||||
| 25 | 50 | 80 | 100 | 125 | 150 | ||||
| 1 | 2 | 3 | 4 | 5 | 6 | ||||
| 1. Labor costs | person-hour | 1,02 | 1,51 | 2,6 | 4,47 | 5,73 | 7,09 | ||
| 2. Salary | rub. | 0,63 | 0,93 | 1,59 | 2,59 | 3,31 | 4,11 | ||
| 3. Machines | “ | 0,1 | 0,16 | 0,29 | 0,37 | 0,46 | 0,61 | ||
| 4. Valves | PC. | 1 | 1 | 1 | 1 | 1 | 1 | ||
| 5. Steel flanges | “ | 2 | 2 | 2 | 2 | 2 | 2 | ||
| 6. Bolts with nuts and washers | kg | 0,6 | 1,24 | 1,3 | 2,74 | 2,86 | 4,96 | ||
| 7. Other materials | rub. | 0,06 | 0,08 | 0,18 | 0,22 | 0,31 | 0,37 | ||
1. Installation of fire and watering valves. 2. Installation of a cabinet (column 1). 3. Assembling and laying the fire hose (column 1).
Table 16-16
| Name of cost elements | Unit | Cranes | |||
| firefighters | watering | ||||
| 1 | 2 | ||||
| 1. Labor costs | person-hour | 3,14 | 0,31 | ||
| 2. Salary | rub. | 1,8 | 0,19 | ||
| 3. Machines | “ | 0,08 | 0,01 | ||
| 4. Valves | PC. | 1 | 1 | ||
| 5. Hemp fire hoses | m | 10 | – | ||
| 6. Hand barrels | PC. | 1 | – | ||
| 7. Heads for connecting sleeves | “ | 3 | 2 | ||
| 8. Lockers for fire hoses | “ | 1 | – | ||
| 9. Other materials | rub. | 0,72 | 0,04 | ||
| Notes: 1. When making intermediate calculations, labor costs and wages for installing a locker are accepted in the amount of 80% of the norms (column 1). 2. If the length of the fire hose is more than 10 m, the actual difference in the length of the hose should be added to the standards of clause 5 (column 1). | |||||
Tags: sleeve, passage, wall, pipeline, through
« Previous entry
General conditions for passing through a wall
In fact, the arrangement of a passage through a wall or through a roof can be done at the design stage. That is, the designer has every opportunity to include in the documentation the junction of the chimney through the wall. At the same time, he must and will be guided by the requirements of GOST, SNiP and SP for fire safety. Thus, the homeowner can be confident that this unit will be completely safe.
When crossing a wall, it is necessary to take into account that there should be no engineering structures near the pipe that are unprotected from heat. The minimum distance to them should be about 400 mm. If it is not possible to ensure this distance, then measures must be taken to additionally insulate the pipe.
The diagram illustrates how to pass a sandwich pipe through a wall
Passage through the wall of a log structure
Before laying a chimney through a wall made of logs or timber, it is necessary to prepare a hole. If the building is just being built, then, directly when assembling the crowns of the log house, using a gas or electric saw, cut a piece of log or timber in the laid crown. Its size must exceed the diameter of the chimney.
If you decide to go through the wall using a round hole, then before you start making it, it makes sense to drill a center hole; its presence will allow you to drill using core drills or “ballerina drills”.
Note: When arranging a junction through the wall of a frame-panel house, it makes sense to perform preliminary drilling and then mark it. The hole can be made using a ballerina or an electric jigsaw.
Passage through the wall of a building made of logs is carried out in the following ways:
- you can use a telescopic unit, that is, several pipes made of heat-insulating material and with a diameter exceeding the chimney. In this case, the pipes must be inserted into each other;
- the chimney can be routed through the wall, without the use of additional pipes, but the space between the walls and it must be lined with thermal insulation materials, such as basalt wool.
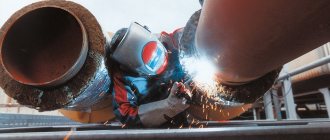
Passage through a brick wall
For arranging a passage through a wall built of brick or blocks with different fillers. Before carrying out its penetration, it is necessary to carry out markings. For these purposes, it is advisable to use a laser measuring tool. In this case, errors will be minimized. When making a hole, you must remember that such deformation of the load-bearing wall can lead to the appearance of cracks. Therefore, builders must take measures to prevent their formation, for example, install a pre-prepared frame in it, which will prevent the wall structure from sagging.
- The installation itself is carried out in several operations:
- a pipe must be installed at the outlet of the boiler;
- install a tee with a valve built into it;
- After installing the tee, pass a sandwich pipe through a pre-prepared hole and connect it to the tee.
The space around the pipe must be filled with fireproof material. It is necessary to install shields at the entrance and exit of the pipe to cover the transition. This shield can be made in several modifications, for example, it can be made of an asbestos sheet and a sheet of stainless or galvanized steel attached to it on top.
Subsequently, the chimney can be assembled like a children's construction set. After the wall has been passed, work begins on attaching the chimney to the wall.
The homeowner, when installing a chimney from sandwich pipes with his own hands, must understand that assembling a gas exhaust system is a very responsible undertaking and the safety of the building structure and the residents living in it largely depends on it.
Traditional solutions
Typically, to seal the gap of the 1st passage of pipes, the following is used: - a heel (woven rope, rope, made of organic or synthetic material, impregnated with an oil-containing solution to improve the sealing properties of the fiber); — sealants; — construction foam; — cement mixtures; - combinations of materials (cabinet and cement mixture);
General disadvantages of using traditional materials for compaction and sealing (cabbage, foams and sealants, cement mixture): - fragility, over time they cake, lose their original volume and elasticity, every spring-autumn period, as a rule, there is a need for work to prevent leaks;
- cannot withstand pressure of more than 2 bar, are squeezed out of the hole, leak; - absorb moisture; - poorly compensate for vibration (water hammer) and other operational loads (temperature changes) on working pipes, which is why gaps and cracks appear in the seal through which moisture seeps in; - if leaks occur, they are beyond repair; cleaning of the interpipe space and their complete replacement are required.
The usual consequences for basements are leaks, containers placed under the ends of the sleeves to collect leaking water, rusty streaks on the walls, standing groundwater, high humidity, corrosion of pipes and metal structures, and in the worst cases, the appearance of fungus and mold. In a humid and warm room, conditions are created for the reproduction of insects, which, through the ventilation system and open doors, enter higher-lying apartments and offices. Thermal chambers are often filled to the groundwater level, even in modern residential complexes.
Prolonged penetration of moisture into premises creates conditions for the formation of mold and mildew, which negatively affect health, as well as the structural elements and decoration of buildings, houses, and their internal contents (equipment, furniture, textiles, etc.). Fighting mold is quite expensive, not environmentally friendly, and often impossible.
We suggest you read: How to deal with mold and mildew on apartment walls, mold remover. How to get rid of fungus on walls
Why should you contact specialists when installing a chimney through a wooden wall?
It is important to strictly maintain the distance from the wall; wood near the chimney is treated with special compounds. It is better to make an exit using ready-made passage units. They can be installed hermetically by specialists with certain skills. Even if you know how to install a chimney through a wooden wall from a fireplace or metal stove, you should not take risks, but entrust the work to professionals
It is important to strictly maintain the distance from the wall; wood near the chimney is treated with special compounds. When thinking about a side chimney, it is important to evaluate the power of the heat generator
If the rules are followed, the chimney will be safe; at low cost, it will be possible to install a fireplace or an additional stove
When thinking about a side chimney, it is important to evaluate the power of the heat generator. If the rules are followed, the chimney will be safe; at low cost, it will be possible to install a fireplace or an additional stove
Fire safety rules
The distance from the brick wall to the chimney is 130 mm. If the structure is wooden, then this parameter increases to 260 mm. When pipes pass in close proximity to rafters or through flammable materials, these places must be insulated.
When using solid fuel equipment, the chimney is equipped with a mesh metal spark arrester, regardless of the material from which the building is constructed. The cell size does not exceed 5*5 mm. In addition, there are other rules:
- the chimney head must be positioned correctly relative to the roof;
- to reduce moisture condensation, the temperature at the outlet of the structure should be 15°C higher than the dew point temperature (60°C);
- if the chimney height is less than 5 m, then the installation of an electrically driven smoke exhaust is required.
The outer wall is separated from the structure by an asbestos-cement sheet or basalt overlay.
Coefficients to estimated standards
| Conditions of use | No. of normative tables | Coefficients to norms | |
| labor costs and wages | machine operation | ||
| 1 | 2 | 3 | 4 |
| 3.1. Laying pipelines at a height from the floor, m: | |||
| St. 3 to 5 | 2, 3, 5 – 13 | 1,05 | – |
| ” 5 ” 8 | 2, 3, 5 – 13 | 1,17 | – |
| ” 8 ” 10 | 2, 3, 5 – 13 | 1,26 | – |
| ” 10 | 2, 3, 5 – 13 | 1,4 | – |
| 3.2. Laying pipelines from steel water-gas, seamless and welded pipes in boiler houses, heating points and pumping units | 7, 8 | 1,26 | – |
| 3.3. Installation of fittings on pipelines made of cast iron pressure pipes | 12 – 14 | 0,7 | 0,6 |
Features of the chimney
Removal of gases through the channel will occur effectively only if the pipe is constructed according to standard dimensions and made of the correct material. These pipe characteristics are selected depending on the type of fuel; the material for the chimney is:
- refractory ceramic bricks;
- asbestos pipes;
- stainless steel;
- sandwich pipes with an inner layer of insulation.
Brick channels are made in the case of a stationary chimney that ensures the removal of gases when heating with wood and coal
To determine the diameter and internal size, the boiler power and the dimensions of the firebox are taken into account. If the calculation is incorrect, reverse draft results or the useful effect of the furnace is significantly reduced. For gas boilers, it is effective to use pipes with two walls, between which insulation is laid
The problem with a chimney for a gas fuel boiler is internal condensation, so insulation will help avoid significant temperature differences
For gas boilers, it is effective to use pipes with two walls, between which insulation is laid. The problem with a chimney for a gas fuel boiler is internal condensation, so insulation will help avoid significant temperature differences.
It is allowed to install one chimney for two operating heating units, if the internal size of the chimney, raised to the required height above the roof ridge, allows combustion products to be easily removed from both stoves. The cutting section pipe is about 0.8 m high.
Dependence of draft on pipe height
The importance of the chimney in the heating system cannot be overestimated. Attempts to save on an extra meter of pipe will lead to cold walls during the heating season and excessive waste of fuel. The danger of carbon monoxide is that it is invisible and undetectable, but can be fatal.
The danger of carbon monoxide is that it is invisible and undetectable, but can be fatal.
A narrow chimney of great height relative to the ridge will accelerate the smoke masses, thus reducing heat transfer. To maintain the desired temperature in the room, you will have to add fuel in excess of the norm. A wide channel of small height will allow smoke and gases to rotate arbitrarily in the pipe, their movement will slow down, and most likely a reverse flow of gases will result. Most often this happens in autumn or spring, when the temperature difference between outside and inside decreases and smoke, without overcoming resistance, is drawn into the room through the firebox.
Chimney location and height
To correctly select the height of the chimney relative to the roof ridge, you need to take into account the location of nearby structures. For an outdoor home, the draft indicators will be good, since there is constant blowing and pick-up of smoke masses. If we talk about a small building surrounded by high-rise buildings, then the length of the pipe should be increased. The height of the chimney depends on several factors:
- slope of the roof plane;
- location of the channel on the roof plan relative to the ridge;
- the location of surrounding buildings and trees;
- estimated thickness of snow cover in a specific area.
When installing a chimney, you should determine:
- elevation of the pipe relative to the roof ridge;
- the total length of the smoke channel from the stove;
- type and dimensions of the head;
- the height of the chimney relative to ventilation and windows of neighboring buildings.
§ 7. U-SHAPED COMPENSATORS
1. Installation of expansion joints with welding connection to the pipeline. 2. Installation and sealing of fasteners. 3. Washing expansion joints with chlorination.
Table 16-10
| Name of cost elements | Unit | Compensator diameter, mm, up to | |||||||||
| 50 | 65 | 80 | 150 | 200 | 250 | 350 | 400 | ||||
| 1 | 2 | 3 | 4 | 5 | 6 | 7 | 8 | ||||
| 1. Labor costs | person-hour | 5,57 | 6,41 | 10,5 | 14,8 | 18,7 | 21,2 | 24,2 | 26,8 | ||
| 2. Salary | rub. | 3,38 | 3,89 | 6,02 | 8,48 | 10,9 | 12,7 | 14,5 | 16 | ||
| 3. Machines | “ | 0,36 | 0,44 | 0,51 | 0,96 | 1,95 | 2,4 | 3 | 3,53 | ||
| 4. U-shaped compensators | m | 10 | 10 | 10 | 10 | 10 | 10 | 10 | 10 | ||
| 5. Mounts | kg | According to design data | |||||||||
| 6. Other materials | rub. | 0,19 | 0,28 | 0,3 | 0,8 | 1,54 | 3,13 | 3,46 | 3,54 | ||