Alexa
23975 0 0
Alexa July 28, 2016Specialization: floriculture, horticulture, vegetable gardening. Hobbies: hair care, hairdressing.
You can make beautiful vases for apartment decor from an unnecessary pipe.
Have you recently done a renovation and are left with a pile of rubbish? Don't rush to put everything in bags and send it to the landfill. Perhaps you will find something useful for home decor. After all, you can stumble upon such useful items for crafts as plastic or paper pipes, the transformation of which I will tell you about today.
Application in the design of homemade pipe vases
Without decorative elements it is impossible to create comfort in an apartment. DIY floor vases made from plastic or cardboard pipes do an excellent job of this task:
- fill voids (walls, corners, niches);
- visually stretch the space;
- decorate the room, divide it into functional zones.
In a country-style hallway, a composition of floor vases made from a sewer pipe is kept in shades of the primary color; the atmosphere is created by a textured surface and uneven coloring. Neutral white color suits any interior; in a monochrome light kitchen, a floor vase with bright artificial flowers is used as an accent
Ideas and variations from concrete and rags
You can create a beautiful flowerpot for the garden in an unusual way. Unnecessary rags will come in handy for this. The fabric is simply soaked in cement mortar. Then it is given the desired shape and the composition is dried. Similar decor can be placed in different places in the garden.
In addition to old clothes, you will need cement and water. The mixture is prepared from two parts dry cement and 8 parts water. The consistency should be approximately the thickness of sour cream. The product is soaked in that solution and then laid out to dry for 24 hours. To easily separate the cement from the item, you can first put a piece of foil or plastic.
For such decoration, you can use towels, bags and pieces of jute canvas. Original sculptures can be painted in any color.
Unusual design for a flower arrangement from an old shirt.
The stylish vase is made from burlap.
An exquisite decor was formed from openwork napkins.
Wicker baskets can also be used for decoration.
An old rag can turn into an unusual flowerpot.
Soaking a round napkin in the solution.
An original composition for garden decoration.
Several vases can be painted in different colors or in the same tone to create a composition in the same style.
How to make a floor vase from a pipe
To work, you need a piece with a height of at least 50 cm. A plastic plumbing pipe with a diameter of 100 mm is suitable. Step-by-step recommendations:
- For decoration, take old newspapers, a roll of cheap toilet paper, and cook the paste in advance.
- First, the blank needs to be covered with newsprint.
- Twist flagella with a diameter of 5 mm from damp toilet paper.
- Decorate a floor vase made from a piece of plastic pipe with balls of salt dough and a plant pattern made from ropes.
- Finally, apply an even layer of spray paint on the outside and inside (top of the neck) of the blank. Seal the bottom with a thin layer of plaster and 2 yacht varnish.
Tools and materials
The materials and list of tools that will be needed during the creative process are listed in the table.
Material from which the workpiece is made
For work, decoration
special stand for smooth edges
glue (silicone, Moment, liquid nails)
metal file
Vase made from linoleum pipe
Making a stylish decorative element with your own hands is quite simple; a brief instruction on how to make floor vases from linoleum pipes will help.
- Saw off a piece 65-70 cm long.
- Cut out a base (circle) from a thick cardboard sheet and glue it to the bottom of the workpiece. Using the template, cut the parts (ribs) of the amphora.
- Using hot glue, secure the cardboard blanks around the perimeter of the future amphora.
- Tear old newspapers into strips and cover the blank. Use PVA glue.
- Cover the entire surface with papier-mâché.
- Finishing is a creative process, there are many design options. The surface can be coated with a primer and then with white acrylic paint.
Find napkins with beautiful motifs and glue them with PVA glue. Make a three-dimensional drawing from putty (PVA). Walk over the surface with sandpaper, wipe with a napkin, and cover with acrylic varnish.
How to decorate a vase from a linoleum pipe
This is what the composition of floor vases made from linoleum pipes looks like. They are made for an office in African style. Natural elements were taken for decoration:
Pieces of burlap, remnants of lace, parts of ropes, fur and twine helped create the desired texture. Base – linoleum pipe, design – white A4 copier paper, primer, varnish
It’s not difficult to make paper tubes for decorating a floor vase:
- take a long, thin knitting needle with a diameter of 2 mm;
- cut A4 sheets into 3-4 strips (along the long side);
- holding the knitting needle suspended, wind a paper strip onto it, fix the edge with glue;
- pull the workpiece off the knitting needle.
A sharp utility knife will easily cut through a pack of 10 sheets of office paper. For convenience, place a metal ruler along the cutting line. Used sheets are suitable for making vines.
Paint the pipe, and when dry, braid it with paper vine using the oblique weaving method. Coat the surface with a homemade primer:
- PVA glue – 1 part;
- water – 1 part.
When the product dries, apply semi-matte transparent varnish for baths and saunas (2-3 layers).
Spectacular vase
It is quite simple to make an original design from a narrow, tall bottle and at minimal cost. Prepare everything you need: a glass container of your choice, white acrylic paint, painting tape, acrylic varnish, scissors, a brush (you can use a kitchen sponge).
Pay special attention to such a moment as degreasing the bottle, otherwise the paint will not lie evenly on the glass. The masking tape should be cut into strips of various sizes (the width and length are determined at your discretion).
Glue it in the way the design will look like (for example, geometric patterns), glue a thinner strip near the neck, or, alternatively, glue the neck completely (it will remain unpainted).
Choose the patterns you like - you can cut out different figures of flowers and stars from the ribbon.
The entire surface is covered with paint. When painting, hold the bottle by the neck. After drying, paint over it too. Carry out the procedure several times, making sure that there are no gaps left. Remove the stencils from the masking tape from the thoroughly dried product and cover the vase with acrylic varnish in several layers. A beautiful, shiny flower vase is ready.
Ikebana will look amazing in it.
How to make a vase from a plumbing pipe
A collection of vases made from sewer pipes using the slow heating method will help you find ideas.
Cheap plastic in the hands of a master will turn into a work of art
To make such a masterpiece you will need:
- a piece of plastic pipe;
- heat;
- template for shaping;
- air pressure of several atmospheres.
The template for shaping is made from a sheet of plywood
DIY metal pipe vase
The attributes of the loft style are decorative interior elements made of metal with traces of rust and scuffs. For an apartment decorated in an industrial style, a vase made with your own hands from metal pipes left over after repairing the water supply, gas, and heating systems is suitable.
To make this floor vase, take 3 pieces of pipe (steel, galvanized) of different lengths, but of the same diameter. To connect them and form the base of the vase, select threaded fittings:
- barrel – 3 pcs.;
- square – 3 pcs.;
- tee – 1 pc.;
- coupling – 3 pcs.
Cut threads on workpieces using a die (thread-cutting tool). Its diameter must correspond to the diameter of the pipe. Clamp the workpiece in a vice. Rotate the nozzle with an adjustable wrench. Forward 3 turns and one back.
Vase made of plastic pipe
You can pour water into DIY floor vases made from PVC pipes with a wooden base, because plastic does not allow liquid to pass through. And the wood is made waterproof by E6000 glue.
- Using a handsaw, cut 3 pieces of the required size from the PVC pipe.
- Using an electric drill and a special attachment (Forstner drill), cut recesses of the required diameter in the wooden base.
- Cover the workpieces with glue.
- Moisten the photographs in water and stick them on the blanks, removing air bubbles. Remove excess liquid from the surface. Cover with Mod Podge (1-2 coats).
- Assemble the floor vase.
In a cool room with moderately humid air, the floor vase dries evenly, the process lasts at least a day.
How to decorate a vase from a plastic pipe
Stockings and tights with holes will find a second life if they are used to decorate a floor vase for decoration, made with your own hands from the remains of plastic pipes.
Cut one edge of the workpieces at an angle. Soak the stockings in PVA glue and place them on the base, forming wavy folds. Paint when the fabric is completely dry
DIY vase made from cardboard tube
The easiest way to make a floor vase from a cardboard tube with your own hands is:
- Cut a piece to the desired height.
- Cut a base from a sheet of thick cardboard - a circle with a diameter larger than the pipe.
- Connect both parts. Use a glue gun.
- Glue a rope onto the surface of the blank.
The product can be left as is or decorated. Fill with decor - dry branches or flowers.
So that the top edge of the cardboard blank is not visible, stick a rope on top, carefully cut the end, and fix it on the inside of the pipe
Decorating ideas
Decorate a floor vase made of a cardboard tube for decorative branches and dried bouquets with fabric and a beaded pattern.
For lovers of voluminous decor, a combination is suitable: jute, lace, fabric flowers. Example of designing a cardboard product for an apartment in a nautical style.
- paper, a piece of twisted rope;
- fiberglass mesh (it is used when applying plaster);
- pieces of leather, stones, beads;
- spray paint;
- PVA glue.
From a wooden deck
For a simple craft, just make a cavity in the log. More complex products will require additional equipment.
- We take a prepared piece of wood. We cut it so that it matches the height of the finished product.
- Remove the bark.
- Using a saw, we adjust the external parameters.
- We make a characteristic indentation. To do this, you can use an electric drill. The hole should not be through. Sand the inner surface with sandpaper.
- The outer surface also needs to be treated.
- We treat the product with stain.
- We decorate the finished item.
Vases made of plastic pipes
Decoration with stockings
First of all, let's look at how to make a vase from a plastic pipe with your own hands. For these purposes, it is best to use a sewer pipe.
So, the instructions look like this:
- If there is a segment longer than 60 cm left, it must be divided into 3 parts.
- Next, the ends of the workpieces need to be cut obliquely.
- Then you need to soak the stockings with PVA glue and squeeze out the excess suspension.
- After this, the stockings need to be pulled over the pipes so that you end up with twisted folds . The product should be left in this form until the glue dries.
- Further actions depend solely on your imagination, for example, products can be painted with different colors and glued together . For stability, you can glue a cardboard circle or square to their bottom. As a decoration for crafts, beads, beads, small seashells, etc. are an excellent option.
The result will be a very beautiful product that will look expensive, despite the fact that the price of materials is minimal.
Combined decoration
The technique for making the product in this case does not differ from that described above. The differences lie only in the method of decoration.
The process looks like this:
- The stockings are stretched from the bottom and top of the blanks, leaving a “bare” area in the middle.
- The space between the stockings should be coated with PVA glue.
- Next, the surface treated with glue should be sprinkled with cereal. Which one is up to you to decide.
- After the glue has hardened, the pieces need to be glued and painted. For stability, you can make a cardboard stand and paint it in a suitable color.
This completes the manufacturing process of the product.
Original craft
Try creating a vase from a material such as cardboard, which will become a wonderful stylish item in the interior.
Gather the components needed for work:
- a cardboard pipe of certain parameters can be purchased at a hardware store;
- stationery knife, glue, newsprint;
- paint and varnish used as a fixative.
Make a bottom for the prepared pipe - cut out a circle with a diameter that matches the diameter of the pipe and glue it to it. The vase frame is ready. Making paper decorations is a rather labor-intensive process. Fold the cut newspaper strips in half and then roll them into small rolls, gluing the ends together.
Prepare a sufficient number of such parts. Cover the surface of the cardboard tube-vase with them. Please note that they need to be placed very close to each other. However, there will still be gaps that can be filled with any available material - small buttons, beads, types of pasta, beans (white or red).
It is advisable to paint the product with gouache, not very diluted with water, or with aerosol paint, carefully painting the paper flower rolls. Leave the product for a while to dry. Decorate according to your taste.
The simplest items can become the highlight of your home's interior. When thinking about creating a vase with your own hands, you need to carefully analyze the style of the interior so that your work emphasizes its originality. Let's look at some of them and listen to the advice of designers.
The laconic, discreet shape of the vase, its discreet colors and neat finish are perfect for the minimalist style. Classicism presupposes symmetry in ornaments of light colors. A variety of materials are used to create a vase with your own hands, suitable for the high-tech style. Metal, plastic, glass or wood are used. Vases, the design of which combines literally everything (even the seemingly incompatible) look interesting in the extravagant kitsch style.
From a metal pipe
If the edges of a metal pipe are evenly sawn off, then it is also suitable for our purposes. The best option is to make a blank from a pipe with a flange, since the product will come out immediately with a stand.
Below we will consider one of the options for how to make a floor vase with your own hands from a pipe of this type:
- First of all, the workpiece must be covered with ordinary toilet paper. In this case, small folds are allowed.
- Then two layers of black paint should be applied to the paper.
- After this, you need to apply varnish with bronze powder over the black paint.
- Additionally, the product can be decorated with beads or glass beads.
- To complete the bottom, you will need mounting foam. The craft should be placed on a plastic stand and the foam stream should be directed downward. When the foam hardens, it can be tinted with spray paint.
Advice! Unusual edges of the product can be made using a welding machine by simply melting them. As a result, they will turn into fancy lace.
Of course, such a product is not intended for fresh flowers, since it will not be possible to pour water into the container, but a composition of dried flowers in such a vase will look very interesting.
Making blanks
First you need to cut the plastic pipes. You need to saw them in such a way that you get segments that correspond to the size of your future vases. This procedure must be done carefully so that the edges of the vase are smooth and beautiful. To do this, it is better to use a special plastic stand. This way you will get guaranteed smooth edges.
Bill Gates and calcium carbonate are to blame: why do bloggers burn with snow?
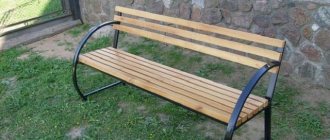
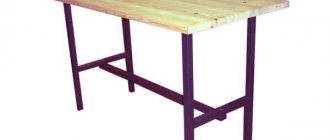
The chairs and table were no longer like anything else: paint and a brush solved the problem
New maintenance rules postponed: what Russians need to be prepared for from March 1
As for the sizes of future vases, it is better to choose products of different heights. A composition of asymmetrical plastic products will look interesting and original.
From a cardboard tube
When packaging linoleum, manufacturers place a tube of thick cardboard inside the roll, which is an excellent material for making a vase. As always, to get an original result, you just need to show a little imagination.
Below we will consider one of the options for making a vase from a cardboard tube with your own hands. Before you begin, you need to prepare the following materials for this product:
| PVA glue | For gluing workpieces and impregnating fabric |
| Masking tape | For sealing joints between workpieces |
| Textile | Any one to your taste will do |
| Bronze and acrylic gold paint | For painting crafts |
| Decor elements | Twine, beads, etc. |
So, the work is performed in the following order:
- As in the case of plastic products, to make vases from linoleum pipes with your own hands, first of all you need to cut the cardboard blank into three parts.
- Next, all three parts must be glued together with PVA glue and secured with copper wire.
- Without waiting for the glue to dry, apply masking tape to the joints.
- A day later, when the glue has completely hardened, the copper wire should be removed, after which the workpieces should be wrapped in a cloth soaked in PVA. In this case, you need to form folds.
- When the fabric dries, it must be painted with bronze paint. You can use the composition in a spray can.
- When the paint dries, you need to “walk” over the entire relief with acrylic gold paint to make the vase shine.
- To complete the work, the vase can be decorated with twine or other decorative elements.
At this point, the floor vase made from a linoleum pipe is ready. Of course, it is not necessary to perform all actions exactly. Using this idea as a basis, you can experiment and come up with your own product design.
Advice! In such a vase you can place dried bouquets, decorative branches or other light decorations. Of course, it is not advisable to use it for planting living plants.
Vase “Golden Autumn”
For this craft, you will need a small glass jar of a shape you like. You need double-sided tape, paper, pencil, scissors, and a piece of foam rubber. An important component will be matte and transparent paint for stained glass, a gold outline on the glass and melange threads like “Iris”. By strictly following the recommendations of the master class, the result will exceed all expectations.
- According to the name of the product, draw various leaves on paper.
- Place decorative elements on tape and cut them out.
- We place the cut-out decor over the entire surface of the jar and, using foam rubber, cover it, as well as the bottom, with a continuous layer of stained glass paint. Choose the tone to your liking.
- After the paint has dried thoroughly, remove the glued elements. In front of you will be a painted plain base of a vase with transparent curly leaf windows.
- Carefully outline all the edges with a gold outline for glass; some parts of the design can be completed on the jar itself (leaf stalk).
- We paint the “glass” leaves with transparent stained glass paint in autumn tones. Draw veins on the dried leaves using an outline.
- Finally, decorate the top of the vase (neck of the jar) and the bend at the base with melange threads, carefully laying them in even and tight turns. Make the rows small in width.
How to make a floor vase from a pipe with your own hands: master class, video
If you have just recently done renovations at home, then there is always a heap of unnecessary garbage left and our advice: do not rush to throw it into the garbage chute, in this heap you can always stumble upon items that will be useful in inventing fakes - these can be various design details and different decorations for your home. Most often, unnecessary items are leftover pipes that no one needs, from which you can invent a wonderful designer vase. There are several methods for reproducing our vase.
So, first, let's look at the types of vases made from plastic pipes.
Other interesting ideas for vases and their decoration
You can make an original vase from the simplest objects. There are many interesting ideas and ways to decorate. A beautiful and practical accessory will be made from textiles. You can wrap an ordinary bottle with bright strips of fabric, knit or crochet a multi-colored pocket, or use an old wicker rug. A simple and interesting idea is to use jute twine. You just need to wrap it around the mold and cover it with glue.
You can decorate any item that has no value in the household. A simple tin can will take on an original look if you cover it with colored pencils and decorate it with clothespins.
Installation
We will decorate with the help of unnecessary nylon stockings.
But before we use stockings, we'll take a look at creating a vase silhouette using plastic pipes. It would be great if these pipes were intended for sewerage. They are perfect in shape and material.
Now let's move on to the manual, which will describe the sequence of work and actions:
- If the unnecessary pipe section is 0.6 meters, then it will do. Cut it into three equal parts of 20 centimeters each.
- Now one of the ends of each pipe needs to be cut so that from the side they are oblique.
- Next, we will use our nylon stockings. We soak them well in PVA glue, after this procedure we remove them from the glue and get rid of excess glue by squeezing.
- Then we put the stockings on the pipes. At the end of this procedure, a significant number of folds should be obtained to give aesthetics and an attractive appearance. We wait a while until the glue dries completely.
- Well, now we have created the look of our vase, now everything depends on your varied imagination or vice versa. For example, the decoration can be painted in different colors and decorated with different rhinestones and the like. DIY vases made from linoleum pipes
To prevent your product from falling at an unnecessary moment, you can attach a bottom made of cardboard material in the shape of a circle or square to the bottom of the vase. An excellent way to decorate can be decorations made from small sea shells, beads of various colors, sparkles, seed beads, etc. At the end of the work, we will receive a beautiful original vase, which cannot be distinguished from an expensive store-bought vase, but you must admit, its creation was not that difficult and expensive.
DIY floor vase made from pipe master class
Composite decoration for a vase
The sequence of actions is practically no different from the first version of creating an invention, but there is still a slight difference and it lies in the fact that the decoration methods are different.
Now let's move on to the process of inventing a vase using this method:
- We put hosiery on the pipes, which we prepare in the same way as in the first option, on both sides so that there is a small empty gap in the middle of the pipe.
- We apply a small amount of PVA glue to this empty gap so that it is spread over the entire area.
- Now we pour any type of cereal onto this smeared gap, depending on your imagination.
- Let's wait until the glue hardens, and attach the pipe sections to each other and paint them in different colors, depending on your wishes.
At this stage we finish making the vase using cereal.
Making a vase from a metal alloy pipe
If you still have an unnecessary metal pipe, the edges of which are cut straight, then it will be useful for creating our craft. If the pipe has an edge, then it is perfect for us because there is no need to create a stand for the vase, it will be ready immediately.
Using this type of pipe, we will become familiar with the technique of creating it using sequential steps:
- To begin with, we will take a roll of ordinary cheap toilet paper and paste our pipe in a circle so that there are no empty spaces left. The formation of small folds is allowed.
- Now we need black paint, and with its help we paint the pipe in two layers to give it a natural look.
- Next, take powder with a powder effect and apply it with gentle movements over the black paint.
- For special beauty, you can decorate the vase with beads or beads.
- Using installation foam we create the bottom of our product. We do it this way: we put the craft on a plastic stand and we put the stream of foam in a vertical position. After waiting until the foam dries, you can paint the bottom with spray paint of any color.
Take note! We can embellish the edges of our beautiful vase using a welding device by welding them a little. The result will be beautiful metallic lace.
I hope you understand that you won’t be able to place fresh flowers in this type of vase as they require water, and you won’t be able to pour it into such a craft, but don’t be upset, it’s perfect for placing dried or non-living flowers of various types into it. In it they will look aesthetically pleasing and tasteful.
Making a vase from a cardboard product
If during the renovation you ordered the required amount of linoleum to your home, then note that a cardboard tube is placed inside each such roll so that it does not wrinkle or move apart. But for the end result,
you just need to show a little of your imagination.
To begin with, we will get acquainted with the method of making crafts from this material, but before starting work, we will get acquainted with the details and tools for further decoration:
- PVA glue. Needed for soaking the fabric and connecting the parts of the cut pipe.
- Painting tape. Needed to make the joint between pipe sections invisible.
- Textile. You can use different ones as you wish.
- Acrylic paint in bronze and gold colors. Needed for coloring our invention.
- Decoration details. These can be beads, beads, sparkles and the like.
Instructions for carrying out work in order:
- We recall the work carried out with plastic pipes, and repeat the same actions with a linoleum pipe, and also divide the pipe into three equal parts.
- Now, using PVA glue, we connect the pipe sections and tighten them with copper alloy wire.
- We don’t wait for the glue to dry and stick masking tape over the joints.
- Now we leave the workpiece in a calm state for a day so that the glue is completely dry. When the day has passed, remove the copper alloy wire and wrap the pipe parts in any fabric, which first needs to be soaked in PVA glue. Form pleats as you put it on.
- After the fabric has completely dried, paint it with bronze paint. In addition to acrylic, you can use spray paint.
- After waiting for the paint to dry, we apply gold-colored acrylic paint on top of the bronze to add shine and shimmer.
- Finally, you can decorate your vase with various decoration details. So you learned: How to make a floor vase from scrap materials.
Conclusion
It is possible to make a beautiful vase from a wide variety of “available” materials, and, as we learned, it is not at all difficult and does not take long. What if it’s not enough to experiment with its design, the result may even exceed your expectations.
From the video in this article it is possible to obtain additional data on this topic.
Hello dear craftswomen. I present to your attention this floor vase.
To make it we will need: - a pipe from under linoleum (I took it from a construction store) - wire - PVA glue - masking tape - highly absorbent fabric (I have gauze) - color - white VA paint - a can of acrylic paint - bronze - gold acrylic paint+sponge
So, I cut the pipe into three parts, form a vase and fasten it with wire.
I generously lubricate all the joints with PVA glue, then, without waiting for the glue to dry, I glue masking tape to the same joints (to make sure it sticks)
The next day, when everything was dry, I removed the wire and covered it with a cloth generously moistened with PVA glue, forming folds.
After waiting for complete drying, I carefully painted it with paint (white VA+color), paying special attention to the folds.
Then I painted it with bronze-colored aerosol acrylic enamel (I used up a whole can, because in some places the paint was absorbed into the fabric, I had to paint it twice), as soon as the paint had dried, I took a sponge and went over the entire relief with gold acrylic paint (on the sponge You don’t need to press too hard!) The photo is not very good, but in reality it’s beautiful :) especially when it shimmers in the sun.
This is how the vase turned out. I didn't have enough time to decorate it. But, I think, beads, small flowers, pebbles, etc. will look beautiful, if you have enough imagination. This vase can also be used as a stand for potted flowers; it doesn’t look bad either. Thank you for watching to the end, good luck to you creatively :)))
Floor vases made of cardboard of unusual beauty
I hasten to share! This is already the second batch of my floor vases, I will show the first ones at the end. It all started when I asked for a linoleum pipe at the construction market. The sellers were of course surprised, asked why they gave it to me and gave it to me. My son-in-law grumbled all the way that if traffic cops spotted us with pipes sticking out of the car windows, then these pipes would cost me dearly. But nothing, we got home safely and I began to implement my long-time wish.
This vase is double sided because I haven’t decided which napkin to choose.
and on the other - poinsettia (it seems so). In addition, the New Year is coming soon, and this motive will be very relevant.
And the second vase is in the Greek style (as planned). Nothing came up other than running athletes.
Well, now, actually, the process itself. We take a cardboard tube (from a roll of linoleum), saw off the length we need (mine is 65 cm). We thought about the form, I immediately drew a blank on cardboard.
I cut out many, many such blanks. The bigger, the better. This is perhaps the most unpleasant moment in the whole work. I rubbed a callus on my hand with scissors.
Glue the pipe to the base. For the base, it is better to use fiberboard rather than cardboard. But I realized this during the process.
I glue the blanks around the entire perimeter with hot glue.
Now we cover it with newspaper strips. PVA glue.
When everything has dried, I coat it with a lot of papier-mâché.
I level and smooth.
I dried it for a couple of days near the radiator. Now I spread the putty (I have Knauf finishing), add a little PVA glue to it, and coat the vase.
This is me all at work).
After drying, sand the skin with a sandpaper. We repeat this procedure until the vase becomes even and smooth. I oiled and sanded three times.
I'm starting to decorate. Paper art is perhaps my favorite technique here. I never tire of thanking Tatyana Sorokina for her. The athletes were sculpted from Keraplast, a self-hardening plastic mass. The top and bottom were covered with millet and peas.
Painted it with black paint. Well, then I coated the whole thing with gold.
I pasted napkin motifs onto this vase. First, of course, I primed it and covered it with white acrylic.
The pattern is putty + PVA.
I found this tube in the medicine cabinet and used it to apply the putty. I finished it with acrylic paint, went over the patterns with bitumen, and wiped it with a cloth moistened with white spirit. I covered it with four layers of acrylic varnish, with intermediate sanding of the entire surface.
Well, here - already with a bouquet.
By the way, I also made the bouquets myself. I soaked Willow in the bath overnight. In the morning I wrapped it around the mops and secured it with tape in several places. I didn’t clear the willow of bark; it was such a long and tedious task. It took me two weeks to dry. Well, I made some balls. I covered half of the rods with black acrylic varnish, and the other half from a spray can with gold.
And these are my firstborns. I made them in the summer as a gift for my niece.
Here craquelure, putty, aged with bitumen.
Now I see how important it is to choose the right form. Here the top turned out to be a bit heavy. But, they learn from mistakes! The birthday girl really liked these vases.
Here's another job:
Did you like the article? Subscribe to the channel to stay up to date with the most interesting materials
You can not only drink hibiscus: an unusual and beautiful idea for Easter
A great idea for Easter would be to use natural products to color eggs. An interesting result is shown by ordinary hibiscus tea: the longer you leave the eggs in the solution, the more saturated the color will be. Eggs painted with hibiscus tea for Easter even somewhat resemble plums in their rich hue. It looks simply wonderful!
To color eggs, you need to take a whole package of hibiscus tea (80 g) and add cold water in a medium saucepan.
Place on the fire, bring to a boil and cook for 15 minutes.
After this, dip the eggs boiled in salted water into the solution, covering them with tea leaves. The longer you keep the eggs in the solution, the more saturated the color will be. For the result as in the photo below, you need to leave the eggs in the refrigerator overnight.
The next day, simply remove the eggs and pat dry with a paper towel. Leave to dry.
Agree, this is a very beautiful result, in which no chemicals were used!
Did you like the article? Subscribe to the channel to stay up to date with the most interesting materials