TOP 5 best manufacturers of warm cable
Leading manufacturers of heating cables are:
- The Swedish company Thermo Industri AB produces cables for heating domestic and main pipelines. Automatic equipment is used to manufacture systems, which improves product quality and reduces product costs. The manufacturer offers thermal regulators and additional devices that ensure reliable operation of pipe heaters.
- Eltrace products are produced by a company with French roots. The company specializes in the production of heating elements with automatic temperature control. The Tubes-heat product series is offered for domestic use. The Traceco range is suitable for installation on industrial pipelines. But the products can also be used in the private sector.
- Thermon products are manufactured by an American company. The equipment is characterized by ease of installation and reduced energy consumption. The company offers products with self-temperature regulation.
- The Danish company Devi offers resistance-type heaters, as well as self-regulating equipment. The company has been specializing in the production of heating elements for over 50 years. The products are of high quality and ease of installation.
- The Russian manufacturer Teplolux (SST) produces heating elements for pipes and floors. The products are distinguished by a reduced price and high quality manufacturing.
If non-standard pipe routing is used on the site. Then the owner will need to create a heating circuit himself or contact a company. When arranging an electric heating circuit, you should remember safety and provide for the installation of protective elements that eliminate the risk of electric shock.
Heating cable review and test, don't miss the video:
How to connect a heating cable to the network:
Direct connection of heating cable without couplings
There is another way to connect to a 220V network - couplingless. The question is, why do we install the coupling?
Firstly, to ensure the tightness of the connection. And secondly, to save on the heating cable and not pull it into the next room to the nearest outlet or switchboard.
What if this “panelboard” is moved closer to the cable itself and placed directly on the pipe? We are talking about a regular sealed box with screw terminals inside.
In this case, the selfreg will have to be cut a little longer - by 15-20cm. And at the end, put the so-called end seal.
Similar kits are produced by Eltherm.
The procedure for preparing and cutting the cable is not much different from the previous method. We remove the external insulation.
We release the braid and twist it into a bundle.
We cut the middle layer and get to the matrix. Then we release the copper cores and remove the middle of the matrix.
We apply silicone sealant to the cutting area and pull the end “glove” over the conductors.
Instead of such special gloves, you can use thermal tubes. You put two narrow ones on each core, and then one wide one on top of them.
After heat shrinking, press the gap between the cores with thin-nose pliers so that the emerging glue reliably seals the joint.
A tube is also pulled over the grounding.
After this, all the veins and braid are pressed with sleeve tips.
The heating cable is inserted into the distribution box, and it itself is attached to the pipe through an L-shaped corner with clamps.
Power to the distribution box must be supplied through an RCD with a leakage current of 30 mA. The cable is protected from short circuits and overloads by a type “C” circuit breaker.
It’s even better to immediately install an automatic differential.
Select the rating based on the heating power. In addition to power, do not forget to choose the correct cross-section of the 220V power cable. The previously specified minimum size of 1.5mm2 may not be enough.
Mistake #10 Many people forget about the starting current.
Here is a measurement of the consumption of a small piece of heating cable during startup and after a couple of minutes.
Consumption of Samoreg at the very beginning briefly jumps three times. For example, a cable with a power of 40W/m and a length of 80 meters can show an initial load of 6kW!
Before direct connection, the insulation resistance must always be checked. At a test voltage of 2500V, the standardized resistance must be at least 10mOhm.
Insulation is checked between:
braid and pipe
braid and working cores
Design differences of self-regulating systems
Samregi (abbreviated) should not be confused with resistive analogues - the first modifications of heating cables.
In short, the disadvantages of the resistive type, due to which it is used less and less, are the following:
- certain length, impossibility of extension or shortening;
- constant resistance along the entire length, which makes it impossible to regulate the temperature in individual areas;
- connection at both ends, causing installation difficulties;
- risk of overheating at intersections;
- There is no repair as such; the entire system has to be replaced.
A positive feature of the resistive type is its low cost, so it is used where small protected areas need heating.
The resistive single-core cable circuit contains four main elements: a copper core, which combines the functions of heating and heat transfer, internal and external protection, and a reinforcing braid.
There are fundamental differences in the design of a self-regulating heating cable:
- Two high resistance copper cores. The greater the resistance, the greater the possibility of temperature regulation.
- Semiconductor matrix. This is a significant element of the cable, which makes it self-regulating. The matrix is sensitive to ambient temperature. As the temperature drops, the resistance of the material rises and it begins to generate more heat.
- Internal insulation. High-quality material has a uniform structure and maximum thermal conductivity.
- Shielding braid. Most often it is a copper mesh or aluminum screen. To protect the cable, the power must be connected via an RCD.
- External insulation. Its function is to protect all cable elements. The service life of the product depends on the characteristics of the external insulation.
The ability of samreg to change its own resistance (and therefore power) from temperature fluctuations frees you from the purchase of additional equipment - various kinds of thermostats with sensors.
Samreg scheme. The main distinguishing element is the semiconductor matrix located between two copper cores. It is she who regulates the level of heat dissipation
The cable can be cut, and the length of the finished product can be shortened or increased if necessary.
If two cable branches accidentally intersect, overheating or system failure will not occur. You can cut off or replace any fragment at any time without damaging the entire heating structure
But the main advantage of samreg is its “selectivity”. The matrix independently detects cold areas and brings their temperature to the optimal value.
In sufficiently heated areas, it simply maintains the required parameters (usually + 3-5 ºС). This is very convenient when it is necessary to protect a cable from freezing that has different heating conditions along its entire length (for example, it passes through both a heated room and cold ground).
At the end of the cold season, there is no need to heat the pipes, soil or roof, so the cable is disconnected from the power supply. When there is a possibility of severe night frosts, you can use a thermostat that automatically turns on the system.
Tips and tricks
Be careful when laying. This will make it possible to avoid some problems.
Do not twist the wires together. A short circuit will occur.
The black polymer surrounding the current-carrying conductors must be insulated. It conducts current, so it is considered a conductor and must be treated as such.
The electrical connections of the entire system must be well insulated to prevent sparking and also to prevent fire.
Any electrical connection for the heating cable must be properly protected from moisture.
Do not use it if its heating temperature reaches the maximum value. This leads to a decrease in its service life.
If the cord is damaged, it must be replaced with a new one. Even stopping the operation of any element will make the entire system inactive.
For explosive environments, it is necessary to install only a specialized cable with special components. Similar conditions include some industries:
- Chemical.
- Petrochemical.
- Coal.
Special cables are installed for them, approved for use in this area.
If inappropriate equipment is installed, an explosion or severe fire may occur.
vseprotruby.ru
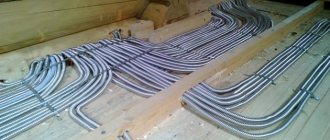
Installation of heating electrical wires
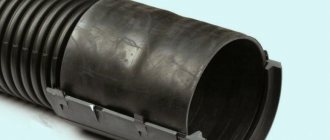
The heating cable for pulling inside the network is produced in the form of a strip electric heater. In the context of the heating device, it has the following components:
- Metal conductor for heating.
- Heating electric cable cores covered with heat-resistant PVC (polyvinyl chloride) insulation.
- The inner layer of insulation is covered with fluoroplastic protection.
- All conductors are enclosed in a screen in the form of a copper mesh.
- The last outer layer of insulation on the heating device is also made of heat-resistant PVC coating.
The outer insulation layer on the heating cable has the following characteristics. It is resistant not only to the influence of moisture and high temperature, but is absolutely not afraid of exposure to aggressive chemical environments.
Also, the warm cable for pulling inside the water supply system is made from materials whose composition is approved for use in the food industry. Therefore, it can be installed in the drinking water pipeline.
A heating cable for installation inside a pipe has the following advantages:
- Reliable performance.
- High security.
- Possibility of using a heating cable both internally and externally.
- Easy installation and operation.
- The ability to save energy through automation is a self-regulating ability.
Perhaps the only drawback of these heating units is their dependence on electricity. For these reasons, it is recommended to install additional power supplies along the main pipeline routes.
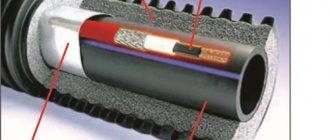
Insulation
Resistive cable
1) copper wire; 2) self-adjusting conductive element; 3) modified polyolefin; 4) screen made of tinned copper; 5) modified polyolefin
A self-regulating cable, which can be used to heat a water supply, is made in the form of a thick tape, where the polymer matrix is heated by parallel semiconductors.
Such a system is designed for self-preservation, that is, semiconductors regulate their heating temperature independently, therefore, the burnout of this system is in principle impossible. In addition, such a wire can be cut anywhere if its length exceeds the required one, but twisting cannot be done on it.
Modified polyolefin, which is applied in two layers to the heating cable, creates excellent mechanical protection against abrasion and shock, chemical active substances (solvents, acetones, petroleum products), and also serves as an excellent dielectric.
If you want to purchase a resistive cable of this type, then do not forget that its price is much higher than that of PNSV, but you are completely freed from monitoring temperature and voltage.
Installation and preliminary calculation
The resistive cable is inserted into the pipe
When choosing a resistive device, you will have to consider three main parameters for its installation:
- Diameter of water pipe;
- The material from which the pipeline is made;
- Potential thermal insulation capacity over the wire.
| Pipe diameter | |||||||
| Indicators in mm | 15 | 20 | 25 | 32 | 40 | 50 | 65 |
| Measurements in inches | 1/2 | 3/4 | 1,0 | 1 1/4 | 1 1/2 | 2,0 | 2 1/2 |
| Minimum thickness of surface thermal insulation | |||||||
| Indicators in mm | 20 | 20 | 30 | 30 | 40 | 50 | 65 |
Table of ratios of pipe diameter to the thickness of third-party thermal insulation
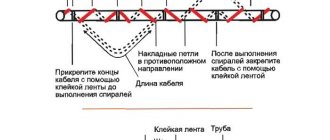
External installation method
Installation of resistive heating wire can be done in two ways - external and internal. External installation can be done in several ways - lay the cable in a straight line on one side of the pipe, or two tapes on both sides, but you can also lay it in a wavy line and even wrap it around, but the latter option will cause a lot of trouble. Such surface installation is mainly carried out in cases where the water supply or sewerage system has already been assembled and put into operation.
Internal installation diagram
In cases where you purchase a resistive heating cable for indoor installation, you should make sure that you are sold the entire kit, which, in addition to the wire, includes a coupling with a gland for sealing the input, as well as a cutting kit for the connection. Before you start stripping the ends, you should put a threaded coupling on the wire, and then the gland itself, which should be pressed tightly against the polyolefin sheath (protection against leakage).
Cable cutting
First of all, you will need to unravel the end of the shielded braid, and to do this, peel the polyolefin sheath approximately 30-40 mm and twist the shield into a flagellum - you will need it for grounding
After this, remove the next layer of polyolefin by 15-20 mm to strip the heating ends, as shown in the top photo, just make sure that the ground does not have the opportunity to contact the heating matrix.
Now you start cutting the matrix itself and for this it is best to turn the cable sideways and carefully, as if sharpening a pencil, remove the insulation first from one side and then from the other. After this, spread the copper wires to the sides and cut out the insulation from the middle
Do not try to do otherwise - the matrix is quite rigid and it is best to remove it this way.
Wire complete set
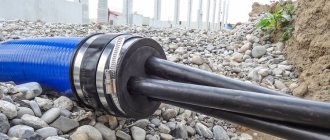
To connect two pieces, you will need a two-channel adapter from the kit, the recesses of which you first fill with sealant, which is also supplied as part of the equipment. First plastic and then metal tubes are also put on the ends of the wire, which are flattened with pliers in the form of terminals, which are inserted into a shield or a special box, as in the top image. After this, insert the cable into the pipeline through the tee and tighten the sealing sleeve that you put on at the very beginning.
How to choose the right cable?
When choosing a suitable hot cable, you need to decide not only its type, but also the correct power.
In this case, it is necessary to take into account such parameters as:
- purpose of the structure (calculations are performed differently for sewerage and water supply systems);
- the material from which the sewerage system is made;
- pipeline diameter;
- features of the area that is supposed to be heated;
- characteristics of the thermal insulation material used.
Based on this information, the heat loss per meter of the structure is calculated, the type of cable and its power are selected, and then the appropriate length of the set is determined. Calculations can be performed using a special formula, using calculation tables or using an online calculator.
The calculation formula looks like this:
Qtr – pipe heat loss (W); – thermal conductivity coefficient of insulation; Ltr – length of the heated pipe (m); tin – temperature of the pipe contents (C), tout – minimum ambient temperature (C); D – outer diameter of communications including insulation (m); d – outer diameter of communications (m); 1.3 – safety factor
Once the heat loss has been calculated, the length of the system should be calculated. To do this, the obtained value must be divided by the specific power of the heating device cable. The result should be increased, taking into account the heating of additional elements. The power of the sewer cable starts at 17 W/m and can exceed 30 W/m.
If we are talking about sewer pipelines made of polyethylene and PVC, then 17 W/m is the maximum power. If you use a more efficient cable, there is a high probability of overheating and damage to the pipe. Information about the characteristics of the product can be found in its technical data sheet.
Using the table, choosing the appropriate option is a little easier. To do this, you first need to find out the diameter of the pipe and the thickness of the thermal insulation, as well as the expected difference between the temperature of the air and the contents of the pipeline. The latter indicator can be found using reference data depending on the region.
At the intersection of the corresponding row and column, you can find the value of heat loss per meter of pipe. Then you should calculate the total cable length. To do this, the size of the specific heat loss obtained from the table must be multiplied by the length of the pipeline and by a factor of 1.3.
The table allows you to find the size of the specific heat loss of a pipe of a specific diameter, taking into account the thickness of the heat-insulating material and the operating conditions of the pipeline (+)
The result obtained should be divided by the power density of the cable. Then you need to take into account the influence of additional elements, if any. You can find convenient online calculators on specialized websites. In the appropriate fields you need to enter the necessary data, for example, pipe diameter, insulation thickness, ambient and working fluid temperatures, region, etc.
Such programs usually offer the user additional options, for example, they help calculate the required diameter of the sewer, the size of the thermal insulation layer, the type of insulation, etc.
Optionally, you can select the type of installation, find out the appropriate step when installing the heating cable in a spiral, and get a list and number of components that will be needed to install the system.
When choosing a self-regulating cable, it is important to correctly take into account the diameter of the structure on which it will be installed. For example, for pipes with a diameter of 110 mm, it is recommended to use the brand Lavita GWS30-2 or a similar version from another manufacturer
For a 50 mm pipe, a Lavita GWS24-2 cable is suitable, for structures with a diameter of 32 mm - Lavita GWS16-2, etc.
Complex calculations will not be needed for sewerage that is not used often, for example, in a summer cottage or in a house that is used only occasionally. In such a situation, simply take a cable with a power of 17 W/m with a length corresponding to the size of the pipe. A cable of this power can be used both outside and inside the pipe, and it is not necessary to install a gland.
When choosing a suitable heating cable option, you should compare its performance with the calculated data on the probable heat loss of the sewer pipe
To lay a heating cable inside a pipe, choose a cable with special protection against aggressive influences, for example, DVU-13. In some cases, the Lavita RGS 30-2CR brand is used for internal installation. This is not entirely correct, but an acceptable solution.
This cable is intended for heating the roof or storm drains, so it is not protected from corrosive substances. It can only be considered as a temporary option, since if used for a long time in unsuitable conditions, the Lavita RGS 30-2CR cable will inevitably break.
Household repair No. 1
Choose reliable craftsmen without intermediaries and save up to 40%!
Post a task and find out prices
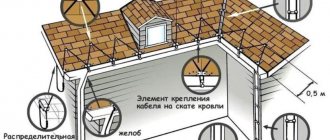
Installing a heating cable is a fairly common procedure. This element is used for heating water pipes, roofing, eaves and other elements where freezing of water is unacceptable in the cold season.
A distinctive feature of a self-regulating water cable is its ability to determine the required heating intensity depending on the temperature of the object itself and the environment. There is such a tendency - the lower the temperature of the first, the more the wire heats up.
Heating cable device
This element contains two cores made of copper, as well as the most important part - the heating matrix. All its parts are individually connected in parallel to the electrical circuit. This allows the matrix to serve as a heating and regulating element.
Externally, the design of the heating cable for water supply is wrapped in a thermal protective layer. Below it is a shielding braid. It promotes reliable protection of the self-regulating cable from the effects of external electromagnetic fields. Grounding is also connected to the braid. The upper sheath of the cable protects the entire structure from mechanical damage.
Operating principle of the heating cable
It is not difficult to understand how this element works. This is due to the fact that its principle is based on the rather simple function of a conductor of electrical energy. When a certain section of the pipe is heated, the current resistance increases. Therefore, a lot of power is consumed.
The section of wire that is placed in a cold temperature has less resistance. The matrix transfers more electrical energy here, causing the cable itself to heat up more. In the area where the temperature is higher, the resistance is higher. Therefore, less current is supplied to the heating element. Consequently, heating of the water supply does not occur in this place.
The self-regulating cable turns on when water inside the pipes begins to freeze. The heating power in this case is maximum. As the pipe temperature increases, it decreases. The heating cable itself does not stop working. Its power simply becomes minimal.
Cable installation
Connecting this heating element with your own hands can be done in one of the following ways:
In the first option, the connection method is divided into:
- linear - produced along a water pipe
- turns - in this case, the self-regulating cable is wound in a spiral around the pipes
Regardless of the chosen installation option for the heating element, insulation of the water supply system is a mandatory procedure. Otherwise, heating will be directed not at the pipes, but at increasing the ambient temperature.
The thickness of the insulating layer, as a rule, varies in the range from 2 to 5 cm. This depends on the installation conditions of the pipes:
- for underground water pipes, a smaller amount of heating layer can be used
- for above-ground structures - the insulation layer must be large
Moisture-resistant materials can be used as a heating layer. It can be polystyrene foam or polyethylene foam. You can create a protective layer to prevent damage to the heating element from pipes of larger diameter.
Options for connecting a self-regulating cable for heating water pipes with your own hands
The first method of installing a heating wire is one of the simplest. It involves placing the cable along the water pipes. In this case, the wire stretches along one of the walls of the pipe, attaching it to it with fiberglass adhesive tape after about 30 cm. You can use plastic clamps to mount the heating element yourself. But in this case, it is worth making sure that they can withstand the maximum temperature of the cable.
The second method of placing a heating element with your own hands is winding in a spiral. This method is good because it allows for maximum contact between the pipes and the cable. But at the same time, the consumption of the latter increases significantly.
To calculate how much heating wire is required in this case, it is necessary to multiply the length of the water pipe to be heated and the correction factor. The last value makes it possible to understand how many meters of wire are required to wind one meter of pipes. Taking into account the spiral pitch and pipe diameter, the correction factor can be from 1.1 to 1.5. You can clearly see this dependence in the table below.
Diameter of water pipe, mm
Number of meters of heating cable per meter of water pipe
How to choose a suitable self-regulating wire
We talked about the principle of operation of a self-regulating heating cable. Let's move on to the next section - we will tell you how to choose a heating wire based on power. For installation inside and outside the pipe, we will use low-temperature samples that heat up to a maximum of +60 degrees. When calculating the heating cable, focus on the following indicators:
It is the number of conductive paths in a cable that affects its maximum output power.
- Internal arrangement when pipes pass underground - the optimal power is 5 W per linear meter;
- External location when pipes pass underground - depending on the depth, you can use samples with a power of 10-15 W/m;
- Any location for outdoor pipes - choose a thin heating cable with a power of 20-30 W.
The low-temperature heating self-regulating cable for protecting pipelines from freezing is thin and flexible, so it can be wrapped around water supply pipes without any problems.
Let's now see how long a self-regulating heating cable can be cut. We have already said that its length is an arbitrary indicator. But there are still some restrictions. The maximum recommended length is 80-100 meters, the minimum is 20-30 cm. As for the bending radius, it ranges from 6 diameters.
The cost of a self-regulating heating wire depends on its power, the range is quite large. For example, the price per meter of heating cable 30GSR2 with a power of 30 W/m is about 210-230 rubles. And the 16GSR2 modification with a power of 16 W will cost 180-190 rubles/m. You can buy it in plumbing and heating stores in your city, including construction hypermarkets.
When choosing a self-regulating heating cable, you must remember that it comes in two types:
Special double insulation allows heating cables to be installed directly inside the pipes. However, this option requires more labor-intensive work.
- Technical purpose - it is used for heating water pipes from the outside;
- With safe insulation - it can be laid inside the pipe, as it uses safe fluorine-containing insulation.
When purchasing this or that sample, be sure to check with the seller about the possibility of using a heating cable inside the water supply pipe. Also on sale are universal heating cables in silicone insulation, suitable for heating pipes and working as part of heated floors.
How to connect a heating cable. scheme
The principle of connecting a self-regulating heating cable is very simple. It is enough to simply connect its current-carrying wires to network 220. And be sure to insulate the second end of the heating cable so that there is no contact between the current-carrying wires. Grounding braid, if available.
Exactly how to connect the self-regulating cable depends on where you will use it, what tools you have, and what consumables you have available.
But the scheme is the same everywhere.
Here we will briefly consider the basic principles.
Below, three photographs briefly show the stages of connecting a self-regulating heating cable without a screen, with a screen, and a heating cable inside the pipe with an adhesive coupling kit (the latter is distinguished by an end cap). Detailed articles at the relevant links.
Everything is very simple. It is necessary to power the heating cable from the network; if the cable is shielded, connect the ground and seal the end of the self-regulating cable.
Connecting a heating cable without braid (screen) of a self-regulating type: Connecting a shielded self-regulating heating cable (with grounding). Detailed article >>Connecting a heating cable: Connecting a self-regulating heating cable for insertion into a drinking water pipe. (before “sealing” the coupling, remember to put on the seal!) detailed article: >>Heating cable inside the pipe connection:
If the cable is not braided, then you just need to power it from the network:
And be sure to insulate the second end of the heating cable. There should be no contact between two conductors:
If our heating cable has a grounding screen, then we connect the screen to the ground:
If we don’t want to ground or there is nowhere to ground, but there is a screen, then you can simply cut it off:
Self-regulating heating cable is very simple. Here is the whole scheme:
Answers to the questions: how to cut a cable, how many centimeters of insulation to remove, how long to strip the conductive cores, how to insulate, depend on how we will connect. A detailed connection diagram using an adhesive kit for sealing self-regulating cables can be found HERE.
Heating cable
The principle of connecting a self-regulating heating cable is very simple. It is enough to simply connect its current-carrying wires to the 220 network.
Types, design and operating principle of heating cable
There are two types of cables designed to protect pipes from freezing:
- Resistive;
- Self-regulating.
Resistive heating cable is available in two versions: single-core and two-core. The design with one conductor is quite simple: nichrome wire is filled with fluoroplastic insulation, over which a copper shielding braid is wound. The outside of the cable is covered with a heat-resistant plastic sheath.
A two-core resistive cable consists of two nichrome conductors that generate heat when current passes. Some systems use two wires with different purposes. One of them is heating, and the second is cold, conductive.
Where a foil screen is used rather than a copper braid, a drain core is installed. It contacts the foil and removes from it the electrical potential generated by electromagnetic fields. This core is used as grounding.
Considering the existing types of heating cable, we will focus on an improved modification of the resistive one. It was called zonal and was developed to eliminate the disadvantage of two-core cables
They cannot be cut into pieces or shortened by more than 10% of the total length. This requirement created and still creates inconvenience during installation.
Zonal cable design
By design, a zonal cable is a system of wire spirals wound on insulation and connected by current-carrying busbars. Trimming the spirals at the points of the contact protrusions does not interfere with their operation and makes it easy to select the thermal power. We also note that the minimum permissible length of such a cable is 1.5 meters.
The most popular type of pipe heating cable today is self-regulating. The main part of its design is a semiconductor conductive matrix. It changes electrical resistance in proportion to changes in ambient temperature.
Self-regulating heating cable device
The colder the soil or air surrounding such a cable, the greater its resistance becomes and, accordingly, more heat is generated.
Connecting to the network is an alternative method
We took this cable:
The heating conductor (3) and the conductors (1 and 2), through which current flows, cannot be short-circuited
- This is what the end looks like.
- Cleaned it up.
- Using this terminal block I connected it to the wire.
The opposite side must be insulated. It is prohibited to bridge the conductors. And we must ensure that they do not bridge in any environment. You can buy a special plug for this. They cost around 300 rubles apiece. But you can do everything yourself using improvised means, such as heat-shrink tubing and a heat gun.
- Thermal gun.
- Heat-shrink tubing.
- End of insulated cable.
The plug is made as follows. We put on the heat shrink tube. We warm it up with a hairdryer. Afterwards we fill the entire structure with a heat gun.
The same procedure can be done with the terminal block to which the cable power is connected. You can also wrap everything with electrical tape just in case. If operating conditions are harsh.
Installation of heating product
The heating cable can be laid inside the pipeline or attached to the outside. Each of these installation methods has its own advantages and disadvantages:
- It is possible to lay the cable inside only if the diameter of the pipeline allows this to be done. This technique is applicable when it is not possible to install external heating (the communications are covered with bitumen or concrete mortar). Single-core resistor-type products are not suitable for internal heating.
- The main advantage of outdoor installation is simplicity and ease of work, as well as practicality. In this case, you can use any types of heating cables.
Let's look at each installation method in more detail.
Internal installation
For indoor installation, a special moisture-resistant cable is suitable, which in addition must be resistant to acidic environments
For indoor installation, a special moisture-resistant cable is suitable, which in addition must be resistant to acidic environments. You do not need full access to the pipeline to perform installation. For this, a special coupling is used, through which the cable is inserted into the water supply system to the required length. After this, the other end of the wire is connected to the electrical network. Essentially, a coupling is a special tee that is screwed onto the pipeline at the exit point.
It’s worth knowing: the efficiency of this heating method is 2 times higher than that of external installation. Therefore, it is allowed to use a heating device of lower power. In addition, to insulate such a pipeline, a smaller layer of thermal insulation material will be needed.
The disadvantages of this insulation method include the following:
- This method is not suitable for heating sewer pipes. In this case, only external installation of the heating device is permitted.
- If the pipeline section has branches, taps and bends at an angle of 90 degrees or more, then this method is not suitable.
- Since the internal clearance of the pipe is slightly reduced due to the laid cable, the water pressure is reduced.
- On long sections, installation is quite difficult.
- Over time, the wire may become coated, which will lead to clogging of small diameter pipes.
Outdoor installation
The wire is wrapped around the pipeline or laid under it and fixed with aluminum film
This method of installing a heating product is quite simple. The wire is wrapped around the pipeline or laid under it and fixed with aluminum film. In addition to fixation, this film effectively reflects heat rays. The pipe is then wrapped with a layer of thermal insulation material.
This method of installing a heating product can be done with your own hands. In this case, the clearance of the pipes does not decrease, and a damaged heating product is easy to replace. In this case, you can use two ways to lay the cable:
- The cable is secured with tape on one side of the pipe. At the same time, to increase the contact area and heat transfer, the product is laid in a wave. After this, the pipe is insulated.
- It is better to wrap pipes laid in climatic regions with harsh winters with cable. In this case, the coil pitch is 50 mm. For more reliable fixation, the product is attached in several places using foil tape.
After completing any cable laying method, the entire pipe is tightly wrapped with tape. This will protect the thermal insulation material from strong heating, since exposure to high temperatures can be detrimental to it.
Attention: the resistive product is connected via a thermostat. It will ensure uniform heating and prevent excess energy consumption. If you install a self-regulating cable, connection through a thermostat is not required
If you install a self-regulating cable, connection through a thermostat is not required.
Features of installation work of a self-regulating cable
For water pipes, it is recommended to use a self-regulating wire with external food insulation.
What steps during installation should be highlighted and followed:
- Purchasing the necessary parts. First, determine the footage of the pipe for heating, and the size of the cable will be the same. You immediately need to buy the necessary elements for installation: couplings, a wire equipped with a Euro plug, an oil seal. The cable must have a metal braid inside and external insulation made of food-grade polymer materials. You may also need a tee, if there is none at the installation site, as well as an RCD of ten milliamps. A tee is required to insert the cable into the pipe; the cable is not inserted into a pipe that has a 90-degree bend. To do this, install a tee in the required place, through which the installation of the system continues.
To ensure cable performance, you should:
- Make a good seal at the ends.
- Provide the cable with a pass-through kit.
- Connect the heating cable with a piece of wire to a plug.
If you carefully perform the end seal, it means that the node on the site will have a tight connection. At the same time, the glue for couplings must also be of high quality.
How to connect the heating and power cables:
- The end of the cable is stripped of 5 cm of the insulating sheath. The metal braided cores cannot be removed; they are twisted into a single core. They are then used for grounding.
- Remove the top shells from the matrix.
- The conductors for conducting current are cleaned from the matrix.
- Heat shrink tubes are placed on the cables.
- Both cables are connected using a crimp sleeve.
- Insulate the cable connections using heat-shrinkable tubing.
- The braid of the wire is connected to the grounding conductor of the wire for power supply.
- The connecting node is completely insulated.
Once the insulation sleeves have cooled, you can move on to the next step.
Types of pipes to be heated
It is necessary to install the heating of sewer pipes with your own hands if they pass along the surface, are located in unheated basements or at a shallow depth in the ground.
The following need constant winter heating:
External sewerage (at the exit from the house) and laid above the freezing level of the soil. Pipelines leading to the receivers of treatment systems. Connecting pipes of multi-stage septic tanks. Flushing outlets of filters. Water pipes for wastewater treated by the septic tank, directed to the aeration field.
Fixing the heating cable on the pipe
If freezing occurs in the pipe at any of these stages, an ice plug will block the passage and the system will stop working. Then you will have to look for where the problem arose and master emergency heating of pipes with a cable yourself.
Operating principle of the heating system
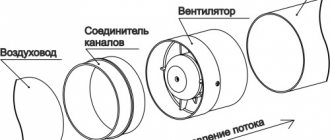
The heating system operates in automatic mode. Virtually no user intervention is required. This is ensured by the fact that the design provides for the presence of a special sensor that continuously receives data on the ambient temperature. It transmits a signal to the regulator, which closes the electrical current supply circuit and the heating elements come into action, warming up the layer of snow or ice.
Composition of the heating system
If necessary, activation can be done manually; usually an additional switch is provided for this.
Which cable to choose
To install heating systems, two main types of conductors are used - resistive and self-regulating.
Resistive is very similar in structure to a typical two-core power cable. It consists of several layers of insulation, inside of which there are heating conductors isolated from each other, connected to the power circuit. The temperature to which the wire warms up is always constant, as is the useful power and resistance value. The photo below shows its structure:
A self-regulating heating conductor for heating roofs and gutters is produced using a special technology and, based on its name, is capable of independently adjusting the heating temperature. This is possible due to its special structure. It consists of a matrix (it itself regulates the degree of heating depending on the ambient temperature, therefore changing the resistance) and external insulation, with an insulating shell and braiding inside. The photo below shows what the wire consists of:
To decide on the choice of heating element for the system, let’s look at their advantages and disadvantages. Thus, a resistive conductor is significantly cheaper in cost than a self-regulating one. However, the latter will allow you to automatically adjust to the desired temperature of the drains, as a result of which there is no need to use temperature sensors.
So what choice should you make? It is rational to use both types of elements when installing heating gutters and roofs. Their combined use reduces the overall cost of the project and has a positive effect on the final quality of the system. It is customary to use resistive elements for roofs, and self-regulating elements for drainage systems.
Operating principle and scope
The main difference between a self-regulating wire and cables of resistive and zonal operating principles is the design.
The resistive product operates on the principle of a boiler, so it is prohibited to shorten it. In this case, the conductors are the heating elements.
The zone heating wire can be cut into pieces, since its design involves the placement of parallel wires. A heating element consisting of high-resistance wire is placed between the cores. In certain areas, the wire comes into contact with the current-carrying conductor, which ensures heating in a specific section of the circuit.
As for the self-regulating cable, it differs from the previous two in the presence of a polymer matrix. The main elements are hidden under the braiding and protective screens - two current-carrying copper cores and a heating matrix. When examining the latter, you will find ordinary polyethylene. In fact, this device made it possible to create unique and modern heating elements. The matrix is a semiconductor that changes properties depending on the specific air temperature.
Example with heated floors
Self-regulating cables can be used to create heated floors. In the bathroom, the floor temperature will be lower, since heating equipment is usually installed in other rooms. The “degree” is also reduced by the fact that the floor in the bathroom or toilet is usually made of ceramic tiles, which are a “cold” building material. The temperature difference is not limited to this: at one end of the room it can be higher, at the other, which is closer to the windows, lower.
In this case, when using resistive or zone conductors, you will not be able to achieve a comfortable balance. The only way to do this is to divide the rooms into parts depending on the floor temperature under normal conditions, but this is a labor-intensive and painstaking process that involves installing thermostats and heat sensors.
The self-regulating wire eliminates the need to use such elements. You can place it over the entire surface of the floor, while the polymer matrix will take care of itself to create a uniformly heated floor surface. A simple but understandable example: you came home from the street and left your shoes, soaking wet, on a specific area of the floor. The self-regulating cable will detect a cold snap and begin to heat this area more strongly than others. This will happen until your boots warm up to the required temperature. And you will go outside in warm shoes! If there are no boots, then the cable does not heat up as much, which means energy savings occur.
Plumbing example
To prevent water from freezing in extreme cold, a self-regulating cable is used to wind the water valve. The valve is a structure of complex geometric shape, due to which the product cannot be in direct contact with every part of the metal. Zone and resistive wires will heat not only the valve, but also the environment.
If you install a self-regulating cable, the heating process will occur only in places of contact with metal. The principle of operation of the product is based on the efficiency of heat transfer: the more pronounced it is, the more the wire heats up. It is clear that upon contact with cooled metal, the thermal output will be much higher. This leads to an increase in the efficiency of the self-regulating wire compared to other heating analogues.
Example with roof heating
The roof is susceptible to icing in random areas, so it is impossible to determine a specific one. Thus, when using a zonal or resistive heating cable, you will have to lay it over the entire surface of the roof. This will significantly increase energy consumption.
Use a self-regulating cable with a semiconductor matrix, due to which only the area of the roof that freezes and where icicles can form will be heated. Moreover, after it is heated, the cable operates at half power for some time, so the efficiency of its operation is much higher.