How to make a pipe from tin - making tin pipes with your own hands
Home builders try to select the most budget-friendly options to solve problems. Therefore, the question of how to make a pipe from tin with your own hands is relevant for many amateur craftsmen. After all, a homemade pipe product made from tin can be compared with gutters or casings that are on the shelves in specialized stores.
Therefore, you need to learn in more detail the process of manufacturing a tin pipe that has characteristics similar to factory products.
Features of the source material
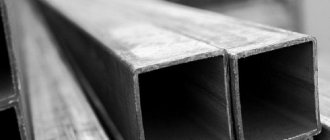
Before you start making a pipe from a sheet of metal, you should become more familiar with the material from which the pipe will be made and its features. To begin with, it is worth saying that this is a rolling type product, in other words, tin is a sheet of steel that has passed through the rollers of a rolling mill and has a thickness of 0.1-0.7 mm.
In addition to rolling operations, the technology for producing tin plates involves processing the finished rolled products to prevent the formation of corrosive processes. To do this, a layer of material is applied to the steel after rolling, which is not susceptible to corrosion.
The result of the performed actions is a steel sheet, the width of which can vary from 512 to 1000 mm, with a chrome or zinc coating. The finished product is flexible, so tin can be easily processed by hand. At the same time, rolled stiffeners can be compared in strength to steel products. This allows the use of tin in the manufacture of products of complex designs.
Features of working with tin
Galvanized sheet metal is an inexpensive and reliable material. Its main feature is its small thickness (most often at home, a sheet with a thickness of 0.3 to 1 mm is used) and plasticity. Thanks to its softness, it is convenient to work with galvanizing and making the desired product yourself will not present much difficulty even for a novice tinsmith.
At the same time, despite the softness of the steel, the resulting seam seam is very reliable and can withstand significant mechanical stress.
Required Tools
The list of tools and devices necessary for making a galvanized chimney pipe with your own hands is determined by the properties of tin, in particular softness and ductility. Processing this type of material does not require the special efforts required to work with sheet materials.
Therefore, when producing tin chimney pipes, the following set of tools is required:
- Scissors for cutting metal. This tool helps to cut sheet material into the required pieces without much difficulty, since the largest thickness of the sheet reaches 0.7 mm.
- Hammer with a soft striker. You can also use a wooden hammer, mallet, or a steel tool with a soft rubber grip. However, the latter option is used very carefully or not at all, since it can cause deformation of a thin sheet of tin and ruin the entire work.
- Pliers. With the help of this tool they solve the problem of how to bend a pipe made of tin, because it is steel, although thin, therefore it is impossible to bend it with your hands.
- Crafting table. This device is necessary when cutting material and when applying markings.
- Calibrating element. This can be a pipe product with a diameter of more than 10 centimeters, as well as a corner with edges of 7.5 centimeters. These elements must be well secured, since the joining seam will be riveted on their surface.
In addition to these tools, you should prepare a ruler or tape measure and a marker, which is a steel rod with a sharp sharpening.
What do we need to work?
Tough as it is
So, let's start our review of the technology with an analysis of the material. We will bend a pipe from tin:
- The basis of the tin sheet is steel that has been processed in a rolling mill. As a rule, sheets from 0.1 to 0.7 mm are found on sale - the thicker, the higher the price.
- To protect against corrosion, the steel base of the tin blank is coated with a material that prevents oxidation of the metal. Most often, compounds of chromium, tin and zinc are used for this.
- At the final stage, the product is cut in accordance with standard sizes. Most often, construction stores sell tin blanks with a width of 512 mm to 2 m, but if necessary, you can find or order wider parts.
This metal has obvious advantages:
- The small thickness ensures a reduction in the weight of tin products.
- Surface treatment quite effectively protects the steel base from corrosion upon contact with environmental factors.
- Thin metal is cut well, and very powerful tools are not required for processing - hand scissors are quite sufficient.
- Rolling and heat treatment of blanks during the production of sheet metal provide them with high ductility. Thanks to this, sheets and strips bend perfectly along a minimum radius without the risk of cracking.
The downside of tin is its low bending strength, therefore, when manufacturing open parts, stiffeners must be added to their design. However, this does not concern our situation: the pipe itself holds its shape perfectly.
Tinsmith's tools
As I already noted, tin is a soft and plastic material that is processed quite simply. But this simplicity also has a drawback: a metal tool not only leaves marks on the surface of the sheet metal, but can also damage the protective layer upon impact, causing the development of corrosion.
That is why the following tools are used to work with tin and thin galvanized steel:
- metal scissors. I use the most common, spring-loaded ones with not very long handles - with relatively little effort they cut 0.7 mm steel perfectly;
It is very important that the blades of the scissors are sharp, otherwise the edges of the workpieces will turn out uneven, and we will have to spend time and effort removing the “fringe”.
- hammer with a rubber/rubber-coated striker. Why rubber is needed is already clear - to prevent metal from hitting metal;
- mallet - in principle, performs the function of a hammer with a rubber attachment. Both tools are interchangeable, which does not prevent me from having both a mallet and a hammer at my disposal;
- pliers (several pieces, different sizes). They are used for bending metal, since it is impossible to grasp the short edges of a sheet or strip with your fingers, despite all its plasticity;
- calibrating blanks - steel pipes (I have two, with a diameter of 50 and 100 mm) and angles. Used as templates for bending round and rectangular parts, respectively;
- measuring instruments - ruler, tape measure, level and compass;
- Marker - A sharpened steel rod that is used to mark tin sheets. You can buy or sharpen a two-hundred nail.
- a workbench is the most necessary thing. The workbench functions as a place for marking the cutting stand, a work table - in general, it is on it that we will perform all the work.
Of course, this set will only be enough for us to make several pipes - up to two or three dozen. If the work is large-scale, then you cannot do without at least a sheet bender - a device that allows you to bend large metal blanks evenly.
Preparatory stage
First, markings are applied to the sheet of tin, according to which the semi-finished product will be cut. In other words, the necessary part is cut from a certain sheet of tin, from which the contour of the future pipe will be formed. The marking process is carried out as follows: the sheet metal is laid out on a workbench and a segment equal to the length of the pipe is measured from the top edge. A mark is placed here with a marker.
Then, using a square, draw a line along this mark perpendicular to the side edge. Now along this line the circumference of the pipe, the same is done along the upper edge. In this case, about 1.5 cm is added on both edges to form the joining edges. The upper and lower marks are connected and the workpiece is cut out.
To determine the circumference, you can use a tape measure, or you can remember your school geometry course.
How to make a pipe body from tin
The purpose of this stage is to form the pipe profile. A line is drawn along the length of the workpiece at the bottom and top along which the folds will be folded. In this case, 5 mm are measured on one side, and 10 mm on the other. The folds must be bent at an angle of 90 0. To do this, the workpiece is laid on a steel corner, aligning the fold line with the edge of the corner. Hitting the edge with a mallet, bend it to the perpendicular side of the corner.
It is recommended to bend the product gradually, passing the hammer along the entire length. In this case, you can start bending using pliers.
Now, on the fold, the size of which is 10 mm, another fold of the fold is made to form a kind of letter G. In the process of bending the fold, you need to ensure that the upper bend is parallel to the workpiece, and its length is 5 millimeters. Therefore, when drawing a fold line, measure 0.5 cm once on one side, and 0.5 cm twice on the other side.
How to make a socket on a galvanized metal pipe
A bell is a technological extension designed for the convenience of installing communication elements with each other and inserting them into a plane. The socket on the finished pipe is made along a wide edge, using the method of flaring the edge to a depth of 15-20mm. In the factory, a special tool is used for flaring - a rolling cone.
At home, you can expand the edge of the pipe yourself using pliers. Ideally, install special rings—stiffening ribs—at the ends of the workpiece.
Fig.3. Flaring diagram:
Processing the seam joint
The final stage involves processing the joining seam, that is, crimping it. To do this, the upper part of the L-shaped fold is folded down, wrapping the edge of the other fold. The result should be a kind of sandwich located perpendicular to the pipe. To obtain a joining seam, you need to press the sandwich to the product.
For greater reliability, the joining seam is strengthened using rivets. However, do-it-yourself tin pipes using this joining method do not require additional reinforcement.
How to make a pipe from tin - making tin pipes with your own hands
Home builders try to select the most budget-friendly options to solve problems. Therefore, the question of how to make a pipe from tin with your own hands is relevant for many amateur craftsmen. After all, a homemade pipe product made from tin can be compared with gutters or casings that are on the shelves in specialized stores.
Therefore, you need to learn in more detail the process of manufacturing a tin pipe that has characteristics similar to factory products.
Features of the source material
Before you start making a pipe from a sheet of metal, you should become more familiar with the material from which the pipe will be made and its features. To begin with, it is worth saying that this is a rolling type product, in other words, tin is a sheet of steel that has passed through the rollers of a rolling mill and has a thickness of 0.1-0.7 mm.
In addition to rolling operations, the technology for producing tin plates involves processing the finished rolled products to prevent the formation of corrosive processes. To do this, a layer of material is applied to the steel after rolling, which is not susceptible to corrosion.
The result of the performed actions is a steel sheet, the width of which can vary from 512 to 1000 mm, with a chrome or zinc coating. The finished product is flexible, so tin can be easily processed by hand. At the same time, rolled stiffeners can be compared in strength to steel products. This allows the use of tin in the manufacture of products of complex designs.
Required Tools
The list of tools and devices necessary for making a galvanized chimney pipe with your own hands is determined by the properties of tin, in particular softness and ductility. Processing this type of material does not require the special efforts required to work with sheet materials.
Therefore, when producing tin chimney pipes, the following set of tools is required:
- Scissors for cutting metal. This tool helps to cut sheet material into the required pieces without much difficulty, since the largest thickness of the sheet reaches 0.7 mm.
- Hammer with a soft striker. You can also use a wooden hammer, mallet, or a steel tool with a soft rubber grip. However, the latter option is used very carefully or not at all, since it can cause deformation of a thin sheet of tin and ruin the entire work.
- Pliers. With the help of this tool they solve the problem of how to bend a pipe made of tin, because it is steel, although thin, therefore it is impossible to bend it with your hands.
- Crafting table. This device is necessary when cutting material and when applying markings.
- Calibrating element. This can be a pipe product with a diameter of more than 10 centimeters, as well as a corner with edges of 7.5 centimeters. These elements must be well secured, since the joining seam will be riveted on their surface.
In addition to these tools, you should prepare a ruler or tape measure and a marker, which is a steel rod with a sharp sharpening.
What you need for work
After purchasing a sheet with the necessary characteristics, you should stock up on the necessary equipment.
Required tools:
- Metal scissors. Choose a convenient tool for cutting a wide sheet of metal;
- A hand jackhammer (also known as a mallet) with a rubber or wooden tip. The mallet should be hard, heavy, but without sharp edges;
- Steel pipe blank for molding the pipe body (“gun”). Its length is at least 1 meter, its diameter depends on the required diameter of the finished product;
- Ruler;
- Tool for marking galvanized steel (sharp metal rod);
- Crafting table. At the corner of the workbench there should be a metal corner, at least 1 m long. It will be used to bend the edges of the pipe, so it must be fastened very securely;
- Pliers.
Preparatory stage
First, markings are applied to the sheet of tin, according to which the semi-finished product will be cut. In other words, the necessary part is cut from a certain sheet of tin, from which the contour of the future pipe will be formed. The marking process is carried out as follows: the sheet metal is laid out on a workbench and a segment equal to the length of the pipe is measured from the top edge. A mark is placed here with a marker.
Then, using a square, draw a line along this mark perpendicular to the side edge. Now along this line the circumference of the pipe, the same is done along the upper edge. In this case, about 1.5 cm is added on both edges to form the joining edges. The upper and lower marks are connected and the workpiece is cut out.
How to make a pipe body from tin
The purpose of this stage is to form the pipe profile. A line is drawn along the length of the workpiece at the bottom and top along which the folds will be folded. In this case, 5 mm are measured on one side, and 10 mm on the other. The folds must be bent at an angle of 90 0. To do this, the workpiece is laid on a steel corner, aligning the fold line with the edge of the corner. Hitting the edge with a mallet, bend it to the perpendicular side of the corner.
It is recommended to bend the product gradually, passing the hammer along the entire length. In this case, you can start bending using pliers.
Now, on the fold, the size of which is 10 mm, another fold of the fold is made to form a kind of letter G. In the process of bending the fold, you need to ensure that the upper bend is parallel to the workpiece, and its length is 5 millimeters. Therefore, when drawing a fold line, measure 0.5 cm once on one side, and 0.5 cm twice on the other side.
Having completed the molding of the folds, you can proceed to the formation of the pipe body. To do this, the workpiece sheet is placed on the calibrating element and begins to be tapped with a mallet or other suitable tool to obtain a profile of a certain shape. The workpiece first takes on a U-shape and then becomes round. In this case, the folds should join together.
Step-by-step instructions for making a galvanized pipe with your own hands
Size calculation
A standard galvanized sheet sheet has dimensions of 1000x2000mm, or 1250x2500mm, although other cuts can be found.
The width of the workpiece is calculated using the formula:
L (circumference, also known as the width of the workpiece) = 2*3.14*R (R is the required pipe radius, mm).
Thus, to make a pipe with a diameter of 100 mm, you will need a blank with a width
2x3.14x50mm = 314mm.
To the resulting finishing length we add a bend of 15mm and get the required value for cutting -300mm.
An important point is that the width of the workpiece is not a constant value. On one side it is 330mm, on the other 340 (for a pipe with a diameter of 100mm). This is done for the convenience of subsequent installation of pipes with each other or with other elements of the system.
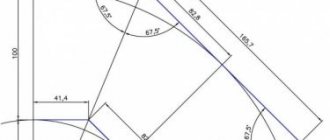
Drawing and diagram
Rice. 1. Pattern of a sheet for a pipe with a diameter of 100 mm.
The fold formation pattern is as follows:
Cutting out the workpiece
After calculating the required dimensions, a blank for the future product is cut out. For this:
- A sheet of tin is laid out on a horizontal surface, markings are applied in straight lines, strictly according to the dimensions of the semi-finished product.
For a pipe with a diameter of 100 mm, along one edge of the sheet, sections of 340 and 330 mm are measured one after another (see Fig. 1). The same segments, but in the opposite sequence, are marked on the opposite side. All perpendicular lines should be drawn using a square.
Don't forget to add 15-20mm to the width of the product on the bend!
- The tin is cut into rectangles according to the drawing.
Formation of a profile
The resulting rectangular blanks must be “transformed” into a pipe. To do this, we will create her profile.
Stages of profile formation:
- Along the entire length of the workpiece, with an indentation of 5 mm on one edge and 10 mm on the other, two lines are drawn. These lines are the boundaries of the folds.
In our case, a seam or a seam lock means a type of connection between the edges of a pipe;
- We bend the edges along the marked line, strictly at an angle of 90 0. We use a metal corner for this, aligning the fold line with the edge of the corner. We start with pliers, continue with a mallet;
- We pass the hammer along the entire length, gradually forming the future seam;
- On a 10mm wide bend we make another bend in the shape of the letter G. The width of the top bar is 5mm, the location is strictly parallel to the workpiece;
- After forming the folds, we move on to the pipe body. We place the workpiece on the gun and use a hammer to give the sheet a round shape.
Processing the butt seam
The final stage is processing (crimping) the butt seam. To do this, bend the upper part of the L-shaped fold down, wrapping it around the opposite edge. The result is a fold of several layers of metal, which must be pressed against the pipe along its entire length.
In the factory, additional strength is added to the seam using special metal rivets.
For handmade products, no additional processing is required.
Processing the seam joint
The final stage involves processing the joining seam, that is, crimping it. To do this, the upper part of the L-shaped fold is folded down, wrapping the edge of the other fold. The result should be a kind of sandwich located perpendicular to the pipe. To obtain a joining seam, you need to press the sandwich to the product.
For greater reliability, the joining seam is strengthened using rivets. However, do-it-yourself tin pipes using this joining method do not require additional reinforcement.
How to make a galvanized pipe with your own hands?
You can buy galvanized pipes freely, but the cost of such products can be quite high, so the desire to make a galvanized pipe with your own hands is dictated, first of all, by considerations of economy.
At the same time, the production of galvanized pipes does not require the use of special efforts, special expensive devices and tools and any professional knowledge, so any home craftsman who has a set of standard carpentry tools can cope with this.
Make it yourself or order it
What is better, buy a galvanized sheet of the required thickness and bend the pipe yourself, or go to the store and buy a finished product?
As usual, let's start with the price. A finished pipe with a diameter of 100 mm and a length of 3 meters will cost you and me about 500 rubles.
The cost of the material in this case is 150 rubles, the rest is labor costs and the seller’s markup.
What if you plan to organize an entire drainage system? You can see for yourself that you will have to overpay for finished products by 2.5-3 times. Making your own pipes will greatly ease the financial burden.
In addition, factory products have strictly defined dimensions, and sometimes it is difficult to choose the right one for your system. And the thickness of the finished pipe usually does not exceed 1 mm.
You should definitely remember that any factory-made product, unlike a home-made one, undergoes strict quality control control, has a perfectly round surface and a precision weld.
Whether a home master will be able to ensure compliance with all these conditions is far from certain.
Characteristics of galvanized pipes
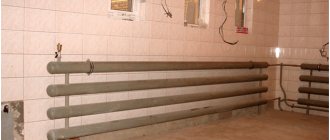
Pipes made of galvanized metal are used to equip chimneys; they are popular due to their light weight and, accordingly, ease of installation. Galvanized chimneys do not require the construction of a foundation, and this significantly reduces the cost of chimney equipment.
Such pipes meet fire safety standards, withstanding temperatures up to 900°, so they can even be used for smoke removal from solid fuel heating boilers and furnaces.
Galvanized pipes are also used in home construction to equip drains. Such pipes are already quite affordable in cost, but the process can be made even cheaper by using hand-made products.
What you need to make a galvanized pipe
At home, to make a galvanized pipe, you need a sheet of tin; the material does not require much effort due to its softness and ductility.
Tin plates are industrially made from thin sheet steel with a thickness of 0.1 to 0.7 mm on rolling machines, after which they are coated with an anti-corrosion protective layer of chrome, tin or zinc. Finally, the workpieces are cut to standard sizes, ranging from 512 mm to 2000 mm wide.
The strength of such products is in no way inferior to their steel counterparts, especially if the material has additional stiffening ribs, but at the same time it is very plastic and allows the installation of pipelines of complex shapes by hand. Anti-corrosion coating protects the pipe from the effects of the external environment.
The problem with such pipes is insufficient bending strength, therefore, for the manufacture of open parts, stiffeners are added to the structure to strengthen the product.
- The stores offer a wide range of such pipes of various sizes: single-circuit;
- double-circuit (made in the form of a sandwich and consisting of an internal and external pipe);
- corrugated, characterized by increased flexibility.
Note! At home, it is technically possible to make only a single-circuit pipe.
When choosing sheet thickness, the purpose of the pipe should be taken into account. For example, a galvanized pipe for smoke removal from solid fuel stoves and fireplaces must have increased resistance to high temperatures, and at the same time high anti-corrosion properties.
It is important! The higher the temperature of the working environment, the thicker the pipe walls should be.
Tools
To work, you need special tools to bend, correctly measure the bend angle and cut the pipe to the required length.
Material characteristics
Thin sheet steel coated with zinc in the factory must comply with GOST 14918-80. Main characteristics that you should pay attention to when choosing:
- Sheet thickness
The most common galvanizing thicknesses are from 0.35 to 3mm. The thinner the sheet, the easier it is to process, which is important for making products at home. But don’t forget – less thickness means less strength.
- Zinc coating thickness
There are 3 classes of material, in accordance with the thickness of the zinc coating layer. Let's summarize the data in a table for convenience.
| Steel class based on zinc layer thickness | Weight of protective layer on both sides (g) | Coating thickness (µm) |
| P (Increased) | 570 — 855 | 40-60 |
| I | 258-570 | 18-40 |
| II | 142.5-258 | 10-18 |
GOST allows some deviations in thickness and the presence of some defects
Marking:
- NR – normal thickness variation;
- UR – reduced thickness variation.
Sheet appearance options:
- KR – With crystallization patterns (some cracks and darkening);
- MT - without patterns.
An important characteristic for the manufacture of pipes is the ability of the metal sheet to be drawn:
- N – normal hood;
- G – deep drawing;
- VG – very deep drawing.
Steels marked VG have the highest ductility, N - correspondingly the lowest.
Instructions for making galvanized pipes
First of all, you need to mark the sheet of iron by drawing fold lines of folds on one side measuring 5 mm, on the other two times 5 mm each, the fold on one side should be wider than the second in order to form a strong seam in the future. Bend the sheet at an angle of 90° on both sides using a corner and pliers.
It is important! The form should be bent gradually, moving from one edge to the other along the fold line.
Then, turning the workpiece, form folds, bring the angle to 135-140°, tapping the edges of the tin with a mallet or hammer with a soft striker carefully so as not to damage the material of the product. After forming the folds, you can proceed to forming the pipe itself.
Fix the workpiece on the calibration template to give it the desired shape, and tap again until the folds are connected.
The wide edge is once again bent parallel to the plane of the product at an angle of 90°.
The last stage is connecting the ends together with a flat seam using a mallet.
Align the folds, bend the horizontal part of the second fold, wrapping it around the first fold, and then bend this seam, pressing it tightly to the plane of the pipe.
You can additionally strengthen the joint with metal rivets using a welding machine, although most often galvanized pipes connected using a flat seam do not need additional strengthening.
Work technology
Step 1. Preparation
Instructions for making a pipe from tin begin with a description of the preparation of the workpiece:
- On a workbench or other flat surface we roll out sheet metal, leveling it using mechanical action if necessary.
- We measure the length and width of the pipe by marking the material with chalk, marker or marker. When marking, we take into account that the width of the workpiece should be equal to the circumference of the pipe + 1.5...1.6 cm for forming a seam.
- We control the perpendicularity of the drawn lines using a square.
- We take scissors and make first a side and then a longitudinal cut. You need to cut strictly along the lines, trying not to make large indents. If the cut line “walks”, problems may arise at the stage of seam formation.
- Once again we level our workpiece. If necessary, tap the edges to remove waves and process them, removing burrs.
Step 2. Pipe Forming
Now we need to make a round pipe from the blank. And at the first stage we create a profile:
- On one side of the part we draw a fold line at a distance of 0.5 cm from the edge.
- On the other side we draw the same line at a distance of 1 cm.
- We place the workpiece on a steel corner and bend the folds perpendicular to the plane of the sheet. To bend, use a mallet, adjusting the metal with pliers if necessary.
- I usually do this: first I grab the metal with pliers, forming a bend about 2-3 cm wide. After the direction of deformation has been set, I change the pliers to a mallet and continue working, using a steel template as a support.
- When working according to a template, we do not apply excessive force, otherwise we risk damaging the material and “scraping off” part of the protective coating,
- Next, we divide the bent fold 1 cm wide in half along the width and repeat the fold. Now we need to bend a strip 0.5 cm wide parallel to the main workpiece.
- Now we form the pipe profile. We place the workpiece on the calibrating surface and tap it, first bending an arc, and then a full circle. The smoother it is, the better - there will be less fiddling around at the final stage of work.
Step 3. Processing the joint
Now we need to form a seam that will turn our workpiece into the actual pipe:
- We combine the folds, bent perpendicular to the main part, pressing them tightly against each other.
- We bend the horizontal part of the long fold so that it wraps around the combined parts.
- We lay the resulting three-layer structure on a workbench and carefully tap it, compacting it thoroughly. At the same time, we make sure that there are no distortions that will negatively affect the strength of the structure.
- We bend the seam from the folds assembled together towards the pipe wall. We put the product on the calibration blank and tap the joint again. The resulting connection holds perfectly without any fasteners due to the plasticity of the sheet metal.
When producing large-diameter pipes that experience significant loads, the width of the folds can be increased and the joint further strengthened with rivets.