The site's email often receives questions about how to connect one or more underfloor heating circuits to an existing heating system.
In this article you will learn how to do this. The underfloor heating circuit can be connected to a system, for example, radiator heating using a local underfloor heating connection module. To do this, you need to purchase this module or make it yourself.
Let's consider an everyday example: You have a radiator heating system installed in your house and you have installed a heated floor circuit, for example, in an extension and want to connect it to your heating system, but at the same time you are wondering how to do it correctly. And on the Internet, I’ll tell you, there is a lot of conflicting information regarding such a connection.
That is why in this article I decided to share with you my experience of connecting a heated floor circuit to an existing heating system.
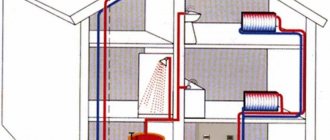
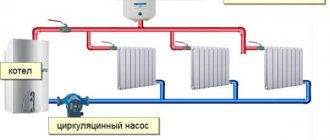
First, let's look at how the heating system should be designed, to which a heated floor circuit can be connected. The system must have its own circulation pump. It can be two-pipe, single-pipe (Leningradka) or gravity.
Construction of a water system
Making a warm water floor in a bathroom with your own hands is a more difficult task, but why not try to cope with it... We have to assemble a structure from pipes and connect them to a source of hot water.
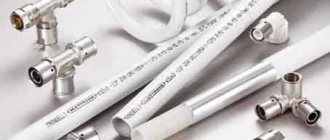
Metal-plastic and polyethylene pipes are suitable for the pipeline. Both materials have flexibility and low hydraulic resistance.
Thorough theoretical preparation
One heating circuit can cover an area of up to 20 square meters. meters, which is enough for a bathroom, but if the floor is planned to be divided into autonomous zones, then water must be supplied to them through a distribution manifold.
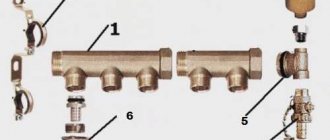
Assembling the manifold consists of connecting all its sections with a pump and mixer, installing thermometers, taps, and air vents. After this, the assembled distributor can be mounted on the wall and pipes can be connected to it
The collector must have flow regulators. With the same water supply to circuits of different lengths, they will heat unevenly. A longer circuit will heat up worse. Moreover, the flow of water in it may even stop due to strong resistance. To eliminate these troubles, flow regulators in the manifold are used.
A mixer is also a necessary thing. The maximum heating temperature in the floors is 50°C; water is supplied to the heating radiators at higher temperatures. If you drain water from the general heating system into the floor, then it must be diluted with cold water to the desired temperature, which is what the mixer does
A number of strict conditions in order to proceed with installation:
- The presence of a closed-type heating system using a circulation pump.
- A double-circuit boiler must have a power reserve.
- All work is carried out with the heating system completely turned off.
The pipes must be freed from coolant.
In the thickness of a warm floor, one can distinguish the obligatory functional layers:
- base;
- hydro- and thermal insulation;
- pipeline made of durable pipes;
- concrete screed or gypsum fiber;
- decorative floor covering.
In wooden houses, you can also make a water floor, but you should worry about reliable waterproofing. It needs to be done in several layers, this is the only way the wooden base of the floor will last for many years without repair.
Step-by-step guide for installing a water floor
The construction of a water system is a cycle that includes standard types of work.
Stage 1. Clean the floor and, if necessary, remove the old covering.
Stage 2. Waterproofing the floor. We lay a waterproofing film on the floor. Preferably in one piece, but if there are several strips, then they should be laid overlapping and the seams should be joined with a blowtorch. The waterproofing material should also cover the surface of the walls (up to 10 cm upward).
Stage 3. Fill the rough screed with a mixture of expanded clay and cement (3-5 cm thick). Dry thoroughly (up to a week), sprinkling the surface with water in the first days to prevent cracks.
Stage 4. We insulate the surface with foam plastic, polystyrene or other similar material. We spread polyurethane with a foil reflective coating on top. We seal the joints with tape. Now the heat from the pipes will be directed only towards the room.
Stage 5. Lay the pipes. We bend them according to the developed diagram, maintain 15-20 cm between the pipes. We fasten the resulting curved structure. We connect the water supply pipe to the flow distribution manifold.
Laying pipes in a “snake” pattern is the most common. An alternative is snail laying. The first option is easier to install, but provides uneven heating. In the second option, the heating is generally more uniform, but there may be cold areas of the floor, since the return turns lie between the supply turns
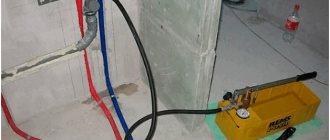
Stage 6. Turn on the coolant supply and check for water leaks in the system.
Stage 7. We make the second screed with the same solution as the rough one. If unevenness of up to 5 mm was allowed in the rough screed, now we pre-install beacon slats to perfectly level the surface.
One of the purposes of underfloor heating screed is heat accumulation. With a thick screed near a water floor, heat accumulation is higher
The finishing layer of screed takes 5-7 days to dry - the same as the rough layer. After complete drying, you can begin finishing the floor and laying floor tiles.
Regulations and restrictions
The main feature of water-heated floors is that they are not high-temperature. According to regulations, heating of the coolant in this system should not exceed 55 degrees. But in practice, the standard is considered to be from 35 to 45 degrees.
It is worth noting that the temperature of the liquid circulating through the pipes differs from the degree of heating of the floor. If there are 35 - 45 degrees near the water, the surface will warm up to an average of +28.
According to the standards, the recommended floor temperature for private houses or apartments is:
- kitchen, bedroom, living room - 26 degrees;
- in rooms where people are not constantly present (bathtub, toilet, corridor) - 31.
A warm water floor is an independent pipeline, which can be single-circuit, double-circuit, or even multi-loop, so the design requires a separate circulation pump.
It can be built into the boiler, or can be located separately. With its help, not only the movement of water is carried out, but also the temperature difference of the liquid at the inlet and outlet is adjusted. According to the standards, the permissible difference is 10 degrees.
Important! When choosing a pumping device, the main thing is not to make a mistake with the power. The maximum permitted coolant speed is 0.6 m/s.
Based on these standards and restrictions, you can assemble a heated floor with your own hands.
Selection of heating pipes
Only a few types of pipes are used for heating systems, so there will not be any particular difficulties in choosing them:
Steel pipes. This material has very high mechanical strength, so it is not afraid of various external damages. Another thing is that steel is susceptible to corrosion, so it can be damaged from the inside. Steel pipes accumulate heat well and partially influence the intensity of convection in the room. Installing heating in an apartment using steel pipes requires welding, so this work requires relevant experience or a good specialist.
Metal-plastic pipes. One of the most inexpensive and easy-to-install pipe options for a heating system. The disadvantage is the large number of connections, which greatly increases the likelihood of circuit leaks. To reduce the likelihood of leaks to a minimum, you need competent heating wiring in the apartment and careful monitoring of it during operation.
Plastic pipes. Another relatively inexpensive option that has a lot of positive qualities. The advantages include resistance to rotting and corrosion, as well as the highest reliability of the connections - they are processed by soldering, and if the work is done correctly, the seams will never leak
This material has no particular disadvantages, but you need to pay close attention to the characteristics of specific products when purchasing them.
Norms and restrictions
Warm water floor is a low-temperature heating system. According to existing standards, the maximum temperature level of the coolant should be +55 degrees. During operation, standard heating usually ranges from +35 to +45, with the floor heating up to +26 - +31. The standards for different premises differ:
- for bedroom, kitchen, living room - +26;
- for bath, toilet, hallway—+31.
Liquid circulates through the floor lines using a pump. In addition, it allows you to regulate the heating level in the room. You need to select it based on the speed of water movement. The maximum permissible for hydrofloors is 0.6 m/s.
The difference between the heating of water at the supply and outlet should not be within 10 degrees.
Connecting the heating circuit of a warm floor
Next, you need to figure out how to connect the heated floor to the heating of the whole house. The article describes an option using a 3-way valve and a bypass designed to mix a less heated coolant in the underfloor heating circuit and hot water from the main heating system.
There are three main positions of the bypass valve:
- By shutting off the bypass, the tenant will direct all the hot water to the underfloor heating system.
- The next position of the tap handle will lead to the supply of water to the bypass and its further passage through a small circle of the circuit.
- In the third case, the coolant will go through a full cycle with its supply being recharged through the “return”.
The essence of the return in this case is quite simple. This element is introduced into the connection between the heating circuit of the heated floor and the main heating system in order to effectively regulate the temperature in the pipes located on the floor. The main task is to mix the cooled coolant into the supplied hot one.
Thus, the amount of coolant does not change, but its temperature is regulated, both in the direction of floor heating and in the main heating system. At the same time, the boiler operates in the mode that it was before properly making a heated floor from heating with your own hands.
Functionally, the valve’s task is to change the coolant pressure power. The essence of using this element is very simple: the stronger the coolant pressure, the more evenly the entire system warms up and works more efficiently.
If professionals are involved in the work, then there is no need to run to a mechanic or a construction company with a photo of the existing heating system. The work can be carried out exclusively on site, since each underfloor heating system project is individual.
Bottom line
The article describes in detail how to properly make underfloor heating so that it is efficient, reliable and safe to use. Naturally, the method described in the article is not the only one, and specialists will help you become more familiar with the various elements of the heating system. They can also take responsibility for all stages of the work - from the purchase of materials and components to their installation, installation and testing of floor heating.
Connecting a self-regulating heating cable and what it is.
This miracle of invention looks like an ordinary wire. It is heated by electricity. At the same time, it has the property of self-regulation of power depending on the room temperature.
That is, there is self-adaptation to the environment. When the temperature in the room or part of the room drops (for example, near a window), the cable heats up more. Conversely, as the temperature rises, it cools down.
The trick lies in the “Smart” polymer matrix, which is responsible for changing the heating temperature of the cable.
Installation of a warm water floor
Any warm water floor system consists of such basic elements as pipes, as well as technology for their fixation. Typically, two methods are used:
- Dry method, using wood and polystyrene, which form the base on which the pipes are laid. To ensure that the heat is distributed more evenly, the pipes are also laid evenly, in grooves specially provided for this. After this, hard material, such as plywood, OSB, gypsum fiber board, etc., is laid on top of the pipes. A solid base is used for laying flooring of any origin.
- Wet method, which involves laying the pipe system in a screed. The technology consists of several layers. The first layer is insulation with a pipe fixation system, the second layer represents the heating system itself, and the third layer is a screed. The floor covering is laid directly on the screed. It is advisable to provide a layer of waterproofing so as not to flood the neighbors below. For greater reliability, a reinforcing mesh can be installed in the screed. The entire system will be more reliable, since the reinforcement will prevent cracking of the screed, which, in turn, will protect the heating system from damage. You should not ignore the presence of a damper tape, which should be present around the perimeter of the room, as well as at the junctions of two circuits.
Neither one nor the other system can be called ideal, although laying pipes in a screed is considered a more optimal option, therefore, most people prefer this technology.
System selection
When choosing a system, it is necessary to analyze a number of factors. Dry systems are more expensive, but they allow you to operate them much faster. Their use is preferable for a number of reasons.
The first and main reason is the weight of the entire system. The heating system embedded in the screed is significant in weight, so not all structures are able to withstand such weight. The thickness of the screed can reach at least 6 cm, and this is a significant weight. In addition, tiles can be laid on the screed, which are not lightweight, especially if they are intended for laying on the floor. If you are not sure that the structure will withstand such a load, it is better to abandon the “wet” option, giving preference to the “dry” option.
The second reason is related to the maintainability of the system. Any system can fail at any time, no matter how well it is installed. Despite the fact that heated floors are laid without joints or connections, they sometimes burst due to the slightest defect or are damaged as a result of repair work or other manipulations. If a pipe in a screed bursts or is damaged, it is very difficult to repair it, since you will have to break the screed, and this is sometimes not easy. Naturally, after renovation, this place is considered the most susceptible to various mechanical loads.
Installation process of water heated floor
It is not recommended to turn on heated floors in a screed until the screed is completely dry, which is about 30 days.
If the screed is laid on a wooden floor, then this in itself is a real problem. A wooden base, and even under the influence of high temperature, and even more so if the technology is violated, will quickly become unusable, collapsing the entire system at any moment.
The reasons are quite significant, so in certain cases it is better to give preference to dry technologies, and if you solve the problem yourself, then such a technology may not be as expensive as it seems. The most expensive element is metal plates, but they are not difficult to make yourself. It is better if aluminum is used as the manufacturing material. The only problem is to bend the metal so that grooves are created for laying pipes.
An option for installing a heated floor system based on polystyrene, made using “dry” technology, is presented in the video.
Water heated floor on a wooden base - Part 2 - Laying the contours
Watch this video on YouTube
Laying methods
The most common methods of installing heated floors include:
- with screed;
- with logs (when the system pipes are laid on top of wooden logs);
- laying method (using special plates).
Floor installation methods
Each of the options is effective in its own way, but in order to choose the most optimal installation method, you need to become more familiar with the principles of their implementation.
With screed
To install a heated floor using a screed, you need to prepare some materials. These include:
Warm water floor with screed
- pipe made of polymer or plastic;
- fasteners;
- pump to ensure water circulation in the system;
- special fittings and valves;
- manifold for heated floors.
Screed thickness for water heated floors
After assembly, the finished system is filled with a layer of cement mortar. The surface of the screed, like its structure, must be free of any voids or defects. Otherwise, this may lead to deformation of individual parts of the system. After the screed has dried, the tiles are laid.
Laying the mortar
With lags
This method is used mainly in houses made of wood. During the work, polystyrene or mineral wool is laid between the lags. The installation process can be carried out in two ways - modular or rack. In the first case, large chipboard modules are used, in which special channels for pipes are made. When choosing the slatted method, the installation of pipes and plates is carried out between slats made of chipboard.
Warm water floor with logs
For fixation, small aluminum plates with special grooves for fixation are used. Once the system is installed, gypsum fiber sheets must be laid on top of it. Only after this can you begin laying tiles.
How to make underfloor heating on a wooden floor
Laying method
It consists of using polystyrene plates with special grooves for installing heating system pipes. The advantages of the flooring method include ease of installation. The laying method is used under certain conditions, for example, when the ceiling in the room is low, as well as when it is impossible to perform a screed (for technical reasons). The laying method is also used when the strength of the floors is insufficient.
Layered method of installing heated floors
Laminate or parquet is usually laid on top of polystyrene slabs. If we talk about tiles, then for laying them you need a moisture-resistant material, for example, sheets of gypsum fiber (a durable, moisture-resistant building material that has successfully replaced plasterboard).
Types of water heated flooring systems
Special radiator models
In apartment buildings, heating wiring is often made in such a way that only side or bottom connection of heating radiators is possible. Changes to the project can only be made in agreement with the commission, and this is a long and tedious task. But many manufacturers of radiator batteries anticipate this problem and produce systems with diagonally routed collectors:
- For lateral connection of radiators, a flow extraction extension is used. This is a bracket with a tube installed, which is screwed into the lower or upper inlet. Due to the bracket, the coolant is taken in or released in the far corner of the radiator and the flow passes through the entire battery diagonally.
- For the bottom connection of radiators, insulation of the outer section is most often used. To do this, a plug is installed at the factory at the junction of the lower manifold of the last and penultimate sections. It blocks the direct flow of the coolant, turning the entire remaining battery into a radiator with a diagonal connection.
Such upgrades can be made with already installed batteries. Brackets with flow extensions can be easily found at plumbing supply stores. An experienced plumber will be required for installation, as it will be necessary to disconnect the radiators from the network, disassemble the approach or outlet pipeline and seal the assembly.
There are similar solutions for covering the end section. Most often this is a coupling that twists at the exit point and has a remote plug. It closes the hole between the penultimate and last sections of the radiator and redirects the main coolant flow along a bypass path.
And finally, some useful tips:
- do not make branches that are too long, especially to other floors. The coolant must reach the radiator;
- When placing the collector in a room, do not place it at the end. The length of the branches to the radiators should be approximately the same. Otherwise, the temperature of the coolant in different radiators may differ markedly;
- When installing pipes in the floor or ceiling, lead them to the radiators entirely, without breaking the connections. Otherwise, if one day such a pipe leaks, it will be a very big problem.
As you can see, there is nothing complicated in the connection diagrams for heating radiators of typical heating systems. Anyone with a general secondary education can understand them in order to design and install their own system. Of course, when creating heating systems, it is necessary to take into account many nuances, but this is a topic for another discussion.
Laying waterproofing and insulation
For waterproofing, we recommend using inexpensive polyethylene film. Its main advantage is that it stretches well, so during operation there will be no cracks, tears or other defects in the waterproofing layer.
- If you need to create thermal insulation greater than 5 cm, then we recommend that you buy 1 wide tile; the best option would be 2 thin ones.
- The insulation should be taken with a reserve so that you have enough to cover all connections.
- Some craftsmen cut tongue-and-groove grooves into the slabs; this will take more time, but the heat-insulating layer will be firmly fixed.
- Sometimes strong gaps appear in the places where the insulation boards drain, they need to be foamed with polyurethane foam.
If you think that the work ahead is difficult, then you can study the question of how to make an electric heated floor. Because its installation will not take so much time and effort.
Pros and cons of two-pipe wiring
First, you need to consider the positive characteristics of using two-pipe circuits:
- The gravity flow circuit does not depend on the state of electricity. However, in this case, you will have to choose an electrically independent type of boiler, and additionally requires piping without connecting to the general network.
- The dead-end system is one of the best analogues of single-pipe systems. Experts highlight simple installation and versatility as its main advantages. It is thanks to these qualities that you can install the system yourself without the help of professionals.
- As mentioned earlier, the Tichelmann loop system is characterized by perfect hydraulic balance, as well as the ability to work with a large number of radiators.
- If you need to choose a method for hidden installation of pipes and automate the operation of the entire system, then the best option would be manifold wiring.
- Gravity systems also have such advantages as the ability to remove excess air without additional valves and simple filling with coolant.
However, there are no ideal systems, so you also need to consider the disadvantages of the given algorithms:
- If you install a system with natural circulation, you will have to spend a significant amount. In addition, it has large dimensions. It is very difficult to install a hidden gasket since most of all the parts will remain in plain sight.
- When installing a Tichelman loop, the wiring can pass through doorways. To cope with this problem, you need to design bypass loops.
Installation of a heating system in an apartment
Do-it-yourself heating installation in an apartment includes the following steps:
- Before turning on the heating in the apartment, you need to mark the places where the elements of the heating system will be located. Radiators are most often mounted at the same level, for which it is enough to move the first mark to all other installation points of heating devices.
- Next, you can install radiators. This work is not particularly difficult - all you need to do is prepare holes in the walls, secure the fasteners with dowels and hang radiators on them.
- The next step is preparing the pipes. At this stage, you need to determine the distances between the radiators, where the pipes will be located, and also solder these pipes in a suitable way. If the work is not carried out alone, then an assistant can be sent to screw fittings into the radiators.
- System assembly usually begins from the point at which heated coolant is supplied to the circuit, as well as from the point at which the coolant returns. A special feature of these sections is that there is no need for soldering - the steel pipes of the boiler usually have a thread cut into them, the connection to which is carried out using adapters. Subsequently, these adapters are soldered to plastic pipes.
- Further work consists of laying all other sections of the supply and return pipes. The last stage is the installation of bends to the radiators, installation of corner valves and connection of radiators with pipes.
How does dual-circuit heating work?
Heating using a double-circuit scheme
The structure of the scheme involves the movement of coolant through two different pipes from each radiator. In this case, both sections are connected to different operating mechanisms: the input section is connected to the supply line, and the output section is connected to the return pipe. Along the first segment, the heating water moves towards all heating devices, and along the second, the already cooled solution goes into the boiler. Experts highlight several features in this regard:
- Each radiator heats up evenly (with correct calculations of the elements);
- If changes occur in one part of the battery, then this does not affect other components of the system;
- There can be up to 30-40 radiators on one section of the pipeline, but there must be appropriate pump performance indicators, as well as pipe diameters, for the unit to function efficiently.
The scheme can be with forced circulation or natural - much depends on the very principles of operation of the structure. Also, various materials, not just water, can be used as a coolant.
Installation
There are various methods for installing heated floors in a bathhouse, which are characterized by general installation rules and certain features. Need to know the step by step guide. Almost all underfloor heating systems must be laid on a heat-insulating material, after which they are covered with a screed on which the floor covering is laid.
In addition, waterproofing acts as an obstacle to the formation of condensation in a structure consisting of several layers. Such a layer can be mineral wool, expanded clay, thick polyethylene film and much more. Let's consider the installation of various systems.
Electric heated floor using cable
Visually, this cable cannot be distinguished from an ordinary wire. The difference lies solely in functionality. A heated cable is capable of converting electrical energy into heat. Such a system is characterized by the presence of a thermostat, thanks to which you can regulate the power and speed of achieving the required temperature.
In addition, manufacturers usually provide temperature sensors, thanks to which you can monitor the operating mode of the cable system.
Please note that the electrical cable used in heated floors can be single-core or double-core. The first option is characterized by greater electromagnetic radiation, however, it is still within normal limits
The second option is characterized by simplicity of layout, since it does not require connecting two ends to the thermostat, since one is enough.
If the cable floor will be laid on a wooden surface, then you need to take care of safety. The wood must be treated with fire retardants, despite the fact that there will be no direct contact between the wire and the floor covering.
For those who want to equip a bathhouse using an electric heated floor, manufacturers provide various devices that will be useful during installation. These devices are special guides, supplemented with fasteners, and a mounting grid. Using the guides, you can place the cables at the optimal distance from each other
It is important that there is a distance of at least 5 cm from the cable on the wall, and at least 10 cm from other heating devices.
Film heated floor
This is the cheapest and fastest installation option. Here, thermal film is produced in special rolls. All you need to do is spread the mat over the floor, secure the strips with adhesive tape or some other simple method. There is no need for a cement screed, which takes a lot of time. In this situation, infrared mats are filled with tile adhesive, onto which the tiles are directly laid. In some cases, the covering is laid directly on the mats.
Water floor
Can be installed in various ways. The choice of one option or another is influenced by the preference of the bathhouse owner and the technical characteristics of the flooring. The most common are two installation methods.
- Concrete type, which is similar to installing electric underfloor heating. The only difference is that the pipes are thicker.
- The flooring method, which is especially popular, as it does not overload the floor covering.
Installing a heated floor using a concrete screed is the most common option, the only downside of which is that it requires a fairly large amount of time. In this case, you don’t have to worry about overheating, so this installation method is chosen quite often. Please note that it is not recommended to install pipes close to each other. The optimal distance between them is 30 cm.
This case does not provide for the presence of bends and kinks. Pipelines must be fastened using clamps and dowels. In some cases, wire is used. The presented method involves running the pipeline in a spiral or snake. This option is not very difficult to build.
Installation of underfloor heating system
To carry out the work, you will need tools and equipment: a container and mixer for mixing concrete, a spatula, usually scissors for cutting plastic pipes, beacons, a container for heating bitumen.
The materials you need to prepare are: ready-made dry sand-cement mixture (or its individual components), waterproofing (you can take roofing felt and bitumen), thermal insulation (for example, Penoplex), damper tape, clamps, reinforcing mesh, fiberglass, mushroom dowels, plastic pipes diameter 1.6 cm.
Fiber fiber for screed reinforcement
Step 1. The base is cleaned. If defects are found in the form of cracks or potholes, it is necessary to pour a thin screed to level the surface (providing for drainage if necessary). The drainage chute must be made of stainless steel or plastic. After this you will have to wait for the concrete to harden.
Step 2. The base is waterproofed. To do this, heated bitumen is applied in an even layer to the subfloor. Roofing felt sheets are placed on it (with an overlap of 100 mm). After this, the procedure is repeated: a layer of bitumen and a layer of roofing material. In this case, the strips of rolled waterproofing in different layers should be placed perpendicular to each other. The unpleasant smell will disappear over time.
Waterproofing the floor in the bathhouse
Step 3. To reduce heat loss, thermal insulation is installed. She must be tough. The thickness of the sheets is at least 100 mm. During installation, you need to ensure that there are no gaps between the elements.
Laying thermal insulation
Step 4. The metallized substrate is laid.
Step 5. A reinforcing mesh is placed (wire diameter - 4 mm, mesh cell size - 150x150 mm). It is needed to give rigidity to the structure and secure the contours.
Step 6. The perimeter of the room is covered with damper tape. It is made from foamed polyethylene. The purpose of the tape is to compensate for possible thermal expansion of the concrete screed (this effect may cause cracks to appear). It has an adhesive layer applied on it for ease of installation. However, it is recommended to additionally secure the tape with dowel mushrooms.
Step 7. The plastic pipe circuit is laid in a spiral. To do this, at the initial stage, pipes are placed around the perimeter of the room. Gradually, in increments of 25 or 30 cm, they wrap towards the center. From the central point, the contour layout is carried out in the opposite direction (parallel to the previous one) so that in the end there is 12.5 or 15 cm between the pipes.
A circuit of plastic pipes has been laid
The contour is fixed using clamps that secure the pipes to the reinforcing mesh.
Step 8. The thermal circuit is connected to the heat exchanger. A test run of the system is being carried out. It is recommended to leave the heated floor running for two days. This way you can check its functionality and tightness of connections. If no problems are found, you can proceed to filling the system with screed.
Step 9. Mix a solution of CPS and water. For this it is more convenient to use a concrete mixer. But if you don’t have it, you can make do with improvised means (a large container and a shovel). To increase the strength of the base, it is recommended to add fiberglass to the mixture.
Prices for electric concrete mixers
electric concrete mixer
The performance characteristics of a concrete composition can be improved by adding a plasticizer.
Instructions for use of plasticizing additive
Beacons should first be installed on the base to determine the filling level. The screed should rise approximately 5 cm above the pipeline. If water needs to be drained from the room, it is necessary to provide some slope in the direction of the drain holes. The concrete solution is poured onto the base and distributed evenly (using a rule and a spatula) over the beacons. Once the floor level has been determined, the beacons can be pulled out, and the resulting depressions must be filled with the same solution.
Pouring concrete solution
After the concrete base has gained strength (this usually takes 4 weeks), you can begin laying the decorative coating. Most often, tiles act in this capacity. We must not forget that before fixing the tiles to the adhesive, the screed must be treated with a primer.
Warm floor in the bath
High-quality water heating in a bathhouse is quite possible for anyone who has at least some skills in finishing work. Using a furnace as a heat source, it is possible to significantly reduce equipment costs, as well as energy costs. The result of the work will be comfortable conditions for everyone who likes to spend time taking bath procedures.
Selection of radiators and pipes
Any heating system has its own characteristic features that must be taken into account in order to know exactly how best to heat the apartment. What makes the choice of heating devices special in all this is that where some batteries are ideal, others will not be efficient or reliable enough.
The simplest and most painless solution related to the choice of heating components is to contact specialized specialists who will conduct a full analysis of specific conditions and select the most suitable elements for them. However, with a competent approach to the matter, you can carry out this work yourself - it will be enough to consider the features of all possible components and figure out under what conditions a certain type of element should be used.
Advantages and disadvantages
Water floor. For heated floors in a private house, a water element is more suitable; it is connected to the heating boiler and does not require additional costs for energy consumption. Its disadvantages include the possible leakage of water during its use. The temperature is regulated by the water supply tap from the boiler.
Convection electric floor. It is popular for installation in houses and apartments as the main and additional type of heating. The advantages include:
- no leaks or flooding of the lower floor,
- possibility of adjusting the heating temperature,
- a wide range of sensors and devices that automatically regulate its operation.
Disadvantages include separate electricity consumption.
Principles of technology for connecting to finished heating
Connecting a heated floor to an existing heating system requires compliance with the following principles:
- each radiator will need to additionally connect a collector unit;
- the coolant should not have a temperature of more than +55 degrees;
- the new design should not have a standard pressure of more than 9 atm.
During preparation, it is necessary to calculate the operating parameters of the heated floor, depending on the existing heating system. It can be one- or two-pipe.
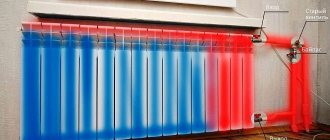
In a two-pipe system, there are two separate pipes. In one way, hot liquid is supplied, and in the other, cooled liquid is discharged to the boiler. In a one-pipe system, the coolant circulates through one pipeline. In this case, the warm floor will be connected as an additional radiator. It is mounted after the heating device, which eliminates the use of devices to reduce the temperature of the coolant.
It is impossible to obtain effective operation of a heated floor using the gravitational principle of fluid movement. The transition of coolant from a pipe of a larger diameter to a smaller one is impossible, since hydraulic resistance arises.
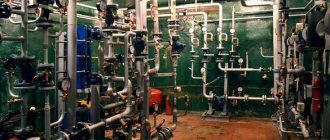
Types of central heating systems
There are three main types of central heating schemes in multi-apartment residential buildings:
- Single-pipe scheme;
- Two-pipe scheme;
- Scheme with centralized risers and apartment-by-apartment connections.
Permission to connect to a single-pipe and two-pipe system can only be achieved by using a heated floor unit with a heat exchanger. Moreover, the unit is equipped with a heat metering device. Even in this case, management companies often refuse to connect, justifying the refusal on the small diameter and low throughput of the risers.
It is impossible to obtain permission to connect to the Leningradka and two-pipe system by other technical means. In houses equipped with central risers for apartment-by-apartment connections of large diameter, it is possible to obtain such permission.