One of the bottlenecks when installing a heating system has always been connecting the battery using threaded connections. Conventional couplings with locknuts were good for massive cast iron radiators. But the era of multi-ton cast iron panels is already a thing of the past, giving way to compact and more efficient systems that use American-type connections as a connection system.
Radiator installation
Let's figure out how to properly hang the battery with your own hands.
Regardless of the type of radiators chosen, before installing them, you should carefully prepare the installation site. Very often, batteries are installed under windows to provide the necessary air convection. When making a major renovation of a private house or apartment, the external walls are often insulated and the internal walls are sheathed with plasterboard. Before insulation, metal frames are installed. In this case, before installing new batteries, it is necessary to solve two problems: decide at what distance the radiator will be located from the supporting base, and install the fasteners in advance (the radiator cannot be mounted on drywall, especially cast iron).
To do this, the wall on which the battery will be mounted must first be sheathed with a frame. If leveling or plastering walls is done from scratch, special beacons are installed. In the case where the frame is mounted, 25 mm thick inserts are made in the places where the fasteners are installed. The material used is OSB or plywood. The inserts should rest with their bottom on the floor and fit into the UD profile. Each heating device requires two or three inserts, depending on the number of brackets planned (4 or 6).
After preparing the base, the location of the fasteners is marked. On temporary stands, the battery is installed in the designed position using a level. If the radiator is installed near a window, this is done in the center of the opening at a distance of 100 - 150 mm from the floor and about 100 mm from the window sill. After marking, the battery is removed and holes for the brackets are made with a hammer drill. They need to be screwed in so that there is a distance of 30-40 mm from the back of the radiator to the wall.
Heavy cast iron radiators with more than ten sections should preferably be secured with at least six brackets. For other types of batteries, four is enough.
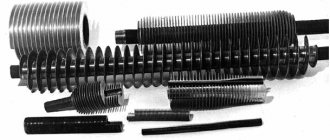
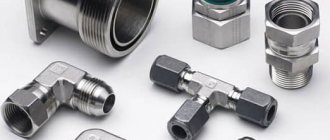
Why do you need a set of plugs for piping radiators?
Set of plugs for piping radiators
Each radiator has four open inputs (two on each side). This is done so that problems do not arise when connecting heating devices, since the connection can be different: one-way, cross, bottom, single-pipe. Before installation, depending on the connection option, radiators are prepared accordingly. Some entrances are closed with blind plugs, others are made through with ½ or ¾ inch threaded connections.
The procedure in which plugs and shut-off and control equipment are installed is called “packing” of threaded connections and is the most critical stage in the installation of a heating system. The reason is that after piping the radiators and starting the heating system, leaks can most often appear in these places.
The most common and effective type of connecting batteries in an apartment is considered to be a one-way connection, in which the supply is connected at the top of the left or right side of the radiator, and the “return” is connected at the same end of the battery at the bottom. To vent air from above, a Mayevsky valve is installed on the opposite side of the radiator, and the lower entrance is closed with a plug.
Each heating device must be equipped with a set of four plugs, three of which are pass-through and one is blind. We determine the thread (right or left) at the entrances to the outer sections of the radiator. We select plugs accordingly. The threads on the through plugs can be half-inch or ¾-inch in diameter. We select the diameter depending on the supply pipe. When supplying the twentieth pipe (outer diameter - 20 mm), a plug with a passage of ½ inch is selected. If the twenty-fifth pipe is being supplied, we take a ¾-inch plug. Such pipes are installed in a vertical single-pipe system when the battery is part of the riser.
It should be taken into account that the plugs have sealing gaskets, so there is no need to use any windings. When screwing in the plugs, you must apply a noticeable force, after using a knife to clean the base to which the plug gasket is adjacent. It is better to perform this operation even with new heating devices.
Marking
The battery is attached to a pre-designated location. To choose this place correctly, take into account the distance from the floor to the radiator, window sill, wall. It is recommended to mount the radiator at least 10-15 cm above the floor to provide sufficient space for air movement and make cleaning easier. The distance between the battery and the window sill is at least 15 cm. For the same reason, a gap of 3-4 cm is left between the radiator and the wall. The degree of contact with the wall is adjusted using the brackets on which the battery is mounted.
Connecting a heating radiator Good-natured Plumber
I wrote about how to replace a heating radiator yourself at the very beginning of creating the site.
Since then, many questions have been asked, and this material is devoted to one of the frequently asked questions.
It turns out that I cannot call American polypropylene pipes reliable and do not recommend sewing them up with finishing. I need to start by completely excluding Turkish Pils pipe from the material I work with. There were cases not only where an American woman simply leaked, but such an American woman was even torn out of the nut. What can I not say about Valtek and Ekoplastik.
Specifically in your case, it wouldn’t hurt to completely solder the bypass. Not soldered very well. The jumper pipe is too short and it “pulls” the feed and the header together.
If you solder the bypass from polypropylene, then the American one can be eliminated altogether. The scheme is something like this:
In your case, soldering such a jumper without an American wire will not be difficult. They are long enough to push the pipes apart and solder them.
What to do if the length does not allow you to solder the jumper in this way. For example, the bends are much shorter and cannot be opened.
Then use an American cone.
The essence of the American cone is that it does not have a gasket. It has a precisely fitted cone, which, when tightened with a nut cape, does not allow water to pass through. The connection is cheap but reliable. If tightened correctly, there will be no leakage.
In general, it is better to install the bypass as close to the battery as possible, but if there is no more than half a meter from the taps to the radiator, then the jumper can be installed immediately on the taps. In the case of polypropylene, you cannot do without an American one.
But if your system is made of metal-plastic pipes, then the American one is excluded, because such a pipe can be bent.
Sometimes metal-plastic is connected like this:
But I recommend the following connection diagram:
Moreover, it does not matter whether you assemble using press fittings or crimp fittings.
According to the second scheme, we block the outlets to the radiator, which will allow us to completely shut off the radiator at any time if a leak appears on the nuts or on the press.
In both cases, we do not block the jumper and do not disrupt the circulation.
If you look at the first diagram, you need faucets or thermostats with American ones, and I also recommend choosing them without gaskets. Look for conical ones.
In the second diagram, you need separate American ones that need to be screwed into the heating radiator.
What's the result:
1. The taps must be after the jumper so as not to disrupt the circulation. 2. Do not use American ones with gaskets. Use conical ones. 3. Try to minimize the number of detachable connections.
You may need:
What is American and where is it used? Sealing threads with flax. How to replace the battery. Ball valve. Fitting for metal-plastic. Thread cutting
When to repair pipes
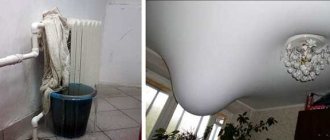
At the slightest hint of a leak in a certain section of the pipe, you need to react immediately, regardless of the time of year outside the window. We are not talking about a complete replacement, because during the heating season this is quite problematic, but about simple measures that help localize the problem without causing leaks to become larger, causing obvious inconvenience to those living in the apartment.
However, if breakthroughs occur, which are precisely the result of inattention to the leaks that have arisen, a complete replacement must be carried out, regardless of the heating or summer season. If your budget allows, you can purchase pipes made from more modern materials, for example, reinforced polypropylene pipes, which can serve their owner for quite a long time.
To avoid this, you need to regularly monitor the condition of the pipes in your premises, promptly responding to the slightest signs of leaks. Prevention here, as in any other area, allows you to avoid many major problems in the further operation of heating system pipes, which are a kind of “veins” in your apartment through which hot water and heat enter your home.
The heating is leaking...
According to all known laws, this usually happens at the most inopportune moment. In a private house, solving the problem is not difficult, but for residents of apartment buildings, even the smallest leak can cause serious trouble. At the height of the heating season, it is very difficult to shut off the heating riser; of course, if water flows like a fountain from a pipe or radiator, then there is simply no other way out. You urgently need to run or swim to the phone and call the emergency team.
But, as a rule, global breakthroughs do not happen just like that. The peak of accidents occurs at the beginning of the heating season, when pressure and temperature in the system increase. It has been noticed that most often, heating leaks start for two reasons.
1. The apartment has old, worn-out pipes and radiators. 2. The heating system was recently replaced and was poorly sealed.
If one of these factors is present in your apartment, you are at risk. It is much easier to solve a problem than to wait for it to arise, as they say - “Forewarned is forearmed!” So, here are a few ways to temporarily fix a leak.
Connection diagrams and methods
Before starting work, you need to find out how your radiator is connected to the heating system. They can be of the following types:
- Lateral one-sided. The most effective and most common type of connection. Its essence is that the inlet pipe is connected to the upper pipe, and the outlet pipe to the lower one.
- Diagonal. The inlet pipe is connected to the upper pipe on one side of the battery, the outlet pipe to the lower pipe on the other. This scheme applies to multi-section radiators (more than 12 sections). Such a system provides the highest heat transfer.
- Bottom. Used when heating pipes are hidden under the floor. Both pipes are located below on one side of the radiator.
- Saddle. Similar to the bottom one, but in this scheme the pipes are located on opposite sides of the radiator. Both of these schemes are considered the least efficient of all, since heat loss reaches 15%.
Review of popular brands
It is worth noting that despite the low prevalence of extension cords on the market, some companies still produce them. Usually these are large manufacturers who can balance costs. All such companies produce devices with the so-called right and left versions, which allows you to equip the heating system without unnecessary problems. The VT model is now widely promoted under the Valtec brand. 503. The manufacturer itself positions such a product as an advanced, unique product.
Replacing a valve on a gas pipeline
Replacement scheme
Replacing valves in an apartment on a gas supply pipe occurs in the following way:
- preparation of materials. To carry out the work you will need:
- new valve, selected according to all parameters;
- two adjustable wrenches;
- means for sealing joints (linen thread and graphite lubricant);
- plug (required if work is performed by one person);
- Before replacement, it is necessary to shut off the gas supply to the room. To do this, the old tap must be moved to the “closed” position, that is, perpendicular to the pipe. Then you need to remove the remaining gas from the pipeline (for example, burn it using a stove burner);
- The old valve is dismantled:
- if the valve is installed on a thread, then the fixing elements are unscrewed;
- if the valve is installed by welding, then the device is cut out of the gas pipeline;
It is recommended to install a threaded valve in place of a welded valve. To do this, threads are cut at the ends of the pipeline using a die.
How to cut threads on a pipe yourself
- A plug is installed at the end of the pipeline. If the work is done by two people, then the pipe can be plugged with a finger;
- the threads are treated with sealing materials. For the strength of the connection and smooth operation of the valve, graphite lubricant is applied over the flax thread;
Thread treatment with graphite lubricant
- A new faucet is being installed.
Installing a new valve on a gas pipe
For safety reasons, replacing a gas tap must be done in a well-ventilated area and with electrical appliances turned off.
Leak test
After installing the valve on the gas pipe, you need to check the tightness of the connections and the device itself. You can determine the presence of a gas leak as follows:
- a saturated soap solution is applied. To do this, the maximum amount of any soap needs to be diluted in water;
- The resulting solution is coated with a sponge on the joints and the valve.
Using Soapy Solution to Detect Gas Leaks
If the connection between the valve and the pipes is not airtight, soap bubbles will form.
The formation of a bubble indicates a violation of the tightness
If a leak is detected, it is recommended to perform all the work again and increase the sealing.
You can replace all the valves in your living space yourself. To carry out the work, minimal knowledge and a small set of tools are required.
Types of taps and materials from which they are made
There is no clear answer to the question of which taps are best installed on heating radiators. They differ from each other not only in price, but also in the material of manufacture, method of fastening and functions performed.
All cranes are divided into two groups:
- Shut-off or adjusting.
- Thermoregulating.
Shut-off devices are designed to control water flow. The shape of control valves for heating radiators can be angular or straight. With their help, you can repair or clean any battery without shutting down the entire system.
Straight radiator tap
Corner radiator tap
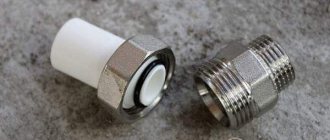
The most important thing when choosing the material from which the device is made is to pay attention to its resistance to corrosion. The method of fastening also depends on the type of material. Most often, taps are made of synthetic brass. Such products are attached to metal or plastic pipes using threads or plumbing fittings.
Threaded fittings made of chrome plated brass.
Devices made from high-quality polypropylene are very popular. They can be coated with metal coating on top. How to install such a tap on a radiator? To do this you will have to use welding. The main disadvantage is the impossibility of replacing the valve without cutting out part of the system.
In plumbing stores you sometimes come across cheap fakes made from silumin (an alloy of aluminum and silicon). Externally, this material is similar to brass, but is susceptible to corrosion and quickly rots.
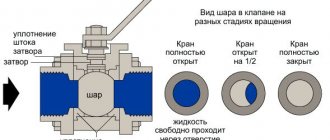
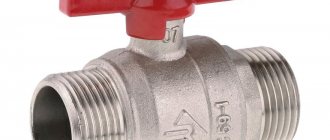
Ball Valves
This type of device is the simplest and most common. It is designed to shut off and open the heat supply. It can only be in two positions - open and closed. If desired, it can be installed in an intermediate position. In this case, its wear will increase many times.
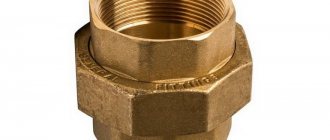
The flow of liquid is blocked by a metal ball, which changes its position by moving the handle. The components of this tap are usually made of bronze (steel, brass). To seal the connections, fluoroplastic gaskets are used. If desired, you can replace them yourself. The valve is connected to the radiator using a nut or an “American” (a quick-release connection consisting of two mating threaded ends and a union nut).
“American” for mounting the valve
Which ball valves are better? Experts recommend purchasing devices made of brass. They are more durable and wear-resistant.
Modern ball valves are manufactured using the latest technologies. Metal balls are carefully polished. The smoother the ball, the less likely it is that hot water will leak through it. In addition, a smooth ball is easier to turn, which means it is more convenient to use.
Ball valve design.
By capacity, ball devices are divided into:
- standard (pass 70-80% of the water flow);
- full bore (pass the entire fluid flow).
In order not to reduce operating efficiency, it is recommended to install a full-bore valve on the heating radiator.
Ball valves are divided into flanged, coupling and welded. Radiators use exclusively coupling models. The remaining two types are not suitable for use in private houses and apartments. Flange devices, for example, are installed on pipelines. They are strong, durable, and can withstand high pressure.
Union ball valve
When purchasing a ball device, you need to take into account the type of pipes with which the connection will take place, their diameter (in millimeters or inches) and operating pressure. Valves come with internal and external threads, with crimp and union nuts.
If you plan to install only ball valves, then they are mounted on two pipes (supplying water and draining it) right at the inlet (outlet) of the radiator.
Cone valves
Such devices operate smoothly, unlike ball-type ones. With their help you can regulate the flow of hot water. The cone valve consists of a handle and a cone threaded rod. When you turn the handle, the rod begins to move along the thread, gradually opening or closing the access of the liquid. In the lowest position, the rod completely blocks the flow of water. Elastic gaskets located in the annular grooves of the rod ensure tightness.
Fuel supply valve
| Purpose and design of the valve-regulator. The valve is used to smoothly regulate the amount of liquid fuel (fuel oil, oil) supplied to the stoves. The fuel can be heated to 200° C and supplied under pressure up to 20 kgf/cm2.
Drawings of parts 4, 6, 8, 11, 15, 18 and 19 are not given. Det. 4 – M3x5 screw, GOST 1491-72; det. 6 – rivet 2x5, GOST 10299-68; det. 8 – bolt, GOST 7805-70; det. 11 – M3x5 screw, GOST 1476-64; det. 15 – gland packing grade AP, GOST 5152-66 (cord, the cross-sectional diameter of which is 4 mm); det. 18 – bolt, GOST 7805-70; det. 19 – cylindrical pin 3x14, GOST 3128-70. The listed parts should be found by GOST number in technical reference books. Select the missing dimensions of standard parts in the GOST tables, taking into account the purpose of these parts in the assembly unit. The designations of standard parts in the specification of the assembly drawing must correspond to the symbols adopted in GOST standards. You can download a three-dimensional model of the valve-regulator on which this article was compiled in the download section. |
Contents | Read comments (1)
1
| Commented by: Alexey | 12.05.13 |
| The link to the fuel supply valve model is broken, please refill it! |
Characteristics
Technical characteristics of American cranes are regulated by GOSTs:
- The seal tightness is class A.
- Media temperature – up to 130⁰C.
- The nominal pressure of the circuit is up to 1.6 MPa.
The manufacturer puts markings on the packaging and body of the products, which allows you to select the right model in accordance with the parameters of the pipeline.
For your information. Diameter is indicated in inches. 1 inch = 25.4 mm (2.54 cm).
Installation of taps on radiators
The next stage of installation of the heating system is the installation of shut-off and control valves in the passage plugs. On radiators, “full bore” ball valves or valves are installed, in which manual adjustment of the coolant movement operates. Nowadays thermal heads are produced that have automatic flow control.
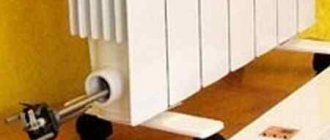
Faucets for heating systems can have different designs, but the most practical are considered to be faucets with an “American” connection with union nuts. The advantage of faucets with an “American” connection lies in their design, which allows you to remove any type of radiator without turning off the heating system. With the help of such a tap, the flow of coolant is quickly shut off, and to remove the battery you only need to unscrew the threaded connection.
The use of American taps is especially in demand when the heating system is forced to start when the heating devices are installed on a rough wall. Their use allows you to easily remove the radiator and finish finishing work on a section of the wall without turning off the heating system (filling the grooves, puttingtying or plastering the walls, hanging wallpaper, and so on). The most important thing is that taps with a detachable “American” connection can be used repeatedly, regardless of the type of gasket (rubber or paranitic) or the option when sealing is carried out only using conical parts made of a stainless alloy.
Valves with union nuts can be straight or angled. They are selected depending on the pipeline supply system to the radiator (from the wall or niche slopes).
The tap is screwed into the plug with an “American” connection using a special key, which is inserted inside the pipe. The cross section of the key can be of very different shapes. It’s easier if you use a hexagon, just choose the appropriate size for the job. It’s more difficult when there are two protrusions in the “American” connection; you have to look for a suitable profile for a reliable hook.
Sometimes they use the jaws of an adjustable wrench or pliers, but more often craftsmen make an L-shaped wrench with a square cross-section. Its ends go slightly to a cone. This allows you to work with different manufacturers of faucets with an American connection.
The connection of the passage plug is sealed with the “American” pipe using a winding. Plumbers use imported flax and investment paste (UNIPAK type) for these purposes. FUM tape is used when the thread profile does not have sharp corners. Also, the thread must have a special notch that prevents the sealing material from twisting.
The two parts must be checked for thread compatibility by connecting them without tow. The degree of density of the assembled compound indicates how much tow needs to be used. With a large layer of winding, cracks may form or thin-walled parts may become deformed. And an insufficient layer often causes connection leakage.
The winding must be collected into a thin bundle and wound in the direction opposite to the direction of the pipe thread. You need to start from the edge of the thread that comes out. It is necessary to fill the entire depth of the thread with flax fibers, pressing the previous one with each new turn and not allowing the winding to scroll. Next, the part is lubricated with UNIPAK paste, which is then screwed into place.
If the heating system is installed using metal ball valves, threaded couplings necessary for switching to polypropylene pipes are screwed onto them using winding. The Mayevsky valve included in the radiator fitting kit comes with a rubber gasket, so it does not need winding.
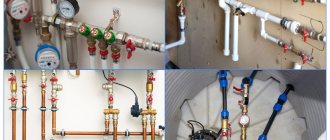
Radiators prepared for operation are installed in their place, after which the installation of pipes can begin. After completing the installation of the heating system, you need to start it up by first filling the riser from bottom to top with coolant and bleeding the air. It is necessary to open the supply valve and check the connections for leaks.
Proper replacement of heating batteries is a good way to increase the heating efficiency in your home or apartment and reduce the cost of paying bills. This work can be done quickly and easily with your own hands, but if you are not familiar with the intricacies of the process, it is better to turn to professionals.
You may be interested in: Cool and inexpensive replacement of radiators in Volgograd from our general contractor
Why are shut-off and control devices needed?
More recently, batteries were connected to the rest of the heating system without any additional elements. Today, the installation of almost every radiator automatically involves the installation of taps. The reason for such changes is related to savings and the possibility of unplanned situations.
If the seal of the radiator is broken, it leaks, or becomes clogged, you can simply turn the valve, blocking the access of water, and remove the battery for repair or cleaning. To do this, you don’t even have to drain the water from the entire system. Such taps are called shut-off taps. They are installed on pipes through which fluid is supplied and discharged. In open mode, they do not interfere with the free flow of water, but in closed mode, they completely block its supply.
Shut-off valves for radiator
The tap is necessary to remove air accumulated in the heating system. Usually it is called "Maevsky".
Some taps allow you to adjust the heating temperature of the heating system. With their help, you can save on heating by lowering the heating temperature of the radiators or turning them off if it’s warm outside. This is true for both private houses and apartment buildings.
Key for American women Good-natured Plumber
If you are faced with such a connection as the American one, then most likely the question has become about how to tighten it? Some American ones are tightened with a hexagon, but for the majority of them, you will still need a special wrench.
I already wrote that in the absence of such a key, you can use pliers or something suitable. The main thing is not to deform the round part of the cone.
The only good thing about this wrench is that it is compact and takes up very little space in your tool bag. The disadvantages of such a key include the following:
1. If the hooks in an American female are too deep, this wrench will not be able to tighten such an American female.2. Very short lever. For tightening American women larger than 1/2 inch, without additional. leverage is indispensable.3. The key must be constantly pressed against the American key, otherwise it tends to jump out of the American slots.
The other key can be said to be similar, but it does not have the disadvantage of number “2” of the previous key + it has a ratchet.
Well, the most convenient key, in my opinion, is a cross-shaped key for American women. It has 4 main sizes, which is more than enough.
Other keys:
Well, for those who have access to a lathe, you can easily make such a key yourself. Buy American ones for 3/8, 1/2, 3/4. Turn round blanks to fit the inner diameter of the American women. Make slits on these blanks and cut out a tetrahedron for the ratchet. All that remains is to buy a ratchet or use the one available from a set of heads.
Tools
The list of tools required to install heating radiators includes:
- Torque wrenches that are well-sized to ensure good tightening without over-tightening or stripping threads.
- Pliers
- Screwdriver
- Screwdriver Set
- Level
- Drill equipped with an impact mechanism
- Pobedite drill
- Radiator key
- Welding machine, if welding is planned
If the batteries are purchased assembled, then some of the keys required to assemble the radiator parts can be neglected.
How to disassemble, extend and assemble a heating radiator
Aluminum, bimetallic, cast iron radiators are assembled according to the same principle: sections in the upper and lower parts are connected to each other by nipple nuts. Nipple nuts are hollow, ring-shaped nuts with external threads. The thread is applied to both ends. Special grooves are made inside each one. During assembly and disassembly, a key is inserted into them, rotating which tightens or separates (depending on the direction of rotation) both sections. Sealing is ensured by a gasket made of paronite or silicone, placed on top of the nut.
This is how the radiator is connected to the system
As a rule, it is necessary to disassemble and reassemble heating batteries in the following cases:
- when installing a new heating system;
- if necessary, add additional radiator sections;
- Replace the leaking section or gasket.
You need to change the gasket, which means disassembling the battery and then reassembling it
approximate price
| Brand | Model | Manufacturer country | Construction type | Valve | Size, inch | price, rub. |
| ProFactor | ProFactor | China | Straight | butterfly | 1″ | 700 |
| Bugatty | New Jersey 900 | Italy | Straight with squeegee | butterfly | ½» | 400 |
| U-tec | Best | China | Straight | pen | 1 ¼» | 450 |
| Fornara | Fornara | Italy | Angular | butterfly | ½" x ¾" | 320 |
| RUB | RUB | Italy | Straight | butterfly | ½» | 600 |
Faucet - double adjustment
Double adjustment valves serve for primary adjustment, performed by installers when setting up the system, and secondary adjustment for consumers.
Double adjustment valves and throttle valves are installed at heating devices of heating systems; they serve to regulate the amount of water entering the heating device.
| Valve with oblique spindle. |
Double adjustment taps are usually installed on the supply lines to the devices. However, in some cases, when the device is located close to the riser and is connected to it with a large-diameter return line, which is most often found in a single-pipe system, it is possible to circulate water between the device and the riser through the return line with the tap on the supply line closed. In this case, in the return line along its upper part, warm water is directed to the device, and water cooled in the device is returned to the riser along the lower part of the line.
Double adjustment valves (through and three-way) are located on one of the connections to the heating device (direct or reverse) according to the design. To facilitate subsequent adjustment of heating systems, all double adjustment valves, in the absence of special instructions in the project, must have a completely open passage section.
| Heating surface of heating devices. |
Double adjustment valves, shut-off, plug and air valves and valves are counted by diameter in pieces, divided into bronze and cast iron according to GOST.
| Double valve Throttle valve with double adjustment. |
Double adjustment taps are installed when the coolant is water with a temperature of up to 100 C, and valves are installed with water and steam with a temperature of 100 C and above.
| Shut-off and control valves. |
Double adjustment valves (Fig. 132, a) are used mainly in two-pipe heating systems.
| Trial taps.| Double adjustment tap. |
Double control taps are used in heating systems to regulate the supply of hot water to heating devices.
Double adjustment taps are intended for water heating systems.
Double adjustment valves for water heating systems are installed, as a rule, on the pipe supplying the heating devices. To facilitate subsequent adjustment of heating systems, all double adjustment valves, in the absence of special instructions in the project, are installed with a completely open passage section.
Armature
What fittings can be used in radiator piping?
| Fittings kit | Functions |
| Two ball valves | They make it possible to completely shut off the device for repair, replacement, or during a long thaw. |
| Ball valve and throttle | In addition to stopping, it is possible to manually adjust the heat output |
| Two chokes | Allows for basic balancing of two-pipe heating and subsequent adjustment of heat transfer |
| Throttle and thermal head | Makes room temperature adjustment fully automatic |
An important point: there must be a bypass in front of the throttling and shut-off devices in any heating system. Otherwise, valves and chokes will regulate the flow of the entire circuit.
The jumper in the photo allows the coolant to circulate in the riser when the valves are closed.
How to assemble an aluminum radiator
We assemble in reverse order. We place the sections on a flat surface (a suitable sized table or simply place it on the floor). If the radiator is not new, unscrew the end cap and Mayevsky tap.
Before installation, you should carefully examine the threads and grooves; they must be of high quality, without chips or changes. On the mounted section for testing, we “drive” the thread by screwing in and unscrewing the nipple
Here you need to pay attention to the fact that there may be a gasket under the layer of factory paint in front of the thread. Lightly rub the end with fine sandpaper; if it is found there, it must be carefully cut off with a knife with a sharp blade.
This is what an aluminum radiator looks like in cross section
Before adding sections of the heating radiator, be sure to clean the ends to a smooth surface. We even remove factory paint. It is not needed at the ends of radiators, but will only contribute to the early appearance of leaks. Sooner or later, coolant will begin to seep under the paint. In the case of non-freezing liquids, this will happen very quickly; if water is used in the system, then not very much, but it will definitely happen. And then coolant will begin to leak between the sections, although the gaskets are still in perfect condition. The whole point is that the paint on the ends has peeled off or been corroded, and microcracks have appeared. So we make sure to clean the ends to bare metal, but use fine sandpaper so that the surface of the metal is smooth and without scratches. This guarantees the operation of the system without leaks in the radiators.
For better tightness, the ends then need to be degreased (using gasoline). Gaskets are also degreased, but they need to be washed with ordinary soapy water. For a system that will be filled with water, degreasing is an optional procedure, but for systems that will run on antifreeze it is necessary. Antifreezes have high fluidity and seep into the smallest pores. After everything is dry, we begin to assemble the aluminum radiators.
Then tighten both nipple nuts half a turn. Heat-resistant paronite (silicone) gaskets are placed on top of the nipple to seal the joints. Now we take the section that needs to be screwed and place it tightly against the nuts, checking the tightness of their fit. Next, insert the key into the upper hole and tighten it 1-2 turns. At the same time, we do not use the lever yet. We twist our hands. Then we perform the same operation in the lower hole. We repeat several times, alternately tightening both nuts several turns.
We unscrew the sections gradually, one or two turns of the nut, either from below or from above.
Tighten as much as you can. Only after tightening by hand can the lever be used. This must be done in two stages on each nipple. It is better not to use excessive force when final tightening the nipples, since you can easily break the threads: aluminum is a soft metal, don’t forget.
If the section is completely assembled, screw a plug onto the unused holes on one side, and a Mayevsky valve on the other (to bleed air from the system). Now you know how to assemble sections of a heating radiator and, if necessary, you can add several sections.
First steps. Slab countertops
Sano published a blog entry in Furniture made from slabs, solids, and various differences, October 6, 2021, blog entry
The first attempts to make something from the brought slabs. Although there may be some attempts, the material costs money and the right to make mistakes is as much as there is money in your pocket. Train at your own expense, as they say.
Therefore, each board is carefully inspected and tried on; the proverb about measure seven times is in action.
The work itself is not tricky, creative, there are several boards and they need to be selected so that they look beautiful and there is no overspending. All sizing and trimming is done with the minimum possible removal of material, simply sawed off a little here, cut a little there with a chisel.
Dismantling aluminum radiators
Diagram of aluminum heating radiators.
Aluminum or bimetallic heating radiators are disassembled in the same way as cast iron ones, but there are slight differences:
- these are smaller sizes of keys and nipples;
- as a rule, these are new products, so when disassembling them you do not need to put as much effort as in the case of cast iron ones;
- on the front side of the plugs and fittings there are designations S and D, respectively for left and right threads.
Metal gaskets are installed between the sections for sealing. After disassembly, they should be wiped, cleaned and stored for later reassembly.
Gaskets under the plugs are usually made of silicone; they cannot be used during assembly and must be replaced with new ones.
Many models of aluminum sections are non-separable. You can disassemble them, but you cannot assemble them.
For disassembly you will need tools and materials:
- disassembly keys (5/4 inch - for cast iron batteries, 1 inch - for aluminum or bimetallic);
- gas key;
- adjustable (plumbing) wrench No. 2-3;
- grinder with a metal disc;
- blowtorch;
- gas cutter (autogen);
- piece of steel pipe.
Please note that the work described is dirty and noisy. Therefore, it must be agreed upon with the neighbors.
Using the tips and recommendations provided and if you have a tool, you can disassemble and reassemble heating batteries with your own hands.
What is FUM tape?
FUM tape (fluoroplastic sealing material) is used for high-quality sealing of threads in various couplings. This sealing tape has a thin synthetic structure, translucent, white color and has fairly high mechanical and thermal stability due to its fluorine content. Long service life, does not break when stretched, does not lose properties under the influence of high temperatures or aggressive chemical environments. The main advantages of such a seal: non-toxicity, ductility, good strength and high resistance to metal corrosion.