Storm drain.
During the spring period of snow melting or during summer rainfalls, a storm drainage system will save the land plot from possible flooding. A storm drain, gutters that collect and drain water - this is what such a sewer system consists of. Features of storm drains. The ditches should be no less than thirty centimeters away from the fence of the site, houses and buildings, so that water does not erode the foundation. It is allowed to lay ditches with a height difference of 5 centimeters for every ten meters.
What is a drainage ditch?
Strictly speaking, any drainage ditch is a special depression in the ground, arranged along the road or along the perimeter of an object or site.
A drainage ditch is a structure in the ground designed to protect the soil from erosion or waterlogging, collect surface water and drain it into the nearest watercourse.
The principle of its operation is extremely simple: water accumulated after intense rainfalls does not stagnate in the area, but flows along the bottom of the ditch into a specially equipped drain or into a natural reservoir. If water is drained from the overlying territory, then such a drainage ditch is called upland. And if the diversion is carried out along the perimeter of the site or along the road, then this is a ditch.
Video description
How to easily maintain the slope of a drainage ditch is shown in this video:
Special
There are many structures and devices manufactured in factories to strengthen the ditch. It is necessary to contact specialists so that they can help you choose the right material for arranging drainage. They will also tell you how to improve the ditch along the site.
Geomats and biomats
They look like a sponge. Manufactured by high-temperature soldering of several polymer meshes. Water does not pass through this material, and plants can germinate. They are laid by rolling from the top (fixed) to the bottom of the ditch, and the next section is overlapped with a tolerance of 15 cm. Then the soil is filled in and grass is planted.
Appearance of geomat Source tegola.ru
What are the advantages of a drainage ditch?
First of all, such a ditch is designed to effectively drain water from the site. This way it will be possible to prevent such unpleasant phenomena as:
- flooding of the site and its waterlogging, the formation of puddles in the area;
- rotting of wooden structures and plant roots;
- inhibition of the growth of plantings on the territory;
- the appearance of fungi and mold on the walls of buildings;
- deterioration of health due to exposure to high humidity;
- accumulation of dirt on the site.
Precipitation and melted snow cause considerable harm to economic activity, increase excess moisture in the soil, which can spoil landscape design, lead to the death of garden plants and destroy the foundation of a building.
In addition, digging a ditch, as a rule, does not involve the use of specialized heavy construction equipment. Literally every owner can take the most ordinary bayonet shovel and dig a ditch on their own. A drainage ditch is also the cheapest and most effective drainage method. It will require virtually no cash costs.
Complex issues of land reclamation
In the past, issues of land reclamation - land improvement, involving the determination of necessary drainage or irrigation - were very relevant and widely discussed. Collective farms and state farms were professionally involved in improving the fertility of lands.
The measures taken brought significant results over large areas.
Now summer residents need to work independently to ensure that the site remains alive and does not turn into a swampy area. Turning to specialists is not a cheap pleasure.
But you should not despair, because from the materials described, with a reasonable approach, you can make a simple but effective drainage system yourself.
Disadvantages of a drainage ditch
However, this method of organizing drainage also has its disadvantages. For example, a ditch is less efficient compared to linear storm drainage and even surface linear drainage.
The ditch does not have a long service life. However, if you approach its arrangement wisely and properly strengthen it, these terms will be extended significantly. But even so, the ditch needs regular maintenance - restoration of the embankment, cleaning and other repair work.
In addition, a drainage ditch can spoil the appearance of the site. But here, too, everything largely depends on the imagination of the owner himself. There are examples of drainage ditches successfully integrated into the landscape design and beautifully decorated.
A ditch is a long open drainage system of the simplest type, dug into the ground to collect and drain water that accumulates as a result of large amounts of precipitation.
Execution materials
Today, different materials are used to lay pipes in the ditch under the entrance to a summer cottage. Each type has its own characteristics, ability to withstand weight loads and service life. The main factor in choosing a product for drainage in this case is the fact that the pipe must have maximum rigidity and load-bearing capacity. Today, several varieties are chosen for drainage.
Metal
More often, steel pipes are used for these systems. They are characterized by strength and durability, although they are not sufficiently resistant to corrosion. On average, they can serve as a drainage system before entering for 30-40 years. In addition to their large diameter, such products have thick walls and are distinguished by their ability to withstand significant weight loads. Even with repeated passage of heavy equipment, they will not bend or become deformed. Therefore, the drainage will not be disturbed.
Concrete
This option is popular, despite the complexity of transporting the pipe itself, as well as its installation. A concrete pipe allows for significant water passage without destroying the road surface itself. These pipes are distinguished by their heavy weight and significant wall thickness. They weigh a lot, making their installation often impossible at home or requiring special lifts. The disadvantage of this material is its instability to destruction over time.
Reinforced concrete
These are pipes made of a steel frame, filled with concrete, compacted by centrifuge and vibrocompression. They have 2 categories with different load-bearing capacities (up to 6 and 10 m).
Plastic
Such pipes are corrugated, lightweight, and inexpensive. They are reliable, inert to rust and deformation. Their throughput and ring stiffness are quite high. Such pipes are characterized by safety; they are easy to install a drainage ditch. Their installation does not require special lifting equipment, and such pipes do not collapse over time.
Where are drainage ditches primarily used?
A drainage ditch, as a rule, finds its application on not too large private plots. This is due to the low degree of automation of work on its arrangement. Therefore, on an industrial scale, drainage ditches are rarely used. This also happens due to the above-mentioned disadvantages - the need for frequent repairs, short service life, etc. It should also be borne in mind that, according to current regulations, it is forbidden to construct drainage ditches and lead them to:
- reservoirs where fish and other living organisms live;
- unfortified or washed out ravines and holes;
- rivers with running water;
- reservoirs that have beaches for recreation;
- as well as to natural lowlands where the area is prone to waterlogging.
Important! It is prohibited to construct drainage ditches in places where the level of groundwater flow is at a depth of less than two meters. This is because dirty wastewater may otherwise seep into the aquifer. If groundwater is expected to occur on the site, then the drainage channels are equipped with closed trays.
The disadvantage of drainage systems is erosion and collapse of walls. Paving a ditch with natural stone is a way to strengthen the slopes of a drainage ditch, as well as give it an aesthetic appearance.
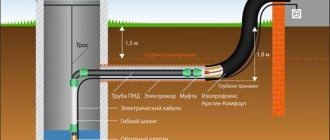
Determining the direction of movement of wastewater on the site
The direction of movement of the drains and the slope of the drainage pipe depend on the following parameters:
- terrain and degree of elevation change;
- depth of groundwater;
- soil freezing level;
- geological features and soil type on the site.
The depth of groundwater can be determined by the water level in a well or river (if there are one nearby).
Otherwise, you will have to dig a well or order a hydrogeological survey of the site from a specialized company. The results of the survey will allow you to select the optimal option for drainage systems.
Drainage ditches will only work effectively if the correct slope of the turf is maintained, as regulated by established regulatory standards.
Table 1. Relationship between pipe diameter and trench slope.
| Diameter of drainage pipes (mm) | Trench slope per 1 m/p of pipe |
| 50 | 3 |
| 110 | 2 |
| 160 | 1 |
| 200 | 0,8 |
Drainage drainage trenches should be located in such a way that water flows through them by gravity
Insufficient pipe slope will lead to silting of the walls and blockages.
Too large a slope leads to significant loads and premature failure of communication nodes.
Errors in calculations will lead to ineffective drainage ditches or premature blockages. Experts will help you avoid technical errors.
Installation of drainage ditches on your own.
What are the technical requirements for drainage ditches?
In order to ensure the greatest efficiency of the drainage ditch, certain standards must be observed. First of all, care must be taken to ensure the required degree of slope of the ditch. If it is dug in a small private area, then we can proceed from the principle: 2 cm of height change for every meter of ditch length. In the case of arranging drainage along roads and industrial facilities, an inclination angle of 3-5 degrees is considered optimal.
The greatest efficiency of a drainage ditch is ensured by organizing the required degree of its slope.
If, for some reason, it is impossible to provide the required degree of slope, then it is necessary to organize special fast flows and so-called water wells along the water path. The minimum flow speed should be 0.3 meters per second. In this case, the ditch can effectively cope in most cases even with relatively intense water flows. As for the dimensions of the ditch itself, they are as follows:
- width – about 50 cm;
- depth – at least 70 cm;
- the slopes on the sides should be at an angle of 30 degrees.
Criterias of choice
Which material to choose is up to everyone to decide for themselves. Usually the determining factor is not so much the material as the definition of the cross-section. It must be sufficient for the unhindered passage of groundwater and rainwater, even if there is plenty of it.
It is important to take into account measures to prevent clogging of the pipe itself (especially if the passage width is large). Since water carries debris and dirt with it, in addition to the pipes, it is necessary to take care of the grates
For this you can choose steel products.
Considering that concrete is destroyed, and reinforced concrete is labor-intensive to install, it is easier to build an embankment using a plastic corrugated pipe. This is the kind of material that beginners and those who plan to use special lifting equipment should choose. Its convenience is the fact that such a pipe can be cut independently without special stationary machines. However, plastic will need geotextiles, which will serve as a kind of filter, keeping out debris and dirt.
If you want to buy a plastic pipe, take into account the number of its layers and the mandatory presence of corrugation. There may be 1-2 of them. In this case, the second layer is corrugated. You cannot use a pipe made from recycled materials for a ditch. It has reduced strength and durability characteristics. Smooth plastic pipes are not suitable for installation. When choosing a pipe for a drain, you should consider 3 rules:
- budget;
- mechanical strength;
- ditch dimensions.
For example, when choosing a corrugated plastic product, you can press on the stiffening rib: if it does not return to its original shape, the product is not suitable for arranging a ditch. Plastic is better than other materials, since it does not retain debris that enters the pipe along with ground or rainwater. However, such a system must be hidden from UV rays, which can harm the plastic.
Reinforced concrete is monolithic; today such pipes are a generally accepted standard, and therefore are in demand. If you want to buy such a pipe, you should give preference to a product with water resistance class W6 and a low degree of water absorption (no more than 6% of the total weight). The minimum frost resistance class should be no lower than F200.
How can you strengthen a drainage ditch?
As already mentioned, one of the significant disadvantages that a drainage ditch has is that its walls and embankment are subject to natural destruction - crumbling and erosion. However, everyone can reduce the effect of this negative factor. And for this it is necessary to take measures to strengthen both the ditch itself and its slopes.
Firstly, even at the construction stage, it is necessary to ensure the presence of a special drainage sand and gravel layer along the edges of the ditch. A pillow 8 to 10 centimeters thick will be enough. After completion of the work, you can line the edges of the ditch with decorative or wild shrubs and trees. On the one hand, their root system will strengthen the walls of the ditch, and on the other hand, it will give it a more aesthetically attractive appearance.
Natural stone is often used to strengthen the ditch and also improve its appearance. With skillful layout, it can transform such a seemingly unprepossessing structure as a drainage ditch beyond recognition.
Geogrid is a honeycomb structure made of polyethylene tapes; it is used for reinforcing loose and heterogeneous soils, strengthening slopes and slopes.
It is also recommended to use a geogrid. With the help of special crutches it is attached to the bottom and walls of the ditch. The same material as geotextiles is recommended to be laid on the muddy soil of the main area of the canvas. The minimum thickness of the embankment on geotextiles should be at least 30 centimeters. Geotextiles can also be used to strengthen both the walls of the ditch and its bottom. The so-called turf is also used for this. The turf is cut into a thickness of 6 to 10 cm and laid out along the embankment. It can be secured with wooden knitting needles. Finally, you can simply show some imagination and use all kinds of available means to strengthen the ditch.
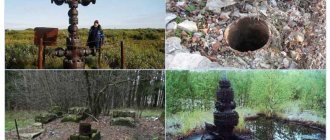
Filtration and storage wells
Drainage wells play an important role in the drainage system of the site.
There are tanks for various functional purposes, the main ones are:
Filtering
Designed for wastewater treatment. Wells are effective in areas where the volume of drainage does not exceed one or two cubic meters per day.
They are vertically installed cylindrical or cone-shaped containers, without a bottom, up to two meters deep.
Wells can be made of plastic or reinforced concrete rings.
At the base of the well, a filter layer of washed river sand, crushed stone, brick chips or coarse gravel, 20-30 cm thick, is poured and covered with geotextile.
The outside of the structure is also covered with crushed stone.
The wastewater enters through drainage pipes that enter the well at the top of the tank and goes through the drainage layer directly into the ground. Passing through a layer of sand and crushed stone, wastewater is purified from various contaminants.
Filter wells are installed at the lowest point of the site, no closer than 20 meters from the water intake well.
Filter wells are effective only on sandy and sandy loam soils that have good moisture absorption.
Installation of a filter well.
Cumulative
Wells are made of large-diameter plastic corrugated pipes, reinforced concrete or polymer-sand rings, steel or aluminum sealed tanks.
The bottom of the wells is concreted or the plastic bottom is sealed with bitumen.
Storage well made of reinforced concrete rings.
Drainage pipes cut into the installed tank. The joints are sealed hermetically.
Sand or crushed stone is poured between the tank and the walls of the pit.
The well is hermetically sealed with a metal, concrete or cast iron lid.
Water collected in a storage well can be used for technical purposes or for watering plants on the site.
Excess water is discharged into nearby ravines or reservoirs, in agreement with local authorities. To do this, a sewage conduit is installed through which the water can flow by gravity or be pumped out by a deep submersible pump.
The pump can be driven by a float sensor that responds to the fill level of the tank.
An effective and functional drainage ditch will ensure optimal humidity in the area.
How to arrange a drainage ditch on your own
As a rule, owners of small plots prefer to make do with the arrangement of drainage ditches on their own. And in order for the ditch to operate with maximum efficiency, you first need to mark the area, taking into account the natural slope of the area. You can even make a plan on paper in advance. In order to understand from which places the water needs to be drained first, you can simply wait for the first downpour and see where exactly the water has accumulated the most.
The most successful option is if the site itself is a sloping area. In this case, it will be enough to simply dig a U-shaped or L-shaped ditch. The “herringbone” arrangement of the ditch is also spreading, all the “branches” of which enter areas of the territory and then merge together - into the “trunk”. Taking into account the above parameters of the slope and the dimensions of the channel, a trench is dug, then the ditch is strengthened using one of the methods proposed above.
With the help of drainage ditches, damp areas are drained to prepare areas intended for the construction of buildings and structures.
We improve the soil composition
Soil with close groundwater, and especially swamp soil, is usually quite poor, and if you manage to dry it out, you will still have to improve it before you plant plants in this area. In addition, the soil needs to be checked for pH level: it is possible that the soil on the site is highly acidic. Then before winter you will need to add from 300 to 400 g of lime per square meter or the same amount of chalk, dig everything thoroughly, and in the spring measure the pH level again, and do this until the soil becomes neutral.
Next, ideally, imported soil should be poured over the existing soil. This way you will raise the area and increase its fertility.
Next, the area needs to be dug up, mixing the soil and adding dolomite flour in the amount of 300 g per hundred square meters of land. Before planting the seedlings (if planting is in the spring, then autumn fertilization is simply an ideal option), you need to add 250-300 g of wood ash per square meter, a bucket of humus and a teaspoon with a heap of superphosphate and potassium sulfate (all this for digging , even if you have to dig up the area again).
What experts say
The construction of drainage ditches on the site is a necessity. If the owner takes care of their arrangement in a timely manner, he can protect himself from many problems at once. And a drainage ditch is exactly where work should begin to improve any area.
Dmitriy.
When drawing up a diagram, you need to take into account the presence of obstacles and obstacles along the way. If there are bushes, they need to be torn down and replanted to avoid flooding of the root system. However, it is best, of course, to build a plan in such a way as to avoid any obstacles.
Alexander.
Useful tips
Here are answers to the most popular questions from readers regarding land reclamation and drainage structures.
- What material is best to cover the area?
For a rise of 20-30 cm in a small area, fertile soil can be used. If a meter-long layer of bedding is required, the base is made of compacted sand, secondary crushed stone or broken brick is placed in the middle (for drainage), and soil is laid on top. On beds and lawns you can do without crushed stone; instead of soil, paths and platforms are sprinkled with excavated soil. Experts believe that it is better to place soil from the site down. This prevents the heavy crushed stone from sinking into the light sand or the light sand from sliding off the loam.
- Are asbestos or used steel pipes suitable for closed deep drainage?
Strengthening the slope with retaining walls
Retaining wall made of gabions to strengthen the slope
Terracing of the site was very often used in past centuries, as evidenced by the time-worn and moss-overgrown antique retaining walls of various ancient landmarks in European countries.
Today, specialists in landscape design of a site widely use the construction of retaining walls to strengthen slopes. This process is very simple, does not have high material costs and is not particularly complex in construction technology.
If the slope is small and to strengthen it it is enough to erect a retaining wall up to half a meter high, then all that is needed is to select suitable flat stones, remove a layer of earth for them, create a drainage cushion and install the stones along the slope.
But if the height of the retaining wall must exceed 50 cm, then the process of strengthening the slope will become a little more complicated. Here you will need to create a small foundation and erect a retaining wall on it from concrete blocks, gabions, natural stones, etc.
The advantage of retaining walls lies in the unusual decorative decoration of the garden plot, the durability of the structure, as well as the simple technology of creation.
But what to do if the retaining walls cannot fit into the garden style, and accordingly into the overall composition of the garden decor? In this case, it is convenient to use reinforcement of the slope with geogrid or other types of geotextiles that are invisible under the lawn or other suitable decoration of the hill!
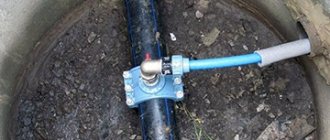
Examples of storm sewer implementation
olegtehFORUMHOUSE Member
The route of the rain sewer system pipe runs almost next to the storm inlet; the pipes are laid under the blind area. I didn’t calculate the throughput, I just took a red pipe with a diameter of 100 mm. Even in a downpour, it’s enough for your eyes, the entire drain goes into a separate well.
GripsKFORUMHOUSE Member
I did the storm drainage project myself, of course, during the installation process there were some minor changes on site, but the main thing turned out as planned. The bend towards the trays, the outlet of the red pipe is almost under the trays in the sand cushion. The trays have sand traps at the ends of the line, which are connected to the storm sewer. It is advisable to join the trays through a sand catcher; they have good cuffs for joining pipes, but you can also put the tray itself directly into the pipe. Each tray has a template for cutting holes for the pipe on both sides in the bottom.
Project.
Implementation.
Strengthening slopes using geomats
The structure of the geomat is similar to an ordinary washcloth.
Geomats are a polymer material that has a waterproof structure. It is created by placing polypropylene lattices on top of each other under high temperature. The structure of the product is similar to a washcloth, but this serves to ensure that plants can break through it. After some time, the roots of the plants will intertwine with the trellises and thereby strengthen the slope.
Laying geomats to strengthen slopes is carried out as follows:
- Before you begin to strengthen the bank, you should clear away debris and level the surface of the slope.
- Fix the upper edge of the geomat in the upper part of the ditch.
- When the desired length is reached, roll out the roll and cut it.
- Straighten the folds of the material and attach the bottom part.
- Next, lay the following rolls one by one. Moreover, they must be laid with an overlap of about 15 cm.
- Cover the finished surface with a layer of soil and plant plants (seeds should be sown on the open surface of geomats at the rate of 40 g per 1 m²).