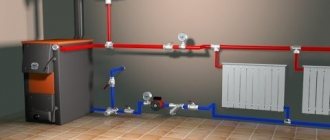
Often there is a need (or desire) to modernize or repair an existing heating system, which will certainly entail the insertion of additional equipment into the pipeline. These can be pumps, taps, valves, pipes, filters, etc. Here we have to consider two factors that influence the installation technology. Firstly, this is the material of the pipes: it is one thing if they are steel, and a completely different matter if they are plastic. Secondly, it is possible to drain the coolant. If for some reason it was not provided for, the situation will become more complicated. But even in this case, as practice shows, there is a way out.
Clamp for inserting into a pipe.
There are certain principles that should be followed when installing new equipment. These include: minimizing coolant leakage (especially from closed systems), maintaining system performance indicators (temperature conditions, efficiency), maximizing the reduction of work time (for which all materials and tools must be prepared in advance).
Elements of the make-up device
The recharge scheme for heating networks will depend on the hourly productivity of the standard recharge. For large main heating networks, in which the standard recharge is hundreds and sometimes thousands of cubic meters of water per hour, the complex includes: a water tank, chemical water treatment, automation, electric pump and shut-off and control valves. When performance decreases, the number of circuit elements can be significantly changed.
System recharge unit
Boiler gearbox
The reducer is installed on the return pipeline in front of the boiler to supply make-up water to the network circuit. Water from the city water supply flows through the valve when the pressure in the network pipeline drops due to leaks or release of an air lock. If the diagram provides for the installation of a circulation pump, then it is installed second. Otherwise, the operation of the entire heating system may be disrupted.
The gearbox operates automatically without maintenance personnel. Sometimes this is not always convenient, since it is impossible to control the leak, and its size can reach emergency proportions. Therefore, many users prefer manual recharge mode or install systems with alarms for high leakage levels.
Pump group
One or more pumps supply make-up water in front of the boiler units at a pressure higher than that in the return network water. The pump is activated by a pressure sensor and supplies water from the make-up water tank.
There are schemes with a submersible pump that can take water from a well or well. The pump group is calculated based on the hourly productivity of the standard make-up; the number of electric pumps must be at least 2, one of which is a reserve one.
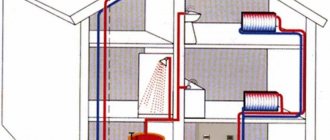
Diagram of a heating system with make-up
Actuating mechanism
It is installed to control the valve on the make-up line. Usually it is included in the make-up unit, consisting of a shut-off and check valve. It has electrical contacts for sending a signal to control the pump. The mechanism is adjusted to the permissible operating pressure. The actuator is usually a valve with an electric motor.
As it is filled, the pressure reaches the operating value, the sensor gives a signal to close the valve, the electric motor of which begins to rotate in the opposite direction.
Check valve
This is a mandatory element for any make-up scheme, since it prevents network water from entering the city water supply or water tank, which can lead to contamination of the tap water and an emergency shutdown of the boiler unit.
Backflow of water can occur even during make-up, if the pressure in the city water supply is lower than in the return, or when the shut-off and control valves do not ensure tight closure. The check valve is installed after the actuator.
In the retail chain there are options when it is built into the pressure reducing valve body. Currently, the make-up unit is equipped with a check valve in front or a “flow breaker” is used.
Makeup water purification filters
Impurities in raw water have a bad effect on the operation of heating equipment, especially the boiler, and can be deposited on boiler heating surfaces in the form of scale and sludge, reducing the coolant circulation rate and causing overheating in the boiler, followed by pipe rupture.
Simpler cleaning is performed using mechanical filters filled with sand or activated carbon. Simpler devices can also be installed - mud collectors, in which mesh filters are installed and have a larger body diameter than that of the return pipes. Water enters the mud basin, its speed drops and suspended solids precipitate. More complex hardness salts must be removed in specialized softener filters.
Options
Installation of this equipment requires taking into account its parameters, pipe diameter, pressure and water temperature, and coolant density.
N - designation of pressure, the ability of the device to raise liquid to a certain level. The parameter is measured in meters. Q – fluid flow in the heating system for a certain period of time, calculated in m3. This value is equal to the boiler power parameter. The coolant flow depends on the diameter of the pipes.
Circulation equipment is not designed to lift water, therefore, when purchasing it, you need to pay attention to parameter Q. If the boiler is not equipped with a pump, then the liquid flow must be calculated
A similar unit is already built into modern heating devices.
There is no point in buying a high-power unit: they will not use it at full capacity anyway. In addition, such a device is too noisy. The length of the pipeline determines the power of the injection equipment: for every 10 m of pipeline, 0.6 m of pressure is required from it. A ring 100 m long will work efficiently and productively at a pump head of 6 m.
When purchasing pumping equipment, you need to remember that its power should be 10% more than the calculated value.
What types of taps are there and what are they used for?
If you decide to install a faucet on your battery, then you need to choose it correctly. Plumbing stores have a large selection of different shut-off valves, but not all of them are suitable for installation on a radiator.
The following types of shut-off valves can be used in the heating system:
- flanged ball valves;
- coupling ball valves;
- needle taps.
Each design is used differently. A special feature of a flanged ball valve is that the valve can only be used in one position. The device must be completely open and allow all flow through, or completely closed. Due to design features, it is impossible to install a flanged ball valve on the battery. Such devices are used to monitor pipelines.
Using a coupling ball valve, you can smoothly regulate the movement of fluid. That is why such a device is perfect as a shut-off valve for installation on a heating radiator. The coupling ball valve has a thread. With its help, the device is securely fixed to the desired device.
Today there is a large selection of coupling ball valves on sale. They can be designed to allow liquids of different densities to pass through them. This feature must be taken into account when purchasing and carefully read the technical specifications for the product.
There is another type of shut-off valve that is usually installed on the battery - this is a needle valve, or Mayevsky valve. The central part of such a device is the needle valve. Using a key (or if you don’t have one, you can use a regular screwdriver) the valve can be opened.
Mayevsky's device is designed to bleed air from the battery. In a central heating system, the coolant circulates unevenly. As a result, numerous air bubbles are formed. Once they enter the radiator, they accumulate in its upper part (usually on the opposite side of the inlet). Such an air lock in the battery will not allow the battery to heat up evenly. Therefore, a needle valve or Mayevsky’s device is installed at the end of the radiator.
In addition, there are other shut-off valves for radiators. Today you can find various automatic cranes on sale. They allow you to regulate the volume of coolant entering the battery, and thereby control the temperature of its heating. Mayevsky’s crane was also automated. You can install a device that itself (without human intervention) will release the accumulated air.
Possible connection diagrams
The most efficient connection of batteries is quite easy to carry out - both in terms of the number of nodes and in terms of installation technology.
Heating radiator designTwo-pipe heating system
Option #1. Tichelman scheme
The most popular connection scheme, its main advantage is the maximum efficiency of all heating radiators at any point in the system. In addition, the Tichelman circuit allows you to regulate a separate radiator without any effect on the rest of the system. So, if it is very hot in one of the rooms, then the battery there can be completely/partially disconnected from the supply of hot coolant. And the thermal energy that is released as a result will be evenly distributed over the remaining radiators.
Tichelman's schemeAlbert Tichelman's solution
Another advantage of the scheme is that the water in both pipes has a common direction of movement. In terms of hydraulics, this is very good, since the load on all components of the system (in particular, the pump and heating boiler) drops noticeably.
Hot water begins to move from the boiler, moving alternately through all radiators. The return movement also starts from the first battery. It turns out that battery No. 1 will be the last on the return path, but the first on the hot coolant supply. Water will flow to battery No. 2 at a slightly lower temperature, but this unit is already closer than the first to the boiler on the “return” circuit.
Water flow process
The situation is similar with each subsequent radiator: the further it is from the source of hot coolant, the shorter the distance to the cold water outlet point. As a result, the conditions for all batteries are approximately equal (in terms of heat exchange with the system); they all heat up equally, regardless of their location.
Pipes with a diameter of 25 mm are used for wiring, while the batteries are connected to the network using pipes of 20 mm.
The radiator in the middle will not work
The Tichelman scheme has only one drawback - radiators cannot be placed exactly in the middle of the system (they simply will not heat in this place). This is explained by the hydraulic effect that occurs in the middle - here the outflow of cold and the supply of hot fluid form equal pressure. In reality, this almost never happens; the problem is solved by slightly moving the battery to the right or left. Although there is a simpler option - to create a small turn on one of the circuits in order to increase its length and thereby move the heating battery from the middle.
Dead-end and associated house heating schemes
Option #2. Connection via two double collectors
This scheme differs from the previous one in that the battery, which is the first to the heating boiler on the supply side, is also the first on the “return” path. This first battery operates as efficiently as possible, while the remaining nodes lose efficiency as they move further into the system.
Connection via two double collectors
The use of two collectors makes it possible to minimize this effect, since two circuits are created. Thanks to this, the number of radiators in one circuit is reduced, and thermal energy is distributed more or less evenly.
Two circuits
In this circuit, each subsequent radiator heats up worse, as we already mentioned above, but this effect can be partially eliminated using balancing valves. If you tighten this valve a little at the supply to the first radiator, then a better flow of coolant will be ensured to the remaining nodes, which are more distant. We also note that it is necessary to adjust the valves in any case, since in reality the length of the circuits created by the manifolds always differs somewhat. Consequently, the batteries will not produce the same amount of heat and therefore need to be balanced to balance their operating efficiency.
Which scheme should I choose?
From everything we said above, we can conclude: the simplest, most flexible and effective is the Tichelman scheme. The use of two double collectors can be an alternative - the efficiency of liquid distribution in such a scheme is quite high, but there are some difficulties during installation; in addition, additional adjustment will be required in the future.
Tichelman loop diagram
Selecting the size (diameter of the valve) based on the dimensions of the pipe
Diameter and nominal bore of the valve or pipe
Taps, like pipes, have their own dimensional characteristics. This is the internal diameter and nominal diameter. Sometimes these numbers match, sometimes they don't.
Where does the difference between pipe diameter and DN come from? Initially it was accepted that:
- Steel pipes and taps according to the internal diameter (passage) and is designated DU
- Plastic pipes have an outer diameter (DN) and have the additional characteristic of wall thickness or SDR (Standard Dimension Ratio) - the ratio of the outer diameter of the plastic pipe to the wall thickness
In the case of steel pipes, the diameter coincides with the DN, i.e.
diameter 3/4″ corresponds to DN20. In the case of plastic pipes, diameter is the outer diameter of the pipe, and DU is the diameter minus 2x wall thickness. That is why the dimensions of a plastic pipe are indicated in this format: [Diameter] x [Wall Thickness]
For taps, the diameter is the landing size and, for full bore taps that are used in our taps, it corresponds to the DN (Conditional bore diameter in mm).
In the case of partial bore valves, the DN is smaller than the diameter. Those. for a partial bore (reduced) valve 3/4″, DN - conditional bore - will correspond to 15mm (1/2″)
For your convenience, we provide you with a summary table of pipe sizes.
Summary table for selecting valve diameter based on pipe data
| DU | Partial bore valve (reduced) | Full bore valve | St," (Inch) | St, mm (N/a) | PPR 16 | PPR20 | PPR a20 | MP | PEX |
| 15mm (1/2″) | 1/2″ | 1/2″ | 15mm (22mm) | 20 | 25 | 20 | 20 | 20 | |
| 20mm (3/4″) | 1/2″ | 3/4″ | 3/4″ | 20mm (28mm) | 25,32 | 32 | 25 | 25 | 25 |
| 25mm (1″) | 3/4″ | 1″ | 1″ | 25mm (32mm) | 40 | 40 | 32,40 | 32 | 32 |
| 32mm (1 1/4″) | 1″ | 1 1/4″ | 1 1/4″ | 32mm (42mm) | 50 | 50 | 40,50 | 40 | 40 |
| 40mm (1 1/2″) | 1 1/4″ | 1 1/2″ | 1 1/2″ | 40mm (50mm) | 63 | 63 | 50, 63 | 50 | 50 |
| 50mm (2″) | 1 1/2″ | 2″ | 2″ | 50mm (63mm) | 75 | 75 | 75 | 63 | 63 |
Accepted abbreviations: St, » - steel pipe dimensions in inches St, mm - steel pipe dimensions in mm N/a - outer diameter of the pipe (water and gas) PPR 16 - PPR (polypropylene PN16) PPR 20 - PPR (polypropylene PN20) PPR a 20 - PPR (reinforced polypropylene PN 20) MP - metal-plastic pipe PEX - cross-linked polyethylene pipe PEX, for example REHAU Stabila
An example of how you can select a tap for a metal-plastic pipe:
The outer diameter of the metal-plastic pipe is 25mm, the wall thickness is 2.5mm, resulting in the inner diameter of the pipe being 20mm. Those. a 3/4″ faucet (DN20) fits this pipe
The presented data on plastic pipes is not a strict requirement, but by decreasing/increasing the bore diameter of the valve relative to the diameter of the pipe, we increase local resistance and thereby reduce pressure , and also create vortex flows that wash out the walls of the pipes
All wall thicknesses of plastic pipes are taken based on the data of the most represented manufacturers on the Russian market.
Which faucet should you choose from the ones presented?
Comparison table of sizes of brass valves for drive
| Diameter | Characteristic | Bugatti - Bl - 1 | EnolGas El-2 | Bonomi - Bon - 3 | Tiemme - Tm - 4 |
| 1/2″ DN15 |
Crane drive dimensions excluding crane size
Conclusions : As we can see, the dimensions of the Bugatti and Tiemme cranes are identical, the Enolgas cranes are close in size to these cranes. Bonomi taps have approximately 10% longer threads and approximately 20% greater wall thickness. Lengthening the threaded part of the taps increases the reliability of the body from mechanical and dynamic loads, but when preparing for installation, the increased length of Bonomi taps should be taken into account. Increasing the wall thickness of the Bonomi crane greatly reduces the chances of damage to the crane as a result of hydrodynamic shocks and mechanical loads.
Device and principle of operation
Circulation pumps are highly specialized equipment whose purpose is to force water circulation. Pump includes:
- The body is made from stainless metals (steel, cast iron, brass, bronze) and alloys;
- Rotor. Ceramic or high-quality steel is used for production;
- Rotor shaft. Includes an impeller wheel with blades;
- An electric motor having a certain power to drive the rotor.
A vertical pump, as part of a closed pipeline, sucks in liquid
on the one hand, due to the rotation of the impeller, it accelerates its movement, and then pushes out the water on the other side. Thanks to this process, a discharged space is created at the inlet, and compression is created at the outlet pipe.
Due to the uniform operation of the equipment, a certain level of pressure in the heating system is maintained. However, to increase its indicator it is necessary to use a special device. The circulation pump is primarily used to overcome resistance in areas of the heating system.
Filling methods built-in mechanism and pumps
Heating filling pump
How to fill the heating system in a private house - using the built-in connection to the water supply using a pump? This directly depends on the composition of the coolant - water or antifreeze. For the first option, it is enough to pre-flush the pipes. Instructions for filling the heating system consist of the following points:
- It is necessary to make sure that all shut-off valves are in the required position - the drain valve is closed as well as the safety valves;
- The Mayevsky tap at the top point of the system must be open. This is necessary to remove air;
- The water is filled until water flows from the Mayevsky tap, which was opened earlier. After this it is blocked;
- Then it is necessary to remove excess air from all heating devices. An air valve must be installed on them. To do this, you need to leave the system filling valve open, making sure that the air comes out of the specific device. As soon as water flows from the valve, it must be closed. This procedure must be done for all heating devices.
After water has been filled into a closed heating system, you need to check the pressure parameters. It should be 1.5 bar. Subsequently, pressing is performed to prevent leaks. It will be discussed separately.
Filling heating with antifreeze
Before you begin the procedure of adding antifreeze to the system, you need to prepare it. Usually 35% or 40% solutions are used, but to save money it is recommended to purchase a concentrate. It should be diluted strictly according to the instructions, and only using distilled water. In addition, it is necessary to prepare a hand pump to fill the heating system. It is connected to the lowest point of the system and, using a manual piston, coolant is pumped into the pipes. During this, you need to monitor the following parameters.
- Air outlet from the system (Maevsky valve);
- Pressure in pipes. It should not exceed 2 bar.
The entire further procedure is completely similar to that described above. However, you should take into account the operating features of antifreeze - its density is much higher than that of water
Therefore, special attention should be paid to calculating the pump power. Some glycerin-based formulations may increase the viscosity coefficient as the temperature increases. Before pouring antifreeze, it is necessary to replace the rubber gaskets at the joints with paronite ones.
This will significantly reduce the likelihood of leaks
Before pouring antifreeze, it is necessary to replace the rubber gaskets at the joints with paronite gaskets. This will significantly reduce the likelihood of leaks.
Automatic filling system
For double-circuit boilers, it is recommended to use a device for automatically filling the heating system. It is an electronic control unit for adding water to the pipes. It is installed on the inlet pipe and operates fully automatically.
The main advantage of this device is the automatic maintenance of pressure by timely addition of water to the system. The principle of operation of the device is as follows: a pressure gauge connected to the control unit gives a signal about a critical decrease in pressure. The automatic water supply valve opens and remains in this state until the pressure stabilizes. However, almost all devices for automatically filling heating systems with water are expensive.
A budget option is to install a check valve. Its functions are completely similar to the device for automatically filling the heating system. It is also installed on the inlet pipe. However, the principle of its operation is to stabilize the pressure in the pipes with the water make-up system. When the pressure in the line drops, the pressure of tap water will act on the valve. Due to the difference, it will automatically open until the pressure stabilizes.
In this way, you can not only fuel the heating, but also completely fill the system. Despite its apparent reliability, it is recommended to visually monitor the coolant supply. When filling the heating system with water, be sure to open the valves on the devices to allow excess air to escape.
Video
It is not difficult to install a Mayevsky tap into a heating radiator. The only slight difference is on which side the crane needs to be installed. See how the master does it:
This video will introduce you to the taps and fittings for the radiator:
What does the correct connection of a heating radiator look like? We will analyze the connection diagrams used in private houses and city apartments, and the pipes, fittings and elements of shut-off and control valves used for this purpose. In addition, we will find out what mistakes can be made when designing and installing a heating system.
Place of radiators in the heating system
The use of radiators in heating residential premises plays a key role today. Not all residential properties, especially apartments in multi-storey buildings, can be converted to underfloor heating. Therefore, the main work of heating internal living spaces is performed by radiators or the good old batteries that are familiar to us.
Radiators transfer thermal energy from the coolant to the surrounding space. Heat transfer is carried out due to the large heating surface of the heating device. Modern models have a number of technical improvements, thanks to which it has become possible to connect in a variety of options and with any wiring diagram.
in old cast iron and steel batteries there was only one upper and one lower pipe, through which hot water is supplied and the return is released.
In modern models, in addition to the main supply and outlet pipes, there are built-in air vents. This design of batteries radically changed the quality of functionality of the heating system. If there are air pockets in heating devices, it is enough to open the drain valve and bleed the air.
In many ways, thanks to modern models of heating batteries, it has become possible to choose the most convenient connection scheme and install heating devices in those areas of the living room in which they are most effective. The quality of operation of the heating water circuit depends on correctly installed piping. The process is necessary if you are using a pipeline made from polypropylene pipes.
Important! If there are metal risers, the piping is made from other consumables. These can be metal copper pipes or metal-plastic. The use of polypropylene pipes in this case is strictly prohibited
The use of polypropylene pipes in this case is strictly prohibited.
The reason for the incompatibility of metal pipes with polypropylene products is the presence of a threaded connection. Considering the fact that propylene pipes have a high coefficient of thermal expansion, when hot coolant is supplied, the threaded connection will lose its tightness and stability. Therefore, if you want to connect a heating radiator made of polypropylene pipes, try to use fittings, adapters and couplings made from similar materials.
the difference in diameters of pipes made of different materials should be taken into account
Harness
There are two types of heating systems - forced and natural circulation. Systems with forced circulation cannot work without a pump; systems with natural circulation work, but in this mode they have lower heat transfer. However, less heat is still much better than no heat at all, so in areas where electricity is often cut off, the system is designed as hydraulic (with natural circulation), and then a pump is installed into it. This gives high heating efficiency and reliability. It is clear that the installation of a circulation pump in these systems is different.
All heating systems with heated floors are forced - without a pump, the coolant will not pass through such large circuits
Forced circulation
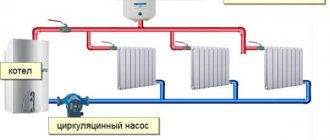
Since a forced circulation heating system without a pump is inoperative, it is installed directly into the gap in the supply or return pipe (of your choice).
Most problems with the circulation pump arise due to the presence of mechanical impurities (sand, other abrasive particles) in the coolant. They can jam the impeller and stop the motor. Therefore, a mesh dirt filter must be placed in front of the unit.
Installing a circulation pump in a forced circulation system
It is also advisable to install ball valves on both sides. They will make it possible to replace or repair the device without draining the coolant from the system. Turn off the taps and remove the unit. Only that part of the water that was directly in this piece of the system is drained.
Natural circulation
The piping of the circulation pump in gravity systems has one significant difference - a bypass is required. This is a jumper that makes the system operational when the pump is not working. One ball shut-off valve is installed on the bypass, which is closed the entire time the pumping is running. In this mode, the system operates as forced.
Installation diagram of a circulation pump in a system with natural circulation
When the electricity goes out or the unit fails, the valve on the jumper is opened, the valve leading to the pump is closed, and the system operates as a gravity system.
Installation features
There is one important point, without which the installation of the circulation pump will require rework: it is necessary to rotate the rotor so that it is directed horizontally. The second point is the direction of flow. There is an arrow on the body indicating which direction the coolant should flow. This is how you turn the unit so that the direction of movement of the coolant is “in the direction of the arrow”.
The pump itself can be installed both horizontally and vertically, just when selecting a model, make sure that it can work in both positions. And one more thing: with a vertical arrangement, the power (pressure created) drops by about 30%. This must be taken into account when choosing a model.
Where should the pump be installed, on the coolant supply or return?
In the last article I touched on this issue, here I will repeat and add. Practitioners believe that there is no fundamental difference where to install the circulation pump into the coolant supply or return. Modern circulation pumps are not afraid of pressure and work great in both places.
However, in practice, it is more often necessary to repair pumps installed for direct coolant supply in systems with solid fuel heating boilers. It is in them that the system boils for a long time and the circulation pump fails.
Let's return to the topic of the article and look at two options for inserting a circulation pump.
Insertion into a plastic pipeline
It is much easier to cut into a plastic pipeline of a heating system: here technologies such as gas welding or thread cutting are generally excluded due to the specifics of the material. Therefore, there are two options left: cutting the pipeline and inserting a fitting in the selected area (in the absence of pressure) or inserting it into the pipe under pressure.
The fitting can be soldered into a polypropylene pipeline using a special soldering iron. Insertion into a metal-plastic pipe is made using fitting tees (crimp or compression). In any case, a section of pipe of the required length is first cut out (with a pipe cutter or scissors), in place of which a fitting is inserted.
The technology for tapping under pressure is the same as for a metal pipe, but the complexity of the work will be less: drilling plastic is much easier.
Fitting installation sequence
The fitting installation procedure is as follows:
The fitting is installed on the main heat supply line. To seal the connection, a non-drying sealant is used (it is better to use automotive sealant) that is resistant to high temperatures; The sealant is applied: it must be applied to the inner surface of the fitting in contact with the metal pipe
Where you plan to drill a hole in the pipeline, there should be no sealant; After installation, carefully tighten the screws of the clamp connection; it is important to avoid distortion of the fitting fastening.
Through an open valve or outlet pipe, a direct connection is made into the heat supply line. A conical drill is used, supplemented with a protective layer so as not to damage the inner surface of the outlet pipe.
The hole in the pipe is drilled after the fitting is securely attached to the pipe
When deciding on a connection to the heating system, it becomes clear that metal pipes are not the best option. Despite their prevalence, metal pipes have ceased to be a universal and convenient solution for arranging heating and plumbing systems. They have been replaced by a generation of metal-plastic pipes, the advantage of which is that:
- plastic pipes are not subject to corrosion;
- a pipeline made of polypropylene components is lightweight and can be quickly installed;
- the possibility of quickly repairing and upgrading the system yourself remains possible;
- there is no need to use complex equipment for installation and transportation of polypropylene pipes.
Insertion into thin water pipes is carried out using the so-called “saddle” - an outlet fitting with clamp clamps. The clamping clamp is also used for inserting into the sewer system. The basic principle of the “saddle” with clamping clamps is to ensure insertion and connection into low-pressure systems.
For the heating main, especially in multi-storey buildings, the use of fragile, cheap fittings is unacceptable. Remaking the internal heating communications will allow you to regulate the level of heat transfer of each heating convector. It is enough to supplement the heating radiators with taps for regulating the coolant supply and a “bypass” - a circuit for the return supply of heated water.
Using fittings you can cut into a heating system mounted from plastic pipes
An insert into the heating communications of the collector groups - on the direct and return coolant supply lines - allows you to repair or modify the system at any time and without turning off the general water supply. The advantage of the collector circuit is that each consumer is provided with autonomous regulation of the coolant supply level. If you use the multi-circuit principle of connecting heating radiators to a collector group, you can create an economical and unpretentious heat supply system.
The disadvantage of such a scheme - an increase in the length of the highway - is compensated by the ability to independently modernize or repair the system without the involvement of specialists.
Procedure for working with metal pipes
In order to cut into a metal water pipe under pressure, you need to carry out several stages of work - preparing the working area, installing a clamp, drilling the pipe and installing a ball valve.
Let's look at these stages in detail:
- Preparing the work area. At the preparatory stage, before installing the clamp, you should thoroughly clean the surface of the pipeline from rust and dirt in the work area.
Remember: the condition of old pipes may be unsatisfactory or completely unsafe. If it is not possible to replace such pipes, do not overdo it when cleaning them to avoid damaging the water supply.
- Installation of the clamp. After cleaning the surface of the pipe, you should put a fastener on it and then tighten it using bolts. A more dense additive will be ensured by alternately tightening the bolts, one on each side.
- Drilling a pipe. Using a guide coupling, we drill a hole in the pipeline, which must subsequently be closed with a plug.
Attention! To ensure safety, you should use a hand or cordless drill.
Once the hole is ready, install the ball valve. However, it is much easier to purchase a clamp with a screwed-in tap, through the cavity of which the drilling is done. The tap valve is closed after water begins to appear at the drilling site.
After this, you need to check the tightness of the clamp to see if there are any leaks in the area where the gaskets are placed. If a leak is detected, the bolts should be tightened. If the saddle is dry, then everything is done correctly. At the final stage of work, open the tap, finish the hole using a hammer and a punch of the same diameter as the drill, and then close the tap.
Heating system with a complex of lines
In a scheme divided into several separate heating lines that heat different floors or sides of the house, each branch has its own pump installed. When installing a specific device, you can adjust the desired operating mode. Since heat tends to rise upward, it will always be warmer on the top floor, so you can reduce the circulating speed of the coolant. The insertion of the device is carried out in the same way (after the heat generator to the first branch). When installing two devices in a two-story mansion, much less coolant will be consumed for heating the second floor.
Equipment selection
An important parameter when purchasing a water pump is its power. An unsuccessful selection will lead to excessive energy consumption and severe noise interference during operation. The complex architecture of the heating system will also require the intervention of a heating engineer.
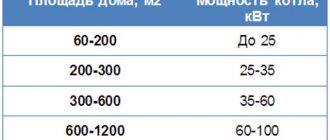
To calculate the required power, the owner of a private house can use the diagram presented below. The technical parameters of the installed devices must exceed the calculated values by 10-15%.
Search for power
The heating requirements provided by the pump depend on the cross-section of the conducting pipe. They are greatly influenced by the maximum pressure indicator, the volume of coolant, its temperature and density.
The amount of working fluid passing through a random section of the water circuit is calculated similar to the volumes of water that the boiler used. Consumption values are equal to power parameters.
Calculation formula
A similar principle applies to radiators. When choosing the location where the circulation pump will be installed, you need to take into account the fluid flow of each ring of the heating network. This indicator will also be affected by the cross-section of the pipeline and its length.
Each ten-meter section of the heating system will require 0.6 m of pressure from the working pump. For hundred-meter-long communications installed in a private house, you will need a device with a pressure of 6 m.
Types of pumping units
Stimulating the movement of liquid in pipes involves the use of one of two qualitatively different methods. A “dry” type unit can be installed in the system, the rotor of which will not come into contact with water inside the circuit. The connection diagram for a “wet” pump, on the contrary, requires immersing its working part in a coolant liquid.
Hermetically insulated flywheels of devices of the first type are used in the construction of high-rise buildings or large shopping centers. The air turbulence that accompanies their rotation causes loud noise and makes them inconvenient for installation in private buildings.
The housings of “wet” pumps are made of brass or bronze, and ceramic or steel parts are placed inside them. Water flowing through them acts as a lubricant and extends the service life.
Selecting a pump installation location
A modern “wet” type circulation pump can be installed in both the return and direct heating branches. Traditionally, the circulation pump is placed in the “return” in front of the boiler in order to:
- Reduce wear and increase the service life of the pump rotor;
- Avoid boiler boiling due to air being drawn out of the boiler by the pump;
- Damage to the pump due to possible boiling of the boiler, especially solid fuel.
Pump diagram in the forward pipeline and Pump diagram in the return pipeline
Types of seals
Previously, there was not such a variety of seals as there is today. Some plumbers use the entire range of materials in their work, while there are conservatives who still recognize only linen. Are they right? Let's figure it out. How to seal the threads on a heating pipe:
- tape-fum;
- flax with paste;
- anaerobic adhesive sealant;
- sealing thread.
Flax dries in systems with hot coolant, but rots in cold water. In the first and second cases, the result of the process will be the appearance of a leak. Thanks to the paste, the fitting can be loosened a little after twisting, turning back no more than 45 degrees. A universal material, suitable for connecting metal heating pipes and polymers.
Flax is suitable for all types of threads on heating pipes, regardless of diameter. It is the cheapest of the seals
It is important to wind it correctly:
- using a metal blade or a file, notches are made on the thread;
- a strand of flax is rolled into something like a thread;
- winding is carried out as the fitting is screwed in (usually clockwise);
- The protective paste is applied evenly.
Seal with flax
When winding flax, it is important not to overdo it. First you need to make the first turn, which will secure the seal to the thread. This leaves a tail
On the second turn, the remaining tail is picked up and wound together with the common fiber. Make sure there are no twists. The material should be distributed evenly along the threads from the end to the fitting body. When working with flax, when connecting heating pipes, you need to watch your hands, as they are constantly smeared with paste. If you grasp a polypropylene pipe with such hands, an imprint will remain
This leaves a tail. On the second turn, the remaining tail is picked up and wound together with the common fiber. Make sure there are no twists. The material should be distributed evenly along the threads from the end to the fitting body. When working with flax, when connecting heating pipes, you need to watch your hands, as they are constantly smeared with paste. If you grasp a polypropylene pipe with such hands, an imprint will remain.
Fum tape is used for thin-walled fittings and connectors with fine threads. The material is easy to work with and your hands are always clean. At the same time, fum tape is quite expensive and is mainly used for small diameters. A significant drawback of this seal is the impossibility of adjustment. That is, if the joint of the heating pipes is twisted and needs to be loosened a little to center it, then the connection loses its tightness.
The sealing thread, like the fum tape, does not require lubrication or the use of special paste. It can be wound onto dirty or wet threads and is suitable for plastic.
Sealants are applied to clean and grease-free threads (usually new ones). They are:
- dismantled;
- difficult to dismantle.
But in fact, they are all not dismantled. Before connecting heating pipes using sealant, you must be prepared for the fact that it will be possible to disassemble the connection only after heating. And only then, perhaps, will it be possible to unscrew it. But during installation, the connection points do not even need to be tightened with wrenches.
How to cut into an iron pipe without welding?
Why do you need to insert into a pipe without welding? In fact, not every pipe can be welded, and sometimes work must be done without disconnecting consumers. Then welding is possible, but with special equipment and using complex equipment. But you can cut into a sewer, or PVC, or even metal pipe without using a welding machine.
It is possible to insert pipes without welding, but this will require certain material costs and the availability of special equipment.
Methods for tapping into a pipe without welding
The easiest way, if you can turn off the media supply, is to cut the pipe, cut the threads with a tap and install a suitable fitting that will have one or two outlets. This insertion is simple, takes little time and, if consumers can wait, is the most preferable.
A more complex method is tapping using a flange and clamps.
- It consists in installing a flange that matches the diameter at the desired place in the pipe where it needs to be cut. We secure it with clamps, having previously coated it with a good sealing compound.
- There is no need for welding if the flange has the required bend.
- We will pre-cut the thread on the outlet and prepare everything for installation. Especially a bucket if we are working with a water pipe.
- After everything is installed, we drill a hole in the pipe through the outlet with a large drill, and then tighten the connection as quickly as possible. The faster you fasten, the less water will flow.
In this way, without welding, you can cut into almost any pipe. These are the two main methods, everything else is just their variations.
The first is the material of the product, the second is the diameter. For example, you cannot put a fitting of the same diameter on a metal pipe, and you can achieve a tight connection using clamps if you use a metal pipe for the fitting, the inner diameter of which is equal to the outer diameter.
The use of fittings is of little use when inserting large diameter pipes.
For large-diameter pipes, tapping by cutting and installing fittings is of little use. Think about how you will connect a cut sewer pipe with any type of coupling, and the desire to experiment with labor costs will disappear by itself.
But in everyday life this is the most common case, for example, when you need to cut in the drain from a dishwasher or washing machine. Cut the plastic pipe.
Considering the specifics of connectors, it is unlikely that it will be possible to restore the connection without emergency assistance from specialists (and not without welding).
Therefore, common sense or expert advice will not be superfluous. Remember that you first need to decide how, with what, in what way and with what tools the insertion will be made without welding, and only after thinking it over, weighing and preparing everything, you can start it.
Practical advice
To insert an outlet for a washing machine you will need: a drill, a metal strip, a clamp, FUM tape and a large-diameter drill.
Let's cut the outlet from the washing machine into a plastic sewer pipe. We have it half-walled into the wall, but we don’t want to install another inlet into the siphon, there are already two outlets there.
Therefore, let's prepare:
- drill;
- metal strip;
- clamp (fix the outlet from the machine);
- FUM tape;
- large diameter drill.
Next, we perform a series of actions in the following sequence:
- We will put a clamp on the outlet that secures the metal strips. They already have holes for wall mounting;
- We run water to clean the sewer pipe a little (there will be less odor).
- We drill a hole in the pipe, and if the drill is thin, use a file or knife in a circular motion to expand the hole so that it remains round and is slightly smaller than the diameter of the outlet.
- After that, we wrap the outlet with FUM tape and insert it tightly, making sure that it is securely fastened. If necessary, we rewind the FUM tape (no need to regret it).
- Now we mark holes on the wall for fixing the metal strips, drill holes and tighten the dowels, fixing the clamp on the outlet as tightly as possible. This fixation will prevent it from falling out of the pipe, and given that the pressure in such a system is very low, this connection will last a long time.
- It is better, of course, to coat the edges of the joint with a sealing compound, because when the sealant sets, it will act as an additional joint. It is clear that in the case of a more accessible place of work, everything can be made simpler, but this insert is the most difficult.
How to cut into a corrugated pipe?
Before use, the corrugation should be carefully leveled.
If there is a corrugation, it is almost impossible to ensure an exact connection and preliminary preparation is necessary.
- The most important thing is to achieve alignment of the corrugation before inserting, and this must be done from a material that will hold securely and durable.
- It should be spread between the corrugations in excess, and the residue should be removed after drying.
- Next, it is necessary to ensure the immobility of the corrugated pipe at the insertion point, which can be ensured by rigid structures secured with clamps. For example, 3-4 nails (one hundred square meters or more) are suitable as reinforcement.
- After the place is prepared, you can cut in the same way as into a smooth pipe.
Other tapping methods are not so labor-intensive, but remember that the tapping process without welding requires thoughtfulness, accuracy and preparedness for an emergency.
How to cut a pipe into a heating pipe with your own hands: technique and rules of work
Metal coolant supply systems in old houses need, at a minimum, modernization, and even complete or partial replacement. When it is possible to turn off the heat supply to the heating lines, the question of how to cut a pipe into the heating pipes does not even arise - a classic welded connection is used.
Insertion into the heating system can be done without welding
Advantages of hot welding
The advantage of conventional welding is that the connection can be made in any place convenient for installation, and the metal heating pipe does not need to be specially prepared for this. It is enough to clean the future welding site from the remnants of old paint and from layers of rust that are inevitably present on metal pipes.
The insertion occurs by adding an additional heat removal circuit to the existing heating pipe - the pipe is welded, sometimes with a branch pipe or a threaded transition to the connecting fitting. The configuration of the exhaust circuit can have any structure that best suits the task of ensuring heat removal.
According to the construction rules and regulations for laying heating networks and heating pipes, all work, including repairs, insertion into a heating pipe and modernization using welding, is usually carried out on a section of the main line without coolant. The pipe is turned off and the remaining water is drained. Next, the connection to the system is carried out.
If there is no water in the heating system, then the method of hot welding of pipes is used
Method of threaded connections of heating pipes
Cutting into the system of the main heat supply line, if it is possible to shut off the supply of heated water, is also done using the method of threaded connections. To do this you need:
- prepare the main pipe in the place where the insertion will take place: thoroughly clean the pipe down to the metal, removing the old paintwork;
- outline the location for the future fitting;
- using a grinder or a hacksaw, cut off part of the pipe at the installation site of the future outlet tee, taking into account the fact that it will be necessary to create mating parts for the threaded connection;
- use a tap to cut threads on sections of the pipe with a pitch corresponding to the thread of the fitting;
- using a sealant - most often tow and oil paint - install a mortise fitting, and after the paint has dried, test the created connection by supplying coolant into the pipe under operating pressure.
Connecting heating pipes without welding will require special tools for cutting threads on metal pipes and skills in working with them. It is advisable to invite a certified specialist to carry out the work if you do not have experience in cutting threads on pipes and creating tight connections using tow.
Tapping into a steel pipe without welding - Machine tools, welding, metalworking
There are often cases when there is a need to expand the water supply system in order to be able to install plumbing equipment.
This may also be due to the need to install an additional circuit. In any case, such actions must be correlated not only with safety precautions, but also with a certain procedure for carrying out work.
In this article you will learn how to cut into a water pipe.
Tapping into a water main
The characteristics of the main water pipeline are the following: such a pipeline is laid on the main streets, pipes with a diameter of 100 to 2000 mm are used. To carry out the insertion, you need to turn to one of two possible options for performing this task:
- welding - the thread necessary for installing the tap is welded, which is used to connect the pipe going to a specific house;
- overhead clamp - used when there is no possibility of blocking the flow of water.
Heating wiring
The simplest and most reliable heating wiring diagram is “Leningradka”, or single-pipe system wiring. Such a system is structurally a looped circuit running along the entire perimeter of the building. Radiators are connected to the pipeline in parallel. The main disadvantage of the Leningradka is the uneven heating of the radiators connected in the circuit.
A much more effective option for how to properly install heating, especially in multi-storey buildings, is a two-pipe heating system. There are two varieties of such a system, one of which is called a dead-end system. This scheme must be balanced, i.e. limit the flow of radiators located close to the boiler - otherwise heating of heating devices located far away will be insufficient.
In a passing circuit, there are several parallel circuits of the same length. There is no need to balance the associated wiring, since in it the heat transfer of all batteries is initially almost at the same level. If no obstacles prevent you from creating a circular passing circuit, then it needs to be done, but otherwise a dead-end two-pipe wiring is quite suitable. In any case, in order to know exactly how to properly install heating in a house, you need to think through all the known nuances in advance.