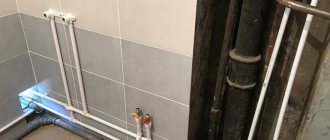
Replacing pipes in the bathroom and toilet is where you should start when renovating these rooms. Nowadays, there is a wide selection of materials in specialized stores, but craftsmen advise using polypropylene, as it is of high quality.
In old buildings, heating systems, sewers and pipelines often have not changed since the first residents moved in. Therefore, today residents are trying to replace them with new systems as quickly as possible. The replacement process is carried out during major repairs or in emergency situations (sewer breaks), if it is impossible to repair the break.
However, in order to successfully change pipes, it is advisable to know what products and materials are offered by modern manufacturers of building materials.
Polypropylene pipes
Replacing pipes in the bathroom is a rather long and labor-intensive process, especially if it is done independently, without the help of professionals. After all, at any stage of work various problems can arise. For example, accumulated sediment on the walls of cast iron and copper products can cause poor drainage. To prevent this from happening to plumbing products in the future, it is necessary to promptly replace old pipes with new ones made of polypropylene.
Changing pipes in the bathroom
Advantages of polypropylene pipes:
- have high flexibility;
- easy to replace (soldering);
- when using pipes for cold water, the warranty period is 50 years, and for hot water – 30 years;
- not subject to rotting, oxidation, rusting;
- are light in weight;
- environmentally friendly.
Tool
When carrying out pipe replacement work, both manual and special construction tools are used, its main types:
Hand tool. A hammer, tape measure, pencil, chisel are necessary for marking and dismantling work in the absence of power tools.
Angle grinder. The grinder is indispensable for cutting any steel or cast iron pipes during dismantling and laying of the pipeline. It is used to cut profiles for drywall, make even grooves, and sometimes cut polymer pipes.
Hammer. This is the main tool for gating walls, knocking down plaster mortars in the area of pipes passing through the floor slabs.
Thread cutters. A situation often arises when steel pipes are cut off at the riser and a polymer pipeline is connected to it. In this case, a thread is cut into the remaining pipe fitting using a die with replaceable nozzles.
Pipeline joining tool. If the power tools listed above are often found in many households, then to connect fragments of pipelines and fittings, special devices are required, which are available from specialists. These are manual and electric press pliers for working with plastic, soldering irons for soldering polypropylene pipes.
Rice. 8 Working tool for pipe laying
How to choose pipes
Replacement of sewer pipes must be carried out according to certain selection criteria:
- for internal cold and hot water supply systems, products with a diameter of 15 to 20 mm are used;
- for water risers, the diameter of the pipes should be no more than 40 mm;
- for internal sewerage, products with a diameter of 50 mm are installed from plumbing fixtures and household appliances to the riser;
- the diameter of the pipe coming from the toilet and the sewer riser must be no less than 100 mm.
It is also better to choose plastic pipes for cold water, and metal-plastic products for hot water.
Helpful advice! Experienced plumbers recommend: before you start replacing pipes, you need to draw up a drawing that will mark the locations of plumbing elements and equipment (washing machine, dishwasher, etc.). Thanks to this scheme, it is much easier to calculate the required number of tees, bends and other components of the sewer and water supply system. If desired, the drawing can be shown to a professional, who, if necessary, will make adjustments and give practical instructions.
Motives
First, let's find out in which cases pipe replacement is justified, and when it will be a waste of your money and time.
Change
An unconditional replacement is needed in the following cases:
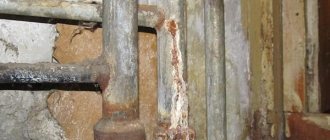
- With a significant number of leaks and a thick layer of rust on the surface of the connections;
- If the water pressure has gradually decreased over the past few years. Over time, steel pipes become overgrown with lime and rust. Cleaning them is most often possible, but requires disassembling all threaded connections and is quite tedious. In addition, the clearance in a cleaned pipe will be significantly less than in a new one;
- It makes sense to replace the cast-iron sewer system, which began to leak at the bells. The time spent on re-embossing all the bells is quite comparable to the time spent on its complete replacement;
Easier to replace than to repair.
As a bonus, we will be able to easily disassemble the comb (indoor sewer) for cleaning if it is clogged. The blockages themselves, however, will become rare: the smooth surface of plastic is much less likely than cast iron to collect deposits.
Do not change
No replacement needed:
- If the pressure of cold or hot water drops suddenly, suddenly. Almost always the cause is debris on the bend of the hose, under the valve seat or in front of the mixer. To clean it, it is enough to open both taps on the mixer when the cold water or hot water riser has been reset (depending on what kind of water has stopped flowing) and plug the spout with your finger;
- It is not necessary to change water supply risers between floors unless absolutely necessary. As a rule, steel pipes rust first of all in the ceiling; if you do not have the opportunity to cooperate with your neighbors, replacement will be a waste of money;
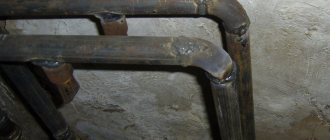
- There is no need to change the cast iron sewer riser (of course, if it does not have serious defects). Plastic pipes make sewers much noisier. If you don’t need information about the digestion of your upstairs neighbors, you will have to soundproof them with roll insulation or build a box around the riser.
There is no point in replacing an entire cast iron riser with plastic.
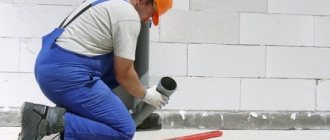
Dismantling old pipes
Replacing pipes in an apartment should always begin with dismantling old water supply elements.
Replacing old pipes in the bathroom with new ones
What you need for unmounting:
- chisel;
- Bulgarian;
- hammer or perforator.
To cut off old pipes, you need to get to them, since you need to open hard-to-reach areas of the water supply and sewer system. For these purposes you will need a chisel and a hammer or a hammer drill. It is better to choose a chisel with a wide hat, and you should wear construction gloves on your hands. This way your hands will be protected from damage. In addition, when working with a hammer drill or grinder, it is advisable to wear goggles and a protective mask or respirator. This is necessary to prevent construction dust from getting into your eyes, mouth, or nose.
Sequence of work
Some may think that dismantling old communications can be done quickly and without problems. However, it is necessary to take into account that the riser passes through several apartments, which means that if it breaks, many people will suffer. Dismantling is a plumbing job of increased complexity. Some experience working with tools and equipment and compliance with safety precautions are required. Therefore, such responsible work must be entrusted to qualified specialists.
To completely eliminate possible emergency situations, it is necessary to perform the following manipulations:
- turning off the water flowing through the riser;
- disconnecting the hose that goes directly to the toilet;
- dismantling the toilet, for which you unscrew the mounting bolts;
- all unnecessary materials, equipment, household appliances and plumbing fixtures are removed from the room so that there are no unnecessary obstacles to dismantling;
- pipes located a little further from the riser are dismantled with a hammer;
- get rid of structures leading to the riser;
- A special cuff is installed on the socket of the tee, for which the old lubricants are removed in advance. If this is not done, then it is impossible to talk about high-quality installation of the new system.
Important! Careless installation of the cuff can damage the tee. In such a situation, it will be necessary to replace a certain section of the riser, which will entail additional costs.
Dismantling stages
- The water in the room must be turned off.
- Now you should disassemble the inputs, as well as the inlet taps. To do this, use a grinder to cut off old pipes from the water supply or unscrew the inlet taps.
- Cut the thread. Screw down the shut-off valves and then close them.
- Connect the water in the riser.
- Disconnect appliances that consume water (faucets, washing machine, etc.) from the water supply.
- Disconnect these same devices from the sewer system.
- Remove remaining water from old pipes.
- Using a grinder, cut off the caps of the dowels that previously attached the water flow to the wall. Remember that dowels are not easy to remove from a concrete wall, especially since the wall must remain level, since tiles will be laid on it in the future.
- If the old pipes were installed high, then move the new ones as close to the floor as possible. In this case, it may be necessary to punch new holes in the walls or they will need to be expanded. Thanks to this, you can hide the pipes without gating.
- If you still cannot do without grooves, then the disc for metal on the grinder should be replaced with a disc for concrete and stone. And if while working in the wall you come across reinforcement, then replace it again with a metal disc.
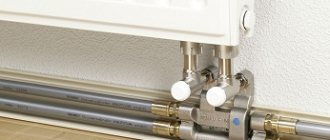
Pipe installation
Required tools:
- electric soldering iron with various attachments;
- cutter;
- Bulgarian;
- impact electric drill.
Replacement of water and sewer pipes
Necessary materials:
- couplings and fastenings;
- adjustable wrench;
- technical tape;
- polypropylene pipes;
- Vaseline for connecting the water flow to consumers;
- shut-off valves.
When installing polypropylene pipes in an ordinary apartment you will need:
- wall mounts;
- pipes, the length of which should be about 30 m;
- ring and corner squares (about 20 pieces).
Replacement of water pipes
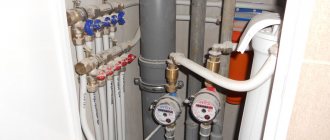
Before replacing sewer pipes, you should first take into account the thickness of the tile layer, and also carry out the following work:
- install a filter for deep purification of cold water, it is located behind the meter and locking mechanism;
- install a filter that purifies hot water (if the bathroom or kitchen has its own risers, then the installation is carried out four times);
- install meters in the direction of arrows indicating the nature of the movement of water flows.
Materials
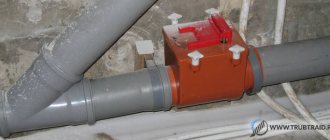
The comb from the tee behind the toilet is replaced with gray polyvinyl chloride pipes with a diameter of 50 mm . To attach the pipes to the wall, clamps or clips are used (depending on how smooth your walls are). Their number is selected based on one attachment point per half meter of pipe . The connection of a plastic pipe with a cast iron socket is made using a rubber sealing collar.
To connect a bathtub, purchase an oblique tee, for a washbasin - a straight one, and for a kitchen sink - a corner.
Typical sewerage scheme.
However, the corrugated tube from the sink siphon can also be inserted into a horizontal socket.
To replace the water supply line, I advise you to buy the following:
- A pair of ball valves size DN15 (1/2 inch). Old valves are rarely in perfect condition;
- A couple of coarse filters. They will get rid of the notorious garbage in the pipes;
Sand and scale don't just cause a drop in water pressure. They are also destructive to ceramic shut-off valves. 90% of failures of ceramic faucets and faucet cartridges occur due to attempts to close them when debris has gotten between the plates.
- Stainless steel corrugated pipe and compression fittings for it. I will explain why exactly her a little later;
Corrugated stainless steel pipe.
- Clips for fastening to the wall at the rate of one clip per half meter;
- Water socket for installing a wall-mounted faucet in the bathroom.
Let's return to the pipes.
All materials for pressure pipelines - polypropylene, PVC, metal-plastic, copper, etc. — capable of performing their functions for a long time when the water supply system is operating in normal mode. However, they all have different safety margins. Let's say, metal-plastic is designed for 95C and 10-16 atmospheres, and the notorious corrugated stainless steel can withstand temperatures of 130 - 150 degrees at a pressure of 25 - 50 kgf/cm2.
The technical characteristics of pipes are often indicated in their markings.
The safety margin will be in demand only in force majeure circumstances, with a significant deviation of the cold water and hot water parameters from the norm. Perhaps this won't happen. However, it is the strength of the pipe that will save your apartment from flooding.
Where do surges in pressure and temperature in the water supply come from? Here are some absolutely real scenarios:
- Water hammer when the water supply system suddenly fills;
- Testing the heating main for density or temperature with faulty shut-off valves in the elevator unit;
- The DHW system is not switched to the return pipeline during the peak of frost, when the supply temperature reaches 150 degrees.
The consequences will be equally unpleasant.
Why not use galvanized steel pipes then? After all, they are even more tensile, have an almost unlimited service life and can withstand high temperatures perfectly, right?
The point is ease of installation.
In order to assemble hot water and hot water supply lines from galvanized steel, you will have to cut a bunch of threads and make a lot of pipes, and their dimensions must be maintained extremely accurately. Assembling hoses from corrugated stainless pipes takes two hours with three breaks; The only tools you need are a pair of adjustable wrenches, a grinder or pipe cutter for cutting the pipe, and a hammer drill for attaching the clips.
The fitting design for stainless steel makes its installation extremely simple.
Installation stages
Today, polypropylene pipes are most often used to update the water supply and sewerage systems. They are installed by soldering the elements with a soldering iron. Let's take a closer look at how to install them below.
- Prepare in advance the previously purchased corners (45 or 90 degrees), elbows, couplings that go to metal, as well as couplings connecting 2 elements. Assemble these fragments in advance, according to the installation diagram.
- Use a marker to make marks, but do not forget about the three-dimensionality of the turns, since everything must be connected at a certain angle.
- You can begin the soldering process. At the same time, it should be understood that the fitting and the pipe being installed are heated in parallel in the soldering iron. The time it takes for the device to heat up is determined by the diameter of the product, and the actual heating time of the device is indicated in the instructions attached to the tool.
- During operation, make sure that the plastic does not overheat during welding. In order for the polypropylene to have time to cool and harden, you need to wait for twenty seconds.
- Due to the fact that hot water will flow through the pipes, they need to be attached to the walls. It is better to use sliding fasteners with standard plastic clips. All elements are attached to the walls using dowels made of plastic with screws.
Helpful advice! Installing ball valves for plumbing is an inexpensive, easy way that allows you to turn off the water in certain places during repair work, and not in the entire house.
Solving organizational issues
It is necessary to provide a pipe laying diagram and make the necessary measurements. You need to draw up a project on paper, it is advisable to write down all the data, and decide on a water supply layout.
To lay pipes, you need to take measurements.
It is necessary to count the number of shut-off valves, lintels, tees, and holding anchors. Then you need to decide on the material of the products, the method of their installation (threaded or soldered).
When replacing a sewer system, special attention is paid to the riser in an apartment building. Here it is necessary to warn neighbors from above not to use the toilet during this period.
This does not need to be done in a private home, but access to the sewer line in the house requires digging a trench to replace the drain.
Test to identify installation defects
Before the water pipe replacement is complete and the system is ready for use, a test must be carried out to ensure that there are no leaks.
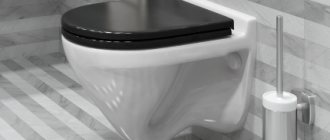
Replacing toilet pipes
- Open cold water (pressure should be medium) and wait for 15 minutes.
- Make sure that along the length of the bendable products there are no leaks at the connecting points.
- If a leak is found, it must be repaired.
- Do the same steps with hot water.
- Make sure that the plumbing in the toilet, bathroom, and sewer pipes are installed correctly. Pour several buckets of water into the bathroom and toilet, then inspect them for leaks. If it is found, remove it immediately.
In general, replacing toilet and bathroom pipes is not a very difficult job. And if you work hard, show persistence and intelligence, you can significantly save your budget. After all, replacing all communications, carried out by experienced plumbers, will be quite expensive. Therefore, if you want to save money, and most importantly, learn something new and useful, then be patient, knowledgeable and carry out plumbing repairs with your own hands.
Replacing old pipes in the bathroom with new ones
Installation of polypropylene and metal-plastic pipes Replacement of water pipes Replacement of water and sewer pipes
Installation of water and sewer pipes Replacement of pipes in the toilet Replacement of pipes in the bathroom
Pressure testing of the water supply system
This is a mandatory activity, it can be entrusted to specialists, but it is quite easy to do it yourself.
Equipment for this - a driven or manual crimping machine - can be purchased at the construction market, or you can simply take it to the arena for a few days. The system is pressure tested in the following order:
- Familiarize yourself with the initial data for pipes on the maximum permissible pressure. This indicator is indicated in the quality certificate and cannot be exceeded.
- Read the unit's instructions and act in accordance with its recommendations.
- Fill the system with water and connect the device.
- Bring the pressure in the system to 4.8 atmospheres (working pressure), check for leaks, and, if necessary, eliminate defects.
- Continue pumping the liquid to a pressure of 7.2 atm (5.8 x 1.5), repeat the control operation.
- To be completely sure, raise the pressure in the system to 9 atmospheres and leave it in this position for a day.
Ideally, after this time, the pressure in the system should remain unchanged.
Check the remaining circuits in the same way.