Calculation method ↑
Scheme for determining the height of the chimney
Each detached house has a heating system with modern boilers running on solid, liquid or gaseous fuel, or with simple wood stoves. Each of these devices is invariably equipped with a structure for removing combustion products. At the same time, the height of the chimney plays an important role in the stable operation of all heating devices. An online calculator will help you determine this parameter.
One of the most important parameters ensuring the efficiency of the heating system is the height of the chimney relative to the roof ridge.
Any mistake or even error when calculating the chimney is fraught with serious problems. For example, the traction force is significantly reduced, which negatively affects the efficiency of the heating device.
An incorrectly chosen height of the chimney above the roof can cause the formation of a turbulence in the smoke exhaust channel, that is, reverse draft. This is fraught with smoke in the room with very serious consequences. Indeed, according to the laws of physics, good draft is stimulated by the wind, which is directed upward to the outlet of the smoke channel.
When he has to “go around” an obstacle that is too high, say, a ridge rib on a pitched roof or a multi-story building nearby, the air flows change their direction to the opposite. As a result, flue gases cease to be removed naturally.
The rules for selecting the height of the chimney above the roof are regulated by SNiP. Let us note the basic technical requirements that determine how high the chimney should be.
The height of the chimney above the roof is regulated by the distance of placement and the height of the solid structure that protrudes above the roof, for example, a parapet or roof ridge. If they are equal or for the structure it is greater, then the height of the chimney pipe is:
- not less than 50 cm - above the surface of a flat roof;
- not less than 50 cm, if the horizontal distance from it to the structure (roof ridge, parapet) is less than 1.5 m;
- greater than or equal to the height of the structure if this distance is between 1.5 and 3 m;
- level or above the line drawn from the ridge and 10˚ with the horizon line, provided that the distance from the chimneys (photo below) to the ridge is more than 3 m.
In any case, the mouth of the canal should be higher than the roof of higher buildings attached to the main one.
The height of the ventilation pipe located next to the chimney above the roof is assumed to be equal to the height of the latter.
It is recommended to increase the chimney until the head of the pipe is above the line, which is laid at an acute angle of 45˚ down from the top point. The most rational for pitched roofs is the location of the chimney, in which it is as close as possible to the ridge beam. Such channel localization ensures:
- the greatest distance between its mouth and the bottom of the grate;
- the skate does not block the path of air flow;
- guarantees minimal costs for the construction of a channel through which smoke is removed.
In cases where the horizontal distance required is no more than 1.5 m, you can use the usual method - build a model of the structure. To do this, use its diagram, made on an accessible scale.
- On the diagram, draw a line parallel to the base.
- In the place where the roof intersects with the pipe, without disturbing the scale, set aside 0.5 m.
- Through the resulting point, parallel to the first line, draw a second one. In this way, the minimum level at which the chimney head can be located is noted.
Finding the lower limit when the horizontal distance from the smoke duct to the ridge is in the range of 1.5–3 m is even easier. It is enough to lay a horizontal line across the top of the roof. This will be the minimum size of the outer section of the channel.
Professionals categorically do not recommend overestimating the size of the outer section of the smoke duct. If there is strong wind pressure, a tall pipe may topple over. If, due to some technical reasons, it is necessary to form a high section of the chimney above the roof, it is strengthened with guy wires.
This process is considered the most difficult, however, it is worth focusing on it, since such a design solution is not so rare. Let's say, houses that have large, exploitable extensions. In these cases, the heating unit is usually placed in such a way as to ensure heating of all living spaces.
Another example would be a complex structure in which a heating unit with a chimney is located in the center, but crosses the roof at a considerable distance from the ridge, for example, not far from the edge of the slope of the main structure.
Installation of a chimney is possible only if the distance between the expected level of the grate and the planned outlet is at least 5 m.
The minimum limit of this value in such cases is calculated in two ways: graphically and mathematically.
This method is based on geometric constructions similar to those given above. The diagram is drawn in compliance with the dimensions and proportions of the house on an accessible scale.
- In the prepared drawing, two axes of symmetry are marked: the ridge and the planned location of the chimney.
- A line is drawn horizontally through the top of the roof and, using a protractor, an angle of 10˚ is laid down from it.
- The designated line is continued until it intersects with the axis of symmetry of the smoke channel.
- The cut off segment gives the desired value.
- It must be measured and recalculated according to scale. The resulting value will be the real height value.
- It remains to check whether the resulting value satisfies building regulations.
The house design can be slightly adjusted if necessary. To do this, the chimney axis is gradually moved horizontally. Thanks to these simple actions, the optimal position of the smoke channel is determined.
This method is based on the use of trigonometric formulas. Calculations are performed in the following sequence.
- Prepare a drawing of the front part of the house on a convenient scale. For designers without much experience, the most acceptable is 1:100, when, when converting drawing units into the dimensions of a real building, 1 cm equals m.
- The axis of symmetry of the chimney is marked on the diagram.
- An auxiliary horizontal line is drawn through the top of the roof and continued until it intersects with the extension of the central axis of the chimney.
- As with the graphical method, a right triangle is constructed with an acute angle of 10˚ adjacent to the ridge edge.
- Knowing one of its legs, you can calculate the other using the formula a = b *tgα. In our case:
- a – distance from the ridge ridge to the mouth of the pipe;
- b – distance from the axis of symmetry of the house to the axis of symmetry of the chimney
- the angle α is an angle of 80˚, adding 10˚ to the right angle.
The presented methods are applicable only when calculating household chimneys that serve only one heating unit. For industrial boilers with a power exceeding 80 kW, or several heating devices, you should contact a professional.
We invite you to familiarize yourself with: Polypropylene bath fonts
The height of the chimney relative to the ridge on a pitched roof depends not only on the requirements of SNiP, but also on its internal shape, cross-section and other parameters, which, in turn, determine the efficiency of the heating device and its efficiency. To perform more detailed calculations, use online calculators, which can be found on specialized websites.
Types of systems
The design of sauna stoves includes 2 types of chimneys:
- Indigenous. They are organized next to the stove, using a special pipe for connection, through which the smoke goes into the main channel. One chimney can be used for 2-3 stoves. The main thing is that its internal diameter has the appropriate parameters, and the pipes from each heating device are located at different heights;
- Systems with a mounted pipe are mounted directly on the stove pipe and discharged through the roof. This chimney option is the most common for sauna stoves.
Classification of chimneys according to installation location includes 2 types:
- External. Their main part is located on the street and fixed to the wall using a bracket. They are not particularly recommended for baths, as they quickly cool down, losing precious heat.
- Internal. These are vertical structures with good traction, located inside the building.
Depending on the material used, chimneys are:
- Brick. A traditional look, characterized by labor-intensive masonry and high requirements for compliance with all parameters. They have a lot of advantages: durability, fire safety, strength, good thermal insulation and heat accumulation. Disadvantages include the roughness and angularity of the inner surface on which soot deposits accumulate;
- A metal chimney is faster to install and costs less. It has a perfectly smooth surface, but weaker heat-retaining characteristics;
- A combined version, including 2 parts: the lower one is made of brick, the upper one is made of a modern sandwich pipe. Allows you to organize neat, small passages that are easier to cover with heat-resistant material.
Design features
Structurally, the chimney is a vertical device that is installed inside the bathhouse or outside on the facade. Its main function is to quickly and timely remove combustion products, but at the same time it should not disturb the natural draft inside the stove. If the chimney is not designed correctly, problems such as:
- Rapid combustion of wood due to increased draft (because of this, the steam room does not warm up as required);
- Slow removal of combustion products, which are concentrated in the furnace, gradually displacing oxygen. Without oxygen, wood stops burning. The result is also an unheated steam room, as well as a frequent need to relight the wood.
design features of a chimney for a bath
External placement
The external chimney of a sauna stove is considered the most efficient. It is located inside the steam room (or in the dressing room) and removes smoke from the stove directly. The upper part of the structure is located on the roof. The shape is achieved through the use of special fittings.
Such placement must be carried out in strict compliance with safety standards. The internal part must be insulated in accordance with established requirements.
Internal placement
The internal chimney removes combustion products through the wall. The structural parts are connected to each other using adapters. Despite the fact that this method is safer than the previous one, it is used less often because the heating efficiency of the furnace is lost.
What should be the height of the chimney pipe?
Basic SNiP standards
So, what facts must be taken into account when calculating the height of ventilation and chimney:
- Distance to roof ridge.
- Roof design and thickness – gable, single-pitch, combined.
- Fire safety rules.
- Section.
- Organization of proper ventilation of the furnace room.
If you decide to do everything yourself, then knowledge of the technology for calculating height, diameter and other parameters will not hurt.
Angle from ridge to tip – 10 degrees
If the pipe is located at a distance of less than 50 centimeters from the ridge, then it is raised another half meter above the roof level. The diagram shows how easy it is to calculate the height, depending on the distance from the roof ridge.
A distance of one and a half to three meters is located at the level of the ridge, more than three meters is a slope of ten degrees down from the ridge, the required height is the intersection of the line of the angle of inclination and the top of the pipe.
The height of the pipe above the roof ridge is the most important calculation parameter. Good draft in the boiler and fuel economy depend on this value. When making calculations, one must be guided by the requirements recommended by the instructions for the boiler and SNiP41-01-2003, as well as SP 7.13130.2009 (basic building standards for heating and ventilation).
Another very important rule is that the length of the entire chimney, from the boiler grate to the point where the smoke exits, must be no less than 5 meters. For a flat roof - at least 50 centimeters.
Requirements for a chimney in an extension
The diagram shows that the chimney from the attic is determined by the intersection point of an angle of 45 degrees from the valley and a vertical line down from the end of the slope at a distance of 50 centimeters.
It is almost impossible to describe these calculations in words; the diagram is more informative. For example, I didn’t complicate the process. A full calculation and a clear plan costs only 2,000 rubles - it is carried out by design organizations; it seems to me that the price is quite reasonable.
The height depends on the roof structure
For pitched roofs, the height is calculated according to the standards, depending on the distance to the ridge. For flat roofs, the calculations are different.
The length of the chimney above a flat roof should not be less than 1 m 20 cm. If the pipe is higher, then it is necessary to install retaining clamps and guy wires made of strong wire for rigid, reliable fastening.
For roofs of complex multi-level structures, calculations are used taking into account height differences. But still, the highest point of the ridge is considered the base point. Multi-level structures must be calculated by specialists, since in this case many specific parameters must be taken into account.
The main problem with an incorrect chimney height is the risk of air turbulence. With strong gusts of wind, it can simply extinguish the fire in the boiler, which leads to very unpleasant consequences.
These conditions must be observed
There are quite a lot of fire safety requirements and all of them must be met:
- All structures adjacent to the pipe that may catch fire must be carefully insulated with asbestos sheets. Now fire safety requirements have changed, and many organizations do not allow asbestos, only galvanized iron. The same applies to chimneys.
- If the roof is made of flammable material and there are ventilation holes in the pipes, then the height should be increased by half a meter to prevent sparks from hitting the coating.
- A sheet of galvanized metal, no less than 1.5 x 1.5 meters in size, must be installed above and below the boiler.
- The distance from the chimney to the attic windows is at least two meters.
- The distance to tall trees and buildings is at least six meters.
Now, according to the changed standards, it is prohibited to install protective fungi on chimneys and ventilation outlets. The requirement is terrible, since birds and garbage clog the pipes every year, you have to constantly call a team to clean all this garbage.
The photo shows a simple table for determining the required section and height
For rectangular brick chimneys, the standard is 1x1.5 cm (minimum 10 square centimeters). Corners must be rounded.
The chimney is round in shape - the minimum diameter is 15 centimeters, but in Crimea they usually require 30-35 cm. Why, I cannot answer.
There is one more unpleasant nuance - there are no adapters for passing a round pipe through the roof, only for square ones. Therefore, you will have to order such an adapter individually from tinsmiths.
Calculation of the cross-section depending on the width (vertical table) and diameter (horizontal table) in millimeters
The height of the ventilation pipe above the roof according to SNiP should be calculated in principle in the same way as the chimney. The main requirement is one level in height of the ventilation and chimney pipes, if they are located no further than 3 meters from each other.
The diameter and dimensions of the ventilation must ensure ventilation of the boiler room space, and this depends on the volume of air contained in the room.
We invite you to familiarize yourself with: Do-it-yourself bathhouse roof, instructions for construction
The required volume of air entering a residential room heated by a boiler is three cubic meters per hour per square meter of area. In utility rooms (boiler rooms), this standard is at least 180 cubic meters per hour.
Formula for determining the ventilation cross-section
The formula for calculations is based on the ratio of the total area of the room to the cross-section of the ventilation duct. The height of the ventilation pipe above the roof is determined according to the same principle as for the chimney.
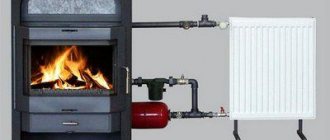
Anyone who believes that the external outlet of a device for removing flue gases, invariably formed during the combustion of any type of fuel, including gas, has little effect on the comfortable temperature in the house is deeply mistaken. The chimney pipe not only removes the resulting smoke and flue gases, but also has a significant impact on the performance of heating units, their efficiency and energy consumption.
Important! Both the height of the pipe and its internal diameter, when correctly calculated using a calculator, guarantee the normal operation of heating units and their safety - both in terms of fires and for human health. After all, such devices prevent carbon monoxide from entering residential premises.
To make a competent and correct calculation of the chimney, you need to consider the following points:
- Depending on the fuel used, you need to choose the material from which the chimney will be built. After all, flue gases from different energy carriers have different temperatures.
- The height of the chimney above the roof, its internal cross-section and design features directly affect the functionality of the heating equipment of your home. The discrepancy between these parameters can lead to incorrect functioning of boilers and furnaces, up to and including their complete reconstruction.
- Various appliances that produce flue gases require ventilation for their operation. Since it is unprofitable to build a separate drainage channel for each such system, most often they are combined in one design.
Naturally, not everyone is able to make competent technical calculations. But you can use an online calculator or entrust the calculation procedure to heating specialists.
This parameter primarily depends on:
- Depending on where exactly on the roof the chimney outlet will be located relative to the ridge.
- From the angle of the roof slope.
- From the presence of tall trees and buildings in the immediate vicinity of the pipe.
- From the wind rose and the strength of wind flows in a particular area, as well as from the average annual height of snow cover.
If the pipe exits the roof at a distance of less than half a meter from the ridge, then the minimum height of the chimney above its level should be 50 cm. This arrangement of the chimney is considered optimal, since in this case a significant amount of materials required for the construction of the smoke exhaust structure is saved.
In addition, in such a place less snow accumulates in winter, which reduces the risk of leaks when it melts in the spring and during thaws. Calculating the height of the chimney relative to the ridge, even using a calculator, is based on the requirements of SNiP41-01-2003 and SP (building rules) 7.13130.2009, as well as on the recommendations of the heating device manufacturer.
General provisions
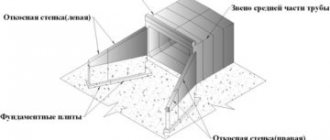
Diagram of channels leading to the roof of the building
- The length of the pipe from the grate to the outlet must be at least 5 meters. If the roof has a flat structure, then the height of the pipe is at least 50 cm.
- On pitched roofs, if the pipe is located at a distance from the ridge of up to 1.5 m, its height should be at least 50 cm relative to the last or enclosing parapet. If the pipe is located within 1.5–3 meters from the ridge, then its height cannot be lower than it or the parapet. When the pipe is located more than 3 meters from the ridge line, its minimum height is determined by drawing a line at an angle of 10 degrees relative to the horizon.
- If there are taller buildings nearby and the heating is done with wood, then the height of the pipe is taken to be higher than the roof of the adjacent buildings.
- Ventilation ducts that go to the roof of the building and are located in close proximity to the chimneys must be the same in height as them.
In addition, there are a number of recommendations for the location of chimney pipes and their installation.
It is undesirable to place chimney pipes near attic windows so that random gusts of wind do not carry smoke or carbon monoxide into the attic space, if it is residential. It is also not recommended to build exhaust pipes and ventilation ducts in valleys to avoid the formation of a snow pocket.
When removing the outer part of the chimney, you should not rigidly fasten it to the roof itself and the rafter system, since if the pipe is damaged by wind or other natural forces, the entire roof structure will be damaged.
Swedish method for calculating chimney diameter.
In the examples described above, the height of the gas exhaust system is not taken into account. For it, the ratio of the area of the combustion chamber to the cross-section of the pipe is used, taking into account its height. The pipe value is determined according to the graph:
Where f is the chimney area, and F is the firebox area.
However, this method is more applicable to fireplace systems, since the volume of air for the firebox is not taken into account.
You can choose different methods for calculating the diameter of the chimney , but when installing complex heating systems, an optimally accurate diagram is important, especially for low-temperature long-burning heating devices.
Chimney materials
Before purchasing materials, you need to determine the structural features of the chimney.
Brick system
The construction is made of heat-resistant brick using a special dry mixture or oven clay. In addition, you may need material to create a fungus over the pipe.
Before purchasing material for the manufacture of a metal chimney in a bathhouse, it is necessary to draw up its exact diagram with the detailed location of all corners and turns of the pipe.
You will also need 2 iron sheets with holes corresponding to the diameter of the pipe. They are fixed on the ceiling of the bathhouse and on the floor of the attic. You will also need a heat-resistant material that will be secured around the pipe at the point where it exits into the wooden attic.
To create waterproofing around the chimney on the roof, you need to prepare a sealant or a special rubber seal.
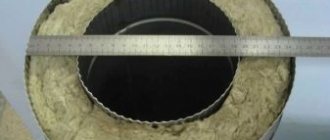
When purchasing iron chimney pipes, you need to decide on their cross-section. Basically, it depends on the power of the stove, but for most bath options this parameter is 15-20 cm. You should not take a diameter that is too large, as it will not retain heat well. And if it’s too small, it won’t create the draft necessary for removing smoke. Whatever it is, the cross-section of the pipe should not be less than the diameter of the outlet pipe of the heating structure.
There are a number of other requirements for the elements of a chimney in a bathhouse:
- The minimum pipe height is 5 m. Neglecting this requirement may result in deterioration of traction. The exact value is calculated depending on the location of the pipe on the roof. In any case, it should rise above the ridge by at least half a meter. The ideal height from the ridge is 1.5 m, but this is not necessary;
- The minimum thickness of the metal used to create the pipe is 1 mm;
- If it is planned that the chimney system will be equipped with a hot water tank, then it must be reflected in a previously drawn up diagram. It is better if the tank is made of stainless steel.
Self-installation of a chimney for a bath
The installation method depends on what material is planned to be used for the production of the chimney. There are some rules that should be taken into account when making a chimney yourself:
- The device must not be connected to other pipes.
- The smoke exhaust structure should not have horizontal sections longer than 1 m.
- During the heating season, the sauna chimney must be cleaned at least 2 times.
- The structure must extend at least 0.5 m beyond the roof.
Installation of a steel sandwich chimney through the ceiling
The first thing to consider is the sandwich chimney. Manufacturers supply products together with a set of additional parts, which include:
- knee;
- tees;
- clamps;
- plugs;
- ceiling-passage units;
- heads;
- protective screens.
The diagram will allow you to understand the technology of installing a stainless steel chimney.
Step-by-step guide to assembling a steel chimney:
- First of all, using a plumb line, you need to mark the exit points of the pipe through the roof and ceiling structure. Next, you need to prepare a recess according to the size of the pipe. It is worth remembering that between the sandwich pipe and the wooden ceiling parts you need to leave a distance of approximately 10 cm around the perimeter of the recess.
The dimensions of the hole should be approximately 10 cm larger than the dimensions of the chimney pipe - Thermal insulation can be done using mineral wool. It will be necessary to close the place where the pipe passes through the ceiling. There is no need to worry about the cotton wool getting damp, as the elevated temperature dries it out quickly.
- You will need to take all dimensions and determine the location of installation of the unloading unit. It is recommended to do it in the attic. It will take on the load of the pipe that comes out of the ceiling. In addition, the unloading unit is able to eliminate lateral vibrations.
The unloading unit takes on the load of the pipe coming from the ceiling - If the distance between the floor base and the attic is large, then a unloading unit should be installed. If the distance is less than 1.5 m, then auxiliary supports are not required. The unloading unit can be constructed from steel angles and fasteners. The corners must be secured to the rafters. The fixation should be as reliable as possible.
- You will need to install an initial pipe on the outlet pipe of the stove. It must fit into a large pipe with an interference fit; during the purchase process you need to select the appropriate dimensions.
An initial sandwich pipe must be installed on the outlet pipe of the furnace - The narrow pipe should fit into the outlet pipe of the furnace, but it should not cover it. The pipe sections must be inserted into each other. The transition and bend areas should be additionally secured with clamps.
Places of passages and bends of pipes must be fixed with clamps - Where the pipe passes through the ceiling structure, a groove must be installed to cover the outlet recess. This will also make the chimney more stable. To the groove you need to weld a pipe of a larger diameter, which will be used as an adapter. This will increase the support area and eliminate deformation in the event of strong loads in the side part. The adapter will allow the chimney to move freely up and down. To eliminate heat loss due to loose parts, it is recommended to use mineral wool. It must be placed under the cutting piece and carefully pulled to the ceiling using nails or self-tapping screws.
To close the outlet hole in the ceiling, you need to install a groove - Holes must be prepared in the sheathing and roof covering. Next, you should seal the outlet of the smoke exhaust device. An adapter is required for this. The joints must be coated with sealant. It is recommended to place another sheet on the covering and secure it with self-tapping screws and rubber washers. The remaining cracks are treated with sealant. The pipe outlet should be 55 cm above the roof level.
The vertical position must be controlled by the building level - A fungus should be mounted at the top of the chimney.
Video: installation of a chimney from sandwich pipes through the ceiling
Installation of a ceramic chimney through the ceiling
The sequence of actions will be as follows:
- First of all, you need to prepare the place where the device will be placed. If there are any irregularities on it, they must be eliminated. Installation of chimneys is allowed on a separate base near the heating device or on its upper surface. A special adhesive mixture is used for masonry, since the solution will not be able to provide the necessary strength.
For masonry you need to use a special glue, since the solution will not be able to provide sufficient strength - You should prepare metal rods 1 m long and 5–10 mm in diameter. With their help, you will need to additionally secure the structure. This will preserve the integrity of the chimney. Next, you need to make recesses in the ceiling and roof. There is no need to make a reserve in terms of dimensions, since the device will be able to protect wooden parts from elevated temperatures.
- The next step is to install 2 halves of ceramics. The lock should be lubricated with an adhesive mixture.
The first block must be filled with adhesive mixture - Next you need to check the location of the halves. If necessary, they can be trimmed. Iron rods should be inserted into the side recesses. The gaps between the reinforcement and ceramics are filled with glue. There is no need to completely fill the cavity. The glue must be positioned so that it connects the rods and ceramics in 3-4 places.
- Thermal insulating material should be wound around the ceramic pipe and lightly tightened with iron wire or a clamp. There is no need to tighten it too much, since the heat insulator should not shrink. Pressed mineral wool is mainly used as a heat insulation material.
- The pipe will need to be installed in the recess of the ceramic, and then its location will be checked. To speed up the process, you can wrap all the pipes with insulation at once. The number of pipes corresponds to the height of the chimney.
You can check the location of the pipe using a building level - The next ceramic block is mounted with glue. Another pipe is inserted into the socket of the first one. Excess glue from the inner tube should be wiped off immediately, there should be no drips.
The lock of ceramic parts must be lubricated with glue and excess removed - The actions are carried out by analogy; during the process it is important to monitor the location of the chimney.
- To secure the chimney in the attic, you need to cut the slats according to the dimensions of the recess, install them around the perimeter of the chimney and firmly nail them to the attic.
- The roof where the chimney exits should be sealed. This is done using additional elements that are sold ready-made.
Where the chimney exits through the roof you will need to install a passage unit
Video: installation instructions for a ceramic chimney
Installing a chimney through the wall
- The first step is to determine the place where the duct will be located inside the building and the chimney pipe will be installed in the wall. To protect the inner base of the bath walls from overheating, a sheet iron screen should be installed. At the passage point, you need to prepare a hole whose dimensions exceed the diameter of the pipe.
To protect a wooden wall from overheating, you need to install a sheet metal screen - The chimney must be connected to the inlet pipe of the stove using an adapter. Next, you should put on a piece of pipe with a damper.
- The parts must be fastened with iron clamps. The joints are treated with a sealant that is not afraid of high temperatures. The chimney must be brought to the point of passing through the wall. If you need to turn the pipe and lay a horizontal section, you will need to use 45° and 90° bends.
- In the place where the structure passes through the obstacle, you need to place a fire-resistant box. It is made of iron or asbestos cement. In the free space formed between the walls of the box and the pipe, you need to place a thermal insulator that does not ignite.
- On the street side, you need to fix a part of the smoke removal system in the form of a tee, in the lower part of which there is a container for condensate.
When installing tees, you need to install brackets for support - The pipe is completed with vertical sections until the required height is reached. To fix it, you need to use iron brackets. The distance between elements is at least 1 m.
After the chimney exhaust device has been assembled, you will need to light the stove. If the smoke comes out of the firebox quickly, this means that the work was done correctly.
How to install a chimney from a bathhouse through the ground
To run a pipe through the ground, you need to insulate it. A regular layer of bitumen will not work, as the pipe will be at high temperatures. The sequence of actions will be as follows:
- You will need to prepare several lined pipes, the diameter of the first should be 5–10 cm less than the diameter of the second. One pipe must be placed inside another. It is recommended to entrust the assembly process to specialist tinsmiths.
- Pipes can be assembled from several parts. The joints are fastened with clamps. There must be 3 spacers between each clamp, otherwise the chimney structure may collapse when falling asleep.
- The joints should be treated with heat-resistant sealant.
- The outer pipe, which is located in the ground, will need to be coated with bitumen.
The instructions may seem simple, but it is recommended to entrust this work to experienced specialists.
Safety first
The temperature of the chimney in the bathhouse can rise to critical limits, so the organization of the system must comply with fire safety requirements:
- Connections of individual parts of the pipe must be strictly sealed;
- The places where the pipe passes through the ceiling are insulated from wooden elements with fireproof material (sand, asbestos, expanded clay);
- The pipe exit through the roof is treated with waterproofing designed to protect the sheathing from moisture.
We suggest you read: The cheapest foundation for a bathhouse
How to properly install a pipe in a bathhouse: the advantages of brick devices
Compared to its metal counterpart, this method has been used for much longer. Previously, there were no metals in production that could withstand extremely high temperatures. Making a brick chimney is a very painstaking task and requires professional training, experience and perfectly calibrated calculations. We strongly do not recommend building such a device yourself if you are not a pro. Unlike metal pipes, the brick laying method has the following advantages:
- Thermal and thermal insulation. An old and proven method will allow you to maintain heat inside the bath for a long time. Vapor circulation also improves.
- Durability. A bend made of fire-resistant brick lasts much longer than its iron counterpart. A structure built according to the correct drawings from high-quality material will please the owner for many years, and the system will not have to be replaced.
- High fire resistance. A bathhouse is a place with an increased risk of fires, so safety and fire resistance become one of the main indicators when choosing materials. A brick structure will prevent flames from spreading, thereby protecting both the property and the owner.
An important feature of maintaining a brick chimney is the need for periodic cleaning. The surface of the material tends to collect dust, ash and other elements, thereby impairing the throughput and draft of the pipe. The cleaning process is not complicated and will help keep your sauna clean and safe.
Brick pipe for a chimney in a bathhouse: how and how to clean a chimney
To perform this procedure, it is not necessary to call a specialist; the cleaning technology is simple and within the power of every person. To do this, you will need brushes and chemicals to remove dirt.
The easiest method is to work with a nylon brush. Treat it with the solution and start cleaning.
How does the cross-section of a chimney affect its height?
Round chimney
In addition to the fact that the height of the smoke exhaust ducts is regulated by the requirements of SNiP, its cross-section and internal shape must be taken into account. These parameters also affect the normal functioning of heating devices and their efficiency.
According to the laws of physics, warm air - in our case, flue gases - rises when heated. And the closer it is to the exit, the more it cools, resulting in the formation of draft. Accordingly, a large chimney cross-section, it would seem, should create better draft. But in reality this is not always the case.
What is the expected way out? You can increase the height of the pipe and reduce its cross-section. In this case, the draft will be so great that it can lead to a loss of efficiency of the heating boiler or stove. After all, the supply of cold air from below will be increased, due to which the heating of the heating device itself will be insufficient. This means more fuel consumption and warm-up time will be required.
If the chimney is high and the internal diameter is insufficient, the draft will also be insufficient for normal operation of the device. In addition, smoke and carbon monoxide may be released into the room. To prevent this from happening, and to ensure that the heating devices operate at full efficiency and productivity, it is necessary to calculate all parameters using a calculator or inviting specialists.
Requirements for the chimney device
effectiveness of the canopy on the chimney pipe.
Design requirements are established in accordance with the functional features of the device. Sufficient draft and rapid smoke removal are the main objectives of the device. To fulfill them, the following requirements must be met:
- Good aerodynamics. Without it, there will be no normal flow of oxygen to the stove, as well as poor smoke removal.
- Anti-corrosion smooth coating on the inside of the chimney. The ribbed surface retains soot, causing the structure to quickly become clogged. The absence of an anti-corrosion coating leads to the formation of rust and premature failure of the device.
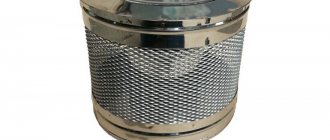
- It is mandatory to have a smoke vent that extinguishes sparks at the outlet. Then they will not fly out through the roof, endangering trees or buildings located next to the bathhouse.
- Outlet channel with high-quality thermal insulation. Otherwise, the risk of fire in the bath room increases due to excessive heating.
Recommendations
It happens that in addition to heating equipment, a house has a fireplace or a gas heater, and each of them requires its own smoke exhaust channel. Naturally, no one will build a chimney for every appliance. In this case, a combined chimney with several channels is made, taking into account the power of each device, the type of fuel and the amount of combustion products produced.
Such structures have several advantages:
- stable operation of all devices;
- saving living space;
- saving money and labor costs.
The calculation of such a structure must be entrusted to professionals.
Advantages of a metal chimney
If you plan to install a pipe in a bathhouse with your own hands, the most convenient solution is a chimney made of an iron pipe. In any construction supermarket or market you will find many ready-made units. The advantages of such systems include:
- Reasonable prices. The cost of such a solution is several times lower than that of brick chimneys.
- Easy installation. The entire installation process can be completed independently and without resorting to the expensive services of a specialist.
- Ease of use. Unlike brick, the metal surface is smooth, which means that soot and other contaminants will not accumulate on the walls. This way you will save your own effort and time, since there is no need to clean the chimney.
Metal structures also have their disadvantages. The most important of them is poor thermal insulation. In winter, the element brought outside will accumulate condensation on itself. To solve this problem, sandwich pipes were created. They consist of two levels of metal with thermal insulation material between them.
Next, we’ll tell you how to properly install a pipe in a bathhouse.
How to calculate the height of the chimney above the roof?
The pipe in the bathhouse is not the subject of complex calculations; it can be selected using ready-made diagrams; the main thing is to know the power of the installed stove.
There are standards that must be adhered to; the parameters depend on the power of the product. Rectangular and square chimneys are calculated in proportions: 140x140 mm is used up to 3.5 kW, respectively 140x200 mm 3.5-5.2 kW, 140x270 mm 5.2-7.2 kW.
If the chimney is round, then it should not be smaller than the exit point from the stove opening, more is acceptable, less is not.
It is easy to calculate the parameter by following certain rules that will help you.
The pipe area must be at least 8 cm² for each kW of power. You can do the calculations yourself; a “bright head” and the formula for the area of a circle will help with this.
The height of the chimney determines the safety for you and your loved ones. If, when operating gas boiler equipment, the chimney plays the role of a smoke exhaust channel, with low-temperature combustion products, then for solid fuel boilers, stoves and fireplaces no compromises are allowed.
Calculation of the smoke exhaust pipe from its location
The fact is that if the parameters of a smoke exhaust pipe or channel are incorrectly calculated, there is a risk of serious poisoning by combustion products, or a fire may even be caused by unburned fractions or fragments of ignited soot.
The following rules should be followed:
- The height of the chimney is not the only parameter that affects the performance and safety of the heating system, with a gas or solid fuel boiler as a heating device. Chimney design begins with determining the operating parameters of the heating system. This means that the complex for calculating the boiler room must take into account these factors as well. At this point, the owner of the premises must decide on the type of fuel used (gas, pellets, firewood or peat), and, with the help of a specialist, determine the thermal power of the boiler. decide on the types of radiators or convectors. There are a lot of questions, however, missing a point can have a detrimental effect on the performance of the entire heating system. For example, many novice home builders are mistaken that all chimneys are the same. This is wrong. A brick chimney is suitable for heating with solid fuel, such as wood, but it is not intended for heating premises with a gas boiler.
- With regard to the operating parameters of boilers, the height of the chimney can also affect the final efficiency during heating. Do not forget about the cross-section of the pipe - the diameter affects the minimum and maximum volume of combustion products passing through, provided by natural draft.
- The process of calculating the chimney of a fireplace or solid fuel boiler may require additional calculations and measurements. This is due to the use of one smoke channel by several devices in the boiler room at the same time. Amateur action can lead either to unforeseen heating parameters or even to dire consequences.
- There is no chimney system that could be universal for any type of fuel, boiler equipment and used as a standard solution. In this regard, the most difficulties arise for developers and owners of private houses and cottages.
Approximate and accurate calculation of the chimney diameter.
Accurate calculations are based on a complex mathematical platform. To calculate the diameter of the chimney , you need to know its main characteristics, as well as the characteristics of the fuel and heating device. For example, you can take the calculation of a standard pipe with a round cross-section without rotating units, connected to a stove and burning wood. The following calculation input parameters are taken:
- gas temperature at the entrance to the pipe t– 150°С;
- the average speed of gas passage along the entire length is 2 m/s;
- burning rate of wood (fuel) with one stack B = 10 kg/hour.
Following these data, you can proceed directly to the calculations. First you need to find out the volume of exhaust gases, it is determined by the formula:
Where V is the volume of air required to maintain the combustion process at a speed of 10 kg/hour. It is equal to 10 m³/kg.
Substituting this value we get the result:
Then we substitute this value into the formula that calculates the diameter of the chimney :
To make such a calculation, you need to know exactly all the parameters in the future gas exhaust system. This scheme is very rarely used in practice, especially in the case of organizing a household autonomous heating system. determine the diameter of the chimney in other ways.
For example, based on the dimensions of the combustion chamber. Since the amount of fuel burned depends on its size, the volume of incoming gases also depends on it. If there is an open firebox and a chimney with a round cross-section, then the ratio is taken to be 1:10. That is, when the size of the combustion chamber is 50*40 cm, then the optimal chimney diameter will be 18 cm.
When constructing a brick chimney structure, the ratio is 1:1.5. The diameter of the chimney system in this case should be larger than the size of the blower. The square cross-section will be no less than 140*140 mm (this is due to the turbulence created in the brick pipe).
Height above roof
The height of the end of the chimney from the ridge or roof must fit into the regulations calculated in advance. If it is located at a distance of 1.5 meters from the ridge, its height is allowed from 0.5 meters. The farther from the vertical line of the ridge, the higher the end of the chimney should be located. At a distance of 3 meters, the chimney should be almost completely aligned with the maximum height of the ridge.
Calculation of the minimum chimney height
Do not neglect such an important stage of housing construction as chimney design. Entrust the correct calculations to specialists, and you will receive the optimal parameters for height, diameter and type of material used for chimneys for various boilers. These numbers hide complex laws of aerodynamics, thermodynamics and materials science.
Tags: bathhouse, height, chimney, roof, pipe
« Previous entry