A soldering iron is an indispensable thing for any craftsman or non-professional. It should always be at hand at home. However, if you use it on occasion, quite rarely, then this purchase is impractical. In this case, it is much better and more interesting to make a soldering iron with your own hands, with the characteristics that are necessary.
Soldering irons vary in heating principle and design
What does the boot consist of?
The structure of any soldering iron:
- Copper rod with a metal pipe (sting).
- Heater.
- Outer shell (casing).
- Pen.
- Cord and plug in mains-powered soldering irons or battery.
The tip heats up through a heating element that conducts current. It, in turn, can be nichrome or ceramic. The product is powered via an electrical cable coming out of the handle. Autonomous models are supposed to use a battery.
Important! Be sure to use insulation in the form of fiberglass or mica between the rod and the body.
general information
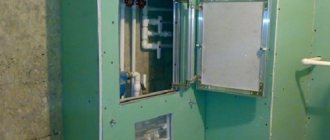
A machine for welding PVC products (or pipes made of any other artificial polymers) is an electrical device operating from a standard 220V network, designed for soldering pipes of various diameters.
Before we begin assembling this device, it would be nice to know what it consists of. The key elements of any soldering iron for pipes are a body with a comfortable handle, a thermostat, which sets the required heating temperature for the heating element, and the heating element itself, hidden in a metal casing that heats up.
Additionally, the kit can be supplied with nozzles for soldering pipes of different diameters. We have dedicated a separate article to the topic of attachments; read it to be aware of all the features. Here we will say one thing: it is preferable to use Teflon-coated nozzles. This way they are guaranteed not to stick to the pipes during heating.
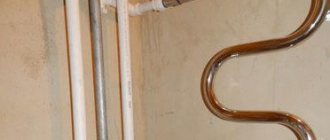
Surely you may have heard that such soldering irons are often called “irons”. And this is not without reason. The fact is that the heating element is indeed visually very similar to the soleplate of an iron and their operating principle has much in common. In both the iron and the soldering iron, the surface is evenly heated, only in the case of a soldering iron, the heat from the heating element is transferred to the nozzles, and the pipe is then pressed against them to melt its edge.
In this case, the heating temperature is set using a thermostat installed in the soldering iron body. Adjusting the temperature is extremely important, because if it is too high, the pipe will simply melt in the nozzle, and if it is too low, it will simply not be able to warm up evenly. This means that the connection will be of poor quality and will quickly leak if we are talking about installing a water supply system, for example.
Physical indicators
The first significant parameter of a soldering device is its power. If the owner plans to use it for household needs, for example, when soldering electronics, a power of 30 W or less is sufficient. To work with thick wires, you cannot do without a 100-150 W device.
The degree of heating of the soldering iron is also taken into account. In professional devices, the temperature can reach 400 °C; often such heating is not required and 100-300 °C is enough.
The type of tip is the following parameter: needle, cone, etc. A certain shape is suitable for the corresponding purpose. Additional features of a purchased or homemade tool include the presence of replaceable rods.
Soldering iron for PP pipes, features of selection and operation - the experience of FORUMHOUSE participants
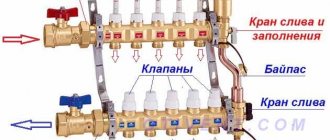
Unlike city apartments, in a country house the organization of heating and water supply systems is the primary task facing the owners. There are several technologies for laying intra-house communications for distributing water or coolant in the heating system. Of these, the most budget-friendly and feasible for beginners is soldering polypropylene pipes. With this technology, the construction of communications is carried out by heating the component elements (pipes, angles, couplings, etc.) with a welding machine, followed by their contact with each other. With the advent of this technology, many homeowners began to choose self-installation and prefer to do without hiring specialists. But what you can’t do without is welding equipment, which will be discussed in the article. We will use the collective experience of the portal participants to choose a soldering iron for polypropylene pipes (welding machine for polypropylene), and also learn about the intricacies of its use.
Tool characteristics
Officially, this tool is called a welding machine for polypropylene pipes, but is popularly renamed a soldering iron, since this is its operating principle - heating elements using an electric heating element to the melting temperature, at which a monolithic connection is obtained without deteriorating the properties of the material. The design of all soldering irons for polypropylene pipes is the same:
- body with handle,
- heating platform,
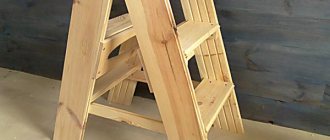
- stand,
- nozzles of different diameters.
The number of nozzles, and therefore pipes, that can be processed simultaneously depends on the shape of the platform. They come in two types: rod-shaped and xiphoid.
Tool platform shape
| Platform shape | A heating element |
| Rod | a heating element in the form of a rod (cylinder), on which nozzles are put on and fixed, |
| xiphoid | the heating element is flat, in the shape of a sword (or iron) with holes in which nozzles are fixed. |
There are no differences in the operation of the units, only in ease of use in certain conditions and the method of fixing the attachments. They can be fixed anywhere on the rod, but on a flat platform only in the existing grooves.
Regardless of the platform configuration, the soldering iron for polypropylene pipes is equipped with mechanical or electronic regulators that allow you to adjust the temperature regime. The optimal heating temperature of the nozzle is 260⁰C; if the deviation in any direction is more than 5⁰C, either the seam will be insufficiently strong, or the destruction of polypropylene will begin. In some models, in addition to a color indication indicating that the device is ready for operation, there is also a sound indicating the completion of operations.
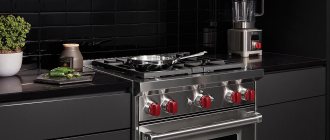
The power of pipe soldering irons starts from 680 W and reaches 2000 W; the larger the diameter of the pipes, the stronger the unit should be. For most soldering operations of plumbing, heating, sewer or irrigation systems, 800-1200 W is sufficient, as our craftsmen confirm.
Dmitry Sokolov FORUMHOUSE user, Moscow.
Power affects the provision of a temperature of 260⁰С, +/- 5⁰С for fittings of different diameters. In general, 1.5-2 kW is excessive; such power is needed for large diameters. For diameters 16-63 mm, a model from 680 W is sufficient, for diameters 16-75 mm - a model 850 W, model 1200 W - diameters up to 125 mm.
Soldering iron attachments
The set of soldering irons for pipes, even in the lower price segment, includes nozzles, usually three pieces for the most common pipe diameters - 20, 25, 32 mm. If we are talking about models that are sold at a higher price, then the kit will include nozzles starting from 16 mm and 63 mm each; as an option, you can buy a set of nozzles separately, but branded accessories can cost the same as a budget soldering iron itself.
Initially, the nozzles are made of copper and aluminum alloys, then covered with a non-stick Teflon layer. The thicker this layer, the longer the nozzle will last, since as the coating wears away, plastic begins to stick to the molds, a characteristic “aroma” appears, and difficulties arise when removing parts. Wear of attachments occurs not only due to increased use or due to initially poor quality, but also due to careless handling of the tool.
Tool selection options
Not everyone has the opportunity to pay a substantial amount for a branded professional tool when they plan only for personal use, even taking into account all its positive characteristics. And a budget model from a not-so-venerable manufacturer will work on all systems in the house and will weld everything properly. Therefore, large, but five, or small, but three, everyone decides for himself, and we will look at what to pay attention to both when choosing and in the process of work.
To regulator gradation
Dmitry Sokolov
Thermostatic adjustment with an accuracy of 10⁰C may not be enough, since at 270⁰C the thermal degradation of PP-R begins, so the most important thing is a temperature of 260⁰C at the nozzle, and not at the temperature controller. This temperature must be checked with a thermometer during operation.
But if you can’t afford to overpay for a model with more precise settings, you can cheat.
mblUser FORUMHOUSE
In addition to your pipe soldering iron, buy an electronic tester with a temperature probe. Each time before heating the fittings being connected, measure the temperature of the soldering iron itself. When it’s 260-265⁰С, feel free to work.
You can also use measuring instruments when choosing a tool so you know what to expect.
APavlovich FORUMHOUSE user
You need to check it right away - go to the store with a pyrometer when looking at strange, cheap devices. In my experience, such a tool does not meet the stated characteristics. The nozzles do not heat up to the set temperature even at full power, the regulators and scale do not match, on some, even when there is a temperature regulator and control lights, the body itself heats up to 80⁰C, the temperature on the nozzles can differ by 50⁰C, there is no question of uniform heating .
For the strength of connections
The reliability of the handles and tripods can be checked by simply holding the device in your hand, as well as its ergonomics and weight, which is also important. A loose platform does not necessarily affect the quality of pipe soldering, but the need to tighten fasteners every few working hours will not add comfort.
Another member of our portal advises an integrated approach to choice.
Faustovo1FORUMHOUSE user
I have been welding PP for more than five years, and I have made the following conclusions about welding machines - when choosing, you need to consider the following points:
- Adjusting the power of heating elements.
- Nozzles
- Platform geometry.
- The location of the nozzles relative to the edge of the platform.
- Base.
The craftsman substantiates his conclusions with real situations.
- Adjustment - using special settings, it is easier to select the optimal temperature for fittings from different manufacturers, since during welding some may still heat up while others are already starting to melt. In winter, polypropylene heats up more slowly and processing takes more time; the regulator can set the appropriate mode.
- Nozzles - the non-stick layer on the nozzles of cheap models is too thin and after a dozen seams residues appear that need to be cleaned before the next operation.
- Geometry – when you have to solder plastic pipes of several diameters, it is more convenient if two pairs of nozzles can be fixed on the platform at once, one after the other (from the edge). This saves a lot of time.
- The location of the nozzles - in order to weld seams in hard-to-reach areas of the pipeline, it is easier when the nozzle is fixed flush with the edge of the platform; the protrusions in such a situation get in the way.
- The base is not the most important, but significant parameter; it is inconvenient to work when the tripod is flimsy.
Beginners are afraid of ruining the connection by choosing the wrong soldering iron, but it's not just a matter of equipment.
qazwer1973FORUMHOUSE user
Degrease the pipe, mark the depth with a felt-tip pen (don’t be lazy), use good quality pipes and normal scissors (so that you don’t make an ellipse out of a circle). And everything will be fine, even with a budget soldering iron.
Before the “test in battle” it is worth practicing on consumables.
Bearr3mFORUMHOUSE user
Budget models are quite suitable for non-professional use. If you are soldering for the first time, I advise you to practice a little - assemble a dozen couplings with a pipe, make sure that the edge of the pipe inside the coupling does not turn inward, narrowing the connection, you will get your hand full - and go into battle.
Whatever pipe soldering iron you ultimately choose, it in itself does not guarantee error-free assembly. If you have doubts about the correctness of the scheme or execution technology, go to the engineering systems section. Specific models of specific brands for soldering work will be recommended or advised against in the topic on choosing a soldering iron for polypropylene. The video talks about the types of pipes and the features of their soldering.
Tools and materials
Required parts:
- The main element is a transformer, resistor, lighter and other things on which the device will work.
- The tip is a copper wire with a cross-section of 2.5 mm or more.
- Fiberglass (asbestos) material is an insulating agent. It is found in electrical devices, in ordinary lamps. You can also use silicate glue together with talc.
- Nichrome thread. It can be taken from an iron, hair dryer and other home heating devices.
- The heater body is a thin tube made of refractory metal.
- Handle: any ready-made holder, for example, made of wood or heat-resistant plastic, can be used. Pieces of PCB will do.
The screwdriver blade is universal
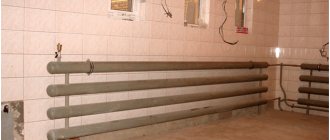
General information and types of polypropylene products
Polypropylene materials are lightweight. They produce products for three types of work:
- hot water supply gaskets;
- arrangement of cold water supply;
- installation of heating systems.
There are 4 types of pipes:
- withstanding pressure of 1 MPa and not intended for residential pipelines;
- capable of withstanding pressure of 1.7 MPa and temperature of 64C;
- withstands temperatures of 85C and system pressure of 2 MPa;
- coping with pressures greater than 2.2 MPa and temperatures of 94C.
The last type of pipe materials has a reinforced layer of foil or glass fibers.
Taking into account the purpose, polypropylene pipe products are used for:
- cold water supply with a permissible ambient temperature of no more than 44C;
- hot water supply with a permissible temperature of no more than 84C;
- universal use with permissible temperature range 65-74C.
Manufacturing methods
Depending on the current tasks, a homemade soldering iron may have different appearance and functionality.
From a lighter
A quick option is a soldering iron from an ignition device. You just need to wind a thick wire around the end of the device, leaving a small piece at the end - this is the main rod of the soldering iron. If the soldering iron has a plastic case, an important condition will be to turn it off periodically, otherwise the shell will melt.
Advice! You should prefer a lighter with a long handle.
Simple
A variation of a mini-soldering iron is a battery-powered soldering iron. It is assembled according to the standard scheme. Taken:
- Nichrome thread.
- 2 wires of different sections.
- Part of the antenna.
- Switch.
- Charging (batteries) at 3.7 W.
- Fiberglass.
- Bar for holder.
From a resistor
An electric soldering iron can be made using a wire-wound resistor and a plywood plate as the main parts. The latter will serve as the handle of the tool. In addition to these, you will need small details:
- Copper rods (the cross-section is determined by the diameter of the resistor).
- Washer and screw.
- Spring ring for fixation.
After preparing the base, the soldering mechanism is assembled.
Note! A resistor soldering iron will be able to operate within a voltage range of 6–24 Volts.
From a ballpoint pen
For simple work, a home soldering iron can be made from a pencil or a regular pen. So, how to make a soldering iron of this type:
- Stationery pen - body.
- MLT resistor.
- Textolite.
- Wire of different diameters.
- Wires.
Mini soldering iron
The mini-format can be assembled from lighting device boards. For it they use:
- Power block of light bulbs.
- Pulse transformer ferrite ring.
- Copper bus.
- Rod with a diameter of up to 3 mm.
Which soldering iron is better - rod or sword-shaped?
Judging by the reviews of master installers, the shape of the heater does not affect the quality of the connection of small-diameter pipes. But other factors play a role:
- if we compare equipment of the same price category, a soldering iron for polypropylene with a flat platform will cost less;
- a sword-shaped element, where you can put 3 pairs of nozzles, is more convenient to use on a table than when assembling ready-made heating sections in a private house;
- the rod platform allows you to attach the nozzle to the end of the heater and work in cramped conditions, getting to hard-to-reach places;
- The block attachment on the clamp is easier to replace during the installation process.
Advice. Balancing an electrical appliance by weight plays an important role. Check how comfortable the device fits in your palm and take a more suitable model.
Induction
An induction soldering iron is distinguished by its heating principle. Distinctive features of such devices:
- The principle of heating without contact with the rod: electromagnetic fields arise due to the flow of current to the wire coil.
- High heating capabilities.
- Special structure: the rod is inserted into the coils themselves, and not into the casing with the thread. Fiberglass is optional.
Additionally! This classification also includes nichrome, ceramic, and pulse soldering irons.
To make a soldering iron, you need to make the right calculations
Popular brands and equipment prices
The range of “irons” for soldering PPR pipelines is very wide, so it is not easy to create a reasonable rating of products. We propose a different approach: we list the manufacturers of soldering irons that appear most often in reviews on various forums:
- The highest price category is Rothenberger (Germany), Dytron (Czech Republic), Rekon (Britain, produced in China). Prices range from 235...400 USD. e.
- Electric soldering irons of average cost - CANDAN (Turkey), Valtec (Italy - China), PATRIOT (USA - China), SUPER-EGO (Spain). Prices – from 55 USD. e.
- Other devices under $50, produced in the countries of the former USSR and China. There are a lot of manufacturers: Forte, Brima, Caliber, Enkor, Resanta and so on.
The prices of welding heaters greatly depend on the configuration. A set of high-quality nozzles with standard sizes up to 63 mm inclusive costs more than any Chinese soldering iron. Compare cheap devices with more expensive ones, see the video:
The second factor is the reliability of the device design. For example, an amateur version of the Czech brand Dytron Polys P-1b will cost 155 USD. That is, professional Dytron Polys P-4a already costs 215 USD. e.
For polypropylene pipes
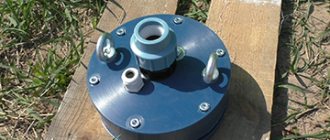
A do-it-yourself soldering iron for polypropylene pipes is required when repairing or building new products. An old electric iron is a suitable installation tool. In addition to this, you need:
- Steel slats.
- Duralumin plate.
- Cords.
- Tumblr.
- Holder.
If necessary, a thermocouple is added. More details on how to assemble a soldering iron will be described below in the instructions.
Step-by-step instruction
A powerful homemade soldering iron is made as follows.
- Heater base. A 60-65 W transformer will be used for the heater. The result is a reliable pulse-type device.
- Making a heater. The bow is connected to the busbar, or secondary winding. A short circuit occurs at the edges - a heater tip appears.
- Making heater leads. The primary winding is connected to a current source, that is, a line or cable conductors from which the device will be powered. A switch is attached to them.
- Manufacturing the body and installing the heater. The device is closed on top with a metal casing - a rectangular plate. Subsequently, the outer bumper is screwed to the top of the handle.
- Design features on the handle side. Before making the handle, you should remember that the cord will pass inside, and you also need to leave a hole on it for the soldering iron button.
- Making a handle. The handle is cut out of wood; consists of 2 parts connected with screws. The size of the blanks is adjusted to the size of the master’s hand.
- Connecting the electrical cord. The main cord is inserted into section 2 of the winding and twisted around it several turns. The whole structure is assembled.
- Completion of soldering iron assembly. After installation, it is necessary to check the device for functionality.
Attention! If the finished device does not heat up well, you should disassemble it again and firmly connect the contacts of the power cable and the incandescent wire.
Additionally, a thermostat or dimmer is installed in the device.
Soldering iron with heating regulator
Such a device makes it possible to control the temperature of its heating. To assemble the soldering iron, in addition to the working soleplate from the iron, prepare:
- thermostat, thermocouple, 2 tips;
- pointer indicator with scale;
- insulated conductors 1 m long;
- asbestos wool.
Specially shaped tips for the heater outlet and fitting are made in advance or ordered at a lathe. The casing is removed from the iron, the thermostat and all other parts and wires are removed from the soleplate (only the ironing plate will remain).
Using a drill, drill holes measuring 6 mm in the tips, screw them to the body from the spout side with bolts. On the other side of the sole, holes are made for mounting a thermocouple.
Long wires are soldered to the latter. Similar wiring is connected to the heating coil, after which all the wires are routed through the hole in the handle of the iron.
At the end of the work, the space between the slab and the casing is filled with asbestos wool, which will serve as a thermal insulation material. The casing is put in place. The wires are connected to the power plug and the thermostat in such a way that the temperature can be set to 255-265 degrees (this will allow the polypropylene to melt).
Using homemade soldering irons
A DIY soldering agent can:
- Solder the headphone wires.
- Connect power circuit contacts, minor technical soldering.
- Solder metal utensils.
- Work with capacitors and blocks.
- Make cable cores, install radiators, etc. But here you need a high-power soldering iron with 80 watts or more.
Attention! The switched-on soldering iron should not come into contact with water.
The article offered several options on how to make a soldering iron with your own hands. It can be the simplest, for example, from a ballpoint pen, or more complex - from a resistor or transformer. Made in accordance with the laws of physics and electrical circuitry, the soldering device will last almost forever and will cope with its tasks perfectly.
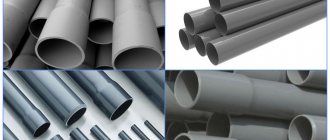
Why polypropylene
Today, pipe manufacturers provide a huge range of products for laying water pipes, sewerage or installing heating systems. You can purchase metal-plastic, metal, or polypropylene pipes. Today, an increasing number of consumers prefer to choose polypropylene pipes, which have many advantages:
- do not corrode;
- easy to install;
- do not require constant repairs;
- durable and reliable in operation;
- can be laid inside a wall or floor;
- are significantly cheaper than metal pipes.
Polypropylene pipes can be used for installing heating systems, for water pipes and for sewerage.
Recommendations for choosing a soldering iron
Craftsmen who have been working with polypropylene for a long time do not need our advice - they have learned from their own experience which tool is better to choose. Another thing is for beginners and ordinary homeowners who want to save money on installation once and solder the heating with their own hands. You should select a soldering iron according to the following criteria:
- power;
- price;
- heater geometry and number of installed nozzles;
- convenience of a tripod (stand).
Advice one. To practice welding and soldering a home heating system made of polypropylene, it is enough to buy an inexpensive Chinese machine. It will easily withstand installation work and will serve subsequently, in case of repair or alteration. We will reveal some of the nuances of using a cheap tool further.
The minimum tool kit (on the left) includes only a soldering iron, 3 attachments and a wrench with a screwdriver.
Let's move on to the rest of the recommendations:
- The iron needs sufficient power to quickly react and heat the platform upon contact with the pipe and fitting. For a device with one nozzle, 600 W is enough for welding pipelines with a diameter of up to 40 mm.
- For 3 nozzles and pipes Ø16...32 mm, choose a soldering iron with a power of up to 1.2 kW, no more is needed.
- If your budget allows, buy a Turkish-made welding device, for example, CANDAN. The soldering iron is reliable and of relatively high quality, tested by craftsmen.
- To work in uncomfortable conditions, it is better to take the rod version of the device.
- Don’t skimp on nozzles - buy 2-3 of the required sizes, but of good quality.
- Make sure that the soldering iron does not dangle in the tripod, this reduces the convenience of working.
Now about saving by renting equipment. For a beginner, renting an iron is not profitable - it’s easier to buy a cheap device of the lowest price category. But sometimes large polypropylene sellers hold promotions - when you buy a certain number of pipes, they give you a soldering iron for temporary use for free.
If you decide to choose an inexpensive soldering iron model, you need to take into account one nuance: such a tool often fails with the heating temperature, the error reaches ±10 degrees. The way out of the situation is simple: using a contact thermometer or pyrometer, you adjust the real temperature experimentally, taking measurements and adjusting the device with a manual regulator.
Comment. Do the same when working with polypropylene of unknown origin. Such material often melts prematurely or, conversely, requires more intense heating.
The problem with a dangling tripod is also completely solvable. The stand is screwed to the table with a clamp, and the soldering iron is fixed in the socket with a self-tapping screw, as was done above in the photo. And lastly: the power cord of cheap models quickly gets twisted near the case, and the copper wires break. It is necessary to monitor the wire or tighten it with electrical tape.