Maksym
15154 0 0
Maksym June 16, 2017 Specialization: country construction, apartment renovation, landscaping of a personal plot, installation and connection of utilities.
Use plastic sewer pipes to transport the sink.
Are you planning to renovate your kitchen? Surely you will have to deal with re-equipping or installing a sewer system, because not a single kitchen can do without it. I will try to reveal the main issues related to this topic.
Drainage in the kitchen
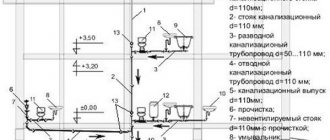
Domestic sewerage is quite simple to install and practically does not require design. The essence of installing a sewer system in the kitchen of an apartment or house is the installation of sewer drains that discharge used water into the sewer riser of an apartment or the sewer system of a private house.
Drains are made using sewer pipe bends, at one end of which there is a drain socket, and the other end of the bend goes into the sewer riser.
drainage in the kitchen
The number of sewer drains should be no less than the number of plumbing fixtures in the kitchen. For example, if the only plumbing fixtures in the kitchen are a sink, one drain is enough. If you plan to install a sink, dishwasher and washing machine, then there should be three such drains.
However, it is worth noting that the number of drains should not coincide with the number of sewer outlets. Thanks to the use of sewer fittings (fittings), it is possible to install a tee at the end of one outlet to connect the drains of three or two devices.
Connection diagram
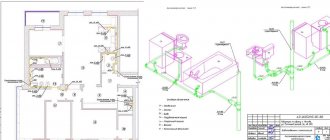
After purchasing a kitchen, there is a need to connect the equipment to utility networks. Typically, kitchen furniture supply companies connect appliances to pre-arranged water and sewerage points, but the problem of laying pipes to these points falls entirely on the shoulders of the customer.
Serious suppliers provide each client with technical documentation for the kitchen, which indicates the coordinates of the connection points for equipment and plumbing fixtures. According to this project, pipe routing is carried out. It must be remembered that all dimensions given in the document are given from the finishing marks of the floor and walls. If you ignore these parameters, problems will arise when installing the kitchen.
- Plumbing equipment
How to change a kitchen faucet in 4 easy steps
Design Features
Designing a sewer system for an apartment, and in particular for a kitchen, does not require special knowledge and can be done in the form of a simple drawing on your own.
There are several basic rules for sewer installation that you just need to know:
- The slope of horizontal sewer pipes towards the sewer riser or exit from the house should be 5˚ (minimum 3˚).
- It is impossible to install horizontal sewer pipes with an increase in pipe diameter along the route.
- For the kitchen, it is better to use sewer pipes with a diameter of 50 mm rather than 40 mm.
- When installing, try to avoid turning the sewer by 90˚. It is better to make such a turn more smoothly, with fittings at 30˚.
Related article: Types of pipe clamps and their application
- If the length of the kitchen sewer outlet is more than 15 meters, then an inspection hatch must be installed on it.
Pipe routing
The distribution of water and sewerage is done from the corresponding risers. Often apartments have common risers for the bathroom and kitchen, but in some series of houses there are separate risers for water supply to the kitchen. Wiring is carried out at the initial stage of repair during the plumbing work and immediately in all rooms where it is provided.
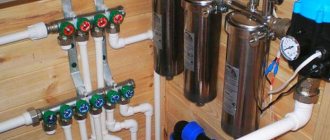
Scheme for connecting equipment to utility networks: 1 – cold or hot water supply riser, 2 – ball valve, 3 – coarse water filter, 4 – pressure reducer, 5 – water flow meter, 6 – collector, 7 – drain to the sewer
Making a QuickEasy connection (WIRSBO): a – cutting the pipe to size; b – putting on a self-clinching ring; c – expansion of the pipe with an expander; d – joining the pipe with the fitting
Installation of shut-off valves
First of all, it is necessary to install shut-off valves on the outlets from the hot and cold water supply risers. Ball valves are best suited for this purpose. High-quality shut-off valves are produced by BUGATTI, GIACOMINI, ITAP (Italy), NAVAL (Finland) and many other companies.
Filter installation
A coarse water filter must be installed behind the ball valve. Such filters are divided into mesh and cartridge filters. The degree of filtration of a cartridge filter may be higher than that of a mesh filter, but the cartridges require periodic replacement. It is recommended to purchase filters with a filter element mesh size of no more than 100 microns.
Mesh models are produced by companies such as RBM, BUGATTI, TIEMME (Italy), HONEYWELL BRAUKMANN (USA-Germany), SYR (Germany). Cartridge filters are manufactured by USFILTER (USA), ATLAS FILTER (Italy), etc.
Installation of pressure reducing valve
If the pressure in the water supply system exceeds 5 atm, it will be necessary to install a pressure reducing valve, or pressure reducer, which is located after the filter. The valve will prevent equipment failure due to excessively high pressure in the system; in addition, installing the devices on both risers will allow you to set the same pressure in the apartment lines. Different pressures cause inconvenience when using mixers (it is difficult to adjust the required temperature and water pressure), and can also cause noise and vibration in pipelines.
For the operation of plumbing fixtures and household appliances, a pressure of 3-4 atm is considered optimal. To save space in the plumbing cabinet, it is better to install combined filters with a built-in pressure reducer. Reducing valves are produced by RBM, HONEYWELL BRAUKMANN, TIEMME, etc.
Features of installation in an apartment
For the installation of kitchen sewerage, modern plastic sewer pipes with sealing inserts and fittings are used. Internal sewerage pipes are made of polypropylene and are gray in color. For external sewerage, polypropylene pipes are produced with a characteristic orange color. You can view them and other products on the website https://www.politek-spb.ru/.
You need to get rid of old cast iron sewer pipes, and use special adapter flanges to enter the cast iron riser.
Connecting sewer pipes and fittings does not require special tools or glue. All sewer pipe connections are made manually. Gaskets installed in the pipe socket ensure a tight connection. You can use plain soap to lubricate the joint.
An important installation point is the connection of the device drain itself with the socket of the sewer pipe. The best option for installing the bell is to position it with the “hole up”. An acceptable location for the socket in the wall is “opening from the wall.” I do not recommend connecting the appliance drain directly to the socket of the pipe itself, without corner fittings, with a “hole along the movement of the drain water.”
Connections of drain hoses and sockets of sewer pipes are made through special seals.
Corrugated pipes for external sewerage
When describing the types of sewer pipes, we will separately mention special corrugated versions for outdoor use.
By design, corrugated pipes are divided into:
- single-layer;
- two-layer.
Single-layer pipes are corrugated both outside and inside.
Single-layer corrugated pipe.
The two-layer version has an internal smooth channel through which drains flow, and an outer skin with an air gap. The pipe ribs protect the communication from mechanical stress and contribute to increased strength.
Double layer pipe.
Corrugated pipes are classified according to load resistance:
- For light loads. They are light in weight, very flexible and easy to lay in difficult areas. Suitable for external drainage systems.
- For medium loads. The pipes have average resistance to mechanical loads and can be laid underground.
- For extra heavy loads. Corrugated pipes with thick walls that can be laid under highways and in industrial areas.
To organize a sewage system in a domestic environment, light and medium category pipes are most often used. They are resistant to standard loads for such places from pedestrians, equipment and ground movements, and also retain these characteristics throughout their entire service life.
The connection of corrugated pipes is carried out with a special fitting. The diameter of the pipes ranges from 100 to 1200 mm, depending on the need for sewer throughput.
Assembly of the main part
The siphon itself is most often the largest part of the kit, consisting of two parts - a body and a removable bowl. It is removed to remove blockages that arise during operation. During assembly, on the contrary, they need to be connected. A complete gasket of appropriate size is usually installed between them. Its size must correspond to the diameter of the screw fastening of the bowl. This is how they usually connect. The bowl is screwed onto the base from below without the use of tools.
The main feature of the chrome siphon is its durability and strength
At the top of the base there is a drain hole where a funnel is installed. It has a screw notch to which the connecting fitting will be attached. It is put on the funnel so that the notches on it and on the base match.
Brief visual instructions for installing a siphon to a rectangular and round sink
It is necessary to install a gasket between the fitting and the base, and only then connect them. The kit may contain more than one gasket for the fitting, but a pair at once. If there are 2 of them, then one in the form of a washer (a flat ring with a hole in the center) will be placed inside the fitting, and the second cone-shaped one will be installed lower, directly on the tubular part of the funnel. The narrow part of the conical rubber gasket should be directed towards the base of the siphon in order to securely fix the funnel at the desired height. The fitting is then tightened tightly enough to avoid future leaks.
Installation dimensions of a siphon for a double sink with the possibility of connecting a washing machine or dishwasher
Basic rules for installing a sewer system
Sewage system diagram
When designing and planning installation work, you need to take into account some basic factors:
- Type and location of the collection tank or septic tank.
- Will the system be used all year round?
- Number of consumers;
- Service – professional or independent.
For small houses, the most compact system with a simple circuit is preferable. Such projects are inexpensive and often more effective. When all water intake points are nearby, then you can use one riser.
Installation of this system should be carried out according to sanitary and technical rules. Often the septic tank should be located no closer than 5 m from a residential building. If there is a spacing deficiency, it can cause the foundation to crack. If the distance is too long, the pipeline will often become clogged. The septic tank should be located 30 m from the water source. It is prohibited to install the system next to a neighbor’s fence.
The principle of operation of a sink siphon
The principle of operation of the siphon is based on simple laws of physics and has a simple diagram. The curved element is constantly filled with water. This protects the kitchen from the penetration of odors in the opposite direction. At the same time, operating pressure is maintained in the sewer network. When its level drops, the amount of water in the water seal also decreases. Residual liquid penetrates into the pipeline riser.
Features of operation of different types of devices
General information
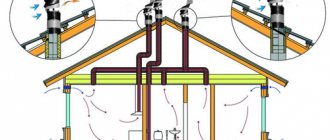
Some pipe elements cannot be masked in the walls of the room. We are talking about camouflage using a groove. When pipes are laid in special recesses in the wall, and covered with cement mortar, and finishing material is also laid on top. If emergency situations arise, you will have to break down the wall to get to the pipes.
It is not recommended to immediately wall up laid pipes with a layer of cement; faults in the installation work may not be immediately noticed, they can only be discovered after a few days. It is necessary to test the operation of the water supply system for two to three days in full to check the tightness of the connections, and then only cover up the grooves.
It is recommended to lay steel pipes welded together in the grooves, as well as copper pipes that do not have threaded joints, and brazed pipes made of plastic material without threaded joints.
It is not recommended to hide X-shaped or T-shaped metal pipes in grooves; they are most susceptible to leaks. Pipes with threaded connections are also dangerous. Counters and compartments with filters installed on them cannot be placed in the walls.
Purpose and design
The device is divided into a pipe and a bent siphon, which helps protect the apartment from the unpleasant odor that spreads from the drain.
How does a siphon drain work?
During draining, the liquid flows into the siphon, passes along the bend, rises and enters the sewer. In this case, part of the water remains in the lower part of the curved tube. It is a hydraulic seal that does not allow odors to pass through. The curved section of the siphon traps solid particles and small objects. To clean this area, the parts are removed and reinstalled after cleaning.
Components
Different types of siphons have different designs, so we will consider in detail the design of a bottle-type siphon, the most popular for installation under kitchen sinks.
Structurally, such a device consists of the following elements:
- body, usually dismountable;
- outlet pipe with raised rings, connected to the sink from below;
- protective mesh with a cell diameter of no more than 1 cm;
- connecting screw connecting the mesh and the pipe;
- corrugated or rigid tube for draining water into the sewer;
- cone gaskets designed to ensure tight contact between the pipes and the siphon body;
- wide rubber gasket for attaching the outlet pipe to the sink;
- rubber gasket designed to seal the protective grille;
- plastic union nuts. They attach the pipes to the device body.
Components of a bottle siphon
How to hide pipes that are laid horizontally
This problem can be solved by installing boxes made of plastic panels, plywood or chipboard. To build a box, markings are applied to sections of the wall on the opposite side. A profile for direction is attached to the marking line using dowels, providing it with jumpers at intervals of sixty centimeters. Cut sheets are attached to the frame.
An option for camouflage can be a removable box; the size of a structure is constructed from boards that are equal to the length and width of the communication; the boards are fastened with corners. The box is installed above the pipes.
Overview of options
Plasterboard box
Drywall is of high quality, easy to shape, and convenient for decorating a room. Drywall with a moisture-resistant coating is lubricated with mixtures against the formation of fungus and has a light green color.
For the base of the box, a frame is constructed from profiles of twenty-seven by sixty millimeters; guides are also used for the box, which measure twenty-six by twenty-seven millimeters.
How to build a box from plasterboard
First, determine the most protruding edge of the pipe vertically, making an indent of 5 centimeters, and draw a line. Horizontal boundaries are also drawn. Using dowels, slats with a guide profile are attached along the lines, and transverse slats with a rack profile are mounted to the slats. The structure is held together with crabs. The completed frame is finished with drywall. Cut out a door for a window. Then they are covered with decorating material, processing the seams.
If hot drainage pipes are hidden behind the box, then holes are made on the top of the panel so that warm air penetrates into the room. A small hole at the bottom will allow you to see leaking pipes.
When drilling holes in the floor, the box must not be allowed to move so as not to warp the structure. Attach the plasterboard frame to the tiled floor covering carefully so as not to damage the tiles.
Disguising sewerage with tiles
Finishing work is similar to the construction of a plasterboard structure, but requires a lot of time and effort. The main advantage is the moisture resistance of the material and ease of care.
The design is based on a frame made of wood or metal; the wooden elements are lubricated with moisture-repellent substances. It is recommended to first make a drawing, which will indicate the size and places where the elements will be attached.
First, measure the area where the frame will be installed. Using slats, they make a frame, attach it to the ceiling, to the floor, to the wall. Next, the surface is sheathed with plywood or chipboard sheets. Cut a hole for the door. Using a special mesh, the surface is prepared for laying tiles. Then the tiles are laid, the seams between the tiles are sealed with mastic to prevent the formation of fungus.
In order to hide the toilet pipes in the structure, you need to make an additional protrusion; you can also place a plumbing installation in it. The box can be extended to the sink by building a niche underneath to store detergents.
Sewerage in a box made of plastic panels
One of the easiest ways to disguise sewer pipes. There are many decorative panels that meet different needs and taste preferences.
Attention! The material has the disadvantage that it is easily flammable. Smoking is prohibited in such rooms.
Plastic panels are also attached to a pre-mounted frame. To begin with, the initial molding is attached to the frame using self-tapping screws; at the end of the work, the final molding is attached. When connecting panels, make sure that the ends are inserted into the locks of the supplied elements without gaps. The joints of the frame with the floor and ceiling are finished using planks.
Installing a siphon under the sink: nuances of work
If you have an old apartment with seedy plumbing, then it is better to immediately replace the drainage system. For the kitchen, the most budget option is a plastic model.
Let's look at how to replace a siphon under a sink and install it. To remove the old drain and replace it with a new one, no special skills in working with plumbing equipment are required.
Modern equipment allows you to install the entire system yourself
Removing the old siphon
Before installing a new device, you must remove the old one. Using a screwdriver, you need to unscrew the screw in the middle of the grille. After this, the old device is easily removed.
If the nut and screw are firmly stuck to each other, then unscrewing the siphon becomes very difficult. In such a situation, you can unscrew only the lower part of the drain and twist the pipe. If this does not help, then special solvents come to the rescue.
Dismantling the old device
How to assemble a siphon for a kitchen sink
Before you begin assembling the siphon for a kitchen sink, all the parts should be laid out to check that there are enough gaskets, pipes and connecting elements.
In the table below you can see the step-by-step assembly of the siphon:
| Illustration | Description of work |
| We lay out all the components of the set. We will install a corrugated siphon from. | |
| We collect the flask. First we put on a thin gasket. It should be put on very evenly. | |
| And then screw on the lid or bottom of the device. In this case, there is no need to use sealant or specially coat the joints. | |
| We put the nut from the kit on the corrugated pipe. | |
| Then we put on a cone gasket, which ensures the tightness of the connection. The tip of the cone gasket should be positioned towards the outlet hole. | |
| Then the siphon is put on the gasket. The gasket should fit evenly to avoid leaks. | |
| The already threaded nut is screwed on top. As you tighten the nut, the gasket will fit even more firmly into the siphon. | |
| Another nut and spacer fit onto the bottom. The nut is put on first, followed by the gasket. | |
| We also insert the lower part into the siphon device. Screw the nut tightly into the thread. | |
| The assembled siphon is mounted to the sink. The blue gasket is placed on the hole in the siphon. And the white one is placed on top of the sink. It is placed on the drain hole, and a metal grate is placed on top. All these components are also included in the kit. |
Required tools and materials for installation
To install the siphon you will need a screwdriver, sandpaper and a tape measure. In some cases, cutting the pipe requires construction shears. Also, do not forget about consumables, which include silicone sealant, plastic pipes with a diameter of 40÷50 mm, sealing tape, tees, fittings and bends.
Unassembled kit
Siphon installation
Installation of the assembled device is carried out as follows:
- a corrugated ring is placed on the pipe, and another ring is pulled under the grate;
- the device is placed on the sink, and a drain grate is placed on top;
- the screw is mounted and screwed.
Then you need to connect the outlet to the sewer drain. If the diameter of the drain hole and the pipe do not fit together, then special adapters are installed. Once the connection is made, you need to check the operation. To do this, you need to fill the drain with water until a water seal appears.
Installation with special tool
Features of installing a siphon for a sink with overflow
Devices with an overflow are installed in the same way as conventional structures, but the overflow must be assembled separately. Here's how the pipe and overflow are combined:
- first put on the nut and then the gasket;
- then an overflow is installed in the outlet;
- the nut is screwed on.
The overflow pipe can be different: prefabricated from elements, corrugated or rigid. If the structure is prefabricated, then the height is adjusted by moving apart the parts and special clamps. A flat gasket should be used between the back of the sink and the overflow inlet.
Overflow device
Siphon care
When purchasing any siphon design, you will need to regularly clean it to remove accumulated blockages. If you use the sink carefully, you can increase the time between cleanings. To prevent the drain from clogging, it is recommended to use a special food chopper and grates. But even in this case, the siphons will have to be cleaned periodically.
The cleaning procedure depends on the design of the drain. The corrugated version can be cleaned when it is completely disassembled. The bottle device is well pierced with a special tube. Special chemicals are also used for cleaning, but they must be used carefully, as they can damage the plastic siphon.
Design
The drainage system for sinks and sinks is the simplest system, consisting of a siphon and a drain pipe that connects the sewer and the drain hole located at the bottom or wall of the bowl. This plumbing product is usually made of plastic, metal, or a combination of these materials. The sink drain consists of the following structural elements:
- Body or "glass".
- Outlet pipe.
- Cuffs and seals made of plastic or rubber.
- Protective and decorative metal grille for the drain hole.
- Plastic nuts.
- Fixing screw.
Bottle siphon design
Note! There are also drains for sinks with overflow, which differ from the usual ones by having an additional drain hole located above the main one. This hole is connected by an additional corrugation to the siphon body
An overflow prevents the sink from overflowing and water from spilling out of the bowl if you forget to turn off the faucet or the drain hole is clogged.
Complete set of drain and overflow system
In order to assemble a drain system, you need to know all its components. Here is a list of the main parts of a siphon with overflow:
- Release. Upper part of the system. Attaches directly to the sink and consists of 3 parts: mesh, bolt, base.
- Neck. It has a wide nut with which it is screwed to the outlet. Can be equipped with additional pipes for connecting kitchen appliances.
- Overflow hose. Screwed to the outlet or neck using a plastic nut.
- Attaching the overflow mesh. A metal bolt that is screwed into the side of the sink bowl.
- Siphon body. A bottle into which a siphon neck fits using a cone seal.
Complete set of drain and overflow system
- Outlet pipe. The closing link of the siphon connecting the drain fittings to the sewer system. Attached to the bottle using a wide plastic nut.
- A set of seals and cuffs for assembling the overflow drain system.
Each part is connected to its neighbor only through a rubber seal. Without gaskets and cuffs, leaks form in the system.
Important! Check that the gaskets are installed correctly. Do not allow their integrity to be damaged or jammed.
Using a complete list of component parts and instructions, you can assemble the product yourself.
How to remove a pipe directly from the house
Having a finished house, the question immediately arises: how to remove the sewerage through the foundation? To remove the sewer pipeline from your own home, it is necessary to install a boundary system that connects the septic tank to the outgoing pipes.
The pipe outlet passes through the foundation. Moreover, the installation depth must exceed the freezing value of the soil. The work is performed in the following sequence.
Stage 1. A trench is dug in which the external and internal systems will be joined.
Stage 2. A hole is made in the foundation for the sewerage system. To work you will need:
- Hammer;
- Metal punch;
- Electric drill;
- Set of drills.
If it is not possible to make a hole with such tools, a special diamond installation is used.
The drilling process is always quite complicated, because you have to drill through a concrete foundation. If a reinforcing mesh was made, you will have to use a grinder. It is easy to handle the fittings. Sometimes you have to work for several days to get the hole you want.
First, the location where the pipeline will be installed is determined on the surface of the foundation. A circle is drawn in this place, and its diameter must exceed the size of the sewer pipe, together with the sleeve.
A hammer drill drills concrete to maximum depth. Any reinforcement bars encountered are cut off with a grinder.
To make a hole in a concrete foundation, builders use several methods:
- Diamond drilling. It is considered the best option. The foundation material does not receive damage during such work. This technology is one of the most expensive, even if you rent such a machine;
- Hammer. Percussion drilling is in progress. The negative side is considered to be chiselling, which causes the appearance of microcracks. Concrete begins to peel off from the reinforcing mesh;
- Impactless drilling. One of the safest methods, which requires a lot of time. A large number of smaller ones are drilled around the entire perimeter of the desired large hole. The concrete plug is knocked out with a sledgehammer, and the reinforcement is cut off with metal scissors.
Stage 3. First, a sleeve is placed in the made channel, then a pipeline is laid. The resulting cracks are closed with polyurethane foam. It also becomes a good heat insulator.