The key to the pleasure you get in a bathhouse is always thoroughly warming it up to the desired temperature. Otherwise, the procedure itself loses all meaning, wouldn’t you agree? The entire load for this part falls on the oven, which must be properly prepared. You can, of course, save yourself the headache about this and turn to specialists. Or you can put in a minimum of effort, but as a reward you will receive a well-prepared oven and a significant amount of savings. How to make a sauna stove from a pipe with your own hands? In fact, using such material as a source allows you to reduce time costs to a minimum - and not at all to the detriment of the final result. The main thing is the availability of the necessary materials and a drawing, according to which you can successfully implement the plan and avoid mistakes that undermine safety.
Vertical or horizontal format?
One of the key issues that you will have to decide if you intend to make a sauna stove from a pipe. Of course, it directly depends on the size of the steam room.
Vertical - ideal for small spaces. The grate bars and the direct firebox are placed in steps, one above the other, which ultimately allows you to save useful space around. The use of this format has recently become noticeably more frequent, especially among professionals. It is better to avoid disputes about which stove is best suited for a bath: make a decision based on your specific situation.
Horizontal is a solution that fits well into the format of spacious bath rooms. At the same time, this is the classic version that is used almost everywhere. Characterized by a slightly enlarged firebox compartment. Often, for practicality, part of it goes into the dressing room, which allows you to speed up the sometimes rather tedious process of kindling.
Agree that it is much more convenient to regulate the temperature from it without wasting time moving from one room to another. In addition, during such “raids” the air actively circulates throughout the bathhouse and prevents its full heating.
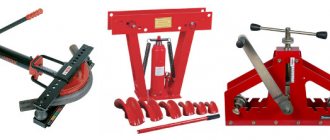
Tools and materials
When creating a horizontal furnace, the following materials are used:
- Pipe section. Its diameter should be from 50 to 53 cm. The length of the body is 80-100 cm. For a steam room of 20 cubic meters. The first characteristic is sufficient. If you need to heat the dressing room as well, it is better to add 15 cm to the pipe length.
- Rectangular sheet of steel 120x70 cm. A small layer of rust is allowed. The main condition is that the surface is smooth, without holes or dents. Metal should be chosen at least 3 mm thick.
- Metal profile. Angle No. 50 is often used. For one horizontal oven you will need 1.5-2 m of profile.
- Reinforcing bars with a diameter of 6-8 mm. You can use cuttings of half a meter.
- The pipe is 150 cm long and 110 mm in diameter. You will also need several knees. The rotation angle and their number should be selected in each case separately.
- Two doors - for the blower and firebox.
- In addition to metal elements, you will need to find 20 electrodes for ferrous and 5 for stainless metal.
- Discs for working with an angle grinder with a diameter of 125 mm.
It is possible to build a horizontal oven only if you use certain tools. The main ones include a welding machine and additional accessories. During the work you will need to saw steel sheets, so you should include a powerful grinder in your list of tools. A carbon dioxide semi-automatic machine is the ideal choice when you need to cook critical components. A simple pulse unit is sufficient if you have the operating skills.
When installing a horizontal stove for long-term operation in a bathhouse, it is necessary to purchase high-quality pieces designed for medium pressure.
Preparing the foundation
- in the place where you plan to place the stove, make a hole 0.5 meters deep, the length and width can be increased to 0.7 meters;
- approximately 0.3 meters high, fill the prepared hole with very fine crushed stone and carry out thorough compaction;
- prepare a cement composition based on cement-sand in a ratio of 1 to 4, dilute the mixture with water and pour it onto the crushed stone;
- within 24 hours the base will dry and become hard - place several sheets of roofing material on top for reliable protection from moisture;
- prepare a concrete composition of cement, sand, fine gravel and water in a ratio of 1:2:4 and pour it onto the roofing material;
- carefully level the base using a building level;
- after drying, make a brick platform approximately 0.7 meters in width and height;
- also arrange a protective brick screen up to 1.2 meters high - in the future the stove will be located in close proximity to it, approximately at a distance of 0.2 meters.
conclusions
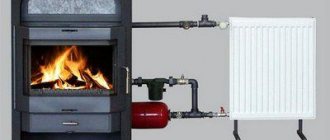
There is no point in heating residential premises with stoves made from pipes: with the thermal power required for this, the stove is comparable in weight and size, labor intensity and, ultimately, manufacturing costs to a brick one. But it still won’t last for several generations and, of course, won’t breathe.
The popularity of sauna and garage stoves made from pipes is justified. However, household pipe stoves are still not very common, but in vain. In many cases, they are quite capable of replacing much more expensive and labor-intensive heater stoves and long-burning stoves. The latter are unsafe without supervision, and an even temperature regime within a day for the winter keeping of poultry and livestock in temperate latitudes is not necessary and even undesirable.
Below you can share your thoughts and results with our readers and regular visitors.
You can also ask questions to the author*, he will try to answer them.
Horizontal oven - step by step
- prepare a working piece of pipe 0.7-0.9 meters long;
- thoroughly clean all edges;
- cut a fragment measuring 0.8 by 0.4 meters from the prepared metal sheet;
- Weld rods horizontally to the opening in the middle, and a grate in the lower part of the pipe;
- make a remote-type firebox from a metal sheet and make cutouts;
- weld this facade to the base pipe;
- to decorate the back wall, cut out a circle equal to the diameter of the pipe and weld it to the main structure;
- You can make a hole for the chimney in the upper part - a small size, approximately 0.16x0.16 meters, will be enough;
- weld the main vault and the pipe that will be used as a chimney;
- all that remains is to install the doors for the combustion chamber and the blower;
- finishing comes down to careful sanding of the entire body, and then treating it with durable polymer-based paint.
Here are some drawings and pictures that will help you in making a horizontal type oven.
Manufacturing procedure
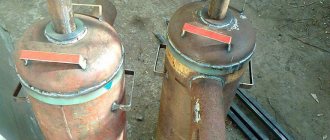
To begin with, it is necessary to mention that all the necessary materials can be purchased at scrap metal collection points. Also, many craftsmen believe that horizontal pipe bath stoves are less efficient and impractical. Therefore, it is better to create a vertical structure with a water tank at the top.
Drawing of the most popular design with a photograph of the finished product, to which minor changes have been made
Required materials and tools
In order to create a stove for a bathhouse from a pipe, you must have:
- welding machine, preferably gas;
- circular saw with cutting wheels for metal;
- measuring tool;
- a brush with metal bristles;
- hammer;
- thick-walled pipe with a diameter of 520-530 cm, a length of 1.5 meters;
- pipe with a diameter of 100 mm, a length of 2 meters;
- a thick sheet of metal from which four circles can be cut along the diameter of the pipe;
- heat-resistant paint.
Advice! It should be noted that all metal parts must have a good appearance, which would indicate that they are ready for welding. Otherwise, you may find through holes during the manufacturing process that were hidden under a thick layer of rust.
A variation of this device with a central placement of the water tank
Manufacturing
- In order for a pipe bath stove to function correctly, it is necessary to divide the pipe into several parts, each of which would have its own volume corresponding to its purpose.
- To do this, a pipe with a diameter of 530 cm is cut crosswise into three equal parts, 0.5 meters in each.
- Next, the manufacturing instructions involve creating a firebox.
- First you need to cut a circle according to the diameter of the hole, which is welded to the bottom of the first resulting element.
Drawing of a sectional device, for the manufacture of which a pipe can be used instead of a square
- Then a window is made on the side of the product through which fuel will be loaded. In order for pipe bath stoves to work efficiently, it is better to immediately equip them with small doors, which can be purchased separately.
- At the next stage, another circle is cut out and welded to the top hole of the firebox. In this case, a hole with a diameter of 90 mm must be made in the center. A hundred square pipe is welded onto it, which will serve as a chimney.
- It is worth noting that such pipe sauna stoves are not equipped with grates for collecting ash and, accordingly, with an additional door. However, if desired, such an element can be added to the design, but the height of the firebox must remain equal to 0.5 meters.
Finnish stoves are created using these manufacturing principles.
- There are drawings of a pipe bath stove that assume that the chimney pipe will be installed from the next chamber, but then many small holes need to be made in the upper circle covering the firebox. Some craftsmen consider this design more effective.
- Next, the second piece of thick-walled pipe is put on top and welded. The resulting chamber will contain stones that will be able to carry out uniform heat exchange in the room. At the same time, many manuals telling how to weld a stove from a pipe for a bathhouse advise not only equipping the compartment with a window, but also with a door. This is especially important if the exhaust pipe will be attached to it from above, and at its bottom there will be holes leading into the firebox.
Ready-made design with a graphical representation of all the necessary elements
- The upper part of this chamber is also made with a hole for the hundredth pipe, but in one case it is simply put on through it, and in the second manufacturing option, such a horizontal panel will be the basis for the chimney. All joints are also boiled, ensuring the quality of the seams. The fact is that with intense heating the metal will expand and this will be a serious test of this work.
- When using electric welding, some craftsmen advise using special electrodes that create a seam that is resistant to high temperatures and sudden temperature changes.
- At the next stage, a sauna stove made from a pipe needs to create a water tank. To do this, a third element is put on top of the structure, which was cut off earlier and carefully welded. This will be a reservoir for water, and it will be heated not only due to the thermal conductivity of the metal, but also using the gases released during combustion, which will rise up the chimney.
A step-by-step process for creating a horizontal device, where the pipe is replaced with an old gas cylinder
- After this, we make a convenient lid with our own hands that covers the surface of the tank, going around the bath pipe coming from the stove firebox. It doesn't have to be made of metal. A wooden board made of boards is quite suitable as a cover.
- Some craftsmen suggest installing a faucet on the bottom of the tank so that you can pour water into the bucket without exposing your hands to danger when coming into contact with steam.
- At the final stage, the finished product is treated with a brush with metal bristles and covered with a layer of heat-resistant paint. It should be said right away that its price is quite high, but if you want to give the structure a good appearance, then such expenses are completely justified.
Drawings and photos of a horizontal stove made of pipe 530
Very often, a 530 diameter pipe is used to make a sauna stove. It allows for longer combustion of wood, significantly increases the performance of the stove, and is generally more convenient to work with. Therefore, photos and drawings of a stove for a bathhouse made of pipe 530 in horizontal format will be useful to you if you decide to build this type of building. Below we offer you popular options that have been tested in practice.
How to choose a pipe?
Above we have already encountered digital designations for pipe sizes. Now let's take a closer look at what they mean and how to effectively use this information for further purposes.
In specifications, round steel pipes are always classified by internal diameter; The 2nd number indicates the wall thickness, and the following symbols, if any, indicate the type and special characteristics. For profile pipes, the first 2 digits are the maximum cross-sectional dimensions, then the 3rd is the wall thickness. The default units are millimeters; others are indicated explicitly. For example, “body - pipe 530x10” means that it is made of a pipe with an internal diameter of 530 mm and a wall thickness of 10 mm, i.e. the outer diameter of the workpiece will be 550 mm plus or minus 5.3 mm, because The tolerance for the diameter of a regular pipe is 10% of the internal diameter. The tolerance is mainly spent on the ellipticity of the pipe.
Further, the wall thickness can be different. Water pipes are produced in lightweight, regular and reinforced types. But, for example, the most common pipe 530 is produced with walls thickness from 6 to 12 mm in increments of 1 mm; the most common denominations are 6, 8 and 10 mm.
Why know all this? To choose the right blanks for the oven. The optimal diameter of a household stove is about half a meter, this allows you to get both good heating technology and sufficient ease of use. And for pipes from 500 mm, the nominal pitch of standard sizes is 10 mm, i.e. there are pipes 500, 510, 520 and 530; large ones are considered to be large-diameter pipes. That is, by selecting workpieces of different diameters and with different wall thicknesses, you can create a concentric structure, the parts of which will telescopically fit into each other with a minimum gap. And typing in the search, say, “buy steel water pipe 510x8 cuttings” is easier than bending a shell from an 8 mm sheet, isn’t it?
GOST 10704–91 (straight-seam steel pipes) and GOST 20295 85 (steel pipes with a spiral seam) specify the pipe diameter from 1 mm; The steps of the dimensional grid for different ranges of standard sizes are of a recommendatory nature. Pipe is one of the most popular products in general, and it would be simply stupid to regulate them scrupulously. In the range of 250-400 mm, the range of pipe sizes produced is very extensive. Let’s see below how this circumstance is used in amateur pipe and furnace projects.
Vertical oven - step by step
- prepare the base - a pipe fragment up to approximately 0.9 meters;
- Weld a circle of metal sheet to the bottom of the pipe - it should be equal to the diameter of the pipe;
- cut a hole for the ash pan, its maximum width is no more than 0.2 meters;
- weld a round plate with a pipe diameter, cut out the middle and weld rods onto the hole - this will be the grate;
- decorate the combustion chamber by cutting out a small rectangle above the grate and seal it with a metal door;
- Again, cut a hole above the firebox, weld rods for the grate and hang the door;
- weld the body with a round piece of metal, do not forget about the holes for the chimney and ash pan;
- The traditional finale is sequential sanding of the entire body and painting.
To help you, there are drawings and photos that will help you make your own stove for a bathhouse from a pipe in full compliance with all safety standards. By the way, don’t forget to do the first warm-up in the fresh air - this way you will avoid fumes from the paint you used getting into your respiratory tract. After all, many polymer compounds are frankly harmful to your health. Remember that an iron stove made of pipe is best lined with brick. This way it will be better to retain heat in the steam room, and the air will be protected from those substances that are released into it when the iron warms up.
DIY methods
When deciding to independently make a stove for a bathhouse from a pipe, it is worth considering that there is no need to talk about the stylish appearance of such a design. However, it fully fulfills its functional purpose, quickly and efficiently heating a steam room with a volume of up to 20 m3.
Structurally, sauna stoves, made by hand from steel pipe, are divided into vertical and horizontal. Each variety has its pros and cons. The main criterion when choosing one modification or another should be based on the area and layout of the steam room.
Horizontal arrangement
If it is fundamentally important to preserve free space in the steam room, you should choose a vertical design. But a horizontal oven has several obvious advantages:
- convenient location of the firebox;
- optimal height for the heater due to the small height of the structure itself;
- excellent heating of stones and water tank;
- the light weight of the structure allows it to be installed in the center of the room on an ordinary steel sheet, 8 mm thick, subject to insulation 20 mm thick;
- uniform fuel distribution.
The material for making the horizontal structure can be a pipe with a diameter of 50 cm or an old gas cylinder.
The peculiarity of this stove is that it perfectly heats all areas of the steam room, except the floor.
Vertical arrangement
Vertical pipe stove
The level of heat transfer and burning time of a vertical stove into a bathhouse from a pipe is lower than that of a horizontally installed structure. This is due to the fact that thermal energy tends upward without having time to warm up the metal walls.
The rate of fuel combustion inside a vertical structure can be reduced by closing the ash pan door and thereby limiting the access of oxygen to the firebox. Another drawback is that in a vertical stove the fuel burns entirely at once, while in a horizontal stove it burns gradually, ensuring uniform heating of the room. The advantage of the vertical design is that the stones are heated more intensely and more saturated steam is produced.
The efficiency of a horizontal furnace is higher, so choosing such a design is more advisable. To give the stove an aesthetic appearance, it can be lined with brick, painted or blued.
When choosing a composition for painting a metal surface, its heat resistance should be taken into account. Paint will solve the issue with the appearance of the stove and protect the metal from corrosion. The heat transfer is affected by the texture and color of the composition - a matte dark surface transfers thermal energy better than a smooth glossy surface.
Heated metal emits scalding infrared radiation. Brickwork will protect you from it, as it will absorb heat and gradually release it into the room.
There are several options:
- with the help of continuous cladding, the stove can be made aesthetically attractive, but to some extent its heating efficiency will decrease;
- You can increase heat transfer and create more comfortable conditions in the immediate vicinity of the stove using a small brick heat shield;
- Universal options include the device of convector cladding with vents.
The treatment of a metal surface with special chemical compounds is called bluing. This decoration method provides, in addition to an aesthetic appearance, reliable protection against corrosion.
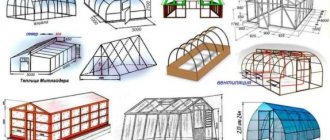
Features of the drawing
Drawing for self-production
To choose the right way to locate the stove in the steam room, it is first recommended to draw a drawing of the room and the structure itself in order to understand how much space is required to place it.
Drawings and photos of a vertical stove made of pipe 530
As with the horizontal format, the 530-diameter labor is ideal for use if you are making the oven yourself rather than enlisting the help of a professional. A stove for a bathhouse made from pipe 530 vertically will help you make drawings with all the necessary markings. Needless to say, this makes your work much easier, because the most difficult thing is to make the necessary markings. Of course, the proposed options are not an axiom. You are also free to make necessary changes to them. With one condition - if you really know what you are doing!
Important Tips
- To prevent heat from leaving the stove container, an opening valve is installed on the edge of the chimney.
- A fire can be caused by a huge accumulation of soot. To do this, two holes are drilled in the pipe. Steel tubes are inserted into them and turned towards the pipe. This prevents the appearance of soot. The fuel will burn completely, and soot accumulation will be minimal.
- After completing the construction, it must be checked for holes, gaps and cracks.
- There should be no objects around the stove that are susceptible to fire: synthetics, wood and fabric.
- All cut edges of pipes and metal sheets must be cleaned of sharp edges to avoid cuts. If you do not have experience in correctly installing a chimney, then it is better to contact specialists.
- The installation of this furnace should be done on a finished concrete foundation, its height is 250-300 mm. Brickwork with clay mortar is laid on it in one or two rows. A brick screen will protect the walls from overheating.