Everyone who is at least a little “in the know” understands that a dacha without running water is like a man without... two golden hands.
But in addition to hands, you also need a golden head in order to decide on the type of materials needed, calculate their required quantity, and figure out how to install and lay pipes.
It is advisable to stock up on gold “magarych” (aka “bubble”) for yourself and two assistant friends, because the work is painstaking, labor-intensive, and time-consuming.
In this article I will tell you how I chose pipes for my site, what I was guided by, and what I came to in the end.
The story was sent by blog reader Andrey.
Types of Home Piping
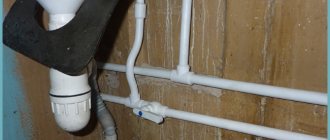
Depending on the location, communications can be internal or external. Street pipelines are most susceptible to freezing, and if the owners left for the winter and did not drain the water, home systems may also freeze.
A typical water supply design in private buildings consists of a well or a well, an underground pipeline connected to internal communications. The source of water supply can be a central pipeline or a common well for several houses.
Water pipelines are made of various materials: steel, cast iron, thermoplastics, chrysotile cement, fiberglass, etc. The most popular pipes in private construction are polypropylene, polyethylene, and metal-plastic pipes. They are durable, inexpensive and easy to install.
Why do pipes freeze?
The risk of water freezing in the pipeline exists regardless of the material of manufacture. But in steel structures, active ice formation begins earlier than in plastic ones. This is due to the high thermal conductivity of the metal, which cools much faster in the cold.
Freezing of water in a pipe is observed at temperatures from -7°C. Provoking factors:
- laying the pipeline above the soil freezing level or in the open air;
- non-compliance with the slope, due to which the pipes are constantly in a filled state;
- improperly functioning taps, taps and valves that delay the outflow of water.
A very unpleasant phenomenon is pipe rupture, which is caused by the expansion of water during the transition from the liquid phase to the solid phase. In this case, you have to replace the damaged area, which is not the easiest thing to do in low temperatures.
What to do with the pond
Another problem that causes a lot of trouble for dacha owners is winter conservation of the pond.
In autumn, when the leaves fly off the trees, it is necessary to stretch a fine mesh over the pond. Of course, the yellow and red leaves carpeting the pond are beautiful. But they settle and begin to rot, causing the area to smell like a swamp. Therefore, it is better to prevent large quantities of leaves from falling into the swamp.
Of course, leaving a pond at the dacha in winter, you need to remove all algae and fish from it - it is better to move them to an aquarium or other suitable containers for the cold season. Otherwise, when the pond freezes, they will simply die.
As frost approaches, you need to reduce the amount of water - leave no more than a third if the pond is of natural origin (not equipped with waterproofing, and the walls are not tiled).
When a crust of ice (3-5 cm) appears on the surface, you need to cut through it so that some of the water comes out, forming small voids that will prevent excessive pressure on the walls. You can take several empty two-liter plastic bottles (at the rate of 1 bottle per 1 square meter of pond), fill them with sand (about a quarter) and throw them into the water. In this case, the pressure of freezing water will be compensated by the voids in the bottles - the water will compress them, reducing the volume of the bottles, which will also reduce the pressure on the bottom and walls.
Correct styling
Proper installation will help avoid serious problems such as water freezing, loss of permeability and pipe rupture. The basic requirements are specified in SP 31.13330.2012, which also apply to private housing construction.
Depth
According to building regulations, it is recommended that water pipes be laid below the ground freezing level. Based on the results of long-term observations, special maps or tables are compiled in the coldest months of the year.
The depth of the pipeline depends on the climatic conditions in the region and the composition of the soil at the site. Loams and clays freeze less than sand or rocky soils. So, in the Moscow region this value is in the range from 1.35 to 2 m, in the Krasnodar Territory - 0.3-0.5 m, in Surgut 2.2-2, 9 m.
Slope
When laying, you must strictly observe a reverse slope of at least 0.001 towards the well or insertion point. On flat terrain it can be reduced to 0.0005.
This means that the height difference for each linear meter of length should be at least 0.5-1 mm. Even with such a small slope, the water will spontaneously flow back into the well or main line and will not stagnate, creating conditions for the formation of ice.
How much does it cost to lay a winter water supply system per 1 linear meter?
installs water supply in:
— Moscow and Moscow region.
— St. Petersburg and Leningrad region.
The cost of laying a pipeline that can be used in winter depends on the region: in St. Petersburg the price of this service is 1000 rubles per linear meter, in Moscow - 1300 per linear meter. The difference in price is due to the difference in labor costs.
We dig water mains mostly by hand. This is cheaper for the client, and besides, the equipment does not damage the site. This is especially important if it is already landscaped.
How to avoid freezing pipes
But what if it is impossible to bury the pipe below the freezing depth? For example, the site may have rocky soil that is difficult to develop. Also making it difficult to penetrate are structures buried in the ground - reinforced concrete slabs, foundations, communication routes that cannot be penetrated or bypassed.
The most common reason is high groundwater level. The soil on the site can be so damp that water begins to appear literally at a depth of two shovels. It is not possible to dig a 1.5-2 m trench and lay a pipe there.
Important. For these cases, various methods of installing a pipeline with insulation are provided. They will help prevent water from freezing even when laid at a very shallow depth.
Thermal insulation with “shells”
Manufacturers produce shells for pipe insulation from various materials - polyurethane foam, foamed polystyrene, mineral wool. PPU and PPS shells are used for laying in the ground. They reliably protect structures from freezing, do not rot, and do not corrode in a humid, aggressive environment.
For ease of installation, some products are equipped with a tongue-and-groove lock. An additional outer layer of foil reflects heat rays and reduces the likelihood of channel freezing.
“Shells” are produced in a wide range of sizes and shapes, so choosing suitable thermal insulation for communications, even of complex configurations, is not difficult. During installation, the shell is placed on the water conduit and additionally secured with fastening tape.
"Pipe in pipe"
This method is often used when laying pipes outdoors: at the entrance to the house or between nearby buildings, for example, a cottage and a bathhouse. The method provides not only good thermal insulation, but can also be useful if an ice plug has formed in the water supply. Hot water is poured into the gap between the pipes and patency is restored in a matter of minutes. Everything is convenient and practical - no need to look for a blockage or dig a hole in frozen soil.
For installation using the “pipe in pipe” method, non-pressure plastic sewer pipes with a diameter of 110 mm are used. The water pipe can first be wrapped with thermal insulation, and then inserted into the channel. A good insulating effect is achieved by using polyurethane foam (polyurethane foam), which is pumped into the gap between the pipes, having previously made holes along the length every 30-35 cm.
To minimize heat loss, the design is made even more multi-layered. It may consist not of 2, but of 3 pipes. If in such a “box” you additionally install thermal insulation from some porous material, for example, foam rubber or a substrate for laminate flooring, the pipeline will not freeze even in the most severe frosts.
Foil materials
Effective thermal insulation of water supply and sewerage systems - cylinders laminated with foil or foamed polyethylene films with a metallized layer. The materials reduce heat transfer to the surrounding space by reflecting infrared rays from the metal surface into the pipe.
Method two. We thermally insulate the upper ring of the structure
Every specialist will tell you that in order to prevent freezing of a well, you need to reduce the thermal conductivity of its upper ring. This method of thermal insulation is performed in two ways:
- by means of polystyrene foam;
- using polyurethane foam.
Let's look at the first method first.
We use polystyrene foam for the ring “under a fur coat”
Here you should prepare the following consumables for work:
- polyurethane foam;
- paint;
- plaster;
- insulating blocks made of polystyrene foam, which are connected using a tongue-and-groove system.
On a note! According to this technology, the first ring on top will be completely insulated, while the second only partially. Now to work!
Step one. Work should begin with preparatory activities. Dig a pit 20 centimeters wide and approximately 0.5 meters deep around the ring. Then thoroughly clean the surfaces from dirt and install the first “fur coat” ball. At this time, make sure that the density of all connections is maximum! Blow out the joints with foam to seal them. Having finished with the first level, proceed to assembling the second and gluing it to the ring. Blow out the gaps that have formed between the layers with foam.
Step two. Next, begin plastering the surface of the rings. This will protect the foam from the negative effects of the sun's rays, which, as we know, worsen the thermal insulation properties of this material. After the plaster has completely dried, apply paint to it - this will prevent the finish from getting wet.
Step three. All that remains is to fill the pit and thoroughly compact the earth.
Penoplex, we insulate the foundation reliably and correctly
We recommend that you read our article on insulating the foundation yourself. You can find out more here
We use polyurethane foam for the ring “under a fur coat”
If you chose polyurethane foam as insulation, then follow these steps. First, dig a similar pit (as in the previous method of insulating a well for the winter), and then build a wooden frame around the first ring. But this is in general terms; let’s analyze the procedure in more detail. Prepare the following materials for work:
- paint;
- dowels;
- polyurethane foam sprayer;
- collapsible metal formwork;
- plaster;
- a piece of plastic film;
- wooden bars.
Step one. Traditionally, start by digging a pit, but narrower (maximum 10 centimeters). After this, install bars around the first ring in increments of approximately 40 centimeters. Cover the edges of the trench with formwork made of thin sheet steel, which will exactly follow all the contours. Cover the formwork with the prepared film. For what? This is explained by the fact that the adhesion of foam plastic is very significant, and therefore dismantling the formwork is impossible.
Step two. Having finished building the formwork, you will notice that a void has formed between it and the ring - this is what needs to be filled with insulation. Upon completion of pouring, the polyurethane foam will increase in volume, and the trench will therefore be filled as densely as possible.
After this, you need to wait until the material is completely dry. As soon as this happens, dismantle the formwork. Plaster the finished surface and apply a layer of paint to it. Fill the void left after formwork with earth and compact it thoroughly.
On a note! It is also advisable to cover the well with a lid, which was described in one of the previous paragraphs of the article.
Anti-freeze taps
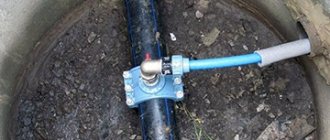
A common reason for the lack of water in the pipeline is a frozen tap. This is especially true if water for domestic needs in winter must be collected from the yard or used for irrigation during periodic frosts. A tap that is installed in the ground is called a hydrant. It is a piece of pipe up to 1.2 m long with a lever at the top and a valve at the bottom. There is another pipe of smaller diameter inside.
One end of the hydrant is connected to the water main, the other is above the ground and serves to supply water. When the handle is lifted, the valve of the inner tube, connected to the lever via a rod, is activated. After lowering the handle, the valve shuts off the access of water, and the remaining water flows through the external pipe back into the water supply. This way, no liquid remains in the hydrant, which means there is no risk of it freezing.
The design and principle of operation of a tap connected to a home network are similar to an underground hydrant, but with some differences. The structure is laid in the wall. At the outer end there is a valve and spout, at the other end there is a check valve with a stem. Product length from 15 to 60 cm for walls of various thicknesses. Since the shut-off valve is located in the positive temperature range, the faucet does not freeze even in severe frost.
By turning the valve, the valve opens and water flows into the spout. When the handle is rotated back, the pipe lumen closes. The remaining liquid is spontaneously removed and the pipe remains empty.
No. 4. Defrosting by supplying hot water through a hose
When the frozen area is in sight, it is enough to pour hot water directly on it. Through simple deductions, we can come to the conclusion that if the blockage is located far from the house, then it is necessary to somehow deliver hot water to the place of icing. Simply pouring hot water into the pipe is not very effective - you will have to get a little confused. This method is applicable to plastic pipes, when you cannot simply take and pass current through them, as through metal.
The procedure is as follows:
- remove the shut-off valves;
- prepare a rigid hose or pipe with a diameter smaller than the water supply. For example, for a pipe with a diameter of 25-32 mm, a metal-plastic pipe with a diameter of 16 mm is suitable. This is if the section is completely straight. If there are turns and bends, then you will have to take a hose that can bend, but is also quite rigid. You cannot take a regular hose for watering - it may not withstand exposure to hot water and will soften, so it will be more difficult to push it through. You can take an oxygen hose or a hose that is usually used to connect gas cylinders. True, it can only be stretched 10-15 m from the input - it is too rigid and heavy. An alternative is to use a flexible hose with wire attached;
- insert the prepared hose or metal-plastic pipe into the pipe until you hit the ice;
- a container can be attached to the outer end of the hose from which hot water will be supplied. If you attach a faucet to it, it will be much more convenient. However, you can also pour hot water through a funnel, but this is not very convenient;
- instead of simple hot water, you can use a salt solution - it freezes at a lower temperature, so the work will go faster;
- melt water will flow out through the gap between the pipe or hose. Prepare a container for collecting it in advance;
- as the ice plug melts, it will be possible to lower the metal-plastic pipe or hose deeper.
When the work is completed, all that remains is to assemble the pipeline and install shut-off valves. To prevent re-freezing, ensure constant movement of water through the pipeline, at least with low pressure. The heating cable can be lowered into a straight pipe.
Hydro level method
A variation of this method is to use a construction hydraulic level of the required length. The method is suitable if there are 2-3 elbows in the pipe and the distance from the house to the frozen area is 20 m. A wire is tied to the end of the hydraulic level with electrical tape. Both need to be leveled a little in advance. There should be no wire sticking out from the end that will be immersed in the pipe. It is better to let it be 1 cm shorter than the hydraulic level.
The hydraulic level is pushed inside the pipe until it hits the ice. Hot water (or saline solution) can be supplied using an Esmarch mug, popularly known as an enema. When you hit the ice, you can start supplying water. To simplify, we give the pipe an enema. We collect the melt water in a basin or bucket, and as it thaws, we move the hydraulic level.
The good thing about this method is that the hydraulic level tube is quite thin, so it fits well into the water pipe, and it can easily navigate turns. The average speed is 1 meter of ice per hour.
Features of highway installation
The winter water supply system is characterized by the following features of its functioning:
- The dacha system must be equipped with equipment for its conservation. If the owners need to leave for a long time, the liquid is simply drained from the pipes. This helps prevent the water pipe from freezing.
- It is important to lay pipes only below the freezing level of the soil or to provide high-quality insulation.
- When installing the main line, it is important to maintain the slope from the house to the source (well). This will ensure free flow of water and protect the pipes from stagnation.
- It is advisable to use a heating cable, which will additionally protect the water supply in the country from sub-zero temperatures.
Preparatory work
At the pre-installation stage, it is extremely important to draw up a diagram of the entire wiring. This will allow you to purchase the required footage of pipes and all the necessary components (fittings, taps, adapters). The location of pumping equipment and plumbing areas in the house must be marked on the drawing.
Preparation includes digging trenches for laying pipes. The channels are made wide enough to accommodate layers of insulation.
It is also worth deciding on the type of source - a well or a borehole. The following advantages speak in favor of the first:
- absence of blockages during prolonged downtime of the source;
- to pump water, you can choose a more affordable surface or submersible pump, but not an expensive deep one;
- Installing a well is always several times cheaper than installing a well.
It is best to install a winter water supply system in the summer or early autumn, when the groundwater level is as low as possible.
Products used for thermal insulation
At the moment, a wide range of insulation materials is used. Old blankets, padded jackets and sheepskin coats faded into the background, giving way to the means of a new generation. What properties do new insulation materials have:
- high level of heat retention;
- reduced heat transfer;
- resistant to hostile conditions, chemical or biological influences;
- maintaining high temperatures, which allows you not to dismantle the material in summer;
- convenient to use;
- long service life;
- increased water-repellent property.
Tools and materials
To lay a winter water supply at your dacha, you should prepare the following tools:
- bayonet shovel;
- a special soldering iron for polypropylene pipes (they are optimal for street water lines);
- roulette;
- hacksaw for cutting pipes;
- Screwdriver Set;
- sealant.
The following materials should be prepared:
- Pump equipment. It is advisable to choose a surface centrifugal pump and immediately equip it with a hydraulic accumulator.
- Required pipe footage. It is better to take polypropylene ones. They are as inert as possible to temperature changes, aggressive environments, rodents, and corrosion.
- Drain valve. Provides water drainage from the system. The drain valve is installed at the lowest point of the water supply near the pump. It is advisable to take an electromagnetic element.
- Hydraulic accumulator. For a family of 3-4 people, a capacity of 25-50 liters is sufficient. The membrane tank helps maintain constant pressure in the line. It is good if the accumulator is equipped with a pressure switch. It is this element that is responsible for the on/off cycles of pumping equipment.
- Connecting fittings. They are selected according to the number of turns of the highway.
- Stopcocks.
- Insulation (cable, polystyrene cylinders, mineral wool, etc.). It is needed if pipes cannot be laid below the soil freezing level due to the characteristics of the topography or soil composition - rocky rocks, etc.
When purchasing tubes, it is advisable to make a small supply - purchase 10% more than the designated footage. They will come in handy if you make mistakes during installation.
Installation stages
Work on installing a winter water supply system is carried out step by step:
- Land works. The bottom of the prepared channel must be compacted and a sand cushion 10-15 cm thick must be poured onto it. It is also compacted.
- Install pumping equipment. It is advisable to install the unit in an insulated caisson and on a special concreted platform. This will prevent it from vibrating.
- A hydraulic accumulator is connected to the pump. In this case, be sure to install a pressure switch.
- A hose and pipes are connected to the inlet and outlet pipes of the pump using fittings. The first is intended for drawing water from a well. The second is the immediate beginning of the pipeline.
- Stretch a line from the pump to the house or bathhouse. Pipe laying is done using a special soldering iron. To do this, one end of the pipe is inserted into a nozzle of the required diameter. The end of the coupling is put on the second part of the soldering iron. Hold for 3-5 seconds and join the two elements. It is important to insert the pipe into the fitting and turn them slightly. The molten polymer binds well, forming a strong, airtight connection.
- The pipes are insulated with the selected material. It is worth ensuring that the insulation is installed without gaps or cold bridges. Otherwise, they will cause condensation to appear, which will cause the system to freeze. At the time of laying the insulation, it is important to take care of its high-quality waterproofing or select a material that reacts inertly to water.
If mineral wool or polystyrene is used for insulation, it is advisable to cover them on top with a special coating of cement and broken glass. Otherwise, rodents may chew through the material in winter in search of warmth.
The last stage of installing a water supply system is backfilling it. The soil is laid loosely, without strong compaction. It is better to add more soil later when it settles than to compact the soil and risk breaking the entire system.
Method two. We thermally insulate the upper ring of the structure
Every specialist will tell you that in order to prevent freezing of a well, you need to reduce the thermal conductivity of its upper ring. This method of thermal insulation is performed in two ways:
- by means of polystyrene foam;
- using polyurethane foam.
Let's look at the first method first.
We use polystyrene foam for the ring “under a fur coat”
Here you should prepare the following consumables for work:
- polyurethane foam;
- paint;
- plaster;
- insulating blocks made of polystyrene foam, which are connected using a tongue-and-groove system.
On a note! According to this technology, the first ring on top will be completely insulated, while the second only partially. Now to work!
Step one. Work should begin with preparatory activities. Dig a pit 20 centimeters wide and approximately 0.5 meters deep around the ring. Then thoroughly clean the surfaces from dirt and install the first “fur coat” ball. At this time, make sure that the density of all connections is maximum! Blow out the joints with foam to seal them. Having finished with the first level, proceed to assembling the second and gluing it to the ring. Blow out the gaps that have formed between the layers with foam.
Step two. Next, begin plastering the surface of the rings. This will protect the foam from the negative effects of the sun's rays, which, as we know, worsen the thermal insulation properties of this material. After the plaster has completely dried, apply paint to it - this will prevent the finish from getting wet.
Step three. All that remains is to fill the pit and thoroughly compact the earth.
Penoplex, we insulate the foundation reliably and correctly
We recommend that you read our article on insulating the foundation yourself. You can find out more here
We use polyurethane foam for the ring “under a fur coat”
If you chose polyurethane foam as insulation, then follow these steps. First, dig a similar pit (as in the previous method of insulating a well for the winter), and then build a wooden frame around the first ring. But this is in general terms; let’s analyze the procedure in more detail. Prepare the following materials for work:
- paint;
- dowels;
- polyurethane foam sprayer;
- collapsible metal formwork;
- plaster;
- a piece of plastic film;
- wooden bars.
Step one. Traditionally, start by digging a pit, but narrower (maximum 10 centimeters). After this, install bars around the first ring in increments of approximately 40 centimeters. Cover the edges of the trench with formwork made of thin sheet steel, which will exactly follow all the contours. Cover the formwork with the prepared film. For what? This is explained by the fact that the adhesion of foam plastic is very significant, and therefore dismantling the formwork is impossible.
Step two. Having finished building the formwork, you will notice that a void has formed between it and the ring - this is what needs to be filled with insulation. Upon completion of pouring, the polyurethane foam will increase in volume, and the trench will therefore be filled as densely as possible.
After this, you need to wait until the material is completely dry. As soon as this happens, dismantle the formwork. Plaster the finished surface and apply a layer of paint to it. Fill the void left after formwork with earth and compact it thoroughly.
On a note! It is also advisable to cover the well with a lid, which was described in one of the previous paragraphs of the article.
Common mistakes when installing plumbing
Often, inexperienced craftsmen make a number of mistakes, which later turn into big problems. The main ones:
- No drain tap. Without it, the water supply of the dacha cannot rightly be called winter. Lack of regular drainage of water provokes the risk of freezing of the line. This will sooner or later lead to its rupture.
- Lack of slope or its wrong direction. In the first case, water will stagnate in the system, which can lead to freezing. In the second option, the liquid will flow not to the source, but to the house. When the taps are closed, it will remain in the part of the main that is closer to the building, and here it will freeze at sub-zero temperatures.
- Using the wrong materials and equipment: incorrectly selected pipes, insufficiently efficient pump, etc. If the tube material is incorrect (steel, PVC), the line may burst, corrode, or freeze. If the problem is in the pump, it simply will not supply the required volume of water to the family. This will consume electricity. The risk of equipment burning in such situations is high.
- Incorrect line depth. If the technician provided inaccurate data on the level of soil freezing in the region, but did not use insulation to heat the system, the line will most likely freeze when the temperature drops in winter. To find out the exact level of soil freezing, it is advisable to use SNiP tables or simply view information on the Internet.
- Lack of a drawing of the laid communication. In the event of an emergency and in the absence of a highway diagram, the master risks facing serious problems. You will have to completely excavate the pipeline to fix the damage.
Laying pipes below freezing depth
The depth of soil freezing will depend on the characteristics of the local climate.
It is recommended to lay the pipeline in the ground without additional artificial heating when it freezes at a depth of up to 170 cm. Laying a winter water supply system with your own hands at the dacha looks like this:
- it is necessary to dig a trench 25 cm deeper than the freezing point;
- sand 10 cm thick is placed on its bottom;
- Next, a technical pipe is laid with a diameter larger than that of the water supply; thermal insulation must fit in it;
- a water supply wrapped in a special heat-insulating material is placed in it;
- The ideal solution would be to use a pipeline without connections in hard-to-reach places; this will protect owners from possible unplanned repairs and unnecessary financial costs.
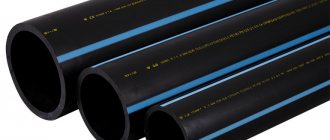
Among the pipeline materials, metal and its various alloys can be used, but low-density polyethylene is considered the most suitable. It does not corrode, freezes more difficult and clogs less.
If possible, the thickness of the pipeline walls should be as large as possible. The depth of soil freezing is calculated based on the temperature regime of the coldest days over the last decade.
Pipeline insulation
When laying winter water supply from your own water intake in the form of a well or borehole, a trench half a meter deep will suffice. The pipeline should be placed in it insulated.
To do this, a trench is laid at the bottom of the ditch made of brick or other building materials, into which the water supply is placed, wrapped in special building insulation.
The top of the gutter is covered with building material and filled with soil. It is necessary to provide waterproofing of the gutter, which will increase the service life of the water supply system. Annual plants are planted in this place, allowing, if necessary, access to the gutter.
There are two main types of insulation:
- special factory heat-insulating products for pipes corresponding to their diameter;
- insulating material produced in tapes or layers, which is used when wrapping the surface of pipes.
Insulation for water pipes
In the northern latitudes of our country, insulation of external pipelines is a necessity, which helps to avoid their freezing.
For high-quality thermal insulation, the following materials are used:
- expanded polystyrene, consisting of granules fused into a single layer, which has excellent thermal insulation characteristics;
- extruded polystyrene makes it possible to insulate the pipe and keep moisture out; it is one of the highest quality materials;
- polystyrene foam has good thermal insulation ability, but is considered fragile and is afraid of mechanical pressure;
- polyurethane foam is most often used in pipeline insulation work;
- foamed polyethylene is in sufficient demand;
- glass wool is well suited for pipeline insulation, but requires compliance with safety precautions when laying it;
- Rock wool has suitable thermal insulation properties, but is used in dry environments.
Before choosing a suitable material, it is necessary to review its performance characteristics and compare them with the installation environment of the water supply system.
Heating
When planning a winter water supply, it is important to understand that thermal insulation helps retain heat and reduce the cooling process of the liquid, but it is not able to raise the temperature in the pipeline. In severe frosts it may not be enough.
To solve this problem:
This allows you to make your own device for heating water and turn it on when the temperature drops significantly.
- a special cable is used to heat the pipe through which water is transmitted;
- depending on the choice, it can be laid along the pipeline or wrapped around it;
- to guarantee it, it is installed under thermal insulation, thus saving electricity;
- it is turned on only in cases of extreme necessity.
Artificial heating of the pipeline is a huge help when laying and operating it in the harsh conditions of the Russian winter. Thanks to it, it is possible to transport water at significant sub-zero temperatures without worrying about the condition of the system.
How to warm frozen water pipes 4 effective ways
When the outside temperature drops below normal and you notice that the water supply is frozen, do not rush to buy new pipes. There are proven ways to help you deal with this problem.
Using hot water
If you find or are 100% sure that a section of your water supply is frozen in an “open” place where you can use boiling water to heat the pipe, then use boiling water. Before doing this, take a rag and wrap the pipe around it. It will take all the water and increase the time the boiling water interacts with the pipe. Pour hot water until the ice completely melts. To speed up the process, you can turn on the tap.
Use a hair dryer
With the help of hot air from a hair dryer, the ice can be easily melted. Owners of such hair dryers recommend hanging plastic film over the heating pipe. This way, heat losses will be reduced significantly, which will allow the hair dryer to work more efficiently. You can also use a hair dryer with a steam generator.
Current
To do this, use a welding machine. To heat a pipe in this way, you need to connect one wire (plus) to one end of the pipe, and the second (minus) to the other end. In just a couple of minutes the ice will melt. The operating principle of this method is similar to a boiler. The advantage of using electric current is that only the water is heated. The transformer wires remain cold. This will prevent the plastic pipe from melting with the water. The downside of this method is that you need a transformer.
Find specialists
You don’t have to suffer on your own, but simply call professionals. They will have special means for warming up the ice. For example, a hydrodynamic installation. It cleans not only water pipes, but also sewer pipes. The installation supplies hot water under powerful pressure, from which the ice gradually melts. At high pressure, the ice in the pipe disappears very quickly.
Which method to choose is up to you. Consider your capabilities and ability to defrost the pipes yourself without incident. And if you doubt that you can do everything correctly, it’s better to call a specialist.
New technologies in insulation
Current developments provide the opportunity to lay a winter water supply from a non-freezing pipe manufactured using modern innovations in a factory environment.
It looks like this:
- The material used is a flexible polymer, which avoids unnecessary connections;
- a special insulation is installed on its surface that meets modern quality requirements;
- on top of the insulating layer there is waterproofing that can limit the pipeline from unwanted moisture;
- A heating cable is provided along the pipeline to maintain positive temperatures.
Such pipes are intended for laying in northern regions in conditions of significant temperature drops. They are capable of operating at temperatures not lower than -40°C. They can withstand a working pressure of 1.0-1.6 MPa, which is quite enough for the needs of domestic water supply.
Such pipes are produced with a diameter of 25-110 mm, which allows for the transfer of large volumes of water or other liquid. They are sold in coils of the required length, which makes it possible to lay a pipeline from the point of water intake to the point of water use without docking.