In order to redesign the gas supply system in a suburban area on your own or with the help of qualified specialists, you need to familiarize yourself with the safety requirements, prepare all the materials and coordinate the project. Read on for more information on how to move a gas pipe on site.
Gas pipes in a suburban area
Procedure for moving pipes on site
Is it possible to move gas supply pipes on the site yourself? Work on redevelopment of the gas system on your own or by qualified specialists is carried out in the following order:
- development and approval of the project in accordance with current safety requirements;
- purchasing materials and preparing a set of tools necessary to complete the work;
- direct transfer;
- checking the quality of work performed and putting the system into operation.
Obtaining approval
The first stage of redevelopment of the gas system is the development of the project and approval of the document.
Layout of the gas pipeline on the site
Where to contact? A project for a future gas supply system for a private home can be developed:
- independently, taking into account all safety standards;
- in any specialized organization;
- at the regional branch of the gas supply company.
The cost of specialist services will be determined based on:
- tariffs of the selected company;
- region;
- project complexity;
- list of additional services (development of estimate documentation, approval of documents, carrying out transfers on site, and so on).
To approve the developed project, you must contact the regional gas service and submit a written application, to which you must attach:
- copies of title documents for the house and garden plot;
- technical passport for the house;
- topographical photograph of the site indicating the location of buildings and communication systems (water supply, sewerage, etc.);
- copy of civil passport;
- transfer project;
- consent of neighbors, if the design documentation suggests moving the system with changes to a neighboring site;
- documents confirming compliance of the installed equipment with safety standards (passports, certificates, etc.).
Preparation
To complete the transfer work you will need:
- Bulgarian;
- welding machine;
- adjustable wrench;
- shovel, crushed stone, insulating material, if the pipeline is to be laid in the ground;
- supporting devices when laying an overhead highway;
- pipes and connecting fittings;
- shut-off valves, meters and other devices provided for by the project;
- materials for insulating threaded connections;
- flexible hoses for connecting a gas stove and other equipment;
- gas equipment.
Redevelopment of the gas supply system
The transfer process is carried out in the following order:
- gas supply shutdown;
Only employees of the service organization can disconnect a separate line from the central system. An application for disconnection must be submitted in advance.
- dismantling of pipes not provided for in the drawn up project. As a rule, the installation of external gas supply systems is carried out with steel pipes, the dismantling of which requires a grinder;
Removing unnecessary pipes
- purging of pipes (releasing accumulated gas). The work is being carried out to improve safety on the site;
- installation and fastening of new pipes and shut-off and control valves provided for by the project;
Construction of a new gas supply system
To connect metal pipes to each other, it is recommended to use a welding method characterized by the maximum level of reliability and tightness. Installation of fittings can be done using the threaded method with the mandatory use of sealing materials.
- equipment connection.
Validation and input
After all work has been carried out, it is necessary to check the tightness of the system and conduct a test run.
Checking the tightness is carried out using a regular soap solution and a sponge (brush), which must be applied to the pipe connections and fittings. Wherein:
if soap bubbles form on the surface when applying the composition, then a leak occurs in this place, that is, the system is not airtight;
Sign of poor connection tightness
the absence of bubbles indicates complete tightness of the gas supply system.
How to install gas pipes on the facade of a building, watch the video.
A test run allows you to determine whether the system can withstand the stated pressure.
Only after all checks have been carried out can pipes be buried (when laying an underground pipeline) and a work completion report required for putting the gas pipeline into operation, which is carried out by the regional gas service, drawn up.
Order pipeline repairs
provides a wide range of services related to pipeline repair. The work is carried out in accordance with industry standards and can be carried out within the city limits, at critical and dangerous enterprises.
The organization has a number of competitive advantages:
- Own fleet of equipment. Corporate vehicles are involved in repair operations. This eliminates wastage of time on equipment rental and allows you to begin repairs immediately.
- Professional approach. The company's employees are qualified specialists with the necessary knowledge and skills. The staff promptly solves assigned tasks and complies with the requirements of GOSTs and SNiPs.
- Carrying out work of any complexity. The organization participates in emergency and scheduled repairs. It is possible to restore multi-level sewer, water, heat and gas pipelines, replete with branches and fittings.
- Transparent price calculation. The cost of services is stated in the standard price list, the estimate is calculated according to the work performed. The company does not charge additional commissions or use increasing coefficients without objective reasons.
Assistance in filling out an application for repair of pipelines, replacement of their components and sections is provided by in-house consultants. They inform about the parameters of services and offer solutions that meet the client’s requirements. You can contact specialists by phone, e-mail or electronic form on the website.
Cooperation with responsible contractors is a guarantee of high-quality repairs at minimal financial costs.
Get specialist advice
Preparing to move pipes
After agreeing on and paying for the estimate, you can expect the arrival of a specialized team (as a rule, they arrive within 5 days). Of course, qualified specialists will do the work quickly and efficiently, but it makes sense to speed up and simplify the work to the limit.
In order for everything to go smoothly, it is worth making preparations, which boils down to the following points:
It wouldn’t hurt to call the craftsmen and find out if they need additional consumables in order to simplify the work process as much as possible and minimize the amount of unnecessary running around; The room in which new pipes will be dismantled and installed must be cleared so that all necessary areas have free access; All objects and surfaces that will remain in the kitchen should be covered with tarpaulin or burlap (it is important to choose non-flammable material to avoid fire); Immediately before starting work, the gas pipeline valve is closed.
Input - gas pipeline
Gas pipeline entries are tested separately from the internal gas pipeline network.
Gas pipeline entries are made with a slope of at least 0,003 m towards the street network directly into those premises where gas is consumed. A siphon is installed at the lowest point of the gas pipeline to collect and remove condensate. Through rooms in which gas is not used, only welded gas pipelines can be laid, which should not have valves or other fittings. It is prohibited to install inlets and lay gas pipelines through warehouses of explosive and combustible materials, basements and rooms of explosive and flammable production facilities, electrical distribution devices and substations, ventilation chambers and rooms in which the gas pipeline will be subject to corrosion (slag pouring rooms, etc.), as well as rooms , inaccessible for inspection. Shut-off devices are installed at each gas pipeline branch from the manifold to the unit, in addition to the shut-off device installed at each burner. A meter for measuring gas consumption is installed after the valve at the entrance to the building.
Gas pipeline entries into residential buildings must be provided in non-residential premises accessible for inspection of gas pipelines. In existing residential buildings owned by citizens as personal property, it is allowed to enter a gas pipeline into a residential building where a heating stove is installed, provided that the disconnecting device is located outside the building.
Gas pipeline entries into public buildings should be provided directly into the room where gas appliances are installed, or into corridors.
Gas pipeline entries should not pass through foundations or under the foundations of buildings. It is allowed to cross the foundation at the inlet and outlet of hydraulic fracturing gas pipelines.
Entry of gas pipelines into technical undergrounds and technical corridors and distribution through these premises in residential buildings and public buildings is allowed only when external low-pressure gas pipelines are connected to them in intra-block collectors.
Gas pipeline entries can be made into staircases and directly into rooms where gas appliances are located. It is prohibited to install inputs into pump and engine rooms, ventilation and elevator chambers and shafts, waste bins, electrical distribution devices and storage rooms.
The gas pipeline entry into a residential or public building is installed in staircases, kitchens, corridors and other non-residential premises accessible for inspection. In technical undergrounds, basements and technical corridors, the laying of liquefied gas pipelines is not allowed.
Gas pipeline entries into residential buildings are arranged underground through the foundations of buildings (Fig. 203, a) - underground entries, above ground level through the base (Fig. 203, b) - base entries and through the building wall above the base - above-ground (overground) inputs.
Gas pipeline entries into residential buildings are usually made into stairwells. It is allowed to install inlets directly into kitchens, as well as enter and lay gas pipelines in basements (except for liquefied gas pipelines), provided that technical corridors and underground areas are installed that meet the requirements of Gosgortekhnadzor.
Gas pipeline entries are tested separately from the internal gas pipeline network.
The entry of gas pipelines into public buildings, buildings of public catering establishments and public utility facilities is arranged in staircases or in rooms where gas appliances are installed.
Gas pipeline entries into public buildings, public catering establishments and public utility facilities are installed in staircases or in rooms where gas appliances are installed. Entrances to the workshops of industrial buildings and utility enterprises are arranged directly into the premises where the gas-consuming equipment is located, or into an adjacent room connected by an open doorway.
Gas pipeline entries should be made, if possible, directly into the room in which the units using gas are located.
Gas pipeline entries into residential buildings are usually laid along staircases. When connecting the input to the riser of the staircase, a crane is installed at a height of at least 1 5 - 1 8 m.
Polymer pipelines
The polymer material used for the production of gas pipes is able to withstand high temperatures and pressures.
HDPE (low-density polyethylene) pipes are most often used for laying underground gas pipelines. To connect individual sections of polyethylene gas pipelines, the butt method is used.
It consists of heating the end of each section of the gas pipe and then connecting them under a certain pressure. Thus, an interatomic connection of the gas pipe material is made.
A fairly new variety, very simple and in demand. High qualifications are not required to perform the work. The welded joint can withstand pressure of no more than 40 atm.
When assembling large-diameter pipelines, special equipment is used; for assembling small-section pipelines, hand tools are used.
Regardless of the thickness of the gas pipes, work is carried out in one way. Strong heating takes place. Then squeezing and getting a joint. Small diameter pipes are connected using electric couplings. The heating temperature of the edges is no more than 2700.
SNIP rules
In case of violation of installation rules, serious penalties may be applied to apartment owners.
According to the current SNIP, there are certain rules and regulations that should be taken into account when implementing or planning gas pipeline reinstallation:
- The distance of gas pipes that are laid openly indoors to any other structures or communications should take into account the further possibility of repair, replacement or preventive work with them.
- It is prohibited for gas pipelines to intersect with door or window openings, as well as ventilation.
- The distance between such pipes and any wired communication means must be no less than that established by safety regulations.
- The minimum distance that must be between the gas pipeline and any types of power supply communications must be observed in accordance with the PUE.
- When gas pipes are laid open, brackets, hooks, hangers or clamps should serve as fastening elements. Moreover, the distance between them is also defined in SNIP.
- To lay a liquefied gas pipeline, a prerequisite is the presence of a slope, which should be 3 percent or more
Please note: if a meter is installed in the apartment, the slope will be calculated from it.
Home gas line pressure
The nominal gas pressure for a home gas pipeline should be in the range of up to 2 mPa ÷ 1000 (artificial gas) – up to 3 mPa ÷ 1000 (natural gas) – up to 4 mPa ÷ 1000 (liquefied gas). Main gas pipelines can have a pressure of 0.1-0.6 MP. The gas pressure is reduced before it is supplied to the internal gas pipeline of the house using a house gas control point (DRP).
The DRP is mounted on the wall of the house in a cabinet or on the site in a cabinet raised on a fireproof platform, with a separate grounding.
Pros and cons of steel gas pipes
Steel products have high physical properties. Despite this, during application, shortcomings are identified that can affect the service life and operating conditions of gas pipes in apartment buildings.
| Advantages | Flaws |
| high level strength | complications when dismantling large areas |
| Suitable for indoor and outdoor use | inability to bend the product in the required place |
| suitable for above-ground and underground installation | large mass of elements |
| ensure uninterrupted supply due to the tightness and reliability of welding seams | lightweight thin-walled products tend to form condensation |
To facilitate installation and construction work, pipes made of polymer materials are being put into operation in some sections of gas pipelines. They have their own advantages and disadvantages. They are identified by comparison with steel structures of this type:
Unlike steel pipes, polypropylene pipes are easy to install. The service life of such pipes can reach up to 80 years. They can only be used in cases where the gas pressure does not exceed 1.2 MPa.
The diameter of polypropylene pipes used for gas wires varies from 20 to 400 mm. Pipes are characterized by increased throughput compared to steel.
The main disadvantages are:
- deformation when heated above 80 degrees;
- damage due to seismic activity or low temperatures;
- destruction of the structure under the influence of ultraviolet rays.
When using gas pipes in residential premises, you must follow the operating rules:
- laying gas pipes is impossible in air ducts and ventilation shafts in apartments;
- pipes should not block door or window openings;
- access to pipes cannot be blocked by wall panels or decor of complex dismantling;
- the distance to the floor surface from the gas pipe must be at least 200 cm;
- installation is carried out in residential premises, the height of which is not lower than 220 cm;
- the finishing of ceilings and walls in areas of access to gas pipes should not contain flammable materials;
- welding is used for connection; an open approach for inspection and access is provided at the connector points;
- the location of the pipes relative to the electrical wiring must meet pre-established safety requirements in a particular residential area;
- pipe connections are provided for kitchens equipped with gas stoves that meet safety standards;
- the distance from the slabs to the walls must be at least 7 cm;
- residential premises in which gas stoves, gas water heaters or heating boilers are installed must have ventilation outlets;
- the gas pipeline system should not be located near cooling devices;
- When fixing the gas pipe to the wall, specially provided devices are used.
Rice. 2 installation of a gas supply system in the apartment
According to SNiP (the standard established for construction organizations), there are requirements for the physical properties of the gas pipeline and the dimensions of structures:
- The thickness of the wall of the wired product should be about 3 mm for laying underground, the thickness of the wall for laying above ground should be at least 2 mm;
- the diameter of steel products for gas pipelines can be from 15 to 100 mm;
- the throughput of such products ranges from 3 to 12 atmospheres, the indicator depends on the location of passage.
Pipes that reach 12 m in length are usually called measured pipes. Unmeasured pipes are those that exceed this level in length.
There are pre-established standards that calculate the service life of steel products for gas conduction. Steel structures have an approximate lifespan of 30 years. The period may be influenced by the presence of external factors. Special conditions create risks of reduced service life.
Signs by which you can determine that pipes need replacement
Before moving on to the replacement process, utility services conduct appropriate examinations and measurements. Based on the actions taken, protocols are drawn up, and gas pipeline products are prepared for replacement.
Rice. 3 gas meter in the apartment
Based on the inspection results, replacement is necessary if:
- there was a thinning of the walls above normal;
- there has been a change in the welding connections;
- There is a gas leak according to meter readings.
Safety regulations
How to move gas pipes in accordance with the standards for the safe use of gas supply systems? When laying external gas pipelines, you must be guided by the standards of SNIP 42-101-2003, which imposes the following restrictions:
- The distance from the house to the gas pipeline varies depending on the category of the system:
- high-pressure gas pipelines belonging to categories I and I-a must be located at a distance of at least 7 m from buildings;
- medium pressure (II category) – 4 m;
- low pressure (III category) – 2 m;
Categories of gas pipeline systems depending on internal pressure
- It is not allowed to lay external gas supply pipes at a distance:
- less than 500 mm from windows and doors;
- less than 200 mm from the roof of the building;
- in relation to other communication systems, the gas pipeline is located according to the table below.
Rules for the location of gas pipelines relative to other communications
It is also necessary to take into account that any gas pipeline, including domestic ones, has a security zone in which the following is prohibited:
- construct buildings, utility rooms and other structures;
- install fences and other barriers;
- equip cesspools;
- dig up the ground to a depth of over 300 mm;
- store toxic and flammable substances;
- light a fire.
Warning sign about the passage of the gas pipeline and the size of the security zone
The size of the security zone also varies depending on the category of the gas pipeline. The following regulations are currently in effect:
- 2 m for category III systems;
- 4 m for pipelines belonging to category II;
- 7 m for high-pressure gas pipelines of categories I and I-a.
The security zone can be increased if:
- the gas pipeline is made of polyethylene pipes (maximum 3 m on each side);
- the pipeline is laid in permafrost conditions (up to 10 m);
- the system is located on the territory of forest fund lands (up to 3 m);
- the gas system runs along the bottom of the reservoir (up to 100 m).
In accordance with these standards, specialists develop an individual redevelopment project.
How to properly obtain permission to carry out repair work?
Before cutting a gas pipe or carrying out any other manipulations with this system, you must obtain a special permit from the relevant government authorities. This requires:
- Contact the gas supply service at the place where your house or apartment is registered.
- The owner of the property must write a corresponding statement. It indicates what needs to be changed.
- The apartment or private house where work is planned should be visited by a gas service specialist.
- The master assesses the place where the specified repair work is planned to be carried out and gives a conclusion.
- After agreement with the regulatory authorities, you can contact the company to draw up an estimate for the work being carried out.
- After drawing up an estimate, it is agreed upon with the homeowner, who must give his consent to the repairs.
- If all documents are in order, you need to pay for the repair team.
In any case, we must not forget that if it is impossible to change the existing pipe configuration, there is an alternative way to solve the problem. To disguise unaesthetic elements of the gas system, you can order special boxes. They will hide ugly details from the eyes, and a successful external design will allow them to fit well into any room.
Interesting camouflage of a gas pipe
Pipeline repair cost
The cost of repairing a pipeline line or section of it depends on several factors:
- purpose of the network (transportation of drinking water, technical fluid, coolant);
- method of laying the highway;
- system device parameters;
- the material from which the pipes are made;
- degree of wear and contamination of the line;
- external conditions that impede work;
- terrain features of the site;
- pipeline depth;
- seasonality, weather conditions;
- need for technology.
Work on installation and dismantling of lines is estimated in linear meters. The cost of repairing shut-off valves is determined taking into account the number of points.
If necessary, other operations associated with repair activities are performed. These works require agreement with the customer and are paid separately.
Transfer or replacement: stages of implementation
A qualified gas service worker must carry out all subsequent actions solely in compliance with safety precautions. Whether it’s cutting a gas pipe in an apartment or moving a gas tap in an apartment, all this should never be done independently. In order to make sure that the gas service representative fulfills everything strictly according to the requirements, you must also be aware of the subsequent stages, possible obstacles, and competent actions.
Preparing to work with pipes
To avoid accidents or unforeseen situations, the pipe layout plan is discussed again. Before the arrival of specialists, it is necessary to immediately clear the area of unnecessary objects in order to speed up the process. It is better to cover furniture and household appliances with non-flammable material that can protect them from welding sparks and other mechanical or chemical damage.
Representatives of the organization bring with them equipment: pipes, tools, other consumables (if they are included in the cost of services). It is better to find out about this when concluding a contract. Immediately check with a specialist about the need to purchase flexible hoses. They are used to connect the stove.
IMPORTANT! Before starting work, shut off the gas access and purge the gas pipeline to remove the remaining contents from it.
Dismantling the old structure
Depending on the side of the room to which you want to redirect the structure, the craftsmen measure the dimensions of all passages in the kitchen and calculate the required sizes of new pipes. This is a very important part of the work, which requires not only theoretical knowledge, but also practical
Therefore, when choosing an employee, pay special attention to the presence of an appropriate certificate. After all, it is issued strictly after completing special courses. Dismantling and installation consist of the following steps:
Dismantling and installation consist of the following steps:
- The unnecessary part of the gas pipe is cut off, then the hole is welded.
- In the place where it is planned to connect the new branch of the gas pipe, a hole is drilled in the riser.
- A new pipe is welded to the created hole, at the end of which a shut-off valve is installed.
- Next, the gas meter input is connected to this structure.
- Now you can connect all the necessary household items to the gas pipeline using flexible hoses.
These are some of the main steps that require care and accurate calculation of the size of the pipes.
Options for changing the wiring
It is known that uneven placement of pipes is strictly prohibited. They are placed parallel to the ceiling or walls. Therefore, options for changing the wiring always include the possibility of laying down from the riser.
Basic requirements that must be met when changing direction:
- All covering elements should not be firmly fixed;
- It is strictly prohibited to lay a gas pipeline through door or window openings;
- The length of flexible hoses should not exceed 3 m;
- The passage of pipes through walls is carried out using sleeves.
Welding metal pipes
After some areas of the structure have been welded, they can be treated with a waterproof paint and varnish coating. This will give them not only anti-corrosion properties, but also an aesthetic appearance. In this case, you can choose the color shade of the paint depending on the overall decoration of the kitchen.
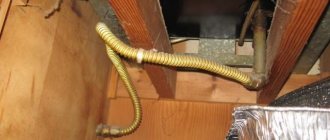
Using bellows hoses
In the modern world, it has become possible to install gas pipes using a flexible transition. Bellows hose is a durable material with unique properties. Namely:
- Tightness;
- Elasticity;
- Resistance to chemical/mechanical damage;
- Durable structure.
Many began to give their preference to bellows hoses, but do not forget that SNiP controls the length of use of such material - no more than 3 meters.
Advice from experts
- Length of flexible hoses so that they naturally sag and allow gas equipment to be moved if necessary. At the same time, they do not hang down to the floor, are not stretched, and do not intersect with other communications.
- If it is necessary to turn the pipe, it is cut off and a stationary plug is installed. Next, a hole is drilled in the pipe, and a new section is welded into it.
- When replacing a gas stove, the standards of multi-storey buildings for the internal volume of the room are taken into account: for 2 burners - 8 m3, 3 burners - 12 m3, 4 burners - 15 m3. In studio apartments without a dedicated room for a kitchen, these figures increase by 2 times. Therefore, it is impossible to simply exchange one slab for another: this issue requires coordination and approval in the relevant authorities.
- If gas pipes are laid through walls, they must be enclosed in a casing. The entire space between the gas pipeline and the casing is sealed with special insulation.
- Gas pipes can be bent, taking into account that the radius of curvature is at least 2.5 times the diameter of the pipe.
Correct connection of pipes
Taking into account the increased danger of carrying out any work on the gas supply system inside the house, the solution to this issue must be left to specialists. They will fulfill the order taking into account all regulatory requirements.
Safety precautions
Safety precautions are basically the first thing you should learn before starting work. Working with gas pipes poses a risk to life and limb, so take this seriously.
Rule one: never suddenly open a gas cylinder. Otherwise, there is a possibility that the oxygen reducer valves may ignite. And what should not be allowed is an explosion of an oxygen cylinder. And such a situation is possible, because the pressure in the cylinder is very high.
Rule two: if you decide to use the gas welding method, then protect your eyes with a welding mask. Otherwise, you may damage your vision. And in general, equipment is needed when using any welding technology. So don't neglect it.
Rule three: do not carry out welding work in a room with tightly closed windows or poor ventilation. Also remove from the room all items that could easily ignite or could themselves cause a fire.
Rule four: after welding, you need to carry out quality control of the joints and make sure that the seams are airtight. Only after this can gas be supplied through the pipes.
Delivery and acceptance of internal gas supply systems
- Hidden work is accepted during the installation process;
- The finished gas pipeline is tested by contractors together with the customer and the distribution network of the Oblgaz branch. The results are recorded in the construction passport or in a separate act.
- The gas pipeline is checked with air under pressure.
Water testing is prohibited.
- Checking for defects in connections is carried out with pressure: 100,000 Pa;
- Checking the density of connections by pressure: 4000 Pa with a meter and 5000 Pa without a meter.
- Tests are carried out with the devices turned on. The gas pipeline is in good condition for tight connections if the pressure in the pipes drops by no more than 200 Pa in 5 minutes.
Based on the tests, a report is drawn up. The act is signed by the installation organization and the district distribution network. According to this act, the acceptance committee consisting of: the customer, the installation organization, the Distribution Zone and Technical Supervision gives permission to start the gas. Gas is released into the house by the repair and maintenance service of the district, in the presence of the organization that did the installation. Next, the system is accepted into operation according to the act. Acceptance of the gas supply system for operation is formalized by an act.
©Obotoplenii.ru.
Other articles in the section Gasification at home
- House Regulatory Point (DRP)
- Stages of gasification at home
- Home gasification project
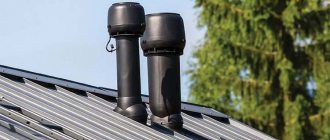
- Installation of a chimney for a gas boiler
- Grounding a gas boiler and gas pipeline
- Requirements for a room with a gas boiler
- Brick chimney for gas boiler
Electric arc welding
This is one of the popular methods of welding gas main pipelines, which is carried out by automatic and semi-automatic welding equipment and installations. This operation can be carried out under the protection of inert gas.
Manual arc welding is also used for laying gas pipes. It is used in the production of tacks and welding of the root of the seam. But such work can be performed by a highly qualified and licensed electric welder.
Welding large-diameter gas pipelines requires special training. For a high-quality seam, it is necessary to perform the correct joining and cutting of the edges.
But first, the ends of the parts are cleaned and wiped with solvent. The edges are cut with a grinder or, when welding parts with a small cross-section, with a file. The seam will be of high quality if the cutting angle is at least 60°.
Then the parts are tacked. A high-quality tack must be at least 3 mm, with a weld leg of at least half the wall thickness. The tacks are located at a short distance for better fixation of the gas supply pipeline joint.
At a rotary joint, welding can be carried out by combining it with rotation of the parts. This method increases the speed of work and the quality of the seam. Welding even on small diameters is performed in several passes.
If the root of the weld can be welded intermittently, then the last layer is welded without breaks. It is performed with a continuous seam along the entire circumference of the gas pipe.
All types of electric arc welding are used for work on highways or procurement areas. When installing intra-house wiring, gas welding or detachable pipe connections are used.
What documents will be needed?
Before proceeding directly with the installation, you will have to start collecting the necessary papers. To do this as quickly as possible, you must immediately prepare a passport, as well as documentation that confirms ownership of the plot and the house located on it.
The next step is to submit an application to the appropriate service. It expresses a desire to gasify the house. Employees will issue a form listing all technical conditions.
The document issued by the gas service is filled out by the specialist involved in drawing up the project. Choose a qualified designer. After all, the result of work and the safety of residents depend on his competence.
According to the project, a gas network is being installed. Sometimes pipes are laid through neighbors' properties. In this case, it is necessary to request written permission from them to carry out this type of work.
In addition to the papers listed above, you will also need to obtain the following documents:
- act of putting gas-powered equipment into operation;
- agreement on the preparation of technical documentation and work;
- permission to supply natural gas and pay for this service;
- document on installation of equipment and gasification of the house.
A chimney inspection will also be required. After this, specialists will issue a corresponding certificate. The last document - permission to gasify a private house - is issued by a local architectural and planning company.
Fine for moving a gas pipe in an apartment
A situation often occurs when it becomes necessary to move a gas appliance to another location. As a result, it is necessary to relocate the gas pipe in the apartment. Such work should be approached with full responsibility and should be carried out by professionals with the appropriate skills and knowledge.
Such a service from specialists is not cheap, but incorrect actions can lead to very sad consequences.
It should immediately be noted that moving gas pipes in an apartment consists of two large and important stages:
- coordination of the movement of gas equipment in special services;
- carrying out work to move the gas supply line.
Instructions for moving a gas pipeline
For professionals, moving gas equipment is not a very difficult task; it is carried out in the following sequence:
- Using the gas tap, turn off the gas supply to the room.
- The gas pipeline is then purged to remove any remaining gases from it.
- In the place where there is a connection to the gas pipeline, an unnecessary section of pipe is cut off and the resulting hole is welded (read: “How to cut a gas pipe - rules and recommendations”).
- A hole is drilled in a certain place and an outlet, which is a metal tube and tap, is welded to the gas pipeline.
- Then they install the branch to the gas appliance by applying threaded connections.
- Before using the equipment, the installed gas tap and pipe with welded joints must be checked for leaks.
To connect household gas units, use a flexible bellows hose no more than two meters long. Before moving the gas pipe in the apartment, it is advisable to think about the fact that perhaps this length of the hose will be sufficient and this movement will not be required.
To work with gas pipelines, specialists must have a permit; they undergo recertification at least once a year in order to confirm their qualifications.
Preparing to move pipes
Before moving a gas pipe, the property owner should contact the gas supply organization at his place of residence with a statement regarding his desire to make changes to the gas supply system of the apartment. A technical specialist will come to the specified address to inspect whether there are conditions for moving gas equipment.
If possible, a representative of the organization will make the necessary calculations and draw up a cost estimate. It is possible that there will be a need to draw up a new technical plan for the room where the gas pipe passes, in which the transfer will be taken into account. After making an advance payment for services, the gas workers will set a day for the work.
The owner of the premises needs to make sure that the gas company is certified and ask its employees for the appropriate documentation, which should be provided to customers upon their request.
When specialists arrive to move the gas pipe, you should check that they have certificates that will confirm their qualifications. Only then can craftsmen be allowed into the apartment. After completing the transfer process, gas workers must draw up a report on the work done and make a corresponding entry in the gas passport.
SNiP provisions on the arrangement of gas pipelines in an apartment
According to the provisions prescribed in SNiP, the distance between a gas pipeline laid openly in a room or in the floor and utilities for other purposes (sewage, heating, water supply systems) should allow for inspection and repair of gas equipment and related fittings.
At the same time, gas pipelines must not be allowed to cross ventilation grilles, window and door openings.
Between the gas pipe laid in the wall and the means of wired communication and broadcasting, the minimum gap is determined taking into account safety precautions, which are provided for by the rules regarding work with cable lines.
The minimum distance and permissibility of intersection between the gas pipeline and electrical wiring located indoors are determined on the basis of the PUE.
The gas pipeline is laid in residential buildings at a height of at least 2.2 meters from the level of the floor covering to the bottom of the pipe, and if there is insulation on it, to the bottom of the insulating material.
Gasification of households step by step
When figuring out how to connect natural gas to a private home, you should take into account the lengthy procedure for completing various documentation.
Stage #1 - documentation of gasification
First, the owner will have to submit an application with a request for gasification of the house, to which must be attached documents on ownership of both the house and the plot, as well as all available technical documentation in relation to these objects.
Before starting the installation of a gas pipeline, specialists draw up technical conditions and a detailed design of the gas system, which indicates all elements, dimensions, distances, etc.
After this, specialists must examine the site and the house to draw up a document called specifications. At the same stage, it should be clarified whether it will be necessary to lay part of the highway through the neighbors’ plots.
It is better to immediately discuss this issue with them, obtain permission and agree on the specifics of the work. This way you can avoid many problems and delays.
Gas pipes are passed through walls and ceilings using a protective sleeve and seal, while only a solid piece of pipe can be located inside the sleeve
Based on the technical conditions, a package of project documentation for gasification of a specific house and site will be drawn up and agreed upon. Only after this will it be possible to hire a contractor to carry out a complex of installation work.
The installation of the external and internal parts of the gas pipeline, connecting it to the common pipeline, connecting gas equipment and other important stages will be carried out.
In the process, you will have to draw up a number of important agreements, such as:
- for carrying out research work and drawing up technical specifications for designers;
- for the preparation of project documentation;
- to carry out installation work on laying internal and external water supply systems;
- for the supply of natural gas, etc.
In addition, it is necessary to obtain a number of permits. For example, you will need permission to gasify the site from the local architectural department.
You should also invite specialists who will inspect the existing chimney in the house (or one specially built for a gas boiler and other gas appliances). The satisfactory condition of the structure is confirmed by the relevant act.
The cost of connecting a suburban area with a house to a centralized gas supply can be found in an article entirely devoted to this issue.
Stage #2 - connecting the pipeline to the house
Almost all elements, devices and materials that will be used in the gasification process should have quality certificates. For gas pipeline installation, it is usually recommended to use pipes made of low-alloy or low-carbon steel. The diameter of the structure should be 150 mm with a wall thickness of 5 mm.
The use of non-galvanized seamless steel alloy pipes is allowed. The pipeline is assembled by welding, the quality of which must be impeccable for individual sections of the pipeline. Threaded connections are used at installation points of shut-off valves.
Image gallery
Photo from
Shortest distance to connection
Polyethylene pipes in the construction of underground lines
Laying in trenches without forming a cushion
Installation of fittings and control tubes
In addition to steel pipes, polyethylene structures have been increasingly used for the installation of gas pipeline systems in recent years. They are lighter in weight, easier to install, well resistant to cold, heat, aggressive chemicals, do not conduct electricity, etc.
When laying polyethylene pipes in the ground, you can do without additional protective measures, as is done for steel structures. However, plastic is used only for the installation of external gas pipelines; the entrance to the house and the internal system must be metal. Plastic is also not applicable in areas with very harsh winters and increased seismic hazard.
Laying an underground gas pipeline is approximately 60% more expensive than installing an above-ground gas network, but this installation method is considered safer
Laying a gas pipeline underground is, for obvious reasons, more expensive, but if it is done correctly, then such a pipe will be reliably protected from outside influences and accidental damage.
Image gallery
Photo from
Passage of pipes under the entrance to the site
Electric welding of pipes on site
Laying welded pipes in a trench
Horizontal drilling under a transport line
If the pipe needs to be laid across the road, the contractor will have to block the road and draw up a detour traffic pattern. The scheme is approved by the local traffic police department, on the basis of which the executor receives a warrant.
It is recommended to give preference to the above-ground laying of a gas pipeline in areas where the soil has increased corrosion characteristics, but if power lines are located nearby, then it is better to give preference to underground communications.
Image gallery
Photo from
Overhead gas communications
Box for placing gas equipment
Painting an overhead gas pipeline yellow
Inserting a gas pipeline into a house
On one site, you can combine both types of laying, for example, lay a gas pipeline underground across the road, above ground through the neighbors’ property, etc.
It is not always possible to lay a gas pipe underground; when laying a gas pipeline externally, special safety measures must be taken, taking into account the influence of external factors
Once the project is ready, you can proceed directly to the installation work. Of course, they will be carried out by specialists who have the necessary training and equipment.
Stage #3 - arrangement of the boiler room
But even before starting to lay the gas pipeline, it is recommended to take care of the rooms where gas appliances will be installed: a gas floor-standing boiler or wall-mounted boiler, stove, etc.
Both the boiler room and the kitchen should have a window that can be opened at any time for ventilation. The opening area must be at least half a square meter. The ceiling height should be at least 220 cm. Door leaves should be made to open outward rather than inward.
Gas boilers with a power of less than 30 kW can be installed directly in the house, having allocated a separate room for these purposes, but for more powerful devices you will need a separate boiler room
It should be taken into account that the number of burners on a gas stove depends on the size of the kitchen. Thus, in a room with an area of less than eight square meters, it is allowed to install only stoves with two burners; for a stove with three burners, at least 12 square meters are required. m, for a four-burner device - at least 15 sq. m, etc.
If the boiler power exceeds 30 kW, you will need to build a boiler room for it, located at some distance from the house. Good forced ventilation should be provided here, the walls, floor and ceiling should be finished with fire-resistant materials.
You should not use the boiler room as a storage room; the presence of foreign objects and materials can cause an accident.
There are serious requirements for the location of the chimney of a gas boiler, which take into account the characteristics of the material for finishing the walls of the boiler room and its roof. Legend: d – diameter of the chimney pipe near the boiler, D – diameter of the chimney outside
The boiler room, which is located in the house, must be supplied with water, as well as a sensor to determine the level of carbon monoxide in the air. It is recommended to install an alarm system that will shut off the gas supply in the event of a leak. You should not install more than two low-power boilers in one boiler room.
For a 30 kW device, a room with a volume of at least three cubic meters is required; for high-power boilers, more than 60 kW, at least 11.5 cubic meters are needed. m of space. People should not be in the boiler room for more than four hours a day.
Image gallery
Photo from
Laying gas pipes on hard surfaces
Distance between communications and gas pipeline
Distance from the electrical network and gas pipes
Open laying of gas pipes
The covering of the floor, walls and ceiling in the boiler room must not only be resistant to fire, but also not produce dust. Dirt often causes breakdowns of gas equipment.
A prerequisite for connecting to the main gas supply is the installation of a gas meter. Our recommended article will familiarize you with the rules for choosing a gas flow meter and the specifics of its installation.
Stage #4 - entering communications into the house
In order to correctly introduce gas into the house during the installation of your own gas supply system, make a hole in the lower part of one of the external walls, but not in the thickness of the foundation.
An insert in the form of a steel sleeve is first inserted into the hole, and then a pipe is inserted into the house through it. The main riser and internal gas pipeline are then connected to it.
The gas service inserts the gas pipe into the main line. This is followed by the first start of gas, checking for leaks, setting up gas equipment, etc.
The riser is usually placed vertically, 15 cm away from the wall and secured with special hooks to secure the vertical position. The pipe is installed at a slight slope towards it.
All places where gas pipes pass through walls deserve special attention. The holes need to be made large enough, since they also need to include protective sleeves through which the pipes are passed.
Previously, all areas of communications that will be located in the wall should be covered with several layers of oil paint. The gap between the surface of the pipe and the sleeve should be filled with a layer of tow impregnated with resin, and also filled with a layer of bitumen.
In this case, you need to make sure that there are no places in the wall that are connected by welding or threading. Only a solid pipe can be located in the thickness of the wall.
Only metal gas pipes can be laid inside the house. High demands are placed on the vertical and horizontal position of structures
The fewer connections there are in the gas pipeline, the larger the sections of solid pipes, the better for the safety of the structure. In order not to cut the structure when it needs to be bent and changed direction, it is allowed to heat the area with a gas burner, but this method should not be abused.
The individual parts of the gas pipeline are connected on the ground, then the pipes are installed along the walls, connected, and secured with special brackets. Narrow pipes, less than 40 mm in diameter, can be fixed to the wall using clamps or special brackets.
Thicker structures are suspended on brackets, as mentioned above. In any case, you need to firmly fix such fasteners in the wall using concrete mortar and wooden plugs.
Narrow gas pipes can be fixed to the wall using special fittings. It is important that these elements are securely reinforced in the thickness of the wall
Welding gas pipes is a special art. In order for the seam to be truly smooth and durable, it is necessary to carefully prepare the surfaces to be joined. The edges of communications should be trimmed, leveled and cleaned to one centimeter. Only after this can you begin welding work. It is recommended to use high quality electrodes.
For the installation of gas pipelines, in addition to pipes, many auxiliary elements are used. All of them must be of high quality, confirmed by a certificate
Threaded connections should be made as few as possible. They must be carefully sealed to eliminate any risk of gas leakage. First, the thread is treated with whitewash, then a sealant is wound around it (linen thread, FUM tape, etc.), only after that the connection is screwed in.
Stage #5 - trial run and final activities
After assembling the system and introducing gas into a private house, you will have to go through a number of final steps. Before starting up and setting up the equipment, home owners must undergo safety training. To lay the internal and external gas pipelines, you can, if desired, invite either one contractor or two different ones.
These can be either specialists from a local gas organization or third-party organizations that have the appropriate licenses. But direct connection to the main gas pipeline must be carried out by a separate tie-in service.
After this, gas is first introduced into the system and checked for leaks. This service is paid separately. By this time, a service agreement for existing gas equipment should already be concluded.
After the first start-up of gas, a specialist from the service company must set up such equipment; this is an important point on which the validity of the warranty obligations depends.
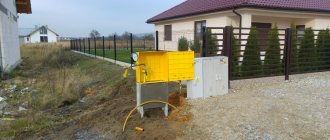
If for some compelling reason connecting to the main gas system is not yet possible, pay attention to the option of installing a gas tank. It is possible that at the moment this method of organizing gas supply to the house will be more attractive to you personally.
Benefits and subsidies for gas supply to a private home
According to Federal Law No. 69-FZ (as amended on July 26, 2019), Article 24 approves a list of persons who can be provided with benefits and subsidies for connecting gas supplies to private households and supplying gas. These include the following categories of citizens:
- pensioners;
- disabled people of groups I, II, III;
- veterans, combatants and their widows;
- large families;
- liquidators of the Chernobyl accident;
- low-income families.
The amount of benefits is regulated at the federal and regional levels. In most cases, a 50% discount on gas connections is provided to owners of private houses belonging to these categories of citizens. However, regional authorities of individual constituent entities of the Russian Federation can return up to 90% of the connection cost. Veterans and disabled people of the Second World War, survivors of the siege, as well as persons over 80 years of age, can be provided with 100% compensation.
Payments for gas connection to the house to benefit groups
To apply for compensation, you need to contact the social insurance fund at your place of registration. You need to have with you:
- Passport.
- Documents confirming ownership of a capital structure.
- Pension certificate (for pensioners).
- Medical documents confirming disability (for disabled people of groups I, II, III).
- Certificate of family composition.
- Certificate of income (for low-income citizens).
- Agreement with a gas distribution organization and a gas supply agreement.
- Acts of completed work.
- Payment receipts (to confirm the purchase of gas equipment and gas supply connection).
If false information is provided, there is a debt, missing documents or an incorrectly completed application, compensation will be denied. Working pensioners may also be denied a subsidy. According to the law, preferential categories of citizens are required to confirm their status annually.
In conclusion of the article, it is worth noting that the ease of use and low cost of blue fuel will pay for the troublesome and expensive gasification procedure.
How to install a gas supply - step-by-step diagram
Step 1: Drafting
Having collected all the necessary documentation, you can begin preparing the project.
It indicates absolutely everything: the dimensions of the pipes and their material, the location of various parts, gas appliances. The types of these devices must be specified. Mounting locations for meters are also indicated. At this stage, the entire system is calculated. But keep in mind that all this is done by a special organization and only if it has the appropriate license. Otherwise, the document will be invalid and you will have to redo everything, which means extra nerve cells and, of course, material costs. So be very careful when choosing such a service. It would be best to contact a company that has the right to do not only design, but also installation work. This way you can save about 25%. So, to create a project, you need to provide the organization with a package of the following documents: technical specifications and certificates for the installed equipment. If there is an underground gas pipeline, then you may also have to do a topographic survey. They may also ask for executive documentation for the gas pipeline itself.
In the photo - an underground gas pipeline of a private house
As a result, the design organization is obliged to come to the site, study the conditions, take all the necessary measurements, and make drawings indicating all gas connection points to heating and other appliances. After this, technical documentation is agreed upon in the department of the gas supply organization and other authorities. Finally, you should have a document in your hands confirming that the project fully complies with the standards.
Step 2: Preparatory work
We have already reviewed the basic requirements for installing a gas pipeline, but we must also properly prepare or build a room in which all the necessary equipment will be located.
It must have a window that opens completely. This will allow you to ventilate the room at any time, because the gas is known not only for its explosive characteristics, but is also very toxic. In this regard, you should also worry about a high-quality ventilation system. The height of the ceilings in the room cannot be less than 220 cm. Area also plays a role; if you have a stove with only 2 burners, then eight squares will be enough. For three-burner units, at least 12 m2, and installation of equipment with 4 burners is only allowed in a room with a volume of at least 15 square meters. When it comes to heating boilers with a power of more than 30 kW, our boiler room should only be a separate building. Naturally, you cannot live in it.