Installing a pipeline for gas supply to an apartment or site is a technically complex task. Domestic gas used for heating and cooking is highly explosive. Any mistake made during the gasification process can cause serious damage to the property and health of residents. Therefore, when laying a gas pipeline, every stage is important: from the selection of gas pipes to their installation.
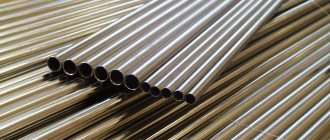
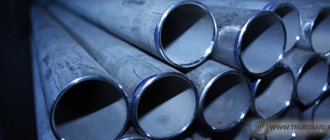
Pipes for carrying gas into a house or apartment can be steel or plastic
Selection of pipes for a gas pipeline
For laying gas pipelines in apartments and private houses, metal elements are most in demand. Steel pipes for gas pipelines are resistant to internal pressure, they provide complete tightness, which eliminates gas leaks.
Depending on the pressure in the gas pipe in the apartment, the type of pipes for laying the gas main is determined. There are gas pipelines with the following conditions:
- low pressure – no more than 0.05 kgf/cm2;
- average pressure – from 0.05 to 3.0 kgf/cm2;
- high pressure – from 3 to 6 kgf/cm2.
Thin-walled metal pipes are used only for gas pipelines in which low pressure is observed. Due to the extreme lightness of the material, thin-walled steel pipes can be used when laying pipelines with complex structures. In addition, such a pipe is quite flexible - thin-walled steel pipes can be bent (at a small angle) without a pipe bender. The thin-walled metal pipe is easy to solder. Threaded steel pipes can be connected to each other using fittings, and socketed thin-walled products are connected only using a sealant (hemp fiber).
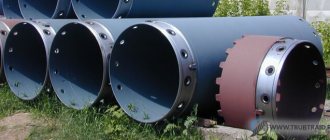
Most often, steel pipes are used to lay a gas pipeline to a house.
If it is necessary for the gas pipeline to withstand high pressure, it is worth using more massive pipes. For the construction of structures with increased strength requirements, seamless steel pipes are used. Cold-deformed steel pipes have the best characteristics. But the process of welding seamless products is more problematic than soldering lightweight thin-walled pipes. A more optimal option in terms of performance than thick-walled steel pipes are copper products. Along with an identical degree of reliability, they are much lighter in weight, but are more expensive.
Helpful advice! Thin-walled steel pipe is characterized by high thermal conductivity, leading to the formation of condensation on the surface of the pipes. To prevent the acceleration of corrosion processes on the walls, after installation it is necessary to apply several protective layers of oil paint to the pipes.
Plastic gas pipes are used to lay the pipeline in the ground. Such gas pipes are flexible, ductile and inexpensive. For underground structures, polypropylene and polyethylene products are recommended. They are often used for gasification of private houses. When laying a gas pipeline at a dacha, polyethylene gas pipes (low pressure) are purchased. As a rule, they are black with yellow markings. Pipes made of high-pressure polyethylene are never used as gas pipes.
For pipe installation in the house, it is allowed to use hoses made of vulcanized rubber with textile reinforcement. But they cannot withstand high pressure, and are most often used when connecting devices to a bottled gas source or to a geyser system.
Plastic pipes for gas can only be used under certain conditions
But the use of plastic pipes is prohibited in a number of cases:
- if the gas pipeline will be laid in areas with atmospheric pressure temperatures below 45 degrees;
- in areas with seismic activity above 6 points;
- if the pressure in the gas zone is high;
- when laying a gas pipeline inside any premises, tunnels and collectors.
In all of the above situations, the HDPE gas pipe will not be able to fully perform its functions. Therefore, in these cases only thin-walled or seamless steel pipelines can be used.
Checking the entire system for leaks and operability
Leaks are checked using a soap solution
The test is done after installation is completed, leaks and performance are diagnosed. First, the general appearance of the system is inspected, the connections are checked, the fittings are tightened, and compliance with the design diagram is checked. Gas emissions are detected at connections and assemblies.
A soap solution is used to coat the joints of pipes with a hose, the interface between a flexible hose and a stove or oven. If bubbles form, the node requires revision and re-diagnosis. The master draws up a report of completed work describing the features, changes are entered into the technical passport.
Standards for gas pipes in an apartment
Before you begin to develop a plan for installing a gas pipeline in an apartment or house, you should clarify under what circumstances it will be used. For example, in the kitchen, as a mandatory means for operating a gas stove, water heater, or in a boiler room to provide heat to the house. There are special requirements for gas pipelines in an apartment.
The gas supply to the column or stove is made taking into account certain requirements
Compliance with these operational and installation standards for gas pipes in the kitchen guarantees the safety and comfort of using the gas pipeline:
- Installation of gas pipes in living rooms, as well as laying gas pipelines in ventilation shafts is not allowed.
- The thin-walled gas pipe should not intersect with window and door openings.
- It is prohibited to lay pipes in hard-to-reach places, for example, behind decorative wall cladding (with the exception of structures that can be easily dismantled). There should always be quick access to the gas system in case of breakdown.
- The distance of the pipe from the floor should not be less than 2 m.
- The length of flexible communication segments, if a thin-walled pipe is used, cannot exceed 3 m. The density of connection of network fragments is also important.
- Installation of gas communications is possible in rooms with a ceiling height of at least 2.2 m. The room must be well ventilated.
- Ventilation in the kitchen, if a gas pipeline is laid there, cannot be adjacent to rooms and other living spaces.
- The ceiling and walls located near the gas system are covered with a layer of non-flammable plaster. If the wall in the kitchen is not plastered, it is insulated from gas communications (especially from the gas water heater) with a sheet of metal at least 3 mm thick.
Care should be taken to securely fasten the gas pipes - clamps with rubber gaskets
Some rules also apply to the installation of pipes for a gas water heater in an apartment. Geysers are installed with an exhaust pipe - a chimney. A flexible aluminum corrugated pipe cannot be used as a chimney exhaust; installation of column exhaust pipes is carried out only with the help of steel or galvanized products.
Helpful advice! Any heating devices, including geysers, must be equipped with fuses. They are needed so that the gas supply is forcibly shut off when the fire accidentally goes out.
Installation of thin-walled gas pipes in the kitchen also has the following features:
- before starting work, make sure that the main gas valve is closed;
- If a gas pipe is moved in the kitchen, the gas pipeline is purged. This allows you to get rid of any remaining gas in the system;
- It is worth taking care of attaching the gas pipe to the wall. Fastening is done using special clamps and staples. Which fastening will be used depends on the diameter of the pipes and their length;
- if electrical cables run near the gas pipeline pipes, then the distance between these communications should be at least 25 cm. And the distance between the gas system and the electrical distribution board should be at least 50 cm;
- It is undesirable to place cooling equipment in the kitchen near the planned gas pipeline system: refrigerators, freezers. The presence of a gas pipe behind the refrigerator can cause its radiator to overheat, and, as a result, equipment malfunction;
- It is also not recommended to install thin-walled steel gas pipes too close to heating devices and directly to the gas stove, behind the wall of the gas water heater;
- gas pipes in the kitchen cannot be laid on the floor, under sinks, or near dishwashers. You can disguise a gas pipe using other, safe methods;
- It is advisable to carry out repair work without the use of artificial lighting, in a constantly ventilated area.
Gas pipes must be installed in compliance with certain rules.
These standards are relevant both for existing gas systems and for gas pipes that are just being installed or are being transferred.
Welding work
SNiP standards provide: no matter what changes in the position of gas pipelines, they must be carried out only by welding. Any detachable connections between two pipe sections are prohibited. Threaded connections are only suitable for gas meters, shut-off valves and household appliances. When working with welding, the master is obliged to use only serviceable devices, tools, and fixtures.
Personal protective equipment is also required:
- special welding gloves;
- mask, shield or goggles;
- work clothes made of thick, non-flammable fabric.
When welding, you must use a mask. Sometimes there are places on the walls, ceiling, and equipment that are burned by welding. Such phenomena have an unpresentable appearance, spoiling the design of the room, requiring protection against corrosion. Having completed all operations, the craftsmen must treat them with waterproof metal paint. The color of the dye is selected to match the main coloring of the walls.
Laying gas pipes in a private house: basic standards
Gasification of private homes should begin with notification of the local gas service about upcoming repair work. The relevant organizations are required to provide technical conditions that will determine the procedure for laying the gas pipeline. Upon completion of technical approval, an individual gasification project for the site is developed. A warrant for permission to lay a gas pipeline must also be issued by representatives of the automobile inspection (traffic police).
If a certain number of houses in the area are already gasified and only the connection of gas pipes in one area to the main system is required, then the service must provide information about the operating gas pressure in the main. The choice of gas pipes in the house will depend on what pressure is maintained in the main pipes.
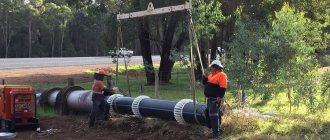
Depending on which gas source was chosen to supply the site, the gas supply system can be autonomous or central. Gas pipelines for private homes are divided into above-ground and underground. The procedure for installing gas communications on a site is quite simple and requires much less time than directly obtaining permission to implement a gasification project.
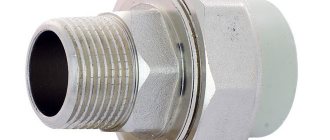
Gas supply to a private house is carried out through a pressure reducer
Laying a gas pipeline has the following stages:
- laying a line of gas pipes from the distribution area to the house (if necessary, a tie-in is made into the gas pipeline);
- entering the pipeline into the house through a cabinet with a pressure reducer;
- installation of pipe distribution in premises (boiler room, kitchen);
- commissioning of equipment, delivery and acceptance of the system, checking the functionality of the gas stove and water heater (usually this stage is carried out in the presence of technical inspectors).
General requirements for the structure of a gas pipeline in a private house include the same points as the standards for laying gas pipes in an apartment and in the kitchen. Installation work when laying a gas pipeline to a house must comply with the following rules:
- The depth of laying gas pipes on the site is no less than 1.25 m and no more than 1.75-2 m.
- The section where the pipeline enters the building has a shallower depth: from 0.75 to 1-1.25 m.
- If it is planned to transport liquefied gas, the gas pipeline should be laid to a depth below soil freezing (climatic features of the region are taken into account). In this case, the pipe is inserted into the house through the foundation.
- If a gas boiler is installed in a private house, the room area per unit of equipment is 7.5 m2. Accordingly, two geysers or boilers require an area of 15 m2.
- Boilers and heaters with a power of up to 60 kW are installed in rooms where the height from floor to ceiling is at least 2.4 m.
Helpful advice! Before laying gas pipes in the ground, steel structures are insulated with anti-corrosion materials. For this, a flexible polymer-bitumen tape is used. Insulation of the inside of the pipe is not required, since natural gas does not promote corrosion.
If you need to install an autonomous gas source in a country house or on the site of a private house, you should pay attention to specific safety standards. They will ensure normal operation of the stove, column and heating system.
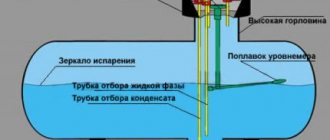
Installation of a liquefied gas tank on the site is carried out in accordance with the requirements of SNiP
The distance from the tank with liquefied gas underground to the well should not be less than 15 m. The pit for the tank is dug at a distance from the house of at least 10 m. Outbuildings can be located no closer than 7-8 meters from the storage tank. The volume of the tank will depend on the number of gas consumption devices (stoves, columns) and the total heating area. Most often, tanks with a volume of 2.7 m3 to 6.4 m3 are used on the farm. Tank models with a volume of 6.4 m3 are optimal for supplying gas to large buildings: the total area of heated rooms in the house can be up to 300 m2.
Is it legal or not?
The hot water supply riser is a common property.
This means that all actions with it in one way or another may affect the rights of other owners, i.e. all residents of the house. The work must be coordinated with the management company, and changes must be approved by the BTI and the architecture department, since the apartment plan is changing.
The main document defining the rules for using the common property of an apartment building is Decree of the Government of the Russian Federation of August 13, 2006 N 491.
According to the requirements of this law, the actions of one apartment owner should not infringe on the rights of other people living in the house. This means that uncoordinated actions with life support systems, which primarily include hot water supply and cold water risers, as well as sewage systems, entail liability.
It is determined by the Housing Code of the Russian Federation (Article 29), which establishes different types of liability, up to the seizure and sale of a problem apartment.
As a rule, the transfer of risers is done over a short distance, within 1 meter (usually even less). Such a transfer is acceptable, and no problems arise when coordinating the work. However, some owners go much further and plan to move the pipes to other rooms or corridors.
It must be taken into account that the installation of plumbing fixtures above residential premises is prohibited. However, there is no such restriction for pipelines. At the same time, a diversion is made from the riser to water collection devices, which poses a certain danger of flooding the premises of the lower floors.
When approving the project, you will have to justify the need and provide guarantees for the safety of residents of other apartments.
Relocating the riser is prohibited if the water supply conditions worsen as a result.
For example, when installing pipes of a smaller diameter, or when using unsuitable materials.
In addition, when replacing metal pipes with plastic ones, the requirements of the PUE are violated (the general potential equalization system changes).
This creates a danger for all residents of the upper floors. Another problem may arise that plastic pipelines are not able to withstand operating or pressure testing, which not all users are aware of.
The approval procedure requires a lot of time (usually at least 2 months), money and nerves. Often, officials, trying to play it safe, require a lot of unnecessary documents and certificates.
You must be prepared for a long walk through the authorities and not plan work ahead of time. Because of this, many owners make unapproved transfers at their own risk.
Requirements and recommendations for laying gas pipes underground
Regarding the above-ground installation of gas pipes, the installation of underground gas pipeline structures is quite expensive. However, this does not reduce the demand for underground gas pipelines. They are less dangerous, better protected from damage and do not spoil the aesthetic appearance of the site. There are also rules and conditions for laying such highways:
- If the soil corrosion test on the site gives a positive result, it is better not to lay the gas pipeline underground. But the presence of high-voltage wires nearby, on the contrary, is a strong argument in favor of an underground structure, but then the pipes are covered with insulation;
- When laying a polyethylene gas pipeline, high-strength products (PE-80, PE-100) are used. Flexible pipe PE-80 can safely serve systems whose operating pressure does not exceed 0.6 MPa. For systems where the pressure is from 0.6 MPa to 1.2 MPa, it is better to use PE-100 pipes and connecting elements or steel pipes. The depth of installation underground will be at least 1.0 m;
- The use of reinforced polyethylene pipes and connecting elements between them is permitted when laying gas pipelines, the pressure in which will be more than 0.6 MPa. The permissible laying depth underground will also start from 1.0 m;
- on lands intended for arable work, as well as in abundantly irrigated areas, the initial depth of laying the gas pipeline will be 1.2 m.
Knowledge of these requirements for high-quality laying of a gas pipeline underground will help you correctly install gas pipes with your own hands, as well as monitor the actions of workers in order to avoid mistakes that lead to negative consequences.
Why can't you do it yourself?
This is due to the fact that a gas stove is a priori a source of increased danger. There are strict regulations regulating this issue. The location of the slab is always clearly marked on the BTI plan of the apartment: all changes and corrections in the plan are interpreted as redevelopment.
Moving a gas stove within the kitchen is a redevelopment, even if the displacement of the object is small. But even this question is divided into many small points. If you plan to place the gas stove a little further from its original location, then in this situation, from the permitting documentation, you will only need a certificate from Mosgaz (if you live in the capital).
If a large-scale relocation is planned, then you need to make a project for the transfer of equipment, it is also ordered from Mosgaz. The rules also require an agreed transfer with the Moscow Housing Inspectorate. Residents of other cities should contact the relevant supervisory authorities of their locality.
Third Party Replacement
The qualifications of full-time plumbers from management companies are not always high enough. Often, apartment owners turn to specialized organizations that perform plumbing work.
Price issue
The cost of the work is determined by the material, the desired configuration of the riser and the presence of additional elements (for example, bends for a heated towel rail).
There are companies that use their own materials. The owner is only required to pay for the procedure.
It is possible to carry out the transfer using customer materials.
The price of the entire procedure in different regions of the country ranges from 6 to 9 thousand rubles.
Where and how to contact?
In every city there are specialized plumbing companies that perform any type of similar work. The easiest way is to take a local newspaper and find advertisements for such organizations with addresses and telephone numbers.
You can also use the city information service (if there is one). However, the most popular way is to search for contractors online. Serious organizations have their own websites where you can find out prices, get advice and place an order.
Step-by-step instructions - how to move a hot water riser
After the project has been drawn up and the upcoming work has been approved by the management company, BTI and other responsible organizations, the time comes for the actual implementation of the work. Let's consider the procedure for moving the hot water riser.
Tools and materials
It is necessary to prepare the following tools and materials:
- Grinder for cutting an old riser and cutting a new pipe.
- Gas or adjustable wrench for installing shut-off valves on the outlet.
- Fittings (minimum set - 4 corners and 1 tee for outlet).
- Ball or valve valve.
- Plumbing flax, FUM tape or other sealing material.
In addition, you may need tools to make holes in the wall and recesses in the floor. Please note that making recesses in the ceiling slab is prohibited. Since this weakens its structural strength.
Preparation and coordination of work
These are the very first actions that are performed before all work begins. A project is drawn up with a diagram of the location of communications before and after the transfer. This is an important part of the work, which is recommended to be entrusted to knowledgeable and experienced specialists.
With the finished project, you need to contact the management company. After receiving their visa, they go to the BTI, where they will need to make changes to the apartment plan. The last stage will be the architecture department, where the project is stamped “for execution.” After this, you can begin work.
Dismantling the old
Before starting work, you must contact the management company to turn off the water supply. This is a paid service.
In addition, it is necessary to indicate how long the work will take, so as not to create unnecessary inconvenience for the residents of the entrance.
After the water is turned off, you need to open all the hot water taps and drain the remaining water from the riser.
After this, the cutting locations are marked (usually under the ceiling and near the floor), and the riser is cut off along with the outlet. The old pipe is immediately removed so that it does not interfere with the room.
Preparation of carts
The next stage will be the preparation of the carts. This is cutting sections of a new pipe, 2 short horizontal sections (they determine the distance by which the riser will be displaced) and a vertical section, which is the riser.
In addition, the vertical section may have to be cut and a tee inserted into it to drain it to the apartment dead-end hot water supply line.
This step is not necessary, since sometimes the outlet is welded directly into the riser without the use of fittings (for example, when installing stainless steel pipes).
Fitting connections
Fittings are elements that allow pipes to be diverted, bent, or otherwise changed in direction.
They fully match the dimensions of the pipes, which allows you to create reliable and tight connections.
When moving the riser, corner bends and a tee are used. The corners are connected to the ceiling and floor sections of the pipe.
Then horizontal sections of pipes are welded, to which another pair of corner fittings is attached. After this, a vertical part with a branch (tee) is installed.
Installation of input fittings
The input fittings determine the boundary of responsibility - on the side of the riser, the common house equipment remains, and after the valve, the property of the home owner remains.
The installation of a shut-off valve is carried out only on the outlet from the riser (the horizontal section leading to the plumbing). Installation of valves on the riser itself is prohibited.
Valve or ball valves are used. The second option is preferable, since these devices are much more efficient and durable.
When you need to quickly turn off the water, they are much more convenient. In addition, ball valves are less likely to fail, which cannot be said about valve structures.
Wiring connection
The riser is connected to the wiring after completion of the installation of all elements, including the input shut-off valves.
Horizontal apartment wiring is connected to a ball valve (or to a DHW flow meter if it is installed immediately after the valve).
This stage is the final one, after which the work is considered completed.
After connecting the wiring, water is supplied (open the valve in the basement) and the riser is inspected.
The plumber from the management company who opened the water should not be released yet, as leaks may be detected, requiring repeated shutdown and elimination of deficiencies. If no problems arise, the riser is put into operation.