Polypropylene (PP) pipes are the leaders in use in country individual houses and modern apartments; they are used to lay water supply and heating communications. But open laying of any pipelines along the walls is not only impractical, but also spoils the appearance of the premises, so the answer to the question of whether it is possible to wall up polypropylene pipes in the wall is relevant.
To make the right decision, you should consider the physical and chemical characteristics of pipe polypropylene and its varieties. Also, for the efficient operation of plumbing and heating systems, it is useful to know the basic rules for the hidden installation of polypropylene pipelines.
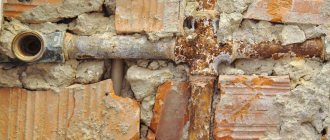
Rice. 1 Options for placing PP pipes in grooves
Types of pipes and their purpose
The quality of the material from which water or sewer pipes are made directly affects their strength, reliability and wear resistance. Not all types of pipes can be used, for example, for hot water, or for a heating radiator, if there is one in the bathroom. The entire variety of pipes can be divided into three categories:
Metal pipes
Which, in turn, are divided into two types:
- Steel – are still in great demand among consumers due to their strength and high thermal conductivity. In addition, they are able to withstand pressure drops of up to 16 bar. Stable to destruction and stable at temperatures up to 120°C. Stainless steel does not emit harmful substances when in contact with water and is completely safe for human health. Differ relatively easy installation and a simple connection method in the form of welding. They also have a rather attractive appearance. The only one flaw – high cost of material.
- Copper - have very good technical characteristics, long service life, practical, safe for health and even have an antibacterial effect. They are resistant to aggressive chemicals and have high throughput due to the fact that their internal surface always remains perfectly smooth. They are easy to bend and easy to install. However, their cost is quite high. But the use of this material practically completely eliminates the possibility of leakage or rupture of the water supply under the influence of strong pressure. They can be used for water supply and heating installations.
Plastic
There are three varieties of this product:
- Polypropylene is the most reliable and durable in its category. Their service life is approximately 50 years. They are able to withstand high temperatures, up to 100°C, and have good thermal conductivity. The material is dielectric and provides good noise insulation. They are an excellent option for apartments. The only point to consider is that the material has a high coefficient of linear expansion, and in case of poor soldering, there may be an obstruction to the water flow.
- Polyethylene – the most elastic pipes. If it happens that the water inside them freezes and begins to expand, they will not burst. However, the effect of hot water on them destructive. This does not apply only to pipes made of cross-linked polyethylene, which is very durable and is not afraid of high temperatures. These pipes are suitable for use in the country or installing cold water pipes in your own home.
- Polyvinyl chloride is a harmful type of pipe, which, moreover, has the worst technical indicators. And during operation, with direct contact of water with the walls, harmful substances from the structure of the material enter the water, which makes them unsuitable for home use. They are only suitable for technical needs.
Metal-plastic
This type combines all the possible advantages of plastic pipes in combination with the good strength properties of steel pipes. They have the most optimal price/quality ratio, which makes them no less suitable for use in an apartment than polypropylene ones. Their wall has five layers, held together with special glue. The frame is made of polyethylene and reinforced with aluminum foil, 0.1 mm thick. Such pipes are sold in special coils. They are not subject to corrosion, are frost-resistant, and their service life is about 50 years. They can easily take on the required shape and configuration, and their installation is very simple. Suitable for both water supply and heating systems.
However, there are also disadvantages. To connect the elements together, fittings made of metal are used, which has a linear expansion coefficient different from plastic. In some cases this may lead to leakage. The material is resistant to direct sunlight, mechanical shocks and breaks, as well as open fire.
When choosing a material for pipes, you need to focus on their purpose. One thing is for sure - the desire to save can sometimes lead to very sad consequences, which can ruin not only your new and expensive renovation, but also provoke a conflict with your neighbors.
What finishing materials should be used for hidden installation of a pipeline?
No matter how you end up covering the pipeline from outside eyes, the finishing materials laid on top of such hidden systems should preferably meet the following requirements:
- They should be easy to care for. It is undesirable to use aggressive chemicals when cleaning;
- The material must be moisture resistant and not deteriorate from exposure to temperature changes and atmospheric pressure. And when the material is heated, substances and vapors harmful to humans should not be released;
- It is also necessary to exclude the possibility of using materials prone to corrosion;
- The smaller and thinner the materials, the less they will “steal” space in already small rooms;
There are quite a lot of materials similar to the above requirements on the market - you can choose according to your taste and budget.
Which pipe elements should not be masked?
This paragraph concerns the camouflage option, in which the pipes are laid in a groove in the wall and tightly walled up in it under a layer of a special solution, and then under facing materials. In this case, you need to be extremely careful. After all, if any damage occurs, in order to eliminate it, you will need to irreversibly damage the walls. It is not recommended to immediately hide the newly completed installation under cement mortar. Yes, plastic, steel or copper pipes have a very long service life, but if the soldering is done poorly, you may not see it right away. Sometimes a seam may be too thin in one place and leak, and this is not visible immediately, but only the next day. Therefore, give the pipes and their joints the opportunity to experience water pressure and stand free for a couple of days . And only after you are convinced of their tightness, you can seal the grooves.
So, you can sew into the walls:
- Welded steel or copper pipes without threaded connections;
- Brazed plastic pipes without threaded connections.
It is not recommended to mask the following elements without quick access:
- Metal connection fittings having an L-, T- or X-shape. These areas have an increased risk of leakage.
- Connections made using threaded elements;
- Installation locations counters or filters.
Box - ready-made or homemade
To hide sewer pipes with plastic panels or drywall, a box is needed and it is desirable that it be removable. To do this, you can use a ready-made one, that is, purchased one, or make it yourself. The removable design has some advantages:
- the use of a removable structure provides free and quick access to the pipes;
- quick installation and dismantling.
The disadvantages are that the design is quite large and cannot fit everywhere. The price will be more expensive than installing a permanent box. Sometimes problems arise with connecting plumbing fixtures, such as a toilet.
Basic rules of camouflage
There are several recommendations that, if followed, will make your hidden plumbing reliable and safe.
- Minimum number of connections. We have already mentioned that such places are the most problematic and prone to depressurization, so try to make sure there are as few of them as possible. This can be achieved by enlisting the help of professional plumbers who can draw up a competent wiring plan.
- Using the same materials. If the presence of connecting elements is unavoidable, then they must be made of a material identical to the material of the pipes. Thus, you do not have to worry that their linear expansion coefficients or tensile strength will be different.
- A viewing window is required. Obviously, if you have water meters, it is necessary to take readings from them, and once every few years, submit them for verification. Therefore, it is worth immediately providing quick access to them. A small hatch with a removable door will do the job perfectly. Also, such an element is required in places where there are many connections or water filters. At any time you can monitor their condition and eliminate the leak in time.
- Don't neglect insulating materials. This rule is especially important for pipes with cold water. After all, condensation very often collects on them. To avoid this, use a special insulating casing made of foam rubber or thermoflex. In case of masking hot pipes in the wall, it will allow them to expand safely.
How to prevent blockages from forming?
A clogged drain is an extremely unpleasant occurrence.
Therefore, during the installation process, close attention should be paid to the correct location of the pipes. It is necessary to accurately maintain the slopes of the pipes, since it is the violation of this parameter that most often leads to the formation of blockages.
It is imperative to install special fittings for cleaning on the pipeline, closed with plugs. This measure will help to relatively easily remove the blockage if it does form. Such fittings for servicing pipelines must be installed every 15 meters in straight sections, as well as in places where the pipeline makes sharp turns.
The best ways to make pipes invisible
are quite options . Starting from the simplest ones, which require a minimum of time and financial costs, to more serious projects. We will list them in order of increasing complexity of the work.
No. 1. We paint or decorate
The simplest and economical way to make communications less noticeable, and in some cases, even turn them into an integral part of the interior. By the way, plastic pipes can also be painted. The very first question is which paint to choose. If we are talking about a white composition, then there is a special variety for painting heating radiators. Its peculiarity is that under the influence of heat it does not turn yellow or acquire other shades for many years. Its color will remain snowy white.
If we are talking about more interesting colors, then alkyd, acrylic or water-dispersion paints are suitable for painting metal pipes Please note that before painting, they must be cleaned, dust removed and coated with a primer, which will create a protective layer, protect the surface from premature corrosion and promote better adhesion to the paint. Primer GF-012 is perfect, which, moreover, has a ridiculous price - about 50 rubles. Before applying paint, make sure there is no condensation. For pipes through which hot water passes, it is necessary to choose heat-resistant paints. For plastic pipes, it is necessary to choose more gentle compounds that do not contain acetone. For example, acrylic or pentaphthalic based on white spirit, water-based for mineral surfaces or water-soluble compounds for carpentry. In this case, it is not necessary to prime the surface. The paint will adhere well and stick to the plastic surface.
Before applying paint, be sure to protect walls behind pipes and floors from unintentional brushstrokes or drips. If you are painting for the first time, then start working with cold pipes, because on hot pipes the paint will dry very quickly and the end result may be unsatisfactory. If you choose the paint exactly to match the color of the walls, you can “dissolve” the pipes against their background.
A very interesting option is
to decorate with polyurethane tubes and decorative stucco elements. You will get mini-columns that will complement the sophisticated aristocratic or classic style of the bathroom. But this is only suitable for vertically located elements. They can also be hidden with artificial vines or painted on the surface with a pattern that already exists in the interior, for example on tiles.
No. 2. Disguise with furniture
Not the most complicated, but at the same time functional way. It lies in the ability to choose the right set for the bathroom, which will help hide imperfections. And if, moreover, you position the plumbing correctly, you can achieve almost absolute invisibility of the pipes.
Vertical pipes, for example, risers, which are the largest in size, will help hide a tall pencil case. To do this, you need to remove its back wall, and make recesses on the back of the shelves that match the dimensions of the pipes. If it is not possible to choose the best option among ready-made ones, you can always make it to order, which will be even better. In addition to a neat appearance, you will get a lot of additional space for storing household chemicals or other bathroom accessories.
The place where the pipes are supplied to the washbasin can easily be hidden by a cabinet, with the back wall of which you need to do similar actions. Many people use a water heater, the pipe supply to which is most often carried out from below. If the next bedside table in the bathroom is clearly superfluous, you can put a beautiful laundry basket under it. Fortunately, the variety of their appearance allows you to choose the most suitable model for any interior.
No. 3. Screen made of plastic panels
This is probably the most successful option in terms of material selection. After all, even in a too humid room with PVC panels, no changes will occur. In addition, they are very easy to install, and if necessary, the structure can always be quickly disassembled with the possibility of reassembly. Plastic is very easy to clean and does not deform over time. And the variety of color options and even textures today is simply amazing. With such screens you can hide large vertical pipes, horizontal pipes passing above the floor, or make a screen under the bathtub .
In order to cover the plastic, it is necessary to make a base frame. The materials you can use are wooden planks, metal profiles or plastic U-shaped corners. The process is very similar to the technology for installing a plastic ceiling. Before attaching the frame, be sure to make markings using a level or plumb line. Now fasten all the planks around the perimeter of the selected area. If the area is large, be sure to add a few pieces in the middle to add rigidity. Now cut the plastic panels into pieces of the required sizes. The first panel will be attached to the profile with self-tapping screws. They should be screwed into the locking part. Next, simply connect the panels to each other using special latches. The last element is also secured with a mounting screw. For reliability, you can screw in a self-tapping screw in the middle of the first and last panels, top and bottom. But not on every one, otherwise it will be difficult to disassemble the structure if necessary. Now, to give the screen a neater look and hide all the fasteners, use decorative corners.
Installing a screen under the bathtub will have a similar technology. The lower plank is attached directly to the floor, and the upper one is attached at one end to the wall, and then supported with the help of spacers, which must be placed at a distance of no more than 40 cm from each other. Plastic sheathing is done in a similar way. Using the screen, you can also hide communications that go to the bathtub itself and to the sink, if it is nearby. And if you equip it with a small window, you can also store household chemicals there. And a bathroom decorated in this way looks more aesthetically pleasing. same way , pipes passing above the floor and even are hidden . Such a step will be narrow and neat. It can even be used as a small shelf.
No. 4. Plasterboard box or false wall
These are more complex methods of camouflage, which require large financial costs and time to implement. Using a plasterboard box, you can hide pipes that are oriented both vertically and horizontally. And just like with plastic, you can line a bathtub with it. The only difference is that drywall needs subsequent additional cladding. Remember that in rooms with high humidity you should use only moisture-resistant materials!
The steps will be similar to those described above. A frame of the required size is mounted from metal profiles in the desired location. Naturally, before this, the straightness of all edges must be checked using a level. After this, fragments of drywall are cut to the required sizes, and using self-tapping screws suitable for installing this particular material, they are attached to the frame. When the frame is assembled, it is necessary to prime the surface, glue a special mesh to the joints and apply a layer of putty. After this, you can perform finishing cladding with suitable materials. Such frames decorated with tiled mosaics look very good. Due to their small size , they do not spoil, but, on the contrary, complement the interior of the room and create additional accents in it. This way, even imperfections can be turned into something beautiful and useful.
As for
the false wall. It is most appropriate to erect it in front of the location of the risers, especially if a toilet is installed in front of them, as is the case in most cases. There is no need to move it. After all, modern models require installation close to the wall, in which we will hide the lower volumetric corrugation. The only drawback of such an element is the use of usable area of the room. Here you have to choose – aesthetics or dimensions. At most, such a protrusion will have a width of 30 cm. But behind the false wall you can hide both filters and counters. It is not recommended to make her deaf. You can make a cutout above the toilet, equip it with hinges and hang a beautiful door. A box is made from metal profiles, which will fence off the pipes from the general space of the room, and is lined with plasterboard. Further finishing is strictly according to your taste.
No. 5. Frame covered with tiles
This means not just a plasterboard surface covered with tiles, but a collapsible tile structure. The good thing about it is that at any time you will have access to problem areas without having to tear down walls. Dismantling can be done using a regular screwdriver, and then everything can be reassembled as it was. In addition, if you tiling with the same tiles as on the walls, then no one will understand that there is something hidden there.
To build the frame you will need: a drill, a tile cutter or a hacksaw, metal profiles, plastic corners, self-tapping screws and the tile itself. A frame is installed from the profiles, which is attached to the floor, the ceiling, and adjacent walls. There are special metal brackets for this. After the frame is ready, it is necessary to take measurements of its edges on which the tiles will be attached, and cut the tiles. Don't forget to take into account the thickness of the tile if you want one edge to overlap another. Now, using a drill and feather drills, you need to drill two holes for self-tapping screws along the edges of the tile. Then place the tiles on the frame and make marks with a marker on the profile in the center of these holes. This way you will definitely get to the right place and complete the installation without distortion. But keep in mind that the holes in the tiles should already be such that the self-tapping screw fits freely into them. While in the profile, they should be smaller. Otherwise you just won't screw them in. When all the tiles are in place, the corners and fastening points are covered with decorative plastic corners. In the right place, you can make a gap between the tiles and install a neat plastic door there, in case there are water meters there.
When working with tiles, do not forget about your own safety. When cutting, the tiles have very sharp edges, so it is recommended to wear gloves. A quick tip - if you wet them before cutting, you'll reduce the chance of them chipping or cracking at the edges. Don't forget about safety glasses. If destroyed, the glazed top layer crumbles into small sharp pieces and scatters over a long distance. If they come into contact with the eyes, they can cause irreparable harm.
No. 6. Plumbing roller shutters
Blinds or roller blinds are a very unusual method of camouflage, which is rarely seen in apartments. However, it is very convenient and original. This design can provide the most complete and easy access to pipes along almost their entire length in a matter of seconds. There is a special variety of them - plumbing roller shutters . They will perfectly complement the interior of a bathroom made in high-tech, modern or loft style. The color range is also quite varied and allows you to choose the most suitable option.
When installing them,
two options for raising/lowering - electrical and mechanical. The choice should be based on the size of the canvas. When the width of the overlapped opening is up to 52 cm inclusive, a manual control system with a cord mechanism is sufficient. If the surface area is larger, then such systems are equipped with a spring mechanism. The only condition that must be met if there is an automated lift is that the motor housing must be located in a sealed housing that does not allow moisture and dust to enter. The frame be a plasterboard structure, a plastic box or a false wall. To ensure stable operation of roller shutters, it is necessary that the sides of the frame structure are strictly parallel to each other.
Otherwise, jamming is inevitable, since a misalignment, even a slight one, will not allow the rollers to slide freely along the grooves. There are two installation options - when the roller shutters are located on top of the box or when the box is located around the canvas. The first option is suitable if the risers are located in a natural niche. Then a profile is simply installed along its perimeter, onto which the blinds are attached and form a single plane with the wall. The second option involves protruding structures, the side parts of which are covered with plasterboard and lined with appropriate materials, and the front part is covered with shutters. When installing a canvas with a cord mechanism, it is first completely assembled according to the instructions, and then installed .
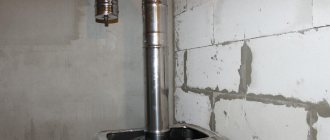
No. 7. Installation of pipes into the wall
This is the most radical and labor-intensive process. It is actively used in case of renovation from scratch or during redevelopment. A significant advantage of this method is maintaining the size of the room. Remember that according to generally accepted building codes, it is not allowed to cut brick and thin-walled partitions in panel houses. The main disadvantage of this method is the limited access to pipes in the event of an accident. Therefore, before giving preference to this type of disguise, carefully read paragraph 2 of this article again and strictly adhere to it. And be sure to draw on paper before starting work . When you have precisely determined the location of all the plumbing elements, you can begin gating the walls.
To avoid distortions and other irregularities, draw preliminary lines on the walls and try to adhere to them.
Depending on the material of the walls, you can get by with a punch drill; in extreme cases, you will have to use a hammer drill. There will be a lot of dust, so use a respirator and safety glasses. When all the grooves are ready, remove debris from them, open them with a primer and lay pipes in them. Wait a few days to make sure all connections are tight. After this, fix their position with cement mortar. Only after complete drying is it possible to begin facing work.
Do-it-yourself sewerage installation in a private house: step-by-step instructions
The entire process of sewer construction can be easily divided into several successive stages.
Preparatory stage
At this stage, a general drawing of the entire system is drawn
Particular attention is paid to intra-house communications. This will greatly help in calculating the need for pipes and other parts.
Scheme of internal sewerage in a private house
The connection to the riser is most often made with pipes 50 mm in diameter. The riser itself and the horizontal pipes leading out of the house are 100 - 110 mm in diameter. The fan pipe is made similar in diameter to the riser, and is often simply a continuation of it. Based on this, the required number of pipes of different diameters is calculated.
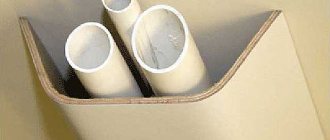
To connect the internal system with the external one, as well as for the installation of external communications, corrugated pipes are used. This ensures reliability during ground movements, since the stiffeners prevent deformation. It is also necessary to take into account resistance to chemical pollutants, reliability and convenience of all connections, and the topography of the internal surface, which should be smooth.
Types of pipes used for installation of external and internal sewerage in a private house
Tool preparation. Whatever the layout or depth of sewer installation in a private house, a special tool is required to implement the project:
- saw for plastic. It is called “trimming” and is needed for cutting pipes to size;
- a sharp knife for cutting burrs on cuts and creating chamfers at the ends of the pipe;
- sets of mounting rubber seals.
Instructions for sawing and joining plastic sewer pipes
Preparation of shaped parts. To install a sewer system, it is not enough to have only pipes. We also need various shaped parts to connect them:
- bends that are designed to form corners. There are 45 or 90 degrees. At the ends they have sockets with seals for a tight connection of the pipes;
- transition bends are designed to create transitions between two pipes of the same diameter;
- triple or quadruple connecting fittings, with the help of which the pipeline is branched;
- Transition couplings provide a smooth transition between pipes of different diameters.
Types of sewer connections
Useful advice! To make pipe installation more convenient, their ends must be heated. This is done by placing the ends of the pipes in boiling water.
The main stage of installation of internal sewerage
Do-it-yourself sewer installation in a private house, a video of which you can easily watch, is not a particularly difficult job if all the calculations and preparations are made correctly. First, vertical risers are installed in the required quantity. Most often they are laid from the base to the roof, thus combining with ventilation.
The location for installing the risers is chosen closer to the toilets, since they should be no further than 1 m from the risers. If two toilets are located on the same vertical line, and the house itself has a small horizontal area, then it will be enough to install only one riser. The farthest plumbing fixture should be no more than 5 m away from it.
Do-it-yourself sewerage installation for a private house
Underwater pipes are connected to the riser. First of all, the toilet pipes are connected. They should be lower than the rest. Then all other side branches are connected. It is allowed to install several plumbing fixtures on one supply. In this case, the thickness of the supply pipe should be taken taking into account their overall performance.
Sewerage for a private house, how to install it correctly. Pipe design and installation. Installation of an internal sewerage system in a private house. Rules to be followed during installation.
Connecting plumbing fixtures through siphons is the final stage of constructing an internal sewerage system with your own hands in a private house. Videos of this process are usually provided with comments on connecting siphons and their purpose. Installation methods, layout, and depth of installation of external sewerage in a private house depend on the chosen type of wastewater disposal, soil properties and behavior of groundwater. Therefore, they must be considered in the context of specific circumstances.
It is not recommended to join sewer pipes at an angle of 90°
Proper design and proper installation of the sewer system will certainly ensure its uninterrupted operation. The safety and reliability of the system depends on the quality of its assembly, which can only be accomplished if you know the necessary instructions. They have been detailed above.
Hiding the pipeline in the floor
Speaking about methods of placing communications, it is worth remembering another interesting method. You can close it in the floor.
This solution to the problem is attractive because it does not require gating. The pipes are laid on the floor slab and secured. After this, the screed is poured.
The disadvantage of this method is that sewer pipelines cannot be hidden in the floor. They will have to be laid using the usual old method - in grooves.
Avoiding mistakes
Since you need to close the pipe in the bathroom correctly, during work it is important to take into account possible mistakes that may be made. To prevent them, the following rules should be taken into account:
- make sure the water supply is working properly;
- provide access to connections and taps;
- ensure the tightness of threaded joints, use sealing gaskets;
- do not forget about the equipment of inspection hatches;
- Use only high quality materials.
All work should begin only after careful planning. This will minimize any errors.
Types of utility wiring
The most popular types of water supply pipes in the bathroom and toilet are:
- sequential;
- collector
The first option is best suited for housing with a short length of water supply and a small number of connection points. The second is used in apartments with a large living area and many plumbing fixtures; it is characterized by a large length of water supply networks.
Here is a detailed description of each of them.
Serial type wiring
The sequential distribution of polypropylene pipes in the bathroom and toilet consists of one branch of the pipeline, starting at the outlet of the riser, and connecting the input to the first consumer. From the first user the pipeline goes to the second and so on until the last point. All consumers are connected through tees installed in water distribution points.
If the length of the network is large and there are many consumers on it, then when they are connected simultaneously, the pressure will be weak.
The operating principle of sequential wiring does not allow turning off the water on one device. To repair or replace individual elements, you will need to turn off the entire branch using an emergency valve at the input. Despite this disadvantage, series wiring continues to be widely used.
Its advantage is ease of assembly - the elements are mounted along one pipeline line.
The collector wiring diagram is more complex.
Collector type of wiring
The complexity of the collector wiring is associated with the need to lay pipes from the riser inlet to each water collection point. This connection is provided by a collector - a device designed to distribute water simultaneously in several directions. This feature ensures the same pressure at each water point. Some manifold models are sold with shut-off valves already installed.
If there are none on the device, you need to install them there yourself - this will make using this type of wiring more convenient. Thanks to shut-off valves, it becomes possible to turn off only the required direction, while others remain in operation. In addition to emergency situations, water supply is regulated in this way when the pressure in the city pipeline decreases.
Direct connection to the collector allows the use of a single pipe without joints made to connect other consumers.
This means that a leak can only occur on the collector and on plumbing fixtures, where it can be easily eliminated. Therefore, pipes laid according to radial routing can be installed using a hidden method.
Disadvantages of this wiring include: complexity and significant costs for more pipes than for a series circuit.
System testing
Another important aspect of sewer installation in an apartment is the procedure carried out upon completion of this work. When the system must be tested for correctness (tightness) of installation and operability of the sewerage system in all its sections.
- To do this, just open the water tap all the way (all the way) and fill the bathroom or sink with water and drain it at once into a new sewer pipe. You can also use a regular bucket, which is pre-filled with tap water.
- This water will eventually need to be abruptly dumped from the container into the sink or bathtub. If, while the liquid is flowing through the new PVC pipe, the surface of the floor in the bathroom and the pipe itself remains dry, then the sewerage installation was carried out according to all the rules.
In the process of testing the system, the so-called do-it-yourself bathroom sewer should properly cope with the flow of water in critical situations
Therefore, it is very important to carefully examine each connection to ensure that the job was done efficiently.
If leaks are detected, the problem areas will simply need to be fixed again, only in this case with the help of silicone glue.
How to close the sewer riser in the toilet methods
In an ordinary apartment with a separate bathroom, almost all the pipes are located in the toilet. This is where, as a rule, meters are located and taps are made. The already small toilet looks like a technical room. And the toilet ended up here completely by accident.
There are several ways to hide all this disgrace.
1. Construction of a false wall.
One of the simplest and most common options is to completely cover the riser in the toilet with plasterboard. You need to keep in mind that a false wall will take up about half a meter of free space. The toilet room is already small, and after sewing up the riser, not everyone will be able to sit freely on the toilet.
The solution is a wall-hung toilet. A special frame on which the plumbing fixture is mounted and the drain tank will be hidden behind the drywall. This will save space.
A false wall can be not only attractive, but also functional. If you equip the free space with shelves, you can store household items there.
2. Construction of a square box.
This method is suitable if all the pipes are in one corner. The box saves free space. And with this option, you need to leave the door opposite the meters and valves.
3. Equipment of an oblique false wall.
It goes at an acute angle to the side or back wall. It is advisable to use this method of masking the riser in the case when thinner pipes extend to the side from the main pipe. The toilet will have to be moved a little to the side.
4. Creating a multi-level box.
When pipes are “scattered along the walls” of the toilet room, it is better to build a multi-level structure. Each of its elements will cover a separate section of the network.
The box can be two-level or three-level. Building it, of course, is more difficult. But space is saved and you get stands for important little things.
Grilling technology using various construction tools
When deciding how to groove a wall in the bathroom for pipes or make channels in the floor to run hot heating pipelines through, they resort to dismantling work using the following methods and tools.
Hammer and chisel
An old-fashioned method, suitable for working on walls made of soft building materials (gas silicate blocks, foam concrete, gypsum plaster). During installation, at the beginning, special grooves are knocked out along two lines of the channel with a depth of about 10 mm, then the material is removed between the punched lines, after which the operation is repeated many times until the desired depth is obtained.
Hammer
To work with a hammer drill, a special construction attachment in the form of a spatula is used; the tool is used to break through any type of wall. The main disadvantage of the hammer drill is the not very aesthetic appearance of the punched channel and a large amount of excess debris - during operation, material is knocked out outside the outer perimeter of the groove.
Therefore, to optimize the work, before using a hammer drill, the boundaries of the grooves are cut with an angle grinder (grinder) or holes of the required depth are drilled into them in increments of about 10 mm.
Rice. 4 Chipping with a hammer and chisel
Bulgarian
When working with a grinder, special discs with diamond coating for concrete are used to cut through concrete or brick walls. The grinder is a dangerous tool, so it is imperative to use a protective cover on the body when working with it.
Using an angle grinder, smooth, deep lines are cut along the perimeter of the groove, after which the material between them is knocked out with a chisel or hammer drill.
The main disadvantage of working with an angle grinder is the high dust content in the air; for protection you should use dust goggles, thick clothing and a respirator.
Decorative options
In fact, it is not necessary to hide communications - it is enough to use one of the original decoration techniques, due to which the pipes will simply look better and easily fit into a modern interior.
The simplest option is painting. It's inexpensive and looks impressive. It works on the principle “what cannot be removed should be emphasized.” Matte black looks great, but you can choose any shade: from neutral white or gray to eccentric yellow, red, blue. The most daring ones can combine two or three colors. At the same time, the treated part can either merge with the wall or deliberately stand out against its background.
Important! The paint must be highly resistant to changes in humidity and temperature. To improve adhesion, use a suitable primer.
If a single color seems boring, dilute it with decoupage or stickers: the main thing is that the technique matches the chosen style. To protect the decor, coat the top with heat-resistant varnish.
People with artistic talent can paint the pipeline to look like bamboo, birch, or other suitable shaped object.