The internal structure of the cisterns of many modern toilets, at first glance, is completely different from what was used 30-40 years ago. Therefore, when many questions arise related to the maintenance of sanitary fittings, for example, how to adjust the float in the toilet or adjust the outlet valve, apartment owners sometimes have uncertainty - should they solve the problem themselves or invite a third-party specialist? However, the functionality of current devices is based on the same principles as before. Their understanding, as well as knowledge of plumbing maintenance algorithms, makes it possible to maintain it in working condition on your own.
Picture 1
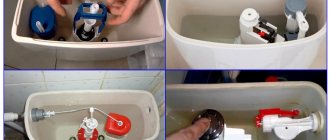
A few words about the design of the tank fittings
Before I tell you why a toilet tank may leak, I will introduce you to the design of the fittings so that you understand the principle of its operation.
Of course, there are currently a great many options for mechanisms.
However, the principle of operation of the tank always remains the same, since any fittings include three main elements:
- shut-off mechanism - is a tap that automatically shuts off the water as it enters the tank. The float is responsible for the water level at which the shut-off valve is activated;
Tank fitting options
- discharge system - is a valve that closes the drain hole. The valve is controlled by a button or lever;
- overflow system - prevents flooding of the apartment in case of failure of the locking mechanism. If the water in the tank rises above a certain level, the overflow system ensures that it is drained into the toilet.
Features of the tank
The mechanism for draining water from the tank is of two types. In the first, all the water is drained when you press a button or when you lift the handle up. The first option provides two buttons for rational use of water. When you press one of them, the water is partially drained, and using the second you can remove all the water from the tank.
If the flush works normally, then water flows into the toilet bowl quickly and without delay with a characteristic sound. If problems arise, the flow of water either does not stop and the walls of the toilet are constantly wet, or the water overflows from the tank.
This kind of breakdown can cause flooding of the toilet room, or provoke the formation of limescale on the walls of the toilet and, undoubtedly, lead to high water consumption due to its constant supply. Another sign of a malfunction may be the appearance of condensation on the cold water pipe that leads to the toilet.
Sometimes, to eliminate a leak, it is enough to clean the tank and parts from plaque and rust. They appear due to poor quality water and failure to follow simple plumbing hygiene rules.
To avoid further problems and eliminate the leak, it is important to find out the cause of the leak and determine in which part of the tank the breakdown occurred and check all the parts. To do this, you need to turn off the water in the riser, then clean the tank and study the design.
Flush design device
If previously the tank body was made of cast iron, today ceramics, earthenware or special plastic are used. All the main elements of the tank are connected to each other.
There are only three key mechanisms: inlet, adjustable float, flush and overflow systems:
- The inlet or fill valve stops the flow of water into the tank after it is filled. The required water level is “measured” by the float.
- Locking or drain mechanism . This is the flapper/valve that opens during flushing.
Modern models have buttons for this. They can be single or double to adjust the amount of water flushed. Old Soviet toilets use a chain, lever or rope that is attached to a lever with a bulb. These elements are connected by traction. And the pear is at the bottom of the tank.
The standard tank design is quite simple. In some models, the flushing mechanism consists of a siphon. Its membrane is the weak link and often fails, as do the spokes connecting the flush and the float
The toilet float regulates the operation of the locking mechanism and controls the level of water drawn in, the design of which depends on the type of water supply to the tank (bottom or side).
There are several types of floats, but each one has air inside:
- The first, hollow, is made of rubber. It is located at the bottom of the reservoir and functions as a rocker arm.
- The second, plastic, glass-like float. Located at the top of the tank. When the tank is filled with water, it rises up and works almost silently. The latter type is used only in older models; the first type is installed in modern toilets.
The overflow system protects the entire toilet room from flooding if the filling mechanism does not work for some reason. When more than normal water gets into the tank, it is the flush tank fittings that drain it into the toilet. If you find a leak, then do not panic, but remove the toilet lid and figure out what the problem is.
The main causes of extraneous noise in the tank
To deal with a problem, you need to understand its source. In the case of noise in the tank while filling with water, experts identify the three most common problems that cause the toilet to “sing”:
Faucet gasket wear
A shut-off valve is installed in the toilet cistern, which is responsible for shutting off the water supply to the toilet if necessary. With prolonged use, the rubber gasket near the faucet begins to wear out and tear. When the flow of water passes through this damage, a strong noise and hum appears.
No tube on tap
Each tank with top water supply is equipped with shut-off valves, which have a bottom water outlet. It is in this area that there should be a tube, which is responsible for ensuring that water flows down the wall of the tank or is supplied to the very bottom when collected. If there is no such tube, the strong water pressure when drawing water will create noise.
Salt coating
It's no secret that the water flowing through our water supply system leaves much to be desired. Impurities, salts, etc. settle on the inner walls of the tank, inside taps, tubes, floats and other mechanisms. This plaque prevents the normal supply of water, and as a result, a decrease in pressure causes extraneous sounds.
Causes of problems and their solutions
The reasons why the water in the toilet does not stop may be hidden in various technical problems. Each of them has its own methods of elimination that you can apply independently.
Liquid flows out through the overflow
There are times when the water in the toilet cistern exceeds the standard level. In this case, the liquid leaves through the overflow. The reasons why water is collected in large volumes can be the following:
- Deformation of the gasket in the valve;
- Loss of elasticity of the gasket, due to which the gasket does not completely cover the water;
- The gasket does not fit tightly to the hole where the water comes from;
- The pin holding the float is lost or rusted;
- The element at the valve hole in the drain tank does not fit tightly to it;
- The float lever has moved from its original position;
- There is a small crack in the valve body.
Only plastic elements can cause cracks. If the element is made of brass, then this is not the reason why the water in the toilet does not stop
.To correct the situation, the following measures must be taken:
- Place the lever so that it is located slightly lower than the entrance of the water pipe;
- Raise the float slightly from its original position, if the leak has stopped, secure the element in this position;
- If the leak does not stop when the float is moved, you need to look at the valve. The valve design has a pin that secures the lever. The stud needs to be checked. If it is missing or broken, it is easy to replace the element with copper wire.
In the place where the pin is attached to the valve there should be no holes, absolutely none. If any are present, it is necessary to replace the entire valve, as damage has occurred that causes the element to not work correctly.
If the leak does not stop even when the gasket tightly covers the hole, then it is necessary to change the device. In order to buy a supply element, it is recommended to take a broken sample with you. It’s better to call a plumber for installation.
Leaking in new plumbing
The problem is fluid leaking into the toilet before the tank overflows. The cause may be a crack in the plastic bolt or, in the case of steel material, the element has rusted.
You need to fix the problem in the following order:
- You must ensure that the water is filled before it overflows. Then turn off the water supply to the tank and pour it by flushing into the toilet;
- Remove the movable line from the tank;
- Unscrew all the bolts securing the shelf going to the toilet;
- Inspect the entire structure. If the element is working properly, you need to replace several bolts or buy new fittings;
- Cut off and replace rusty bolts;
- Drain the remaining water from the cuffs after dismantling them;
- Reassemble the structure in reverse order.
It is recommended to replace the gaskets with new ones, since the old ones no longer shut off the water. If absolutely necessary, you can tighten the cuff using wire or a clamp.
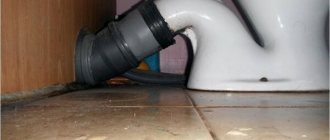
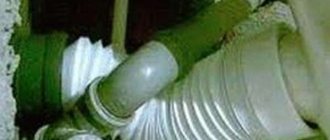
Water leaks between the toilet bowl and the cistern
Design of toilet flush fittings
1) the problem can be solved easily: just tighten or simply correct the part. Causes of the problem: a faulty cuff is most often the cause of water leakage. Regardless of what material the cuff is made of, there are clamps for both plastic and metal. Tighten the cuff with clamps carefully, not too tight, but not too loose. If the cuff device is corrugated, then it can simply move. In this case, simply return the part to its place and secure it.
2) Replacement of rubber gaskets, tightening of bolts and nuts. Causes of the problem: too weak fixation of the shelf to the tank. Just tighten the fastenings. Metal bolts rust and become deformed over time, but this does not happen to brass bolts. If tightening the bolts and nuts does not help, check the rubber gaskets. They need to either be completely replaced or repaired (dry, apply sealant, dry and reinstall with bolts).
3) Replacing the drain tank. Cause of the problem: Water leaking between the tank and the shelf may be a sign that the shelf is completely broken. This kind of problem is very serious. It is better for you to consult a specialist, because a breakdown often requires a complete replacement of the toilet bowl or even the flush tank. Plumbing products should be regularly inspected for cracks, including the cuff and pipes. toilet design Toilet design for a better understanding of the problem Water flows simultaneously with the flush The essence of the problem: every time you press the flush, water begins to leak from under the tank.
4) Check the serviceability of the drain mechanism inside the tank. Take the valve with your hand and press it lightly. If the leak has stopped, it means that the reason was hidden in the loose fit of the valve in the center of the tank. In this case, you just need to replace the gasket in the valve. But this reason is far from the only one.
5) The next reason for the tank leaking may be a displaced drain button. If the height adjuster has moved and the valve is higher than the drain hole, then a gap will form between the drain and the shut-off valve. You just need to return the water height regulator to its original position. The breakdown is quite simple and not at all costly.
6) A loose nut on the outside may cause water to leak out. You need to carefully and carefully tighten the nut and also check all the fasteners that secure the flush cistern to the toilet. Minor damage can be repaired and eliminated. The cost of replacing a toilet in Chelyabinsk, in particular here, is not high - look at the prices.
Water flows after pressing the water drain button
In some cases, a leak may appear immediately after the water is drained from the tank into the toilet. To solve problems you need to:
- Check the correct operation of the internal mechanisms of the drain tank. To do this, take the valve with your fingers and press it. If the leak is eliminated by this action, then the cause is a loose valve fit. To eliminate this, it is necessary to replace the valve gasket.
- Also often the cause of a leak in the tank is the displacement of the drain button. When the height adjuster moves and the valve moves into place above the drain hole, a gap is formed between them through which water passes. To solve it, just return the regulator to its original position.
- It is recommended to check how the nut fits on the outside. If the nut does not fit tightly, a leak will form. It is necessary to carefully and carefully tighten the nut until it stops. You should also check all tank fastenings.
Overflowing water from the toilet tank
A fairly common problem is when water constantly overflows from the toilet tank and it makes noise.
First of all, you need to find out the cause of this phenomenon. This is easy to do, just press on the overflow socket in the toilet cistern. If the leak goes away, it means that the overflow nut has come off. You need to carefully tighten it until it stops.
This can only be done by removing the shelf. Also, in a situation where there is overflow of water in the toilet tank, it often happens that the nut sticks tightly to the tank. To eliminate leakage, you need to turn the overflow clockwise, as if twisting it. This action will return the element to its place and the leak will go away.
In the case when the nut does not stick to the tank, and water overflows from the tank, do the following:
- If the nut is not completely unscrewed, but there is still a gap between the tank and the surface of the tank, it is recommended to turn off the water supply and drain the water from the container. It is important to wait until the walls of the tank are dry. Then wrap the gap with tow and fill it with paint. Wait 7-8 hours until the paint is completely dry and continue using the tank.
- When the nut is completely unscrewed, you need to turn off the water and pour the liquid out of the tank. Remove the overflow and put an additional seal on the thread. Then put the tank in place and tighten it.
To increase the tightness, it is recommended to lubricate this area with paint or sealants. It is important to place the tank so that the overflow is open and not clogged. If this is not observed, the water will stop going into the toilet and will flow onto the floor. It is also important to place the tank level; if it is tilted, the water will not stop flowing through the overflow or will flow onto the floor outside the tank.
Float valve clogged
In most cases, there is a common problem with the float valve. The valve becomes clogged due to constant overflow of water through the drain. This tank flush valve works something like this:
- Water is collected;
- The float rises according to the liquid level;
- The float lever presses on a plastic or brass plug;
- The pressure plug uses a gasket to close the nozzle from where the liquid flows.
Sometimes some toilet models do not have an overflow in the tank. To eliminate the problem in such a model, it is necessary to close the flow of liquid and remove the movable liner. Then disassemble the fluid supply valve. Next, remove the plastic plug and straighten the cotter pin to secure it, remove it. Holding the valve with the body with your other hand, remove the float holder from the body.
When you remove the locking lever along with the rubber gasket, it will fall out. After this, you will see the hole from which the liquid enters the tank. If there are foreign objects and debris in the tank, it is necessary to clean the channel with a long thin object (knitting needle, wire).
When the channel becomes free, you need to check the gasket on the lever. If there is a leak, the gasket is pressed in and should be replaced with a new one. When the elements are replaced and the channel is clean, reassemble the mechanism in the reverse order. If you do everything correctly, the leak will disappear and will no longer bother you.
Depressurized float
After adjusting the float, make sure that it floats on the surface of the water and the locking mechanism works as expected.
If it turns out that the float is “submerged” or even submerged in water, it is useless to adjust it, since it has become depressurized.
In this case, this part must be replaced. As a rule, it changes along with the shut-off valves.
Therefore, the dismantling instructions look like this:
- turn off the water supply;
- flush the existing water into the toilet;
- unscrew the nut of the flexible connection;
- then unscrew the nut that secures the shut-off valve.
A depressurized float can be soldered. To do this, melt a regular cellophane bag and seal the hole or crack with it. However, keep in mind that such repairs can only temporarily solve the problem.
After this, you need to take the shut-off valve and go with it to the nearest plumbing store to purchase a similar mechanism. Install the new part by performing the steps in reverse order.
Faulty locking mechanism leaks when the float is raised
Manual float adjustment
Let's move on to information that often worries owners of both old models and new units. Let's try to figure out how to independently adjust the float in the toilet in order to raise/lower the water level in the tank.
A larger volume of water is needed if what is available in the container is not enough for a high-quality flush, and they reduce the amount of water collected if they want to save money.
The adjustment process differs for different models. The outdated “yoke” can be adjusted in a very simple way, without even turning off the water. We remove the tank lid, find the float holder wire and simply bend it.
Due to their small cross-section, brass, aluminum and steel holders bend easily, so no tools are required to change the shape of the rod
Due to the bend, the inlet valve blocking device is activated earlier, therefore, the volume of water entering the reservoir is also reduced.
If the float holder is assembled from two rigid metal strips connected with a bolt, the adjustment process is somewhat more complicated:
After unfastening the drain lever or button, remove the tank lid. Loosen the nut on the float rocker and use pliers if necessary. We select the desired position of the float and tighten the nut with pliers. The water in the tank should not reach the overflow hole. Let's manually activate the drainage device and see to what level the container is filled. If the level of water collected in the tank does not suit us, we adjust the position of the float using the same method. If everything is fine, put the lid on and attach the drain lever or button.
- Step 1: Loosen the mounting bolt nut.
- Step 2: Selecting and fixing the optimal position.
- Step 3: Check the fill level of the tank.
- Step 4: Reassemble the cistern in reverse order
If the lever is not metal, but plastic, you cannot bend it - you will break it. Such devices are usually equipped with a screw or “ratchet” to change the shape of the lever. You just need to twist the screw or move the element on the ratchet.
Adjusting glass-type plastic fittings will take a little longer. The task is to move the float on the “sliders” (plastic vertical elements that support it) up or down, depending on the planned increase/decrease in the flush volume.
Very often one of the “sliders” (or both) is equipped with a scale from which you can determine the exact height of the water level. Manufacturers print correspondence tables in the instructions, from which you can see what height the water level will be when choosing a particular division on the scale.
To simplify the adjustment procedure, some manufacturers equip the design with a special screw. Let's look at how to use it using a photo gallery.
Carefully unscrew the drain button; to do this, just turn the plastic ring on the thread. Remove and set aside the tank lid, under which there is a float device.
We find the part we are interested in - a float or water shut-off valve. We are interested in the plastic adjusting bolt, which is a pin with notches.
Our task is to tighten the screw so as to reduce the maximum volume of water in the tank. Turn the ribbed bolt so that the float moves down several positions.
To check, we drain the water; if the volume of water and the quality of the flush are satisfactory, we perform the reverse steps. Replace the tank cap and screw the drain button back in.
- Step 1 – unscrewing the button.
- Step 2 - removing the tank cap.
- Step 3 - determining the location of the float.
- Step 4 - Locate the adjusting bolt.
- Step 5 - determining the required water level.
- Step 6 - adjust the bolt.
- Step 7 – flush diagnostics.
- Step 8 - button installation
In the same way, if necessary, you can increase the volume of water entering the tank. As you can see, the procedure is very easy and does not require special knowledge.
Repair of valve faults
Troubles usually happen unexpectedly, when there is no way to call a specialist or seek help from more knowledgeable people, so you always need to be prepared to act independently.
Failures of the float mechanism can disable the operation of the drain tank, and flushing it off with water from buckets every time is not an interesting task. Let's figure out how to quickly change or repair the float in the toilet if it has become unusable.
Violation of the tightness of the plastic ball
When the old float wears out, a crack may appear, which over time will turn into a hole. Liquid will begin to flow through the hole into the plastic ball, and it will no longer be able to float up and block the inlet valve. A problem arises - a constant flow of water in the toilet. Water losses quickly turn into financial costs.
Let's find out how to avoid this:
- turn off the water;
- remove the float;
- wipe it dry;
- cover the crack with waterproof sealant;
- dry;
- fix the float in the tank;
- We check his work.
There is no point in repairing a float with a large hole or completely leaky plastic; in this case, we rush to the store and purchase a new part to replace it.
If the float valve fills with water due to a ruptured membrane or a crack in the valve, this sealing device must be replaced:
After removing the button or lever of the drain mechanism, remove the tank lid. Now let's unscrew the float device for inspection and repair. To study the condition of the float and determine the reason for filling it with water, unscrew and remove the head of the float valve. We study the condition of the float membrane, find the cause of the leak - a breakthrough.
We take it with us to the store and buy exactly the same one to replace it. After installing the new membrane, assemble the float mechanism in the reverse order. We install it in the tank and secure the device.
- Step 1: Dismantling the float valve of the toilet fittings.
- Step 2: Disassemble the float head.
- Step 3: A ruptured membrane is the cause of the problem.
- Step 4: Reassemble the Float Device
Skewed float structure
Due to wear of the rubber (silicone) seals or due to poor water quality, the glass-type float device may become misaligned.
Does the plastic float “stick” with each release of water or does it even stop moving up and down relative to the guide “sliders”. Depending on its position, either the flow of water into the tank stops, or, on the contrary, it constantly pours, flowing straight into the sewer.
A common cause of breakdowns is poor quality tap water. It is characterized by a high content of lime and rust, which settle on the walls of the “glass” and on the rods (holders, guides)
First, try cleaning the mechanism without disassembling the entire structure. Perhaps the movement of the float is slowed down by debris that has fallen into the water. If this does not help, you will have to turn off the water, remove the tank, and then the float block. The drainage device may not be touched.
Then we carry out diagnostics and act on the results: we correct the position of the float and install it in place or completely change the block responsible for the water inlet.
Most often, breakdowns associated with changes in the position of the structure are corrected quickly, while it is better not to repair worn-out devices, but to replace them with new ones.
Lack of water in the tank
It is not always the case that a faulty plumbing system results in a leaking toilet. Sometimes it is impossible to drain water due to its absence in the tank (the reason is not related to a violation of the general water supply). If sagging of the handle or button is additionally detected, check the connection between the siphon rod, which performs the lifting function, and the lever responsible for lowering. We are talking about a wire link having a C- or S-shaped configuration. Usually this link opens, so restoration of the tank’s operation is possible after ensuring the connection is closed. Sometimes, to eliminate a malfunction, you need to insert your finger into the siphon and point the plate upward to exit the end of the rod outside.
The inability to drain water is also associated with a low level in the tank due to incorrect adjustment of the angle of the float valve lever. If you have a plastic valve, you can solve the problem by tightening the adjusting screw with a screwdriver. If the valve is made of brass, for repair and adjustment, slightly bend the float lever upward or loosen the fastening nut of the moving element, after which the fastening is shifted upward.
What is needed for repair?
For repairs, you will need the simplest tools that are found in every home: screwdrivers, a work knife, a hammer, a piece of sandpaper, pliers or a set of wrenches. You will also need sealing material - tow with grease and plumbing sealant.
It is also worth preparing a piece of rags to wipe your hands while working. If the water supply valve for the toilet is located in another room, it is better to work with an assistant.
How to fix a leak with your own hands?
First of all, you need to carefully remove the tank cap. Start by checking the valve that shuts off the liquid supply. Raise the float until the water stops flowing. If the leak is eliminated, you need to adjust the position of the float on the rod.
If this does not help, you need to remove the drain fittings and inspect the condition of the sealing rubber. Often it is enough to clean it of dirt to restore normal operation of the mechanism.
If this does not help, you will have to disassemble the tank in search of failed parts. These could be sealing gaskets between the tank and the shelf, bolts, tightening parts or parts of the drain fittings.
- The float may leak water due to a clogged rubber band. To clean it, you need to disassemble the float lever mounting assembly. After disassembly, the gaskets are washed and the rubber on the lever is replaced (it often develops wear). Video instructions will help you understand how this work is done:
- Another problem area is the rubber locking mechanism. Over time, it warps and the valve begins to jam. The problem is that with the low cost of the gasket itself, this part may not be available in the store. Buying entire fittings (for 800–900 rubles) for the sake of a 15-ruble elastic band is unprofitable. It is worth choosing a more or less suitable elastic band from the domestic range, cutting it and putting it in place. We offer video instructions for this operation:
- If you decide to change the entire fittings, you will have to turn off the water supply and empty the tank. Then unscrew the water supply hose with a wrench (a little liquid may spill out - replace the container). Then unscrew the fasteners and remove the tank. This will allow you to get close to the plastic nuts holding the reinforcement. We unscrew them, remove the shut-off valve and the float assembly, and install new parts. All stages of work are shown in the video:
Such repairs are already quite complicated for a novice plumber; it is better to seek help from an experienced specialist. But if this is not possible, you can figure it out yourself. The main thing is to do everything slowly, periodically checking the instructions for the fittings. Good luck with your work!
Constantly filling the tank with water
Repairing a toilet cistern with such a malfunction involves aligning a displaced or skewed float lever. The problem can be solved by placing the lever below the entrance of the water supply pipe at a distance of 2.5 cm.
If you don't have specific construction skills, you may only make things worse
It is worth assessing the condition of the float. There may be damage to the element body and accumulation of water in it, which leads to weighting of the part. In the event of such a malfunction, a leak in the tank can be eliminated by freeing the float from water and sealing the hole, after which the element is placed in the place provided for it in the tank. To seal a hole or crack, use plastic heated to a plastic state or a plastic bag that is always on hand and tightly fixed to the element.
If water constantly leaks from the tank and it is possible to flush only after frequently pressing the button, the problem is a malfunction of the siphon membrane. To replace it, first replace the tank lid with a crossbar, to which the float lever is fixed by tying it up. The tank is emptied of water, the fixing nut used to connect the tank to the flush pipe is removed, and the siphon nut is loosened. After disconnecting and removing this structural element, remove the damaged membrane, replacing it with a new analogue of a suitable size and identical shape. Then perform the steps described above in reverse order.
If there is damage to the flush button, if the toilet tank does not leak, repair the faulty rod by disconnecting the broken part and replacing it with a piece of thick wire. In order for the toilet to work properly after repair for a long period of time, it is better to immediately install a new draft.
Ways to eliminate extraneous sound in a toilet cistern
As you can see, the reasons for the noise when water is filling the toilet tank are quite commonplace. Therefore, there will be no problems eliminating them. So, what to do if your toilet starts singing?
First of all, remove the shut-off valve and replace the old rubber with a new one. Some people prefer to completely change the entire fittings, but frankly speaking, this is not at all justified;
The solution to the second reason is obvious; in order for your toilet to stop making noise, you need to install a tube on the faucet. Since the standard internal diameter of the tap in the tank is 5-8 mm, you can choose a suitable tube at any hardware store;
You can and should fight plaque, otherwise the service life of your plumbing fixtures will be significantly reduced. Fortunately, salt deposits can be removed very easily and quickly. It is enough to pour descaler for washing machines or regular table vinegar mixed with baking soda into the tank. A few hours is enough for the plaque to decrease and the noise when drawing water to completely disappear.
Other people's experience proves that the above actions are an excellent way to cope with extraneous sounds in the toilet cistern. Try it too, and very soon the annoying noise will no longer cause discomfort.
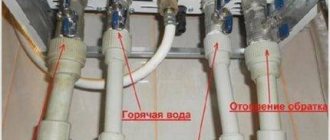
Improper installation of sewerage
The next reason is improper laying of sewer pipes, incorrect slope. The diameter of the sewer pipe is incorrectly selected. The diameter of the sewer pipe should be approximately 100 mm (10cm). It happens that construction debris, sand, or mortar gets into the pipe, as a result, the passage of the pipe is reduced and then the ingress of hair, cotton wool or wood litter for cat litter firmly clogs the toilet.
The quality and defects of the toilet itself, you purchased a non-certified product, for example, in China, with a small drain neck with a mousehole diameter of 50 mm.
Installation of sewer pipes is carried out at a slope within strictly defined limits.
If the slope is small, the liquid simply will not flow down them, and if the slope is too large, the water will drain quickly, but the contamination will remain in the pipe.
Paradoxically, excessive “leaking” of the sewer pipe leads to chronic blockages. SNiP give the following values for MINIMUM slopes of sewer pipes:
With diameter
- 50 mm – 30 mm/m.
- 110 mm – 20 mm/m.
- 160 mm – 8 mm/m.
- 200 mm – 7 mm/m.
The MAXIMUM slope should not exceed 150 mm/m, with the exception of bends for plumbing fixtures up to 1.5 m long. Connecting sewer pipes at right angles is allowed only in a vertical plane.
Sewer system malfunction
A malfunction of the sewer system, for example, if you live on the ground floor, when the sewer pipe is combined with a storm drain line. All it takes is a good rainfall and your sewer system will work intermittently.
It’s winter outside, and due to an incorrectly adjusted shut-off valve in the tank, the water does not close, but constantly flows into the sewer in a thin stream and freezes in severe frost. If the sewer pipe is not dug in at the proper depth, a blockage is guaranteed. The sewer does not clog, but freezes.
In this case, you need to contact the housing office or the management company for servicing the local area. You most likely won’t be able to fix this on your own; you need a professional plumber.
If the riser is thoroughly clogged and the plumbers cannot clear the blockage, you will be prepared to have to disassemble the plumbing, remove the casing, for example, when installing a wall-hung toilet, disassemble the toilet itself, remove the drain pipe and corrugation. Prepare for unpleasant odors and the sight of sewage and feces on the floor. It's better not to see this for the faint of heart.
For the future, we recommend installing a non-return valve in the sewer pipe. The valve costs an average of $150-200, but you can choose cheaper models. If there is no free space to install a check valve, you can use sewer check valves with internal installation.
This check valve allows you to swallow the entire contents of the toilet, but will not allow you to “vomit” anything back.
The check valve concerns exclusively the first floors of an apartment building.
If residents of the upper floors very willingly flush feminine hygiene products and rolls of toilet paper down their toilets, then in the basement this lounger can very easily become clogged and water will begin to rise up the pipe in a column.
But it will only go up to the first toilet, i.e. to the first floor. And then from the toilet on the first floor it will flow onto the floor. Those. Simply put, everything that people wash off from the upper floors, at a certain moment they will begin to wash it all off onto the floor of the first floor apartment. And if you encounter a similar situation, then a device such as a check valve can be a salvation.
Adjusting the water level
Violation of the optimal volume of filling the installation tank leads to unstable flushing at low levels or excessive water consumption at high levels. You can easily adjust the required amount of liquid with your own hands.
By dismantling the button and partition, you gain access to the fittings. By turning the pin, the float is lowered or raised, lowering or raising the fill level accordingly.
Adjusting the float position.
It is not necessary to remove the filling block; you can rotate the pin through the opening.
The Geberit drain block is equipped with flag indicators that regulate the volume of large and small drains. Details from 2:45: , also watch the previous video from 2:25.
Vacuum systems from Grohe are equipped with an original mechanism for adjusting the volume of large and small release. The large drain is adjusted with a gate plug.
The gate (blue plate on the left) at the top is the minimum large drain.
Moving the plug to its lowest position.
Pressing the big shutter key.
Gate at the bottom - maximum large drain..
Economical drainage is regulated by moving the float along the flask. In the upper position, the minimum amount of liquid flows out, the lower position corresponds to the greatest discharge for the economy mode.
Pressing the economy shutter key, blue float at the bottom.
Largest reset in economy mode.
Moving the float up to reduce flow.
Initiation of economy mode with the float raised.
Remaining water after a small drain set to minimum.
Grohe recommendations for adjusting the Rapid SL system: