When the plumbing works smoothly, no one pays attention to it, but as soon as problems appear, they have to be solved urgently. For example, if a pipe behind the toilet is leaking or another joint is leaking, it is unwise to ignore the situation, otherwise you can flood your own bathroom and flood your neighbors below.
Why does the corrugation leak in connection with the toilet, what other joints can water seep in, and what can be done to fix the problem? Now we will tell you everything so that you can repair the toilet yourself if necessary.
- What to do if there is a leak under the toilet
- How to fix a leak in a corrugated toilet
- Loose bolts are a common cause of leaks under the toilet.
- A pipe is leaking in the toilet behind the toilet: what to do?
What to do if the toilet joint is leaking - do-it-yourself sealing
When the plumbing works smoothly, no one pays attention to it, but as soon as problems appear, they have to be solved urgently.
For example, if a pipe behind the toilet is leaking or another joint is leaking, it is unwise to ignore the situation, otherwise you can flood your own bathroom and flood your neighbors below. Why does the corrugation leak in connection with the toilet, what other joints can water seep in, and what can be done to fix the problem? Now we will tell you everything so that you can repair the toilet yourself if necessary.
Leak at the junction between the bowl and the tank
One of the common reasons why a toilet joint leaks is a misalignment or damage to the gasket. If you just bought a new toilet, and there is dripping at the junction with the tank, it is due to improper installation or a defective rubber gasket.
If the toilet has already been in service for some time, the reason is probably a cracked gasket or a misalignment of the tank (for example, someone pressed hard on it from the side). It should be clear to you what to do if the joint between the bowl and the tank leaks due to the gasket - the rubber seal needs to be replaced. The algorithm of actions is quite simple:
- turn off the water supply and drain the water from the tank.
- blot the remaining water at the bottom with a sponge or rag, otherwise it will flow out onto the floor;
- unscrew the water supply hose from the tank;
- Unscrew the screws that hold the tank on the toilet shelf, after which it can be dismantled;
- unscrew the locknut that holds the drain;
- install a new gasket, coating it with silicone (gaskets differ in shape and size, so it is better to choose according to your own example);
- put everything back together in reverse order.
Fill the tank with water and make sure there are no more leaks at the junction.
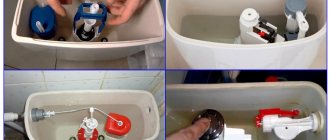
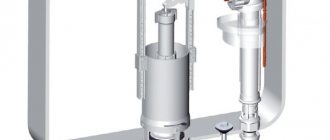
The junction of the inlet fittings with the drain tank
This is a fairly common problem in which the toilet leaks from below. It is often confused with the formation of condensation on the surface of the tank.
Important! If the leak is not eliminated for a long time, a dark smudge forms at the junction.
How to fix the problem:
- Using a wrench, tighten the inlet fitting nut to the tank if the reason is a loose gasket.
Important! This is especially true for tanks with a bottom supply.
- If the gasket is completely missing or worn out, turn off the water and disconnect the nut with the hose. Buy the same gasket that was installed and replace it.
- In tanks with side inlet, leakage occurs from improper adjustment of the shut-off valve. Because of this, the water level in the tank is too high. Open the tank lid, then tighten the fixing screw and lower the float a little. The water will thus be shut off before it reaches a critical level.
Important! While working on the float, also check the condition of the sealing gasket. If necessary, replace it with a new one.
- Fuzzy operation of the diaphragm valve due to errors in the assembly of water intake fittings. Simply dismantle the fittings and check the condition of all threaded connections.
- Worn diaphragm valve. This malfunction can be eliminated by completely replacing the shut-off valves. On average, the replacement frequency is 1 time every 5 years.
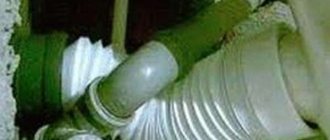
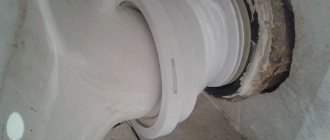
What to do if the corrugation leaks
If the toilet bowl leaks or drips, you can also deal with this problem yourself. Most often the reason is a dried out seal. Over the years, the rubber membrane loses its elasticity and may crack, resulting in gaps through which water leaks from the drain hole onto the floor.
If possible, you should remove the toilet to provide more room for action, but this is not necessary. Your task is to remove the worn-out corrugation and clean the seats: the fan pipe and the outlet on the bowl.
Coat the surfaces with plumbing silicone and install a new corrugation. It should fit quite tightly. Allow the silicone to set by waiting at least 1-2 hours, after which you can check that the toilet bellows at the joint are no longer leaking.
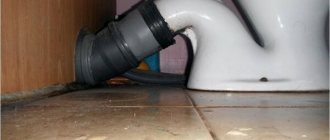
In the case when it is impossible to dismantle the toilet or this has its own difficulties, and the corrugation cannot be removed without this, you can resort to one trick:
- try not to flush the toilet for at least one day;
- crawl under it, picking up a screwdriver (it is better to use a plastic or wooden stick);
- carefully pry up the corrugation at the junction with the toilet that is leaking;
- having protruded it, squeeze out a small portion of silicone inside;
- bending the corrugation in a circle, fill the entire cavity with silicone sealant.
This method may not be the most productive, but it is quite effective. With its help, you can urgently eliminate a leak with minimal labor costs.
Using sealant in an old bathroom
Silicone paste can be used to partially repair an old toilet whose joint with the floor has already lost its strength. To do this, proceed as follows:
- prepare the base - clean it from dirt, rust, plaque, remove old sealant if possible,
- degrease the surface,
- purchase sealant in a cartridge, insert it into a construction gun,
- pass the product over the seam so that it gets under the device as deeply as possible, making the line strictly continuous,
- remove excess composition with a rag,
- after a few minutes, begin forming the seam using a rubber spatula (you can also use your hands wearing rubber gloves) - the goal is to level the silicone to the level of the surface being treated,
- After the drop has hardened and the seam is uneven, cut off with a utility knife.
It happens that the toilet cuff, which is placed on the sewer pipe, has lost its seal. It can also be replaced using sealant. To do this, you need to remove the adapter with the cuff from the rubber seal of the pipe, take out the latter too, clean and dry everything. Buy new parts: seal, adapter, cuff. Apply silicone sealant to the pipe, insert the rubber band, then lubricate the cuff with the same compound and secure it in place.
Tighten loose bolts
Another reason when a toilet leaks at the junction is the loosening of the tank mounting bolts. They are usually metal or plastic. While the former can rust and break, the latter simply burst over time due to static load or if someone rests on the tank.
The problem is solved by replacing the bolts with new ones, and to do this you need to proceed as follows:
- turn off the water supply to the tank and empty it;
- unscrew the flexible supply hose;
- remove the bolts (if they are rusty, this will not be easy, but be careful not to damage the fragile tank);
- insert new bolts with spacers into the holes and tighten (just do not overdo it).
If it is still leaking at the joint, you will need to tighten the bolts a little more to seal the toilet. The main thing is not to squeeze it so that nothing bursts or cracks.
What to do if the pipe behind the toilet is leaking
The last reason why toilet problems occur is due to the drain pipe. How to seal a drain pipe in a toilet if it is an old cast iron outlet and ordinary corrugations do not fit it?
The sewer pipe in the toilet often leaks when the toilet is installed on cement mortar. This installation method is especially common in old apartments without renovation. The method is quite simple and reliable, but over time the pipe in the toilet leaks. Gradually, the putty cracks and crumbles, resulting in leaks. The remaining solution is washed down the drain, and the leak gradually intensifies.
If the sewer pipe in the toilet is leaking, how to cover it up and how to do it correctly in our instructions:
- take a narrow chisel or flat screwdriver, as well as a small hammer;
- break up the remaining putty;
- do not hit too hard so as not to split the toilet outlet;
- clean out dirt, dust, debris;
- fill the void.
To seal the toilet, you can use a 1:1 solution of sand and cement diluted with water, but this is not very convenient. It is better to use silicone sealant, which is sold in every hardware store.
Consultants in the store can tell you which sealant is best to use to seal the toilet if the toilet downstairs is leaking. Experienced plumbers recommend using a special sanitary sealant - it has good adhesion to sanitary ware.
If you have done everything, but there is still a leak under the toilet, we recommend that you contact a professional. San Remo company technicians will quickly determine the cause of the problem and fix the problem. If the pipes and plumbing are too worn out, it may be wiser to replace them. Our craftsmen will install any type of toilet, incl. and suspended, on different types of surfaces.
By clicking the “We’ll call you back” button, I accept the terms of the Personal Data Privacy Policy and give my consent to the processing of my personal data.
What will the job require?
- Silicone sealant (or polyurethane foam).
- Screwdriver.
- A new part to replace the broken one (if necessary).
- Hammer.
- Burlap or twine.
- "Sandpaper."
- Drill, set of drills.
- Turbine (angle grinder).
- Pliers.
- Knife.
Angle grinder (impeller)
Now that we've sorted out the tools, the hardest part remains - identifying the cause of the leak. There can be many of them, it all depends on the location of the leak.
Prices for silicone sealant
silicone pipe sealant
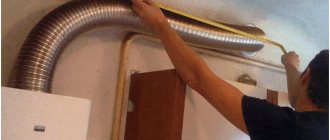
How to change the corrugation on a toilet yourself without removing the toilet
A non-pressure corrugated plastic pipe or cuff is used to connect the toilet to the sewer system. It replaced heavy cast iron products that had to be caulked at joints for tightness. The corrugation allows you to move the device to a convenient position up to 200 mm and even rotate it, which could not be done when using metal pipes. With this device you can replace your plumbing fixtures yourself. The plastic adapter is easily removed during dismantling.
Features of replacing corrugations on a toilet
The release can be vertical, horizontal and oblique. Whatever the shape of the toilet pipe, when connecting the device to the waste system, the installation rules dictated by SNiP and operating experience must be followed:
- The diameter of the corrugation must correspond to the size of the outlet section and be at least 110 mm. If the wiring combines several branches of the drainage system, it is permissible to use a larger adapter to increase cross-country ability.
- Installation of horizontal sections is carried out with a slope to maintain the principle of gravity. The slope for pipes with a diameter of 110 mm is 2 cm per linear meter.
- To avoid sagging in horizontal sections, fastenings are provided to increase the rigidity of the collector. The step between them is no more than ten times the diameter of the pipes.
- To prevent uncoupling of the vertical risers, a fastener is installed under each socket.
- The sealant not only prevents leaks, but also prevents the penetration of accumulated gases into the room.
A corrugated pipe connects the toilet outlet to the sewer fitting. Thermal plastic is used to make corrugation: polyvinyl chloride or polypropylene. On one side it has an elastic cuff for connection to the outlet. Standard dimensions of the transition pipe: length 250-300 mm, cuff diameters external/internal 134/75 mm, from the side of the sewer socket 110 mm.
Replacing the corrugation and the old toilet needs to start with preparatory work:
- disassemble the connection, remove the insulation from cement and sealant;
- remove dirt from the sewer pipe and clean its inner surface with a rag.
Removal of the corrugation begins by first shutting off the water in the basement so that you do not have to clean up the spilled liquid.
Installation is performed according to the following algorithm:
- One end of the corrugation with sealant applied is inserted into the sewer outlet to a depth of 5-6 cm. Before this, the rubber ring in the pipe is lubricated with liquid detergent so that the connection does not leak.
- The corrugated cuff is placed over the outlet of the device.
- Check connections for leaks by pouring water into the toilet.
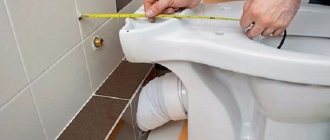
- After this, markings are made on the floor for fastening when installing the device.
- The corrugation must be temporarily removed by disconnecting it from the plumbing fixture.
- The toilet must be stable and perpendicular to the floor.
- The drilled holes are coated with sealant, then the bolts are tightened.
- Return the adapter to its place and apply sealant to the joint.
- The sole screed is filled with mortar.
The plastic transition pipe, in addition to obvious advantages during installation, has a number of disadvantages: it is easily damaged when sharp objects, boiling water and aggressive chemicals get into the flush. When stretched, the corrugation sags, which contributes to the formation of a garbage plug.
Common causes of breakdowns and ways to prevent them
The corrugation is changed in the following cases:
- If during repairs the old tile is not removed and a new one is laid on top of it, the toilet bowl will move in a vertical position relative to the axis of the connection with the sewer.
- When replacing a domestic device with an oblique outlet (for self-cleaning) with an imported device with a horizontal connection.
If the corrugation is leaking at the junction with the toilet, there may be several reasons for this:
- The o-ring in the socket is missing or damaged. Experts advise changing it and putting it on a plastic product. Apply sealant to the sewer extension.
- A cheap Chinese low-quality adapter model was installed. In this case, it is better to buy a reinforced pipe.
- To tightly connect the corrugation to the cast iron, a transition collar is used, which should solve problems with loss of tightness.
- There were cases when leaks were eliminated by changing the angle of connection of the shaped product into which the corrugation was inserted not at 90 degrees, but at an angle of 30 degrees.
Before disassembling the old connection, it is worth checking whether the toilet tank is leaking to rule out other causes of problems. What tools and materials are needed to replace the corrugation?
The walls of the non-pressure corrugated pipe are thin and therefore easily damaged. The soft adapter is popular because it is easy to connect to the toilet outlet and to the sewer system.
Advantages of reinforced corrugation:
- long service life;
- excellent strength indicators;
- reliability in operation.
Plastic adapters can have different lengths, depending on the distance the toilet is located from the socket. When choosing a short corrugation, the material is quickly damaged due to tension.
Tools for work:
- chisel to remove old mortar;
- dry cloth for wiping the outlet extension;
- holes for toilet mounting are drilled with a hammer drill; a drill with an impact function is also suitable for this purpose;
- using a tape measure and ruler, mark the position of the device on the floor;
- construction silicone seals connections;
- transition collar from cast iron to plastic;
- flexible corrugation for connecting the outlet to the outlet;
- tow or FUM tape, which will seal the connection;
- Use wrenches to tighten the fasteners; adjustable wrenches may be needed when connecting the tank to the water supply.
After making sure that all the necessary tools are at hand, you can begin work on installing the device and connecting its pipe to the sewer outlet.
Repair and connection methods
Experts give advice on how to change the corrugation on a toilet. There are two connection methods for this. The first is used in cases of moving the location of the device or to change its rotation. But if you want to install the device end-to-end in order to ergonomically use a small space, then the plastic pipe will prevent you from doing this.
Therefore, you need to determine in advance the required length of the soft corrugated product, since a long pipe will bend and prevent drainage into the sewer and cause blockages, and installing a short element will lead to its stretching and loss of strength.
Another method is to use a rigid corrugation, which provides maximum reliability when connecting a toilet with a horizontal or oblique outlet.
Tips and recommendations for further care
Successful operation of sewerage in an apartment building depends on the choice of pipes. Care is related to the characteristics of the material used. Plastic is sensitive to high temperatures. For normal work at home, it is recommended that the drain temperature be 40 degrees, short-term - up to 60 degrees, otherwise the material loses its properties and the pipe may leak.
Deposits also form on smooth surfaces of PVC products. Together with the drainage of hot water, they turn the cross-section of the pipes into an ellipse, which leads to a loss of throughput. Polyvinyl chloride is a flammable material, so fire safety rules must be followed. Aggressive substances corrode the connections and walls of the corrugation; it is not recommended to drain them into the sewer.
Advantages of Sanitary Silicone Sealant
A big advantage of silicone-based sealant is the ease of working with it and the ability to install plumbing fixtures yourself. The product is universal, suitable for a wide range of actions in the bathroom, kitchen, sauna, bathhouse, swimming pool.
Other advantages of sealants are:
- resistance to UV radiation, no fading in light,
- suitability for all types of materials that go into the manufacture of plumbing fixtures: cast iron, earthenware, ceramics, acrylic,
- resistance to the influence of low, high temperatures, temperature changes, humidity, good tolerance to direct contact with water,
- the presence of a fungicide in the composition, protection of surfaces from fungus, mold,
- high strength, high adhesion force to the base,
- smooth, shiny surface of the seam after drying, aesthetic appearance,
- elasticity, the ability to stretch and shrink along with the base material,
- resistance to household chemicals and other aggressive substances that may get on the seam,
- safety for humans, environmental friendliness.
Types of toilets
There are many variations of these plumbing fixtures. But the most popular are floor and suspended structures. The first ones are installed on the floor, and the suspended ones are attached using a special design - installation.
However, regardless of the type, the toilet includes four main elements: the bowl, the open part, the flush barrel and the siphon. The last part of the design prevents unpleasant odors from entering the room. The barrel can be plastic or metal, it works after pressing a button or lever.
Types of breakdowns
There are several breakdowns that cause water to leak. Let's look at the most common ones.
The putty in the pipe was cracked and crumbled.
Very often, during the installation of a plumbing fixture, owners decide to seal the pipe outlet with concrete mortar. This method provides good tightness and strength, but it has many disadvantages, one of which is cracking. Also, under the socket, solution residues can accumulate and then absorb moisture, which causes a leak.
To fix the breakdown, you need to take a screwdriver and use it to remove the remaining solution. However, this work must be done carefully so as not to damage the bell - it can burst if pressed hard with a screwdriver.
Then the place where the solution was must be filled with sealant, polyurethane foam or concrete mortar (without using sand). The last option is unreliable.
Breakage of rubber membranes
If the toilet leaks after flushing and you don’t know what to do, check the rubber membranes in the corrugation area. These elements ensure tightness. Like other parts of the device, membranes begin to dry out over time, lose elasticity and cannot perform their function.
Note!
Once the rubber bands are damaged, gaps form between the plumbing fixture and the seal, which can lead to leaks. Cuffs and corrugations may also break.
There are several options to solve the problem. You need to lift the toilet a little and replace the seal underneath. This element is attached to the same sealant.
Second option: use a screwdriver to unscrew the seal and apply a small amount of silicone or sealant to the identified gap.
Often, when it breaks, the corrugation is wrapped in rubber; it can be made from an old bicycle inner tube. Winding must be done in such a way that each subsequent layer half covers the previous one. This technique will ensure complete tightness.
Next, the last turn is fixed using copper wire. Of course, from an aesthetic point of view, this option will not look very attractive, but in the future you will not have to deal with the fact that the toilet is leaking after flushing.
If the bowl is cracked
In this case, the only thing that can be done is to change the device completely. The fact is that it is impossible to cover up a crack in the bowl. Even if it works, it won’t be for long.
To do this, you need to drill holes at both ends of the crack, and then use sandpaper or a turbine to clean them out. You need to apply epoxy resin to the damaged area (it is important to choose a two-component one). You can use the toilet after it is completely dry. In the video you can see what the cracks on the bowl look like.
The base of the plumbing fixture is cracked
There are also situations when the naked eye can see that the toilet is leaking after flushing, but it is impossible to find a breakdown. In this case, you should “sin” on the crack at the base of the toilet. Most often this happens due to the fact that one of the household members pours boiling water into the bowl.
What to do with a crack at the base or near the place where the corrugation comes out? In this case, no putty will help, only replacing the device will save you. Even the best materials will become damaged after a few days, and the toilet will start leaking again.
If the junction of the shelf and the device is leaking
The cause may be drying out of the cuff. This element is rubber, so over time it loses its original abilities. This happens if the toilet is Soviet-made.
Worth knowing!
Modern devices are produced with a built-in shelf, so such damage is excluded.
To solve the problem, you need to drain the remaining water from the barrel, unscrew the bolts, and remove the cuff so that the flexible line does not become detached. Then you need to remove the damaged part, replacing it with a new gasket. When buying a cuff, pay attention to its elasticity; thanks to this feature, the device will not leak after flushing.
A problem with the toilet can occur for various reasons. Each case requires the right approach and adequate solution. If you don't know what to do or how to fix a fixture, barrel or installation, then contact a plumber. It is important to regularly check the serviceability of the device so that you do not have to spend money on replacing it.
Nuances of installing seals
There are usually no special nuances for installing gaskets between the flush cistern and the toilet bowl. The exception is rare models of plumbing fixtures that are far from the standard configuration. As a rule, the seal is inserted (placed) inside the landing recess intended for it in the mating area.
After that, the drain tank is carefully placed at the installation site so that the holes for the mounting hardware on the tank and the bowl stand are aligned. It is important here not to displace the gasket from the seating area when installing the tank.
The seat for the sealing element usually looks like a recess in the body of the toilet shelf and has a diameter equal to the outer diameter of the spacer disk. But there are also bowls with smooth landing shelves. M60 type seals are designed for this
It is somewhat easier to mount the filling tank on the toilet bowl stand when gaskets of the M60 and KK100 types are used. This rubber seal fits with a slight tension onto the fastening nut of the drain mechanism. Therefore, the risk of displacement of the M60 (KK100) gasket during installation is practically reduced to zero.
Step-by-step instructions for disassembling the drain tank for repair work are given here. In the article we recommend you will find many valuable recommendations.
Tank-bowl intermediate gasket
Some models of household toilets are made to connect the filling tank with the toilet bowl through an additional intermediate gasket. If it is included in the plumbing kit, the easiest way to install it is by first attaching the mounting screws to the threaded rods.
Intermediate softening elements. Their main purpose is to protect fragile ceramics. These spacers are installed together with gaskets under the tank. As a rule, they are made of a material similar to isolon
Intermediate seals traditionally have “ears” with holes through which the mounting screw rods pass. If you install the intermediate seal in place, aligned with the mounting holes, and then try to install the tank, the gasket can easily be moved out of place. Therefore, simply attaching it to the screws simplifies the installation procedure.
Screed torque
It would seem that there is nothing simpler than tightening the connection parts with screws after all the manipulations with the gaskets. Meanwhile, the fastening procedure also has its own characteristics. The nuts should be screwed onto the threads of the bolted studs evenly, by about 2-3 threads, alternately applying the action to the bolted joints.
The dismantling and reinstallation procedure is also carried out if the tank does not hold water. Those. if it is necessary to replace the fittings responsible for drawing and draining water from this plumbing container.
When tightening the screws securing the tank-bowl assembly, attention should be paid in terms of correct execution of the actions. It is necessary to ensure uniform tightening of parts under moderate force pressure
The tightening force must be calculated correctly. There is no need to retighten bolted connections when the gasket is already securely tightened. Moreover, re-tightening is not recommended for connections where polypropylene screws are used. And to ensure guaranteed reliability, it is reasonable to replace plastic fastening accessories with metal products.
Testing the installed gasket
The procedure for testing gaskets (checking the reliability of tightness) is a mandatory part of the installation. The test does not require any special metalworking procedures.
After completing the installation work, it is enough to fill the toilet tank two-thirds with water by briefly opening the shut-off valve. In this condition, the plumbing fixture should be carefully inspected in the area where the sealing rubber is located. The first test is considered passed if no obvious water leaks are detected.
Leak tests are carried out in a standard way - by pouring water into the tank and then checking for water leaks. It is advisable to carry out testing in two stages for greater confidence in the quality of the seal.
The second test will take some time - at least half an hour. It is necessary to fill the tank to the full level (the limit level of the drain mechanism) and keep it in this state (for half an hour or an hour).
Then take a piece of toilet paper and thoroughly wipe the areas of the toilet close to the area where the gasket is installed. Similar actions must be performed both on the top side and below. Is the paper dry? In this case, you can put the plumbing into operation.
If, after the second check, the toilet paper becomes damp (even partially), these symptoms indicate a poor seal. You shouldn’t rely on “maybe” here. The correct solution is to redo the installation of the filler tank and correct the installation of the sealing gasket. In this case, it is desirable to determine the causes of the leak.
It often happens that water on the floor next to the toilet is not at all the cause of its leak. This is the tank “sweating”. We advise you to familiarize yourself with the reasons for the appearance of condensation on its surface and with methods for eliminating unwanted moisture.
The principle of complete tightness
Why is it necessary to ensure complete tightness of the system when installing the filler tank to the toilet bowl? The requirements are explained simply. Even a small leak leads to the formation of pockets of dampness. And dampness is the optimal environment for microbial growth.
The second stage of leak testing - this requires a time delay and careful monitoring of leaks using a simple sensor - toilet paper
A slight (unnoticeable) water leak contributes to the formation of water stone. This substance has a negative effect on rubber - it deforms individual sections of the gasket. As a result, the operation of the device results in emergency leaks. Such accidents can occur at any time, including when home owners are away.
Finally, the presence of minor leaks and increased humidity levels inside the washroom will affect the durability of the surrounding materials. In damp conditions, the service life of even the highest quality products is reduced by half.
You will learn how to deal with a leak in the toilet itself from the following article, the contents of which we recommend that you familiarize yourself with.
Installing corrugation on a toilet - subtleties and nuances
The process of installing a corrugation is very closely related to the installation of a toilet - you cannot install a toilet and then connect it to the sewer with a corrugation. Everything will have to be combined and done in a strictly defined sequence.
- To begin with, the corrugation must be pulled over the toilet outlet. It is very easy to put on, but nevertheless, careless movements can lead to damage to the product. If you smear the sealing rubber in the socket with soap, the corrugation will fit onto the socket easily, with minimal effort - in any case, you need to tighten it with a twist.
- Next, we move the toilet to the sewer socket and insert the corrugation into it, after which we position the pot in the desired position and mark its attachment points.
We remove the corrugation from the sewer socket. We drill holes for fasteners in the floor and return everything to its place, inserting the corrugation into the sewer.
- Now, after a test flush, when you are convinced that there are no leaks, the toilet bowl can be thoroughly fixed to the floor. In principle, that’s all, but there is one subtlety - in order for the rubber to properly seal the connection between the corrugation and the old cast iron sewer, the socket of the latter must be very well cleaned of rust and old seal. There are no other nuances here, and you will not need any additional sealing of the seams with silicone. It is not needed here - silicone spoils the rubber over time, so you should completely forget about it.
To conclude the topic about why a toilet corrugation is needed and how it is installed, I will say a few words about replacing the old, leaky corrugation with a new one. Such repairs are carried out very simply, without even having to remove the toilet. First, squeezing the corrugation like a spring, the liner must be disconnected from the toilet. Then, accordingly, pull it out of the socket. The new corrugation is installed in the reverse order - first it is inserted into the socket, then it is compressed and pulled onto the toilet. This is where the superiority of corrugated pipes over rigid toilet connections lies. Yes, I completely forgot - such a trick is only possible if in the established position the corrugation is stretched and not compressed to the limit. This point should not be overlooked during the initial installation of a plumbing fixture.
The connection point between the bowl and the fan pipe
It happens that the toilet leaks not because of the tank - the bowl leaks from below when flushing. This happens with old cast iron sewers when the drain pipe is poorly connected to the corrugation.
Water can leak if the connection between the pipe and the corrugation is poor
To solve the problem you will have to disassemble the connection. The joint must be thoroughly cleaned and reassembled. At the same time, it is necessary to carry out sealing using high-quality means.
After carrying out the work, you need to let the structure stand for 24 hours and only then carry out tests.
Corrugation for toilet: advantages and disadvantages
If we compare the corrugation for a toilet flush with the old technology for connecting this plumbing fixture to the sewer system, then we can highlight at least a couple of global advantages.
- First of all, this is the speed of installation. If previously you had to wait for the sealant to harden, then in the case of a flexible outlet the toilet can be used immediately after connecting to the sewer.
- Versatility. The flexible corrugated outlet allows you to rotate the toilet bowl relative to the drain hole at almost 90 degrees in any direction. There is only one limitation for it - the outlet does not allow the toilet to be brought closer to the wall when installed directly. Well, there are other products of this type for this purpose.
- Reliability. It is ensured by a well-thought-out system of rubber seals. At such a connection, the joint leaks only in two cases - when the corrugation is installed incorrectly and when the sealing rubber dries out over time.
Corrugation leakage
If the corrugation leaks, the problem is hidden in the absence of a rubber sealing ring. To do this, you need to remove the corrugation and install it, after which the leaks will disappear. If the seal is already installed, then there is a problem with the integrity of the corrugation and it needs to be completely replaced.
Important! In fact, the corrugation is designed for contact with plastic pipes, and not with cast iron. Leakage can be prevented by adding a transition collar and silicone sealant to the system.
Corrugation for toilet installation technology
Author Anna Kmeta July 16, 2013
Few people remember that previously the entire sewer system was a cast iron structure, the main advantages of which were strength and reliability. Despite this, it had to be abandoned due to frequent pipe blockages, which could only be removed by cutting. Over time, toilets and their components have undergone many modernizations, which entailed changes in the cross-section of pipes, their length, and so on. All this led to the impossibility of using standard cast iron networks. In the modern world, not only new toilets have come to the aid of plumbers, but also their components, which are now made of plastic or rubber without sacrificing quality. One such device is a toilet corrugation. Let's consider the features of installing corrugations and their main characteristics.
What is a toilet corrugation?
A toilet corrugation is a flexible corrugated pipe that is attached to the base of the toilet flush hole and the socket of the sewer riser. It has the following features:
Installing a toilet corrugation
The development of a corrugated pipe has made the installation of a toilet much easier, since now there is no need to remember the dimensions of its socket and the diameter of the riser. The toilet corrugation is equipped with sealing rings that are easy to tighten to avoid leaks. So, let's look at the procedure for installing the corrugation:
- One end of the pipe must be placed on the toilet drain hole, which must first be cleared of debris. To make the connection more tight and prevent the appearance of unpleasant odors, it is recommended to lubricate it with plumbing sealant, preferably silicone. It is imperative to ensure that the pipe is evenly fixed around the entire circumference. Then you need to wait a little for the sealing solution to dry.
- Place the toilet in the place where it is planned to be placed so that it does not rock.
- The second end of the toilet corrugation must be pushed into the sewer socket until it stops, having first cleaned the pipe of dirt and coated it with sealant.
- After the silicone has dried, you need to pour several buckets of water into the toilet to control the strength of the installed corrugation. If it does not leak, there are no cracks or sagging on it, you can use the toilet.
The toilet corrugation can only be replaced if it leaks or is damaged. On average, its service life reaches 15 years.
Quality of corrugated pipe
Replacement of corrugation.
Modern plumbing stores have a large selection of corrugated pipes for
toilet repairs, varying in price and quality. But is it worth shelling out for expensive products or can you get by with cheap ones? Research by experts in the field of plumbing equipment will help answer this question. The experiment was carried out as follows: cuffs from corrugations from different manufacturers were put on a regular pipe one by one.
Related article: Monolithic frame house construction technology: pros and cons
It turned out that cheap, low-quality corrugation does not fit tightly to the inner walls of the pipe and forms waves, which (according to experts) intensify over time, which inevitably leads to leakage. In addition, during the repair process, with minor bends, the corrugation can easily become deformed. It was also noticed that the cuff skirt of some products is not straight, but cone-shaped, which is completely unacceptable. More expensive products, especially imported ones, are considered to be of higher quality, so they are necessary for a good repair.
To carry out repair work, you should call a specialist. When replacing pipes, knowledgeable people advise monitoring the actions of the plumber, because good specialists are rarely found in this matter. However, even with correct and careful installation, low-quality corrugation still very quickly becomes unusable. It follows from this that there is no need to save on materials, otherwise you will have to make repairs again and again. It is important to note that when calling a plumber, it is advisable to ask not only about the cost of the material, but also about its manufacturer. A qualified master will always give a specific and detailed answer to any question related to his field of activity.
Types of corrugations for toilet bowls, their features and purpose
Apart from variations in size, the corrugation for a toilet bowl can be classified according to only three criteria.
- According to the degree of reliability. In this regard, we can distinguish between reinforced and non-reinforced corrugation for the toilet. What is the difference between them? In short, the reinforced corrugation (in its folds) additionally contains metal wire. In more detail, this wire prevents the corrugation from bending more than necessary, and at the same time breaking in the folds. This corrugation lasts several times longer and at the same time costs only slightly more than its non-reinforced counterpart.
According to the degree of rigidity - based on the thickness of the plastic used to make the corrugation. Despite the fact that hard corrugation is reliable and durable, soft corrugation is still widely used, since working with it is much easier and more convenient.
All these points, or rather varieties, must certainly be taken into account when choosing corrugation - or rather, they must be correlated with local circumstances, on the basis of which the choice of one or another variety of corrugation is made
Particular attention should be paid to the length of the product - in the sense that you should not purchase a short corrugation in the hope that it will stretch. It may stretch, but then it can just as easily shrink back, forming a leak.
Everything should be in moderation.
Toilet leaking causes and solutions
If water is leaking in the toilet, then the problem needs to be fixed as soon as possible, since constantly leaking water can cause flooding of your apartment and the apartment of your neighbors living below. All repair work can be done independently.
Plumbing product malfunctions
The main causes of leakage
If water appears on the floor of the toilet room, the reasons may be:
- wear of the gasket installed between the toilet bowl and the flush cistern;
- worn gaskets on the fastening elements of the tank;
- loosening of the threaded connection between the inlet and the float valve located in the drain tank;
- rupture or displacement of the corrugated hose connecting the toilet outlet to the sewer pipe.
Methods for eliminating leaks
How to fix a toilet leak? First of all, it is necessary to find out what caused the puddle to form. To do this, simply drain the water in the toilet and visually determine the location of the leak. If you can’t determine it visually, you can feel each element of the system with your hands. Moisture will appear at the leak site.
Replacing the gasket between the bowl and the tank
If the toilet runs, but no chips or cracks are found on the flush cistern during a visual inspection, then the reason lies in the wear of the gasket located between the toilet bowl and the cistern. Troubleshooting occurs according to the following scheme:
- the water supply to the toilet is cut off;
- The water is completely drained from the cistern. It is recommended to remove any remaining water with a cloth;
- the hose supplying water to the tank is disconnected;
Disconnecting the line from the toilet tank
- the bolts securing the tank are loosened;
Possible faults
The tank is leaking - this can happen for several reasons:
- damage to the float valve - if a hole appears in the float, it begins to take in water; This can be corrected using sealant or simply wrapping the float in cellophane;
- incorrect position of the float - a skewed float can be easily corrected manually, just move it from side to side, and the optimal position will find itself;
- wear of the rubber bulb - in this case the product will have to be replaced;
- limescale deposits on different parts of the drain mechanism - lime does not allow the parts to fit tightly to each other, which causes disruptions in the operation of the drain mechanism; this problem can be solved using special cleaning products;
- the nut that secures the overflow to the bottom of the tank is loose - in this case, the fastening can simply be tightened;
- unreliable connection between the tank and bowl - it may be necessary to replace the cuff connecting the two parts of the toilet;
- wear of rubber gaskets - sealing gaskets are consumables and must be replaced;
- damage to the body of the cistern - scratches and cracks are treated with a special compound for the restoration of plumbing fixtures;
- The fastening of the water pipe has become loose - in this case, it is usually necessary to replace the fastening element.
Problems with the thicket. If the cause of leaking water does not lie in the flush cistern, then the toilet bowl should be inspected for damage. If a crack or chip is found from which water is leaking, then in order to avoid further problems, the bowl will have to be replaced. However, there is a temporary solution to the problem that will help fix the leak for a short time (long enough to buy a new bowl). To prevent the crack from growing, drill holes at both ends, always through them. Then, from the inside of the bowl, treat the damaged area with an angle grinder and apply a layer of epoxy. As a rule, mechanical damage to the bowl is visible at first glance, so if none is immediately found, then the problem most likely lies elsewhere:
The connection between the toilet outlet and the water pipe has become depressurized. This can happen if the connection is fixed using cement mortar with sand. After some time, the hardened putty begins to crack, resulting in a leak. To correct the situation, you need to carefully remove the remaining mixture from the sockets and reconnect them using a modern sealant or the same cement mortar, but without adding sand.
The membrane that should seal the corrugation joints has worn out. This happens quite often with rubber products - they become deformed or dry out. Usually this part can be easily replaced, but if for some reason this is not possible, try sealing the connection with sealant.